CrownWall PRO Series User manual

PRO Series Cabinets
CrownWall®
Assembly Instructions

i
PRO Series Cabinets
CrownWall®
Table of Contents
Safety Information and Tools Required
Hardware List
Cabinet Weight Capacities
Installing the Feet
Installing the Kickplates
Installation of Tall and Base Cabinets
Installing the Work Surface
Installing the 2 Door Wall Cabinet
Installing the Handles
Adjusting/Aligning the Doors
Warranty and Liability Disclaimer
•••••••••••••••••••••••••••••••••••••••••••••••••••••••••••••••••••• 1
•••••••••••••••••••••••••••••••••••••••••••••••••••••••••••••••••••• 2
•••••••••••••••••••••••••••••••••••••••••••••••••••••••••••••••••••• 3
•••••••••••••••••••••••••••••••••••••••••••••••••••••••••••••••••••• 4
•••••••••••••••••••••••••••••••••••••••••••••••••••••••••••••••••••• 5
•••••••••••••••••••••••••••••••••••••••••••••••••••••••••••••••••••• 6
•••••••••••••••••••••••••••••••••••••••••••••••••••••••••••••••••••• 7
•••••••••••••••••••••••••••••••••••••••••••••••••••••••••••••••••••• 8
•••••••••••••••••••••••••••••••••••••••••••••••••••••••••••••••••••• 9
•••••••••••••••••••••••••••••••••••••••••••••••••••••••••••••••••••• 10
•••••••••••••••••••••••••••••••••••••••••••••••••••••••••••••••••••• 11
1
PRO Series Cabinets
CrownWall®
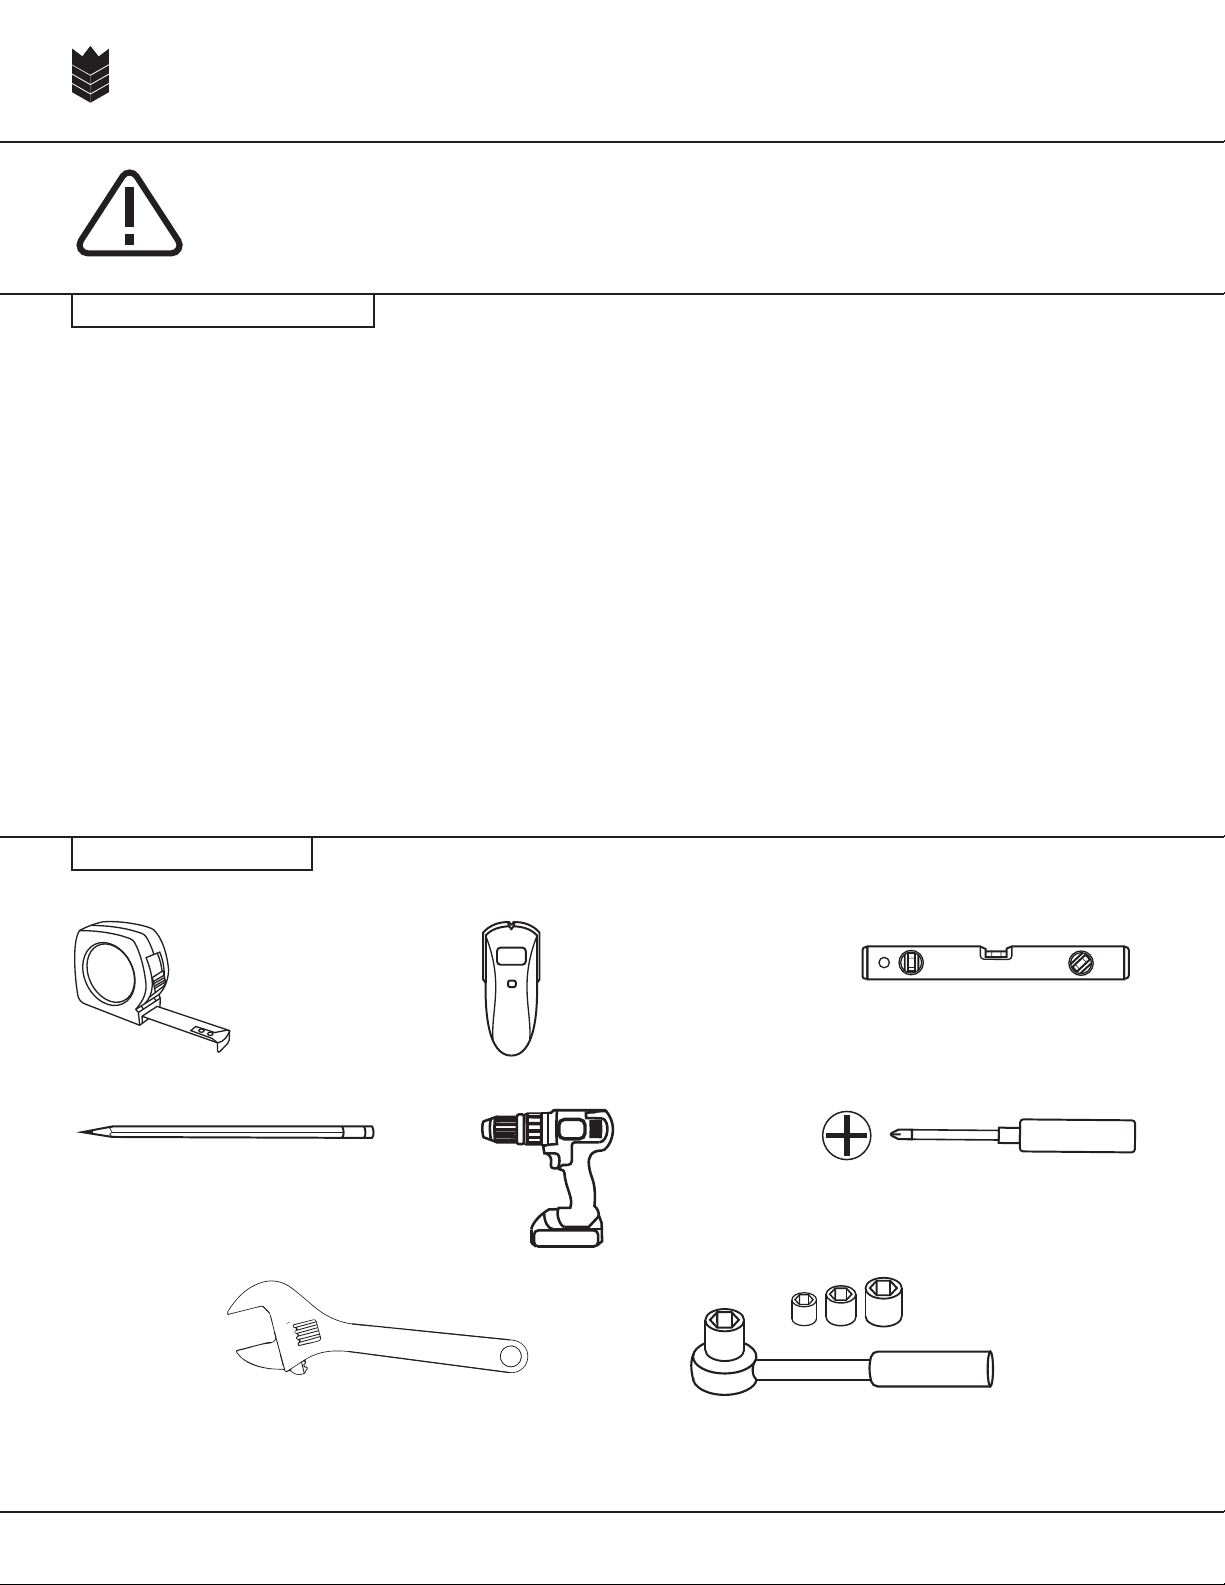
SAFETY INFORMATION
TEAM LIFT – Minimum of 2 individuals should be involved in the assembly of these
cabinets, due to the heavy weight of the cabinets.
Cabinets must be properly secured to wall studs in order to properly hold the
specified weight capacity, to avoid injury or death during the use of these Cabinets.
Stud Finder
Measuring Tape
Pencil
Level
Drill
TOOLS REQUIRED
Star screwdriver
Adjustable wrench or pliers Ratchet set
Hardware for mounting the cabinets to standard surfaces such as walls (wall studs)
are included. It is the responsibility of the end user to properly research the
necessary hardware for mounting the CrownWall®PRO Series Cabinets to any wall or
mounting surface, as such mounting surfaces can vary.
Please ensure that any children involved in the installation of the CrownWall®PRO
series Cabinets are properly supervised.
PLEASE READ THIS INSTRUCTION MANUAL THOROUGHLY BEFORE BEGINNING
ASSEMBLY OF CABINETS

2
PRO Series Cabinets
CrownWall®
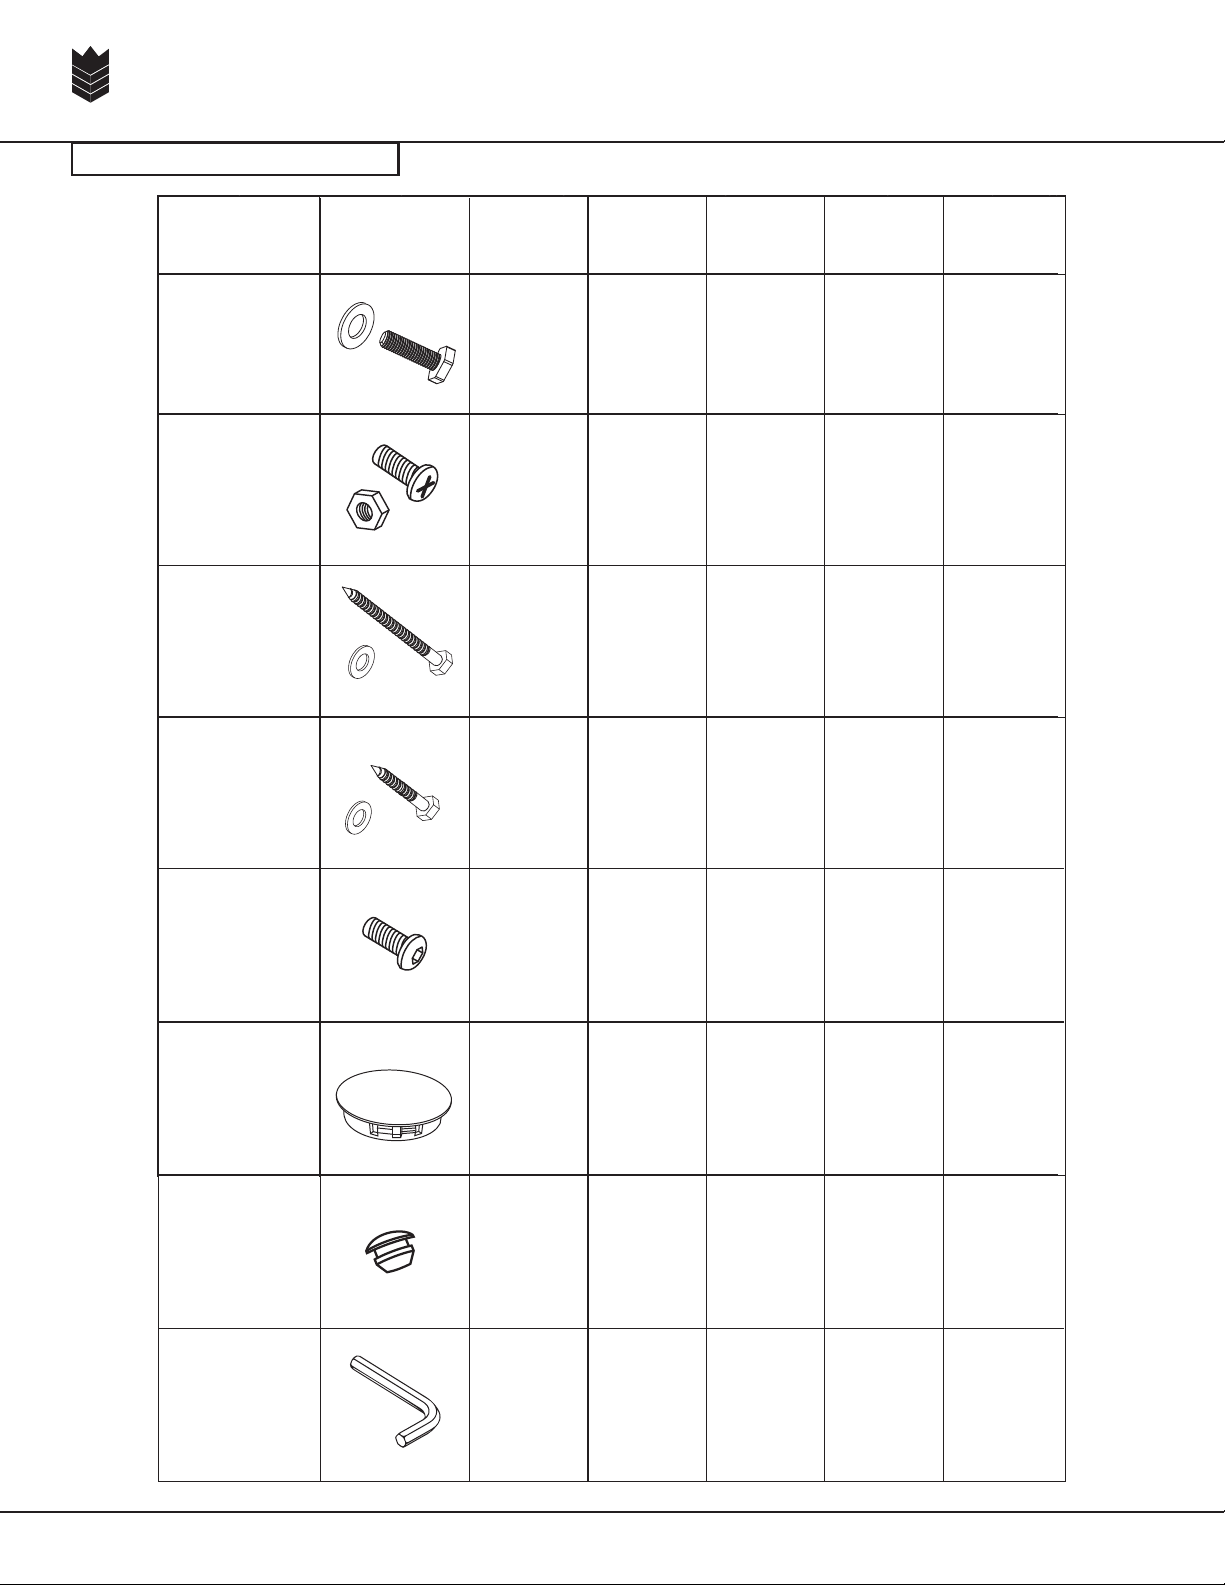
HARDWARE LIST
2 Door
Tall Cabinet
2 Door
Wall Cabinet
5 Drawer
Base Cabinet
2 Door
Base Cabinet
24”, 48”, and
72” Work
Surface
Item Name
Hex Bolt
and Washer
Pan Head Bolt
and Nut
3” Wood Screw
and Washer
(Wall Mounting)
1” Wood Screw
and Washer
(Work Surface
Mounting)
Socket
Screw
Cable Port Plug
Item Image
16 X 16 16 X
4 4 4 4 X
XXX4 4
X 4
x
X1111
66x6
X
XX
Small Rubber
Plug
Socket Screw
Wrench
x
x11x1
88816

3
PRO Series Cabinets
CrownWall®
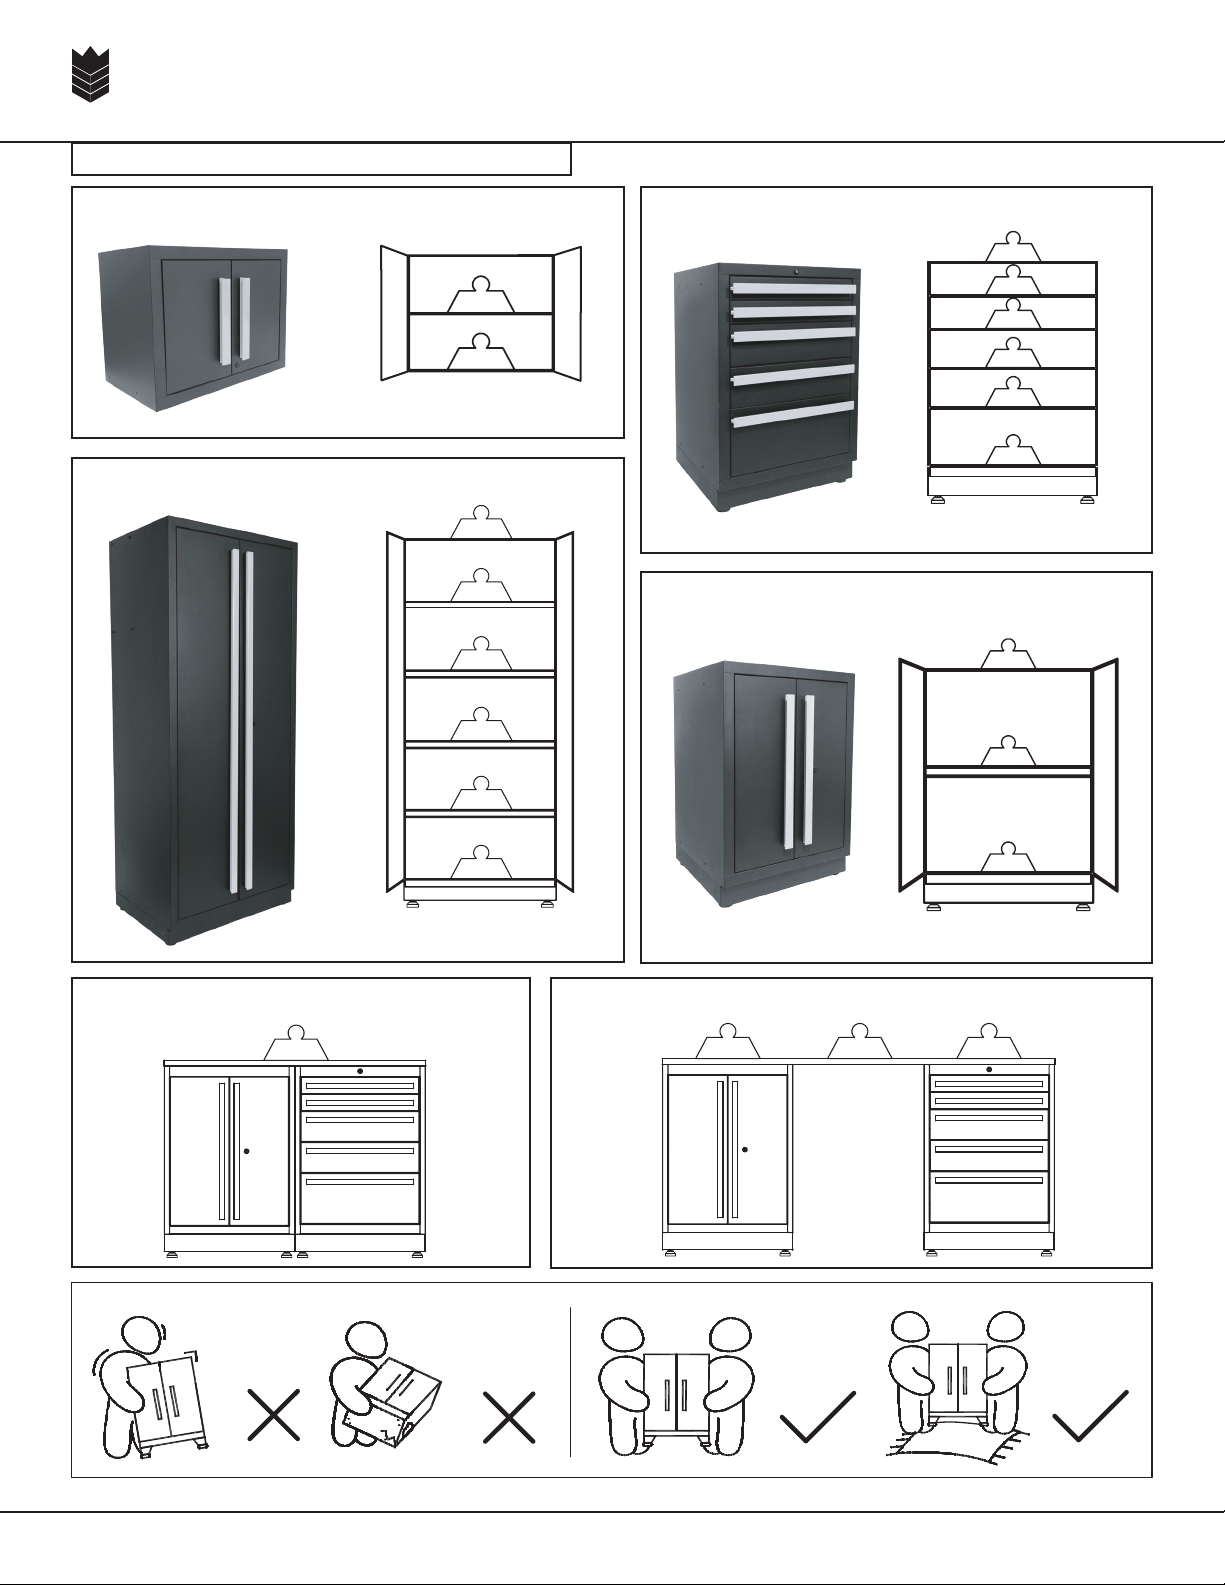
CABINET WEIGHT CAPACITIES
2 Door Wall Cabinet
MAX 100 lbs.
MAX 600 lbs.
MAX 600 lbs.
MAX 300 lbs.
2 Door Tall Cabinet
5 Drawer Base Cabinet
2 Door Base Cabinet
72” Work Surface
48” Work Surface
100 lbs.
100 lbs.
100 lbs.
100 lbs.
100 lbs.
100 lbs.
100 lbs.
100 lbs.
100 lbs.
100 lbs.
100 lbs.
100 lbs.
100 lbs.
100 lbs.
100 lbs.
MAX.
900 lbs.
300 lbs. 300 lbs.300 lbs.

4
PRO Series Cabinets
CrownWall®
ASSEMBLY INSTRUCTIONS
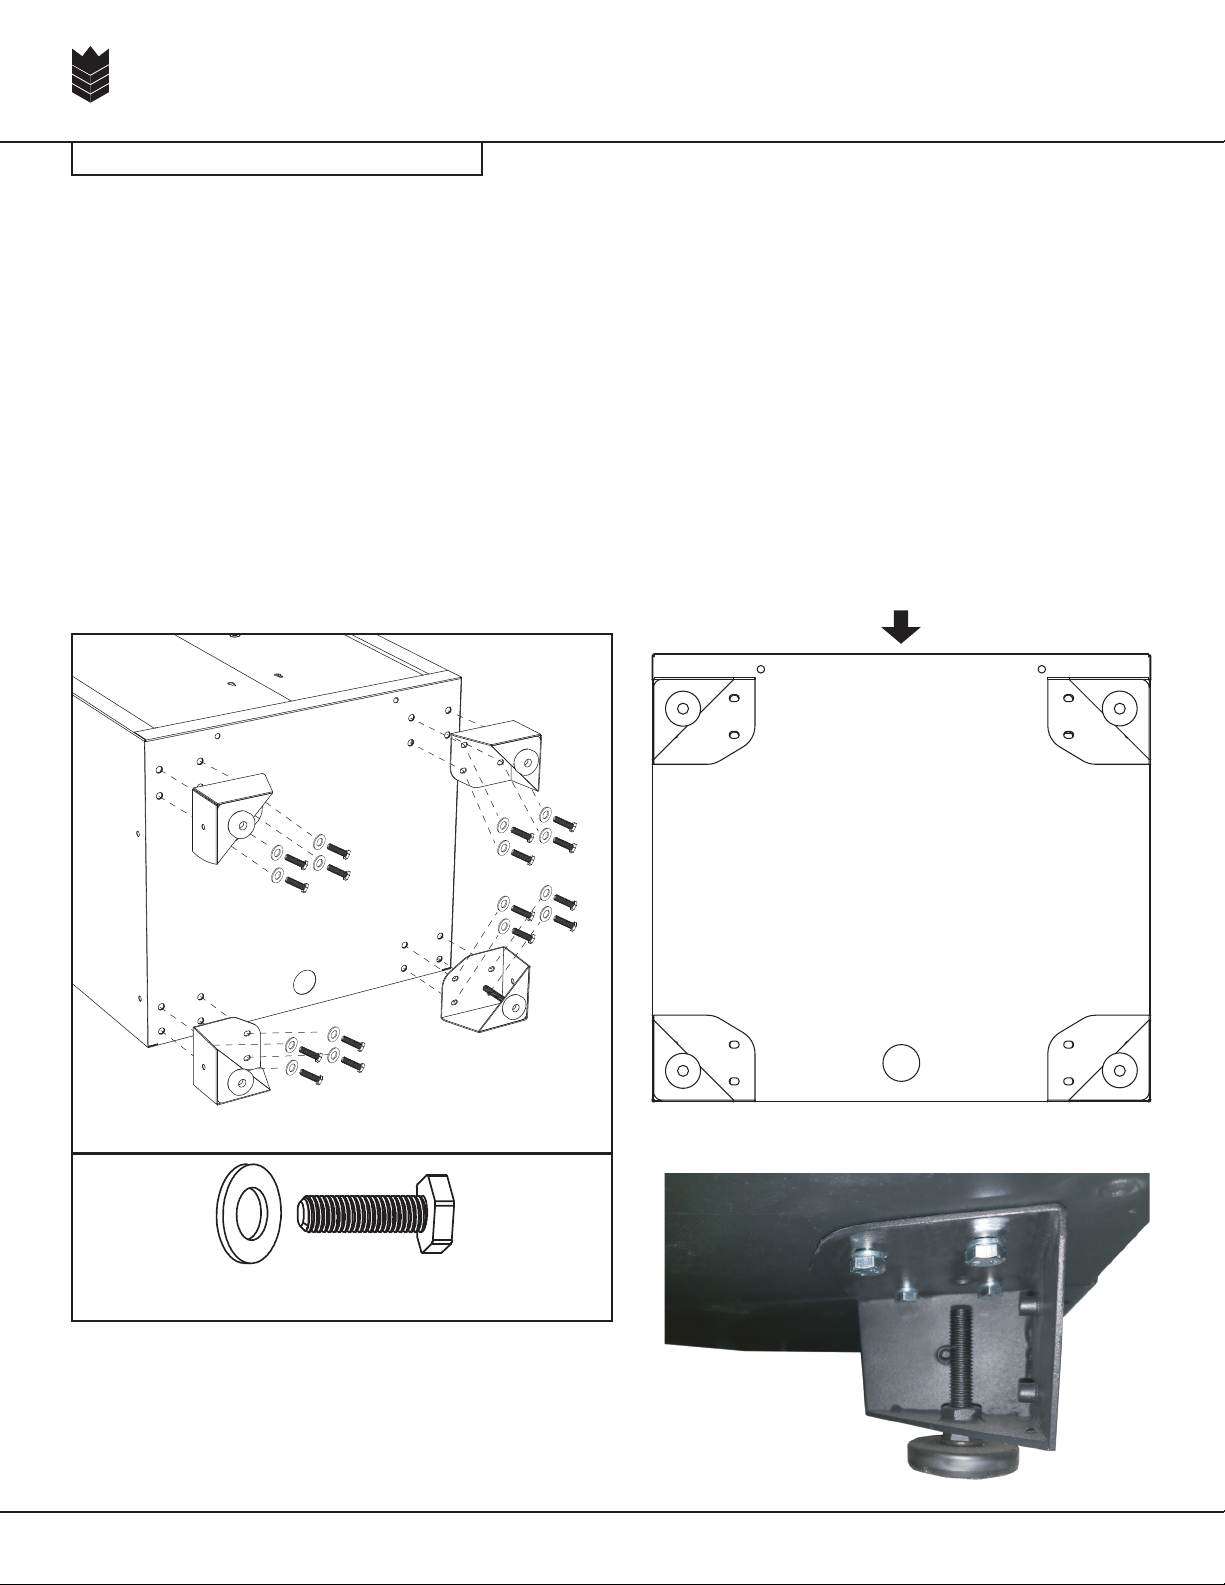
STEP 1: Installation of feet
This step applies to the 2 Door Tall Cabinet, 2 Door Base Cabinet, and the 5 Drawer
Base Cabinet.
1. Empty the cabinet (remove shelf or any other items that may be inside)
2. As a precaution, place cardboard or carpet on the floor.
3. Lay the cabinet upside down or on its back (bottom of the cabinet must be easily
accessible) on the cardboard or carpet.
4. Install the feet as shown below using the supplied hex bolts and washers (4 hex
bolts per foot). Note the orientation of the feet and bolt pattern.
Bottom View
FRONT OF CABINET
EXAMPLE OF FOOT INSTALLED WITH
SUPPLIED HEX BOLTS AND WASHERS
Hex Bolt and Washer

5
PRO Series Cabinets
CrownWall®
STEP 2: Installation of Kickplates
This step applies to the 2 Door Tall Cabinet, 2 Door Base Cabinet, and the 5 Drawer
Base Cabinet.
Kick plates can be installed on the front and sides of each respective cabinet when
being used individually. Alternatively on only the exposed sides of the cabinets when
multiple units are installed together as a set.
1) Install the front kickplate as shown below using the supplied socket screws using
the supplied socket wrench.
2) Install the side kickplates (both sides follow the same procedure) as shown using
the supplied socket screws using the supplied socket wrench.
12
Socket Bolt
6
PRO Series Cabinets
CrownWall®
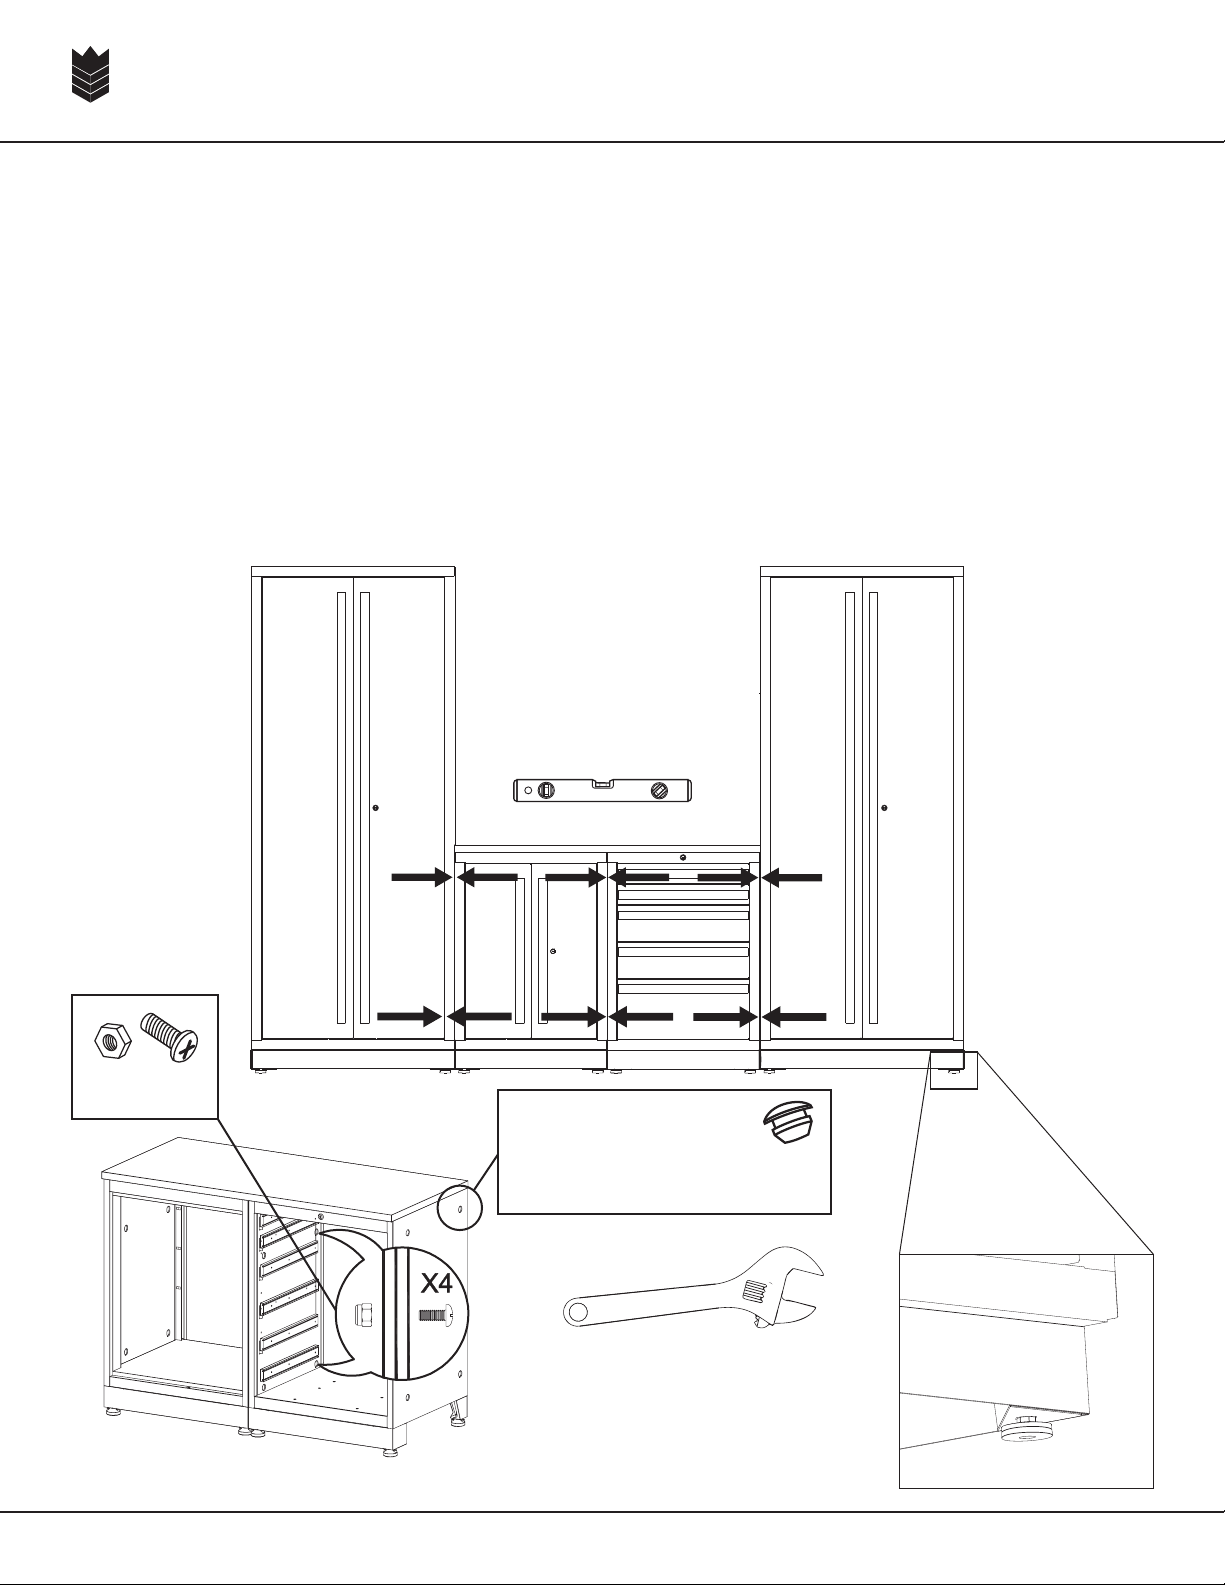
STEP 3: Installing Tall and Base Cabinets
This step applies to the 2 Door Tall Cabinet, 2 Door Base Cabinet, and the 5 Drawer
Base Cabinet.
Installing Multiple Cabinets Together
When installing multiple base cabinets together (2 door base cabinet, 5 Drawer base
cabinet, and 2 Door Tall Cabinet) ensure that the feet have been adjusted so as the
cabinets are level to each other. Fasten the cabinets together using the supplied star
bolts and nuts through the holes found on the sides of all cabinets. You will need to
remove the top and bottom drawer of the 5 Drawer Base Cabinet to access these holes.
Using the supplied 3” wood screws, fasten the tall cabinets into wall studs through the
holes found in the back of the cabinets.
Level
Adjust height of cabinets by
rotating the hex-bolt on the
adjustable feet
(Clockwise to lower
Counter clockwise to raise)
Use the supplied
rubber plugs for
plugging any unused
connecting holes
Star Head Screw
and Nut

7
PRO Series Cabinets
CrownWall®
STEP 4: Installing The Work Surface
This step applies to any scenario that uses either the 24”, 48”, or 72” Work Surface
• 24” Work Surface covers 1 Base Cabinet
• 48” Work Surface covers 2 Base Cabinets
• 72” Work Surface covers 3 Base Cabinets
2 Door Base Cabinet
When the 2 Door Base Cabinet is present, open the doors with the supplied tool to
access the pre-drilled holes in the top of the cabinet. Screw in the work surface through
the pre-drilled holes using the supplied 1” wood screws.
5 Drawer Base Cabinet
When installing the work surface on top of the 5 Drawer Base Cabinet, remove at least
the top drawer of the 5 Drawer Base Cabinet to access the pre-drilled installation
holes in the top of the cabinet. For better access, remove all drawers as indicated in
1” Wood Screw
and Washer

8
PRO Series Cabinets
CrownWall®
STEP 5: Installing The 2 Door Wall Cabinets
THIS STEP REQUIRES TWO INDIVIDUALS TO COMPLETE
1) Using your stud finder, locate all studs that are found in the wall that you will be
installing your cabinets against. Mark these locations with a pencil.
2) Once the studs have been located, using the supplied 3” wood screws and washer,
fasten the wall cabinets into the wall studs through the holes found in the back of the
cabinets.
IF WALL CABINETS ARE BEING INSTALLED IN CONJUNCTION WITH OTHER CABINETS
AS A SET, BE MINDFUL OF THEIR LOCATION RELATIVE TO THE OTHER CABINETS
3) Multiple wall cabinets can be installed beside each other, and fastened together using
the supplied star bolts and nuts through the holes found on the sides of the wall
cabinets. Note, this is in conjunction with each cabinet being mounted to wall studs.
Note:
If you have purchased the
CrownWall®PRO Series
Aluminum Backsplash,
consult the instructions for
installing it at this time
3” Wood Screw
and Washer

9
PRO Series Cabinets
CrownWall®
STEP 6: Installing The Handles
Ensure that you use the correct handles with the correct cabinets. Please note the
following:
• 2 Door Wall Cabinet uses: 2 x handles 11-13/16” (302 mm)
• 2 Door Base Cabinet uses: 2 x handles 22-13/16” (580 mm)
• 5 Drawer Base Cabinet uses: 5 x handles 20-1/2” (520 mm)
• 2 Door Tall Cabinet uses: 2 x handles 67-7/8” (1724 mm)
1) All handles are supplied with the mounting screws in place. Loosen the screws with a
few turns using a star screwdriver (do not completely remove).
2) All cabinet doors feature “key hole” openings with one part of the hole larger then the
other. Insert the handles with loosened screws through the larger portion of the holes,
then slide over to the smaller side of the hole. Then tighten the handles in place from
the inside of the door or drawer (ensure that the washers are on the inside of the
cabinet door or drawer).

10
PRO Series Cabinets
CrownWall®
STEP 7: Adjusting/Aligning the Doors
This step applies to the 2 Door Tall Cabinet, 2 Door Base Cabinet, and the 2 Door Wall
Cabinet.
To align the doors there are two screws on each soft close hinge that will need to be
adjusted.
1) For adjusting the doors forwards or backwards (closer or farther from the frame)
Screw Acan be turned (using a star screwdriver)
2) Door adjusting the doors left or right screw Bcan be turned (using a star screwdriver)
Soft Close Hinge
AB
A B
Adjustment A Adjustment B

11
PRO Series Cabinets
CrownWall®
CrownWall®PRO Series Cabinets 5 Year Warranty
The information provided here details the Garage Royalty™ Products Inc. warranty for all new CrownWall®PRO Series
Cabinets that are purchased in North America (anywhere in North America). This 5 Year warranty extends only to the
first retail purchaser of the CrownWall®PRO Series Cabinets.
5 Year Warranty
Garage Royalty™ Products Inc. (hereafter CrownWall®) warrants its Cabinets against defects in material or
construction for the period of 5 Years. Any defective CrownWall®PRO Series cabinets will be replaced by CrownWall®
under the condition that the CrownWall®PRO Series cabinets in question were - (A) Installed according to the
relevant and printed instructions; - (B) Maintained as per the relevant and printed instructions; - (C) Installation
followed any relevant local building codes (If applicable). Any CrownWall®PRO Series cabinets replaced under the
terms of this 5 Year Warranty will inherit the remaining warranty period from the original purchase. Replacement of a
defective product is the sole and exclusive remedy under the 5 Year Warranty.
5 Year Warranty Exclusions
The following items are not covered by the 5 year warranty:
• Damage caused by improper installation, abuse, or misuse of the cabinets in any way
• Damage caused by fire or accidents.
• Damage that may occur because of over-loading any of the CrownWall®PRO Series Cabinets.
• The cost of all labor associated with installation.
• The cost of accessory materials.
• Surface damage resulted from chemicals
• Corrosion resulted from humidity
• The cost of return shipping for defective CrownWall®PRO Series Cabinets or other products associated with
the line of CrownWall®products.
Limitations of Warranty
The above 5 Year Warranty is the exclusive warranty for CrownWall®PRO Series Cabinets and disclaims all other
warranties, express or implied, including any implied warranties of merchantability, fitness for a particular purpose, or
otherwise. If you live in an area where consumer law prohibits this disclaimer, the above 5 year warranty will not
extend the time period of any such implied warranty.
Obtaining 5 Year Warranty Service
For warranty service, call 1-866-291-6982. You will need your original proof of purchase and photos to illustrate the
claimed defect.
CrownWall®Liability Disclaimer
Garage Royalty Products inc., its successors, distributors, and dealers (hereafter SELLER) shall not in any way take
responsibility for the proper use, installation, or service of the CrownWall®product. The SELLER will assume no
responsibility or liability for any case of improper installation or other misuse of CrownWall®products. ALL LIABILITY
CLAIMS ARE HEREBY WAIVED BY THE BUYER. The installer has the responsibility of ensuring that they understand
the procedures of proper installation for CrownWall®products. Any doubts should be resolved by contacting the
manufacturer. Please understand that the assembly instructions and other assembly guidelines can not cover every
assembly or installation scenario that may present itself. As every installation situation may have it’s unique attributes,
it is ultimately the responsibility of the final installer to understand and plan accordingly to ensure that the
CrownWall®products are installed correctly. It is the sole responsibility of the purchaser and final installer to ensure
that the installation of CrownWall®panels and trims meet any local building codes. It is recommended that all plans
are professionally reviewed by a licensed engineer, architect or building official before installation of CrownWall®
products commences. The SELLER does not claim any liability for injury or damages caused by incorrect or improper
use or installation of the CrownWall®products. The BUYER acknowledges and agrees that the disclaimer of any
liability for personal injury is a valid term of agreement, and the BUYER agrees to indemnify the SELLER and to hold
the seller as not responsible for any claim related to CrownWall®products. Under no circumstances will the SELLER
have any liability for any damages or expenses by reason, use, or sale of the CrownWall®product.
Consequential Damages
The SELLER shall not be liable to the other parties for any and all special, indirect, incidental, or consequential
damages resulting from the use of the product.
Severability
If any provisions of this 5 Year warranty is held to be invalid, illegal, or unenforceable, the balance of this 5 year
warranty shall remain in effect.
Questions?
Please call our customer Service line at: 1-866-291-6982
Monday - Friday • 9:00 am - 5:00 pm EST
www.crownwall.com
PRO Series Cabinets
CrownWall®
Armoires PRO Series
CrownWall®
Instructions d’assemblage

i
Armoires PRO Series
CrownWall®
Table des matières
Informations sur la sécurité et outils requis
Liste de quincaillerie
Capacité de charge des armoires
Installation des pattes
Installation des coups-de-pied
Installation des armoires hautes et sur plancher
Installation de la surface de travail
Installation de l’armoire murale à 2 portes
Installation des poignées
Ajustement/alignement des portes
Garantie et exclusion de responsabilité
••••••••••••••••••••••••••••••••••••••••••••••••••••••••••• 1
••••••••••••••••••••••••••••••••••••••••••••••••••••••••••• 2
••••••••••••••••••••••••••••••••••••••••••••••••••••••••••• 3
••••••••••••••••••••••••••••••••••••••••••••••••••••••••••• 4
••••••••••••••••••••••••••••••••••••••••••••••••••••••••••• 5
••••••••••••••••••••••••••••••••••••••••••••••••••••••••••• 6
••••••••••••••••••••••••••••••••••••••••••••••••••••••••••• 7
••••••••••••••••••••••••••••••••••••••••••••••••••••••••••• 8
••••••••••••••••••••••••••••••••••••••••••••••••••••••••••• 9
••••••••••••••••••••••••••••••••••••••••••••••••••••••••••• 10
••••••••••••••••••••••••••••••••••••••••••••••••••••••••••• 11

1
Armoires PRO Series
CrownWall®
CONSIGNES DE SÉCURITÉ
ASSEMBLAGE EN ÉQUIPE : au moins 2 personnes doivent assembler ces armoires en
raison de leur poids élevé.
Les armoires doivent être fixées adéquatement aux montants de cloison pour offrir la
capacité de charge indiquée, ainsi que pour éviter de causer des blessures ou la mort
au cours de leur utilisation.
Détecteur de
montants de
cloison
Ruban à mesurer
Crayon
Niveau
Perceuse
OUTILS REQUIS
Tournevis cruciforme
Clé anglaise ou pince réglable Ensemble de cliquets
La quincaillerie servant à fixer les armoires aux surfaces standards comme les murs
(montants de cloison) est incluse. Il incombe à l’utilisateur final d’utiliser
adéquatement la quincaillerie nécessaire pour fixer les armoires PRO Series de
CrownWall®à tout mur ou toute surface, car leur nature peut varier.
Veillez à ce que tout enfant qui participe à l’installation des armoires PRO Series de
CrownWall®soit surveillé adéquatement.
VEUILLEZ LIRE CE MANUEL D’INSTRUCTIONS ATTENTIVEMENT AVANT DE
COMMENCER L’ASSEMBLAGE DES ARMOIRES
2
Armoires PRO Series
CrownWall®
LISTE DE QUINCAILLERIE
Armoire
haute à 2
portes
Armoire
murale à 2
portes
Armoire à 5
tiroirs sur
plancher
Armoire à 2
portes sur
plancher
Surface de travail
de 60,96 cm (24
po),de 121,92 cm
(48 po) et de
182,88 cm (72 po)
Nom de l’article
Vis à tête
hexagonale et
rondelle
Vis à tête
cylindrique
cruciforme et
écrou
Vis à bois de 7,62
cm (3 po) et
rondelle
(montage mural)
Vis à bois de 2,54
cm (1 po) et
rondelle
(montage de la
surface de
travail)
Vis à tête
creuse
Passe-câble
Image de
l’article
16 X 16 16 X
4 4 4 4 X
XXX4 4
X 4
x
X1111
66x6
X
XX
Petit bouchon
en caoutchouc
Clé hexagonale
x
x11x1
88816
Armoire à 2 portes sur plancher
3
Armoires PRO Series
CrownWall®
CAPACITÉ DE CHARGE DES ARMOIRES
Armoire murale à 2 portes
MAX: 45,36 kg
MAX: 272 kg
MAX: 272 kg
MAX: 136 kg
Armoire haute à 2 portes
Armoire à 5 tiroirs sur plancher
Surface de travail de 182,88 cm
Surface de travail de 121,92 cm
45,36 kg
45,36 kg
45,36 kg
45,36 kg
45,36 kg
45,36 kg
45,36 kg
45,36 kg
45,36 kg
45,36 kg
45,36 kg
45,36 kg
45,36 kg
45,36 kg
45,36 kg
MAX:
408 kg
136 kg 136 kg
136 kg
22,68 kg
22,68 kg
272 kg
4
Armoires PRO Series
CrownWall®
INSTRUCTIONS D’ASSEMBLAGE
ÉTAPE 1: Installation des pattes
Cette étape s’applique à l’armoire haute à 2 portes, à l’armoire à 2 portes sur plancher
et à l’armoire sur plancher à 5 tiroirs.
1) Videz l’armoire (ôtez les tablettes ou tout autre article qui pourrait être à l’intérieur).
2) Par précaution, mettez un carton ou un tapis sur le sol.
3) Déposez l’armoire à l’envers ou sur le dos (le bas de l’armoire doit être facile
d’accès) sur le carton ou le tapis.
4) Installez les pattes comme indiqué ci-dessous à l’aide des vis hexagonales et des
rondelles fournies (4 vis hexagonales par patte). Remarquez l’orientation des pieds
et des vis.
Vue de dessous
AVANT DE L’ARMOIRE
EXEMPLE DE PATTE INSTALLÉE AVEC LES VIS
HEXAGONALES ET LES RONDELLES FOURNIES
Vis à tête hexagonale et rondelle
Table of contents
Languages:
Popular Indoor Furnishing manuals by other brands

Dorel Home Products
Dorel Home Products Cosmopolitan CosmoLiving S020001 manual

rst brands
rst brands Vaughn OP-AWAC-VGHN Assembly instructions

IMS FORINVEST
IMS FORINVEST NELLY Assembly instruction

Household Essentials
Household Essentials 8119-1 instructions

John Lewis
John Lewis Cotswold manual

VISIONARY DESIGNS
VISIONARY DESIGNS MOD-1327 Assembly


modway
modway EEI-3908 quick start guide

Rauch
Rauch M1494 Assembly instructions

Bob's Discount Furniture
Bob's Discount Furniture Elevations 20050983003 ASSEMBLY INSTRUCTIONS & PARTS IDENTIFICATION

Rowico
Rowico Monterey 118690 Assembly instruction

Tommy Swiss
Tommy Swiss Winged Gas Lift Storage Bed Frame installation guide

HORM
HORM Bolero Estensibile manual