manuals.online logo
Brands
  1. Home
  2. •
  3. Brands
  4. •
  5. Crux
  6. •
  7. Digital Camera
  8. •
  9. Crux Sightline RVCCH-75C User manual

Crux Sightline RVCCH-75C User manual

Other Crux Digital Camera manuals

Crux RVCTY-71T User manual

Crux

Crux RVCTY-71T User manual

Crux Sightline RVCVW-73 User manual

Crux

Crux Sightline RVCVW-73 User manual

Crux Sightline RVCTY-71c User manual

Crux

Crux Sightline RVCTY-71c User manual

Popular Digital Camera manuals by other brands

Canon WP-DC35 user guide

Canon

Canon WP-DC35 user guide

Xiaomi 70mai Dash Cam Lite user manual

Xiaomi

Xiaomi 70mai Dash Cam Lite user manual

Samsung PL70 Quick start manual

Samsung

Samsung PL70 Quick start manual

GE E1680W user manual

GE

GE E1680W user manual

Canon EOS 1200D instruction manual

Canon

Canon EOS 1200D instruction manual

Tevion MD 86497 user guide

Tevion

Tevion MD 86497 user guide

Exakta VX Features

Exakta

Exakta VX Features

Kodak Digital Science DC120 user guide

Kodak

Kodak Digital Science DC120 user guide

Nikon FM3A Specifications

Nikon

Nikon FM3A Specifications

Vectra Fitness H1 Quick reference guide

Vectra Fitness

Vectra Fitness H1 Quick reference guide

Nikon COOLPIX 775 quick start guide

Nikon

Nikon COOLPIX 775 quick start guide

Olympus IR 500 - 4MP Digital Solutions Camera Manuel de Référence

Olympus

Olympus IR 500 - 4MP Digital Solutions Camera Manuel de Référence

Samsung EC-L100ZBBA brochure

Samsung

Samsung EC-L100ZBBA brochure

FujiFilm FINEPIX BL01124-201 owner's manual

FujiFilm

FujiFilm FINEPIX BL01124-201 owner's manual

Panasonic DMC-L10KPP Service manual

Panasonic

Panasonic DMC-L10KPP Service manual

Hyundai Electric HYU-CC-CHBF12001 Quick installation guide

Hyundai Electric

Hyundai Electric HYU-CC-CHBF12001 Quick installation guide

Sony DSC-WX80 specification

Sony

Sony DSC-WX80 specification

Nikon Nuvis S - Point & Shoot instruction manual

Nikon

Nikon Nuvis S - Point & Shoot instruction manual

manuals.online logo
manuals.online logoBrands
  • About & Mission
  • Contact us
  • Privacy Policy
  • Terms and Conditions

Copyright 2025 Manuals.Online. All Rights Reserved.

RVCCH-75C
Rear View Integration Interface with VIM
for CHRYSLER, DODGE & JEEP
R
INTERFACING SOLUTIONS
Sightline
Multi View Integration
Crux Interfacing Solutions • Chatsworth, California
phone: (818) 609-9299 • fax: (818) 996-8188 • www.cruxinterfacing.com
rev.020520
1 of 3
• Acvates Uconnect Touchscreen Radio for enabling Video features
• Aermarket Rear-view Camera included
• Automacally switches to Rear-view when car is in Reverse mode
• Forced reverse camera view feature
• VIM funcon
• Plug & Play Installaon
PRODUCT FEATURES:
PARTS INCLUDED:
RVCCH-75C Module RVCCH-75C Harness CCH-01G Camera
INSTALLATION DIAGRAM:
WHITE Wire
Parking Guideline
To Radio
OEM Radio
Harness
DP
ON
DIP
SWITCH
LED*
*LED RED = Power ON Status
LED BLUE = Data Bus ON Status
RVC Video
Signal Input
RED Wire Push in Connectors
all the way
Line up Arrows
Regulator
20 Ft. Coax Cable
RED Wire
Tape O
(Not Used)
BLACK
Wire
BLACK
(Ground)
8-Pin Molex Represents Solder Joint
Connect RCAs and secure
with tape all around
WHITE Wire
(Camera Power Output
+12V 250mA)
OR*
*Connect BLACK (ground) wire to a source ground and not
chassis ground (i.e. ground wire on reverse light)
If video noise is present, we recommend connecting the
ground wire to the BLACK ground wire on the RVCCH-75C harness.
Source Ground
GREEN Wire
For Non Permanent
VIM function
Crux Interfacing Solutions • Chatsworth, California
phone: (818) 609-9299 • fax: (818) 996-8188 • www.cruxinterfacing.com
rev.020520
2 of 3
R
INTERFACING SOLUTIONS
Sightline
Multi View Integration
DIP SWITCH SETTINGS:
INSTALLATION INSTRUCTIONS:
INSTALLING THE CDR-02 CAMERA AND CABLE
1. Remove the rear panel lip.
2. Drill a 5/8 inch size hole in the available locaon.
3. Fish the wires thought the drilled hole and through the pass through into the trunk/cargo area.
4. Route the wires towards the radio and make the power and video connecons. For powering up the camera, use the 12V
OUTPUT (White Wire). (See Wiring Diagram on page 1)
5. Connect the camera ground wire to chassis ground. If video noise is present, we recommend grounding the camera
directly to the BLACK wire on the RVCCH-75C T-harness.
6. Test the camera before re-installing the radio.
CODING THE RADIO FOR A REAR VIEW CAMERA
The radio has to be coded to accept a reverse camera. Please follow the coding procedure below:
1) Turn key o and remove the key from ignion.
2) Open the driver door then close it (make sure all doors, li gate and hood are also closed).
3) Look at the module and wait for LEDs to turn o then disconnect the module.
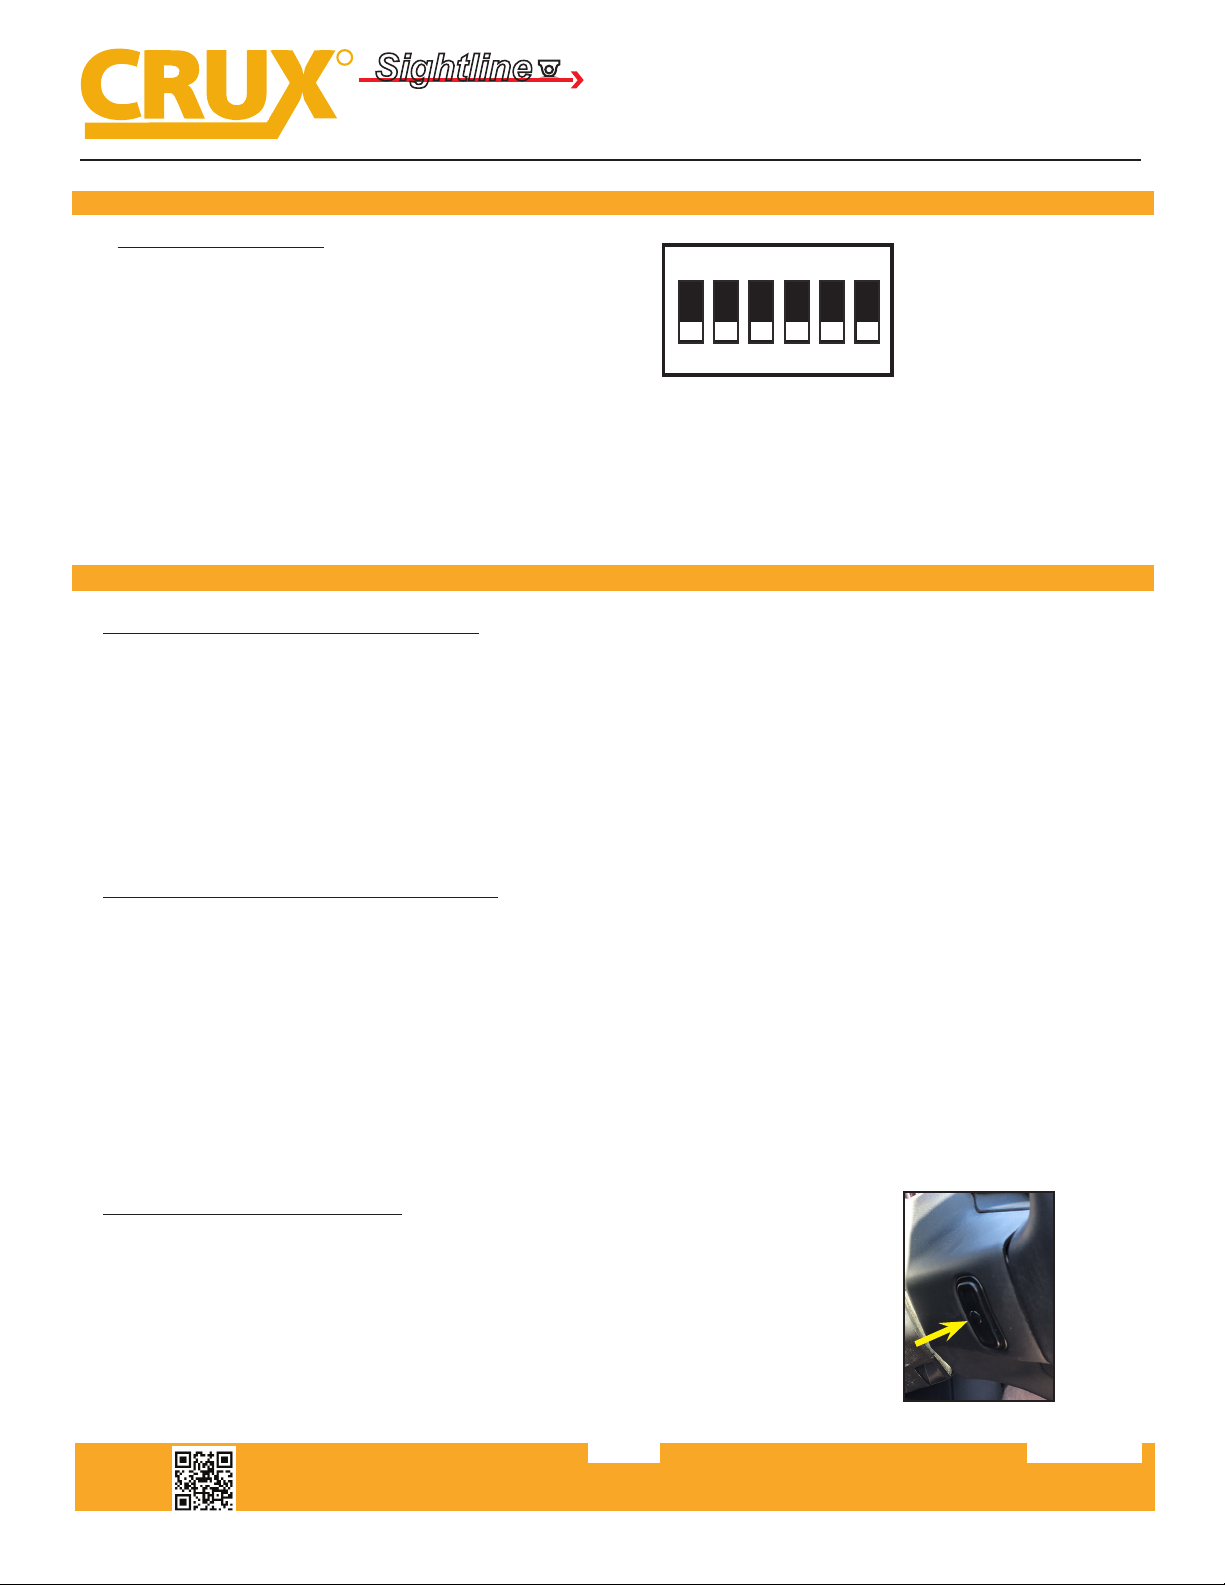
4) Before plugging back the module, turn all DIP switches to ON then OFF.
5) Set DIP switches 1 (if permanent VIM is desired), 2 and 6 to the ON posion.
6) Reconnect module and wait for the LEDs to turn o.
7) Start up engine and the coding operaon is complete.
8) Put the gear in reverse to test the camera.
FORCED VIEW OF REVERSE CAMERA
The Force RVC is used to view the back-up camera when the vehicle is
not in reverse gear. Allows you to view what is in the back while driving.
To acvate this feature, make sure that DIP 4 is set to ON. Press the center
buon once on the le hand side steering wheel control (located behind the steering wheel).
NOTE: The camera is defaulted to power down aer 10 seconds.
DIP SWITCH FUNCTIONS:
DIP 1 = Video in Moon Acvaon ON / OFF
DIP 2 = Rear View Camera ON / OFF
DIP 3 = Not Used
DIP 4 = Forced RVC ON / OFF
DIP 5 = Defaulted to OFF*
DIP 6 = Defaulted to ON*
RVCCH-75C
Rear View Integration Interface with VIM
for CHRYSLER, DODGE & JEEP
*DIP 5 & 6
If the radio is having turn-on issues, please try the following:
Aempt 1: Set 5 & 6 to ON
Aempt 2: Set 5 to ON and 6 to OFF
Aempt 3: Set 5 to OFF and 6 to ON
1 2 3 4 5 6
ON
Crux Interfacing Solutions • Chatsworth, California
phone: (818) 609-9299 • fax: (818) 996-8188 • www.cruxinterfacing.com
rev.020520
3 of 3
R
INTERFACING SOLUTIONS
Sightline
Multi View Integration
RVCCH-75C
Rear View Integration Interface with VIM
for CHRYSLER, DODGE & JEEP
VEHICLE APPLICATIONS:
CHRYSLER
2015 - 2016 300
NOTES:
1. Not compable on vehicles with heated seats or heated steering wheel.
COMPATIBLE RADIOS:
8.4” Screen with Separate Knobs 5” Screen with 6 Buons & Separate Knobs
4.3” Screen with 4 Buons & 2 Knobs
(monochrome display)
Not compable radio
DODGE
2014 - 2017 Durango
2015 - 2015 Charger
2013 - 2017 Challenger
JEEP
2014 - 2017 Grand Cherokee
For radios without a separate CD slot (one piece radio).