Crystal Acoustics Teevy User manual
Teevy Quick Guide
Thank you for purchasing Crystal Acoustics Teevy
Teevy uses a unique driver design to create a fully immersive 360° room filling musical experience, as well as convenient, compact size for placing it
anywhere in your home.
Small yet powerful, it produces an unexpectedly deep and clear bass.
With Teevy, you can connect numerous devices and enjoy countless hours of non compromised listening.
Acoustic Features:
• 5 Drivers (Teevy-5MR), 6 drivers (Teevy-6MR) with Balanced Directivity for wide sound everywhere in the room
• Ideal In-Room response using WiSound technology
• Incredible Bass down to 38Hz (Teevy-5MR), 35Hz (Teevy-6MR)
Place it
Connect it
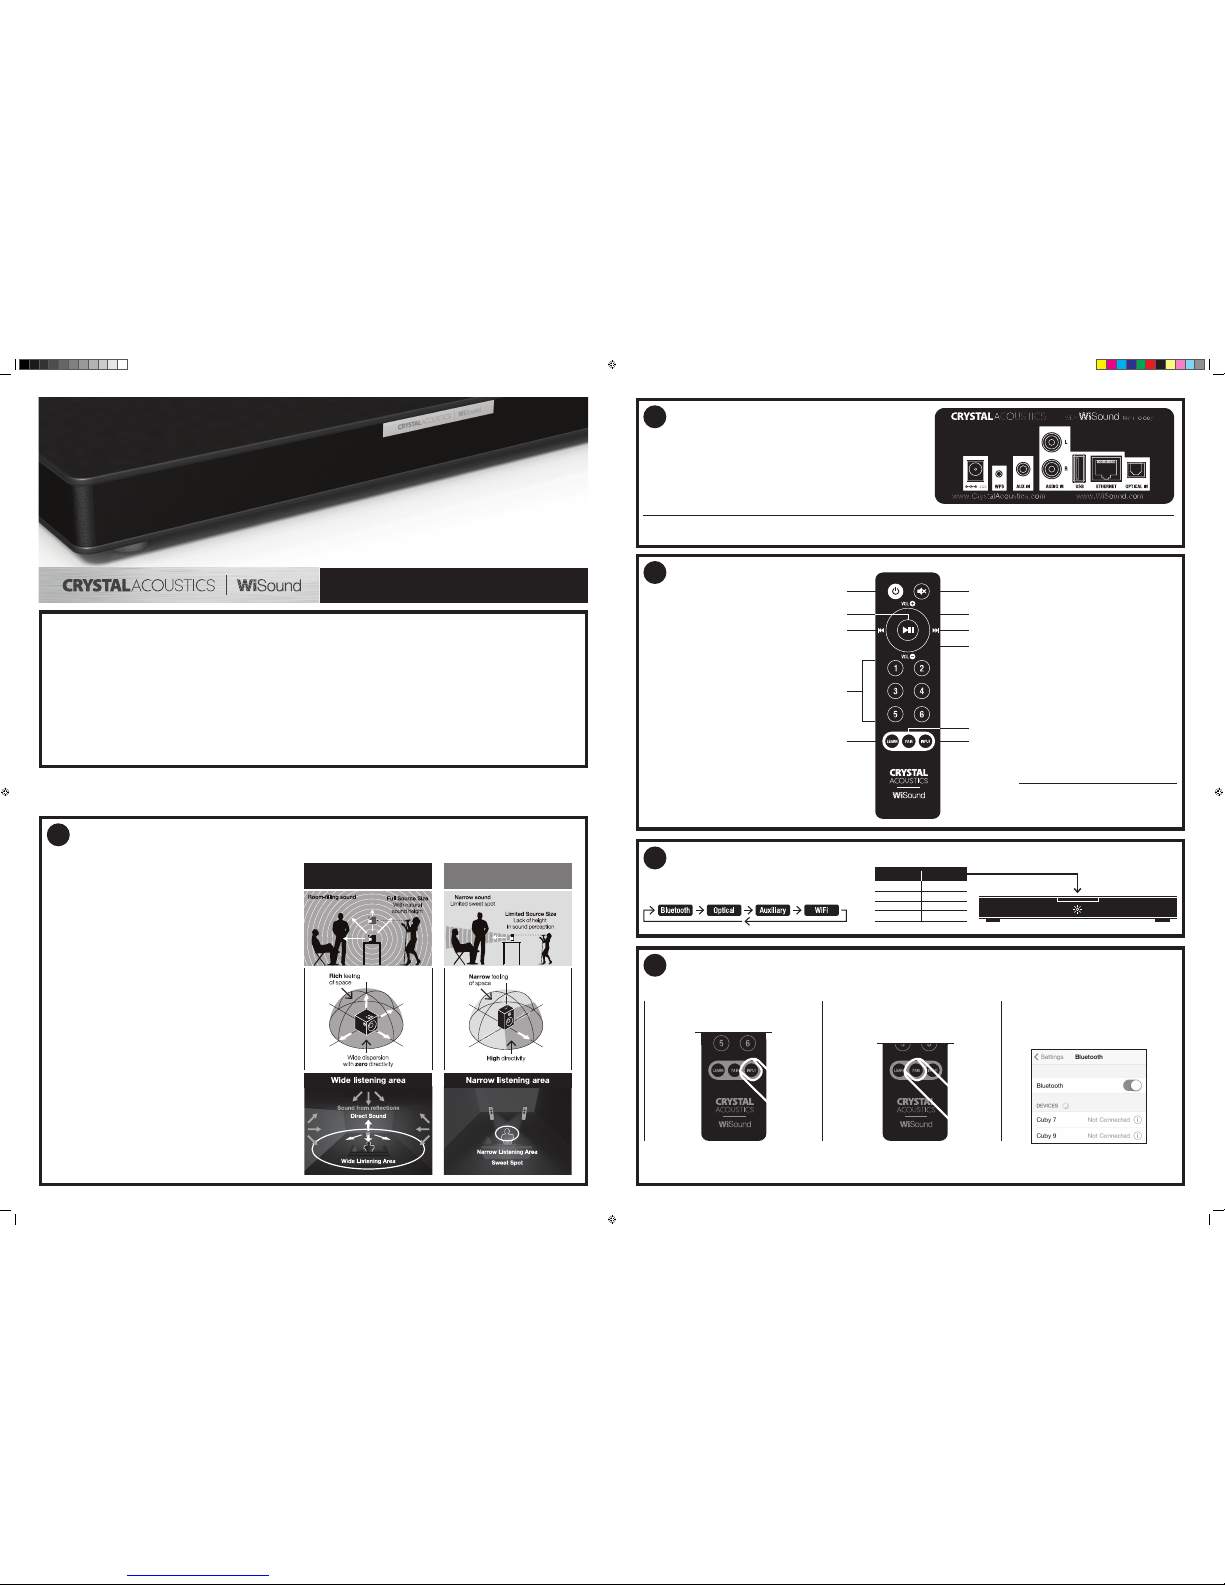
Connect Teevy to your devices through:
1. Optical: If available, use this connection for best quality
2. RCA: Connect both left and right channels to your device
3. AUX 3.5mm: Connect to the headphone output of your device
4. USB: Play songs from your USB HDD/Flash or charge your phone/tablet
5. Ethernet: Get network access in case of no/weak Wi-Fi signal
Control it
Control Teevy by the included
remote control.
Select it
Use the Ιnput button on the unit or on the remote control,
to cycle between the various available options:
Pair it [Βluetooth]
You can connect your Teevy with any Bluetooth enabled device (phone,tablet, computer, etc).
Once paired, music from your device will play through the unit.
To add another Bluetooth device, repeat from step 2. Teevy may store up to eight paired devices in memory.
WiSound Speaker
Drivers firing forward, sideways and upwards
Conventional Speaker
Front-firing speakers only
Power ON/OFF
Previous Track
Play/Pause
Learning Function
Mute
Volume Up
Next Track
Volume Down
Bluetooth Pairing
Input Selector
Web Radio Presets
Blue
White
Green
Yellow
Color
Bluetooth
Optical
Aux
Wi-Fi
Input
Input colors are according to table:
Note: If in maximum volume you are experiencing
crackling sound during heavy Bass passages,
the protection mechanism for the amplifier and speaker
drivers has been activated. Turn down the volume a bit!
Note: When the 3.5mm socket is used, it takes priority over the RCA input and it becomes the Auxiliary Source. In this case the RCA input is muted.
Note: To save power, Teevy will automatically turn off (in optical / line-in mode) if no sound has played through it for 30 minutes. It will automatically turn on again once it receives a signal.
1
2
3
4
5
Teevy is designed to be placed under your TV. The TV must have a
base no wider than 580mm (Teevy 5) or 780mm (Teevy 6) and no
deeper than 280mm (Teevy 5 & Teevy 6) and must weigh no more than
60kg (30lbs).
If the TV base is too large to fit, place Teevy on an extra shelf under
your TV rack, taking care not to cover the unit’s side speakers.
Alternatively, you can mount it on the wall.
To mount your Teevy on the wall, you’ll need to drill two holes:
1. Mark with a pen or pencil the points where you’ll drill the holes. The
distance between the two holes is 400mm for Teevy
5and 600mm for Teevy 6.
2. Drill the holes on the wall using a drill.
3. Place the plugs in the holes on the wall and enter them fully (you
may need a hammer).
4. Screw the mounting hooks in the plugs.
5. Hang your Teevy on the wall, with the high/mid drivers looking up
and sideways. After placing it, pull gently on each side, to make sure
that the two support points are secured.
1. Select the Bluetooth input on the remote by
cycling Inputs.
2. To pair a Bluetooth device to Teevy, press
and hold the pairing button for about 5sec.
The Bluetooth indicator LED will start blinking.
3. Consult the instructions of the device to be
paired to connect to Teevy. Successful pairing
will be signaled by a ‘beep’ from the unit and the
Bluetooth indicator LED will stop blinking.

Charge it
Network it [Wi-Fi]
Use App Store (IOS devices) or Google Play (Android devices) to download WiSound application (Wi-Fi connection and internet access are required).
Run the App and follow on screen guide to setup network.
To add the first speaker in your network:
Note: If you use Ethernet connection, instead of Wi-Fi the above procedure is not required. You just need to run the App and the speaker is already there!
Table below summarizes the network status depending on LED:
Useful:
If there is no Wi-Fi router available, you can connect your phone/tablet directly to the speaker’s network. Typically the name is TeevyX_YY and the default
password is Wisound1234. You are strongly advised to change this password through the App or through your speaker’s web interface (10.10.10.254,
under Network tab)
Group It
Useful:
• You can make one or more groups
• You can have more than one Slave speakers under the same Master
•
In a Group, even if the source is Optical / Line in / Bluetooth, you can listen to Slave speakers playing the same song as the Master speaker (Redirect feature)
• You can simultaneously control the volume of all the speakers in a group by using Volume buttons of your phone/tablet
• For a Group configuration, choose which speaker can play Left (L) , Right (R) or Left/Right (LR), by touching the relevant icon.
Learn it
You can control Teevy’s volume with your TV’s remote control. To learn your TV’s remote to Speaker:
4. Repeat steps 1-3 for Vol-
Νοte: Some TV remotes may not be compatible with Learning function
Play it
Music Selection Now playing Available speakers
• Select your local songs or USB songs through My Music
• Access Web Radio through TuneIn
• Change Input through Line In / Bluetooth / Optical
• Search for online songs through Search
• Access your Favorites through Favorites
• Access Web services (Pandora/Spotify/Deezer) by touching the corresponding icons (region dependent)
Useful:
Your friends/guests can stream their music to the entire group of speakers without downloading any Apps or having to connect to your sensitive Wi-Fi
network. Just ask them to pair their phones/tablets via Bluetooth to the Master speaker!
Preset it
To assign web radio stations to preset buttons (up to 6 stations can be assigned):
Any time wishing to access the preset web radio stations, simply select Wi-Fi as input and press the relevant button on the remote.
1. Press Add Device button 2. Type the password of your wifi network
and press next
3. Press the WPS button on the back of your
speaker and press next
4. The App searches the speaker
and automatically adds it to your network
5. You can now select the speaker’s name
or set a custom one
6. To add more speakers, press + on the top
right and repeat steps 1-5
If you want to ungroup, just grab and drag the slave speaker below the
middle line. Slave speaker becomes Master speaker and can play differ-
ent music.
In the list of the available speakers, grab and drag one speaker and drop
it over another speaker. In this way, this speaker (slave) becomes part of a
group and Master’s music is also played through all the Slave speakers.
1. Keep pressed LEARN button on remote
for about 2 seconds (LED slow blinking)
2. Press either Vol+ on speaker’s remote (LED
fast blinking)
3. Press relevant Vol+ on TV’s remote (LED
stops blinking)
VOL CH
CrystalAcoustics.com|WiSound.com
WirelessMultiroom.com
You can charge any USB powered device.
Just plug it to your Teevy’s USB Power Out.
2. Browse your favorite station 3. Press the small icon next to the
web radio station
4.
Select the required preset number
1. Select TuneIn
6
7
8
9
10
11
Other Crystal Acoustics Speakers manuals


