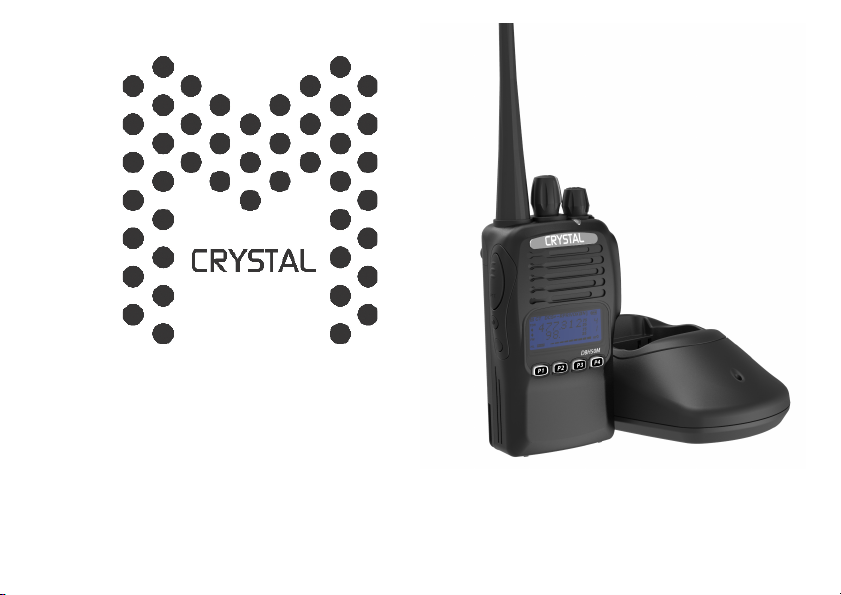
Crystal DBH50M-80 User manual
! ! !
!
!
!
!
!
!
!
!
Operating!Instructions!
DBH50M!680!Channel!5!watt!UHF!Hand!held!CB!radio

!
!
THANK YOU!
!
Thank you for purchasing a Crystal transceiver. Crystal transceivers will provide you with a reliable, clear
and efficient communication service.
The transceiver introduces an innovative DSP (Digital Signal Processing) baseband processing system
to achieve high-fidelity voice processing and encryption. It boasts stability, great reliability, nice timbre and
long distance communication as well as fashionable design and smooth exterior lines. The DBH50M is a
cost-effective and multi-functional professional transceiver, made to meet your professional needs.
!
NOTE:
This product has an
IP67
waterproof rating. Protected against dust and the immersion of water
between 15cm and 1 metre.

!
!
SAFETY INFORMATION FOR USER
Crystal transceivers are designed with advanced technology. Please observe the following precautions to
prevent personal injury and ensure the safe usage of the transceiver.
1. Keep the transceiver and accessories away from children.
2. Please do not try to open or modify the transceiver without permission; non-professionals process may
also cause damage.
3. Please use assorted battery and charger to avoid damage.
4. Please use assorted antenna to ensure the communication distance.
5. Please do not expose the transceiver to long periods of direct sunlight, nor place it close to heat
appliances.
6. Please do not put the transceiver in excessively dusty or humid areas.
7. Do not use harsh chemicals, cleaning solvents to clean the transceiver.
8. Do not transmit without antenna.
9. When using this transceiver, we recommend transmitting for 1 minute then receiving for 4 minutes.
Continuous transmitting for long time or working in high power will heat the back of the transceiver.
10. Do not place the transceivers hot back close to any plastic surface.
11.If any abnormal odor or smoke is detected coming from the transceiver, turn off the power and take off
the battery pack and its case. Then contact your local Crystal dealer.
ATTENTION: All tips
above
apply to
accessories
supplied your Crystal
transceiver.
If any
device
does
not work normally,
please contact
your Crystal dealer.
If you use any
accessories
made by other companies Crystal does notguarantee the
safety
of
operability
the
transceiver.

CONTENTS
!
!
!!!!!UNPACKING
.......................................................................................................................
1
Supplied
Accessories..........................................................................................................................
1
STANDARD
ACCESSORIES/OPTIONAL ACCESSORIES...............................................
2
Standard Accessories
.........................................................................................................................
2
ASSIGNING & CHANGING FUNCTIONALITY KEYS
.........................................................
2
Software Download
............................................................................................................................
2
Optional Accessory
............................................................................................................................
2
BATTERY INFORMA
TION
..................................................................................................
3
Charging Operation
.............................................................................................................................
3
Charger Applied
..................................................................................................................................
3
NOTES................................................................................................................................................
3
How to Charge
....................................................................................................................................
4
Normal Charging Tips
.........................................................................................................................
6
How to Store the
Battery.....................................................................................................................
6
PREPARA
TION
...................................................................................................................
8
Installing / Removing the Battery
........................................................................................................
8
Installing / Removing the Antenna
......................................................................................................
8
Installing / Removing the Belt Clip
......................................................................................................
9
Installing the Additional Speaker/ Microphone/ Programming Cable (Optional
..................................
9

CONTENTS
!
!
!
Installing/ Removing the Hand Strap (Optional)
.................................................................................
10
GETTING
ACQUAINTED.....................................................................................................
11
LCD Display
........................................................................................................................................
11
Front Panel
.........................................................................................................................................
12
Side Panel
...........................................................................................................................................
13
BASIC OPERA
TIONS
.........................................................................................................
14
Switch on / off Transceiver
..................................................................................................................
14
Adjusting Volume
................................................................................................................................
14
Channels Selection
.............................................................................................................................
14
Receiving
............................................................................................................................................
15
Transmitting
........................................................................................................................................
15
ADVANCED OPERA
TIONS
................................................................................................
16
Call
......................................................................................................................................................
16
Alarm
...................................................................................................................................................
16
Monitor
................................................................................................................................................
16
Squelch off
..........................................................................................................................................
17
Scan
....................................................................................................................................................
17
Squelch Levels Setup
.........................................................................................................................
17
Frequency Reverse
.............................................................................................................................
18

CONTENTS
!
!
!
Talk Around
.........................................................................................................................................
19
Keypad Lock
.......................................................................................................................................
19
TX Power Switch
.................................................................................................................................
19
Instantaneously Squelch off
................................................................................................................
20
CTCSS/DCS
Encode/Decode.............................................................................................................
20
Transmit Pilot frequency
.....................................................................................................................
21
Scramble (Encryption)
........................................................................................................................
21
Voice Compander
..............................................................................................................................
21
Whisper
..............................................................................................................................................
21
Voice Prompt Setup
............................................................................................................................
22
VOX level setup
..................................................................................................................................
22
VOX Delay Setup
................................................................................................................................
23
Battery Capacity Enquiry
....................................................................................................................
23
DIirect CH1 / Direct CH2
.....................................................................................................................
23
FM Radio
............................................................................................................................................
24
Add/delete scan list
.............................................................................................................................
24
Offset Frequency
.................................................................................................................................
24
BACKGROUND
OPERATIONS..........................................................................................
25

CONTENTS
!
!
!
LCD Backlight mode setup
.................................................................................................................
25
Resume Factory Default
.....................................................................................................................
25
TROUBLE SHOOTING
GUIDE...........................................................................................
26
TECHNICAL ASSISTANCE
................................................................................................
29
DUPLEX OPERATION INFORMATION
.............................................................................
35
WARRANTY INFORMATION
.............................................................................................
38

Professional
FM Transceiver 1
!
!
UNPACKING
!
Carefullyunpack the transceiver. We recommend you to identifytheitemslistedin thefollowing
table before discarding the packing material. If any items are missing or have been damaged during
shipment, please contact dealers immediately.
!
Supplied Accessories
!
Item
Number
Quantity
!
Antenna
QA11U(411-481MHz)
!
1
Li-ion Battery Pack
QB-26L
1
Battery Charger
QBC-26L
1
AC adaptor
QPS-11
1
Car Charger
CPL11
1
Belt Clip
BC11!
1
Earphone
HS13
1
Instruction Manual
1
!
!

2
S
S
T
ANDARD
ACCESSORIES/OPTIONAL
ACCESSORIES
Antenna
QA11U (411-481MHz)
Li-ion Battery Pack
QB-26L(1500mAh)
Charger
QBC-26L
AC Adaptor
(12V/500mA) QPS-11
Belt Clip
BC11
Optional Accessory
USB Programm
To assign and change function keys other than default (see picture below), USB programming (DBH50USB) cable is required.
Additional free downloadable software is required to assign & change key functions. Downloadable software is available from this link.
http://tdj.com.au/firmware/Crystal/DBH50M/
Software is Windows compatible only.
ing
Cable (DBH50USB)
Car Charger
CPL11
Earphone
HS13
Factory default settings
ASSIGNING & CHANGING FUNCTIONALITY KEYS
Standard Accessories
FM Transceiver
!
!
!
!
!
!
!
!
!
!

Professional
FM Transceiver 3
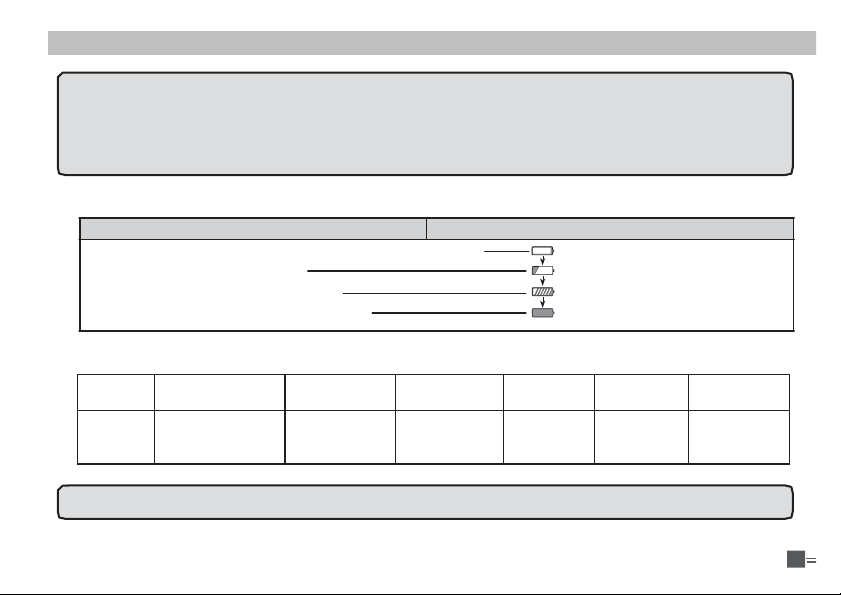
BATTERY INFORMATION
!
!
!
Charging Operation
The battery pack is not charged at the factory; please charge it before use.
Charging the battery pack for the first time after purchase or extended storage (more than 2
months) may not bring the battery pack to its normal operating capacity. After fully charging/
discharging cycle for two or three times, the operating capacity will reach its best performance. The
battery pack life is over when its operating time decreases even though it is fully and correctly
charged. Replace the battery pack.
!
Charger Applied
Please use the specific charger appointed by our company. Other models may cause explosion
and personal injury. After installing the battery pack, if the radio displays low battery with red flashing
lamp or voice prompt, please charge the battery.
!
NOTES
▼Do not short the battery terminals or throw the battery into fire. Never attempt to remove the
casingfrom the battery pack, we shownoresponsibility on anyresults causedbymodifying
freely without permission of our factory.
▼The ambient temperature should be between 5℃and 41℃while charging is in progress.
Charging outside this range may not fully charge the battery.
▼Always switch OFF the transceiver equipped with a battery pack before charging. Otherwise, it
will interfere with correct charging.
▼To avoid interfering the charging, please do not cut off the power or take out the battery during
charging.

Professional
4 FM Transceiver
!
!
▼Do not recharge the battery pack if it is already fully charged. This may shorten the life of the
battery pack or damage the battery pack.
▼Do not charge the battery or transceiver if it is damp. Dry it before charging to avoid danger.
!
WARNING:
Avoid metal objects making contact with the battery terminal,this may cause damage to the
batteryor user
!
How to Charge
1. Plug the AC adaptor into the AC outlet, and then
plug the cable of the AC adaptor into the DC jack
located on the back of the Charger. The Indicator
lights orange (1s) and then goes out----waits to
charge.
2. Plug the battery or transceiver into the charger.
Make sure that the battery terminals are in contact
with charging terminals well. The Indicator turns
into twinkling red-----Pre-charging begins.
3. After pre-charging for about 5 minutes, the indicator
will stop flashing----charging begins.
!
!
!
!
!
Ac Input
4. It takes approximately 4 hours to fully charge the battery. When the lamp lights green, the charging
is finished. Remove the battery or the transceiver equipped with battery from socket.
BA
TTERY
INFORMA
TION
Professional
FM Transceiver
5
!
!
!
N
O
T
E
:
when charging a
p
o
w
e
r
-
o
n
transceiver
equipped
with battery, the indicating lamp will not
turn into green to show the fully charged status. Only when the transceiver is
switched
off, can the
lamp indicate normally. The transceiver
consumes
energy when it is
p
o
w
e
r
-
o
n
,
and the charger can
not
detect
the voltage when the battery has been fully charged. So the charger will charge battery in
constant voltage
and fail to
indicate correctly whether the
battery has
been charged
fully.
!
5. Charging Process
Charging Status Indicator
Status
Standby (Self-examine lights orange 1second when power on) None
Pre-charging (Pre-charging stage) Red light twinkles for about 5 minutes
Charging (Charge in a constant current) Lights red for about 4 hours
Fully charged (Charge in a constant voltage) Lights green
!
6. LED Indicator:
!
STATUS
Self-Examine
When Power on
No Battery
Pre-charging
Charge
Normally
Fully
Charged
Trouble
!
LED
Orange
(for 1 second)
!
None
Red Light
flashes
for
5
Minutes
!
Red
!
Green
Red flashing
for a long time
!
NOTE: Trouble
means
battery
heating,
battery short-circuit or
charger
short-
circuit
.

Professional
6 FM Transceiver
!
!
!
Normal Charging Tips
1. Self- Examination: When charging, orange light flashes for 1 second and goes out, which means
the charger has passed its self-examination and it can charge the battery normally. If the light
remains orange or the red light flashes, it means the charger can not pass its self-examination or
charge the battery.
2. Trickle Pre-Charging: If red light flashes when battery is inserted into the charger, it means the
remnant voltage is low and the charger is trickle-charging the battery (Pre-Charging Status). The
chargerwillautomatically turn into normal chargingwhenthe battery reaches a certain electric
quantity, And if the red light stops flashing, it means the remnant voltage meets a certain electric
quantity, the charger will charge the battery normally.
!
NOTE:
Trickle charging
(
P
r
e
-
C
h
a
r
g
i
n
g
Status) time can not
beyond 30
minutes. If the indicating lamp still
flashes
after 30-minute trickle charging, it
means
that the charger cannot
charge
the battery. Please
check whether the
battery or
charger
is damaged.
!
!
How to Store the Battery
1. If the battery needs to be stored, keep it in status of 50% discharged.
2. It should be kept in a low temperature and dry environment.
3. Keep it away from hot places and direct sunlight.

BA
TTERY
INFORMA
TION
Professional
FM Transceiver
7
!
!
!
WARNING:
▼Do not short circuit battery terminals.
▼Never attempt to remove the casing from the battery pack.
▼Never assemble the battery in dangerous surroundings, sparks may cause explosion.
▼Do not put the battery in hot environment or throw it into fire, it may explode.
Professional
8 FM Transceiver
!
!
PREPARA
TION
!
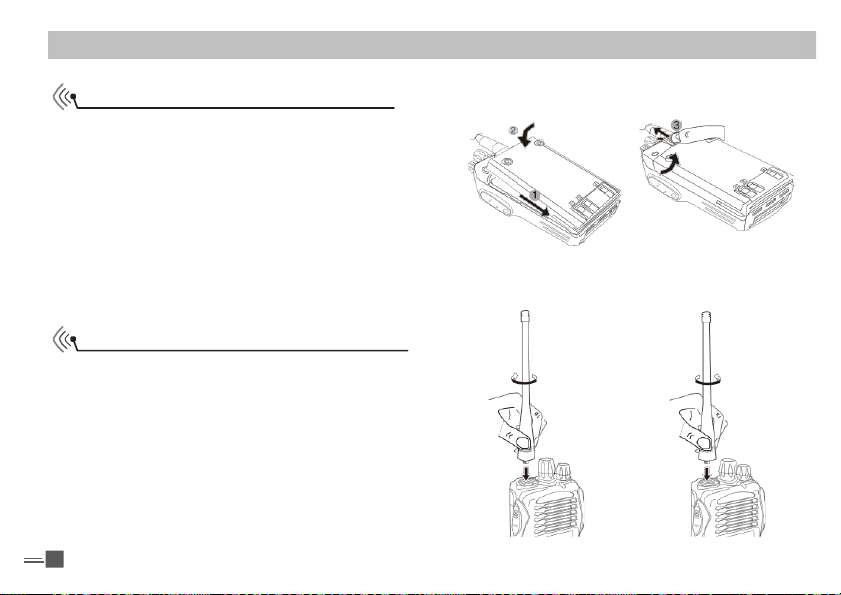
Installing / Removing the Battery
1. Match the three grooves of the battery pack with
the corresponding guides on the back of the
transceiver, and then push it.
2. Press the battery pack until the release latch on
the top of the transceiver locks. After hearing a
“click” sound, the battery has been locked.
3. To remove the battery pack, slide up the release
la
t
ch and remove
t
he pack away
f
rom
t
he
transceiver.
!
!
Installing / Removing the Antenna
!
■
Installing the Antenna:
Screw the antenna into the connector on the top
of the transceiver by holding the antenna at its base
and turning it clockwise until secure.
!
■
Removing the Antenna:
Turn the antenna anticlockwise to remove it.
Professional
FM Transceiver
9
PREPARA
TION
!
!
!
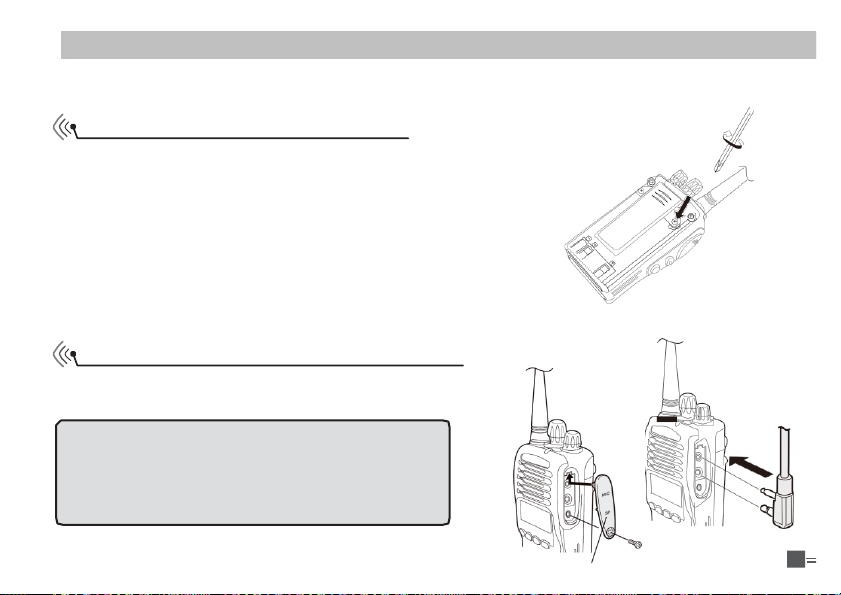
Installing / Removing the Belt Clip
■
Installing the Belt Clip:
Place the belt clip to the corresponding grooves
on theback of the transceiver, and then clockwise
screw it.
!
■
Removing the Belt Clip:
Anticlockwise turn the screws to remove the belt
clip.
!
Installing
the
Additional Speaker/Hand Microphone/ Programming Cable
(Optional)
!
Unveil the MIC-SP jack cover and then insert the
Speaker/Microphone/Programming Cable plug into MIC-SP jack.
!
N
OTE
:
1.To
keep transceiver waterproof, must cover the
MIC-SP
jack by standard jack cover.
2. The
transceiver
is not
completely waterproof
while
using the
Speaker/Microphone.

GETTING ACQUAINTED
Professional
10 FM Transceiver
!
!
PREPARA
TION
!
Installing/ Removing the Hand Strap (Optional)
Slide the loop of the hand strap through the eyelet on
the upper rear of the transceiver; then pull the entire
hand strap through the loop to secure the hand strap
in place and lastly tighten the hand strap.

Professional
FM Transceiver
11
!
!
GETTING
ACQUAINTED
!
LCD Display
!
On LCD display screen, you will see various icons which stand for the selected functions and
sometimes you may forget the meaning of them. Here you will find the following table extremely useful.
!
Frequency
Reverse
Offset Frequency
DCS
Talk Around
CTCSS
!
FUNC Icon
!
The arrow points to
current operational
channel
FM radio
!
TX Power
!
Priority Scan
VOX Function
Scan Skip
Narrow band
Scramble
(Encryption)
!
Battery Capacity
!
Function Menu Serial
No. / Main Channel
No. serial No.
FM Channel No.
Serial No.
!
Keypad Lock
!
Busy Channel
NOTE:
Battery
capacity
indicator(full) No
power,replace
battery pack or
charge
battery
Battery
capacity
remnant Real time
display receiving
signal
strength/Power
Indicator

Professional
12 FM Transceiver
!
!
GETTING
ACQUAINTED
!
Front Panel
!
!
!
Antenna Channel switch
Power/Volume
switch
!
LED indicator,
green light when
receiving , red light
when transmitting
!
Speaker
Microphone
!
LCD
!
!
!
Programming key

GETTING ACQUAINTED
Professional
FM Transceiver
13
!
!
!
Side Panel
!
!
!
!
!
!
!
!
!
PTT key
!
PF1key, programming key
PF2key, programming key
(programming all kinds of
functions)
!
!
!
!
!
!
!
!
!
!
Left Panel Right Panel
Speaker /
MicrophoneJacks
Reading/Writing
Programming Software
Jack
!
Belt Clip
!
Battery
Table of contents
Other Crystal Radio manuals


Popular Radio manuals by other brands

Silvercrest
Silvercrest SBDB 5 A1 Operating instructions and safety instructions

Silvercrest
Silvercrest SSRM 10 A1 manual

Silvercrest
Silvercrest KH 2411 operating instructions

PERFECTPRO
PERFECTPRO LUNCHBOX 2 Operating instruction

Groov-e
Groov-e Paris GV-DR03-BK user manual

Eton
Eton American Red Cross FR350 owner's manual

Silvercrest
Silvercrest SKR 800 B2 Operating instructions and safety instructions

E-Bench
E-Bench Bench KH 2245 Instructions for use

Silvercrest
Silvercrest KH 2299 operating manual

HobbyPCB
HobbyPCB RS-HFIQ Quick start instructions

Silvercrest
Silvercrest SDR 1 A1 Operation and safety notes

PERFECTPRO
PERFECTPRO DAB+BOX2 Operating instruction


