Cuche CU-2688 User manual
Instruction Manual CU-2688
Spray and Steam Iron
CU-2688 inst/2.qxd 13/7/05 12:32 PM Page 1
IMPORTANT SAFEGUARDS
• Please read all instructions before use.
• Use the iron only for its intended use.
• The iron should always be switched off before connecting or disconnecting from
the power supply. Never pull by the cord to disconnect the plug from the wall
socket..
• Do not operate the iron with a damaged cord or plug. Never use the iron if it is
damaged in any way. To avoid the risk of electric shock, do not disassemble the
iron. Take it to a qualified serviceman for examination and repair.
• If you are leaving the appliance momentarily always switch it off, remove the plug
from the wall socket and stand the iron on it’s base.
• Take care that children cannot touch the iron when the iron is hot and make sure
they cannot pull the mains cord.
• To protect against the risk of electric shock, do not immerse the iron, cord or plug
in water or other liquids.
• Burns can occur from touching hot metal parts, hot water or steam. Be careful
when you turn a steam iron upside down, there may be hot water in the tank.
• Do not allow the mains cord to touch hot surfaces. Let the iron cool down
completely before winding the mains cord around the iron for storage.
• Always disconnect the mains plug from wall socket before filling the iron with
water or pouring the remaining water out.
• Avoid the use of an extension cord. If absolutely necessary, use an extension cord
as short as practical.
• This iron is for household use only.
• This iron is not intended for use by children or infirm persons without supervision.
• Do not allow children to play with the iron.
1
1
2
3
4
5
611
7
8
9
10
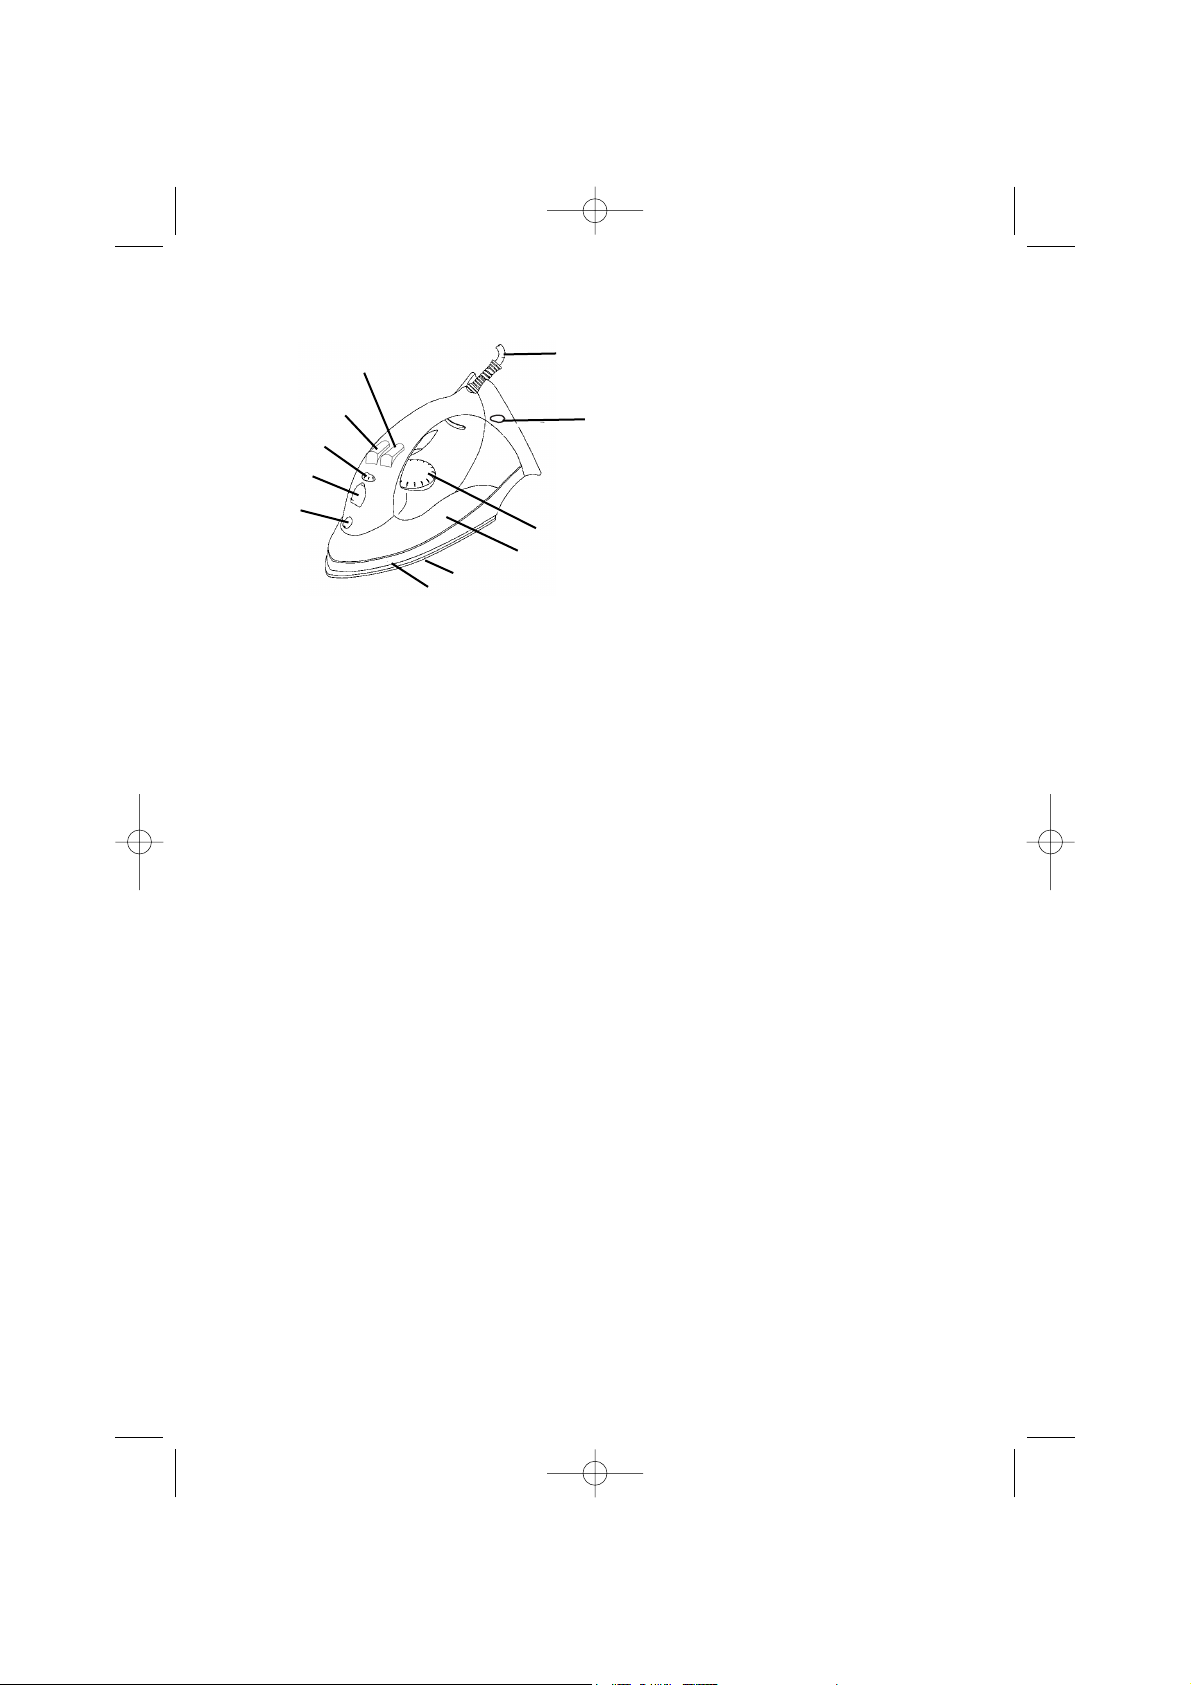
1. Temperature Control Dial
2. Spray Nozzle
3. Lid
4. Steam Dial
5. Spray Button
6. Steam Button
7. Indication Light
8. Water Tank
9. Soleplate
10. Skirt
11. Power Cord
IDENTIFICATION
CU-2688 inst/2.qxd 13/7/05 12:32 PM Page 2

SAVE THESE INSTRUCTIONS
NOTES:
• When using the iron for the first time, test on an old piece of fabric to ensure
that the soleplate and water tank are completely clean.
• The iron may smoke slightly when switched on for the first time. This is normal
and will soon cease.
• Thank you for purchasing this user-friendly full function iron. Please read
these instructions carefully before use.
IRONING
IMPORTANT: Have you read the section “Important Safeguards”?
CHOICE OF WATER
• The iron can be used with normal tap water.
• If the water in your area is particularly hard, it is advisable to use distilled or
demineralized water to prevent the scale forming within the iron. Do not use
chemically descaled water.
FILLING WITH WATER
• Ensure that the iron is disconnected from the power supply before filling.
• Turn the steam dial(4)(Fig.2) to “MIN” position.
• Open the lid(3). Fill water through the water filling aperture(Fig.3).
• Cover the lid.
NOTE:
• Do not fill higher than the “MAX” indicator of the water tank. In order to avoid
water spilling out.
• Fill with clean water only. If you have to refill while ironing, remove the mains
plug from the wall socket before filling.
• Pour out any remaining water after use.
Fig.2 Fig.3
4
IRONING TEMPERATURE
• Always check first to see whether a label with ironing instructions is attached
to the article to be ironed. Follow these instructions in all cases.
• If ironing instructions are missing but you do know the kind of fabric, the
following table may help.
2
CU-2688 inst/2.qxd 13/7/05 12:32 PM Page 3
IRONING TEMPERATURE (cont)
• Sort the laundry out first: Wool with wool, cotton with cotton, etc. Start ironing
the fabrics requiring the lowest temperature and progress to the higher ones
because the iron heats up quicker than it cools down.
• If the fabric consists of various kinds of fibres (e.g. cotton with polyester) you
must always select the lowest ironing temperature of those fibres.
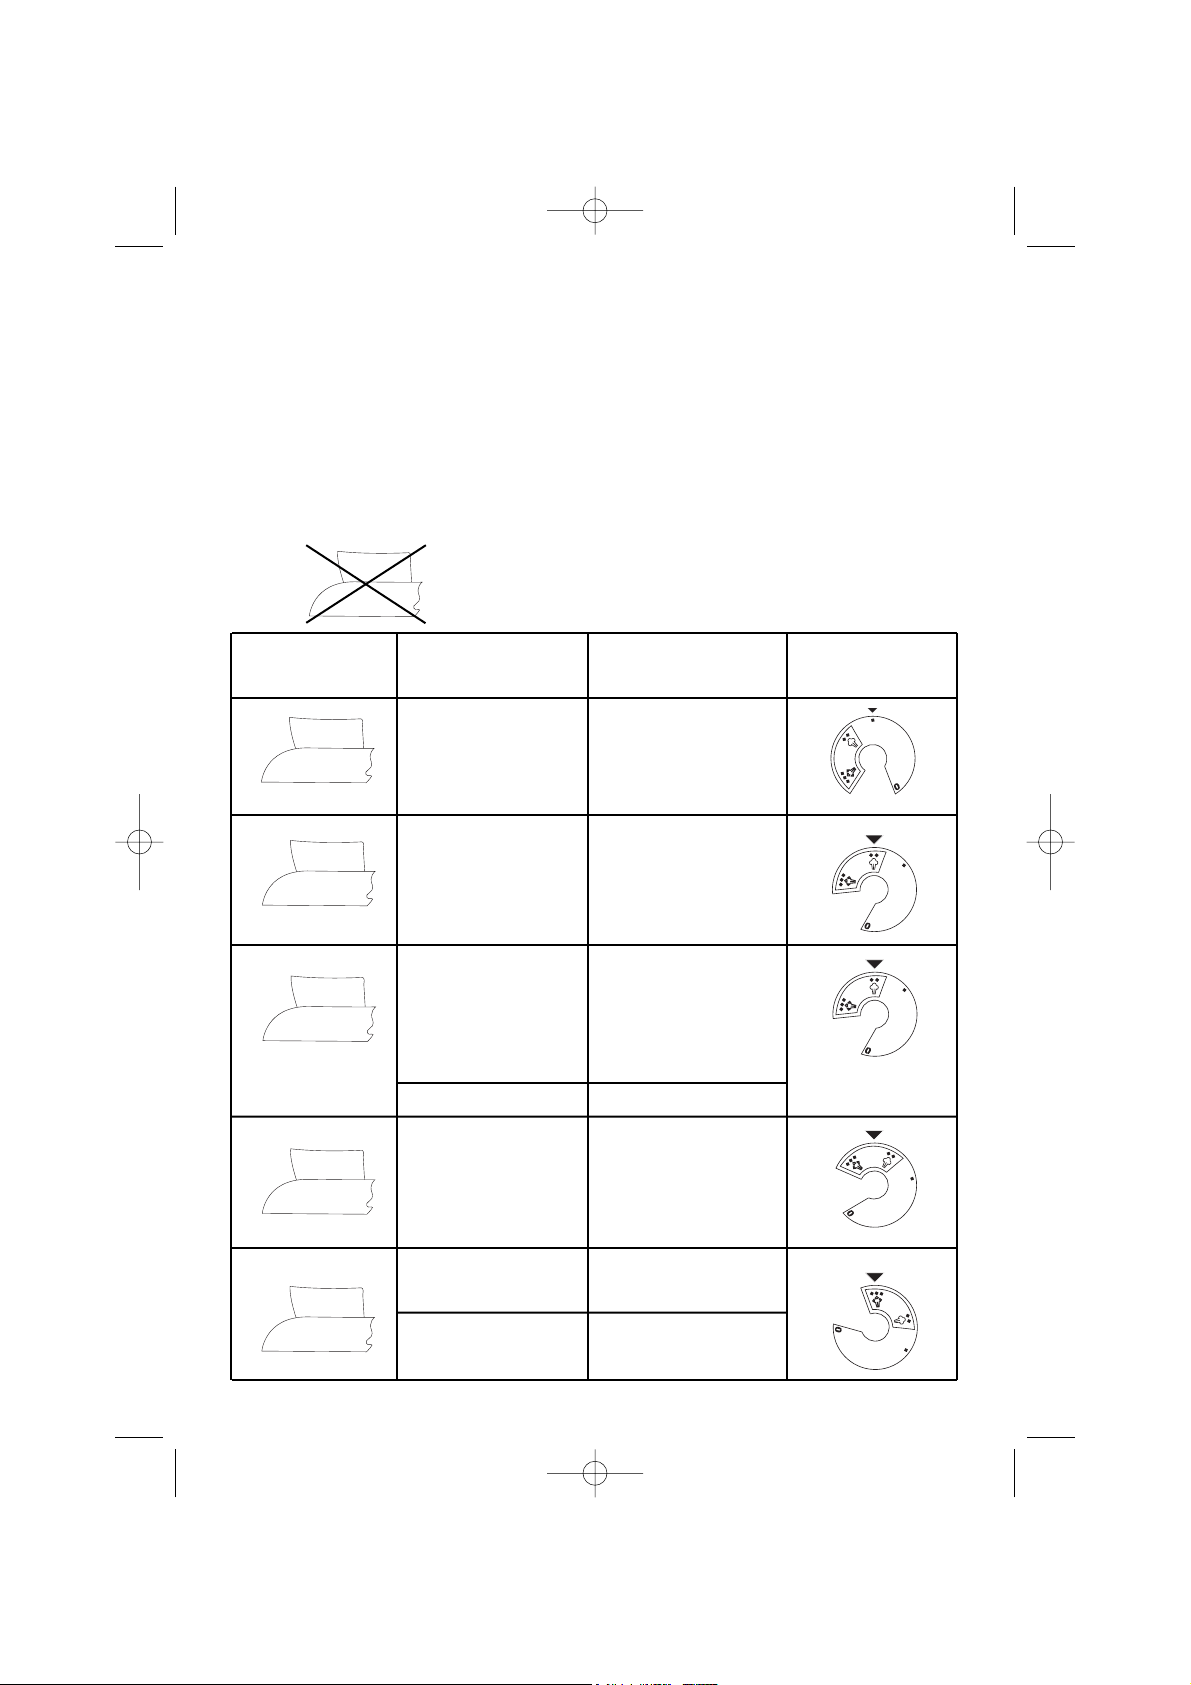
SETTING THE TEMPERATURE
Kind Of Textile
Synthetic
Synthetic
Synthetic
Silk
Wool
Cotton
Linen
Fibre Material
Acrylic
modacryl
Polypropylene
Polyurethane
Acetate
Triacetate
Metalized Cupro
Polyamide (nylon)
Polyester
Modal
Viscose (Rayon)
Silk
Wool
Cotton
Linen
Label
Temperature
Knob Position
•
•
•
•
•
•
•
•
•
•
NOTE: on garment label means: This article cannot be
ironed! (e.g. Chlorofibre, elastodiene).
3
CU-2688 inst/2.qxd 13/7/05 12:32 PM Page 4

SETTING THE TEMPERATURE (cont)
• Insert the plug in the wall socket and stand the iron upright.
• Set the temperature control dial(1) to the correct temperature as indicated in
the ironing instructions or in the label.
• Wait a little while for the soleplate temerature to stabalize.
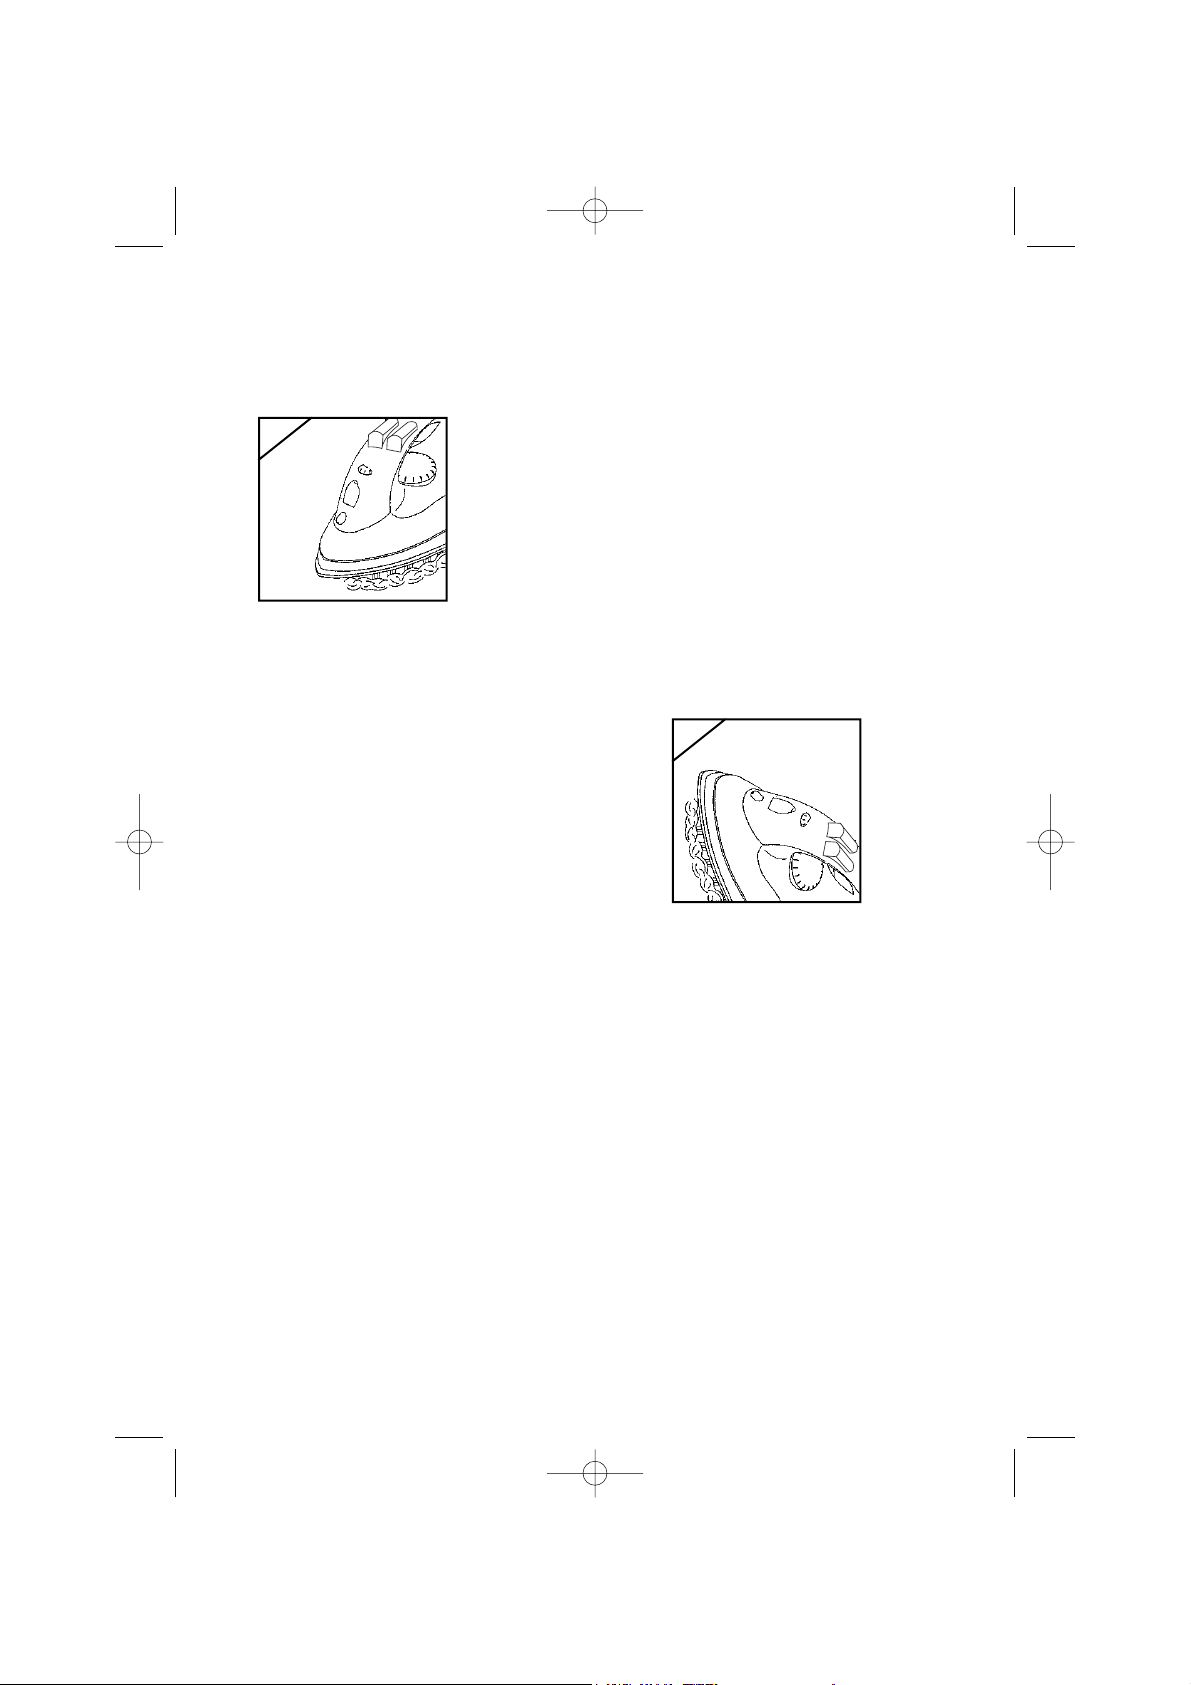
SPRAYING
• At any temperature by pressing the spray button(5) a couple of times, the
laundry can be damped down(Fig.4.).
• Ensure that there is enough water in the water tank.
Fig.4
STEAM IRONING
• As indicated on the temperature control dial and the temperature table, steam
ironing is only possible at higher ironing temperature.• • or • • • for moderate
steam. • • • or “MAX” for maximum steam.
• Ensure that there is enough water in the water tank.
• Stand the iron upright
• Insert the plug into the wall socket.
• Set the temperature control dial(1) at the required position within the higher
ironing temperature range (• • or • • • or “MAX”).
• Wait a little while for the soleplate temerature
to stabalize.
• Set the steam control dial(4) to the required
position(Fig.5.) then the steam will emerge from
the vents in the soleplate
NOTE:
• Water may leak from the soleplate if the temperature selected is too low.
This will then cause stains. If it happens, set the temperatures slide control to
the advised position. Steaming will re-commence as soon as the appropriate
temperature has been reached.
Fig.5
4
CU-2688 inst/2.qxd 13/7/05 12:32 PM Page 5
SHOT OF STEAM
• Set the temperature control dial(1) to the “MAX” position.
• By pressing steam button(6) an intense shot of steam is emitted from the
soleplate(Fig.6.).
Fig.6
This can be very useful e.g. when removing stubborn creases. The shot of
steam facility can be used only while ironing with high ironing temperature
(positions • • or • • • or “MAX”)
VERTICAL STEAM
• Set the temperature control dial(1) to the
“MAX” position.
• Stand the iron on its rear side.
• Wait a little while for the soleplate temerature
to stabalize.
• Hold the iron vertically and press the steam
button(6), an intense vertical steam will be
emitted from the soleplate(9)(Fig.7.).
Fig.7
This can be very useful e.g. when removing stubborn creases. The shot of
steam facility can be used only while ironing with high ironing temperature
(positions • • or • • • or “MAX”)
DRY IRONING
• Insert the mains plug into the wall socket.
• Ensure that the steam dial(4) is in position “MIN”.
• Select the setting on the temperature control dial(1) best suited for the fabric
to be ironed.
• Wait a little while for the soleplate temerature to stabalize.
SAFETY PROTECTIVE CUT OUT
In the unlikely event of the thermostat failing, the protection cut-out will operate
to prevent the iron overheating. The iron should then be taken to an authorised
repairer.
5
CU-2688 inst/2.qxd 13/7/05 12:32 PM Page 6
CARE AND CLEANING
After Each Use
• Turn the steam and temperature control dial(1) to the “MIN” position.
• Turn the power off and remove the plug from the power outlet.
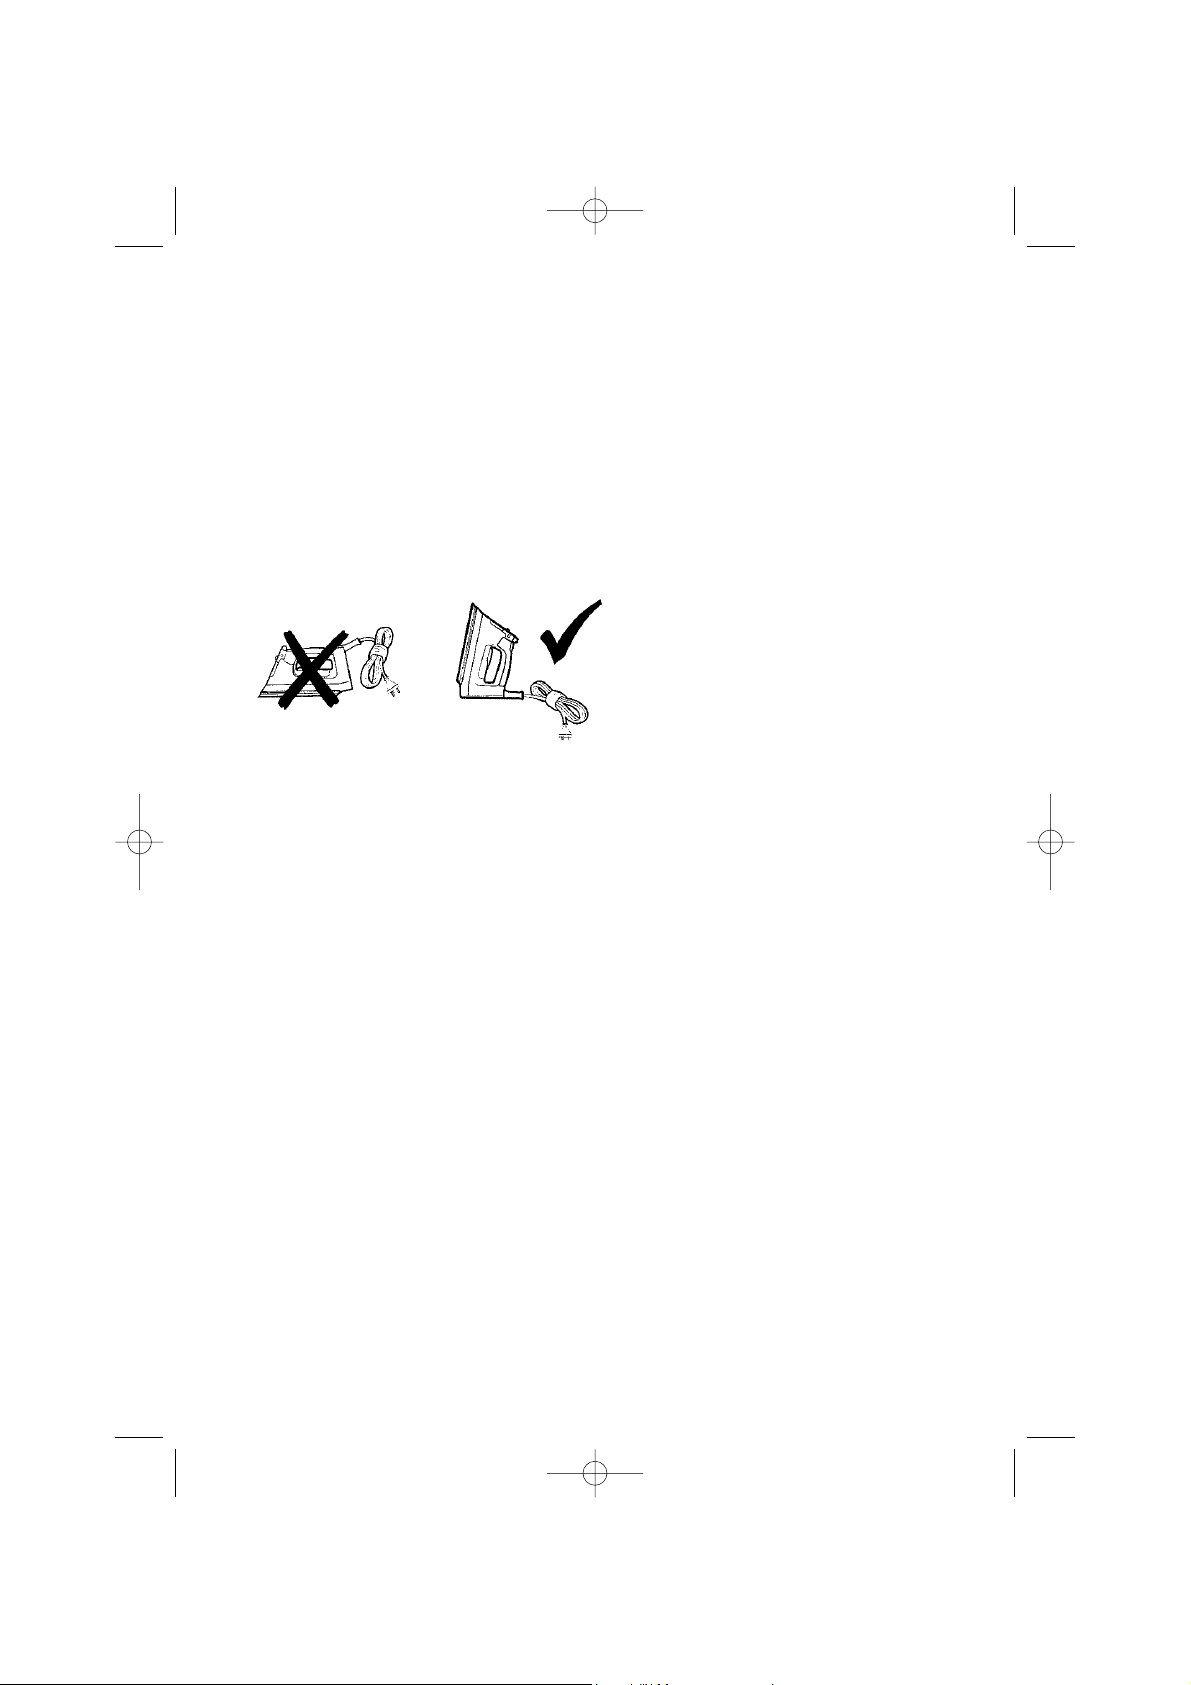
Storage
•Always store the iron on its heal rest.NEVER STORE THE SOLEPLATE
FACING DOWN OR IN THE CARTON. Even the smallest amount of moisture
will cause corrosion and staining of the soleplate if the iron is stored face
down
NOTE: The iron may be stored with water in the tank but ensure that the iron
is stored on the heel rest and on “MIN STEAM” setting.
Care of the Soleplate
•The coating reduces sticking of fabrics and starches to the soleplate. Do not
iron over sharp objects such as buttons, studs and zippers.
To Clean the Soleplate
•Wipe the soleplate with a damp soft cloth after each use. If polyester has
burnt to the soleplate, wipe the hot iron with a damp cotton cloth.
•DO NOT USE scouring pads, abrasives or harsh cleaners to clean your sole
plate, as these will scratch and damage the surface.
•When ironing with ironing aids such as starch, a build up of lint and starch
can occur inside the steam channels of the soleplate. It does not come from
inside the iron and will not affect the ironing performance.
To Clean the Steam channels
•Simply wipe with a damp cloth or cotton bud.
To Clean the exterior of your iron
•Wipe over with a damp soft cloth and wipe dry.
CAUTION:
Never use harsh abrasives, chemical cleaners or solvents to clean the exterior of
your iron as these will damage the surface.
6
CU-2688 inst/2.qxd 13/7/05 12:32 PM Page 7

IMPORTANT:
RETAIN THIS INSTRUCTION AND WARRANTY FOR FUTURE REFERENCE.
GUARANTEE
Cuche guarantees this product against defects of material and workmanship for
a period of 12 months from the date of purchase provided that the product is
used in accordance with Cuche recommendations and within such voltage and
current limits as are specified by the manufacturer in relation to the product.
Cuche will at its own option make good, replace with the same or similar prod-
uct, or provide credit for any product manufactured or supplied by it, which
proves to be defective within the limits set out above provided always that no
repairs, alterations or modifications to the product have been undertaken or
attempted, other than by the company or its authorised agents. Should the pur-
chaser wish to make a claim under the guarantee, the product should be
returned pre-paid to the place of purchase. To obtain the warranty the purchase
receipt must be returned with the product. This guarantee is in addition to and
does not take away from the rights available to the consumer under the Trade
Practices Act and the State consumer protection legislation.
• 12 month guarantee applies for non commercial use only.
• Warranty excludes damage or malfunction due to
commercial application or use; wilful abuse or misuse.
• PROOF OF PURCHASE. Please retain your receipt for all
service or warranty claims.
For all Sales Enquiries
Phone: (03) 9727 8860
Fax: 1300 360 650
Cuche´
Maroondah Hwy, Mooroolbark Vic. 3138
CPIN419/2
7
CU-2688 inst/2.qxd 13/7/05 12:32 PM Page 8
Table of contents


