Curtis TXSG0101S600 User manual

1
Models
TXSG0101S600
TXSG1501S600
TXSG0101S200
TXSG1501S200
SERVICING THE THERMOPRO SERVER
1. Completely drain the unit of any coffee.
2. Allow server to cool.
3. Unscrew and remove the lid and tube assembly.
REPLACING THE GAUGE GLASS
The gauge glass can be removed for maintenance and cleaning. Refer to the illustration on page three [3] for assembly sequence.
1. Unscrew the vented cap plug from the top of the gauge glass shield.
2. Carefully lift out the gauge glass tube from the shield and scrub inside the glass with a tube cleaning brush and mild detergent
solution. Inspect the glass tube for cracks or chips. If broken, carefully remove all traces of glass and insert a new glass tube.
3. Check the top and bottom washers. Clean the washers. Make sure they are not leaking. Replace if necessary.
4. With the sight glass seated in the gauge glass shield, thread the cap plug onto the top of the shield. Do not overtighten.
REMOVING THE BASE & BOTTOM COVER
To replace the silicone elbow tting for repair or cleaning:
1. Remove the base assembly. Press down on the slide tab in back of the stand and lift off the server.
2. Turn the server upside down and take off the plastic bottom cover, revealing the silicone elbow tting.
3. Remove the wire hose clamps by squeezing the wire ears together. While holding the clamp open,
loosen the soft silicone elbow from the liner drain pipe and the faucet shank and pull out elbow.
4. Check for leaks and replace with a new elbow if necessary.
5. Reverse these steps to assemble.
REMOVING THE FAUCET
The faucet will require periodic cleaning and maintenance.
1. Remove the faucet from the body of the server. Unscrew the large nut holding the faucet to the shank
to take off the faucet.
2. Disassemble the faucet. Unscrew the bonnet from the body of the faucet.
3. Remove the faucet handle by pressing inward on the seat cup (see photo at right) then unhooking the
handle from the center shaft.
4. The seat cup, center shaft and spring will now separate from the bonnet. Clean these parts with a mild
detergent solution.
5. While you have these parts disassembled for cleaning, check the condition of the seat cup. Make sure
the faucet spring is free of corrosion. Replace these parts with repair kit if necessary (item 19, page 3).
ASSEMBLY
Assemble the unit by reversing the steps for disassembly. Finger tighten wing nut onto faucet. Make sure
clamps are fastened properly and silicone ttings are in good condition. Once assembled, check for leaks around the tting and
faucet.
Wilbur Curtis Co., inC.
Service Manual – TXSG Server
BREWING INTO THE TXSG SERVER
1. Make sure the control panel screen reads READY TO BREW.
2. Place a clean and empty server centered under the brew cone of your coffee brewer.
3. Remove the top cap from the lid.
4. Fill brew cone with the correct measure of ground coffee.
5. Select the BREW button that matches the brew volume. Press the BREW button to start the
brew.
6. Allow coffee in the brew cone to completely drip out before removing the coffee server.
WARNING – Thermopro servers may be heavy when lled.
Care must be taken when transporting to avoid dropping or spilling.

2
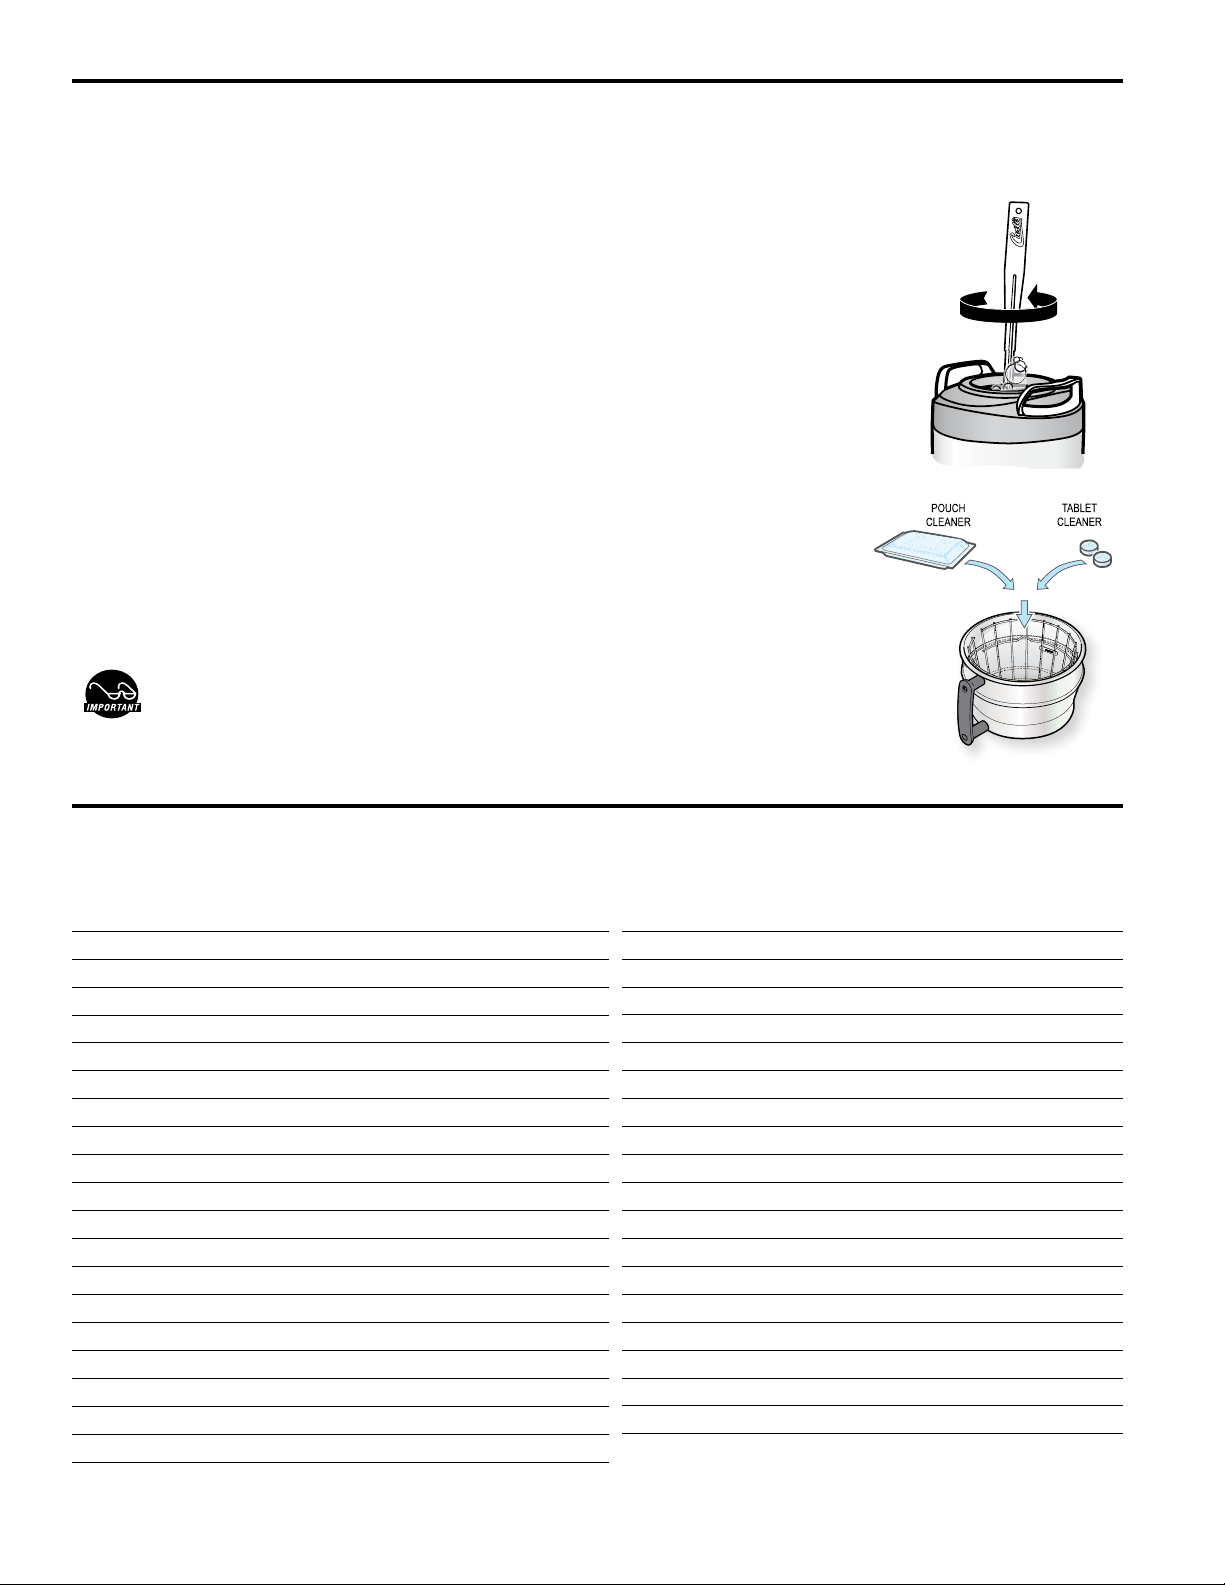
Cleaning Instructions
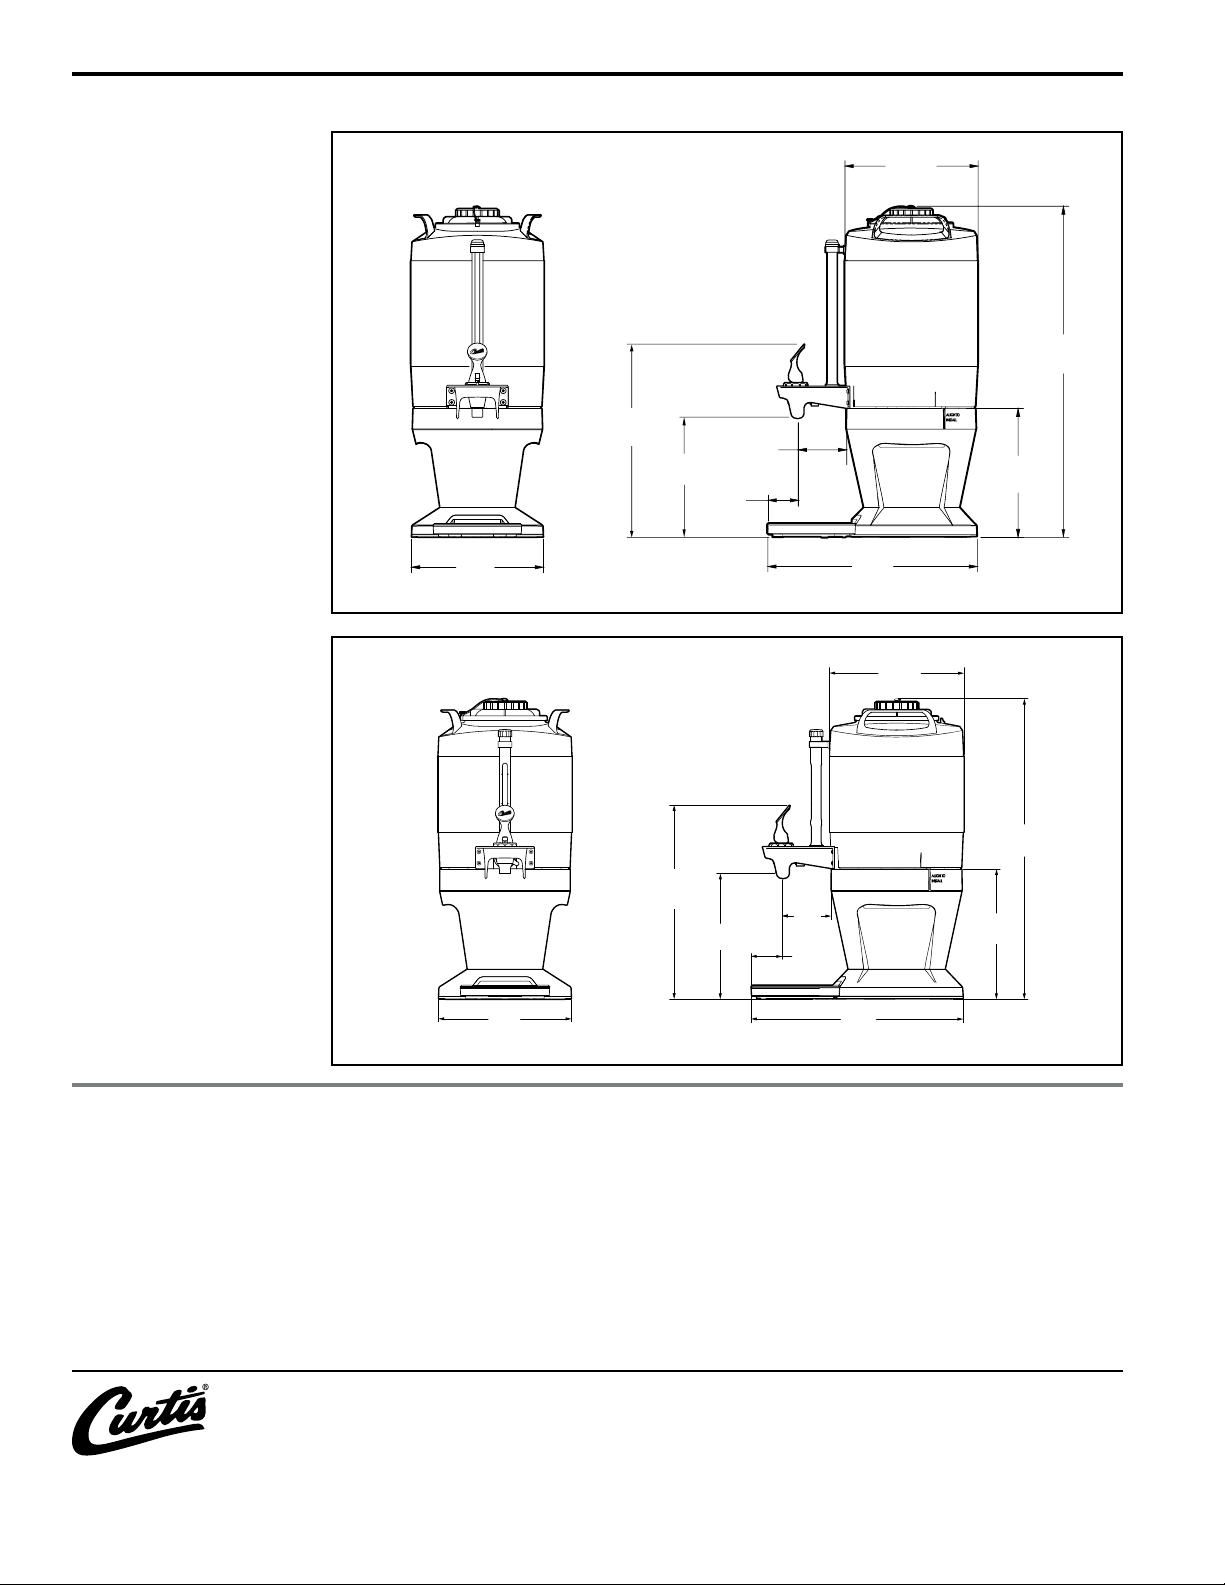
All parts are common between the 1 gallon and 1½ gallon servers, except where indicated by TXSG15 and TXSG01.
1. In a container, mix a mild detergent and warm water solution for cleaning the coffee server.
2. Discard old coffee from the coffee server.
3. Remove and clean the lid.
4. Clean inside the coffee server with a sponge brush soaked in detergent solution.
5. An easy way to remove mineral deposits from the brew cone and the coffee server is to
use a pouch or tablet cleaner.
a. Place two tablets or one pouch (refer to manufacturers’ recommendation) into the
brew cone.
b. Place the empty coffee server onto the brew deck.
c. Start a coffee brew cycle by pressing the Brew button on the electronic controller.
d. When the brew cycle has nished, allow the cleaning solution to sit in the coffee
server for a few minutes, then empty the coffee server.
6. Wipe the exterior surfaces with a sponge moistened with the detergent solution. Wipe
off coffee spots or stains.
7. Rinse the brew cone and coffee server with running water.
8. Dry the parts and return them to the coffee brewer.
TXSG Coffee Server Precautions:
Do not immerse coffee server in water.
Do not place in dishwasher.
Do not use harsh powders or cleansers containing chlorine.
Do not use a wire brush or pot scour to clean inside liner.
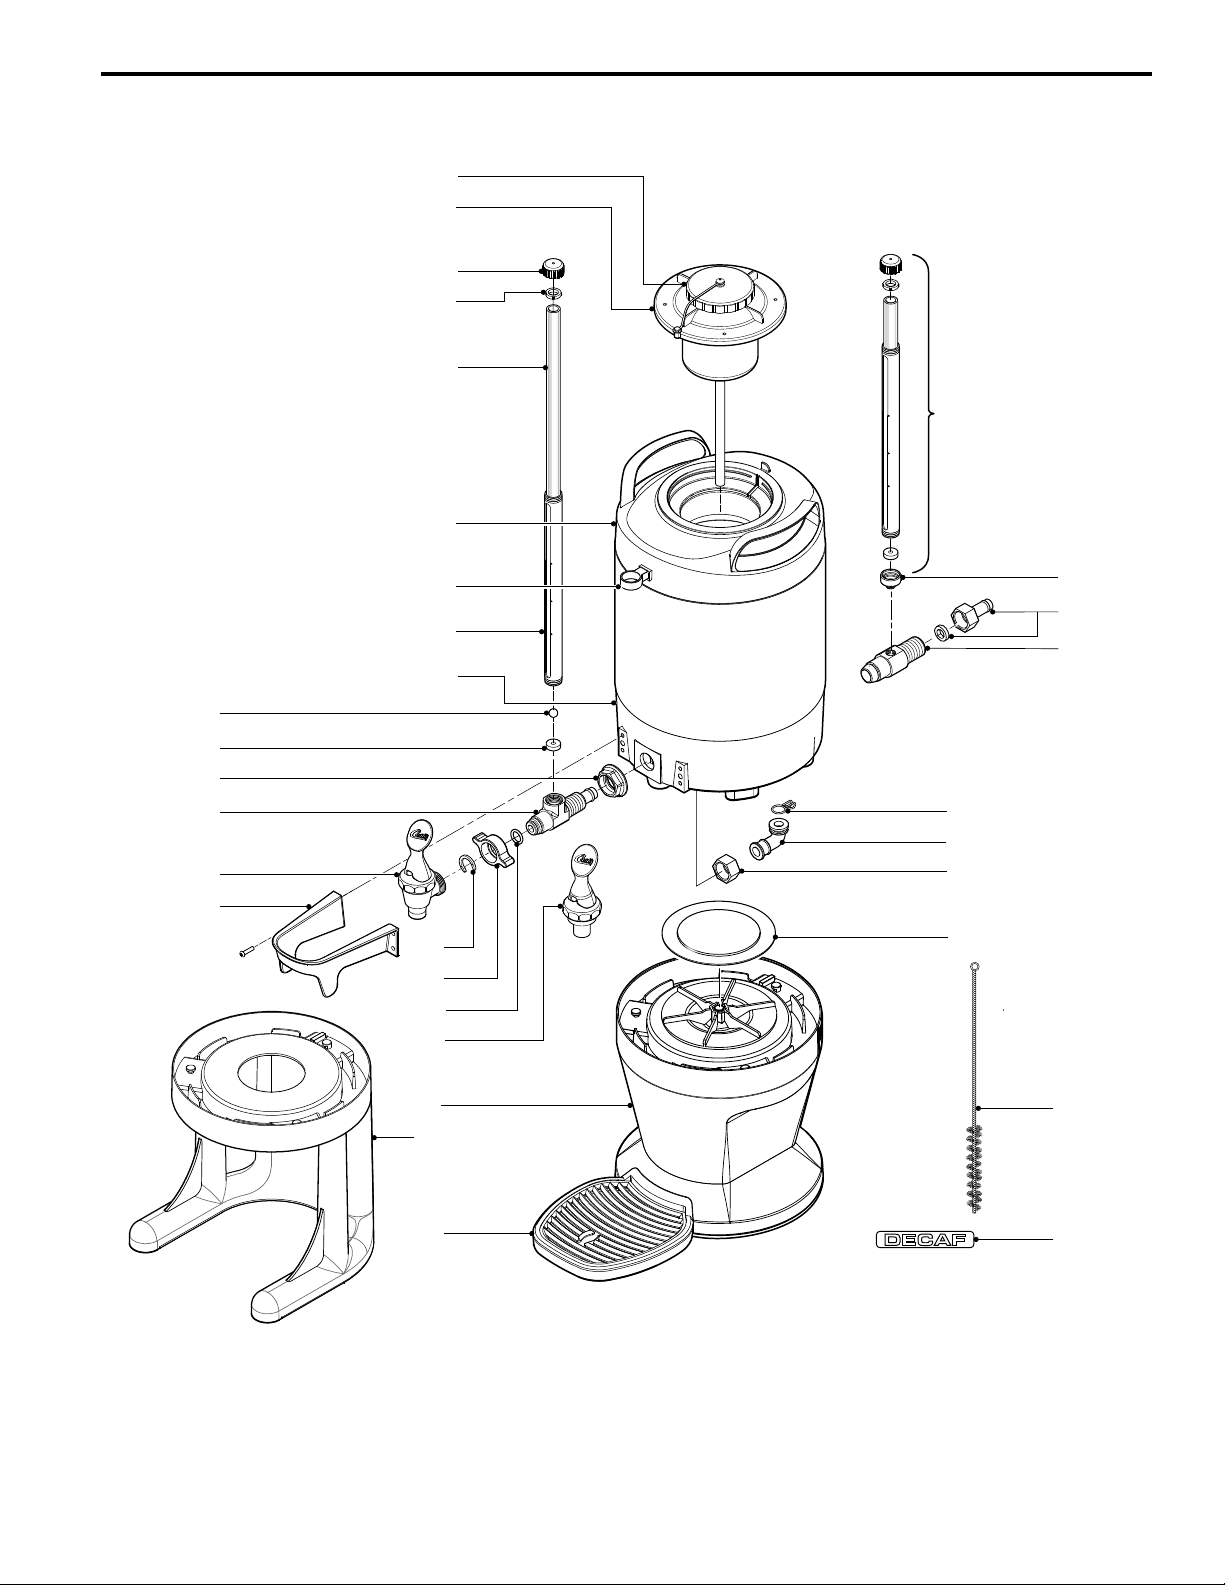
Illustrated Parts List
1
2
2A
3
4
5
5A
5B
6
7
8
8A
9
10
11
12
13
13A
14
WC-37387
WC-56025
WC-56024
WC-1949
WC-2005
WC-2027
WC-2025
WC-37396
WC-56028
WC-2063K
WC-2012-101
WC-2010-101
WC-56030
WC-32004
WC-2006
WC-1951
WC-1938-103K
WC-1938
WC-1841
KIT, CAP, TETHER & SCREW TXSG
LID ASSY, TXSG15
LID ASSY, TXSG01
CAP, SHIELD WITH VENT, PLASTIC
WASHER, SHIELD CAP 1/8”
GLASS, GAUGE 10” TXSG15
GLASS, GAUGE 8” TXSG01
KIT, GLASS GAUGE 10” 3PK TXSG15
TOP SERVER THREADED BLK
KIT, BRACKET, GAUGE GLASS RING
SHIELD, GAUGE GLASS 10” TXSG15
SHIELD, GAUGE GLASS 8” TXSG01
BOTTOM, PLASTIC BLACK SERVER
BALL, PLASTIC RESTRICTOR TXS
WASHER, .188 ID X .188 THK BTM
NUT, FLANGED, PLASTIC
KIT, SHNK, NUT & INST. TXSG 1GAL. & 1.5GAL
SHANK, PLASTIC (OLD UNITS)
FAUCET, ESP BLACK LOCKING
15
16
17
18
19
20
20A
21
22
23
24
25
26
27
28
28A
29
30
WC-64079
WC-1906
WC-1905
WC-4320
WC-3705
WC-56020
WC-56013
WC-61689
WC-43091
WC-2456
WC-4281
WC-58262
WC-37395
WC-2004-101
WC-29082
WC-29082K
WC-36076
WC-38281
GUARD, FAUCET TXSG ZINC
C’ RING .917 x .760 x .090
NUT, WING PLASTIC 1-1/32-14UNF
O-RING, ½” I.D.
KIT, FAUCET REPAIR
BASE ASSY SERVER STRAIGHT SIDE
BASE ASSY, SERVER (OPTIONAL)
DRIP, TRAY ASSEMBLY TLXS
CLAMP, WIRE HOSE
ELBOW, SILICONE STRT SIDE SRV
NUT, ½ – NPSM PLASTIC
COVER, BOTTOM WHITE PLASTIC
KIT, GAUGE ASSY 10” BLK TXSG15
SHIELD BASE GAGE BLACK (OLD UNITS)
FITTING, ½”-14 NPSF ASSY(OLD UNITS)
KIT, FIT., W/ SILICONE WASH (OLD UNITS)
BRUSH, GAUGE GLASS
LABEL, DECAF
INDEX № PART № DESCRIPTION

3
10
11
12
13
14
15
3
4
5
5A
5B
16
17
18
19
20
20A
21
22
23
24
25
26
27
28
13A
1
2
2A
6
7
8
9
29
30
Illustrated Parts

ECN 16647 . 8/26/15 @ 12.0 . rev M
ECN 13309 . 7/12/11 @ 9.7 . revJ
ECN 12581.9/7/10@13.3.revH
ECN 12489 . 7/23/10 @ 9.5 . rev F
ECN 12161 . 2/18/10 @ 12.9 . rev E
ECN 10341 . 3/18/9 @ 15.3 . rev D
ecn 10071 . 11/3/8 @ 15.6 . revC
ECN 9932 . 8/25/8 @ 15.0 . revB
ecn 9812 . 7/18/8 . 13.8 . revA
EDR 5296 . 12/9/7 @ 13.5
Printed in U.S.A. 8/2015 F-3595 Rev M
WILBUR CURTIS CO., INC.
6913 Acco St., Montebello, CA 90640-5403 USA | Phone: 800-421-6150 | Fax: 323-837-2410
Product Warranty Information
Wilbur Curtis Co., Inc. certies that its products are free from defects in material and workmanship under normal use. The following
limited warranties and conditions apply:
1 year from the original date of purchase.
RETURN MERCHANDISE AUTHORIZATION: All claims under this warranty must be submitted to the Wilbur Curtis Co., Inc. Techni-
cal Support Department prior to performing any repair work or return of this equipment to the factory. All returned equipment must
be repackaged properly in the original carton. No units will be accepted if they are damaged in transit due to improper packaging.
NO UNITS OR PARTS WILL BE ACCEPTED WITHOUT A RETURN MERCHANDISE AUTHORIZATION (RMA). RMA NUMBER
MUST BE MARKED ON THE CARTON OR SHIPPING LABEL. All in-warranty service calls must be performed by an authorized
service agent. Call the Wilbur Curtis Co., Inc. Technical Support Department to nd an agent near you.
Rough-In Drawings
TXSG15
TXSG01
Ø 9.13”
(23.2 cm)
23.00”
(58.4 cm)
8.88”
(22.6 cm)
14.38”
(36.5 cm)
2.13”
(5.4 cm)
3.38”
(8.6 cm)
8.63”
(21.9 cm)
13.25”
(33.7 cm)
9.00”
(22.9 cm)
Ø 9.13”
(23.2 cm)
20.50”
(52.1 cm)
8.88”
(22.6 cm)
14.38”
(36.5 cm)
3.38”
(8.6 cm)
2.13”
(5.4 cm)
8.63”
(21.9 cm)
9.00”
(22.9 cm)
13.25”
(33.7 cm)
This manual suits for next models
3
Table of contents
Other Curtis Beverage Dispenser manuals

Curtis
Curtis CFB1 User manual

Curtis
Curtis Chill-X CFBX2 User manual

Curtis
Curtis TCC2S User manual

Curtis
Curtis TCC2N User manual

Curtis
Curtis C-5HS User manual

Curtis
Curtis TCO-419 User manual

Curtis
Curtis CFB2 User manual

Curtis
Curtis PCGT4 User manual

Curtis
Curtis FRP500 Operation manual

Curtis
Curtis Chill-X User manual