Curtis FRIGIDAIRE EFMIS2438 User manual

CANADA
EFMIS2438
lntrodution ..............................................................................................................................2
lmportant Safety Information ..........................................................................................3-4
Installation Instructions ...........................................................................................5
Grounding Instructions .............................................................................................6
Features ...............................................................................................................................7-8
Operation ...................................................................................................................9
Display ......................................................................................................................10
Troubleshootiong .....................................................................................................11
Limited Warranty ..................................................................................................................12
BEVERAGE COOLER
CURVED DOOR

Handle is secure and tight
Door seal completely to cabinet on all
sides
Keep the front and back level for cooler
Cabinet is setting solid on all corners
House power turned on
Beverage cooler plugged in
Shipping material removed
Temperature setting

PLEASE FOLLOW THE PRECAUTIONS BELOW
FOR YOUR NEW COOLER
1. This refrigerator must be properly installed and located in accordance with the
Installation Instructions before it is used.
2. Do not allow children to climb, stand or hang on the shelves in the refrigerator.
They could damage the refrigerator and seriously injure themselves.
3. Do not store or use gasoline or other flameble vapors and liquids in the vicinity
of this or any other appliance.
4. Keep finger out of the clearances between the doors and cabinet. Be careful
closing doors when children are in the area.
5. Unplug the refrigerator before cleaning and making repairs.
6. We strongly recommend that any servicing be performed by a qualified
individual.
8. Do not leave refrigerator in extreme cold or warm temperatures.
9. Do not place refrigerator near heat sources or open flames.
10. Clean the refrigerator with a soft, damp cloth. Remove stains with a mild soap.
Do not clean the unit with industrial grade solvents, or abrasive chemicals.
11. Do not place heavy items on top of the refrigerator.
12. Never install the refrigerator where there is a lot of moisture and water can splash.
13. Do not allow children to hang on the doors; the cooler may be tipped over and
hurt children.
14. Never eat spoiled food stored too long in the refrigerator or in an out-of-order
refrigerator.
15. Do not use sharp tools inside the refrigerator for example to remove ice as damage
may occur.
16. Unplug and remove food from the refrigerator if not used for a long period of
time.
PROPER DISPOSAL
An empty refrigerator is an extremely dangerous attraction to children. If you are
getting rid of your old refrigerator, please follow the instructions in the Child
Entrapment Warning.
Risk of child entrapment. Before you throw away your old refrigerator or freezer:
1. Take off the doors.
2. Leave the shelves in place so that children may not easily climb inside.
CHILD ENTRAPMENT WARNING
CAUTION: USE OF AN EXTENSION CORD IS NOT RECOMMENDED
FOR HOUSEHOLD USE ONLY SAVE THESE INSTRUCTIONS
IMPORTANT SAFETY INFORMATION
7. Turning the temperature control dial to the 18 degree stops cooling but does not
shut off power to the refrigerator.

Replace the fuse with the same type.
-Save these instructions-
IMPORTANT SAFETY INSTRUCTIONS
(l) WARNING:To reduce the risk of electrical shock, or injury when using your
appliance, follow these basic precautions:
(2) Read all instructions before using the Wine Chiller.
(3) DANGER or WARNING: Risk of child entrapment.
(4) Child entrapment and suffocation are not problems of the past.
(5) Junked or abandoned appliances are still dangerous ... even if they will just sit in
the garage a few days.
(6) Before you throw away your old Wine Chiller: Take off the door.
(7) Leave the shelves in place so that children may not easily climb inside.
(8) Never allow children to operate, play with, or crawl inside the appliance.
(9) Never clean appliance parts with ammable uids. The fumes can create hazard or
explosion.
(10) Do not store or use gasoline or any other ammable vapors and liquids in the
vicinity of this or any other appliance. The fumes can create are hazard or
explosion.
(11) Do not repair or replace any part of the Wine Chiller or attempt any servicing
unless or attempt any servicing unless specically recommended in the
user-maintenance instructions or in published user-repair instructions.

Before Using Your Product
Remove the exterior and interior packing.
Check to be sure you have all of the following parts:
Model EFMIS2438 : (1) 3 x Flat rack
(2) 1 x Defender
(3) Instruction Manual x 1
Installation of Your Product
INSTALLATION INSTRUCTIONS
This Wine Chiller is designed to be free standing installation only, and should not be
recessed or built-in (Fully recessed).
Place your Wine Chiller on a surface that is strong enough to support it when it is
fully loaded. Allow 5 inches of space between the back and sides of the Wine
Chiller, which allows the proper air circulation to cool the heat sink.
Locate the Wine Chiller away from direct sunlight and sources of heat (stove,
heater, radiator, etc.). Direct sunlight may affect the acrylic coating and heat
sources may increase electrical consumption. Extreme cold ambient temperatures
may also cause the unit not to perform properly. This Wine Chiller uses compressor
refrigeration technology and is not designed for storage in hot areas like garages,
warehouses or outdoors since it is designed to operate at a maximum of 30
degrees below the ambient temperature. Avoid locating the unit in moist areas.
Plug the Wine Chiller into an exclusive, properly installed-grounded wall outlet. Do
not under any circumstances cut or remove the three (ground) prong from the
power cord. Any questions concerning power and/or grounding should be directed
toward a certied electrician or an authorized Products service center.
After plugging the Wine Chiller into a wall outlet, allow the unit to cool down for 2-
3 hours before placing any items in the compartment.

GROUNDING INSTRUCTIONS
This appliance must be grounded. In the event of an electrical short circuit, grounding reduces
the risk of electric shock by providing an escape wire for the electric current. This appliance is
equipped with a cord having a grounding wire with a grounding plug. The plug must be inserted
into an outlet that is properly installed and grounded.
WARNING
Improper use of the grounding plug can result in a risk of electric shock. Consult a qualified
electrician or service person if the grounding instructions are not completely understood, or if
doubt exists as to whether the appliance is properly grounded.
If it is necessary to use an extension cord, use only a three wire extension cord that has a
three blade grounding plug, and a three slot receptacle that will accept the plug on the
appliance. The marked rating of the extension cord should be equal to or greater than the
electrical rating of the appliance.
INSTALLATION
1. Steady, flat location:
If the refrigeratoris not levelled during installation, the doors may not close or seal
properly, causing cooling, frost, or moisture problems. It is very important for the
refrigerator to be level in order ro function properly, To level your refrigerator or turn
counter-clockwise to lower that side. Having someone push against the top of the
refrigerator will take some weight off the levelling led. This makes it easier to adjust the
levelling leg.
2. Ventilation:
Place refrigerator approximately 5 inches from the wall to ensure proper airflow to the
compressor. Do not place refrigerator near any heat resources such as a heater or stove as
it will put a strain on the power supply.
3. Power supply:
Check your local power source. This refrigerator requires a 110-120V, 60Hz power supply.
Use a receptacle that will accept the ground prong. The power cord of this appliance is
equipped with a 3-prong (grounding) plug which mates with a standard 3 prong
(grounding)wall outlet to minimize the possibility of electric shock hazard from this
appliance.
(a) Longer cord sets or extension cord are available and may be used if care is exercised
in their use.
(b) If a long cord or extension cord is used, (1) the marked electrical rating of the cord set
or extension cord should be at least as great as the electrical rating of the appliance, (2)
the extension cord must be a grounding-type 3-wire cord, and (3) the longer cord should
be arranged do that it will not drape over the counter top or table top where it can be
pulled on by children or tripped over unintentionally.
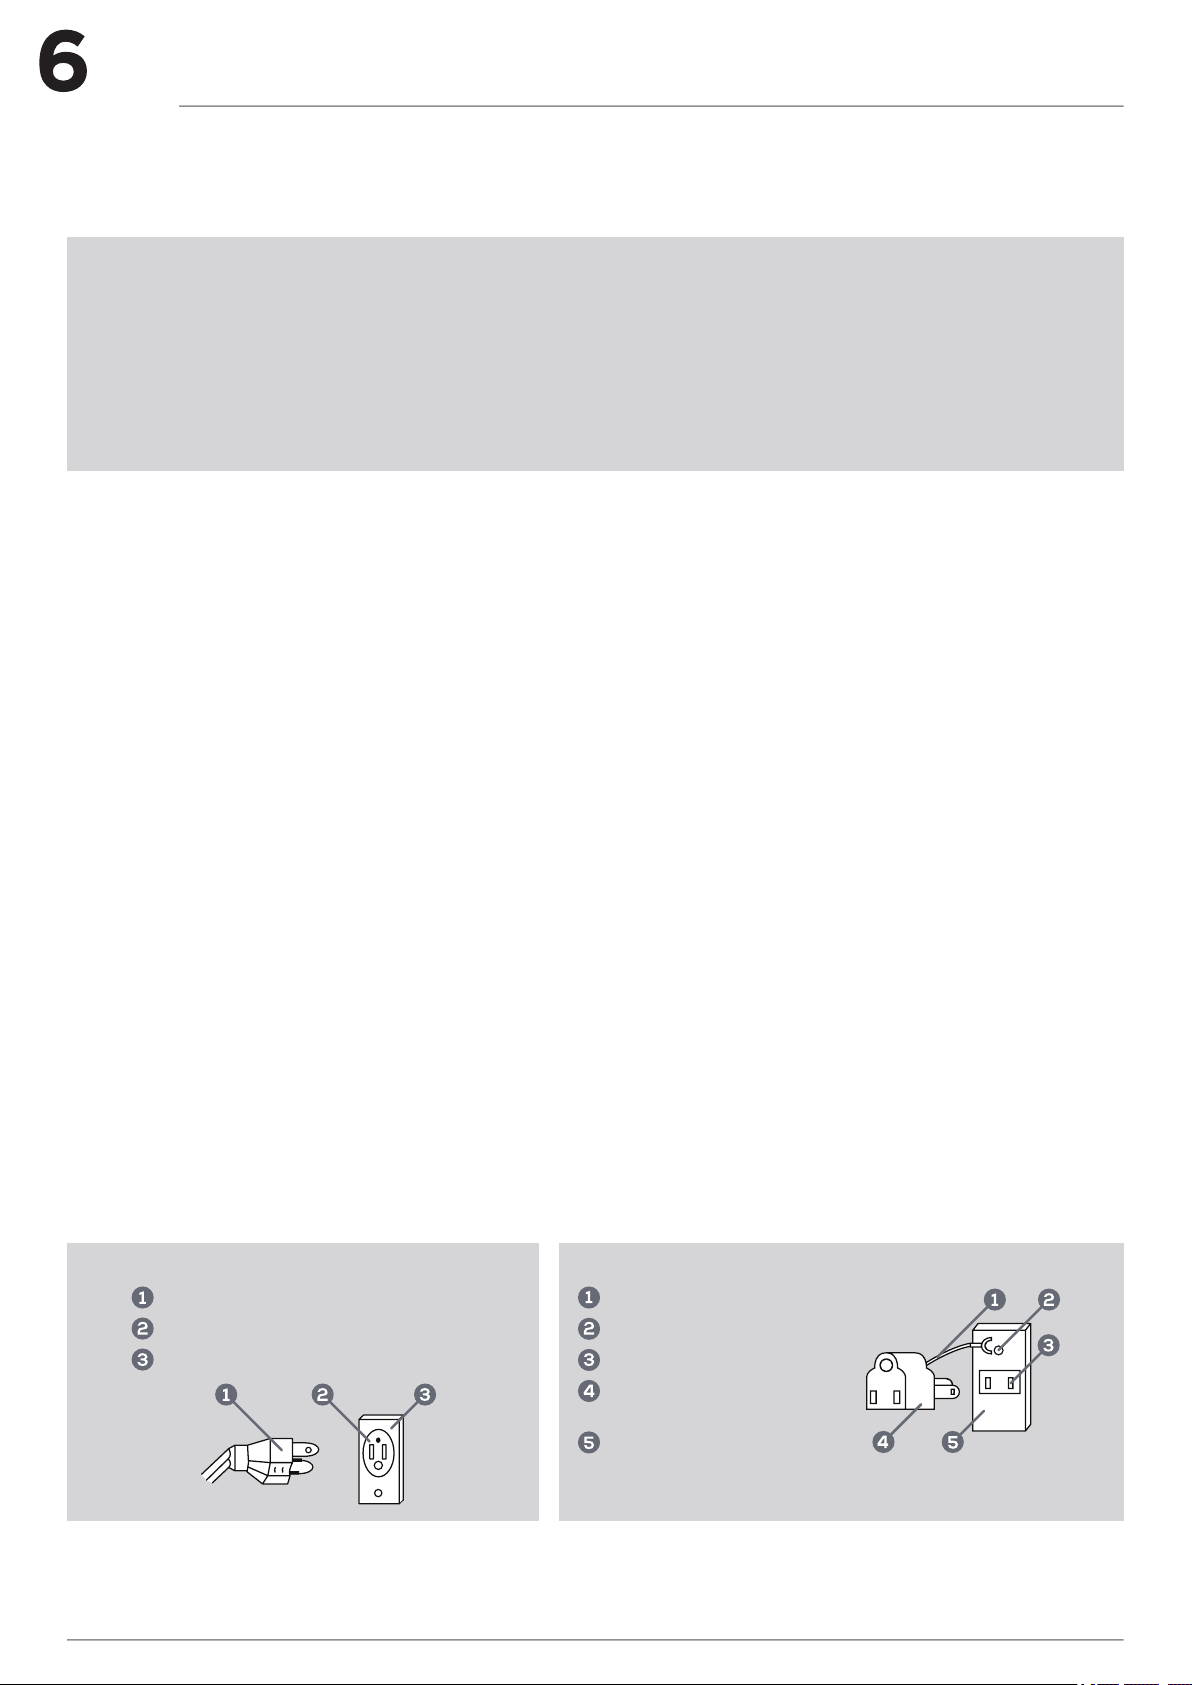
When using a 3-prong plug:
3-PRONGED PLUG
3-PRONGED RECEPTACLE
RECEPTACLE BOX COVER
Make sure the receptacle box is fully grounded.
When using a grounding adaptor:
GROUNDING LEAD
SCREW
RECEPTACLE
GROUNDING
ADAPTOR
RECEPTACLE
BOX COVER

FEATURES

RACK
LED LIGHT
DOOR GASKET
COOLING COILS
BOTTLES DEFENDER
FEATURES

SETTING THE TEMPERATURE CONTROL
CONTROL PANEL
Your Wine Chiller is equipped with acontrol panel lock feature. The lock will
automatically activate 20 seconds after thelast button is pressed.
To unlock the control panel, long press button for 2 seconds. You will
hear a BEEP sound to alert you that the panel is unlocked.
Set the temperature inside the Wine Chiller by pressing the (increase) and
(decrease) buttons to adjust the temperature in increments or decrement.
You can select the temperature to display in Fahrenheit or Celsius by long pressing
the button for 2 seconds.
Turn the interior light on or off by short pressing the light bulb symbol button
The light will be turned off automatically if it remains on for 10 minutes. Press the
button again to turn it back on.
OPERATION FOR TEMPERATURE
Temperature Range: 5°C-18°C
41°F -64°F
Note:
Temperature range of product compartment is 41°F (5°C) to 64°F (18°C)
at room temperature of 86°F (30°C)
OPERATION

DISPLAY
*Tips: Please move the rack carefully when you need to put 101 cans.

TECHNICAL SPECIFICATIONS
Unit Dimension (WxDxH) (inches)
Power Supply
Power Consumption Per Year
16.9 X 17.71 X 29.1
AC115V ~ 60Hz / 95W
170 kWh
TROUBLESHOOTING
Current 1.2 A
operate if:

This product is warranted to be free from defects in material and
workmanship for a period of one (1) year from the date of original purchase.
During this period, your exclusive remedy is repair or replacement of this
product or component found to be defective, at our option; however, you
are responsible for all costs associated with returning the product to us. If
the product or component is no longer available, we will replace with a similar
one of equal or greater value. Prior to a replacement being sent, the product
must be rendered inoperable or returned to us.
This warranty does not cover glass, filters, wear from normal use, use not in
conformity with the printed directions, or damage to the product resulting
from accident, alteration, abuse, or misuse. This warranty extends only to the
original consumer purchaser or gift recipient. Keep the original sales receipt,
as proof of purchase is required to make a warranty claim. This warranty is
void if the product is used for other than single-family household use or
subjected to any voltage and waveform other than as on the specified rating
on the label (e.g.,120V-60Hz).
We exclude all claims for special, incidental, and consequential damages
caused by breach of express or implied warranty. All liability is limited to the
amount of the purchase price . Every implied warrant y, including any
statutory warranty or condition of merchantability or fitness for a
particular purpose, is disclaimed except to the extent prohibited by law, in
which case such warranty or condition is limited to the duration of this
written warranty. This warranty gives you specific legal rights. You may
have other legal rights that vary depending on where you live. Some states
or provinces do not allow limitations on implied warranties or special,
incidental, or consequential damages, so the foregoing limitations may not
apply to you.
For faster service, locate the model, type, and serial numbers on your
appliance.
LIMITED WARRANTY
This product has been manufactured and sold under the responsibility of
Curtis International Ltd. Frigidaire, the Frigidaire logo, the two dogs
(Nipper and Chipper) logo, are registered trademarks or trademarks of
Technicolor (S.A.) or its affiliates and are used under license by Curtis
International Ltd. Any other product, service, company, trade or product
name and logo referenced herein are neither endorsed nor sponsored by
Technicolor (S.A.) or its Affiliates.

Our home is your home. Visit us if you
need help with any of these things:
owner support
service

Garantie limitée
Dépannage
Opération
Introduction
Informations de sécurité importantes
instructions d'installation
Fonctionnement de l'adaptateur
Fonctionnement pour le cordon de voiture
Caractéristiques
CANADA
EFMIS2438
REFROIDISSEUR DE BOISSON
PORTE COURBÉE

Bienvenue dans notre
Merci d'avoir amené Frigidaire chez vous!
Nous voyons votre achat comme le début
d'une longue relation ensemble.
Ce manuel est votre ressource pour
l'utilisation et l'entretien de votre produit.
Veuillez le lire
Gardez-le à portée de main
Si quelque chose
avant d'utiliser votre appareil.
Gardez-le à
la section de
Des FAQ, des conseils et des vidéos utiles,
des produits de nettoyage et des accessoires
de cuisine et de maison sont disponibles sur
www.frigidaire.com.
Nous sommes là pour vous! Visitez notre
site Web, discutez avec un agent ou
appelez-nous si vous avez besoin d'aide.
Nous pourrons peut-être vous aider à éviter
une visite de service.
d'un service, nous pouvons le faire pour vous.
Si vous avez besoin
Liste de contrôle d'installation
Porte
La poignée est sûre et serrée
Joint de porte complètement à
l'armoire de tous les côtés
Gardez l'avant et l'arrière de niveau
pour plus de fraîcheur
Nivellement
L'armoire se solidifie à tous les coins
Puissance électrique
L'alimentation de la maison est
allumée Refroidisseur de boissons
branché
Vérifications finales
Matériel d'expédition retiré
Réglage de la température
famie
pour une référence rapide
ne semble pas correct,
dépannage vous aidera à résoudre les
problèmes courants.

VEUILLEZ SUIVRE LES PRÉCAUTIONS CI - DESSOUS POUR VOTRE
NOUVELLE CAVE À VIN
1. Cette cave à vin doit être correctement installéetet située conformément
à I'instructions d'installation avant utilisation.
2. Ne laissez pas les enfants grimper, se tenir ou accrocher sur les étagères dans
la cave à vin. Ils pourraient endommager le cave à vin et se blesser gravement.
3. Ne rangez nine utilisez de I'essence ou d'autres vapeurs et liquides
inflammables à proximité de ce produit ou de tout autre appareil.
4. Gardez les doigts hors des dégagements entre les portes et le corps de la
cave à vin.Faites attention de fermer les portes lorsque les enfants
sont dans cette région.
5. Débranchez l'alimentation avant de nettoyer et de faire des réparations.
6. Nous recommandons vivement que toute maintenance soit effectue par les
professionnels.
7. Ne pas laissez la cave à vin dans les températures extrêmement froides ou chaudes.
8. Ne placez pas la cave à vin à proximité des sources de chaleur ou des flammes.
9. Nettoyer la cave à vin avec un chiffon doux et humide.Enlever les taches avec un
savon doux.Ne pas nettoyer I'appareil avec des solvants de qualité industrielle,
ou de produits chimiques abrasifs.
10. Ne placez pas d'objets lourds au dessus de la cave à vin.
11. N'installez jamais la cave à vin la ou il y a beaucoup d'humidité et l'eau peut
éclabousser.
12. Ne laissez pas les enfants s'accrocher aux portes; La cave à vin peut être renversé
et blesser les enfants.
13. Ne jamais manger des aliments cuits stockés trop longtemps dans la cave à vin ou
en cas de coupure d'alimentation de la cave à vin.
14. N'utilisez pas d'outils tranchants à l'intérieur de la cave à vin, par exemple, mettre
la glace est possible de survenir comme des dommage.
15. Débranchez l'alimentation et retirez les aliments de la cave à vin s'il ne pas utilise
pendant une longue période de temps.
ÉLIMINATION CORRECTE
Une cave à vin vide est une attraction extrêmement dangereuse pour les enfants.
Si vous se débarrassez de votre vieille cave à vin, suivez les instructions dans le
Avertissement d'Piégeage des Enfants s'il vous plaît.
AVERTISSEMENT D'PIEGEAGE DES ENFANTS
1. Enlever les portes.
2. Placez les étagères par terre afin que les enfants ne puissent pas facilement
grimper à l'interieur.
ATTENTION: UTILISATION D'UNE RALLONGE N'EST PAS RECOMMANDE
CES INSTRUCTIONS SEULEMENT CONSERVEZ AU USAGE DOMESTIQUE
INSTRUCTIONS DE SÉ SÉCURITÉ IMPORTANTE

1. AVERTISSEMENT: Pour réduire le risque de choc électrique ou de blessures lors
de l'utilisation de votre appareil, suivez ces précautions de base:
2. Lisez toutes les instructions avant d'utiliser la cave à vin.
3. DANGER ou AVERTISSEMENT: Risque de piégeage des enfants.
4. Le piégeage et la suffocation des enfants ne sont pas des problèmes du passé.
5. Les appareils fermés ou abandonnés sont encore dangereux... malgré qu'ils soient
déposés dans le garage quelques jours.
6. Avant de jeter votre ancienne cave à vin: enleve la porte.
7. Placez les étagères par terre afin que les enfants ne puissent pas facilement grimper
à l'intérieur.
8. Ne laissez jamais les enfants fonctionner, jouer ou ramper à l'intérieur de l'appareil.
9. Ne jamais nettoyer les pièces de l'appareil avec des uids ammables. Les furmées
peuvent créer un danger ou une explosion.
10. Ne rangez ni ne utilisez de l'essence ou d'autres vapeurs et liquides inflammables
à proximité de ce produit ou de tout autre appareil. Les fumées peuvent créer un
danger ou une explosion.
11. Ne pas réparez ou ne remplacez aucune partie de la cave à vin ou essayez tout
entretien, sauf indication contraire dans les instructions d'entretien de l'utilisateur
ou dans les instructions publiées de réparation de l'utilisateur.
Remplacer le fusible du même type.
- Gardez ces instructions -
INSTRUCTIONS DE SÉCURITÉ IMPORTANTE

Avant d'utilisation de la cave à vin
Retirez l'emballage extérieur et intérieur.
Vérifier pour assurer d'avoir toutes les pièces suivantes:
Modèle EFMIS2438: (1) 3 x PLATEAU PLAT
(2) 1 x DEFENSEUR
(3) Manuel d'Instructions x 1
Installation de votre cave à vin
Cette cave à vin est conçu pour être installé seul et ne doit pas être encastré ou
intégré(entièrement encastré).
Placez votre cave à vin sur une surface suffisamment stable pour le supporter
lorsqu'il est complètement chargé.
Laisser 5 pouces d'espace entre le dos et les côtés de la cave à vin, ce qui
permet une bonne circulation d'air pour refroidir le dissipateur de chaleur.
Localisez la cave à vin loin de la lumière directe du soleil et des sources de
chaleur(cuisinère, chauffage, radiateur, etc.). La lumière directe du soleil peut
affecter le revêtement acrylique et les sources de chaleur peuvent augmenter
l'éctricité consommation. Des températures ambiantes extrêmes froides
peuvent également empêcher l'appareil de fonctionner correctement.
Cette cave à vin adopte la technologie de réfrigération thermo-électrique (sans
compresseur) et n'est pas conçue pour être stockée dans des zones chaudes
comme les garages, entrepôts ou à l'extérieur car elle est conçue pour fonctionner
à un maximum de 30 degrés sous la température ambiante.
Évitez de localiser l'appareil dans des zones humides.
Branchez l'alimentation de la cave à vin correctement installée dans une prise
murale exclusive. Ne coupez ou retirez en aucun cas la troisième broche (masse)
du cordon d'alimentation . Toute question concernant puissance et/ou la mise à la
terre doit être dirigée vers un électricien qualifié ou une centre de services de
produit autorisée.
Après avoir branchél'alimentation de la cave à vin dans une prise murale, laissez
l'appareil refroidir pour 2-3 heures avant de placer tout objets dans le
compartiment.
INSTRUCTIONS D’INSTALLATION

INSTRUCTIONS DE MISE ÀLA TERRE

CARACTÈRE
CHARNIERE / COUVERCLE DE PORTE SUPERIEURE
MANIPULER
PIEDS DE NIVELLEMENT
CONCEPTION DE PORTE EN VERRE 2 NIVEAU
COUVERCLE DU TROU DE LA PORTE
Table of contents
Languages:
Other Curtis Refrigerator manuals