CyberHome CH-DVD 402 User manual

DVD-Player
DVD-Player
CH-DVD
CH-DVD 402
402
www.cyberhome-europe.de
Manual________________________________________
Bedienungsanleitung____________________________
Mode d’emploi__________________________________
Istruzioni per l’uso______________________________
Manual de instrucciones_________________________
Handleiding____________________________________
ENG
FR
ES
DE
NL
IT

Accessories, Region Code Information, Specifications...........................................................
Safety Instructions......................................................................................................................................
Preparation Knowledge.............................................................................................................................
Points for Attention.....................................................................................................................................
Operation..........................................................................................................................................................
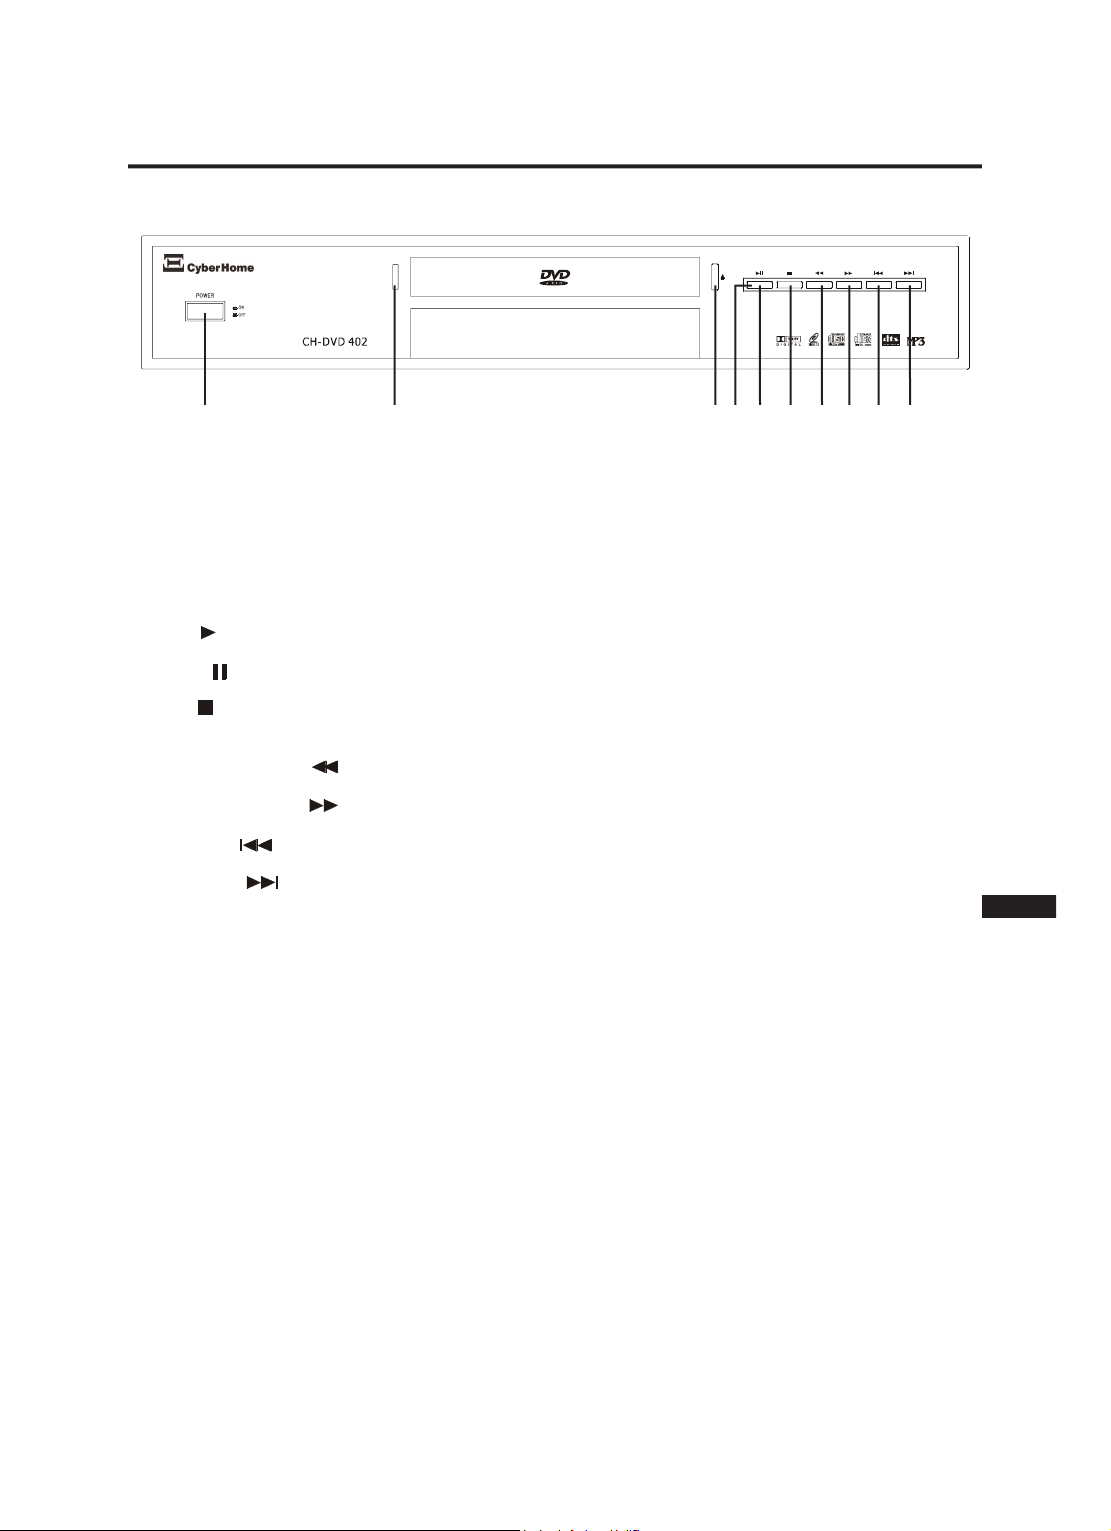
Operation of Control Panel...............................................................................................................................
Operation of Display.........................................................................................................................................
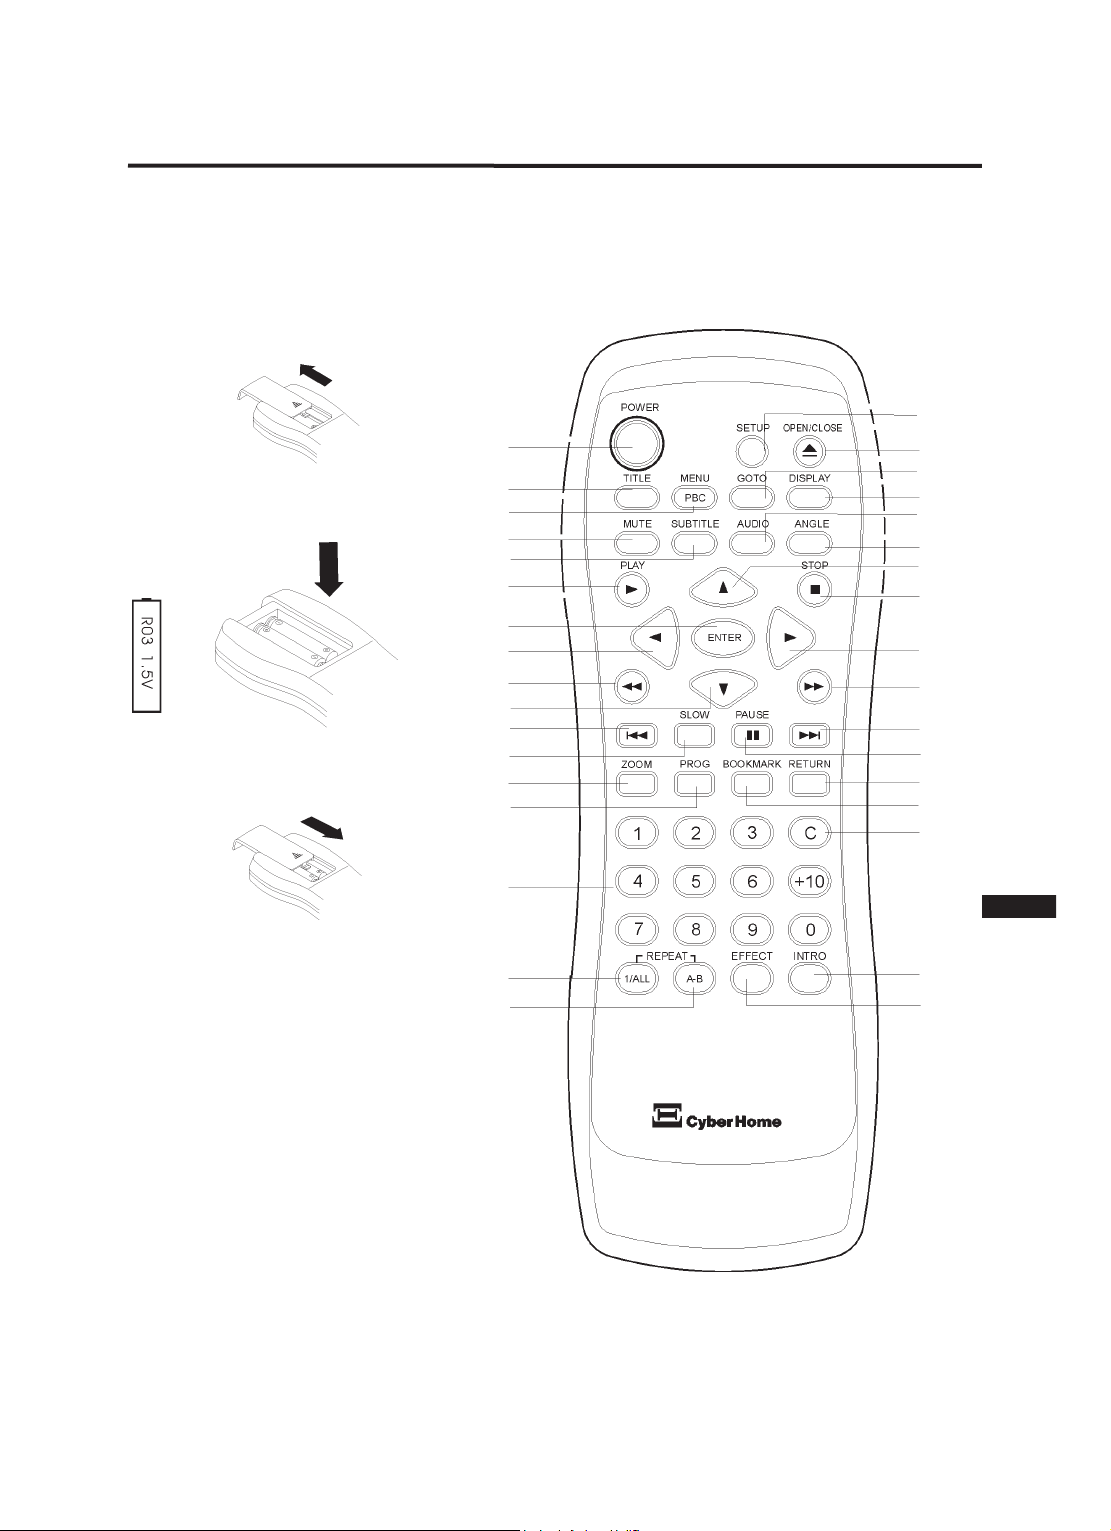
Operation of Remote Control...........................................................................................................................
Electrical Connections..............................................................................................................................
Viewing & Listening....................................................................................................................................
Setup Menu.....................................................................................................................................................
Changing the general setup.............................................................................................................................
Changing the audio setup................................................................................................................................
Changing the video setup.................................................................................................................................
Changing the language setup..........................................................................................................................
Playing Functions........................................................................................................................................
Selecting a section of the disc to play..............................................................................................................
1. Selecting a chapter using the DVD menu.............................................................................................
2. Playing from a specific time on a disc, in a track or title.......................................................................
3. Playing a specific track or chapter and title...........................................................................................
4. Skipping through the chapters or tracks................................................................................................
Using the repeat features.................................................................................................................................
1. Repeating an entire disc or playlist.......................................................................................................
2. Repeating a track, chapter or title.........................................................................................................
3. Repeating a section of any disc............................................................................................................
Playing a disc at different speeds (Fast forward/backward search).................................................................
Playing a disc frame by frame..........................................................................................................................
Still the Picture frame.......................................................................................................................................
Zooming in and out of an image.......................................................................................................................
Using the Intro feature......................................................................................................................................
Using position markers (Bookmark).................................................................................................................
Using the sound effects....................................................................................................................................
Changing the time displayed............................................................................................................................
Special Features for DVD.........................................................................................................................
Using the DVD menu........................................................................................................................................
Displaying subtitles...........................................................................................................................................
Changing the audio language..........................................................................................................................
Changing the angle of view..............................................................................................................................
Special Features for Video CD..............................................................................................................
Using playback control (PBC)..........................................................................................................................
Special Features for MP3, JPEG and MPEG Files.......................................................................
Playing of MP3s, JPEG and MPEG files..........................................................................................................
Additional features for JPEG files.....................................................................................................................
1. Rotation of a picture..............................................................................................................................
2. Making a preview...................................................................................................................................
3. Making a slide show..............................................................................................................................
4. Zooming in and out................................................................................................................................
Creating a Playlist........................................................................................................................................
Creating a playlist of DVDs..............................................................................................................................
Creating a playlist of VCDs or CDs..................................................................................................................
Creating a playlist of MP3s, JPEG and MPEG files.........................................................................................
Problem Handling........................................................................................................................................
List of Languages........................................................................................................................................
Technical Terms............................................................................................................................................
1
2-3
4
5
6-9
6
7
7-9
10-13
13
14-18
14-15
15-16
17-18
18
19-21
19
19
19
19
19
19-20
19
20
20
20
20
20
20
20
21
21
21
22
22
22
22
22
22
22
23
23
23
23
23
23
23
24
24
24
24
25
26
27-28
TABLE OF CONTENTS
ENG

ACCESSORIES
DVD-Player x 1
Manual x 1
Remote Control x 1
Batteries x 2
Cinch Cable 3 in 1
Power Cord x 1
Scart Cable (for Europe) x 1*
*optional
REGION CODE INFORMATION
This DVD-Player has been constructed and produced in the way that it adheres to “Local Management” information,
which are recorded on a Digital Versatile Disc (DVD). If the number of the destination area on a DVD does not corre-
spond with the number of the destination area of this DVD-Player, this device won’t be able to play the corresponding
disc. The device is set to region code “2”. You can find the region code on the back side of the DVD cover.
SPECIFICATIONS
Audio Features Frequency Response 20 Hz ~ 20 KHz
Audio Format 96 KHz / 24 bit Audio D/A Converter
Optical Output Level (SPDIF) IEC 60958
Coaxial Output Level (SPDIF) IEC 60958
Video Features Video Format 10 bit Video D/A Converter
Signal Type NTSC / PAL
Output Level 1 Vp - p ( 75 Ohm)
S-Video Y Output Level 1 Vp - p ( 75 Ohm)
C Output Level 1 Vp - p ( 75 Ohm)
General Specifications AC Input AC 230 V, 50 Hz
Power Consumption 27 W
Weight 5 Kg
Dimension (W X H X D) 430 mm x 80 mm x 290 mm
*Designs and specifications are subject to change without notice. All of the company or product names mentioned in
this manual are the trademarks or registered trademarks of their respective holders.
1

SAFETY INSTRUCTIONS
2
Dear Customer,
May we take this opportunity to thank you for purchasing this DVD-Player. We strongly recommend that you carefully
study the Operating Instructions before attempting to operate the unit and that you note the listed precautions.
Power cord protection
To avoid any malfunctions of the unit and to protect yourself against electric shock, fire or personal injury, please
observe the following:
- Hold the plug firmly when connecting or disconnecting the AC power cord to this unit.
- Do not connect or disconnect the AC power cord when your hands are wet.
- Keep the AC power cord away from heating appliances.
- Never put any heavy object on the AC power cord.
- Do not attempt to repair or reconstruct the AC power cord in any way.
- Remove dust, dirt, etc. on the plug at regular intervals.
- If the unit has been dropped or otherwise damaged, turn off the power and disconnect the AC power cord.
- If smoke, odours or noises are emitted from the unit, turn off the power and disconnect the AC power cord.
Placement
Avoid placing the unit in areas of:
- direct sunlight or heating radiators
- high temperature [over 35° C (95°F)] or high humidity (over 90%)
- excessive dust
- vibration, impact or tilted surfaces, as the internal parts may be seriously damaged
Non-use periods
- When the unit is not used, turn the power off.
- When the unit is unused for a long period of time, the unit should be unplugged from the household AC outlet.
Do not touch internal parts
- Touching internal parts of this unit is dangerous and may cause serious damage to the unit. Do not attempt to
disassemble the unit.
- Do not put any foreign objects on the disc tray.
Keep away from water and magnets
- Keep the unit away from flower vases, tubs, sinks, etc. If liquids are spilled into the unit, serious damage could occur.
- Keep magnetic objects, such as speakers, distant from the player.
Stacking
- Place the unit in a horizontal position and do not place anything heavy on it.
- Do not place the unit on amplifiers or other equipment, which may become hot.
Condensation
Moisture may form on the lens in the following cases:
- immediately after a heater has been turned on
- in a steamy or very humid room
- the unit is moved from a cold environment to a warm one
If moisture forms inside this unit, it may not operate properly.
In this case, turn off the power and wait about one hour for the moisture to evaporate.
Noise interference on the TV while a broadcast is being received
Depending on the reception condition of the TV, interference may appear on the TV screen while you are watching a
TV broadcast, if the unit is switched on. This is not a malfunction of the unit or the TV. To watch a TV broadcast, turn
off this unit.
ENG

SAFETY INSTRUCTIONS
WARNING
TO REDUCE THE RISK OF FIRE, ELECTRIC SHOCK
OR ANNOYING INTERFERENCE, DO NOT EXPOSE
THIS APPLIANCE TO RAIN OR MOISTURE AND ONLY
USE THE RECOMMENDED ACCESSORIES.
CAUTION
TO REDUCE THE RISK OF ELECTRIC SHOCK, DO
NOT REMOVE THE COVER (OR BACK). NO USER-
SERVICABLE PARTS INSIDE. REFER TO QUALI-
FIED SERVICE PERSONNEL FOR SERVICING. ONLY
OPEN THE DEVICE IF IT IS DISCONNECTED FROM
THE POWER SOURCE - UNPLUG THE POWER CORD!
Use of the controls or adjustments or performance of
procedures other than those specified herein may
result in hazardous radiation exposure.
DANGER
Invisible laser radiation when cover is opened and
interlock failed or defeated. Avoid direct exposure
to beam.
The DVD-Player is a class 1 laser product. However, this
DVD-Player uses a visible laser beam, which could cause
hazardous radiation exposure, if directed. Be sure to ope-
rate the DVD-Player correctly as instructed.
When this DVD-Player is plugged into the plug socket, do
not place your eyes close to the opening of the disc tray
and other openings to look into the inside of this player.
Do not open covers and do no repairs yourself. Refer to
qualified personnel for servicing.
.
.
3
RISK OF ELECTRIC SHOCK!
DO NOT OPEN!
CAUTION
The lightning flash with arrowhead symbol, within
an equilateral triangle, is intended to alert the
user to the presence of not isolated “dangerous
voltage” inside the product that may be sufficient
magnitude to constitute a risk of electric shock to
persons.
The exclamation point within an equilateral trian-
gle is intended to alert the user to the presence
of important operating and servicing instructions
in the literature accompanying the appliance.
CLASS 1
LASER PRODUCT
Manufactured under license from Dolby Laboratories.
"Dolby” and the double-D symbol are trademarks of Dolby
Laboratories.
Confidential Unpublished Works.
©1992-1997 Dolby Laboratories, Inc.
All rights reserved.
This product incorporates copyright protection technology
that is protected by method claims of certain U.S. Patents
and other intellectual property rights owned by Macrovi-
sion Corporation and other rights owners. Use of this copy-
right protection technology must be authorized by Macro-
vision Corporation, and is intended for home and other
limited viewing uses only unless otherwise authorized by
Macrovision Corporation. Reverse engineering or disas-
sembly is prohibited.

Maximum playing time
MPEG II TYPE
133 min. (4.7 GB) max.
242 min. (8.5 GB) max.
266 min. (9.4 GB) max.
484 min. (17 GB) max.
MPEG I TYPE
74 min. max.
74 min. max.
20 min. max.
MPEG I layer - III
640 min. max.
Diameter / Side / Layer
DVD
12 cm / Single / Single
12 cm / Single / Double
12 cm / Double / Single
12 cm / Double / Double
VCD
12 cm / Single / Single
CD-DA
12 cm / Single / Single
CD-DA
8 cm / Single / Single
MP3
8 cm / Single / Single
12 cm / Single / Single
Suitable discs & their marks
PREPARATION KNOWLEDGE
This device supports the following disc formats:
4
- DVD and VCD: Audio and Video discs
- CD-DA and MP3: Only Audio discs
- This device conforms to the standards of DVD, VCD (v1.1 and v2.0). You can perform different playback functions
depending on the type of discs.
- This device supports also Photo CDs with JPEG files.
- Don’t load any exceptional discs in the Player, as this will cause null playback or other problems (also with copy-
saved Audio CDs).
- UDF format won’t be supported.
ENG

Please consider the following points in order to use this disc player correctly and safely!
Handling of Discs:
- Please hold the disc by gripping the rim or by placing the index finger in the central hole. Never
touch the signal surface, which is shiny. (Both sides for double side discs.)
- Never add labels or adhesive tapes on the discs and do not scratch or damage the discs.
Cleaning of Discs:
- Finger prints or stains on the surface of the disc will directly cause signal missing. Depending on
the degree of stain, the reflected luminosity from the signal surface may be weakened, resulting in
a poorer picture quality. Therefore, please use a soft cloth and wipe in a radiating manner from the
centre to the outer rims when cleaning the disc.
- If the surface of your disc is very dirty, please wipe the disc with a moist cloth, finally use a dry soft
cloth to remove all the water stains.
- Never use electrostatic prevention products as well as solutions which contain benzene, thinner or
any other vaporizing substances, as they may damage the disc surface.
Storage of Discs:
- To prevent discs from getting bent or deformed, they should be vertically kept in the disc storage
case. To prevent damages, avoid placing them in a car, which may contact direct sunlight.
- Please thoroughly read the "Instruction Points for Attention" on the discs.
Cleaning of Player:
The control panel and the case of the player only require wiping with a soft cloth. Areas with stub-
born stains can be cleaned with a soft cloth dipped in a neutral detergent. To prevent damaging the
player, never use vaporizing solutions.
Disc Accessory:
Do not use any disc accessory to improve the audio quality or disc protective and lens cleaner, both
will cause failure.
POINTS FOR ATTENTION
5
Power:
Please connect the device to the correct power outlet (AC 230 V). Please compare the main voltage on the rear panel.
Power Lines:
Please DO NOT place heavy objects on the device, as this may result in fire and electric leakage. When the player is
not in use for a long time, disconnect the power line/s.
Suitable Location:
- Please do not place the device on the following locations: easily affected by vibration, with high humidity, with poor
ventilation, with direct sunlight, with too high or too low temperature
- The device should be placed on a leveled surface.
- To prevent being affected by electromagnetic fields, please place the device away from television, radio, computer
and speaker.
Safety Notice:
Contacting the device’s internal structure may result in an electrical shock, thus please DO NOT remove the upper lid.
Never place heavy objects on the device.
Prevention of Condensation:
When the device is suddenly moved from a cold to a warm location, it may cause condensation. Thus, please keep
the device switched off for about 1-2 hours before the playback of any titles.

1. POWER / ON / OFF :
2. STANDBY MODE :
3. OPEN / CLOSE :
4. PLAY :
5. PAUSE :
6. STOP :
7. FAST BWD SEARCH :
8. FAST FWD SEARCH :
9. SKIP_BWD :
10. SKIP_FWD :
OPERATION
Control Panel
6
Switches the device on or off.
If the device is in Standby mode, the LED will light. If the Player is in operation, the
LED light will be off.
Opens or closes the disc tray.
Loading the disc; starts playing.
This is used to pause a disc.
Stops the disc playing (HOLD) and enters Stop mode after pressing the button two
times (STOP).
Fast backward search while playing (2x, 4x, 8x, 16x).
Fast forward search while playing (2x, 4x, 8x, 16x).
Skips to the previous track on an audio disc or the previous chapter on a DVD.
Skips to the next track on an audio disc or the next chapter on a DVD.
ENG
1 2 3 4 5 6 7 8 9 10

OPERATION
Display
1
11
109
87
6
5
4
3
2
15
141312
30 30
7
1. Indicates the inserted disc type.
2. Indicates that the repeat play function is activated.
3. Indicates PBC ON (VCD).
4. Indicates the multi visual angles status.
5. Indicates zoom status.
6. Indicates that the program function is activated.
7. Shuffle-Play function.
8. Indicates the playing Audio mode.
9. Indicates status of the front right and front left speakers output.
10. Indicates that the microphone is on or off in Karaoke mode*.
11./12. Indicates the title number, the current chapter or track of the disc playing. The display depends on the inserted
disc type.
13. Indicates the playback time.
14. Indicates the status of the playback (PLAY/PAUSE/STOP).
15. Playback indicator.
*Only available on some specified models.
Operation of Remote Control
You can use the enclosed wireless remote control
to control this device. When using the control, plea-
se aim at the device's remote control sensor.

OPERATION
1
33
16
31
30
29
28
27
26
25
24
23
22
21
20
19
18
17
15
14
13
12
11
10
9
8
7
6
5
4
3
2
32
34
8
Remote Control
If the remote control only operates when you get closer to the device, it means that the batteries have been used up.
Please replace the two batteries simultaneously with two new batteries (Size AAA, R03, 1.5V). Please note the +, -
polarity. Note: When changing batteries, please do not use old and new batteries or batteries of different brands simul-
taneously.
PUSH
OPEN
CLOSE
BATTERY
COVER
ENG

1. POWER
2. TITLE
3. MENU “PBC”
4. MUTE
5. SUBTITLE
6. PLAY
7. ENTER
8. DIRECTION BUTTON
9. FAST BWD SEARCH
10. DIRECTION BUTTON
11. SKIP_BWD
12. SLOW
13. ZOOM
14. PROGRAM
15. NUMBER BUTTONS
(0 to 9, +10)
16. REPEAT “1/ALL”
17. REPEAT “A-B”
18. SETUP
19. OPEN / CLOSE
20. GOTO
21. DISPLAY
22. AUDIO
23. ANGLE (only DVDs)
24. DIRECTION BUTTON
25. STOP
26. DIRECTION BUTTON
27. FAST FWD SEARCH
28. SKIP_FWD
29. PAUSE
30. RETURN
31. BOOKMARK
32. “C”
33. INTRO
34. EFFECT
OPERATION
Operation of Remote Control
Switch the device on/off.
For DVDs, this displays the DVD menu.
To enter the menu of DVD discs or to select PBC function for VCD discs.
To mute the Audio output.
For DVDs, this can be used to display subtitles and select the language to use.
Press this button to start the playback.
Executes the selected menu instructions.
Moves towards the left to select menu items.
Fast backward search while playing (2/4/8/16x).
Moves downward to select menu items.
Skips to the previous track on an audio disc or the previous chapter on a DVD.
Slow movie playback (1/2x, 1/4x, 1/8x, 1/16x).
Zooms in and out the picture (maximum 4x).
This can be used to set up a playlist.
Used for direct selection of a numbered item in the menu or number input for the
function “GOTO”.
Repeats the current title or all titles.
Repeats the sequence stipulated by two selected playback points.
Enters the device’s setup menu screen to setup according to preference (in Stop
mode).
Opens or closes the disc tray.
Used for the direct selection of TRACK, TITLE, CHAPTER or TIME for intended
play.
Screen display for indicating the disc and time information.
Interchanges the audio settings depending on the disc content.
Changes the camera angle depending on the disc content.
Moves upward to select menu items.
Stops the disc playing (HOLD) and enters Stop mode after pressing the button two
times (STOP).
Moves toward the right to select menu items.
Fast forward search while playing (2/4/8/16 x).
Skip to the next track on an audio disc or the next chapter on a DVD.
This is used to pause a disc.
Returns to the previous menu.
To store specific portions of the disc in memory and play them immediately whene-
ver you want without the need to search.
Used to delete programmed titles or clear the number input.
To play the first seconds of each title, chapter, title interval and chapter interval (for
DVDs) or of each track and disc interval (for Video CDs) or of each track (for CDs).
To setup the sound effects.
9

Video and Audio Connection
- The device has three types of Video output terminals, the S-VIDEO, the CVBS VIDEO output and RGB (over Scart),
which can be connected to devices such as television, projector etc.
- The Audio output has two types of Audio output terminals, the 2 channel output and the AC-3/DTS digital output (pass
through).
- NOTE: If this device is placed next to a receiver or tuner that is receiving AM/FM broadcast, they may interfere with
each other. If such a situation occurs, please take the receiver or tuner away from the device.
The visual and sound surrounding system connecting method introduced here is for practical use. For other connec-
ting methods, please refer to the instructions of the amplifier purchased.
Possible Connections:
Audio/Video Connection of the DVD-Player with the TV over SCART:
If your TV has a SCART socket, you can optionally connect your device with the TV over the SCART socket. The advan-
tage is here an optimal picture quality. In this case, please use a completely connected SCART cable, which is also inclu-
ded in your accessory (optional). If the TV offers the possibility to choose manually between RGB and CVBS, you should
set your TV to RGB in order to achieve a better picture quality. If the DVD-Player is connected with the TV over the
SCART cable, the TV automatically switches to the DVD mode when you turn on the Player (if the TV supports this func-
tion).
ELECTRICAL CONNECTIONS
10
Scart Cable
ENG

Audio/Video Connection of the DVD-Player with the TV over the Cinch cable:
Please connect the Cinch outputs with the corresponding Cinch inputs on your TV by means of the Cinch cable.
Audio/Video Connection of the DVD-Player with the TV with the Cinch cable and S-Video cable:
Please connect the Cinch outputs and the S-Video output with the corresponding inputs on your TV.
ELECTRICAL CONNECTIONS
RED (AUDIO R)
WHITE (AUDIO L)
RED (AUDIO R)
WHITE (AUDIO L)
11
YELLOW (VIDEO)
S-Video cable

Audio Connection of the DVD-Player over the Analogue Stereo Output (2 Channel Downmix):
Please connect the Audio left and Audio right analogue output with the corresponding input on your amplifier by means
of the Cinch cable.
Audio Connection of the DVD-Player over the Coaxial Output:
Please connect the digital coaxial output with the corresponding input on the amplifier by means of a coaxial cable.
Please note that this connection is only possible if your amplifier contains a DTS/Dolby Digital Decoder. In this case the
digital output has to be set to SPDIF RAW. For standard amplifiers without decoder the digital output has to be set to
SPDIF/PCM.
ELECTRICAL CONNECTIONS
RED (AUDIO R) WHITE (AUDIO L)
LEFT - FRONT RIGHT - FRONT
12
5.1 Channel Amplifier
ENG
5.1 Channel Amplifier
LEFT - FRONT SUBWOOFER RIGHT - FRONT
LEFT - REAR CENTER RIGHT - REAR
COAXIAL CABLE

Audio Connection of the DVD-Player over the Optical Output:
Please connect the digital optical output with the corresponding input on the amplifier by means of an optical cable.
Please note that this connection is only possible if your amplifier contains a DTS/Dolby Digital Decoder. In this case the
digital output has to be set to SPDIF RAW. For standard amplifiers without decoder the digital output has to be set to
SPDIF/PCM.
ELECTRICAL CONNECTIONS
VIEWING & LISTENING
LEFT - FRONT SUBWOOFER RIGHT - FRONT
LEFT - REAR CENTER RIGHT - REAR
OPTICAL CABLE 5.1 Channel Amplifier
- Switch on the TV, then switch the “TV/VIDEO” mode to “VIDEO” mode. This player can play the formats DVD, VCD,
CD-R/RW, MP3, Photo CD with JPEG files and DTS discs.
- If it is connected to an AUDIO system, the amplifier has to be switched on and the corresponding input has to be
set (e. g. “CD” or “AUX”).
1. Switch on the power
- Press the “POWER/ON/OFF” switch to activate the power of the device.
- When the display panel indicates “ON”, “READ”, the disc is read.
- If no disc is inserted, the display panel will indicate “INSERT DISC”.
2. Insert the disc
- Press the “OPEN/CLOSE“ button to open the tray. The display panel will indicate “OPEN”.
- Insert the disc in the centre of the tray.
- Press the “OPEN/CLOSE“ button again, after closing the tray, there will be displayed “CLOSE” on the display panel.
- If the disc supports the “FIRST PLAY” function, the title of the disc will be played immediately.
3. Start playing
- Press the “PLAY“ button to start playing the disc:
* If the disc inserted is a DVD disc, the title menu can be selected for playing or various special playing functions
can be selected depending on the content of the disc.
* If the disc inserted is a VCD disc with PBC function, the menu will appear on the screen and the operation can be
done according to the instructions on the menu or the “MENU” button can be pressed again to remove the PBC
function and to play directly.
* If the VCD disc does not have PBC function or if the disc inserted is an ordinary music CD, the entire disc will be
played directly.
4. Stop playing
- Pressing the “STOP“ button will immediately stop playing:
* “HOLD” will appear on the display.
* Press the “PLAY“ button again to start playing on the same place.
* Press the “STOP” button twice to stop playing. “STOP” will appear on the display.
5. Remove the disc
- Press the “OPEN/CLOSE“ button. The display indicates “OPEN”, remove the disc.
6. Switch off the power
- After pressing the “POWER” button on the remote control, the device will go into standby mode. In order to switch
the device comletely off, please press the “POWER/ON/OFF” on the front panel.
13

14
SETUP MENU
Important notes for moving in the main menu:
-Press the “SETUP” button on the remote control in the “STOP”
mode.
-The setup menu has five setting items: General Setup, Audio Setup,
Video Setup, Language Setup, Exit Setup
-The control of the main menu may be effected by pressing the
direction keys , , and . To finalize your selection, please
press the button “ENTER” on your remote control. To exit please go
back to the Main Page and choose “Exit Setup”.
GENERAL SETUP
Angle Mark
-Highlight “Angle Mark” in the general setup menu. Please press the
direction button to enter the menu. Move the highlight bar by
pressing the buttons or to enable or disable the multi-angle
display. Please press “ENTER” to finalize your selection. You can
leave this menu by pressing the button on your remote control.
The number of angles depends on the disc.
Close Captions
-Highlight “Close-Captions” in the general setup menu. Please press
the direction button to enter the menu. Move the highlight bar by
pressing the buttons or to enable or disable the close caption
feature. Please press “ENTER” to finalize your selection. You can
leave this menu by pressing the button on your remote control.
- Note: Please note that the DVD has to support this feature. Further-
more, you need a Video Subtitle Decoder.
Screen Saver
-Used to set the amount of time the device should be idle before the
screen saver is enabled and before the device goes into Standby
mode.
-Highlight “Screen Saver” in the general setup menu. Please press
the direction button to enter the menu. Move the highlight bar by
pressing the buttons or to enable or disable the screen saver.
Please press “ENTER” to finalize your selection. You can leave this
menu by pressing the button on your remote control.
Parental
-Used to select the level of parental control required. When the level
is set, a disc above this level can only be viewed if the correct pass-
word is entered. The lower the value is, the more strict the limita-
tion. You can choose the following playback limitations:
1. KID SAFE
2. G
3. PG
4. PG 13
5. PGR
6. R
7. NC 17
8. ADULT
OFF
ENG
SETUP MENU -- MAIN PAGE
GENERAL SETUP
AUDIO SETUP
VIDEO SETUP
LANGUAGE SETUP
EXIT SETUP
ANGLE MARK ON
CLOSE-CAPTIONS OFF
SCREEN SAVER
PARENTAL
PASSWORD
DEFAULT
MAIN PAGE
ANGLE MARK
CLOSE-CAPTIONS
SCREEN SAVER
PARENTAL
PASSWORD
DEFAULT
MAIN PAGE
1. KID SAFE
2. G
3. PG
4. PG 13
5. PGR
6. R
7. NC 17
8. ADULT
OFF
-- GENERAL SETUP PAGE --
-Highlight “Parental” in the general setup menu. Please press the direction button to enter the menu. Move the
highlight bar by pressing the buttons or to choose the required playback limitation. Please press “ENTER” to
finalize your selection. You can leave this menu by pressing the button on your remote control.
- Note: Any changes in the parental setup require to enter a password. The password setup is explained in the
“Password” menu.

Default
-If you want to reset the default settings, please highlight “Default” in
the general setup menu. Please press the direction button to
highlight the menu point “Reset”. Press “ENTER” to reset the OSD
settings to the original factory settings.
- Note: Please note that the Password or Parental settings won’t be
changed or deleted.
AUDIO SETUP
SPDIF Output
-Highlight “SPDIF Output” in the audio setup menu. Please press the
direction button to enter the menu. Move the highlight bar by
pressing the buttons or to select one of the following options:
SPDIF OFF: Please select this option to switch the digital output off.
Please note that the analogue outputs are still enabled.
SPDIF / RAW (Digital DOLBY/DTS): Digital Coding of one to six
channels (5 plus 1) in a bitstream (Dolby Digital/DTS). If you would
like to enjoy the effect of DVD 5.1, please select SPDIF RAW.
SPDIF / PCM: PCM (Pulse Code Modulation). The description of
the PCM sound of DVD's corresponds to the CD system, but with a
higher reading rate (48 kHz, 96 kHz also possible). Alternatively,
audio for most films is stored as discrete, multi-channel surround
sound using Dolby Digital or DTS audio compression similar to the
digital surround sound formats used in theatres.
-Please press “ENTER” to finalize your selection. You can leave this
menu by pressing the button on your remote control.
15
SETUP MENU
Password
-To set the password, please highlight “Password” in the general setup menu. Please press the direction button
to highlight the menu point “Change”. Press “ENTER” to open the password change page. Enter now the last stored
password using the number keys on your remote control. Enter now the new password and confirm your setup by
entering this password again. You will now be asked to press “ENTER” to continue.
-In order to activate the new password, please leave the setup menu. When pressing again the “SETUP” button, the
new password is activated.
- Note: Please keep your password in mind!
ANGLE MARK
CLOSE-CAPTIONS
SCREEN SAVER
PARENTAL
PASSWORD
DEFAULT
MAIN PAGE
CHANGE
-- GENERAL SETUP PAGE -- -- PASSWORD CHANGE PAGE --
PLEASE ENTER OLD PASSWORD
OLD PASSWORD
NEW PASSWORD
CONFIRM PWD
ANGLE MARK
CLOSE-CAPTIONS
SCREEN SAVER
PARENTAL
PASSWORD
DEFAULT
MAIN PAGE
RESET
-- GENERAL SETUP PAGE --
-- AUDIO SETUP PAGE --
SPDIF OUTPUT
DOWNMIX
DUAL MONO
DYNAMIC
MAIN PAGE
SPDIF OFF
SPDIF/RAW
SPDIF/PCM

SETUP MENU
16
ENG
Downmix
-Output over analogue audio output and additionally over the digital
output when set to PCM.
-Highlight “Downmix” in the audio setup menu. Please press the
direction button to enter the menu. Move the highlight bar by
pressing the buttons or to select one of the following options:
LT/RT:If you set to LT/RT, a mixed signal of the surround signal will
be produced on the left and right output. The left output signal con-
sists of the front left signal plus centre and the sum signal of the left
and right signal of the surround speakers. The right output signal
consists of the front right signal plus subwoofer plus the difference
signal of the left and right signal of the surround speakers.
STEREO: If you set to STEREO, the left signal consists of the front
left signal plus surround left signal and sum signal of the centre and
subwoofer. The right signal consists of the front right signal plus sur-
round right signal and sum signal of the centre and subwoofer.
-Please press “ENTER” to finalize your selection. You can leave this
menu by pressing the button on your remote control.
Dual Mono
-Highlight “Dual Mono” in the audio setup menu. Please press the
direction button to enter the menu. Move the highlight bar by
pressing the buttons or to select one of the following options:
STEREO: Sets the stereo signal.
L-MONO: There will only be output of the left signal on the left and
right loudspeaker.
R-MONO: There will only be output of the right signal on the left
and right loudspeaker.
MIX-MONO: The left and right signal will be mixed and put out
mixed on the left and right loudspeaker.
-Please press “ENTER” to finalize your selection. You can leave this
menu by pressing the button on your remote control.
Dynamic
-In this menu you can set the Dynamic Range Control. Big volume
jumps will be reduced, if they are annoying - e. g. late in the eve-
ning.
-Highlight “Dynamic” in the audio setup menu. Please press the
direction button to enter the menu. Move the bar by pressing the
buttons or to select the required dynamic range control. You
can set this mode to OFF, 1/8, 2/8, 3/8, 4/8, 5/8, 6/8, 7/8 and FULL.
-Please press the button on your remote control to leave this
menu point.
-- AUDIO SETUP PAGE --
SPDIF OUTPUT
DOWNMIX
DUAL MONO
DYNAMIC
MAIN PAGE
SPDIF OUTPUT
DOWNMIX
DUAL MONO
DYNAMIC
MAIN PAGE
LT/RT
STEREO
STEREO
L-MONO
R-MONO
MIX-MONO
-- AUDIO SETUP PAGE --
SPDIF OUTPUT
DOWNMIX
DUAL MONO
DYNAMIC
MAIN PAGE
FULL
6/8
4/8
2/8
OFF

SETUP MENU
17
VIDEO SETUP
TV Type
-Highlight “TV Type” in the video setup menu. Please press the direction
button to enter the menu. Move the highlight bar by pressing the
buttons or to select one of the following options:
PAL: Television norm in most European countries (from 625 lines only
576 lines will be transferred with a picture changing frequency of 50
half pictures per second).
MULTI: The DVD will be played in the original format (multinorm TV
necessary).
NTSC: Television norm in USA and Japan (from 525 lines only 480
lines will be transferred with a picture changing frequency of 60 half
pictures per second).
-Please press “ENTER” to finalize your selection. You can leave this
menu by pressing the button on your remote control.
TV Display
-Highlight “TV Display” in the video setup menu. Please press the direc-
tion button to enter the menu. Move the highlight bar by pressing
the buttons or to select one of the following options:
NORMAL/PS 4:3 (Pan-Scan): Transmission of a widescreen film on a
standard size television with the sides chopped off.
NORMAL/LB 4:3 (Letterbox): Transmission of a widescreen film with
bars on top and on bottom on a standard size television.
WIDESCREEN 16:9: Transmission of a widescreen film on video with
black bars on top and on bottom. This setting is recommended if you
are using a television with 16:9 format.
-Please press “ENTER” to finalize your selection. You can leave this
menu by pressing the button on your remote control.
Sharpness
-In this menu you can adjust the picture sharpness.
-Highlight “Sharpness” in the video setup menu. Please press the direc-
tion button to enter the menu. Move the highlight bar by pressing
the buttons or to set the sharpness either to high, medium or low.
-Please press “ENTER” to finalize your selection. You can leave this
menu by pressing the button on your remote control.
Brightness
-In this menu you can adjust the bright-
ness of the picture.
-Highlight “Brightness” in the video setup
menu. Please press the direction button
to enter the menu. Move the bar by
pressing the buttons or to set the
brightness. The setting range is from
-20 to +20.
-Please press the button on your
remote control to leave this menu point.
-- VIDEO SETUP PAGE --
TV TYPE
TV DISPLAY
SHARPNESS
BRIGHTNESS
CONTRAST
VIDEO OUTPUT
MAIN PAGE
PAL
MULTI
NTSC
-- VIDEO SETUP PAGE --
NORMAL/PS 4:3
NORMAL/LB 4:3
WIDESCREEN 16:9
HIGH
MEDIUM
LOW
TV TYPE
TV DISPLAY
SHARPNESS
BRIGHTNESS
CONTRAST
VIDEO OUTPUT
MAIN PAGE
TV TYPE
TV DISPLAY
SHARPNESS
BRIGHTNESS
CONTRAST
VIDEO OUTPUT
MAIN PAGE
I I I I I I I I I I I . . . . . . . . . . .
-- VIDEO SETUP PAGE --
0
BRIGHTNESS 0
PRESS LEFT TO MAIN MENU
TV TYPE
TV DISPLAY
SHARPNESS
BRIGHTNESS
CONTRAST
VIDEO OUTPUT
MAIN PAGE

SETUP MENU
18
ENG
LANGUAGE SETUP
Highlight the menu point you would like to set in the language setup
menu. Please press the direction button to enter the menu. Move
the highlight bar by pressing the buttons or to select the required
language. Please press “ENTER” to finalize your selection. You can
leave this menu by pressing the button on your remote control.
OSD Language
Sets the language for the user interface menus. You can choose bet-
ween different languages.
Audio
Sets the language for the disc sound track.
I I I I I I I I I I I . . . . . . . . . . .
Contrast
-In this menu you can adjust the contrast of the picture.
-Highlight “Contrast” in the video setup menu. Please press the direction button to enter the menu. Move the bar
by pressing the buttons or to set the brightness. The setting range is from -20 to +20.
-Please press the button on your remote control to leave this menu point.
Video Output
-In this menu you can either set the video output to RGB or S-Video.
RGB (over Scart): Electrical transmission possibility for video pictu-
res, i.e. it is a picture signal, which is splintered according to the pri-
mary colours of the TV (red, green and blue).
S-Video: Picture signal, which is splintered according to colour and
brightness. This signal transfer enables a higher sharpness and more
low-noise picture compared to composite picture information, which
will only be sent over one wire.
Subtitle
Sets the language in which subtitles are displayed. If no subtitle display is required, please select “OFF”.
Disc Menu
Sets the language in which the menus provided on the disc are displayed.
Note: You are only able to select the menu points AUDIO, SUBTITLE and DISC MENU in “Stop” mode.
-- VIDEO SETUP PAGE --
TV TYPE
TV DISPLAY
SHARPNESS
BRIGHTNESS
CONTRAST
VIDEO OUTPUT
MAIN PAGE
0
CONTRAST 0
PRESS LEFT TO MAIN MENU
OSD LANG
AUDIO
SUBTITLE
DISC MENU
MAIN PAGE
-- LANGUAGE SETUP PAGE --
ENGLISH
FRENCH
GERMAN
SPANISH
PORTUGUESE
ITALIAN
SWEDISH
DANISH
DUTCH
TV TYPE
TV DISPLAY
SHARPNESS
BRIGHTNESS
CONTRAST
VIDEO OUTPUT
MAIN PAGE
RGB
S-VIDEO
-- VIDEO SETUP PAGE --
Table of contents
Other CyberHome DVD Player manuals

CyberHome
CyberHome CH-DVR 1600MU User manual

CyberHome
CyberHome DVR 1500 Installation and operating instructions

CyberHome
CyberHome CH-DVD 402/S User manual

CyberHome
CyberHome CH-DVD 300 User manual

CyberHome
CyberHome DX162D User manual

CyberHome
CyberHome CH-DVD 300 User manual

CyberHome
CyberHome 4620 User manual

CyberHome
CyberHome CH-MDP 2500 User manual

CyberHome
CyberHome MP016-A Mounting instructions

CyberHome
CyberHome DVR 1200MU User manual