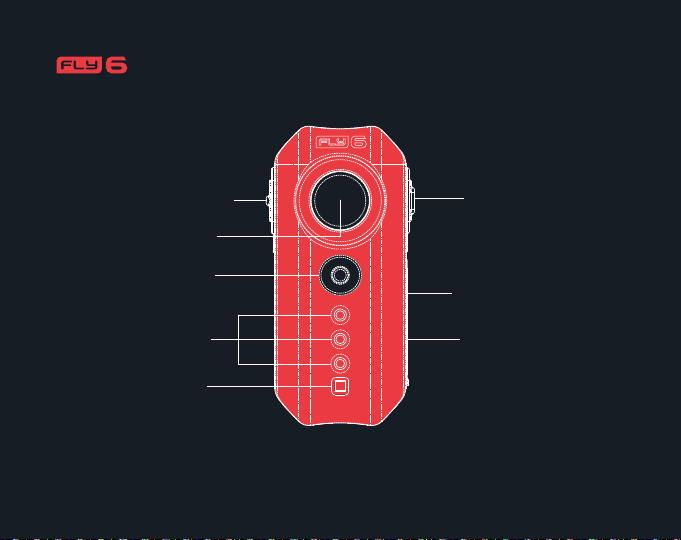
cycliq Fly 6 User manual

QUICK
START
GUIDE


WHAT’S IN THE BOX
Fly6
unit
1
10 degree
spacer
Standard
Strap x 4
microUSB
cable
Aero post
spacer
Longer
Strap x 2
MicroSD
Quick start
guide
0 degree
spacer x 2
Seat post
mount
SD card
adapter
5 degree
spacer

2
FEATURES & FUNCTIONS
Power button
HD camera
LED strobe
light microUSB
port
LED lights
Courtesy
dimmer
MicroSD
slot
Charging
light
The MicroSD card has already been installed

3
CONNECT & CHARGE
With the supplied USB cable connect your Fly6 to a PC or Mac. The bottom
LED will light until charged. Your Fly6 will now be visible on your computer

4
SETTING TIME & DATE
Keeping your Fly6 connected select the icon
on your computer desktop
Open the new directory called “Fly6” in your
le explorer
Using the application ‘Textedit’ on Mac or
‘Notepad’ on Windows, open “ CONFIG.TXT”
Modify from a ‘0‘ to a ‘1’ in the 1st row
Modify date to suit the following 24 hour format;
Sep 24 2014 12:56:00
Save the le
Safely remove your Fly6 from your computer
Turn on to have the settings take effect

Seat
Post
Mount
Click
5
ATTACHING FLY6 TO YOUR BIKE
Slide seat post mount onto your Fly6, you should hear a click
Use provided spacers to ensure Fly6 is at 90º to the ground
Hold Fly6 against seat post to check unit orientation
Now attach straps to seat post mount hooks

Hold against seat post and wrap straps around post afxing straps to hooks
Ensure unit is securely xed avoiding any excessive movement or tilt
6
ATTACHING FLY6 TO YOUR BIKE

7
OPERATING YOUR FLY6
Important: Before operating, ensure the
USB cover is rmly depressed and seated
Power button
- Turn On/Off (depress for 1 second)
- Toggle through ashing sequences
(depress briey)
Courtesy dimmer
Use this button to cycle through dimming
modes
Fly6 will remember your last settings

8
Incident Capture Mode
If device is tilted more than 30º from horizontal
for 5 seconds, incident capture mode will
activate and 3 quick beeps will sound. Fly6 will
continue to record for 1 hour and then turn off
(with 3 loud beeps)
Using your Fly6 video les
To view your footage use VLC Media Player
(www.videolan.org)
To convert your footage to other video formats
use the free Smart Converter
(www.shedworx.com/smartconverter)
To edit your footage use VideoLAN
(www.nchsoftware.com/videopad/index.html)
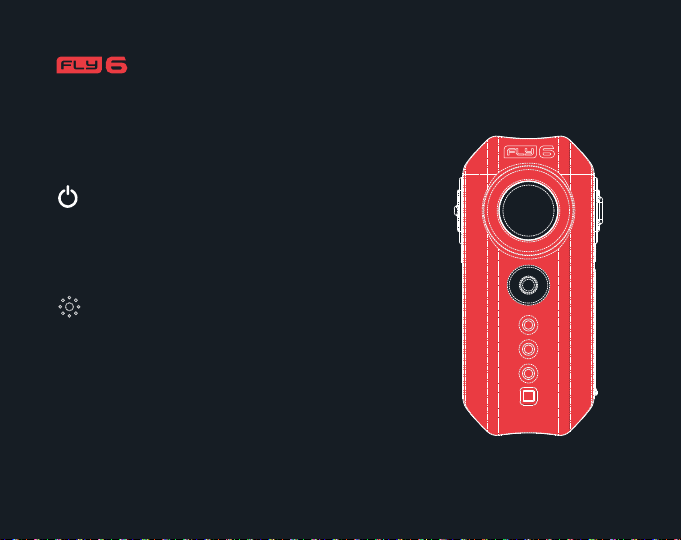
OPERATING YOUR FLY6

4 Beeps
75%+
Charged
NOTE: Should the battery deplete beyond 5% during
operation, 3 long beeps will sound, audio and video
function will turn off, and light will continue to operate
with remaining power (approx. 1.5 hours)
For additional instructions, visit www.cycliq.com to
download a complete instruction manual
3 Beeps
50%+
Charged
2 Beeps
25%+
Charged
1 Beep
5%+
Charged
3 Beeps
Under 5%
Charged
POWER AND BATTERY LIFE
9

Video: 1280 x 720
Frame rate: 30fps
Video format: .AVI
Video compression
format: H.264
File size: 10 minutes (~400-900MB)
Battery Life: Up to 6 hrs
Max Lumens: Up to 30
Max supported
memory card: 32GB
Recommended
MicroSD card: Class 10
Weight: 4 oz (113g)
USB: Micro 2.0
10
SPECS AND REFERENCES

11
PROBLEM SOLUTION
TROUBLESHOOTING
Powering
down
Idle mode prevents battery from depleting if you have
forgotten to turn off your Fly6 and it remains stationary
for 15 minutes by turning off
Records
for only
one hour
Three loud
beeps
Incident capture mode will engage if the bike with a Fly6
is leaned over more than 30 degrees from horizontal
for more than ve seconds. Your Fly6 will then turn off
completely after one hour
Battery has depleted to 5% or less. Only the camera &
audio functions are shut down leaving the ashing lights
functioning, which can last for up to 1.5 hours
Or;
Incident Capture mode was triggered 1 hour ago and
the device has just shut down due to this function being
triggered 1 hour prior
Tip: Reformat MicroSD card on a regular basis for optimum performance.

CYCLIQ COMMUNITY
• Join the Fly6 video community by uploading your
videos to our website www.cycliq.com
• Follow us on our social media channels
• For further information and a full instruction manual
please visit our website
12
FCC Compliance Statement
This device complies with Part 15 of the Federal Communications Commission (FCC) Rules. Operation is subject to the following two conditions: 1) This
device may not cause harmful interference, 2) This device must accept any interference received, including interference that may cause undesired operation.
Caution:
Changes or modications to this unit not expressly approved by the party responsible for compliance could void the user’s authority to operate this
equipment. This equipment has been tested and found to comply with the limits for a Class B digital device, pursuant to Part 15 of the FCC Rules. These limits
are designed to provide reasonable protection against harmful interference in a residential installation. This equipment generates, uses and can radiate radio
frequency energy and, if not installed and used in accordance with the manufacturer’s instructions, may cause interference harmful to radio communications.
There is no guarantee, however, that interference will not occur in a particular installation. If this equipment does cause harmful interference to radio or television
reception, which can be determined by turning the equipment off and on, the user is encouraged to try to correct the interference by one or more of the
following measures: Reorient or relocate the receiving antenna. Increase the separation between the equipment and receiver. Connect the equipment to an
outlet on a circuit different from that to which the receiver is connected. Consult the dealer or an experienced radio or TV technician for help.
Cycliq, PO Box 130, Leederville, Western Australia, 6903

www.cycliq.com

Other manuals for Fly 6
4
Table of contents
Other cycliq Camcorder manuals