Cyclo Vac HD User manual

SERIAL NO / NO DE SERIE : _____________________________________
ENGLISHFRANÇAISESPAÑOL
ManuEl D’instructions
Veuillez lire attentivement ce document avant de procéder
à l’installation et/ou l’utilisation de votre récupérateur.
Manual DE instruccionEs
Por favor, lea atentamente este documento antes de
proceder a la instalación y/o utilización de su recuperador.
ownEr’s Manual
Please read this document carefully before installing
and/or using your collector.
Dust collEctors
rÉcuPÉratEurs À PoussiÈrE
rEcuPEraDorEs DE Polvo
by / Par / Para


3
IMPORTANT SAFETY INSTRUCTIONS
Read all instructions before using this appliance.
WARNING
1. Do not use outdoors or on wet surfaces.
2. Do not allow system to be used as a toy. Close attention is necessary when
used by or near children or inrm persons. This appliance is not intended for
use by persons (including children) with reduced physical, sensory or mental
capabilities, or lack of experience and knowledge, unless they have been
given supervision or instruction concerning the use of the appliance by a
person responsible for their safety.
3. Use only as described in this manual.
4. If appliance is not working as it should, has been dropped, damaged, left
outdoors, or dropped into water, return it to a Cyclo Vac service center.
5. Do not pick up anything that is burning or smoking, such as cigarettes,
matches, or hot ashes.
6. Use extra care when cleaning on stairs.
7. Do not use to pick up ammable or combustible liquids such as gasoline or
use in areas where they may be present.
KEEP THESE INSTRUCTIONS


5
Table of Contents
Preface 6
Schematic 6
INSTALLATION
Unit installation 7
Dos & Don’ts – Installing conduits 8
MAINTENANCE
Dirt Receptacle 10
Collector with lters 10
Collector with electrostatic bag 11
Collector – No lter, no bag 12
TROUBLESHOOTING
General Information 13
Decrease in suction strength 14
System will not start 16
System will not stop 16
WARRANTY INFORMATION
Limited lifetime warranty 17
WEEE Directive 18

6
1. Air intake
2. Filtration exhaust
Preface
Your new Cyclo Vac dust collector was designed and manufactured in Blainville,
Quebec, by the largest central vacuum cleaner manufacturer in Canada. With over
50 years of experience in the eld, we provide a high-quality, state-of-the-art pro-
duct, and guarantee your complete satisfaction. Our extensive network of qualied
professionals ensures rst quality service near you. Contact us for the location
of the Cyclo Vac authorized dealer in your area, or visit our website: www.cyclovac.
com.
Schematic
Installation
2
2
OR
1
1
* Must be connected
to a HD motor

gure 1
gure 2
gure 3
7
Installation
Unit Installation
Using the mounting plate provided with
your unit, secure it to the wall (gure 1),
at a height allowing easy access to change
the bag or empty the dust canister.
The connections to the piping system will
require some basic tools: a mitre box and
small saw or a pipe cutter (gure 2). See
pages 8 and 9 for general instructions
pertaining to the preparation of PVC pipes.
To simplify matters, installation kits are
available at your CycloVac dealer.
Contrary to all other connections in the
piping system (except the connection
between the collector and motor),
do not glue the last tting to your unit.
Cyclo Vac dust collectors are equipped
with an adjustable air intake valve (gure 3),
which does not require glue. An air-tight t
is obtained with the screw-type adjustment
on the tting itself.

8Installation
Dos & Don’ts
INSTALLING THE PIPING

9
Installation
Dos & Don’ts

10
Dirt Receptacle
Occasional maintenance of the dirt receptacle is necessary to ensure constant,
lasting performance. We recommend that it be emptied at least every season,
depending on frequency of use. To empty the collector dust receptacle, disconnect
your HD motor from its power source. Then, release the two clamps and empty
the recipient. Reseal the receptacle in place.
gure 14
gure 15
gure 13
Regular maintenance of the ltration system is
recommended to ensure maximum performance of your
central vacuum system.
Your Cyclo Vac system collector is equipped with two
lters. The anti-clogging lter (thin fabric) stops the larger
particles, and the thick lter catches the microscopic
particles. Both lters are washable in cold water (no
bleach) and can be dried at low temperature.
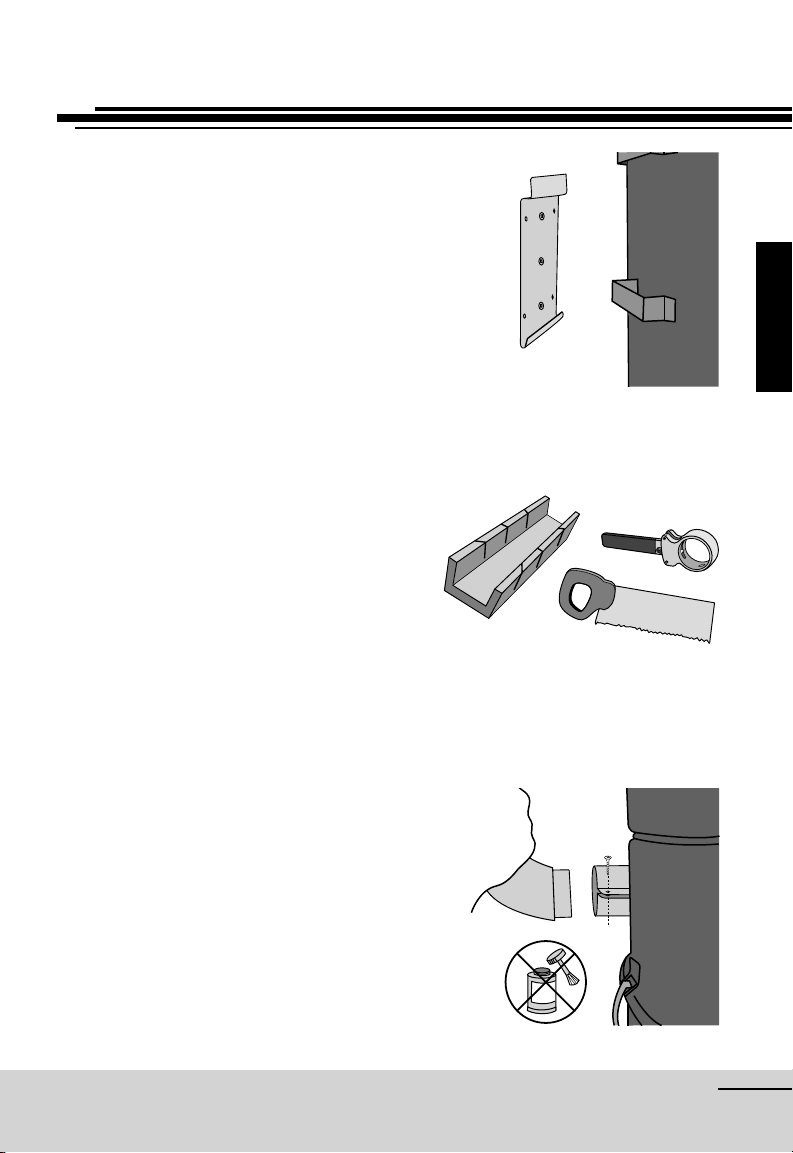
1. To remove the lters, rst remove the dust receptacle
(gure 13).
2. Then, use the straps at the base of the lters to
withdraw (gure 14) We recommend cleaning the anti-
clogging lter (thin fabric) every time the dust receptacle
is emptied. You may either shake it out, or wash it. The
thick lter should be cleaned after four anticlogging lter
cleanings, or approximately once a year.
3. Both lters must be completely dry before they are
reinstalled. Carefully install them in the support grooves
(gure 15) on the lter frame to ensure adequate
protection of the motor. Install the thick lter rst,
and the anticlogging lter (thin fabric) over.
Inspect the lters for tears and punctures before
reinstalling them. Do not reinstall damaged lters.
Troubleshooting
Collector with Filters

11
Troubleshooting
Collector with electrostatic Bag
Replace the bag when full. Frequency will depend
on use of the unit.
1. To access the bag, unlatch the two clips and
remove the dust receptacle (gure 16).
2. Remove the used bag and seal bag opening
(adhesive seal provided on each bag). Discard
used bag.
3. Install the new bag, ensuring the tabs on the
bag adaptor are aligned with the slots in the bag
collar (gure 17).
4. Ensure adequate sealing by inserting bag as far
as retention ring (gure 18).
Rotate bag 20° (gure 18) to ensure tabs on
bag adaptor are no longer aligned with the slots
in the bag collar.
5. Put the dust receptacle back in place and seal
by latching both clips.
Only use genuine Cyclo Vac replacement bags.
Failure to do so could void the warranty on
your collector.
gure 16
gure 18
gure 17
Permanent Filter
The drum-shaped lter requires no maintenance. It will be checked by the
authorized dealer when you have the system unit inspected, after approximately
500 hours of use.
retention ring
tabs on bag adaptator

12
For a normal use, we recommend a regular maintenance of your dust canister, to
ensure the maximum performance of your system.
1. To empty the collector dust receptacle, disconnect the HD unit from its
power source.
2. Release the two clamps, remove the dust canister, and empty it (gure 13A).
3. If the guard screen (wire netting) looks blocked, clean it with a scrubbing
brush (gure 13B).
4. Put the dust canister back in place and seal by latching both clips.
Collector – no filter, no bag
gure 13A gure 13B
Troubleshooting

13
General Information
Your vacuum cleaning system is designed to collect everyday dry matter (dust).
It is approved by authorized testing agencies for dry use only. Do not use on wet
surfaces.
Should you accidentally vacuum liquids, immediately unplug the HD unit from the
electric outlet, then empty and wipe the collector dust recipient with a dry cloth.
Then operate the system from the vacuum inlet through which you vacuumed the
liquid, in order to eliminate all moisture in the piping system.
We strongly recommend against vacuuming abrasive materials such as cement,
plaster and gyproc dust. This ne dust could cause considerable damage. Should
you do so inadvertently, immediately clean the lters (if applicable) and, as a
precautionary measure, contact your authorized service center to determine the
extent of the damage to the unit.
Remember that in order for your warranty to remain valid, maintenance of the
motor and repairs to the unit itself must be carried out by an authorized service
center, using original CycloVac or Trovac parts.
Troubleshooting

14
Troubleshooting
PROBLEM POSSIBLE CAUSE CORRECTIVE ACTION
Decrease in suction
strength
Dirt recipient/Bag is full Empty dirt recipient /
change bag.
Dirt recipient is not
properly attached
Check clamps and dirt
recipient are aligned.
Filters need cleaning /
replacing (if applicable)
Remove, shake and/or
wash lters or replace
them (depending on
model) before reinstalling
them in the unit.
Open vacuum inlet Close all vacuum inlets
not in use.
Exhaust line is clogged Verify that no object is
blocking the exhaust.
Guard screen (wire netting)
of the collector (no lter,
no bag) is blocked.
Check the guard screen
for blockage. If it is
blocked, clean it with
a scrubbing brush.
Troubleshooting

15
Troubleshooting
PROBLEM POSSIBLE CAUSE CORRECTIVE ACTION
Decrease in suction
strength (cont.)
Blocked hose Plug the handle end of
the hose into the suction
inlet, thus reversing the
suction in the hose.
Cover the gap around
the handle, to ensure
suitable suction strength,
and ensure contact with
inlet contacts to start the
unit. This should clear
the hose
Obstruction in the piping
system
Remove the screw from
the air intake connector,
to free the collector from
the piping system. Start
the system by plugging
the hose into a vacuum
inlet. By placing your
extended hand over the
air intake opening on
the collector, check the
suction strength on the
collector itself. If suction
strength is normal, the
obstruction is in the
piping system. If suction
strength is diminished
or completely absent,
have the unit and dust
collector checked by an
authorized service center.
If none of these suggestions restore suction strength, contact
your authorized service center.
Troubleshooting

16
Troubleshooting
PROBLEM POSSIBLE CAUSE CORRECTIVE ACTION
System will not start Faulty vacuum inlet Start the vacuum system
from other inlets in your
home, to identify the
defective inlet.
Defective on/off hose Turn the hose ¼ turn in
the vacuum inlet. If unit
starts, have the vacuum
hose checked by a
certied service center.
If none of these suggestions help start your system,
contact your authorized service center.
System will not stop Hose improperly inserted
into vacuum inlet
Ensure that the hose
end is properly placed
in the vacuum inlet: the
tab on the hose should
t into the slots of the
inlet, to ensure adequate
contacts for the hose
switch to function.
Defective on/off hose If the hose is properly
placed in the vacuum
inlet, and the unit
continues running
despite the fact that
the hose switch is in
the “off” position, have
the hose checked by a
service center.
If in spite of these suggestions, your system is still not stopping,
contact your authorized service center.
Troubleshooting

17
Warranty Information
LIMITED LIFETIME WARRANTY
Your Cyclo Vac HD dust collector is protected by a lifetime warranty. We
guarantee that the unit canister will be exempt of any material or manufacturing
defect. This warranty is valid from the date of purchase, for as long as you are
the original owner, and the system remains at its original place of installation.
Our authorized service center will repair or replace (at Cyclo Vac’s discretion)
the defective part or parts, free of labor costs, for a period of 5 years.
Cyclo Vac Warranty
Parts
MODEL PARTS LABOR
HD dust Collector 10 years 5 years
In order to maintain your warranty, all repairs must be made by an authorized
Cyclo Vac service center, with original CycloVac or Trovac parts. Failure to do so
could void the warranty.
This warranty excludes normal wear and tear of certain parts such as lters,
damages caused (according to Cyclo Vac) by abusive use (ex. : drywall
dust, water, etc.), lack of appropriate maintenance, inadequate installation,
negligence, natural disasters, accidents, and acts of God.
This warranty is not a modication but an addition to warranties required by
law. Any claim relative to this warranty must be accompanied by the original
invoice.Any changes or modications made to the product may invalidate this
warranty. Transportation and service calls are excluded . This warranty is non
transferable.
Keep all payment records (bill of sale, delivery slip). The date on these records
establishes the warranty period. Should warranty service be required, you must
show proof of purchase.
Cyclo Vac shall not be held responsible for any consequential, incidental, or
special damages arising from the use of the central vacuum.
WARRANTY TERMS MAY VARY DEPENDING ON COUNTRY.
Warranty Information

18
IMPORTANT ENVIRONMENTAL INFORMATION – EUROPEAN ECONOMIC AREA ONLY
This appliance has been assessed in accordance with the European Parliament
Directive on Waste Electrical and Electronic Equipment, usually referred to as the
WEEE Directive.
The WEEE Directive requires that the appliance be disposed of at the end of its
useful life in an environmentally responsible manner. Parts and materials should
be re-used or re-cycled in order that the use of new resources and amount of
waste going for landll can be minimised.
The WEEE Directive stipulates that the supplier should collect the used item
without cost to you. Please inform the supplier of your wish to have the old
appliance collected when ordering the replacement.
If you wish to dispose of the appliance yourself, do not mix it with unsorted
municipal waste. The crossed-out wheeled bin symbol on the unit label (gure 22)
indicates this requirement. You must ensure that the appliance is disposed of at
an authorised treatment facility. Details can be obtained from your local council.
WEEE Directive
gure 22

RÉCUPÉRATEURs À POUssIÈRE
PAR
MAnUEl D’InsTRUCTIOns
Veuillez lire attentivement ce document avant de procéder à l’installation
et/ou l’utilisation de votre système d’aspiration centralisée commercial.
NO DE SERIE : ____________________________________________
FRANÇAIS

Table of contents
Languages:
Popular Dust Collector manuals by other brands

Jet
Jet DC-650BK Operating instructions and parts manual

Jet
Jet DC-900 operating instructions

Grizzly
Grizzly G0637HEP manual

Trelawny
Trelawny A70 Operation and maintenance manual

Donaldson Torit
Donaldson Torit Downflo II DFT 2-4 Installation and operation manual

OHM ELECTRIC
OHM ELECTRIC DUST CUBE ODU-080DSA-AT3 instruction manual

Harbor Freight Tools
Harbor Freight Tools 2448 Assembly and operating instructions

Central Machinery
Central Machinery 61808 Owner's manual & safety instructions

Donaldson
Donaldson Downflo Evolution DFE 2-8 Installation, operation and maintenance manual

Texas Equipment
Texas Equipment COLLECTOR BOX Assembly instruction

Blastrac
Blastrac BMR-75D operating manual

Craftex
Craftex CT186 user manual