Shenzhen Tomacro IimHD 310s User manual
(Version: 1.04)

1
Important Safety Precautions
zTo reduce the risk of fire, electric shock or product damage, do not expose the
device to rain, humidity or any spilling of liquid. Do not place any water-holding
vessels such as vase on the player.
zFor the purpose of good conditions of ventilating, do not set up the device or put it
in bookcase, internal-inserted player cabinet or other airproof spaces. Keep the
curtain or any other things from blocking the airway, in case that excessive heat of
the device causes electric shock or fire.
zNever place any open flame devices such as the burning candles on the player.
zTry to dispose the used battery in an environmental friendly way.
zThe player should be placed near the AC socket-outlet. The electricity pin should
be placed easily accessible if any malfunctions occur.
zThe player might be interfered by the radio wave of mobile phone while using. If
the interference is obvious please keep the mobile phone away from the player.
zPlease read the instructions and methods of operation in the manual. Keep this
manual well for future references.
Placement
Put the player on even surface away from the sunlit/sunlight, high temperature, high
humidity or frequent vibration. Otherwise it will cause damages to the cabin and its
internal parts thus shorten its life. Do not place any heavy loads. Keep it in a distance
more than 20 cm away from the wall. In case of any personal accidents, do consider the
safety of infants or children while placing it.
Overload
Do not overload or trample on the device. Doing so may cause serious personal accidents
and critical damage to the player.
Ventilation
The groove joints and cooling holes are designed for ventilation, avoiding overheat and
working liability of the device. Do not block or cover it. Do not put the player on things

2
like beds, sofa, and cloth in case the vent is blocked. Don’t place the player in unventilated
or other locations not recommended by manufacturer such as bookshelf and frames.
Power supply
No over power supply or it might overload the player and cause fire. Connect the AC
power cable properly and make sure there are no defects. Poor connection or defected
power cable will cause fire and electric shock.
Do not pull, fold the power cable or make it heavy loaded.
Do not overload the power supply in the socket-outlet. Be careful as it might cause electric
shock or fire if power cable, IC lead socket are lengthened.
Hold the plug tightly when disconnecting theAC supply.
Do not plug in or unplug with wet hands. Otherwise it might cause electric shock.
Unplug the player when thundering or long unused to avoid damages from thunder and
electric fluctuations efficiently.
Heat sources
The player should be kept away from heat sources, such as radiators, heat registers, stoves
and other heat producers (including amplifiers).
Water and Moisture
Do not use the player near water, such as bathtub, wash bowl, kitchen sink or laundry tub
and etc.; also avoid moist places like basement or near swimming pool.
Dew
Humidity and dews cause damages to the player. Therefore, read it carefully.
Humidity and dews always happen. For instance, in summer you will find globs outside the
glass if you pour iced drinks into it. Similarly, dews might appear in top cap of the player,
which is the most sensible part in the player. Dews easily appear in the following
conditions:

3
zWhen you suddenly move the player from warm places to cold places.
zWhen you use the player in the room where you just open the heater or the player is
right under the cooling areas of air conditioner.
zWhen you move the player from air-conditioner room and use it in places of high
temperature and humidity in hot summer.
Do not use the player if dew appears. Doing so might damage the internal parts. Insert
the plug into the socket-outlet and press the power button. After 2 to 3 hours, the player
will be heated and make dews evaporated.
Object and liquid Entry
Do not push any metal objects or liquid into the player. Otherwise it might lead to
short-circuit and cause electric shock, fire or malfunctions. Unplug the player and contact
with the local agent if you carelessly drop any liquid into the player.
Do not spray pesticide to the surface or the internal part of the player. The sprinkler
pesticide contains combustible gas that might cause fire if it enters the player.
Cleaning
Unplug the electric pin of AC supply before cleaning. Do not use any liquid cleaning
solvent or aerosol detergent. Use soft damp cloth for cleaning.
When cleaning the stains difficult to clean, immerse the soft cloth with liquid detergent and
wring out the cloth before cleaning. Then wipe the device dry with soft dry cloth. Do not
use any dissolvent like retarder thinternal and synasol as they will damage the surface of the
player.
Follow the instructions if you use the cloth soaked by chemical water while cleaning.
Attachments
Do not use attachments not recommended by the manufacturer as it might cause danger.
Accessories
Do not place the player on an unstable trolley, stand, tripod, bracket or desk. The player
might fall, causing injuries to child or adult. Fix the player following the manufacturer’s
instructions and use the recommended accessories. A product and trolley combination
should be moved with care. Quick-stop, excessive force and uneven surfaces may cause the
product and trolley combination overturn.

4
Headphones
Turn the volume up to the middle position when using the headphone. It might cause
hearing impairment if you listen to loud music by headphone for a long time.
Services
Do not try to repair the player. Repairing, disassembling or remodeling the player by
unskilled people might cause electric shock or damages to the player. Unplug the electric
pin of the AC supply and contact with the local agent or maintenance center, if the followings
happen or other malfunctions not showed in the manual occur.
a) If there is abnormal sound/picture, guiding light, or when the light of VFD panel
goes off or smoke occurs;
b) When the power-supply cord or plug is damaged;
c) If liquid has been spilled, or objects have fallen into the player;
d) If the player has been exposed to rain or water;
e) If the player does not operate normally under correct operation. Adjust the
buttons specified in the manual, as an improper adjustment of other buttons may
result in damage. It often requires extensive work by even a qualified technician
to restore the player to its normal operation;
f) If the player has been dropped or damaged in any way;
g) When the player exhibits a distinct change in performance, this indicates a need for
service.
When parts replacement is required, make sure the new parts are specified by the
manufacture or with identical characteristics to the original parts. Unauthorized
substitutions may result in fire, electric shock or other hazards.
After any service and repair to the player, ask the technician to perform safety checks to
make sure that the player is in proper operating conditions.

5
limHD310s User Manual
Important Safety Precautions ............................................................................................................1
Chapter 1 limHD310s Brief Introduction .........................................................................................7
Chapter 2 limHD310s Technical Specifications ...............................................................................8
2.1 Hardware.............................................................................................................................8
2.2 Display Device supported ...................................................................................................8
2.3 Digital Media formats supported ........................................................................................9
2.4 Subtitle ................................................................................................................................9
2.5 Multi-language Supported...................................................................................................9
2.6 Firmware Upgrade Supported.............................................................................................9
Chapter 3 Precautions before Operation of limHD310s .................................................................10
3.1 Buttons ..............................................................................................................................10
3.2 Set the Video Output Mode...............................................................................................10
3.3 Refresh when changing USB devices ...............................................................................10
3.4 Mega Capacity CD............................................................................................................10
3.5 Recommended power-up procedures................................................................................11
3.6 Recommended shutdown procedures................................................................................11
3.6 Website.............................................................................................................................. 11
Chapter 4 limHD310s Internal HDD Installation ...........................................................................12
4.1 Install the Internal HDD....................................................................................................12
4.2 Format the Internal HDD ..................................................................................................14
4.3 Transfer files to Internal HDD ..........................................................................................15
Chapter 5 Installation and Connection............................................................................................16
5.1 Power Supply Jack(DC12V)........................................................................................16
5.2 USB 2.0 Device Connection .............................................................................................16
5.3 USB 2.0 Host Connection.................................................................................................16
5.4 10/100M Ethernet Connection (RJ45) ..............................................................................17
5.5 A/V interfaces ...................................................................................................................17
5.5.1 Video connection....................................................................................................17
5.5.2 Audio connection ...................................................................................................19
Chapter 6 VFD Panel of limHD310s ..............................................................................................21
Chapter 7 Remote Control of limHD310s ......................................................................................23
7.1 Precautions before using remote control...........................................................................24
7.2 Functions of Remote Control Buttons...............................................................................25
Chapter 8 limHD310s Buttons Instructions ....................................................................................28
Chapter 9 limHD310s Setup ...........................................................................................................29
9.1 Audio Setup.......................................................................................................................29
9.1.1 Audio output:..........................................................................................................29
9.1.2 Speakers Out ..........................................................................................................30
9.2 Video Setup .......................................................................................................................30
9.2.1 VGA .......................................................................................................................31
9.2.2 HDMI.....................................................................................................................32
9.2.3 SD Mode ................................................................................................................32

6
9.2.4 HD YPbPr ..............................................................................................................33
9.3 System Setup.....................................................................................................................34
9.3.1 TV Standard ...........................................................................................................34
9.3.2 TV Shape................................................................................................................35
9.3.3 Network Setup........................................................................................................35
9.3.4 Restore to the Default Settings...............................................................................38
9.3.5 Firmware Upgrade .................................................................................................39
9.3.6 Language Preference..............................................................................................40
Chapter 10 limHD310s Media Playback.........................................................................................41
10.1 Play Video Files ..............................................................................................................41
10.2 Play Music Files..............................................................................................................42
10.3 Browse the Photo Files....................................................................................................44

7
Chapter 1 limHD310s Brief Introduction
limHD310s is a kind of high-end High Definition Multi-media HDD Player. It is a perfect match
to your HDTV.
You can enjoy High Definition movies, listen to music or browse digital photos by connecting
limHD310s to HDTV (or other display devices such as High Definition Projectors) just by AV
cable.
Excellent Quality & Performance:
High definition video with resolutions up to 1080p
CD quality sound
Crystal clear pictures
limHD310s specific features:
1. Support resolution up to 1080p, is a perfect match to 1080p full HDTV. It realizes the real
pixel to pixel reproduction to obtain the best image quality.
2. Innovative Gapless video playback. You are able to watch segmental High Definition
videos completely as easy as a whole DVD - When one of the videos finishes playing, It will
play the next segmental video automatically and easily.
3. Menu and subtitles display in Vector font – which is smoother and sharper than Dot Matrix
Font. And both the font and the font size can be changed according to your favor.
4. Support H.264 & VC-1 Video decoding. As H.264 coded videos become more and more
popular, H.264 decoding is becoming a basic demand of players.
5. Interface of HDMI 1.3 – new HD audios such as DTS-HD, Dolby True HD will be supported
by future firmware update.
6. Popular Media formats are widely supported.
7. Optional Internal HDD of any capacity. User-friendly designs make the HDD installation
safer and much more convenient.
8. Interface Variety, including A/V ports and I/O Ports.
9. Dynamic color VFD helps you operate it more directly and efficiently.
8
Chapter 2 limHD310s Technical
Specifications
2.1 Hardware
CPU SMP8635
Memory256MB DDR
Flash 32MB
Storage
Devices
Hard Disk Driver: 3.5" SATA HDD
File System NTFS & FAT32
Note: NTFS is recommended, as FAT32 support file size maximum
4GB
USB 2.0 Host x 2 (used to connect to external CD or DVD
ROMs/Mobile HDD/U disk and play stored Media files.
USB 2.0 Device ( used to connect to PC for data transmission)
I/O Interface
10/100Mbps LAN(used to play videos in network or VOD)
HDMI1.3(with embedded digital AV signals)
VGA(YpbPr/RGBHV)
S-Video(Output standards definition PAL/NTSC analog video signal)
Composite Video: output PAL/NTSC analog video
Coaxial SPDIF: output 5.1channels digital audio
Optical SPDIF: output 5.1channels digital audio
A/V Ports
Analog stereo audio(Audio R/L):24bit/192khz Sampling Rate DAC,
support Dolby ProLogic and ProLogic II
2.2 Display Device supported
NTSC (480i / 480p)
PAL (576i / 576p)
LCD HDTV (720p/1080i/1080p)
For TVs:
Plasma TV (1366x768, 1280x768)
For PCs: PC Standard - VGA, SVGA, XGA, SXGA
Analog - Component(YPbPr), VGA(RGB+HV), S-Video, Composite
Video
For
Projectors:
Digital - HDMI, DVI

9
2.3 Digital Media formats supported
Coding format encapsulation
MPEG2-HD .mpg, .tp, .ts, .avi, .mkv
WMV-HD/VC-1 .evo,.wmv, ts, .avi, .mkv
H.264(Mpeg4-AVC) .m2ts,.mov,.mp4, .ts, .avi, .mkv
High
Definition
Mpeg4(DivX-HD,
Xvid-HD)
.avi, .mkv
MPEG-1/2/4 .mpg, .mpeg, .mp4, .m4p, .m2t, .
m2p,.m1v, .m2v, .m4v, .trp, .dat
MPEG2: DVD .iso, .ifo, .vob
MPEG4: DivXTM &
XviD
.avi, .mkv
Videos
Standard
Definition
WMV .wmv, .asf
Audios
WAV
MP3/MP2/MPA
AAC (Advanced Audio Coding)
WMA
OGG
RPCM
Photos JPG/BMP/GIF/PNG
2.4 Subtitle
Support .srt subtitles and more other formats by future Firmware update.
2.5 Multi-language Supported
Support Chinese(Simplified/Traditional)/English/Rumanian/French/German/Italian. More can
be supported by Firmware update.
2.6 Firmware Upgrade Supported
Firmware update can be done in System Setup. You can use the Internal HDD or a U disk to
update. Please visit www.tomacro.com/english/download.asp for latest Firmware download.

10
Chapter 3 Precautions before Operation of
limHD310s
3.1 Buttons
In case of remote control malfunctions, limHD310s is designed with function buttons on the
front panel. Using remote control is recommended.
3.2 Set the Video Output Mode
If it is your first time to use limHD310s (the factory default settings may not match your TV
display) or if you need to change your display device (it might not match your pervious
settings), please use to adjust the Video Output mode. Press to enter
the System Setup Manu, adjust to the Video Output Mode you prefer. Press to save
the settings.
3.3 Refresh when changing USB devices
When limHD310s is working normally and you need to change USB devices, such as.
¾Disc changing of USB DVD DRIVE ( Press to unmount the USB DVD drive,
then change the disc);
¾External USB HDD changing;
¾Other USB storage devices.
please go back to the main menu ( press or press ), move the cursor to
icon and press OK(). limHD310s will refresh and begin searching new USB device.
After that, you can visit the USB devices normally.
3.4 Mega Capacity CD
You can use limHD310s as Mega Capacity CD Player. Please choose Music storage
devices such as internal HDD, USB mobile HDD or USB Flash, and then follow the steps
below:
zEnter the MUSIC directory

11
zSelect Music Playback Mode by pressing button;
zSelect one MUSIC to play;
zSelect REPEAT ALL mode.
Suggest using A/V receiver (amplifier)to achieve high fidelity sound effects. limHD310s
supports Coax/Optical SPDIF in the convenience of building a perfect music hall for you.
3.5 Recommended power-up procedures
zMake sure that you have connected the limHD310s to your display device (such as TV)
and Audio device (such as A/V receiver) with appropriate cables;
zConnect limHD310s to power supply;
zTurn on limHD310s and power light on VFD will be lighted;
zWait for the player initializing and enter the main menu to operate and enjoy your time
of high definition.
3.6 Recommended shutdown procedures
zStop playing the media files (Do not power off while playing the media files, doing so
might damage your HDD or player itself);
zPress on the remote control or to go back to main Menu;
zIf you have connected limHD310s to USB CD/DVD drive, press to
UNMOUNT then take out the disc;
zPress to let limHD310s enter sleep mode
zPress power button on the front panel of limHD310s and power off;
zUnplug the AC electric plug if you do not use limHD310s for a long time
3.6 Website
Please visit our website www.tomacro.com frequently. Pay attention to the latest firmware
release. Download the latest firmware and update to keep your limHD310s in the best
performances.

12
Chapter 4 limHD310s Internal HDD
Installation
limHD310s supports internal SATA HDD (PC universal hard disk, Windows format). Please
refer to the technical specifications provided by HDD manufacturer for more details.
4.1 Install the Internal HDD
Follow the steps below to install your SATA HDD:
Step 1: Place limHD310s in a place convenient for HDD installation.
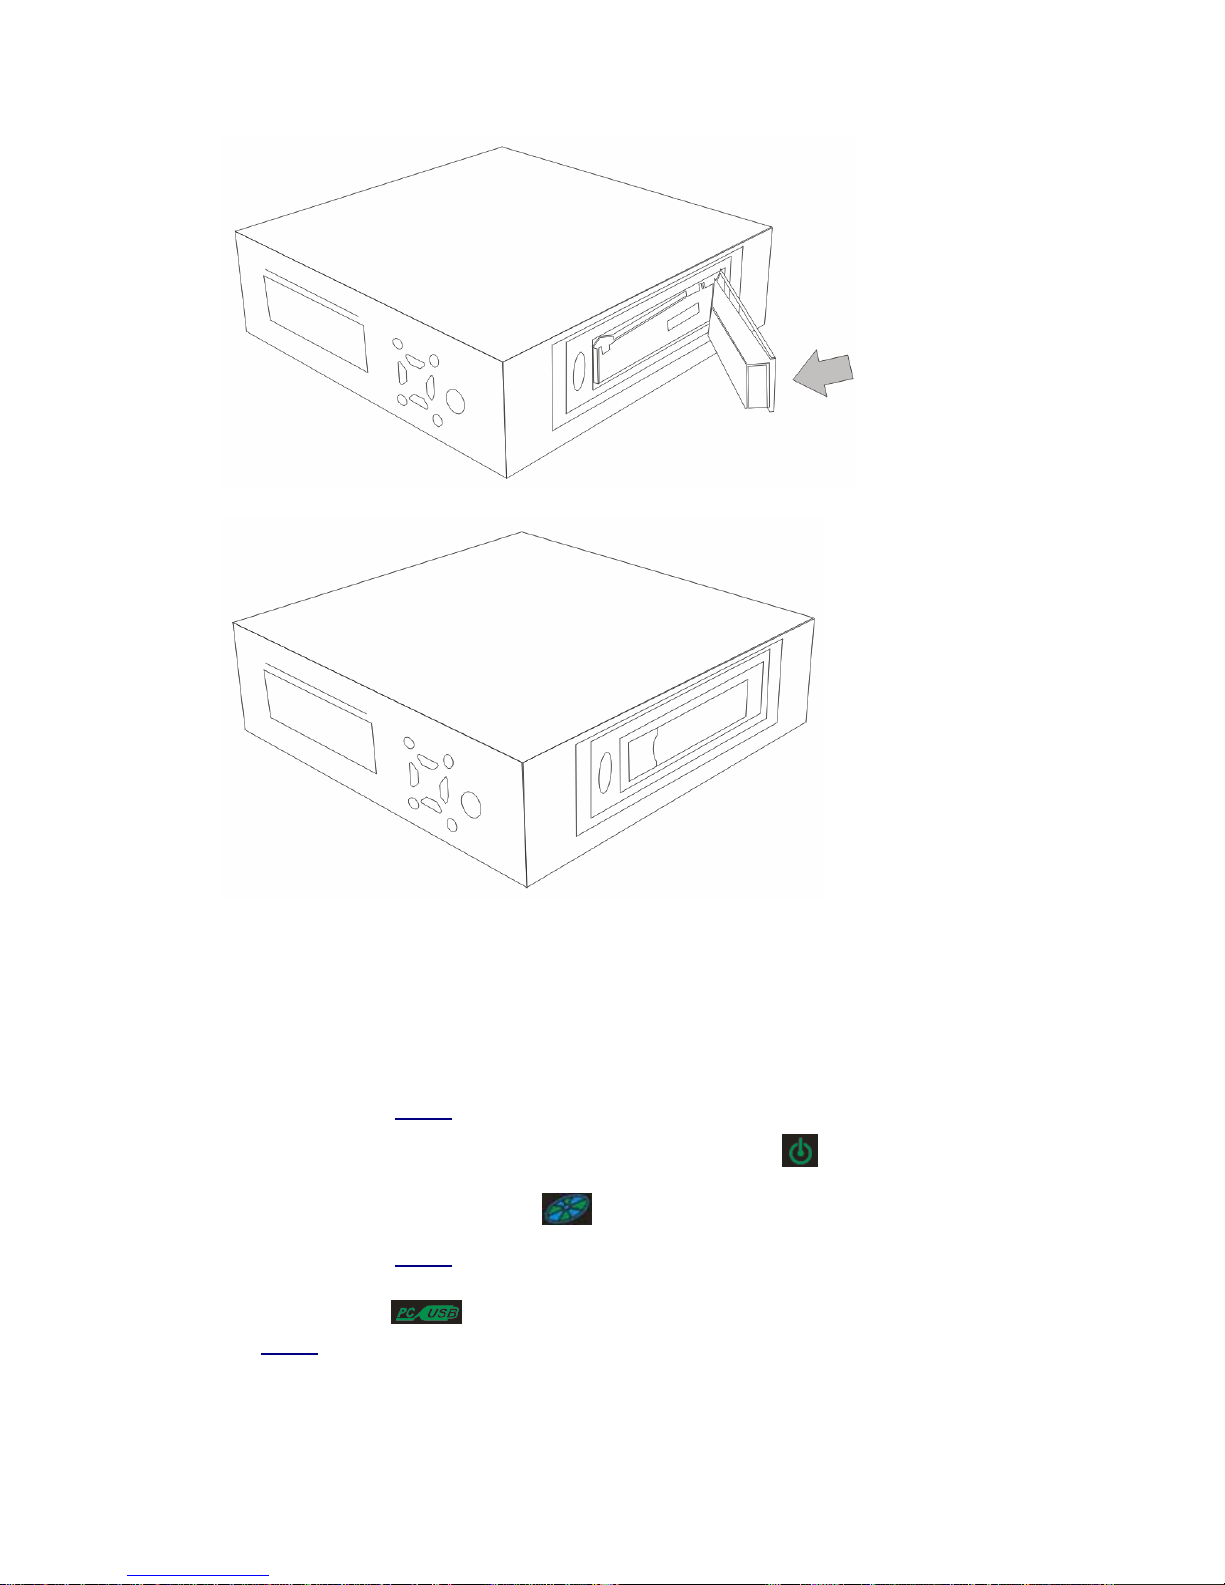
Step 2: Open the HDD cabin.
Step 3: Pull the cabin gate out to the maximum position.

13
Step 4: Let the SATA HDD (side with text specifications) face up, Make sure that the power
connector and data cable connector of your HDD are inserted to the corresponding
connectors inside the cabin of limHD310s properly.
Step 5: Slide the SATA HDD into the HDD cabin.
Step 6: Push the SATA HDD completely into the cabin and close the gate
14
Step 7: Fasten the cabin gate.
Now you can use internal SATA HDD to enjoy high definition videos.
4.2 Format the Internal HDD
If HDD remains unformatted, please follow the steps below:
Step 1: Connect limHD310s to the power supply near your computer;
Step 2: Press power button on the front panel if the power signal is not lighted.
Step 3: Wait for normal display of on VFD;
Step 4: Connect limHD310s to PC through USB device by USB cable.
Step 5: when on VFD lighted, it indicates the computer has identified the
limHD310s’ internal HDD.
Step 6:Partition and format the HDD according to your operating system and instructions
recommend by HDD manufacturer.

15
Notes:
1. limHD310s supports multi-partition, while the first partition of HDD must be initialized as
Master
2. limHD310s supports FAT32 and NTFS. NTFS is recommended as FAT32 only supports
files size 4GB maximum.
4.3 Transfer files to Internal HDD
Connect limHD310s to PC by USB cable as mentioned in 4.2. Copy and paste files between
limHD310s and PC as if data transferred between 2 HDDs of PC itself.

16
Chapter 5 Installation and Connection
5.1 Power Supply Jack(DC12V)
Caution: Do use the 12VDC wide-voltage power Adapter. If not, it might damage your player; the
power cord used must accord with the local country standards. Please contact with local agents if
you need to change the power Adapter.
Step 1: Connect the power cord to adapter;
Step 2: Connect the AC pin of power cord to the power supply socket;
Step 3: Connect the 12VDC output of adapter to the player;
Step 4: Turn on the power.
You will notice that the green LED of the Adaptor is lightened. If the VFD light goes off,
please press the power button on top of limHD310s.
5.2 USB 2.0 Device Connection
Through the USB 2.0 Device limHD310s along with its internal HDD can be connected to PC,
when it acts as an external USB 2.0 Hard Drive and all contents inside can be managed by PC.
5.3 USB 2.0 Host Connection
Through USB 2.0 Host limHD310s can be connected with and stream from USB devices like
Flash Disk, HDD, DVD ROM, Digital Cameral, etc., when the power signal light on VFD is
lighted.
17
5.4 10/100M Ethernet Connection (RJ45)
limHD310s can be connected to Ethernet through its self-adaptive RJ45 interface, when it can
stream shared files like a VOD terminal from the server or PCs in the network. When
limHD310s works as a network streamer or VOD, 100M Ethernet is recommended because
Hi-Def videos of high bit rates require broad bandwidths. Some high-def videos of high bite rate
cannot be played smoothly even in the environment of 100M Ethernet.
5.5 A/V interfaces
5.5.1 Video connection
limHD310s supports 1080p (1920x1080 progressive scanning) resolution, which realizes real
pixel-to-pixel video output (1080p videos are needed in this case.) Please choose appropriate
video outputs, resolutions, and connecting cables according to the displays used.
The following table is for your references:
Video Output Highest Resolution Supported Signals
HDMI 1080p Digital signals
DVI 1080p Digital signals
VGA 1920x1200 Analog signals
YPbPr Component 1080i Analog signals
S-video 480i Analog signals
Composite 480i Analog signals
1. High definition connection
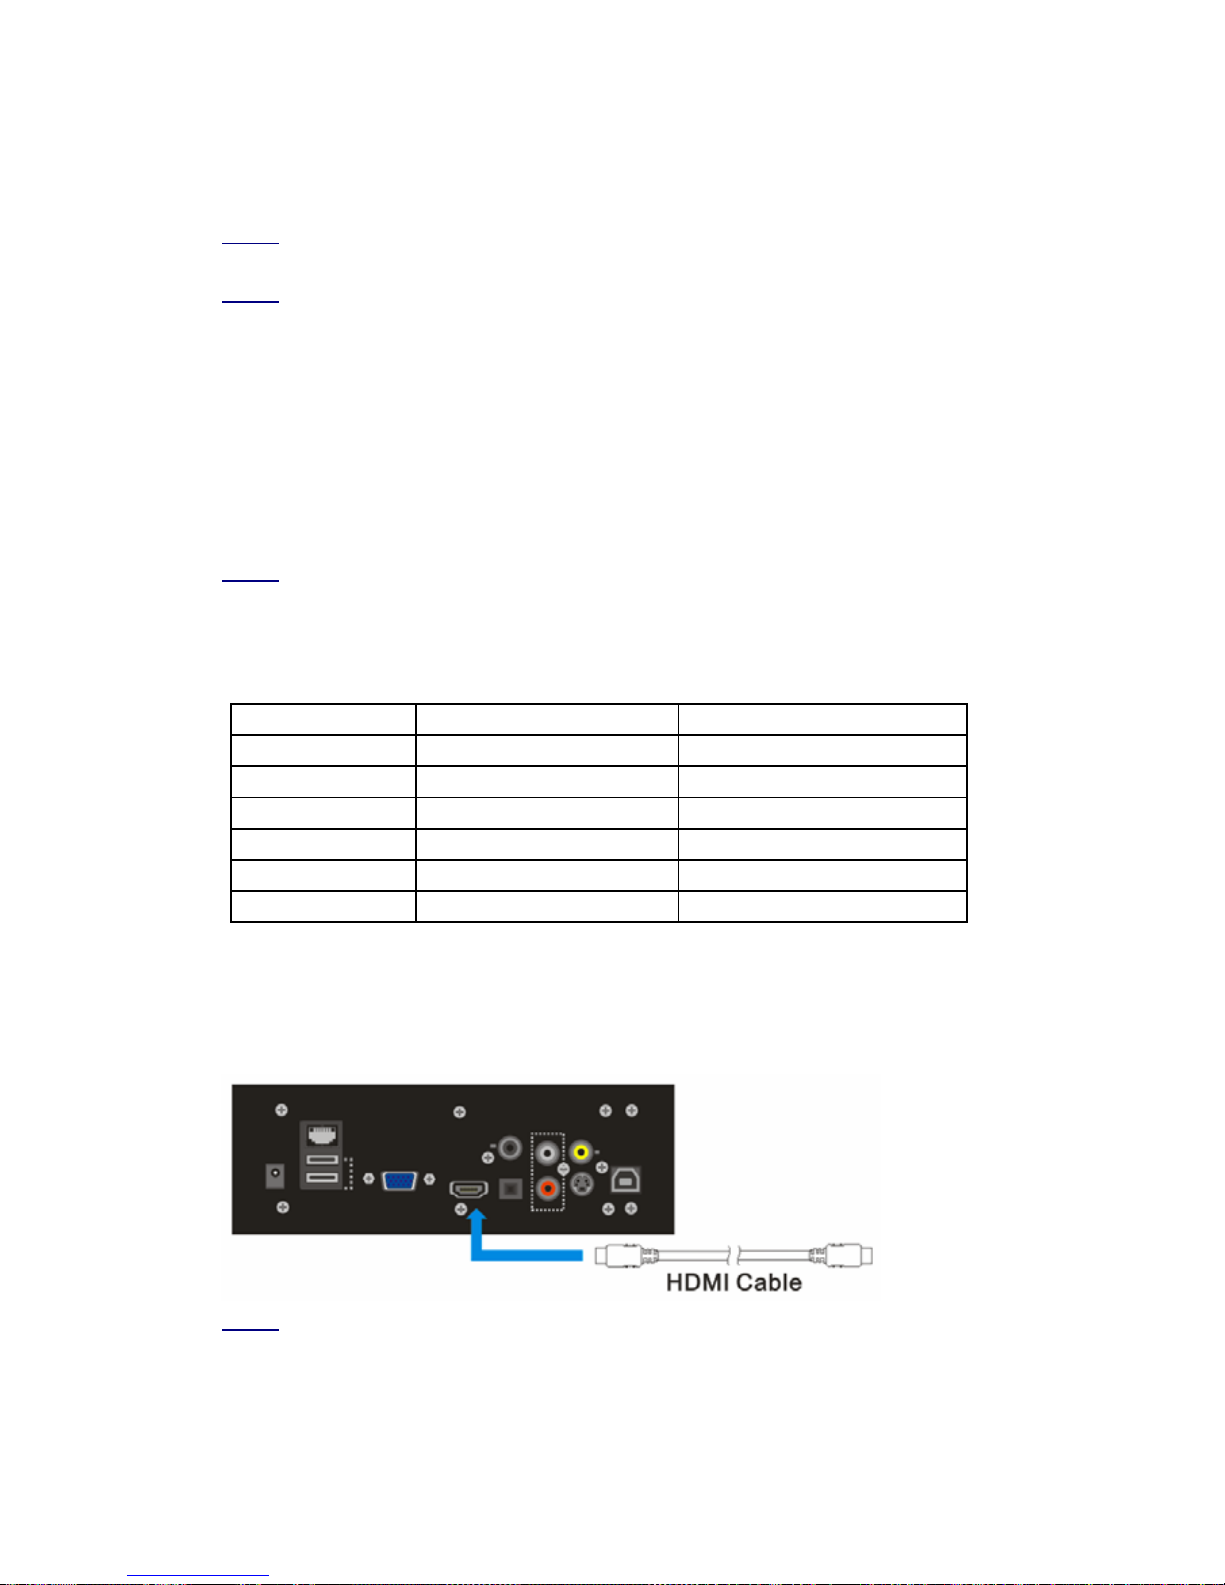
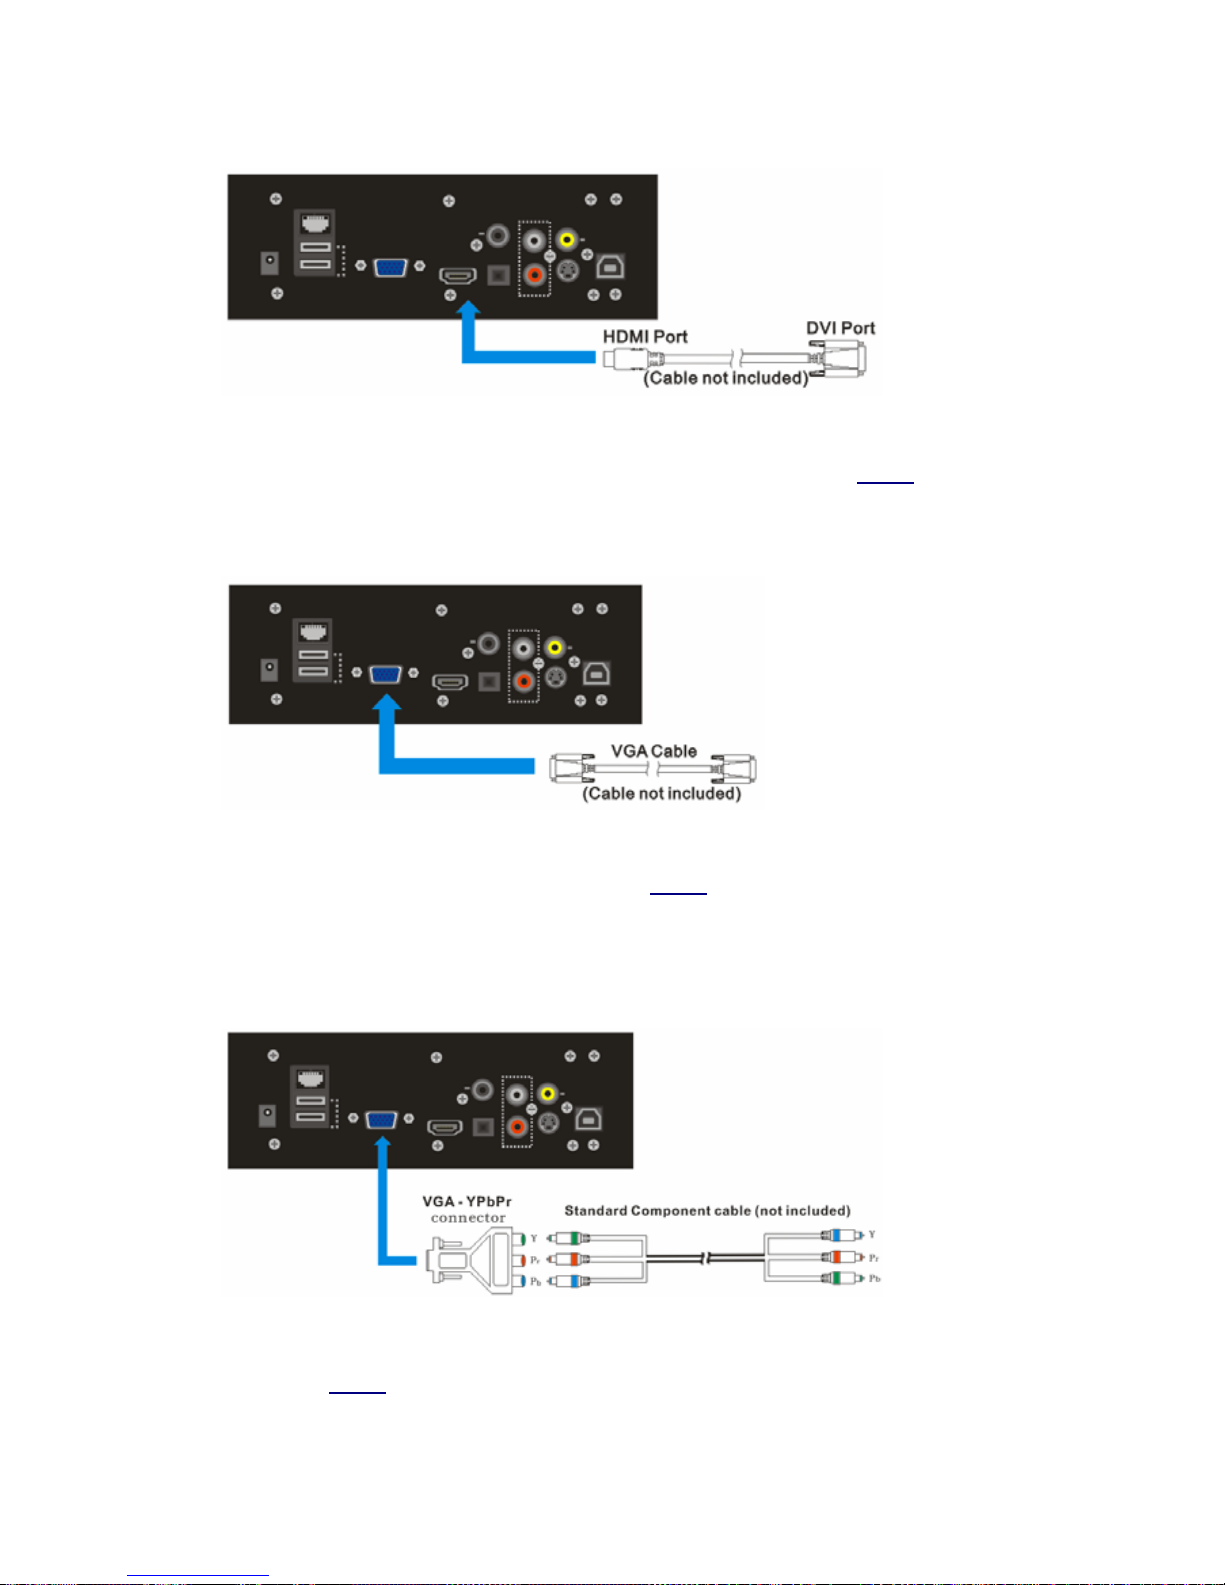
1) HDMI Output
limHD310s adopts HDMI1.3 which can output lossless uncompressed audio and video with much
higher quality in a single cable. We recommend you to use this HDMI connection if it is
supported by your display device.
18
2) DVI
DVI (Digital Video Interface) is a common interface of High Definition Display devices. Note that
the main difference between DVI and HDMI is that DVI has no embedded audio signals. DVI
can transfer uncompressed pure digital video signals. You can connect limHD310s by a
HDMI-DVI cable to your display devices with DVI interface.
3) VGA (RGB+HV)
VGA interface only outputs analog signals separated into tricolor R(red), G(green), B(blue) with
Horizontal sync and Vertical sync. You can connect limHD310s to VGA display device by VGA
cable or VGA-RGBHV cable if your display devices have separate R, G, B, H (Horizontal
synchronization), V (Vertical synchronization) plug.
4) High definition component video (YPbPr)
Use VGA connector for this connection. One VGA-YPbPr connector is required (included in the
accessories). You only need to connect one end of VGA-YPbPr connector with the VGA
connector of limHD310s, the other end to a standard YPbPr cable, then connect standard YPbPr
cable to your display device.
19
2. Standard definition connection
1). Standard definition component video (YPbPr)
Same as above.
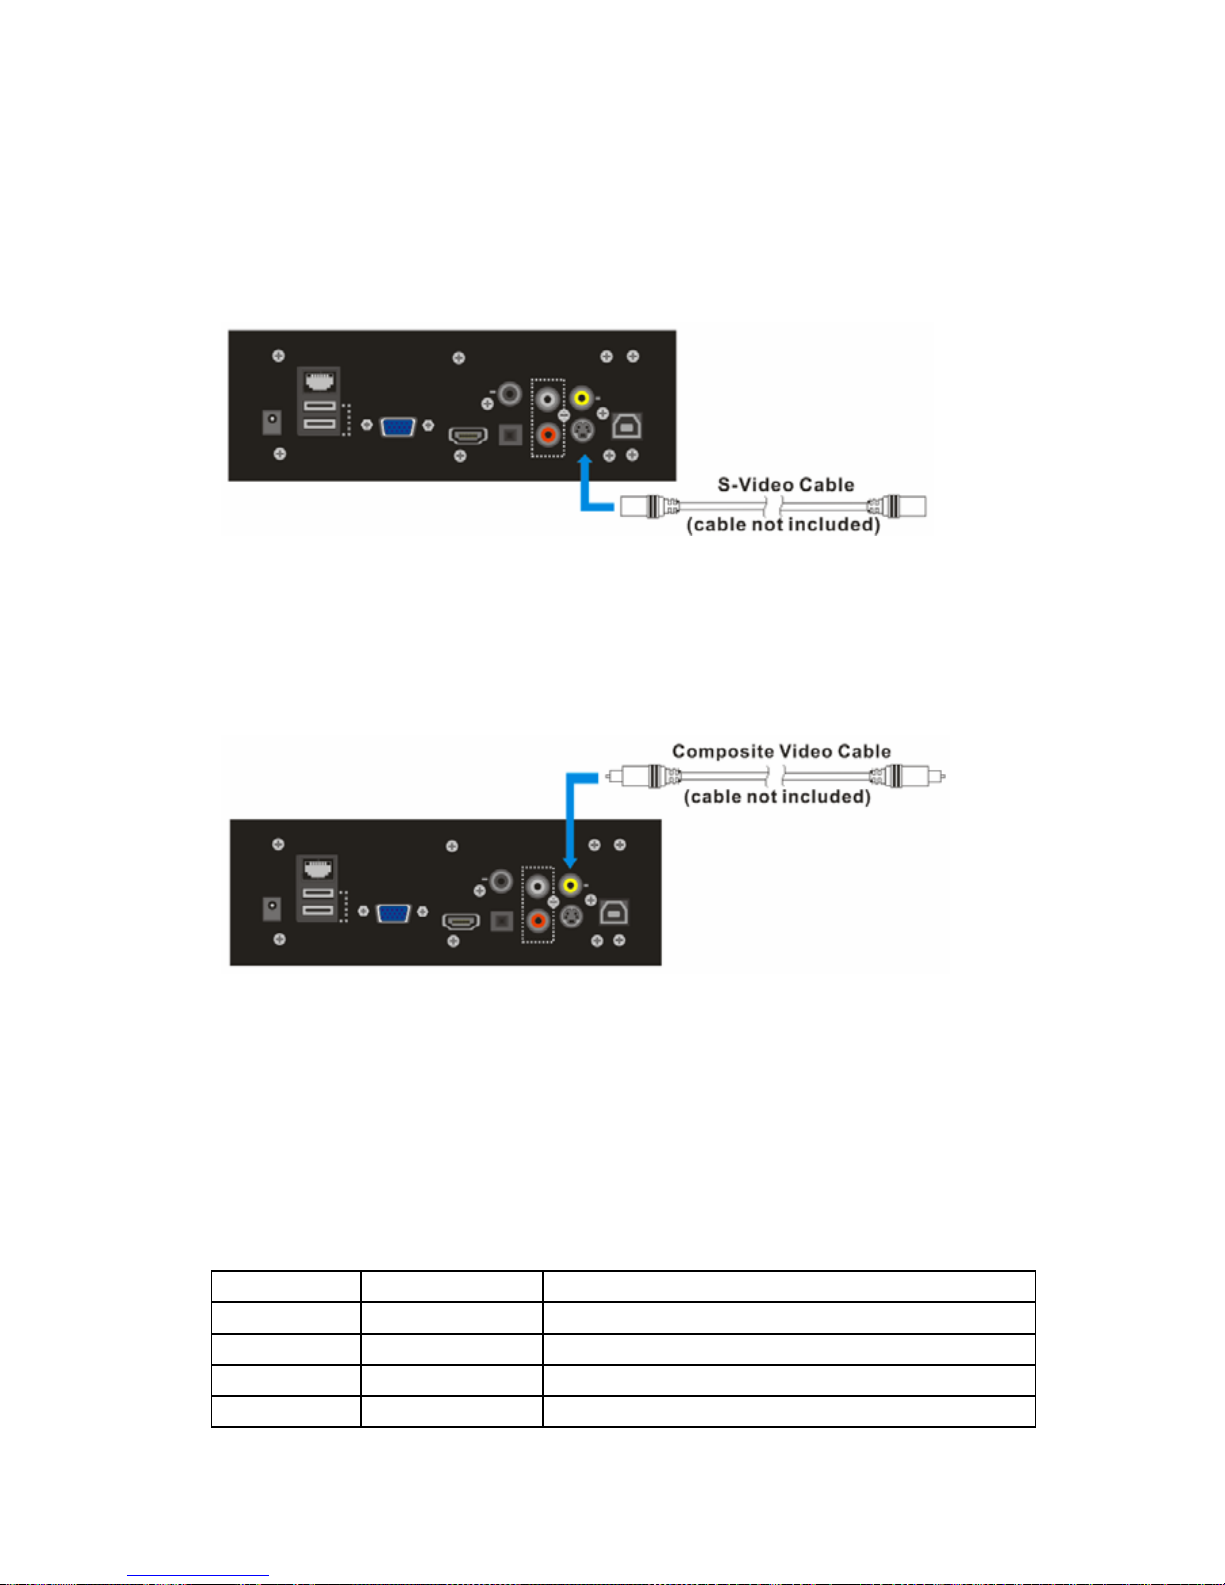
2). S video
S-Video, short for Separate Video, is one of the video interfaces most commonly used. It
transfers Luminance and Chroma signals separately. To a greater extent it avoids image
distortion caused by signal-to-crosstalk and higher image quality can be provided. S-video is
combined by five signals - two Y signals, two C signals and one common shield ground.
3) Composite Video Output
The interface of composite Video is a standard yellow RCA plug, which is the most commonly
used so far. Composite Video, composite by Y/C, is a kind of video signal that supports low
quality image. Generally, the resolution can only reach to 350-450 scan lines and therefore is not
recommended.
5.5.2 Audio connection
There are analog stereo and digital stereo. Please choose appropriate audio outputs. The following
table is for your reference:
Audio Output Maximal Channels Remarks
HDMI 1.3 7.1 Digital Audio: HDMI 1.3 amplifier is needed
Coaxial SPDIF 5.1 Digital Audio: digital audio decoder or amplifier is needed
Optical SPDIF 5.1 Digital Audio: digital audio decoder or amplifier is needed
Analog L/R 2 Analog stereo with left and right channels
Table of contents
Popular Media Player manuals by other brands

Avocent
Avocent Emerge EMS1000P Series Installer/user guide

As Seen On Tv Wholesale
As Seen On Tv Wholesale WONDER BIBLE Guide

SKP Pro Audio
SKP Pro Audio USD-6010 user manual

SONIQ
SONIQ QMS100 Operation manual

ZyXEL Communications
ZyXEL Communications WAP5705 quick start guide

Extron electronics
Extron electronics SMD 202 Setup guide


