manuals.online logo
Brands
  1. Home
  2. •
  3. Brands
  4. •
  5. D-Link
  6. •
  7. Voice Recorder
  8. •
  9. D-Link JustConnect DNR-4020-16P User manual

D-Link JustConnect DNR-4020-16P User manual

Other manuals for JustConnect DNR-4020-16P

2

Popular Voice Recorder manuals by other brands

TS-market EDIC-mini Tiny16 B43 Short operating instructions

TS-market

TS-market EDIC-mini Tiny16 B43 Short operating instructions

Xtend Voice Logger Analog Line installation manual

Xtend

Xtend Voice Logger Analog Line installation manual

Aiwa IC-M120 operating instructions

Aiwa

Aiwa IC-M120 operating instructions

Olympus VN-7000PC instructions

Olympus

Olympus VN-7000PC instructions

Radio Shack Digital Recorder owner's manual

Radio Shack

Radio Shack Digital Recorder owner's manual

EDIC-mini Card Series Short Operating Instruction

EDIC-mini

EDIC-mini Card Series Short Operating Instruction

Sony ICD-UX533F quick start guide

Sony

Sony ICD-UX533F quick start guide

RCA VR5230 quick start guide

RCA

RCA VR5230 quick start guide

Ramsey Electronics BULLSHOOTER ENDLESS LOOP BS2C Assembly and instruction manual

Ramsey Electronics

Ramsey Electronics BULLSHOOTER ENDLESS LOOP BS2C Assembly and instruction manual

Sony TCM-400DV Specification sheet

Sony

Sony TCM-400DV Specification sheet

LogTag TREL30-16 user guide

LogTag

LogTag TREL30-16 user guide

SVAT CVP800 user manual

SVAT

SVAT CVP800 user manual

Marantz PMD620 Service manual

Marantz

Marantz PMD620 Service manual

Roland BR-900CD manual

Roland

Roland BR-900CD manual

JVC ProHD GY-HMZ1U Basic user's guide

JVC

JVC ProHD GY-HMZ1U Basic user's guide

Panasonic PQT8531-P operating instructions

Panasonic

Panasonic PQT8531-P operating instructions

Tascam DR-07 quick start guide

Tascam

Tascam DR-07 quick start guide

Olympus DW-90 instructions

Olympus

Olympus DW-90 instructions

manuals.online logo
manuals.online logoBrands
  • About & Mission
  • Contact us
  • Privacy Policy
  • Terms and Conditions

Copyright 2025 Manuals.Online. All Rights Reserved.

Additional documentation is also available on the D-Link website
DNR-4020-16P
Quick Installation Guide
JustConnect 16-Channel H.265 PoE Network Video Recorder
INSTALLATIONSANLEITUNG
GUIDE D’INSTALLATION
GUÍA DE INSTALACIÓN
GUIDA DI INSTALLAZIONE
КРАТКОЕ РУКОВОДСТВО ПО УСТАНОВКЕ
КОРОТКИЙ ПОСІБНИК ЗІ ВСТАНОВЛЕННЯ
GUIA DE INSTALAÇÃO RÁPIDA
快速安裝指南
PETUNJUK PEMASANGAN CEPAT
Contents
English 1
DEUTSCH 5
FRANÇAIS 9
ESPAÑOL 13
ITALIANO 17
РУССКИЙ 21
УКРАЇНСЬКА 30
PORTUGUÊS 35
中文 40
BAHASA INDONESIA 45
Quick Installation Guide
1
ENGLISH
Hardware Overview
Front Panel LED Indicators
Figure 1: Front Panel LED Indicators
# LED Description
1Power
Indicator
Lights up when the device
is receiving power and the
power switch is turned on.
2HDD
Indicator
Hard disk status indicator.
This indicator flashes when
data is being transmitted.
Table 1: Front Panel LED Indicator Descriptions
Front Panel Interface Connectors
Figure 2 Front Panel Interface Connectors
# Interface Description
1KB/Mouse
Port
USB port for a keyboard or mouse.
2Backup
Port
USB port for a flash drive.
Table 2: Front Panel Interface
Connector Descriptions
Before You Begin
This Quick Installation Guide gives you step-
by-step instructions for setting up your
DNR-4020-16P JustConnect 16-Channel H.265
PoE Network Video Recorder. The model you
have purchased may appear slightly different
from the one shown in the illustrations. For more
detailed information about the NVR, please refer
to the User Manual.
Package Contents
This DNR-4020-16P package should include the
following items:
• DNR-4020-16P JustConnect 16-Channel
H.265 PoE Network Video Recorder
• Power cord
• 8 x hard disk screw
• 2 x rack mount bracket
• 6 x rack mount bracket screw
• 2 x terminal block
• Documentation
If any of the above items are damaged or
missing, please contact your local D-Link reseller.
System Requirements
• Microsoft Windows®
• Microsoft Edge, Internet Explorer, Firefox,
Chrome, or Safari
1 2
1 2
2
Quick Installation Guide
ENGLISH
Hardware Installation
Before You Begin
Observe the following precautions to help
prevent shutdowns, equipment failures, and
personal injury:
• Install the DNR-4020-16P in a cool and
dry place.
• Install the DNR-4020-16P in a site free
from strong electromagnetic sources,
vibration, dust, excessive moisture, and
direct sunlight.
• Visually inspect the power connector and
make sure that it is fully secure.
• Do not stack any devices on top of the
DNR-4020-16P.
Hard Drive Installation
Note: The hard drive of the device is not
included and must be provided by the user.
1. Remove the fixing screws from the top
cover of the DNR-4020-16P, then remove
the top cover from the device.
Figure 4: Unscrewing the Cover
Rear Panel Interface Connectors
Figure 3: Rear Panel Interface Connectors
# Feature Description
1 PoE Ports
PoE ports that offer direct
connection to up to 16
cameras.
2 LAN Uses a standard Ethernet cable
to connect to a switch or router.
3 Audio OUT Connect external speakers for
live audio or audio playback.
4 VGA Output Output connector for a VGA
monitor.
5 USB 2.0 Port Connect a USB storage device
such as a flash drive.
6Power Connect the supplied power
cord to the input port.
7 Audio IN
Connect a microphone to use
2-way communication with
your camera(s).
8 HDMI Output Output connector for an HDMI
monitor.
9 Alarm I/O Alarm I/O ports for connecting
to sensors or other devices.
10 Power Switch Press "1" to turn the device on,
"0"to turn it off.
Table 3: Rear Panel Interface
Connector Descriptions
132
7
4
8
5
9
6
10
Quick Installation Guide
3
ENGLISH
2. Insert two screws into the holes near
the rear panel of the hard drive. Turn the
screws twice, so that they protrude slightly.
Figure 5: Attaching Screws to the Hard Drive
3. Insert the hard drive into the drive bay of
the DNR-4020-16P, fitting the heads of
the two screws into the slots indicated in
Figure 6: Inserting the Hard Drive. Slide
the hard drive toward the center of the
DNR-4020-16P so that it locks into position.
Figure 6: Inserting the Hard Drive
4. Turn the device over and secure the hard
drive inside the device by screwing the
provided screws into the four remaining
holes on the bottom of the DNR-4020-16P.
Figure 7: Securing the Hard Drive
5. If desired, install a second hard drive by
repeating steps 1-4. Attach the hard disk
data cable and power cable to the device,
then reattach the top cover and fasten the
fixing screws.
Management Options
VGA or HDMI Connection
1. Connect your network cameras directly
by using the PoE ports on the back
of the device, or connect them to a
switch or router that is connected to the
DNR-4020-16P.
2. Connect the power cord to the port on
the rear panel of the DNR-4020-16P and
turn the power switch on.
3. Connect a VGA or HDMI display to the
corresponding port on the back of the
device. To control the GUI, connect a USB
mouse to the USB port on the front panel.
4
Quick Installation Guide
ENGLISH
4. The Activation window will appear in the
center of the screen. Select your preferred
language, and enter a password that
will be used to access the management
interface. Confirm the password by
retyping it.
5. In the Default channel password field,
enter the password that will be used to
view and configure the device's channels.
Click OK to continue.
6. On the next screen, reenter the admin
password and click Login to access the
management interface.
Mobile Interface
Once the DNR-4020-16P has been activated, it
can also be managed using the JustConnect+
mobile app.
1. Download the JustConnect+ app from the
App Store or Google Play by scanning the
following QR code.
2. Open the JustConnect+ app and follow
the onscreen instructions to discover and
connect to NVRs on the same network
as your mobile device. Alternately, enter
the domain name or IP address of your
DNR-4020-16P to connect to it remotely.
By default, the DNR-4020-16P will receive its IP
address via DHCP. It will default to 192.168.0.20
if it is unable to receive an IP address from a
DHCP server.
Web User Interface
The DNR-4020-16P can also be controlled using
a web browser.
1. Open a web browser and enter the IP
address of the device in the address field.
2. Log in to the web user interface using
the same information used to access the
management interface.
Additional Information
If you are encountering problems setting up
your device, please refer to the user manual.
Additional help is available online. To find out
more about D-Link products or marketing
information, please visit the D-Link support
website at http://dlink.com/support/.
Warranty Information
The D-Link Limited LifetimeWarranty information
is available at the following website:
http://warranty.dlink.com/.
TECHNICAL SUPPORT dlink.com/support
Quick Installation Guide
5
DEUTSCH
Hardware-Übersicht
LEDs Vorderseite
Abbildung 1: LEDs Vorderseite
Nr. LED Beschreibung
1LED-
Betriebsanzeige
Leuchtet, wenn das Gerät
mit Energie versorgt wird
und eingeschaltet ist.
2 HDD-Anzeige
Festplattenstatusanzeige.
Blinkt, wenn Daten
übertragen werden.
Tabelle 1: Beschreibung LEDs Vorderseite
Anschlüsse Vorderseite
Abbildung 2 Anschlüsse Vorderseite
Nr. Schnittstelle Beschreibung
1Tastatur/
Maus
USB-Anschluss für
Tastatur oder Maus.
2 Backup-Port Port für USB-Laufwerk.
Tabelle 2: Beschreibung Anschlüsse Vorderseite
Vor der Inbetriebnahme
In dieser Installationsanleitung werden Sie
Schritt für Schritt durch die Einrichtung Ihres
DNR-4020-16P JustConnect 16-Channel
H.265 PoE Network Video Recorders geführt.
Beachten Sie, dass das von Ihnen erworbene
Modell sich möglicherweise geringfügig von
den Abbildungen unterscheidet. Detaillierte
Informationen zum NVR finden Sie im
Benutzerhandbuch.
Packungsinhalt
Im Lieferumfang des DNR-4020-16P-Paket ist
enthalten:
• DNR-4020-16P JustConnect 16-Channel
H.265 PoE Network Video Recorder
• Netzkabel
• 8 x Festplattenschraube
• 2 x Rackmontagehalterung
• 6 x Schraube für Rackmontagehalterung
• 2 x Klemmleiste
• Dokumentation
Sollte eines der oben aufgeführten Teile
beschädigt sein oder fehlen, wenden Sie sich
bitte an Ihren örtlichen D-Link-Händler.
Systemvoraussetzungen
• Microsoft Windows®
• Microsoft Edge, Internet Explorer, Firefox,
Chrome oder Safari
1 2
1 2
6
Quick Installation Guide
DEUTSCH
Hardware-Installation
Vor der Inbetriebnahme
Beachten Sie die folgenden
Vorsichtsmaßnahmen, um Ausfälle, Gerätefehler
und Verletzungen zu verhindern:
• Installieren Sie den DNR-4020-16P an
einem kühlen und trockenen Ort.
• Installieren Sie den DNR-4020-16P an
einem Ort ohne starke elektromagnetische
Quellen, Vibrationen, Staub, übermäßige
Feuchtigkeit oder direktes Sonnenlicht.
• Überprüfen Sie den Netzstecker und
achten Sie darauf, dass er fest eingesteckt
ist.
• Stellen Sie keine Geräte auf den
DNR-4020-16P.
Installation der Festplatte
Hinweis: Die Festplatte ist im Lieferumfang nicht
enthalten und muss vom Nutzer bereitgestellt
werden.
1. Entfernen Sie die Befestigungsschrauben
von der oberen Abdeckung des DNR-4020-
16P und entfernen Sie die Abdeckung.
Abbildung 4: Abdeckung lösen
Anschlüsse Rückseite
Abbildung 3: Anschlüsse Rückseite
Nr. Funktion Beschreibung
1 PoE-Ports
PoE-Ports für den direkten
Anschluss von bis zu 16
Kameras.
2 LAN
Für die Verbindung zu einem
Switch oder Router mittels
Standard-Ethernet-Kabel.
3Audio-
Ausgang
Schließen Sie externe
Lautsprecher an für die (Live-)
Audiowiedergabe.
4VGA-
Ausgang
Zum Anschluss eines VGA-
Monitors.
5 USB 2.0-Port Zum Anschluss eines USB-
Laufwerks, z. B. USB-Stick.
6 Strom
Schließen Sie das im
Lieferumfang des Produkts
enthaltene Netzkabel in die
Eingangsbuchse an.
7Audio-
Eingang
Zum Anschluss eines
Mikrofons für die bidirektionale
Kommunikation mit Ihren
Kameras.
8HDMI-
Ausgang
Zum Anschluss eines HDMI-
Monitors.
9 Alarm E/A Zum Anschluss von Sensoren
oder anderen Geräten.
10 Ein-/Aus-
Schalter
Drücken Sie„1“ zum Einschalten
und„0“ zum Ausschalten.
Tabelle 3: Beschreibung Anschlüsse Rückseite
132
7
4
8
5
9
6
10
Quick Installation Guide
7
DEUTSCH
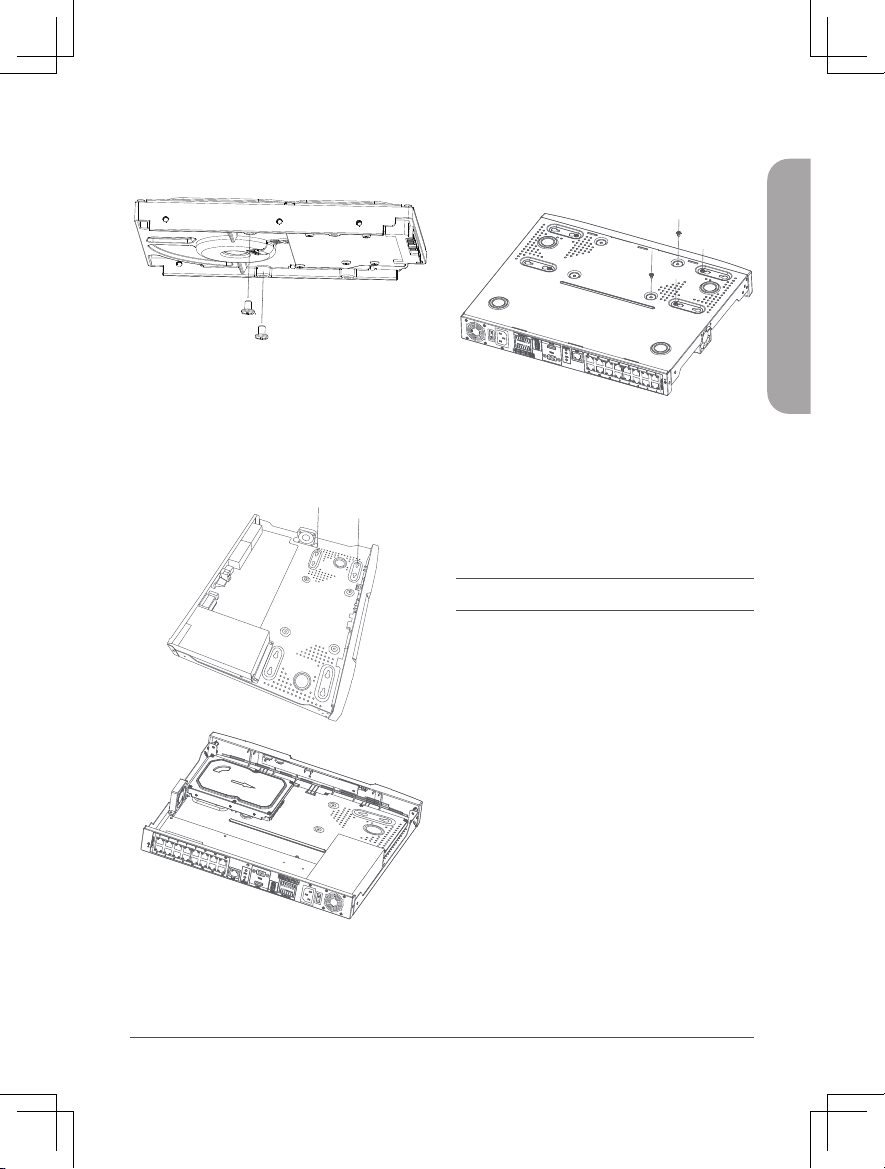
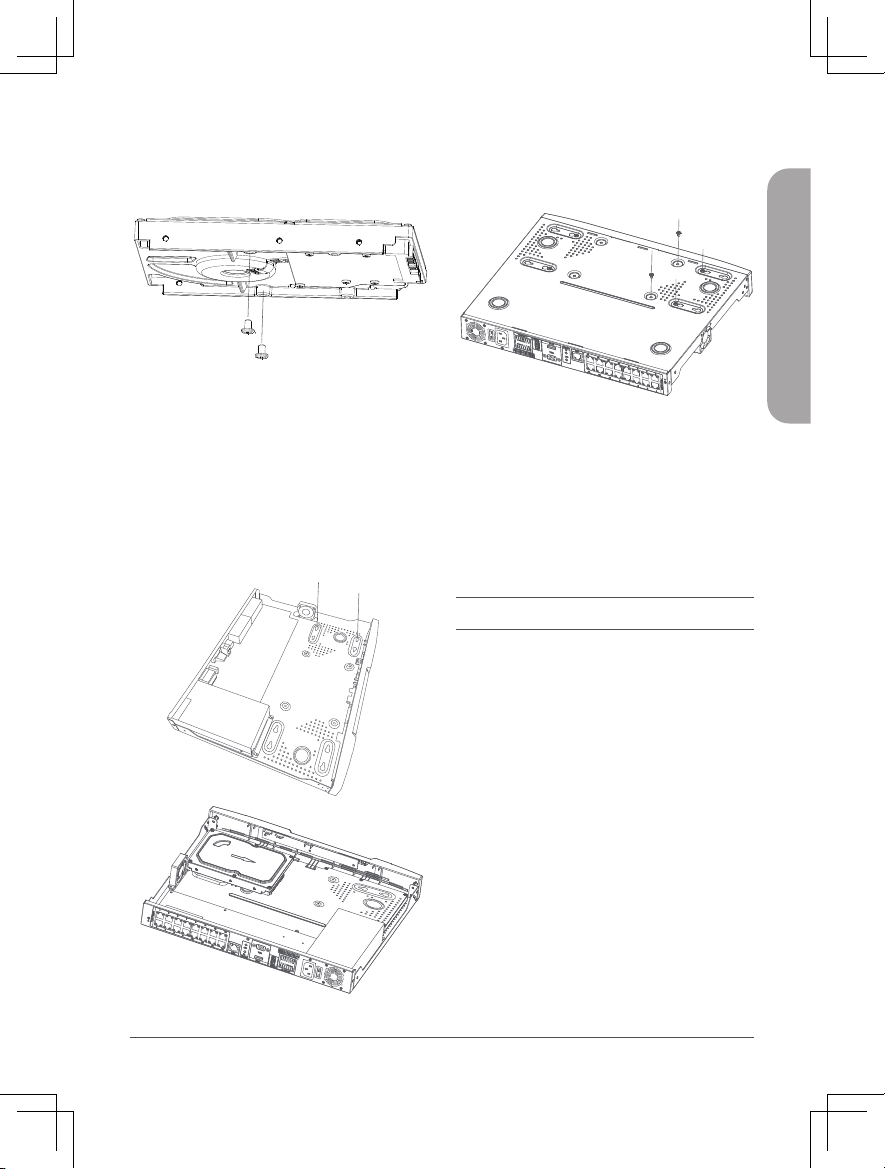
2. Schrauben Sie zwei Schrauben in die
Löcher nahe der Rückseite der Festplatte.
Drehen Sie die Schrauben zwei Mal, sodass
sie leicht hervorstehen.
Abbildung 5: Schrauben an der
Festplatte anbringen
3. Schieben Sie die Festplatte in den
Laufwerkeinschub des DNR-4020-16P,
wobei die Köpfe der beiden Schrauben
in die in Abbildung 6: Festplatte
einsetzen angezeigten Löcher passen
sollen. Schieben Sie die Festplatte in
Richtung Mitte des DNR-4020-16P, sodass
sie einrastet.
Abbildung 6: Festplatte einsetzen
4. Drehen Sie das Gerät um und fixieren Sie
die Festplatte, indem Sie die beigelegten
Schrauben in die vier restlichen Löcher
unten am DNR-4020-16P schrauben.
Abbildung 7: Festplatte xieren
5. Wiederholen Sie bei Bedarf die Schritte
1 bis 4, um eine weitere Festplatte
einzubauen. Stecken Sie Datenkabel und
Stromkabel der Festplatte an, setzen Sie
die obere Abdeckung wieder auf und
befestigen Sie sie mit den Schrauben.
Betrieb
VGA- oder HDMI-Verbindung
1. Schließen Sie Ihre Netzwerkkameras
direkt über die PoE-Ports auf der Rückseite
oder über einen mit dem DNR-4020-16P
verbundenen Switch oder Router an.
2. Stecken Sie das Netzkabel in den Anschluss
auf der Rückseite des DNR-4020-16P und
schalten Sie das Gerät ein.
3. Schließen Sie ein VGA- oder HDMI-
Anzeigegerät am entsprechenden
Anschluss auf der Rückseite an. Um die
GUI zu steuern, schließen Sie eine USB-
Maus am USB-Port auf der Vorderseite an.
4. In der Bildschirmmitte wird das
Aktivierungsfenster angezeigt. Wählen
Sie die gewünschte Sprache und geben
Sie ein Kennwort für den Zugriff auf die
Verwaltungsoberfläche ein. Bestätigen Sie
das Kennwort durch erneute Eingabe.
8
Quick Installation Guide
DEUTSCH
5. Geben Sie im Feld Standard-
Kanalkennwort das Kennwort ein, mit
dem Sie die Kanäle des Gerätes anzeigen
und konfigurieren können. Klicken Sie zum
Fortfahren auf OK.
6. Geben Sie im nächsten Bildschirm
das Admin-Kennwort erneut ein und
klicken Sie auf Anmelden, um die
Verwaltungsoberfläche zu öffnen.
Mobile Verwaltung
Nachdem der DNR-4020-16P aktiviert wurde,
kann er auch mit der mobilen App JustConnect+
verwaltet werden.
1. Laden Sie die App JustConnect+ aus dem
App Store oder bei Google Play herunter,
indem Sie den folgenden QR-Code
scannen.
2. Öffnen Sie die App JustConnect+ und
folgen Sie den Anweisungen auf dem
Bildschirm, um NVRs im selben Netzwerk
wie Ihr Mobilgerät zu finden und sich
mit ihnen zu verbinden. Geben Sie
alternativ für eine Remote-Verbindung
Domainnamen oder IP-Adresse Ihres
DNR-4020-16P ein.
Standardmäßig erhält der DNR-4020-16P
seine IP-Adresse mittels DHCP. Sollte er
keine IP-Adresse von einem DHCP-Server
beziehen können, lautet seine Standardadresse
192.168.0.20 .
Web-Benutzeroberäche
Der DNR-4020-16P kann auch im Webbrowser
verwaltet werden.
1. Öffnen Sie einen Webbrowser und geben
Sie die IP-Adresse des Gerätes in der
Adresszeile ein.
2. Melden Sie sich mit den Zugangsdaten
der Verwaltungsoberfläche bei der
Weboberfläche an.
Weitere Informationen
Wenn Sie Probleme bei der Einrichtung
Ihres Gerätes haben, lesen Sie bitte das
Benutzerhandbuch.
Weitere Hilfe erhalten Sie online. Um mehr
über D-Link-Produkte zu erfahren oder
Marketinginformationen zu erhalten, besuchen
Sie die D-Link Support-Website unter http://
dlink.com/support/.
Garantieinformationen
Informationen zur lebenslangen
eingeschränkten D-Link-Garantie finden Sie
auf folgender Website:
http://warranty.dlink.com/.
TECHNISCHE UNTERSTÜTZUNG eu.dlink.com/support