d'Magna MASTERFOX 125cc 2015 User manual
OWNER’S MANUAL 2015
MASTERFOX 125cc
1
We would like to thank you and congratulate you on your purchase of a brand new
d’Magna Design MASTERFOX.
You are now the owner of a unique, handmade machine that guarantees to bring you
lots of fun and enjoyment, provided that you clean and maintain it appropriately.
ABOUT NOISE REGULATIONS
Owners are warned that the law may prohibit:
(a) The removal or rendering inoperative by any person other than for purposes of maintenance, repair or
replacement, of any device or element of design incorporated into any new vehicle for the purpose of
noise control prior to its sale or delivery to the ultimate purchaser or while it is in use; and the use of
the vehicle after such device or element of design has been removed or rendered inoperative by any
person

OWNER’S MANUAL 2015
MASTERFOX 125cc
2
OWNER’S MANUAL
Please read this manual carefully and completely before going on your first ride. It contains a great deal of
information and advices which will help you use and handle your bike properly. Only by doing so will you learn how
to tune your motorbike to your specific needs and how to protect yourself against injury. Besides, this manual
contains important information on maintenance.
At the time this manual was typeset, it was up-to-date with the latest state of this series. It cannot be completely
ruled out, however, that minor discrepancies may exist resulting from further design upgrades of the Masterfox.
The fuels and lubricants specified in the Owner's Manual or automotive fluids with equivalent specifications must be
used in accordance with the maintenance schedule.
Take special care to follow the recommended run in, inspection, and maintenance intervals. Heeding these
guidelines will significantly increase the life of your Masterfox.
WARRANTY
No claims can be filed under the warranty for damage or consequential damage caused by manipulations or
conversions to the motorcycle. For complete warranty information visit: http://dmagnadesign.com/WARRANTY
AUTOMOTIVE FLUIDS
The fuels and lubricants specified in the Owner's Manual or automotive fluids with equivalent specifications must be
used in accordance with the maintenance schedule.
SPARE PARTS, ACCESSORIES
For your convenience the Masterfox was built using standard parts out of the Masterfox and bicycle industries to
make it easily reparable if needed and customizable but d’Magna is not liable for damage that arises in connection
with the use of other products.
TRANSPORT
When transporting your Masterfox, secure it with elastic straps or other mechanical devices in an upright position.
Be sure that the fuel tap is closed. If the motorcycle topples over, fuel can flow out of the carburetor or fuel tank
ENVIRONMENT
Offroad-Motorcycle driving is a wonderful sport and we hope that you will be able to enjoy it to the full. It may,
however, involve potential problems for the environment or lead to conflicts with others. These problems or conflicts
can be avoided if the Masterfox is used responsibly. To safeguard the future of motorcycle sports, make sure that
you use it in accordance with the law, show that you are environmentally conscious and respect the rights of others.
Enjoy driving your Masterfox!
OWNER’S MANUAL 2015
MASTERFOX 125cc
3
1. What’s on the box:
A brand new Masterfox and a little bit of mud… yes, some dried out mud on the tires and we
are proud of it. It means we have taken the time and effort not only to handcraft your
Masterfox but to go and try it out on the field to make sure everything works the way it should
before you get it, that’s why we leave some of it.
So you will find a 90% preassembled and a little bit muddy Masterfox and all the parts needed
to take it to a 100% (The tools are up to you, but you won’t need anything fancy so don’t
worry). All you need is about an hour of work and you will be ready to go have fun.
2. General Tips and Warnings:
Instructions for Initial Operation
–Read these operating instructions carefully before your first ride.
–Familiarize yourself with the operating elements.
–Set the handlebar to the positions that is most convenient for you.
–Get used to handling the Masterfox on an empty parking lot or open space, before
starting on a longer drive. Also try to drive as slowly as possible to improve your
feeling for the vehicle.
–Do not drive along off-road tracks which go beyond your ability and experience.
–Hold the handlebars with both hands and keep your feet on the foot rests while
driving.
–Remove your hands from the brake levers when you are not braking. If the brake
lever is not released the brake pads rub continuously and the braking system is
overheated.
–Masterfox are sensitive to alterations in the distribution of weight. If you are taking
luggage with you a backpack is the best option, but if not, whatever you are caring
should be secured as close as possible to the middle of the vehicle and never over the
wood fairing; distribute the weight evenly between the front and rear wheel. Never
exceed the maximum permissible laden weight and the axle weights. The maximum
permissible laden weight is comprised of the following components:
–Masterfox ready for operation and tank full
–Driver with protective clothing and helmet.
–The Masterfox was built using standard parts out of the Masterfox and bicycle
industries to make it easily reparable if needed and customizable just in case you
want to give it your personal touch.
–Pay attention to the running-in procedure.

OWNER’S MANUAL 2015
MASTERFOX 125cc
4
Running In
In comparison, new sections of engine components have rougher surfaces than
components which have been sliding across one another for quite some time.
Therefore, every engine needs to be broken in.
For this reason, do not load the engine more than 50% of its capacity during the first 3
operating hours. Besides, the engine speed must not exceed 7000 rpm. Avoid going
full-throttle!
In the following 12 operating hours, you may load the engine up to 75% of its
capacity.
WARNING
–Dress properly for the ride. Smart drivers always wear a DOT helmet, boots, gloves
and the right Enduro/Motocross clothing if going off road. Protective clothing should
be conspicuous to make sure other road users see you in time.
–Do not drive after drinking alcohol.
–Always use front and rear tires with the same tread pattern.
–The Masterfox is designed and built for 1 person only. No passengers are permitted.
–Adjust your speed to the conditions and your driving skill.
–Drive cautiously on unfamiliar roads or in unfamiliar terrain.
–Always have a friend accompany you on his Masterfox when driving off road so you
can help each other if you run into trouble.
–Replace the helmet visor or the lenses in your glasses in time. A scratched visor or
scratched lenses can make you practically blind in back light.
–Never leave your Masterfox running unattended.
–When riding your Masterfox, please remember that excessive noise may disturb
others.
3. Assembly:
Tools: 8mm to 15mm wrench set. Set of Allen wrenches. One flat and one cross head
screwdriver. One utility knife and a workbench, stand or somewhere safe to place the
Masterfox while working on it.
a. The first thing to do after deciding where you are going to work is to take it out of the box,
obviously. Be careful not to scratch it or let it fall on its side. Having someone to help you
might be nice, is not that light.
b. If you don’t have access to a Masterfox workbench, an upside bucket or wood box should
suffice, just make sure that is properly seated over the engine skid plate and won’t fall.
c. Install the front wheel. First remove the plastic separator that is in between the brake pads
and then position the wheel. Once the front wheel is between the fork legs and the brake

OWNER’S MANUAL 2015
MASTERFOX 125cc
5
rotor is correctly positioned between the brake pads, insert the axle through the pinch
blocks or fork lugs and through the center of the wheel, followed with installing the nut on
the end of the axle. Be careful not to overtighten the axle nut.
d. Now for the rear wheel and shock. Lower the swing arm and remove the metallic “T”
separator, make sure to save the nut and bolt. Now position the lose end of the shock
absorber between the same holes where the “T” was, insert the bolt you just removed and
tighten the nut. Do not overtighten.
e. Next, the “pedals”. One of the reasons pedals can be difficult to remove is lack of
lubrication, so be sure to grease the pedal threads before installation. Then look closely at
the pedal ends to see which side they belong on. You should see a little “R” and “L,” for
“Right” and “Left”. Choose the appropriate pedal and start it into the correct crank arm by
hand turning the pedal axle toward the front of the Masterfox (both pedals thread in in
this direction). If it won’t start, don’t force it! You’re probably trying to install the left pedal
on the right side or vice versa. Thread both pedals into the crank arms as far as you can by
hand. Then fully tighten them with the 15mm wrench.
These are standard BMX pedals but as you already know they won’t be doing any pedaling.
They work as foot pegs. They are ideal for the Masterfox because they can pivot over its on
axle allowing the rider to maintain an ideal “horizontal” positon at all times, even when
climbing or coming down a hill.
f. Handlebar risers. Each riser is market either Right or Left depending on which side they
belong on. Take the first one and align the two holes with those over the top clamp/flat
plate of the front suspension fork, making sure the mount for the handlebar looks to the
front. Insert the bolt through the front hole followed with installing the split lock, the
washer and the nut. For the rear hole you only need to screw the bolt with the split lock
and washer from the bottom up. Repeat the process with the second riser.
g. Handlebar. Loosen the stem bolts with a hex key. Slowly loosen all the bolts until the front
plate of the stem is free. Place the handlebar on the stem aligning each steam with the
masking tape on the handlebar, do not remove the tape. Before adjusting the stem plate
back make sure to set it in the position that is most convenient for you. Then place the
stem plate over the handlebar. Finger-tighten the bolts back on. Fixing bolts should be
tightened alternately and incrementally rather than each bolt being fully tightened one at
a time. Tightening a single bolt at a time can damage your handlebar and pose uneven
pressure on your handlebar. Use zip ties or electrical tape to secure down your brake and
switch cables together.
h. Now the very important security check before moving on:
i. Brakes. After the front wheel and handlebar have been installed, it's important to
bring the brake pads back into contact with the brake rotor and build up brake
OWNER’S MANUAL 2015
MASTERFOX 125cc
6
pressure at the brake lever, you want to make sure they’re firm and not soft or
spongy, if they feel soft and you can move the Masterfox while compressing the
levers you might need to BLEED THE BRAKES.
WARNING: Failure to properly adjust the brakes can cause a major safety
problem and an accident.
ii. Look for any loosen bolts or nuts and tighten them.
iii. Leaks. Inspect the engine/transmission case and the fuel tank for leaks. Look
beneath the Masterfox for signs of leaking fluids. If there is any leakage, clean and
tighten fittings as necessary.
iv. Engine oil. Check oil level using the dipstick on the right side of the
engine/transmission case, and add oil if necessary. Be sure to use 4 stroke 10W-40
oil. Be sure the dipstick is properly and securely refitted into the
engine/transmission case.
v. Finally, check or set the tire pressure and get that thing off the stand as that's all
there is to putting together a brand new d’Magna Masterfox.
Front
25 psi
(1.8 kgf/cm 2)
Rear
25 psi
(1.8 kgf/cm 2)
4. Operation Instruments:
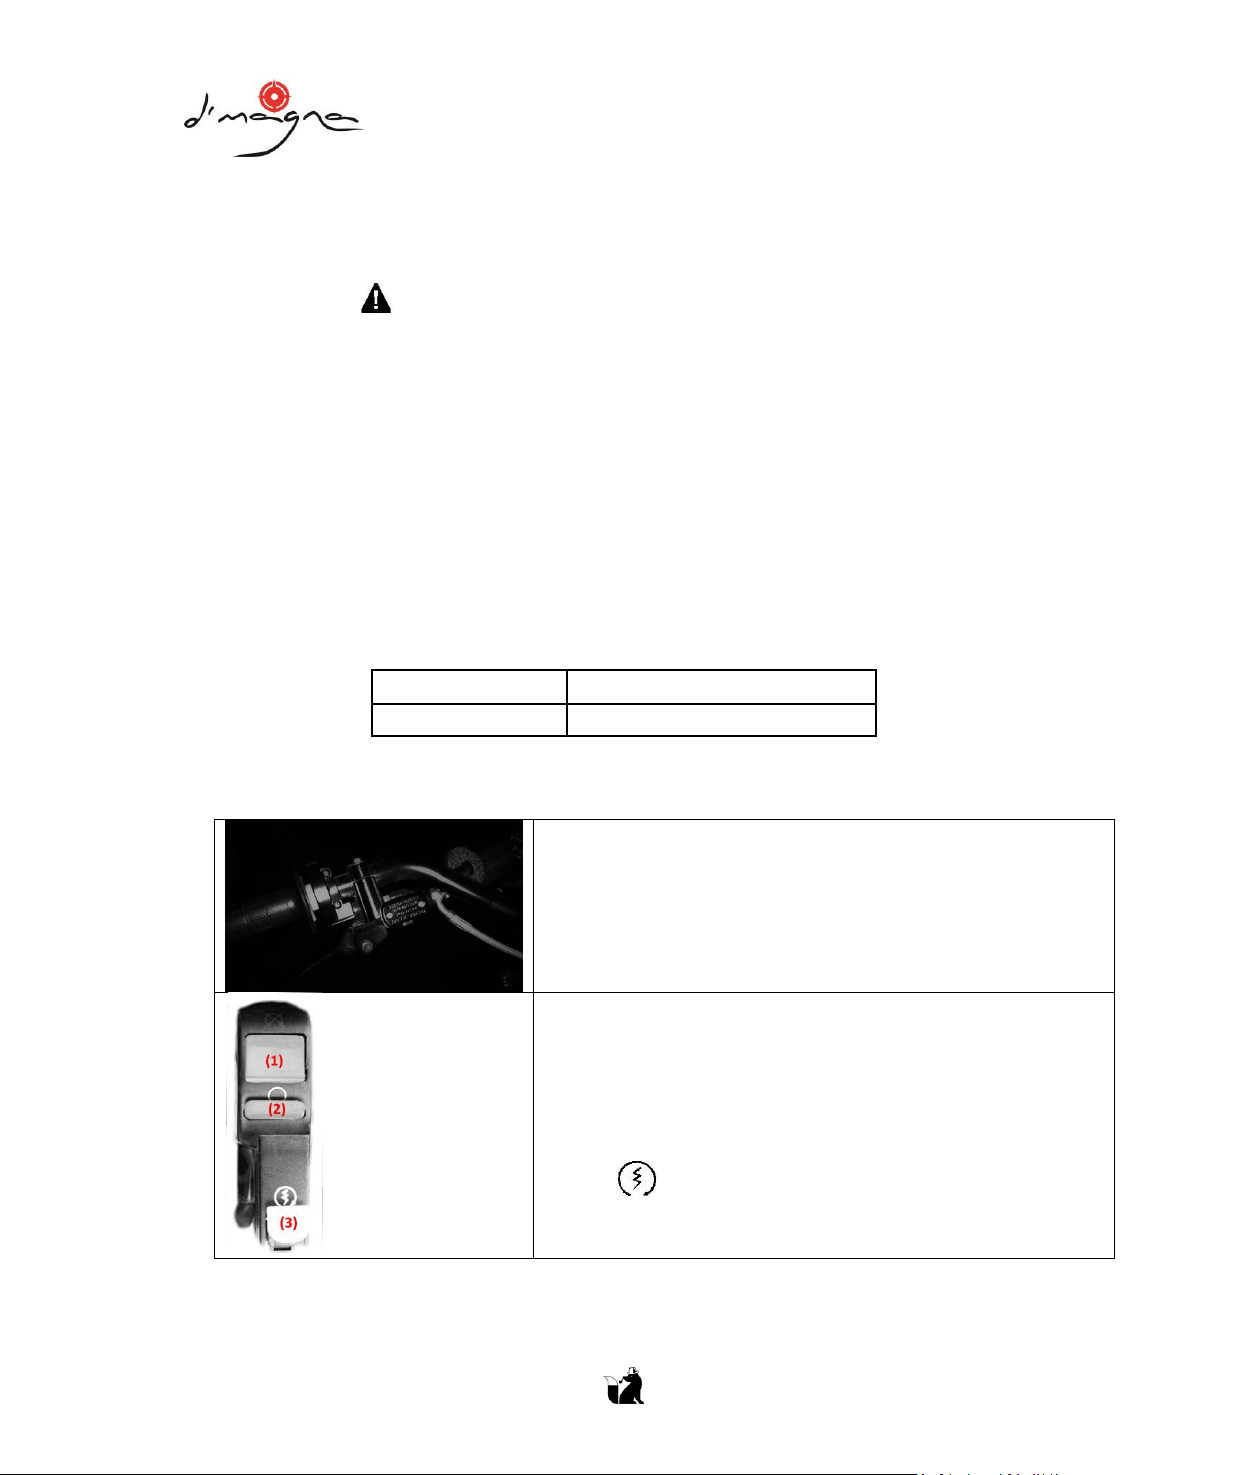
a. Hand brake levers: The hand brake lever mounted on
the handlebars on the Right actuates the front wheel
brake and the one on the Left actuates the rear wheel
brake.
b. Starter / Off button: The short circuit button [1] turns
off the engine. The GO button [2] needs to be pressed
to be able to start the Masterfox. Pushing the yellow
starter button [3] will actuate the E-starter.

OWNER’S MANUAL 2015
MASTERFOX 125cc
7
c. Filler cap: To open the filler cap: Turn the filler cap
counter-clockwise. To close the filler cap: Put the
filler cap on and turn it clockwise.
d. Fuel Tap:
OFF In this position the fuel tap is closed. No fuel can
flow to the carburetor.
ON During operation the twist grip must be turned to
ON. This means that the fuel can flow to the
carburetor.
RES In this position the carburetor will be using the
fuel at the very button of the tank, the reserve.
e. Choke: The Masterfox carburetor has three
positions; Fully “OPEN,” “DETENT” a halfway
position and fully “CLOSED”). If you pull the choke
lever up [1] as far as possible, a bore in the
carburetor will be opened through which the engine
may take in additional fuel. The result is a “fat“ fuel-
air mixture of the type needed for cold starts. To
deactivate the choke, push the choke button back
into its basic position. Use the choke for cold starts,
first place the lever in the Open position and start
the engine, push the choke lever down part way to
the “DETENT” position immediately after the engine
starts and, after about 15 seconds, push the choke
lever the rest of the way down to the fully “CLOSED”
position (2). If the idle is unstable, open the throttle
slightly until the idle evens out.
5. Running In
In comparison, new sections of engine components have rougher surfaces than components which
have been sliding across one another for quite some time. Therefore, every engine needs to be
broken in.
For this reason, do not load the engine more than 50% of its capacity during the first 3 operating
hours. Besides, the engine speed must not exceed 7000 rpm. Avoid going full-throttle!
In the following 12 operating hours, you may load the engine up to 75% of its capacity.
6. Riding:
a. Make sure the Fuel Tap is ON.
b. Insert and turn the key.
OWNER’S MANUAL 2015
MASTERFOX 125cc
8
c. Press the GO followed by the Starter push button.
d. Engine will start. If it doesn’t you might need to use the choke as instructed at the
Operation Instruments (4) section.
e. To turn the engine off press the short circuit button. Remove the key.
f. If you won’t be running again within a few minutes also turn the fuel petcock to the “OFF”
position.
SAFE ACCELERATING
When accelerating, using throttle control lever located on the right side of handlebar,
always LEAN FORWARD enough to resist rearward inertia as to keep the front wheel on the
ground.
SAFE BRAKING
Close throttle and apply the left hand (rear brake) first followed by the right hand (front
brake. When driving on sandy, wet or slippery ground use mainly the rear wheel brake.
Always brake with feeling, blocking wheels can cause you to skid or fall. Always finish
braking before you enter a curve.
When driving downhill, use the braking effect of the engine. In this way, you will not need
to brake so much and the brakes will not overheat.
–In case of rain, after washing the Masterfox, after rides through water and in case of rides on wet off-
road tracks, humid or dirty brake discs can delay the braking effect. The brakes must be pulled until
they are dry or clean.
–Dirty brake discs cause increased tear of brake pads and brake discs.
–When you brake, the brake discs, brake pads, brake caliper and brake fluid heat up. The hotter these
parts get, the weaker the breaking effect. In extreme cases, the entire braking system can fail.
–If the resistance in the hand brake levers feels “spongy” (too much play), this is an indication that
something is wrong with the brake system. Don’t ride your Masterfox anymore without first having
the brake looked.
Stopping and parking
Apply the brakes. To turn off the engine, push the short-circuit button with the engine at idling speed until
the engine stops. Turn the fuel tap to the OFF position, park on an area where the ground is firm.
Engines produce a great amount of heat while running. The engine, exhaust pipe, muffler, brake rotors,
and shock absorbers can become very hot. Do not touch any of these parts after operating the
Masterfox, and take care to park it where pedestrians are not likely to touch it and get burned.

OWNER’S MANUAL 2015
MASTERFOX 125cc
9
–Close the fuel tap when leaving your vehicle. Otherwise the carburetor can flood and fuel will enter
the engine.
–Never park your Masterfox in places where there are fire hazards due to dry grass or other easily
flammable materials.
Fuel
Use leaded or unleaded premium grade gasoline (95 octanes). Never use gasoline having less than 95
octanes because it may damage the engine.
Gasoline is highly flammable and poisonous. Extreme caution should be used when handling gasoline.
Do not refuel the Masterfox near open flames or burning cigarettes. Always switch off the engine before
refueling. Be careful not to spill gasoline on the engine or exhaust pipe while the engine is hot. Wipe up
spills promptly. If gasoline is swallowed or splashed in the eyes, seek a doctor’s advice immediately.
7. Maintenance:
WHY PROPER MAINTENANCE IS IMPORTANT
Keeping your Masterfox well maintained is essential to your safety as well as being a good way to protect
your investment, realize its maximum performance, avoid breakdowns and have fun.
To help you keep your new Masterfox in top condition this section includes a Service Intervals Schedule,
simple and easy-to-follow instructions for specific maintenance work, safety precautions, information and
recommendations for oils, plus tips to keep your Masterfox looking its best.
INTERVALS*
SERVICE OPERATION**
Every 3 Hours
Every 5 Hours
Every 10 Hours
Every 15 Hours
Valve Adjustment
X
Engine Oil
R
Engine Oil Strainer Screen
R
Drive Chain
L/A
Brake Fluid Reservoir Levels
I
Brake Fluid Condition
R
Brake Lines
I
Brake Pads
I
Air Filter
I

OWNER’S MANUAL 2015
MASTERFOX 125cc
10
Spark Plug
I
Throttle Cable
A/I/L
Wheel Spokes, Tightness
I
Wheel Bearings
L
Fasteners
I
Suspension Fluids
R
A –Adjust
I–Inspect and, if necessary, clean, correct, fill or replace
L–Lubricate
R–Change or replace
T –Tighten to proper torque
X -- Perform
*Inspect and service your Masterfox more frequently if ridden hard or in dusty, hot, or other extreme
conditions. Regardless of hours of riding, always perform all service operations prior to storage or annually.
**Unless the owner is an experienced and skilled mechanic and has a good selection of the proper tools
and equipment he or she should never attempt to perform these service operations. In all other
instances, service operations should only be by a qualified technician.
8. Troubleshooting:
Engine Does Not Start
1. Fuel tank is empty.
2. Fuel petcock is turned off.
3. Fuel petcock is clogged.
4. Fouled spark plug
5. Spark plug cable connectors loose or in bad condition and are shorting.
6. Engine flooded with fuel from over-enrichening (excessive use of the choke).
7. Throttle held too open when using the choke.
Engine Starts Hard
1. Spark plug is in bad condition, has improper gap or is partially fouled.
2. Spark plug cable is in bad condition.
3. Carburetor is not adjusted correctly.
4. Fuel tank vent is plugged or the fuel line to the carburetor is closed off, restricting fuel flow.
5. Carburetor flooded by excessive “pumping” of hand throttle.
6. Water or dirt in the fuel system and/or carburetor
Engine Starts But Runs Irregularly or Misses
1. Spark plug is in bad condition or partially fouled.
2. Spark plug cable is in bad condition.
3. Spark plug gap is too close or too wide.
OWNER’S MANUAL 2015
MASTERFOX 125cc
11
4. Intermittent short circuit due to damaged wire insulation.
5. Water or dirt in the fuel system or carburetor.
6. Fuel system vent is plugged or the fuel line to the carburetor is partially obstructed.
Pre-ignition or Detonation (Knocks or Pings)
1. Incorrect fuel (not high enough octane rating or blend of additives incorrect for Masterfox engine)
2. Incorrect spark plug (heat range) for type of usage.
Overheats
1. Insufficient oil supply or the oil is not circulating properly.
2. Heavy carbon deposits from “lugging” the engine.
3. Insufficient air flow over cylinder head from idling too long or obstructed by mud and debris.
Engine Leaks Oil
1.
Loose parts. Check for loose bolts and nuts.
2.
Bad seal(s) and/or gaskets.
Excessive Vibration
1. Engine mounting bolts loose.
2. Broken frame. Contact us.
3. Drive chain and/or sprocket badly worn, or links tight from insufficient lubrication.
4. Wheel(s) and/or tire(s) damaged.
5. Masterfox is not properly aligned.
Brakes Do Not Hold Normally
1. Front or rear master cylinder(s) low on fluid. Check for visible leaks. Add fluid if no leaks found.
2. Brake line contains air bubbles. Bleed brakes.
3. Front or rear master cylinder piston worn.
4. Brake pads contaminated with grease or oil. Replace pads and clean rotors before using.
5. Brake pads badly worn. Replace.
6. Brake rotor badly worn or warped. Replace.
7. Brakes fade because of heat build-up. Excessively hard use of brakes or because brake pads are
dragging.
8. Brake pads drag due to insufficient hand lever free play. Adjust free play
ENGINE OIL
Using the proper oil, plus regularly checking the oil level, adding additional oil if needed, and changing the
oil as recommended will all help extend the life of your Masterfox’s engine. Remember, the engine in this
Masterfox is cooled by outside air flowing over the engine, and the oil circulating within the engine. Even
the best oil gradually wears out, reducing its lubricity. It also picks up dirt and other contaminants from the
inside of the engine and becomes more and more contaminated as the miles of use add up. Old and/or

OWNER’S MANUAL 2015
MASTERFOX 125cc
12
dirty oil can dam-age your engine or cause accelerated wear on moving parts; running the engine with
insufficient oil can cause serious damage to the engine and transmission.
Oil Recommendation
API Classification SF or SG
Viscosity (weight) SAE 10W-40*
Suggested Oil 4-stroke oil (USA & Canada) or equivalent**
*For continued use with ambient air temperatures above 90-95-degrees F, and not dropping
below. **50-degrees F, use SAE 20W-50 viscosity SF or SG oil for air- cooled engines.
CHECKING & ADDING OIL
Park your Masterfox on a firm, level surface. Re-move the oil cap/dipstick and check the oil level. If the oil
is at or near the upper level mark (see photo) you do not have to add oil.
*Lower (1) and Upper (2) Oil Level Marks
If the oil is below or near the lower level mark (see photo) add oil of the recommended
specifications until it reaches the upper level mark. Do not overfill.
Insert the dipstick and screw it in tightly. Check for oil leaks.
OWNER’S MANUAL 2015
MASTERFOX 125cc
13
Changing Engine Oil
If the engine is cold, start it and let it idle for three- to five-minutes. Turn the engine off and wait
two- to three-minutes for the oil to settle.
Park your Masterfox on a firm, level surface.
Remove the oil filler cap/dipstick.
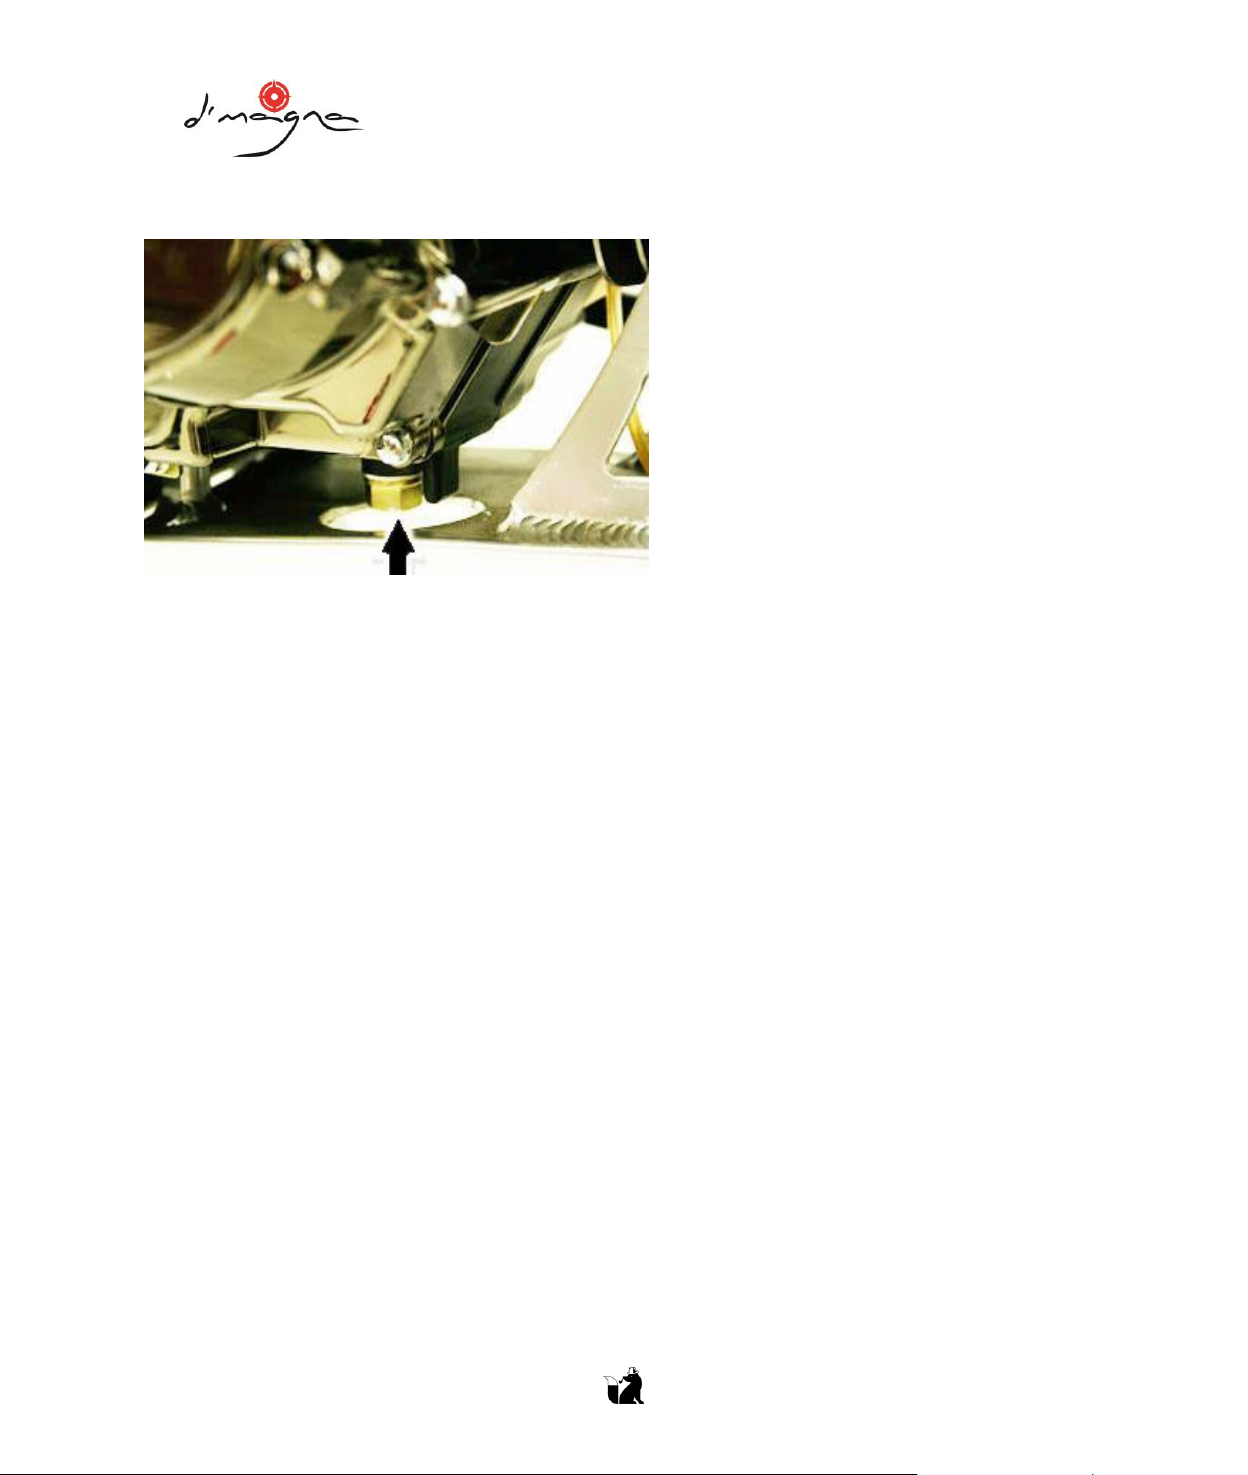
Place a drain pan under the crankcase.
Remove the oil drain bolt.
After most of the oil is drained, gently tilt the Masterfox from side to drain the remaining oil.
Pour the drained oil into a suitable container and dispose of it in an environmentally-safe manner.
Most auto parts stores accept used engine oil for recycling.
Remove the old sealing washer from the drain bolt and install a new sealing washer.
Install the oil drain bolt and tighten it to the specified torque, 18 lb-ft.
Pour approximately 0.6 US quart (0.57 liter) of the recommended oil into the crankcase.
Install the oil filler cap/dipstick securely.
Start the engine. Let it idle for two- to three-minutes, then turn it off.
With the Masterfox held upright on a level surface, check the oil level. If needed, add oil until it
reaches the upper level mark on the dipstick. Do not overfill!
Check for oil leaks.
Engine oil has a major influence on both the performance and the service life of the engine. Non-
detergent, vegetable or castor-based racing oils are not recommended. Aftermarket oil additives are not
needed and can negatively affect the Masterfox’s engine, use the recommended oil.

OWNER’S MANUAL 2015
MASTERFOX 125cc
14
THROTTLE CONTROL
Inspection
Check free play. Free play is the amount the throttle control will move before starting to open the throttle
on the carburetor. Free play should be between 5/64 and 5/32-inch (2.0mm to 4.0mm) movement at the
grip. Adjust, if necessary, to bring free play within the specified rang using the following instructions.
Adjustment
Slide the rubber dust cover off of and away from the locknut.
Loosen the locknut on the throttle cable mechanism.
Turn the adjuster to reduce or increase throttle free play.
Tighten the lock nut. Return the dust cover to its normal position.
After making the necessary adjustments, check the throttle grip to ensure it rotates smoothly from
fully closed to open at any steering (handlebar) position.
*Engine Idle Speed
The engine must be at normal operating temperature in order to make accurate idle speed
adjustments. Ten-minutes of stop-and-go riding should be sufficient. Do not attempt to
compensate for faults in other systems by adjusting idle speed.
Warm up the engine, shift into neutral and rest the Masterfox securely on its side stand.
Connect a tachometer, following the tachometer manufacturer’s instructions.
Adjust the idle speed using the throttle stop screw (arrow). Idle speed should be 1400 rpm,
plus/minus 100 rpm.

OWNER’S MANUAL 2015
MASTERFOX 125cc
15
AIR FILTER
Inspect the air filter regularly. When it becomes dirty or contaminated discard it and replace with an
equivalent new part. The air filter is a reusable washable type, wash the dirt out with a mild detergent,
rinse thoroughly and dry with a clean towel.
SPARK PLUG
Spark Plug Recommendation
The recommended standard spark plug is satisfactory for most riding conditions. However, If you plan to
ride for extended periods at high speeds or near maximum power (high engine rpm) in hot climates, or
plan extended riding in cold cli-mates, a “colder” or “hotter” heat range plug may be recommended.
NOTICE: Using spark plugs with an improper heat range can cause engine damage.
1. Side electrode
2. Sparkplug gap
3. Center electrode
Removing or Replacing the Spark Plug
Before removing the spark plug clean any dirt from around the spark plug base.
Carefully disconnect the spark plug wire cap.
Do not pull on the wire as this may damage the conductor within the wire causing high resistance
and reduced firing voltage.
Remove the spark plug with a spark plug wrench.

OWNER’S MANUAL 2015
MASTERFOX 125cc
16
Inspect the spark plug electrodes for wear. The center electrode (1) should have square edges.
The side electrodes (2) should not be eroded.
The insulator should not be cracked or chipped.
Check the spark plug gap (3), using a wire-type feeler gauge. If an adjustment is necessary, bend
the side electrode carefully to open or close the gap, which should be 0.024- to 0.028-in. (0.60 to
0.70mm). Make sure the plug washer is in good condition. If you need to install a new spark plug
check and, if necessary, adjust the gap.
With the plug washer attached, thread the spark plug in by hand (to prevent cross-threading).
Do not force-fit the plug.
Tighten the spark plug about 1/8 to1/4 turn after it seats, if the old plug is good, or about 1/2 turn
after it seats if installing new plug.
NOTICE! Improperly tightened spark plugs can cause dam-age to the engine. A loose plug can cause a
burned piston; over-tightening the plug can damage or strip the threads in the cylinder head.
SUSPENSION
Loose, worn, or damaged suspension components may adversely affect the handing and stability of your
Masterfox.
Front Suspension Inspection
Check fork operation. Pull the front brake lever in to lock the brake. Then push up and down on the fork
legs several times. The suspension should function smoothly. There should be no oil leakage. Check to be
sure that the fork mounting bolts and handlebar riser mounting nuts are tight.
Rear Suspension Inspection
Place the Masterfox on a maintenance stand. Either strap securely in place or have a helper hold
the Masterfox while you push hard against the side of the rear wheel and feel for any free play
which indicates worn swing arm bushings. Do not ride with worn swing arm bushings.
Check that the fasteners for the shock absorber attachment points are secure.
Shock absorber attachment points
Shock absorber bushing
Check that the shock absorber bushings are not worn, check for oil leaks in the shock absorber.
OWNER’S MANUAL 2015
MASTERFOX 125cc
17
Foot peg Suspension Inspection
Lock on the brakes. Place your right foot over the right foot peg and press downwards. The
suspension should oppose some resistance but function smoothly. There should be no clocking
noises. Check to be sure that the mounting bolts and nuts are tight.
BRAKES
Front Brake Lever Free Play
Check free play by pulling in slowly on the front brake lever until the brake starts to engage.
Free play should be between approximately 3/8-to 13/16-inch (10-20mm).
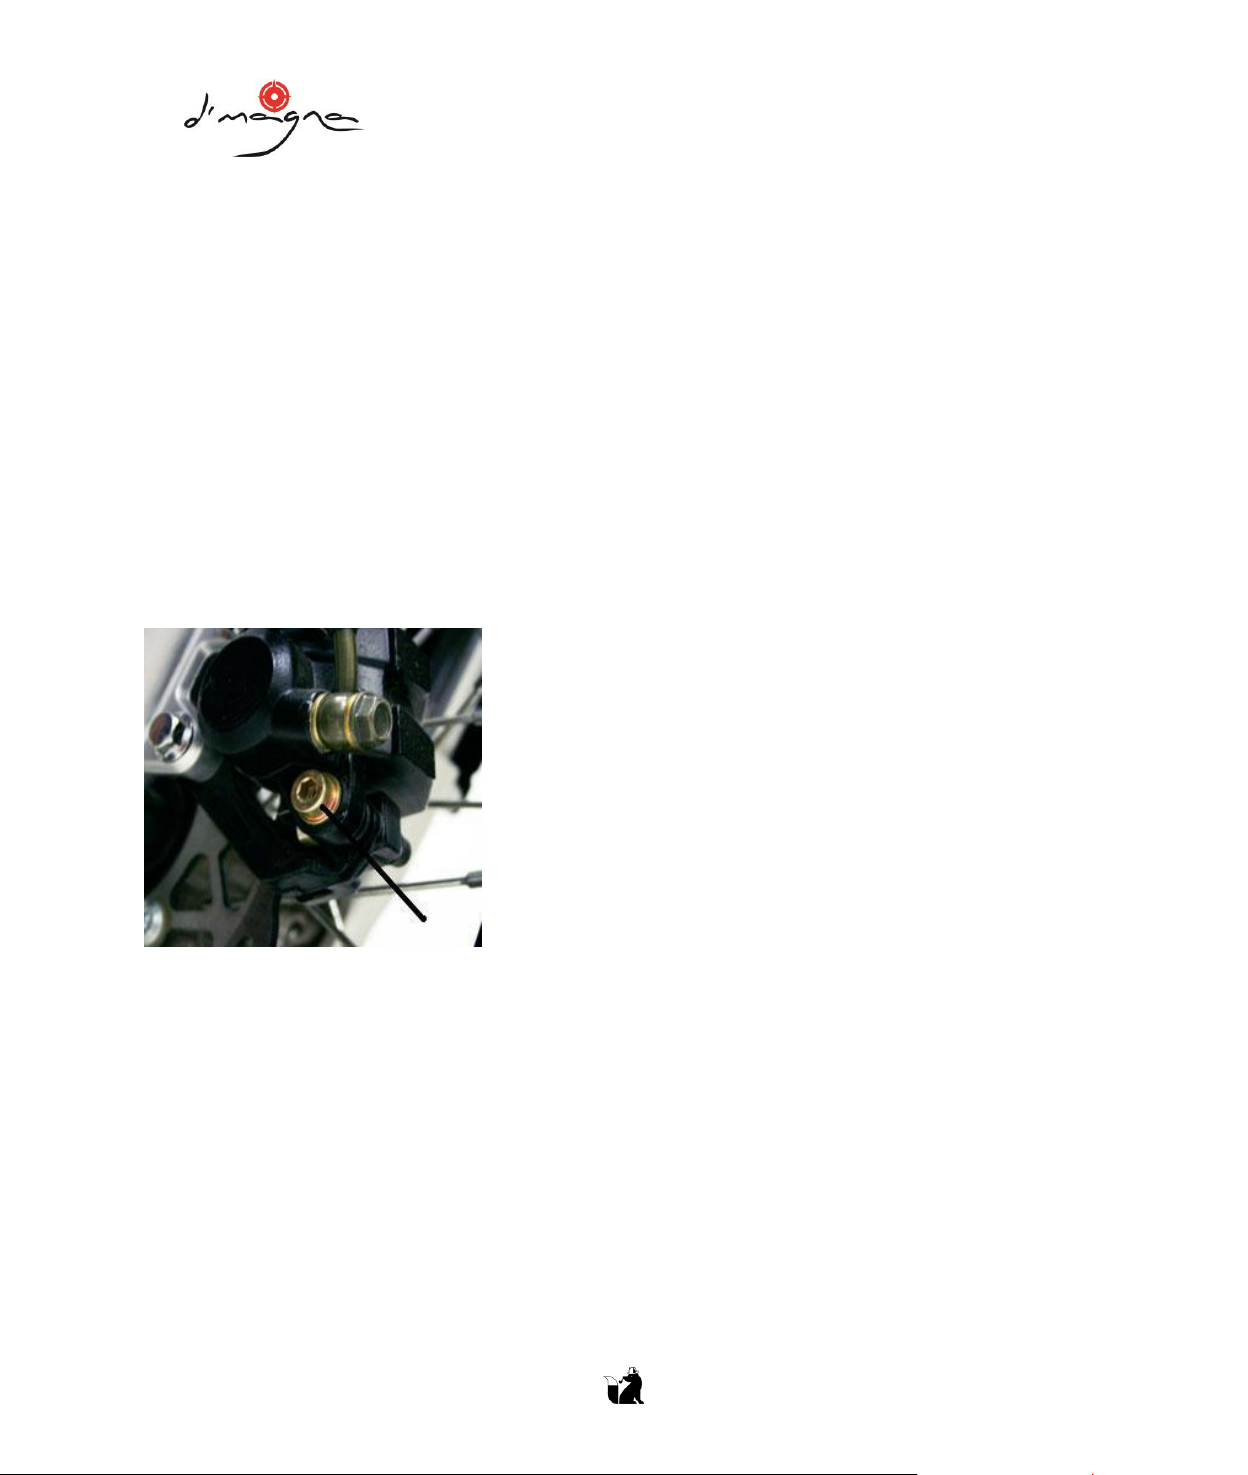
If necessary, adjust to the specified range. To do this find the brake adjusting nut on the lower
portion of the brake caliper. Using a hex-head wrench turn the bolt clockwise to increase free play
or counter-clockwise to reduce free play.
*(1) Front Brake Lever Free PlayBrake Caliper Free Play Adjusting Nut
Rest the Masterfox securely on its side stand.
Check free play by slowly depressing the brake lever until the brake starts to engage.
Free play should be between 3/8- to 13/16-inch (10-20mm). If necessary, adjust to the specified
range. To do this, find the adjusting nut at the bottom of the rod connecting the rear brake lever
and linkage to the master cylinder.
Turn the nut clockwise to reduce free play, or counter-clockwise to increase free play.
Brake Wear Inspection
The front and rear brakes should be checked for wear after every 15-hours of riding. We
recommend that this inspection be performed by a professional.

OWNER’S MANUAL 2015
MASTERFOX 125cc
18
Other Inspections & Lubrication
Check the brakes hydraulic fluid lines for kinks or signs of wear or abrasion that could cause
sticking or failure.
Front: Make sure the brake levers, spring, and fasteners are in good condition.
Wheels
Maintaining correct spoke tension and trueness (roundness) of the wheels is critical to safe motor-
cycle operation.
During the first hour or two, spokes will loosen rapidly due to the initial “seating” of the parts.
Excessively loose spokes may result in instability at moderate and high speeds leading to a possible
loss of control. It’s also important that the rim locks are secure to prevent tire slippage.
It is not necessary to remove the wheels to perform the recommended services in the
Maintenance Schedule. However, information for wheel removal is provided for emergency
situations.
Inspect the rims and spokes for damage.
Tighten any loose spokes.
Rotate the wheel slowly to check for signs of wobble. If the wheel appears to wobble, the rim is
out of round or not “true.” If the wobble is noticeable, contact your Tech for inspection.
FRONT WHEEL REMOVAL
Removal
Raise the front wheel off the ground by placing a maintenance stand or support block under the
engine. Secure the rear of the Masterfox with tie-down straps.
Remove the front axle nut and front axle.
Remove the wheel. Do not get any grease, oil or dirt on the brake pad surfaces. This can cause
poor or erratic brake performance, or rapid brake pad wear after reassembly.
Installation
Reverse the removal procedure.
Torque the axle to 35 Ib-ft.

OWNER’S MANUAL 2015
MASTERFOX 125cc
19
Check front brake adjustment.
If a torque wrench was not used to re-install the wheel, have your Tech inspect it as soon as possible to
verify proper assembly. Improper re-assembly may lead to loss of front braking function.
TIRES and TUBES
To safely operate your Masterfox, the tires must be of the proper type (for off-road use only) and size, in
good condition with adequate tread, no cuts or other visible signs of damage, and correctly inflated.
WARNING! Using a tire that is excessively worn or improperly inflated can lead to a loss of control which
could result in serious injury or death. Follow all instructions in this owner’s manual regarding tire inflation
and maintenance.
Tire Air Pressure
Properly inflated tires provide the best combination of handing, tread life and riding comfort.
Under-inflated tires wear unevenly which adversely affects handling. Under-inflated tires are more
likely to fail from overheating. Under-inflated tires may also cause wheel damage in rocky terrain.
Over-inflated tires will make your Masterfox ride more harshly, are more prone to being damaged
by surface hazards and wear unevenly.
Check Tire Pressure Cold
Always check tire air pressure when the tires are cold. Tire pressure measurements will be inaccurate,
inconsistent and always higher if the air pressure is checked when the tires are warm or hot, which
happens even if the Masterfox has only been ridden for a few miles. If you let air out of warm or hot tires
to match the recommended cold air pressures, the tires will be under-inflated. Make sure the valve stem
caps are secure. If a cap is damaged or missing install a new cap.
Front
25 psi
(1.8 kgf/cm 2)
Rear
25 psi
(1.8 kgf/cm 2)
*Recommended Tire Pressure, COLD
If you decide to adjust tire pressure for a particular riding condition, make changes a little at a time.

OWNER’S MANUAL 2015
MASTERFOX 125cc
20
Inspection
A flat tire is inconvenient at best and may cause an accident. Carefully inspect your Masterfox’s
tires and wheels every time before you ride. Look for bumps or bulges in the tire sidewall and
tread. Replace any tire that has a bump or bulge. Look closely for cuts, slits, or cracks in the tires.
Replace the tire if you can see any fabric or cord anywhere on the tire. Check for rocks or other
objects embedded in the tire or tread. Remove any objects.
Measure the tread depth. Replace the tire before tread depth at the center is 1/8- inch (3mm) or
less, or any time you begin to notice a reduction in trac-tion.
Check the position of the valve stems on both wheels. A tilted valve stem indicates the tube is
slipping inside the tire or the tire is slipping on the rim.
Tube Replacement
If a tube is punctured or damaged, you should re-place it as soon as possible. A repaired tube may
not be as reliable as a new one, and it could fail while you are riding.
Always use a replacement tube that is equivalent to the original. We recommend that tubes be
replaced by your Tech. Replacing a tube requires removing and re-installing the wheel. Any time a
tube is replaced, carefully inspect the tire.
Tire Replacement
The tires that came on your Masterfox were engineered to provide the optimum combination of
handling, braking, durability, and comfort
Use a replacement tire equivalent to the original.
Replace the tube any time you replace a tire. The old tube will probably be stretched and, if
installed in a new tire, could fail.
We recommend that tires and tubes be replaced by your Tech.
WARNING! Installing improper tires can negatively affect handling and stability. This can lead to a loss of
control which could cause serious injury or death. Always use the size and type of tires recommended in
this owner’s manual.
This manual suits for next models
1
Table of contents


 owner's manual")


