Daewoo DBC430 User manual

USER‘S MANUAL
ОРИГИНАЛНА ИНСТРУКЦИЯ ЗА ЕКСПЛОАТАЦИЯ
Manufactured under license of Daewoo International Corporation, Korea
Произведено по лиценз на Daewoo International Corporation, Korea
DBC430 -DBC520 -DBC520N
BRUSH CUTTER / КОСА БЕНЗИНОВА С НОЖ И КОРДА

www.daewoopower.bg
2
www.daewoopower.bg
2
.................................................................................................................
...................................................................................................................................
.
............................................................................................................................
10
13
15
.....................................................................................................................
4
.........................................................................................................................................
3
..............................................................................................................
16
INDEX
1
1. Symbol Explanation
2. Safety Instructions
3. Assembly
4. Fuel Handling
5. Start and stop
6. Maintenance

www.daewoopower.bg
3
www.daewoopower.bg
2
.................................................................................................................
...................................................................................................................................
.
............................................................................................................................
10
13
15
.....................................................................................................................
4
.........................................................................................................................................
3
..............................................................................................................
16
INDEX
1
1. Symbol Explanation
2. Safety Instructions
3. Assembly
4. Fuel Handling
5. Start and stop
6. Maintenance
www.daewoopower.bg
3
2
1. SYMBOL EXPLANATION
WARNING! Clearing saws,
Brush cutters and trimmers can
be dangerous!
Careless or incorrect use can
result in serious or fatal injury to
the operator or others.
Read through the Operator's
Manual carefully and understand
the content before using the
machine.
Always use
• A protective helmet where there
is a risk of falling objects
• Ear protection
• Approved eye protection.
Always wear approved protective
gloves.
Use anti-slip and stable boots
Fuel and oil mixture .
The operator of the machine
shall ensure, while working,
that no persons or animals
come closer than 15 metres.
Keep body away from hot
parts Of the engine. Avoid
contact during and
immediately after operation.
Keep exhaust area clear of
flammable debris. Do not
run the engine indoors or
where there is poor
ventilation. Engine fumes
contain deadly poisonous
carbon monoxide
Keep body away from blade
or trimmer head.
Do not smoke or allow
smoking near fuel or the
machine or while using the
machine.
Engine stop position.
Engine run position.

www.daewoopower.bg
4
www.daewoopower.bg
4
3
2. SAFETY INSTRUCTIONS
PERSONAL PROTECTIVE EQUIPMENT
IMPORTANT INFORMATION
A brush cutter, brush cutter or trimmer used incorrectly or carelessly can become a dangerous tool, that can cause
serious or fatal injury to the operator or others. It is extremely important that you read and understand the content of
this manual.
When using a brush cutter, brush cutter or trimmer, personal protective equipment approved by the appropriate
authorities must be used. Personal protective equipment does not eliminate the risk of accidents, however, it can
reduce the effects of an injury in the event of an accident. Ask your dealer for help when choosing protective equip-
ment.
WARNING!
Remove your hearing protection as soon as you stop the engine, so that you can hear any noises or warning signals.
EAR PROTECTION Ear protection offering sufficient dampening effect should be used.
EYE PROTECTION Blows from branches or objects thrown by the rotating cutting equipment can damage the
eyes.
GLOVES
Gloves should be worn when necessary, e.g., when assembling cutting equipment.
BOOTS
Use anti-slip and stable boots.
CLOTHING Wear clothes made of a strong fabric and avoid loose clothing that can catch on shrubs and branche
Always wear heavy-duty long pants. Do not wear jewellery, shorts, sandals or go barefoot. Secure hair so it is above
shoulder level.
FIRST AID KIT
A first aid kit should be carried by operators of brush cutters, or trimmers.
THE MACHINE'S SAFETY EQUIPMENT
This section describes the machine's safety equipment, its function and how checks and maintenance are carried
out to ensure that it operates correctly. (See the chapter "What is what"to locate where this equipment is positioned
on your machine.)
WARNING!
Never use a machine with defective safety equipment. Follow the control, maintenance and service instructions
described in this section.

www.daewoopower.bg
5
www.daewoopower.bg
4
3
2. SAFETY INSTRUCTIONS
PERSONAL PROTECTIVE EQUIPMENT
IMPORTANT INFORMATION
A brush cutter, brush cutter or trimmer used incorrectly or carelessly can become a dangerous tool, that can cause
serious or fatal injury to the operator or others. It is extremely important that you read and understand the content of
this manual.
When using a brush cutter, brush cutter or trimmer, personal protective equipment approved by the appropriate
authorities must be used. Personal protective equipment does not eliminate the risk of accidents, however, it can
reduce the effects of an injury in the event of an accident. Ask your dealer for help when choosing protective equip-
ment.
WARNING!
Remove your hearing protection as soon as you stop the engine, so that you can hear any noises or warning signals.
EAR PROTECTION Ear protection offering sufficient dampening effect should be used.
EYE PROTECTION Blows from branches or objects thrown by the rotating cutting equipment can damage the
eyes.
GLOVES
Gloves should be worn when necessary, e.g., when assembling cutting equipment.
BOOTS
Use anti-slip and stable boots.
CLOTHING Wear clothes made of a strong fabric and avoid loose clothing that can catch on shrubs and branche
Always wear heavy-duty long pants. Do not wear jewellery, shorts, sandals or go barefoot. Secure hair so it is above
shoulder level.
FIRST AID KIT
A first aid kit should be carried by operators of brush cutters, or trimmers.
THE MACHINE'S SAFETY EQUIPMENT
This section describes the machine's safety equipment, its function and how checks and maintenance are carried
out to ensure that it operates correctly. (See the chapter "What is what"to locate where this equipment is positioned
on your machine.)
WARNING!
Never use a machine with defective safety equipment. Follow the control, maintenance and service instructions
described in this section.
www.daewoopower.bg
5
4
1. Throttle trigger lock
The throttle trigger lock is designed to prevent the throttle from accidentally being engaged. When the trigger lock (
is pressed into the handle (= when you hold the handle) the throttle (B) is released. When the grip on the handle is
released the throttle and the throttle trigger lock return to their original positions. This takes place via two indepen-
dent return spring systems. This means that the throttle is automatically locked in its "idling" position.
2. Stop switch
The stop switch should be used to stop the engine.
3.Debris shield
This debris shield is intended to prevent objects from being thrown
towards the operator and to protect the operator from unintentionel contact with the cutting attachment.
WARNING!
Under no circumstances may the cutting equipment be used without an approved debris shield fitted.
CONTROL AND SERVICE OF THE MACHINE’S SAFETY EQUIPMENT
1. Throttle trigger lock
• Check that the throttle is locked in the "idling position" when the throttle trigger lock is in its original position.
• Press in the throttle trigger lock and make sure it returns to its original position when released.
• Ensure that the throttle and throttle trigger lock move easily and that their return spring systems function.
• See section "Start". Start the machine and apply full throttle. Release the throttle and check that the cutting equip-
ment stops and remains at a standstill. If the cutting equipment rotates with the throttle in the idling position then the
carburetor's idling setting must be checked.
• 2. Stop switch
• Start the engine and make sure that the engine stops when the stop switch is moved to the stop
3. Debris shield
• Check that the shield is undamaged and not cracked.
• Replace the shield if it has been exposed to impact or is cracked.
• Always use the prescribed blade and shield combination.
• 4. Blade and Trimmer head
• 1) Grass blades are intended for brush cutting.
• 2) The trimmer head is intended for trimming grass.
• 5. Locking nut
• A locking nut is used to secure some types of cutting equipment on the output shaft
6. Muffler
The muffler is designed to give the lowest possible noise level and to direct
the engine's exhaust fumes away from the operator. .
In countries that have a warm and dry climate the risk of fire is obvious.
We have therefore fitted certain mufflers with a spark arrestor screen. Make
sure that your muffler is fitted with this kind of screen.
It is extremely important that the instructions for checking, maintaining
and servicing the muffler are followed.

www.daewoopower.bg
6
www.daewoopower.bg
6
5
CUTTING EQUIPMENT
IMPORTANT INFORMATION
The section describes how through correct maintenance and through using the right type of cutting equipment you
can reduce the machine's tendency to kickback, obtain maximum clearing capacity and increase the service life of
the cutting equipment.
• Only use the cutting and guard equipment we recommend!
• Refer to the instructions for the cutting equipment for the correct winding of cord and for the selection of the right
cord diameter.
• Keep the blade's teeth well and correctly sharpened! Follow our recommendations. Also refer to the instructions
on the blade packaging.
WARNING!
Incorrect cutting equipment or an incorrectly sharpened blade increases the risk of kickback.
Filing the blade
The blades are sharpened using a single cut flat file.
Sharpen all edges equally to maintain the balance of the blade.
Always stop the engine before starting work on any part of the cutting equipment. This continues to rotate even after
the throttle has been released. Ensure that the cutting equipment has stopped completely and remove the cable
from the spark plug before you start to work on it.
Trimmer head
Only use a trimmer head and trimmer cord that is recommended.
These have been tested by the manufacturer to suit a particular engine size.
This is especially important when a fully automatic trimmer head is used.
Only use the cutting equipment we recommend!
Generally smaller machines require a small trimmer head and vice versa.
This is because when clearing using a cord the engine must throw out the
cord radially from the trimmer head and also meet resistance from the grass
being cleared.
The length of the cord is also important. A longer cord requires greater engine
power than a shorter cord of the same diameter.
Make sure the knife positioned on the trimmer guard is intact. This is used to
cut the cord to the correct length.
To increase the life of the cord it can be soaked in water for a few days.
This will make the line tougher and it will keep longer.
IMPORTANT INFORMATION
Always ensure the trimmer cord is wound tightly and evenly around the drum, otherwise harmful vibrations will occur.

www.daewoopower.bg
7
www.daewoopower.bg
7
6
GENERAL SAFETY INSTRUCTIONS
IMPORTANT INFORMATION
• The machine is only designed for trimming grass and brush cutting.
• The only accessories to be used with the engine unit as a drive source are the cutting units we recommend in the
chapter "Technical data".
• Never use the machine if you are tired, if you have consumed alcohol, or if you are taking medicines that can affect
your sight, your judgement or the control of your body.
• Use personal protective equipment. See the section "Personal protective equipment".
• Never use a machine that has been modified so that it no longer corresponds with the original design.
• Never use a machine that is faulty. Follow the maintenance, control and service instructions in this Operator's
Manual. Some maintenance and service actions should be carried out by trained and qualified specialists. See the
chapter "Maintenance".
• All covers and guards must be fitted before starting the machine. Check that the spark plug cap and HT ead are
not damaged, otherwise you could get an electric shock.
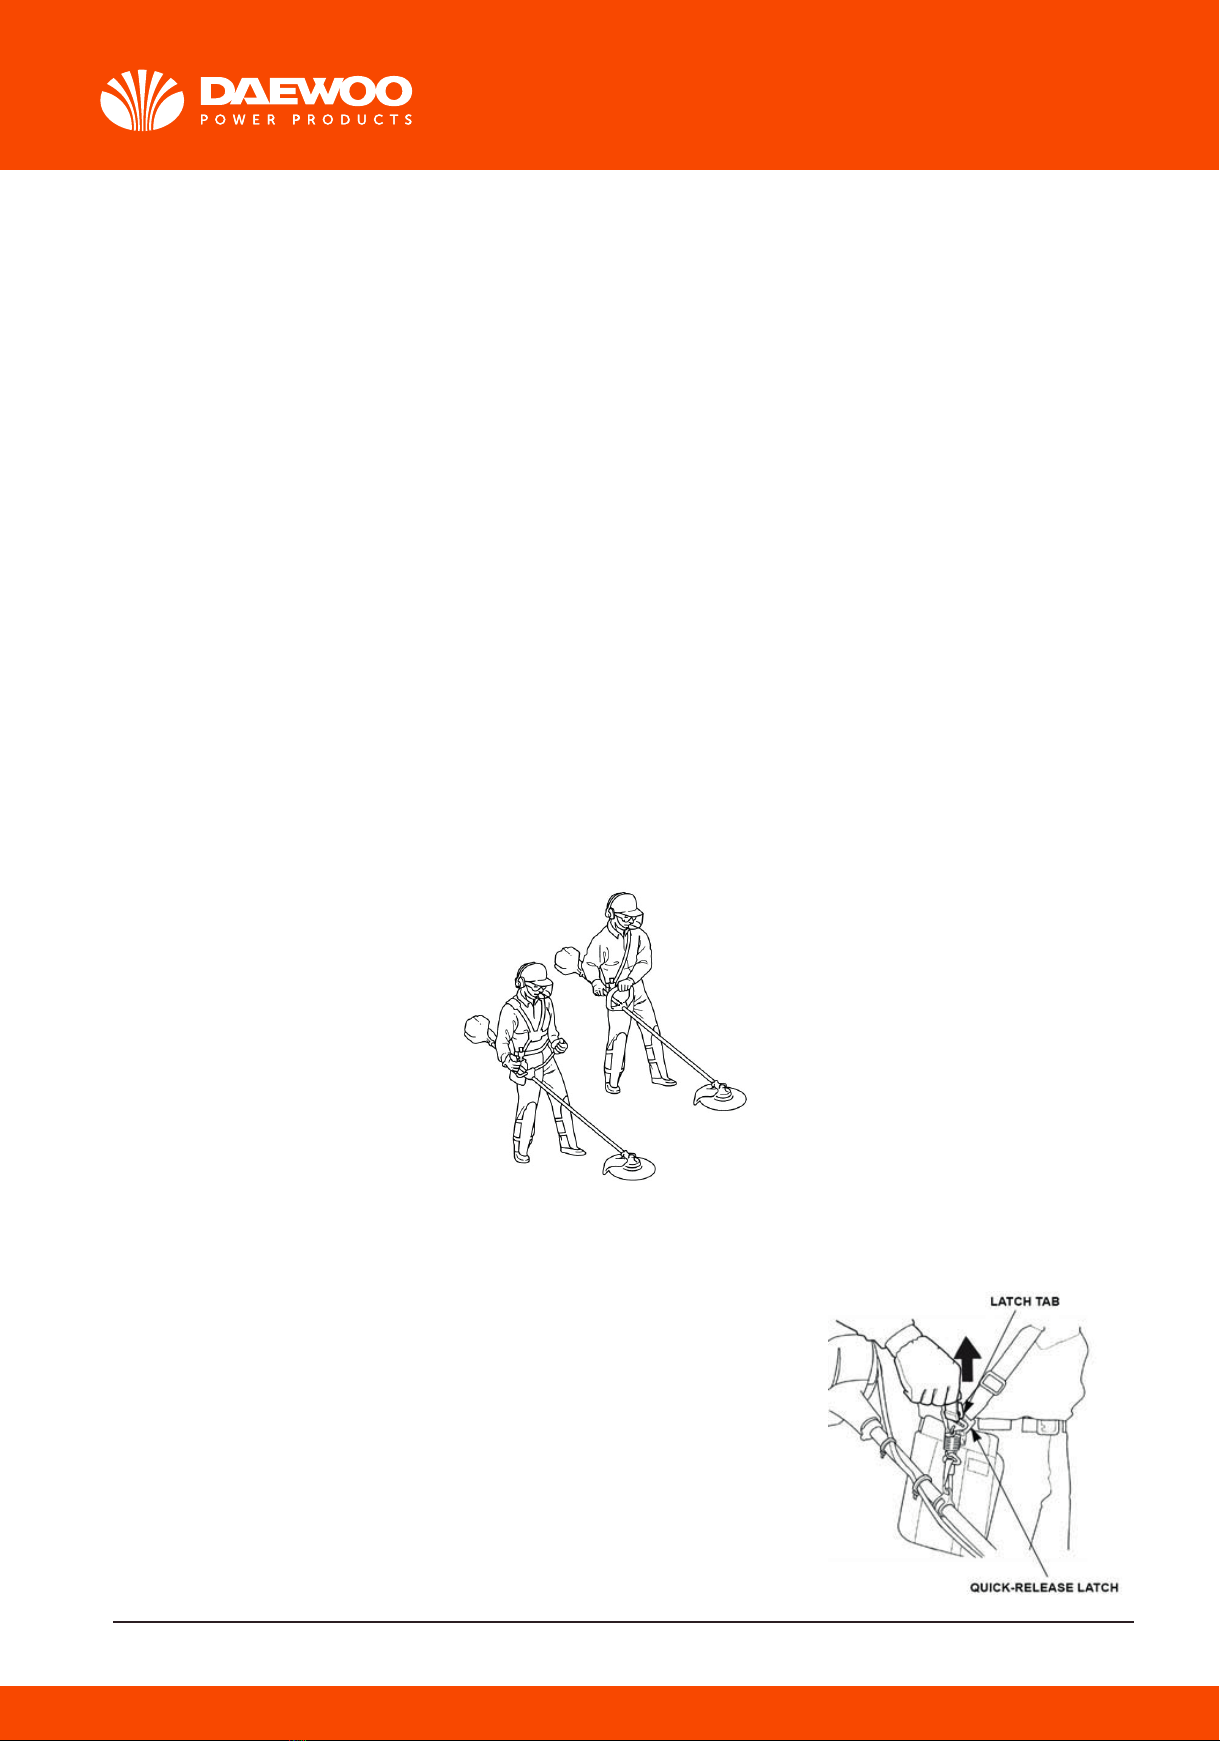
• The machine operator shall ensure, while working, that no persons or animals come closer than 15 metres. When
several operators are working in the same area the safety distance should be at least double tree length, however,
at least 15 metres.
WARNING!
Faulty cutting equipment or an incorrectly sharpened blade increases the risk of accidents. When the engine is
started with the choke in either the choke or start throttle positions the cutting equipment starts to rotate immediate-
ly.
Never start the machine indoors. Bear in mind the dangers of inhaling the engine's exhaust fumes.
Observe your surroundings and make sure that there is no risk of people or animals coming into contact with the
cutting equipment.
Place the machine on the ground, ensure the cutting equipment runs free of twigs and stones. Push the machine
body towards the ground using your left hand. (NOTE! Not with your foot). Grip the starter handle with your right
hand and pull the starter cord.
Fuel safety
• Always use a fuel container with an anti-spill valve.
• Never fill the machine while the engine is running.
Always stop the engine and let it cool for a few minutes before refuelling.
Provide good ventilation when filling or mixing fuel (petrol and 2-stroke oil).
Move the machine at least 3 m from the filling position before starting.
• Never start the machine:
a)If you have spilt fuel on it. Wipe up all spillage.
b)If you have spilt fuel on yourself or your clothes. Change your clothes.
c)If there is a fuel leak. Make regular checks f leakage from the
fuel cap and the fuel supply pipes.
Transport and storage
Store and transport the machine and fuel so that any leakage
or fumes do not risk coming into contact with sparks or naked flames.
For example, electric machines, electric motors, electrical switches/power
switches, heaters or the like When storing and transporting fuel approved
containers intended for this purpose must be used When storing the machine
for long periods the fuel tank must be emptied. Contact your local petrol
station to find out how to dispose of excess fuel.
1. Throttle trigger lock
The throttle trigger lock is designed to prevent the throttle from accidentally being engaged. When the trigger lock (
is pressed into the handle (= when you hold the handle) the throttle (B) is released. When the grip on the handle is
released the throttle and the throttle trigger lock return to their original positions. This takes place via two indepen-
dent return spring systems. This means that the throttle is automatically locked in its "idling" position.
2. Stop switch
The stop switch should be used to stop the engine.
3.Debris shield
This debris shield is intended to prevent objects from being thrown
towards the operator and to protect the operator from unintentionel contact with the cutting attachment.
WARNING!
Under no circumstances may the cutting equipment be used without an approved debris shield fitted.
CONTROL AND SERVICE OF THE MACHINE’S SAFETY EQUIPMENT
1. Throttle trigger lock
• Check that the throttle is locked in the "idling position" when the throttle trigger lock is in its original position.
• Press in the throttle trigger lock and make sure it returns to its original position when released.
• Ensure that the throttle and throttle trigger lock move easily and that their return spring systems function.
• See section "Start". Start the machine and apply full throttle. Release the throttle and check that the cutting equip-
ment stops and remains at a standstill. If the cutting equipment rotates with the throttle in the idling position then the
carburetor's idling setting must be checked.
• 2. Stop switch
• Start the engine and make sure that the engine stops when the stop switch is moved to the stop
3. Debris shield
• Check that the shield is undamaged and not cracked.
• Replace the shield if it has been exposed to impact or is cracked.
• Always use the prescribed blade and shield combination.
• 4. Blade and Trimmer head
• 1) Grass blades are intended for brush cutting.
• 2) The trimmer head is intended for trimming grass.
• 5. Locking nut
• A locking nut is used to secure some types of cutting equipment on the output shaft
6. Muffler
The muffler is designed to give the lowest possible noise level and to direct
the engine's exhaust fumes away from the operator. .
In countries that have a warm and dry climate the risk of fire is obvious.
We have therefore fitted certain mufflers with a spark arrestor screen. Make
sure that your muffler is fitted with this kind of screen.
It is extremely important that the instructions for checking, maintaining
and servicing the muffler are followed.
Exercise great care when handling fuel. Bear in mind the risk of fire, explosions and inhaling fumes.
WARNING!
Min 3 m

www.daewoopower.bg
8
www.daewoopower.bg
8
7
GENERAL WORKING INSTRUCTIONS
IMPORTANT INFORMATION
• This section takes up the basic safety precautions for working with the brush cutter and trimmer.
• If you encounter a situation where you are uncertain how to proceed you should ask an expert. Contact your dealer
or your service workshop.
• Avoid all usage which you consider to be beyond your capability.
• Before starting you must understand the difference between forestry clearing, brush cutting and grass trimming.
Basic safety precautions
1. Observe your surroundings:
• To ensure that people, animals or other things cannot affect your control of the machine.
• To ensure that the above mentioned do not come into contact with the cutting equipment or objects that can be
thrown by the cutting equipment.
NOTE! Never use a machine without the possibility of calling for help in the event of an accident.
2.Avoid usage in unfavourable weather conditions. For example, thick fog, heavy rain, strong winds or extreme cold,
etc. To work in bad weather conditions is tiring and can create dangerous situations, for example, slippery surfaces.
3.Make sure you can walk and stand safely. Look out for any obstacles with unexpected movement (roots,
stones, branches, pits, ditches, etc.). Take great care when working on sloping ground
Adjusting the harness and brush cutter
WARNING!
When working with the brush cutter the harness should always be
worn. If this is not done, you cannot control the brush cutter safely
and this can result in injury to yourself or someone else.
Harness quick disconnection
• To quickly detach the harness from the brush cutter, pull the
quick-release latch tab upward.
• Insert the latch tongue in the slot of the quick-release latch
to reattach the brush cutter to the harness.

www.daewoopower.bg
9
www.daewoopower.bg
9
WHAT IS WHAT ON GRASS TRIMMER ?
8
Warning for thrown objects. Always wear protective glasses. Never lean over the guard. Stones, rubbish, etc. can be
thrown up into the eyes causing blindness or serious injury. Keep unauthorised persons at a distance. Children,
animals, onlookers and helpers should be kept outside the safety zone of 15 m.
Stop the machine immediately if anyone approaches.
WARNING!
D-HANDLE
ENGINE STOP
LOCK BUTTON
U-HANDLE
MAIN PIPE
GEAR HOUSING
TRIMMER HEAD
DEBRIS SHIELD
THROTTLE
TRIGGER

www.daewoopower.bg
10
www.daewoopower.bg
10
9
3. ASSEMBL
Assembly of the debris shield
It is extremely important that the disc drive's/support flange's guide engages correctly in the cutting equipment's
centre hole when assembling the cutting equipment. Cutting equipment assembled incorrectly can result in serious
and/or fatal personal injury.
WARNING!
Under no circumstances may the cutting equipment be used without an approved shield fitted.. If the wrong guard
or a defective shield is fitted this can cause serious personal injury.
Assemble debris shield as the fig. illustrated, note that the bolts should be tightened.

www.daewoopower.bg
11
www.daewoopower.bg
11
10
Assembling the blade
Fit the upper plate (F)and adapter housing(E) to the output axle.
Turn the blade axle until one of the holes in the upper plate aligns with the
hole in the gear housing(H).
Insert a locking pin in the hole (H)so that the axle is locked.
Place the blade (D), low plate (C) and plate housing (B)
on the output shaft.
Fit the nut (A).
The tightening torque of the nut is 35-50 Nm (3,5 - 5 kg.m). Use the socket
spanner in the tool kit. Hold the handle of the spanner as close to the blade
guard as possible. The nut is tightened when the spanner is turned
against the direction of rotation (left-hand thread).
Assembling the debris shield
1) Fasten the cord cutter (A) to the shield(C) with a ST3.5 x 12 screw, as shown.
2) Attach the shield extension (B) to the shield bottom
Assembling the U-handle
Insert the U-handle bar into the handle holder, making sure that the hole in the handle holder fit in the handle bar.
After the handle bar in place, tighten the four bolts. Note: Be sure the bolts are tight, but not overtight.

www.daewoopower.bg
12
www.daewoopower.bg
12
11
Connecting throttle cable and stop switch wires
1) Insert the throttle cable through the cable adjuster sleeve on the carburetor bracket. Make sure the end of the
throttle cable housing is seated positively in the sleeve.
2) Position the slotted fitting on the carburetor so the recessed hole (A) is away from the cable adjuster sleeve.
3) Rotate the carburetor throttle cam and slip the throttle cable through the slot in the slotted fitting, making sure the
cable l drops into the reces hole.
4) Operate the throttle trigger a few times to make sure that it works correctly.
5) Bind the throttle cable and the wires with bands (B).
Adjusting the harness
Quick release
On the front is an easily accessible, quick release catch:
• Pull out the red strap.
• The hip strap and one shoulder strap will be automatically released at the same time and the harness and the
engine unit will slide to the ground.
Use this if the engine should catch fire or in any other emergency situation when you quickly need to take off the
harness and machine.

www.daewoopower.bg
13
www.daewoopower.bg
13
12
Assembling the trimmer head
Fit the upper plate (D)and adapter housing(C) to the output axle.
Turn the blade axle until one of the holes in the upper plate aligns with
the hole(F) in the gear housing(E).
Insert a locking pin in the hole (F)so that the axle is locked.
Place the low plate (B) and nylon trimmer head (A) on the output shaft.
Screw on the trimmer head (A) in the direction of rotation.
Assembling the main shaft
Loosen the screw(A) and two bolts(C).
Insert the main shaft tube into the gear housing, Turn the blade axle
and push t main shaft tube in until the holes(B) in the main shaf
tube aligns with the hole(A in the gear housing. Tighten the screw(A)
and two bolts(C), so that the main shaft tube is locked.
4. FUEL HANDLING
Fuel mixture
NOTE!
The machine is fitted with a two-stroke engine and must always be run on a mixture of petrol and two-stroke oil. It
is important to measure the quantity of oil accurately, to ensure the correct mixture ratio. Small discrepancies in the
amount of oil have a great bearing on the proportions of the fuel mixture when mixing small amounts of fuel.
WARNING!
Always provide good ventilation when handling fuel.
Petrol
NOTE!
• Always use an oil-mixed quality petrol (at least 90 octane).
• recommended octane rating is 90. If you run the engine on a petrol with a lower octane rating than 90 so-called
"knocking" can occur. This leads to an increased engine temperature, which can result in a serious engine break-
down.
• When working at continuous high revs a higher octane rating is recommended.

www.daewoopower.bg
14
www.daewoopower.bg
14
13
Two-stroke oil
• For the best results use high level two-stroke oil. Mixing ratio 1:25 (4%).
• Never use oil intended of four-stroke engines.
Mixture
• Always mix petrol and oil in a clean container intended for petrol.
• Always start by filling half the quantity of petrol required. Then add the entire oil quantity. Mix (shake) the fuel mixtu-
re. Fill the remaining quantity of petrol.
• Mix (shake) the fuel mixture carefully before filling in the machine's fuel tank.
• Do not mix more than max. one month's supply of fuel.
• If the brush cutter is not used for a long period of time, the fuel tank should be emptied and cleaned.
Fuelling
WARNING!
The following precautions reduce the risk of fire:
Do not smoke or place any sources of heat in the vicinity of the fuel. Never refuel when the engine is running. Always
stop the engine and let it cool for a few minutes before refuelling. Open the fuel cap slowly when fuelling so that any
over pressure is released slowly. Tighten the fuel cap carefully after refuelling. Always move the machine from the
fuelling place before starting.
Clean around the fuel cap. Contamination i the tank can disr operations.
Ensure that the fuel is well mixed by shaking the container before filling the tank.
Always use a fuel container with an anti-spill valve.
4% (1:25)
5
10
15
20
Gasoline
Oil
0,20
0,40
0,60
0,80
20
FUEL AND OIL MIXTURES
• Never ll the fuel tank to the very top.
• Never add fuel to the tank in a closed non-ventilated area.
• Do not add fuel to this unit close to an open re or sparks.
• Be sure to wipe o spilled fuel before attempting to start engine.
• Do not attempt to refuel a hot engine.
Fuel used for this model is a mixture of unleaded gasoline and approved engine lubricant.
When mixing gasoline with two-cycle engine oil, use only gasoline which contains NO
ETHANOL or METHANOL (Types of Alcohol) Use Branded 89 octane or higher unleaded
gasoline known to be of good quality. This will help to avoid possible damage to engine fuel
lines and other engine parts.
Fuel mixture at the rate
other than 25:1 may cause
damage to the engine,
Ensure mixture
ratio is correct.
FUEL
The engine uses two-stroke fuel, a mixture
of gasoline and 2-stroke lubricant 25:1
GASOLINE
Use branded 89 octane or higher unleaded
gasoline known to be of good quality.
STORING FUEL
Store fuel only in a clean, safe, aprroved
ontainer. Check and follow local
ordinances on type and location of
storage container.
IMPORTANT
Two-stroke fuel may separate.Shake fuel
container thoroughly before each use.
Stored fuel ages. Do not mix more fuel than
you expect to use within a month.
FUEL AND OIL MIXTURE
Inspect fuel tank making sure that it is clean
and fill with fresh fuel. Use a mixture of 25-1.
WARNING!
ON LEFT SIDE
CUT-OFF KNIFE
CUT ON
COUNTER CLOCK WISE ROTATION
THIS SIDE
SCALPING
EDGING
AVOID WIRE
TO WALL
ANGLE
GROUND
RAISED
KNIFE SIDE
TRIMMING
ANGLE TO
DEBRIS
WARNING DANGER
DO NOT TOUCH THESE TYPES OF
OBJECTS WITH BLADE
METAL STAKES
UTILITY WIRES RUBBER
ROCKS
MASONRY
FENCES
DO NOT
HACK LARGE
TREES
BINDING
SAWING SAPLINGS
OIL-1 PART
GASLINE
25 PART
FILTER COVER KNOB
0.6-0.7mm(0.023"-0.028"in.)
CHOKE
Max Speed
10000r/min
BLADE
BLADE
INSTALLING BLADE GUARD
GUARD
13
Two-stroke oil
• For the best results use high level two-stroke oil.
• Never use oil intended of four-stroke engines.
• Do not use processed oil or any other lubricants except specialized oil for two-stroke engines.
PLEASE NOTE that this oil-gasoline ratio is expressed in the following proportions, indicated in the table below:
Mixture
• Always mix petrol and oil in a clean container intended for petrol.
• Always start by filling half the quantity of petrol required. Then add the entire oil quantity. Mix (shake) the fuel mixtu-
re. Fill the remaining quantity of petrol.
• Mix (shake) the fuel mixture carefully before filling in the machine's fuel tank.
• Do not mix more than max. one month's supply of fuel.
• If the brush cutter is not used for a long period of time, the fuel tank should be emptied and cleaned.
Fuelling
WARNING!
The following precautions reduce the risk of fire:
Do not smoke or place any sources of heat in the vicinity of the fuel.
Never refuel when the engine is running. Always stop the engine and let
it cool for a few minutes before refuelling. Open the fuel cap slowly when
fuelling so that any over pressure is released slowly. Tighten the fuel cap
carefully after refuelling. Always move the machine from the fuelling place
before starting.
Clean around the fuel cap. Contamination i the tank can disr operations.
Ensure that the fuel is well mixed by shaking the container before filling the tank.
Always use a fuel container with an anti-spill valve.
5. START AND STOP
Control before starting
For reasons of safety follow these recommendations!
• Check the blade to ensure that no cracks have formed at the bottom of the teeth or by the centre hole.
• The most common reason why cracks are formed is that sharp corners have been formed at the bottom of the
teeth while sharpening or that the blade has been used with dull teeth. Discard a blade if cracks are found.
OIL GASOLINE
4 ml - 100 ml
8 ml - 200 ml
12 ml - 300 ml
16 ml - 400 ml
20 ml - 500 ml
24 ml - 600 ml
28 ml - 700 ml
32 ml - 800 ml
36 ml - 900 ml
40 ml - 1000 ml
MIXTURE RATIO IS 25:1 - GASLINE-25 PART, OIL-1 PART

www.daewoopower.bg
15
www.daewoopower.bg
15
5. START AND STOP
Control before starting
For reasons of safety follow these recommendations!
• Check the blade to ensure that no cracks have formed at the bottom of the teeth or by the centre hole.
• The most common reason why cracks are formed is that sharp corners have been formed at the bottom of the
teeth while sharpening or that the blade has been used with dull teeth. Discard a blade if cracks are found.
• Check that the support flange is not cracked due to fatigue or due to being tightened too much. Discard the
support flange if it is cracked.
• Ensure the locking nut has not lost its captive force. The nut lock should have a locking force of at least 1.5 Nm.
The tightening torque of the locking nut should be 35-50 Nm.
• Check that the guard is not damaged or cracked. Replace the guard if it is exposed to impact or is cracked.
• Check that the trimmer head and shield are not damaged or cracked. Replace the trimmer head or shield if they
are exposed to impact or are cracked.
• Never use the machine without a guard or spray guard nor with a defective guard.
Start and stop
WARNING!
The complete clutch cover with shaft must be fitted before the machine is started, otherwise the clutch can become
loose and cause personal injury. Always move the machine from the filling area before starting. Place the machine
on a flat surface. Ensure the cutting equipment cannot come into contact with any object. Make sure no unauthori-
sed persons are in the working area, otherwise there is a risk of serious personal injury. The safety distance is 15
metres.
Cold engine
IGNITION: Set the stop switch to the run position. CHOKE: Set the choke control in the choke posi-tion.
AIR PURGE: Prime with fuel by pressing the dia-phragm repeatedly until fuel begins to run back into the tank through
the transparent fuel hose.
Warm engine
Use the same starting procedure as for the cold engine, but do not set the choke control in the choke position. Set
the throttle to the start position by pressing the throttle trigger and then pressing the red button next to the stop
button.
Stop
Stop the engine by switching the stop switch to the stop setting.
14

www.daewoopower.bg
16
www.daewoopower.bg
16
15
WARNING!
When the engine is started with the choke in the choke or start position the cutting equipment starts to rotate imme-
diately.
Start
Press the machine body against the ground using your left hand . Grip the starter handle, slowly pull out the cord
with your right hand until you feel some resist-ance, now quickly and powerfully pull the cord. Reset the choke
control as soon as the engine fires and repeat until the engine starts. When the engine starts quickly apply full throttle
and the start throttle will automatically disengage. NOTE! Do not pull the starter cord out completely and do not
release the starter cord from the fully extended position. This can damage the machine.
6. MAINTENANCE
Carburetor
After your unit has been run 8-10 tanks of fuel the engine has broken in. To ensure that your unit is at peak perfor-
mance and producing the least amount of harmful emissions after break in, have your authorized servicing dealer,
who has a revolution counter at his disposal, to adjust your carburetor for optimum operating conditions.
WARNING!
The complete clutch cover with shaft must be fitted before the machine is started, otherwise the clutch can become
loose and cause personal injury.
Operation
• The carburetor governs the engine's speed via the throttle. Air/fuel is mixed in the carburetor. The air/fuel mixture
is adjustable. To take advantage of the engine's optimal output the adjustment must be correct.
• The setting of the carburetor means that the engine is adapted to local conditions, for example, the climate, altitu-
de, petrol and the type of 2-stroke oil.
Idle speed adjustment
Check that the air filter is clean. When the idle speed is correct, the trimmer head will not rotate. If adjustment is
required, close (clockwise) the T-screw, with the engine running, until the trimmer head starts to rotate (3 400 rpm).
Open (counterclockwise) the screw until the trimmer head stops. You have reached the correct idle speed (about
2500 rpm) when the engine runs smoothly in all positions well below the rpm when the trimmer head starts to rotate.
Note: The carburetor adjustment should be carried by qualified specialists
WARNING!
Contact your servicing dealer, if the idle speed setting cannot be adjusted so that the cutting attachment stops. Do
not use the machine until i t has been properly adjusted or repaired.
NOTE! The machine should only be used for short periods at its highest speed.

www.daewoopower.bg
17
www.daewoopower.bg
17
Muffler
The muffler is designed to dampen the noise level and to direct the exhaust fumes away from the user. The exhaust
fumes are hot and can contain sparks, which can result in fire if the exhaust fumes are directed towards a dry and
inflammable material. Some mufflers are equipped with a special spark arrestor screen. If your machine is fitted with
this type of screen it should be cleaned regularly. This is done using a wire brush. On mufflers without a catalytic
converter the screen should be cleaned weekly, or replaced if necessary. On mufflers fitted with a catalytic converter
the screen should be checked and cleaned monthly. If the screen is damaged it should be replaced.
If the screen is frequently blocked, this can be a sign that the function of the catalytic converter is impaired. Contact
your dealer to inspect the muffler. A blocked screen will cause the engine to overheat resulting in damage to the
cylinder and piston. Also see under "Maintenance".
NOTE! Never use a machine with a defective muffler.
Cooling system
To maintain as low an operating temperature as possible the engine is equipped with a cooling
system. The cooling system consists of:
1. An air intake on the starter unit.
2. Cooling fins on the flywheel.
3. Cylinder cover (leads cold air onto the cylinder).
Clean the cooling system using a brush at least once a week, in difficult conditions more often.
A dirty or blocked cooling system leads to the engine overheating resulting in damage to the cylinder and piston.
Air lter
The air filter should be cleaned regularly removing dust and dirt to avoid:
• carburetor malfunction
• starting problems
• reduced engine power
• unnecessary wear to engine parts
• abnormal fuel consumption
Clean the filter after every 25 hours or more regularly if operating conditions are exceptionally dusty.
16

www.daewoopower.bg
18
www.daewoopower.bg
18
17
Cleaning the air lter
Dismantle the air filter cover and remove the air filter. Wash in clean, warm soapy water. Ensure that the filter is dry before
refitting. An air filter used for a long period of time can never be cleaned completely. Therefore it is necessary to replace
the filter from time to time with a new filter. A damaged air filter must always be replaced.
Drive shaft
The drive shaft is lubricated with grease. The shaft must be lubricated at least every 25 working hours.
Lift up the locking button that holds the drive shaft sleeve in the clutch cover.
Remove the clip that holds the throttle cable on the drive shaft.
Pull the drive shaft sleeve out of the clutch cover.
Remove the drive shaft from the sleeve either by shaking it out or pulling it out using pliers.
Coat the surface of the shaft with grease from the tube. Spread it out using a brush or rag.
Slide the drive shaft back into the sleeve. Make sure the shaft engages correctly by turning it and pushing at the same time.
When the shaft is correctly installed in the sleeve the end of the shaft should project about 10 mm beyond the edge of the
sleeve.
Rotate the shaft and push it in at the same time.
Install the drive shaft sleeve in the clutch cover so that the hole is positioned directly underneath the locking button on the
clutch cover.
Angle gear
The angle gear is filled with a sufficient quantity of grease at the factory. However, before using the machine you should
check that the angle gear is filled to 3/4 with grease. Normally, the grease does not need to be changed except when the
angle gear is repaired.
Maintenance schedule
Below follows some general maintenance instructions.
If you need further information please contact your service workshop.
Daily maintenance
1. Clean the outside of the machine.
2. Make sure the harness is not damaged.
3. Make sure the throttle trigger lock and the throttle function correctly from a safety point of view.
4. Check that the stop switch functions.
5. Check that the cutting head does not rotate while idling.
6. Clean the air filter. Replace if necessary.
7. Check the guards for damage and ensure that they are not cracked. Replace the guards if they have been exposed to
impact or are cracked.
8. Check that the blade is well centred, is sharp, and is not cracked. An uncentred blade causes vibrations that can result
in damage to the machine.
9. Check that the trimmer head is undamaged and not cracked. Replace the trimmer head if necessary.
10. Check that the locking nut is tight.
11. Check that all nuts and screws are tightened.

www.daewoopower.bg
19
www.daewoopower.bg
19
Weekly maintenance
1.Check the starter, the starter cord and the return spring.
2.Make sure that the vibration damping elements are not damaged.
3.Clean the outside of the spark plug. Remove and check the electrode gap. Adjust the gap to 0,6-0,7 mm or change
the spark plug.
4.Clean the cooling fins on the flywheel.
5.Clean or replace the muffler's spark arrestor screen (not on mufflers with a catalytic converter).
6.Clean the carburetor area.
7.Clean the cooling fins on the cylinder and check that the air intake in the starter unit is not blocked.
8.Check that the angle gear is 3/4 filled with grease. Fill if necessary using special grease.
Monthly maintenance
1.Clean the fuel tank using petrol.
2.Clean the carburetor and the area surrounding it.
3.Clean the fan and the area around it.
4.Check the fuel filter and the fuel pipe, replace if necessary.
5.Check all cables and connections.
6.Check the clutch, clutch springs and the clutch drum with regard to wear. Replace if necessary.
7.Change the spark plug.
18

www.daewoopower.bg
20
www.daewoopower.bg
20
19
SPECIFICATIONS
*Speci cations are subject to change without notice.
MODEL DBC260 DBC330 DBC430 DBC520/DBC520N
ENGINE
DISPLACEMENT 26 CC 30.5 CC 42.7 CC 52 CC
FUEL TANK CAPACITY 600 ml 850 ml 1200 ml 1200 ml
NOISE LEVEL
RATED SPEED
MAX SPEED
MAX POWER 0.7 kW 0.9 kW 1.2 kW 2.2 kW
START
MIXTURE (oil: gasoline)
CUTTING HEAD
CUTTING BLADE
GROSS WEIGH 7 kg 8 kg 8.5 kg 8.7 kg
NET WEIGHT 6 kg 7 kg 7.5 kg 7.7 kg
VIBRATIONS
1:25
Single cylinder, 2 stroke, air cooled
113 dB
7500 rpm
9000 rpm
Manual
400-450 mm
3 T
CUTTING WIDTH
255 mm for cutting blade
400-450 mm for cutting head
19
SPECIFICATIONS
*Speci ions are subject tochange without notice.
MODEL DBC260 DBC330 DBC430 DBC520
ENGINE
DISPLACEMENT 26 CC 30.5 CC 42.7 CC 52 CC
FUEL TANK CAPACITY 600 ml 850 ml 1200 ml 1200 ml
NOISE LEVEL
RATED SPEED
MAX SPEED
MAX POWER 0.7 kW 0.9 kW 1.2 kW 2.2 kW
START
MIXTURE (oil: gasoline)
CUTTING HEAD
CUTTING BLADE
GROSS WEIGH 7 kg 8 kg 8.5 kg 8.7 kg
NET WEIGHT 6 kg 7 kg 7.5 kg 7.7 kg
VIBRATIONS
1:25
Single cylinder, 2 stroke, air cooled
113 dB
7500 rpm
9000 rpm
Manual
400-450 mm
3 T
CUTTING WIDTH
255 mm for cutting blade
400-450 mm for cutting head
idling 2.784 m/s2
racing 6.09 m/s2
right handle:
idling 2.67 m/s2
racing: 2.789 m/s2
K=1.5m/s2
DBC520/DBC520N
DBC260 DBC330 DBC430
This manual suits for next models
2
Table of contents
Languages:
Other Daewoo Brush Cutter manuals