DAMSON S-SERIES User manual

S-SERIES
USER GUIDE
SUPPORTS

Congratulations on purchasing the
Damson S-Series Home Cinema System
The Damson S-Series Home Cinema system was specifically designed
to allow you to enjoy lifelike cinematic sounds from the latest movie,
event or concert in the comfort of your own home without the need
for extra trailing cables and a room full or oversized speakers.
Please take a few moments to familiarise yourself with this prior to the
arrival of your shipment.
You will also find a list of some useful frequently asked questions at
this link FAQs.
For further product support with your S-Series we offer:
Email support – support@damsonglobal.com
Live chat – visit our website and click on the “live chat” pop up.
Video support – book a meeting

Table of Contents
Before you begin
What’s in the box?
Connections and supported
formats
Get the best out of your
system
Unboxing
General Speaker Placement
Parts in detail
S-Woofer
S-Bar & S-Atmos
S-Cube
Remote Control
4
5
6
7
9
9
10
11
13
23
21
22
24
14
14
15
16
17
18
19
20Setup
Instructions for 5.1.2 setup
using one HDMI
Diagram of setup using one
HDMI input
Diagram of setup using two
HDMI inputs
Setup using your TV’s ARC
function
Virtual Surround Sound
setup
5.1 Setup
Connecting/Disconnecting
your S-Bar to Bluetooth
Using the Remote Control
Using the buttons on the
S-Bar
Multi room audio setup
S-Cube - Primary functions
and setup
Individual stereo speaker
Multi room speaker setup
Establishing a connection and
reconnecting to the S-Bar,
S-Woofer and S-Atmos
Charging your S-Cube
Trouble shooting

4
Before you begin
What’s in the box Connections and
supported formats
Connections
Output - HDMI (ARC)
Input - 2 x HDMI which supports
Dolby Atmos, Dolby True HD,
Dolby Digital +, Dolby Digital,
ProLogic. AUX and DC
Supported formats
Dolby Atmos, Dolby True HD, Dolby
Digital +, Dolby Digital, ProLogic
1 x S-Bar
1 x S-Atmos
1 x S-Woofer
1 x remote control
2 x power cables for S-Cubes
with 4 adaptors (UK, EU, Australia & USA)
1 x power cable for S-Bar with 4 adaptors
1 x power cable for S-woofer with 4 adaptors
2 x Mounting brackets for S-Cubes
1 x QR code for link to user guide

5
Get the best out of your system
What do you need to get the best out of the system?
A 4K TV or projector is required to deliver UHD content with Dolby
Atmos. Please note if you do not have a 4K TV, the S-Series will
automatically downscale content to the next best Dolby format. Check
your TV/Projector manufacturer specifications for the ability to handle
Dolby Atmos, 4K or UHD content.
If you do not have a 4K TV but you have a Blu-ray player and a Blu-
ray disc with Dolby Atmos content, Atmos content will play subject to
your Blu-ray player audio settings set to either Dolby TrueHD or Dolby
Atmos in the Blu-ray menu. Follow the on screen menu options to
enable this.
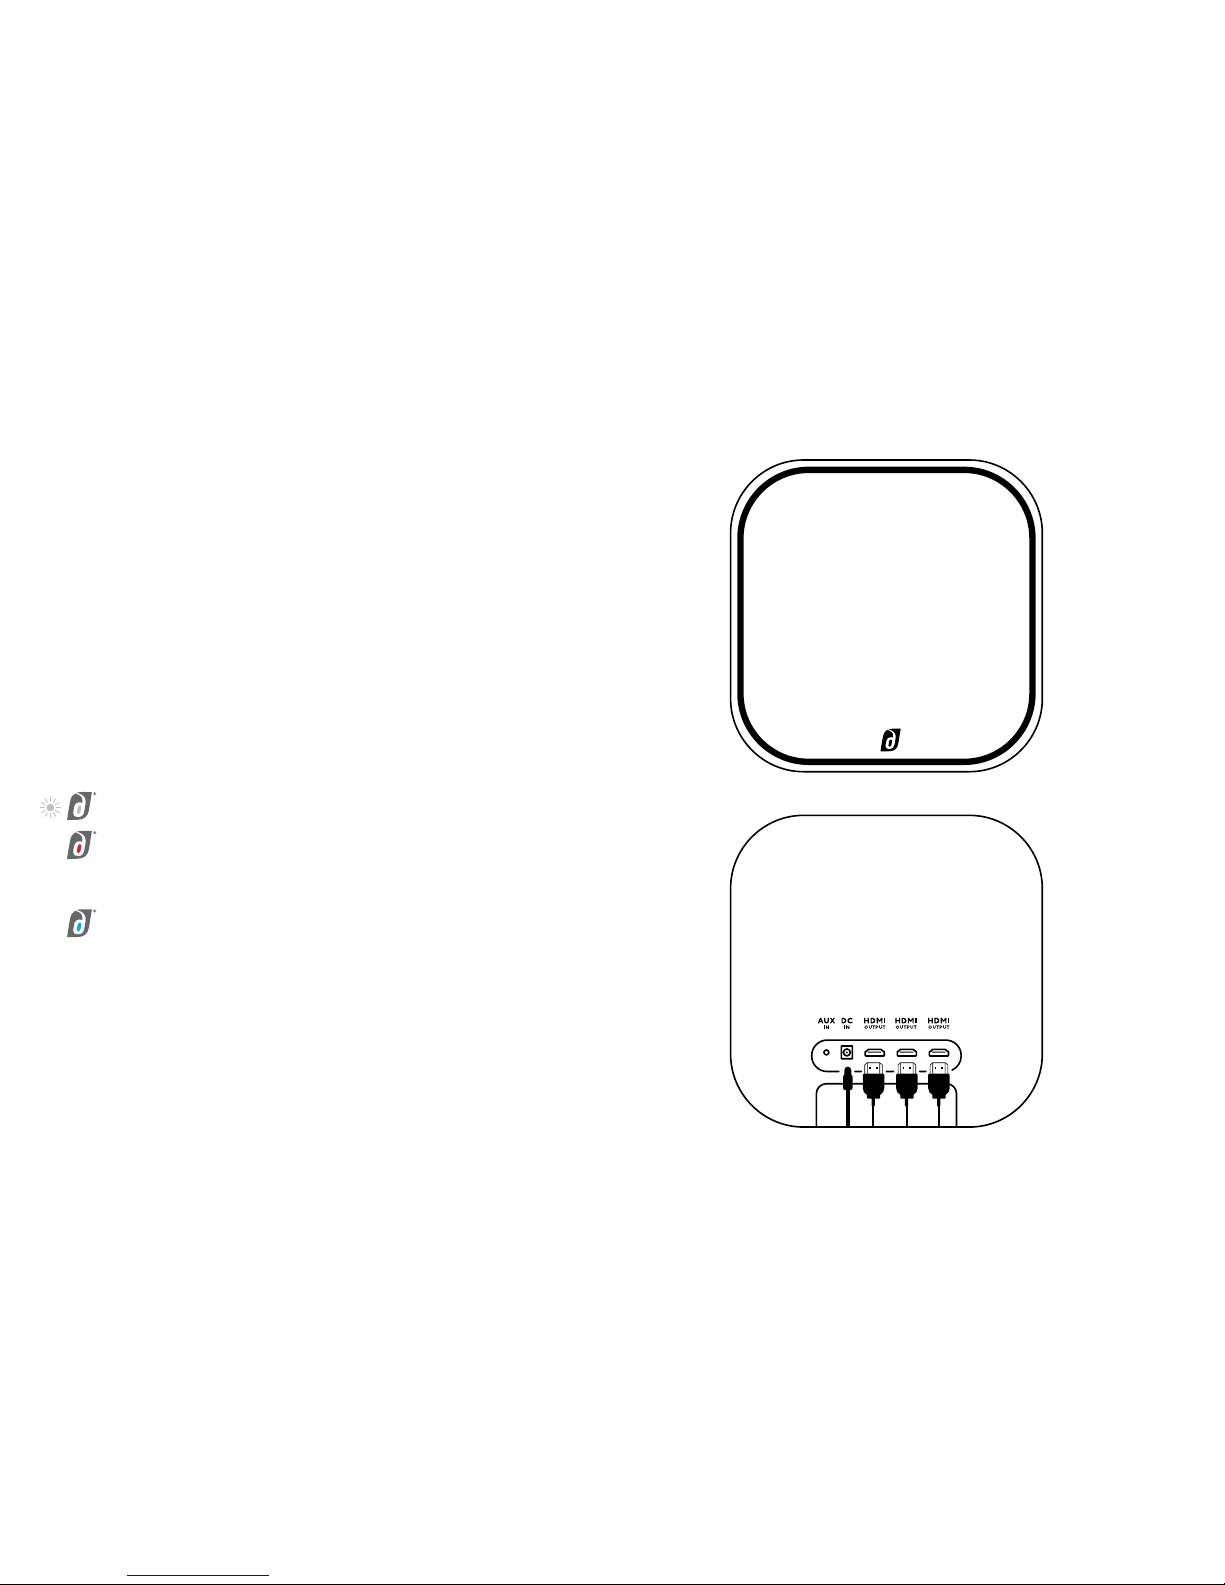
High speed HDMI cables are required to enable the 4K pass through
(High speed 2.0). An Amazon Basics HDMI 2.0 High Speed cable is a
good option for this.
Upscaling and downscaling broadcasts
The S-Series fully supports all Dolby formats and is backward
compatible back to Dolby ProLogic. If a programme is broadcast in
5.1, the S-Series will automatically play the audio through 5.1 and will
upscale the audio quality ensuring you will receive a better sound
experience than systems designed without Dolby Atmos capability.
The S-Series does not require a WiFi connection, nor does it require
you to install an app. The S-Series works off the Damson proprietary
network known as the JetStreamNet.
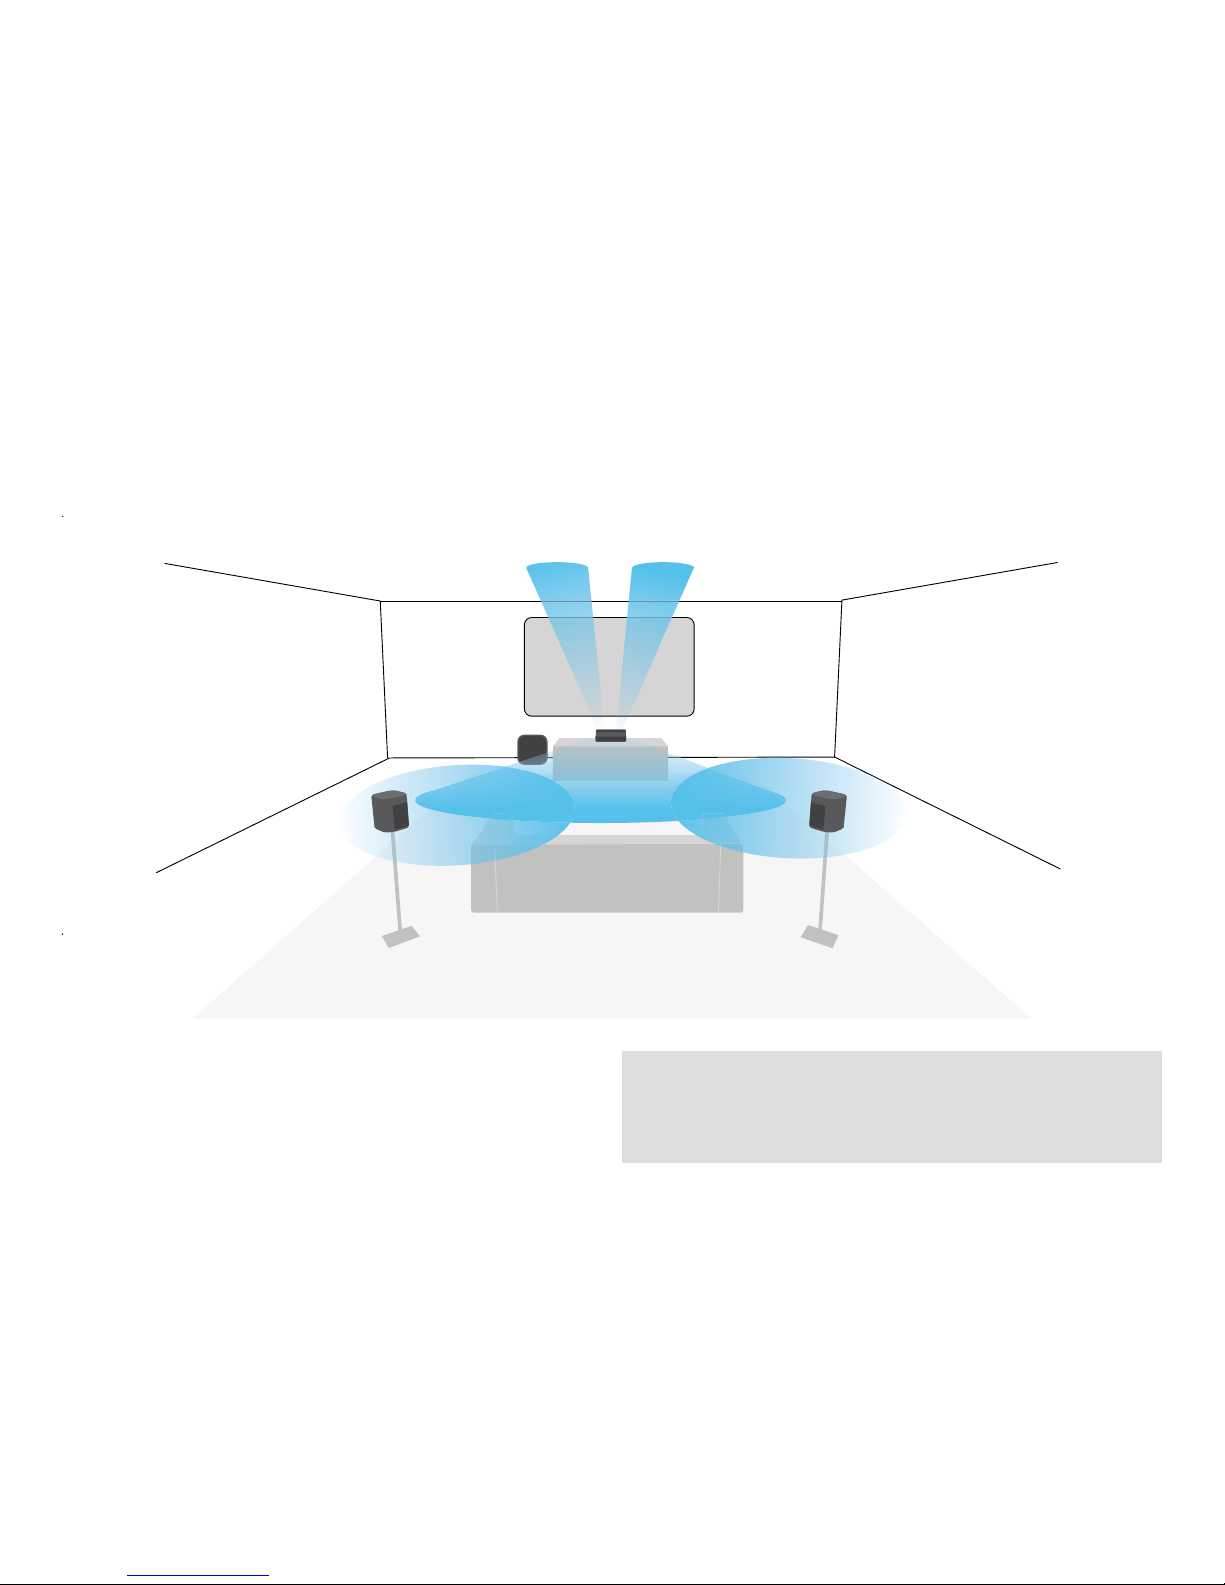
What is Dolby Atmos?
From a sound perspective, Dolby Atmos is experiencing sound from in
front, above and behind. From a technical perspective, Dolby Atmos is
an enhancement of Dolby TrueHD and Dolby Digital Plus. If you own any
BluRay discs, check the format for Dolby TrueHD. Using a BluRay player
and playing a Dolby TrueHD disc whilst connected to the S-Series will give
you the best experience of surround sound and Dolby Atmos.
If you are using a streaming device e.g. Sky Q, Netflix, it’s more than
likely that the format is in Dolby Digital Plus.
Do I need an AV Receiver to use the S-Series Home Cinema System?
No, the S-Woofer is not only the subwoofer but acts as an AV Receiver.
It will receive and process the audio and video signals.
Breaking in your S-Woofer
We recommended a good two weeks worth of use for your S-Woofer
to be fully broken in. After which you will experience improved
performance.

6
Unboxing
1. Open the master carton.
2. Remove the four inner boxes.
3. S-Cube boxes: Remove the two S-Cubes from the packages, the
associated power cables, power adaptors ( 2 x 1500mAh) and
optional wall mount.
4. S-Atmos box: Remove the S-Atmos speaker.
5. S-Bar & S-Woofer box: Remove the following from the box:
6. S-Bar, power cable and adaptors – 3000 mAh;
7. S-Woofer, power cable and adaptors – 2000mAh
8. Remote Control and 2 AAA batteries. 3.
4.
5.
6.
7.
8.
PLEASE NOTE: the power
cables have different voltages
and are NOT interchangeable.
To avoid injury or suffocation,
keep the plastic bags out of
the reach of children.

7
General Speaker Placement
Perspective view
To get the best out of your home cinema system, we recommend
you layout the system similar to the diagram above. PLEASE NOTE: in order to reduce interference we do not recommend the
S-Woofer is placed inside a cabinet or too close to other electrical devices.
The S-Woofer should be positioned no more than 1.5m away from the TV/
projector screen.

8
Speaker 2 & 3 – Left and Right S-Cube
The rear speakers give an extra sense of immersion. These can
be walled mounted using the brackets included. If you prefer not
to wall mount the S-Cubes, a windowsill or bookshelf will suffice.
Each S-Cube contains four full range drivers and a woofer which
compliments the S-Woofer.
Speaker 4 – S-Bar with Dolby Atmos (S-Atmos) Extension
The S-Bar and S-Atmos unit contains upward firing speakers to
disperse the sound overhead. Place the speaker horizontally on a
stable, level surface. It should point towards the centre of the main
seating area. Do not place this vertically or on its side. Do not block
any TV sensors. Do not place it inside a cabinet as this will restrict the
upward firing speaker impacting the Atmos sound effect. To get the
best effect from Dolby Atmos, it is recommended that the ceiling
height is between 2.5 metres (9ft) and 3.5 metres (15ft) and the ceiling
is flat. The ceiling reflects the sound to provide that overhead sensation
of sound.
Speaker 5 – S-Woofer
The S-Woofer is the sub-woofer and nerve centre of the system
(AV Receiver). It adds a dimension of bass to enhance the listening
experience and is complimented by the bass from the surrounding
S-Cubes. There is a small stand at the back of the woofer to allow the
S-Woofer to stand independently. Most people place this at the front
of the room.
1
2
45
3
Speaker placement
1. Seating position
2. S-cube left speaker
3. S-cube right speaker
4. S-Bar with Dolby Atmos extension
5. S-Woofer*
*S-Woofer LED will flash when it is receiving
Dolby Atmos Content

9
Parts in Detail
S-Woofer
Controls
There are no control buttons on the S-Woofer.
LED
The led is in the “d” logo on the front of the speaker. The modes are:
Flashing (any colour) – receiving Dolby Atmos content.
Solid red - S-Woofer is connected to the power and turned on.
It is optimised for stereo or general home cinema content. Dolby
Atmos content is not being received.
Solid blue - S-Woofer is connected to the power, turned on and
optimised for music. Dolby Atmos content is not being received.
S-Woofer Front
S-Woofer Back

10
Parts in Detail
S-Bar & S-Atmos
Controls
The Mode button. This represents the buttons around the circle of
the remote control. Press to toggle between HDMI1, HDMI2, ARC,
AUX and BT
To decrease the volume
To increase the volume
To play or pause and for BT pairing mode.
Lights
The led is in the “d” logo on the top of the speaker. The modes are:
Red –connected via HDMI1
Pink – connected via HDMI2
White – connected via ARC
Green – connected via AUX
Blue – connected via Bluetooth
Your S-Series will remember the mode it was last set to when you power
off. Next time you power on, it will be set to the last mode it was in.
M

11
Parts in Detail
S-Cube
Controls on the top
Left to right
Power on:
1: Power on the unit
2: Toggle between
JetStreamNet and Bluetooth.
Short press to toggle.
To decrease the volume on
the S-Cube
To increase the volume on
the S-Cube
To play or pause the music.
Controls on the back
JetStreamNet Pairing
(pairing the S-Cube to other
S-Cubes or to the Home
Cinema System)
2, 3, 4 – For selecting left,
right channel or stereo.
5 – Reset
6 – AUX in
7 – AC/DC input
1.
2.
5.
6. 7.
3. 4.

12
LED (when connected to the Home Cinema)
To work as a full surround sound setup toggle the S-Cube to the
JetStreamNet mode (light blue LED). The S-Series Home Cinema system
comes factory pre-set to home cinema mode so you should not need to
change anything when first starting up.
Solid light blue – JetStreamNet mode
Light blue and intermittent blinking red: In JetStreamNet
mode and charging.
Solid red – charging and powered off.
LED (Single S-Cube)
When one S-Cube is being used independently from the Home Cinema,
the lights in the d logo, at the top of the speaker, have the following states:
Red slow flashing – the S-Cube is powered on and is charging.
Red solid – The S-Cube is charging but is powered off. The red
LED will not display when fully charged.
Solid light blue – the S-Cube is in JetStreamNet mode but may
or may not be connected to the rest of the system.
Solid dark blue – the S-Cube is connected via Bluetooth.
Blinking alternate red and colour of the mode – when the S-Cube
is powered on, plugged in and charging and until fully charged. E.g.
Dark blue and red would indicate charging and in Bluetooth mode.
Solid yellow light – when the S-Cube is powered on and the
AUX in is being utilised.
LED (Two or more S-Cubes connected together via the JetStream
Net, outside of the home cinema system.
When two or more S-Cubes are being used independently from the
Home Cinema, the lights in the d logo, at the top of the speakers, have
the following states:
Parent S-Cube (operating as the main speaker): See LED (Single
S-Cube) instructions.
Child speakers:
Red flashing – the S-Cubes are powered on and charging.
Red solid – The S-Cubes are charging but are powered off.
Solid light blue – The child speaker is set to JetStreamNet but
may or may not be connected.
Blinking alternate red and light blue – Child speaker is in
JetStreamNet mode and charging. This will continue until the
unit is fully charged, after which the red light will not display.
LED indictor on
the top of S-Cube

13
Parts in Detail
Remote Control
Remote Control
The remote has approximately 10 metres range and does not require
line of sight with the S-Bar or the S-Woofer. The remote is powered by
2 AAA batteries.
Controls
Power on/off
Mute audio
Select this source
Select this source
Select this source
Select this source
Optimises the sound
for music whether this
is via a streaming app or
watching on screen
Bluetooth.
Volume up
Volume down
Pair / JetStreamNet For
reconnecting the S-Cubes
after separate use. Please see
“Establishing a connection and
reconnecting” for further detail.
Play/Pause – this function only
works when in Bluetooth mode.
Play/Pause music and also when
pairing your streaming device to
the S-Series via Bluetooth.
Previous – previous track.
Only works in Bluetooth mode.
Next – next track.
Only works in Bluetooth mode.
XBASS
Volume Pair Play/Pause
Previous Next
HDMI1
HDMI2
ARC
AUX
XBASS
BT
Power Mute

14
Instructions for 5.1.2 setup using one HDMI
PLEASE NOTE BEFORE
COMMENCING SETUP
On initial set up it is recommended
to connect the power supply of
the S-Woofer last as this provides
auto-power upon initial setup. If the
S-Woofer is powered up before the
other speakers are connected, you
will need to power off the S-Woofer
either by removing the power cable
or pressing the power button on the
remote control until the LED turns
off, then power on the system using
the remote control.
PLEASE NOTE: The S-Cubes are
set up to power on automatically
to the surround sound system only
when connected to a power supply.
Insert batteries into
Remote Control.
Position the S-Bar in
front of the display (TV/
Projector), connect power
cable (3000mAh).
Couple the Dolby Atmos
speaker (S-Atmos) onto
the S-Bar. It will snap into
place. Position the speaker
as per the description
on the “General speaker
placement” page.
Using a high speed HDMI
cable (not supplied), insert
the HDMI source into the
S-Woofer HDMI input 1.
E.g. connect S-Woofer to
a source such as Set top
box, Cable, Xbox, FireTV,
BluRay etc.
Connect the S-Woofer to an output source e.g. TV or
projector, using an high speed HDMI cable. Place one end of
the cable into the HDMI output on the back of the S-Woofer
and the other end into your TV/Projector.
Connect the power
supply to the S-Woofer
(2000mAh). The d
logo on the front of the
S-Woofer will turn red.
The system will now power
up and configure itself. The
S-Woofer LED in the d logo
will turn red. The LED in
the S-Bar d logo will light
up red and the LED on the
S-Cubes logo will display
light blue.
Select a location for the
first S-Cube surround
speaker, connect power
cable (1500mAh). For left
surround move switch on
S-Cube to Triangle.
Select a location for the
Second S-Cube surround
speaker, connect power
cable (1500mAh). For
right surround move the
switch on the S-Cube to
the Square.
DC
2
DC
3 4 5
68 9
AAA
1
AAA
S-Woofer
S-Bar
S-Cube
7

15
Diagram of setup
using one HDMI input
PLEASE NOTE: This guide is
for setting up one device to the
S-Series. The device could be a set
top box (Sky/Comcast/Xfinity),
Blu-ray, games console, Apple TV
4K, Amazon Fire 4K.
We recommend inserting Dolby Atmos compatible devices
in to the S-Series inputs and not to use the TV’s ARC
INPUT1ININ INPUT2 OUTPUT
HDMIDCAUX HDMI HDMI

16
Diagram of setup using
two HDMI inputs
Typical set up for a set top box (Sky/Comcast/Xfinity),
Blu-ray, Games Console, Apple TV or Amazon Fire 4K
INPUT1ININ INPUT2 OUTPUT
HDMIDCAUX HDMI HDMI
Wall Socket

17
HDMI
OUTPUT
Setup using your TV’s
ARC Function
Ensure the TV has the ARC port. Ensure your TV
audio mode is set to output audio through ARC.
Change the S-Series to the “ARC” mode. The
LED in the d logo on the S-Bar will turn white.
There are two ways to change to the “ARC” mode.
Plug the HDMI cable into the
port HDMI (ARC) on TV.
a. Press the “Mode” button,
“M” on the S-Bar quickly.
Insert the other end of the
HDMI cable into S-Woofer
HDMI Output port.
b. Press the “ARC” button on
the Remote Control.
IMPORTANT INFORMATION
If using a TV that supports ARC
additional audio can be sent
when using the S-Series in ARC
mode to transmit audio directly
from the TV, either via additional
devices connected via HDMI
or the TV’s own content or built
in apps. Not all TV’s support
4K audio pass through (Dolby
Atmos) via ARC. Projectors do
not currently support ARC.
If it is supported then the LED
on the S-Woofer will flash to
indicate it is receiving UHD audio
content. Please refer to your TV
manufacturers specification and
support to discover whether your
model will support UHD audio.
1 2 3
44 a. 4 b.

18
Virtual Surround Sound setup
For Virtual Surround Sound setup,
you require the following parts:
S-Bar and S-Atmos
S-Woofer
Soundbar and Subwoofer will deliver Dolby Virtual Surround sound

19
5.1 Setup
For the 5.1 setup you require
the following parts:
S-Bar (no S-Atmos
attachment)
S-Woofer
2 x S-Cubes
Soundbar and Subwoofer with 2 S-Cubes work as Dolby 5.1 surround supporting
Dolby Digital+ and Dolby TrueHD

20
Using the Remote Control
Connecting/Disconnecting
your S-Bar to Bluetooth
It is not recommended to connect the S-Series Home Cinema to a TV
via Bluetooth as the system and audio is not optimised for this use. It is
recommended to only connect to TV’s or Projectors via high speed 2.0
HDMI cables.
• Ensure the S-Series is powered on.
• Navigate to the Bluetooth (BT) settings on your smart device.
• Select BT on the remote control to put the S-Series into Bluetooth
mode. The LED in the d logo on the S-Bar will be dark blue.
• Press and hold down the play/pause button on the remote control for
approximately 5 seconds. You will see the S-Bar appear in your available
devices list.
• Connect to the S-Bar.
• Stream music.
PLEASE NOTE: If you
then switch the mode on
the S-Series e.g. to HDMI1,
the S-Series will still remain
connected, in the background,
to your streaming device. You
may wish to disconnect or
forget the device.
Using the buttons on the S-Bar
• Ensure the S-Series is powered on and navigate to the Bluetooth
settings of your smart device.
• Use the “M” (Mode) button on the S-Bar to select the Bluetooth mode.
The LED will be dark blue when in Bluetooth mode.
• Press and hold down the play/pause button on the S-Bar for
approximately 5 seconds.
• The S-Bar will appear on the discoverable list.
• Connect to the S-Bar.
• Stream music.
Other manuals for S-SERIES
1
Table of contents
Other DAMSON Home Theater System manuals