DAS HDJ-9000 User manual
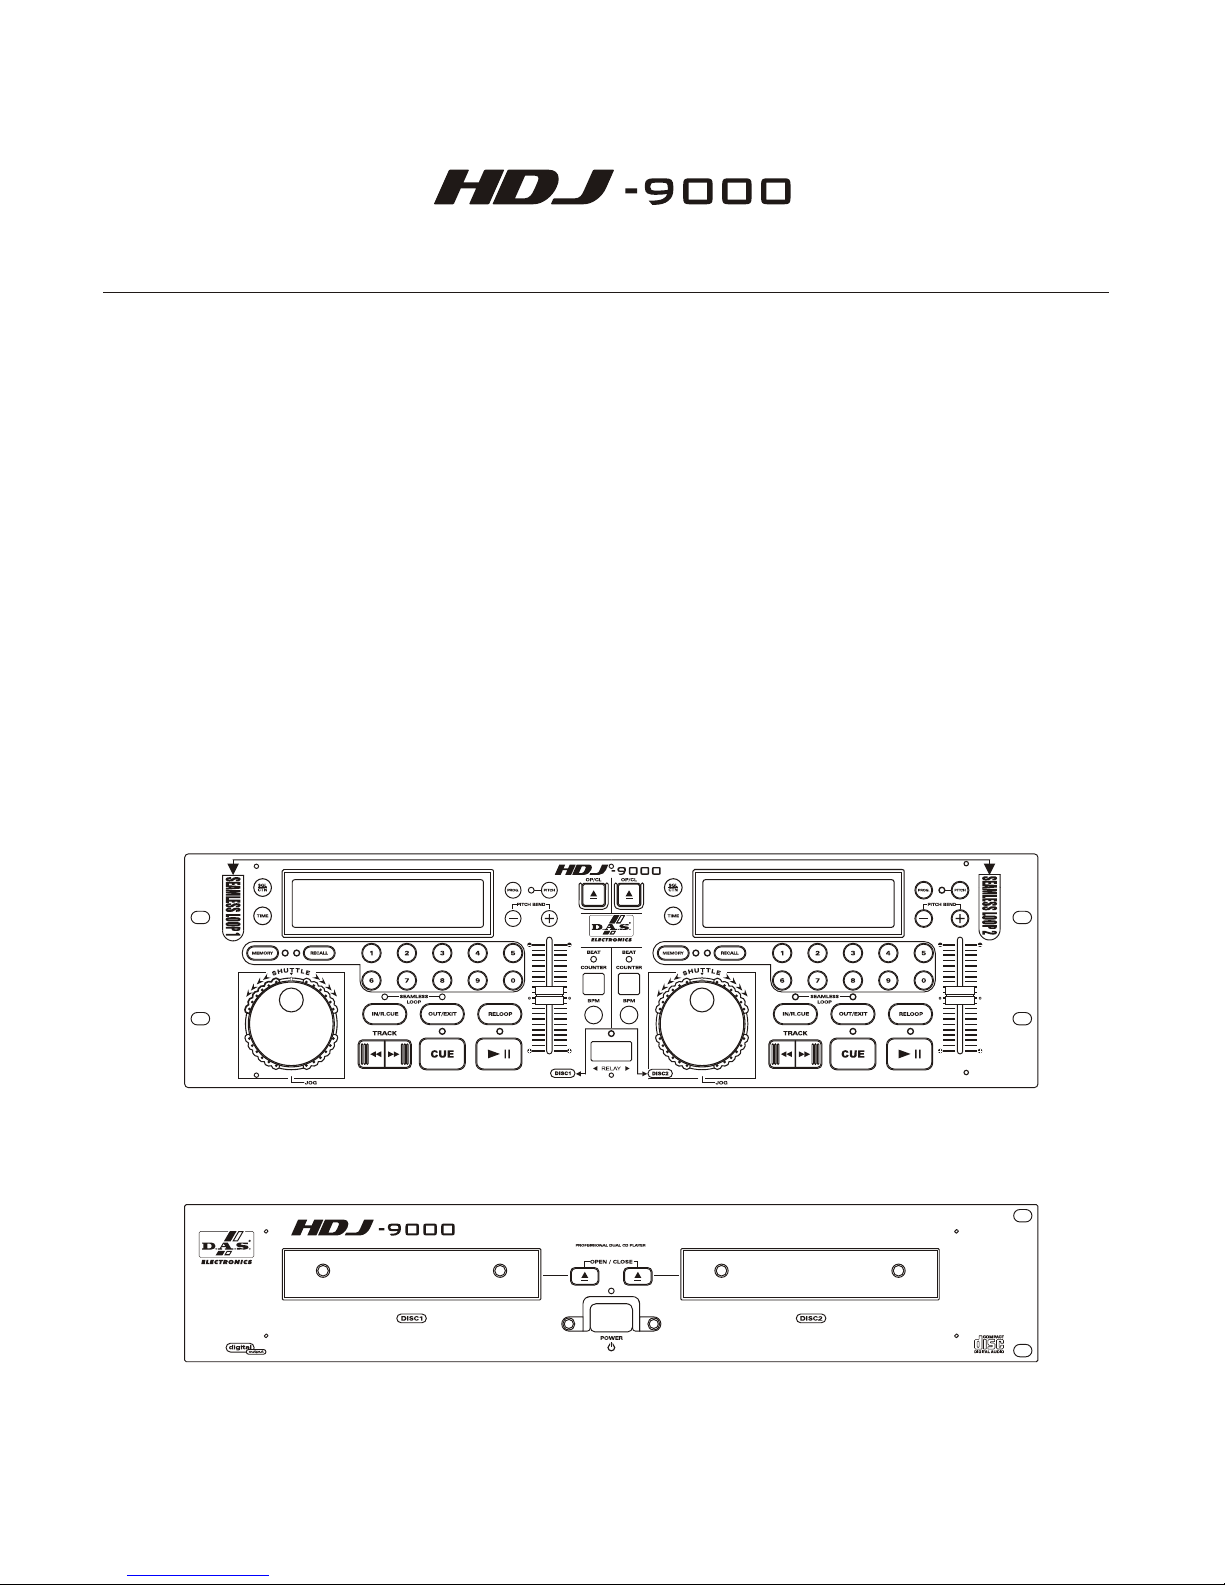
PROFESSIONAL DUAL CD PLAYER
USER'S MANUAL
CD PLAYER
USER'S MANUAL
CD PLAYER
_
_
_
_
1
Important To Safety
WARNING:
TO PREVENT FIRE OR SHOCK HAZARD, DO NOT
EXPOSE THIS APPLIANCE TO RAIN OR MOISTURE.
CAUTION:
1. Handle the power supply cord carefully
Do not damage or deform the power supply cord. If it is
damaged or deformed, it may cause electric shock or
malfunction when used. When removing from wall
outlet, be sure to remove by holding the plug
attachment and not by pulling the cord.
2. In order to prevent electric shock, do not open the top
cover. If a problem occurs, contact your dealer.
3. Do not place metal objects or spill liquid inside the CD
player. Electric shock or malfunction may result.
Please, record and retain the Model name and serial
number of your set shown on the rating label.
Model No. ____________ Serial No._____________
CAUTION: TO REDUCE THE
RISK OF ELECTRIC SHOCK, DO
NOT REMOVE THE COVER (OR
BACK). THERE ARE NO
SERVICEABLE PARTS INSIDE.
REFER SERVICING TO QUALIFIED SERVICE
PERSONNEL.
The lightning flash with arrowhead symbol,
within an equilateral triangle, is intended to
alert the user to the presence of un insulated
"dangerous voltage" within the product's
enclosure that may be of sufficient magnitude
to constitute a risk of electric shock to
persons.
The exclamation point within an equilateral
triangle is intended to alert the user to the
presence of important operating and
maintenance (servicing) instructions in the
literature accompanying the appliance.
•FOR U.S.A. & CANADA MODEL ONLY
CAUTION
TO PREVENT ELECTRIC SHOCK DO NOT USE THIS
(POLARIZED) PLUG WITH AN EXTENSION CORD,
RECEPTACLE OR OTHER OUTLET UNLESS THE
BLADES CAN BE FULLY INSERTED TO PREVENT
BLADE EXPOSURE.
NOTE:
This CD player uses the semiconductor laser. To allow
you to enjoy music at a stable operation, it is
recommended to use this in a room of 5
℃41℉-35℃
95℉.
DATE LABEL
MONTH YEAR
DATE LABEL
CLASS 1 LABEL
CAUTION:
USE OF CONTROLS OR ADJUSTMENTS OR
REFORMANCE OF PROCEDURES OTHER THAN
THOSE SPECIFIED HEREIN MAY RESULT IN
HAZARDOUS RADIATION EXPOSURE.
THE COMPACT DISC PLAYER SHOULD NOT BE
ADJUSTED OR REPAIRED BY ANYONE EXCEPT
PROPERLY QUALIFIED SERVICE PERSONNEL.
DOUBLE INSULATED -WHEN SERVICING, USE ONLY
IDENTICAL REPLACEMENT PARTS.
NOTE:
This unit may cause interference to radio and television
reception.
•
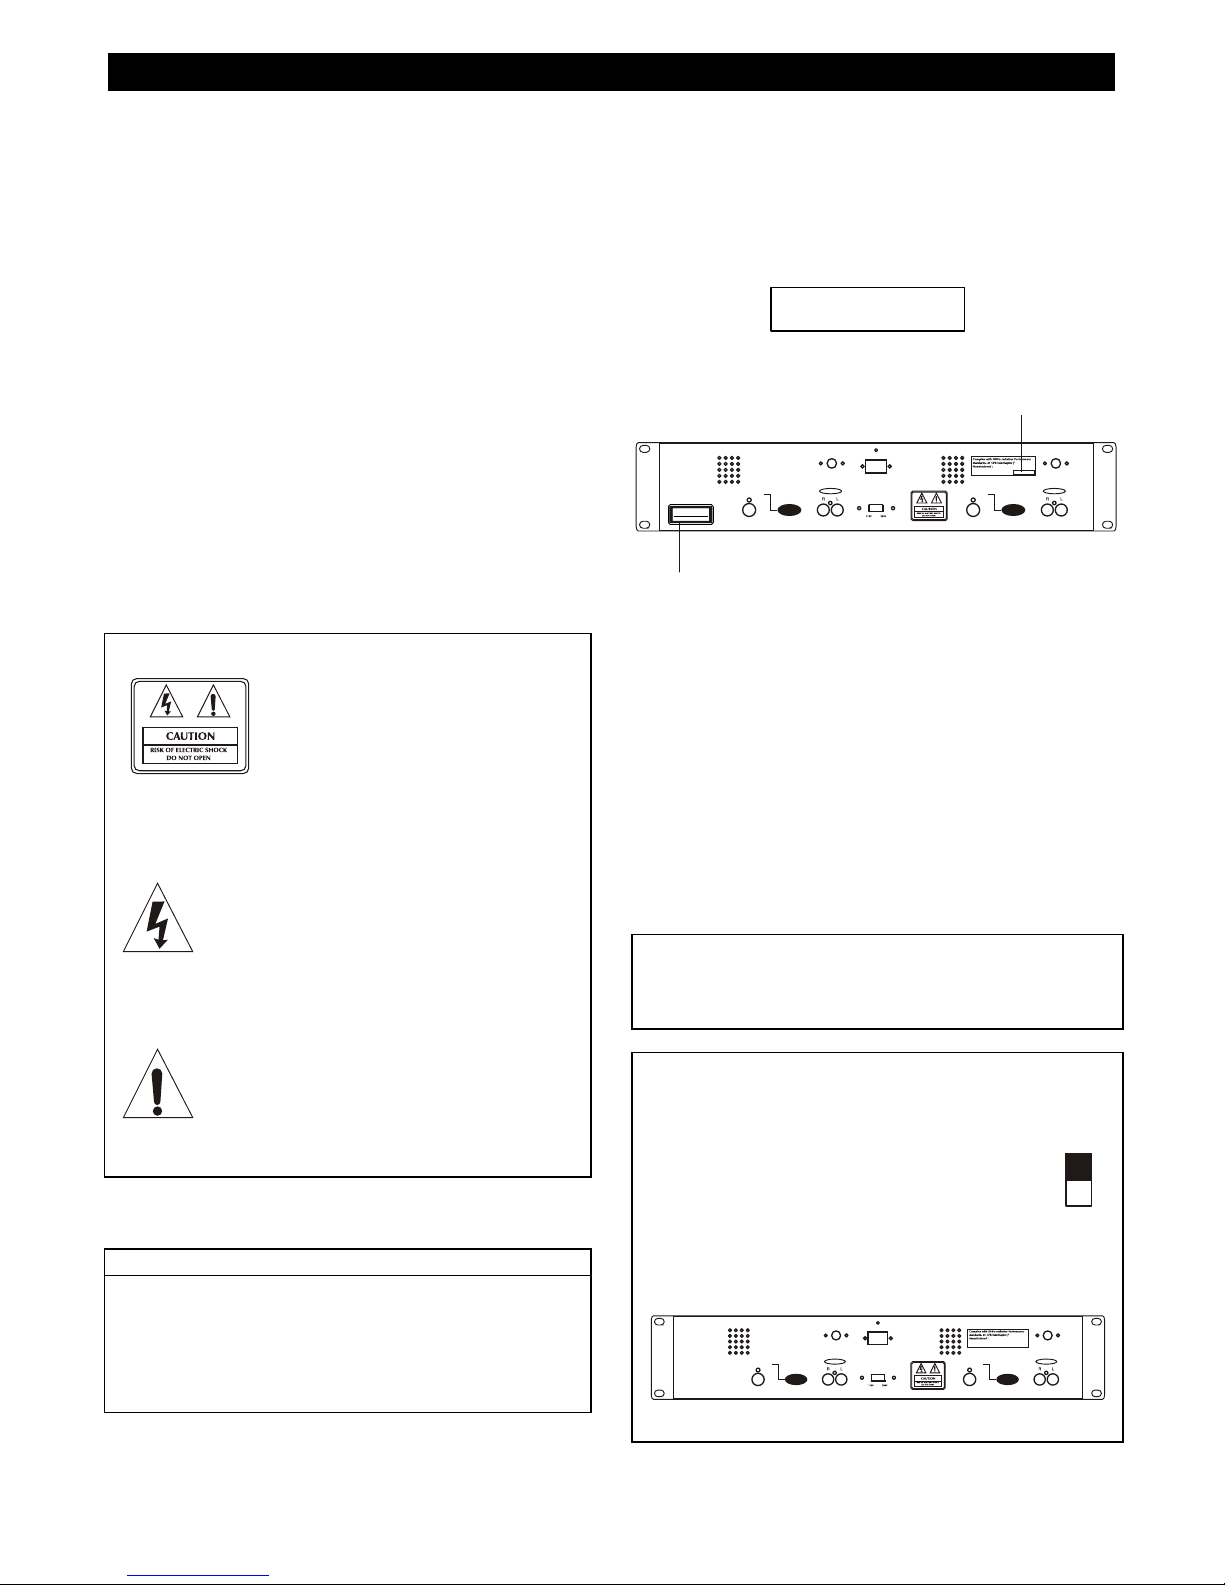
Line Voltage Selection (for multiple voltage
model only)
The desired voltage may be set with the
VOLTAGE SELECTOR switch on the rear
Do not twist the VOLTAGE SELECTOR
switch with excessive force as this may
cause damage.
If the VOLTAGE SELECTOR switch does not move
smoothly, please contact aqualified serviceman.
115V
230V
DIGITAL OUT DIGITAL OUT
AUDIO OUT AUDIO OUT
CONNECT TO
REMOTE CONTROL
2
CONNECT TO
REMOTE CONTROL
1
DIGITAL OUT DIGITAL OUT
AUDIO OUT AUDIO OUT
CONNECT TO
REMOTE CONTROL
2
CONNECT TO
REMOTE CONTROL
1
CLASS
LASER
LASER KLASSE
PRODUCT
1
1

2
Important Safety Instructions
1. Read Instructions –All the safety and operating
instructions should be read before this product is
operated.
2. Retain Instructions -The safety and operating
instructions should be retained for future reference.
3. Heed Warnings -All warnings on the appliance and
in the operating instructions should be adhered to.
4. Follow Instructions -All operating and use
instructions should be followed.
5. Water and Moisture -The appliance should not be
used near water -for example, near a bathtub,
washbowl, kitchen sink, laundry tub, in a wet
basement, or near a swimming pool, and the like.
6. Carts and Stands -The appliance should be used
only with a cart or stand that is recommended by the
manufacturer.
An appliance and cart combination
should be moved with care. Quick stops,
excessive force, and uneven surfaces
may cause the appliance and cart
combination to overturn.
7. Wall or Ceiling Mounting -The product should be
mounted to a wall or ceiling only as recommended by
the manufacturer.
8. Heat -The appliance should be situated away from
heat sources such as radiators, heat registers, stoves,
or other appliances (including amplifiers) that produce
heat.
9. Power Sources –This product should be operated
only from the type of power source indicated on the
making label. If you are not sure of the type of power
supply to your home, consult your product dealer or
local power company. For products intended to
operate from battery power, or other sources, refer the
operating instructions.
10. Grounding or Polarization –This product may be
equipped with a polarized alternation-current line plug
(a plug having one blade wider than the other). This
plug will fit into the power outlet only one way. This is
a safety feature. If you are unable to insert the plug
fully into the outlet, try reversing the plug. If the plug
should still fail to fit, contact your electrician to replace
your obsolete outlet. Do not defeat the safety purpose
of the polarized plug.
11. Power-Cord Protection-Power-supply cords should
be routed so that they are not likely to be walked on or
pinched by items placed upon or against them, paying
particular attention to the cord in correspondence of
plugs, convenience receptacles, and the point where
they exit from the appliance.
12. Cleaning -The appliance should be cleaned only as
recommended by the manufacturer.
Clean by wiping with a cloth slightly damp with water.
Avoid getting water inside the appliance.
13. For AC line powered units -Before returning repaired
unit to user, use an ohm-meter to measure from both
AC plug blades to all exposed metallic parts. The
resistance should be more than 100,000 ohms.
14. Non-use Periods-The power cord of the appliance
should be unplugged from the outlet when left unused
for a long period of time.
15. Object and Liquid Entry-Care should be taken so
that objects do not fall and liquids are not spilled into
the enclosure through openings.
16. Damage Requiring Service-The appliance should be
serviced by qualified service personnel when:
A. The power-supply cord or the plug has been
damaged; or
B. Objects have fallen, or liquid has been spilled into
the appliance; or
C. The appliance has been exposed to rain; or
D. The appliance does not appear to operate
normally or exhibits a marked change in
performance; or
E. The appliance has been dropped, or the enclosure
damaged.
17. Servicing-The user should not attempt any service to
the appliance beyond that described in the operating
instructions. All other servicing should be referred to
qualified service personnel.
18. Ventilation –Slots and openings in the cabinet are
provided for ventilation and to ensure reliable
operation of the product and to protect it from
overheating, and these openings must not be blocked
or covered. The openings should never be blocked by
placing the product on a bed, sofa, rug, or other
similar surface. This product should not be placed in a
built-in installation such as a bookcase or rack unless
proper ventilation is the manufacturer’s instructions
have been adhered to.
19. Attachments –do not use attachments not
recommended by the product manufacturer as they
may cause hazards.
20. Accessories –Do not place this product on an
unstable cart, stand, tripod, bracket, or table. The
product may fall, causing serious injury to a child or
adult, and serious damage to the product. Use only
with a cart, stand, tripod, bracket, or table
recommended by the manufacturer, or sold with the
product. Any mounting of the product should follow the
manufacturer’s instructions, and should use a
mounting accessory recommended by the
manufacturer.
21. Lightning –For added protection for this product
during a lightning storm, or when it is left unattended
and unused for long periods of time, unplug it from the
wall outlet and disconnect the antenna or cable
system. This will prevent damage to the product due
to lightning and power-line surges.
22. Replacement Parts –When replacement parts are
required, be sure the service technician has used
replacement parts specified by the manufacturer or
have the same characteristics as the original part.
Unauthorized substitutions may result in fire, electric
shock, or other hazards.
23. Safety Check –Upon completion of any service or
repairs to this product, ask the service technician to
perform safety checks to determine that the product is
in proper operating condition.

3
Features
n8 times over sampling 1 bit D/A converter
nInstant start within 10 msec (sound is produced
immediately when the PLAY button is pressed)
nSeamless Loop (uninterrupted loop playback)
nAuto cue
nRealtime cue
nFrame search
n4 different speed scan
nThe BPM adjustment range with the pitch slider
can be set to +/-8%, +/-12%, +/-16%
nPitch display
n10 number buttons for direct track access
n30 programable tracks
n10 cue points can be memorized
nDigital output RCA coaxial
nFader start, Fader stop, (back cue) must have a
Mixer equipped with the signal output, when
combine with PIONEER DJM-500 DJ mixer is
available.
nRelay playback (using the control jack)
nBeat counter
nLarge bright LCD Screen can be viewed from wide
angles
n60 seconds transport protection
nAuto protection (after 15 minutes with no
operating in pause mode, the laser diode will be
turned off).
Main unit
1. POWER (Power ON/OFF Switch) -When the
POWER switch is pressed, the power turns on.
2. DISC HOLDER -Place the discs in the holder. Press
the OPEN/CLOSE button to open and close the disc
holder.
3. OPEN/CLOSE BUTTON -Press it to open and
close the disc holder. The control unit also includes
OPEN/CLOSE button. The disc holder can not be
opened during playback, so stop playback before
pressing the button.
4. REMOTE CONTROL CONNECTOR -Connect this
connector to the control unit using the included
control cords.
5. LINE OUT 1 AND 2 -The audio signals from each
player are output from these jacks.
6. DIGITAL OUT SOCKET –The music-signals of this
socket is digital. Connect the output to the respective
input of a digital amplifier for example.
4 5 4 56 6
32
1
2
DIGITAL OUT DIGITAL OUT
AUDIO OUT AUDIO OUT
CONNECT TO
REMOTE CONTROL
2
CONNECT TO
REMOTE CONTROL
1

_
_
_
_
21
2019 22
8 9 10
1211
1234567
18
17
1615
14
13
23 24
CONNECT
TO
MAIN UNIT
2
CONNECT
TO
MAIN UNIT
1
CONTROL CONTROL
2 1
Control unit
1. MEMORY BUTTON (Memory Cue Button) -This
button is used to saved the CD current position to the
cue memory. You can memorize up to 10 cue points.
To erase all the cue memory hold the MEMORY
button down for more than 2 seconds till the cue
memory indicators on the LCD display are off.
2. TIME (Time Button) -The TIME button switches
among Elapsed playing time, Remaining time in a
selection, Total remaining time of the disc.
3. SGL/CTN -You can choose between a single track to
play or all tracks in order by pressing once or twice.
4. LCD DISPLAY -Indicates all the functions, as they
are occurring with the CD.
5. RECALL BUTTON (Recall Cue Button) -This
button allowsyou to cue up any of the 10 memory
CUE points that have been memorized. The player
will cue up the selected point when RECALL button is
pressed.
6. Track Numerical Buttons -These buttons serve 3
functions depending on the MEMORY and RECALL
LEDs you are working in.
aThe numerical buttons are for quickly advancing to
the track on a CD while both MEMORY and
RECALL LEDs are off.
bPress the numerical button when the MEMORY
LED lit. The current CD position will be saved to the
cue memory then the cue memory indicator on LCD
display lit.
cPress the numerical button when the RECALL LED
lit. The cue memory indicator on the LCD display
will flash to show which cue memory point is
recalled.
7. PITCH BEND +/-16% (Pitch Bend Button) -The
pitch will automatically rise while the + button is
pressed and return to the original pitch when the
button is released. The pitch will automatically drop
when the –button is pressed and return to the
original pitch when the button is released.
8. PROGRAM -Depress this button to stop the CD and
enter the program mode. Note the word “PROGRAM”
is indicated on the display. Select each track to be
programmed and press the PROGRAM button
between selections. You can program up to 30 tracks.
Press PLAY to start the program. To exit and erase
program hold the PROGRAM button down for mode
than 2 seconds while the unit is stopped.
9. PITCH (Pitch Button) -This button activates the
Pitch Slider (19).
10. OPEN/CLOSE (Disc Tray Open/Close) -Press to
load or eject the disc. Each press will open or close
the disc tray on the transport. NOTE: Tray will not
open when the disc is playing.
11. SEARCH WHEEL (OUTER RING) -This wheel has 4
forward and 4 backward speed positions for
searching through songs. The more you turn the
wheel in either direction the faster you search through
the music.
12. JOG WHEEL (INNER RING) -This jog wheel serve 2
functions depending on the mode you are working in.
a. The jog wheel will act as a slow frame search
control when the CD is not playing but either paused
or set to a cue point. To set a new frame cue point,
spin the wheel then press PLAY when you have
determined the proper position. Press CUE to return
to the “CUE POINT”.
4

b. The jog wheel temporarily bend the pitch of the
music up to +/-16% if the song is already playing by
rotating the wheel clockwise to speed up or
counterclockwise to slow down. The amount of pitch
change is determined by the speed of rotation.
13. IN/R.CUE -This allows you to set the cue point
without stopping the play back. This button also sets
the beginning of a seamless loop.
14. TRACK (Track Search Buttons) -These buttons are
used to select the track to be played. Forward skip &
Back skip
15. OUT/EXIT -Used to set the ending when looping
music. The player will start to loop continuous until
you press this button again to exit.
16. CUE -Pressing the CUE button during play provides
a return to the position at which play was started. If
pause is used before CUE or CUE point was set, that
will become the cue point. With the unit in the pause
mode (Play/Pause LED blinks) the search and/or jog
wheel is used to set adifferent start point.By
pressing "PLAY/PAUSE" button then "CUE",you can
confirm this new cue point is desirable. The CUE LED
will light up since the cue button is pressed until the
CD has returnedto the position at which play was
started.
17. RELOOP BUTTON -If a loop has been made and
you have hit the exit button, press this button to enter
the loop again. To exit loop pressing OUT/EXIT
button.
18. PLAY/PAUSE -Each press of the PLAY/PAUSE
button causes the operation to change from play to
pause or from pause to play.
19. PITCH SLIDER -The pitch can be changed up to +/-
12% by pressing the PITCH button so the PITCH
LED is lit, then moving the sliding fader.
The pitch will not be changed if the PITCH LED is off.
If you want to change the BPM adjustment range (+/-
8%, +/-12% , +/-16%), press and hold PITCH button
then press the PITCH BEND+ to select.
20. COUNTER BUTTON -Tap this button with the beat
of the music to determine the current Beats Per
Minute (BPM).
21. RELAY –Pressing the RELAY button to enable or
disable RELAY function.
Pressing the RELAY button to enable Relay function.
While the Relay is enabled, the LED will light on.
In the single mode, the CD player will be paused at
the next track when finishplaying current track;
And only the other side of CD player that is standby in
pause mode will start playing automatically.
There is no Fader start function when in the Relay
mode.
Pressing the RELAY button to disable Relay function.
The LED will light off when Relay is disabled.
The Fader Start function can be worked.
22. BPM BUTTON -Switches the mode of the display
between showing the BPM and the percentage
change in pitch.
23. REMOTE SWITCH INPUT JACK -For external
remote switch input, to control this unit play or pause.
For CROSS FADER control, connect this connector
to the control out from mixer control out.
24. CONTROL CONNECTOR -Connect this connector
to the REMOTE connector on the main unit using the
included control cords.
LCD DISPLAY
1. PLAY –lit while the unit is playing a CD.
2. .PAUSE -The PAUSE indicators light during pause
or cue mode.
3. CUE –Lit when the unit is at a cue point.
4. CUE MEMORY CALENDAR -The numeral on the
cue memory calendar shows to indicate which cue
memory is set previously. Flashing while the cue
memory is setting or recalling.
5. PROGRAM –This lights when program mode is set
or played.
6. SINGLE -Shows when the unit is set to play just one
track at a time. When this is not lit the CD will play
continuously through all tracks. The function is
controlled by the SGL/CTN BUTTON (3).
7. ELAPSED, TOTAL REMAIN -These indicate that the
time shown on the display is the ELAPSED, TOTAL
REMAINING or single song remaining time.
8. LOOP -shows when the CD is repeating a particular
area with the music on the CD.
9. RELOOP -shows when the CD has had a loop set
previously and can go back to loop again.
10. TRACK –shows the track that unit is playing with.
11. ~ 14. TRACK, MINUTE, SECOND, FRAME These
displays indicate information on the current track and
time
15. BPM -indicator lights up when when BPM button is
engaged
16. PITCH/BPM –Shows either the percentage change in
pitch or the BPM of the song depending on the mode
selected with the BPM BUTTON (22).
1
11 12 13 14 15 1810 16
23456879
17
5
6
17. PITCH -indicator light to show percent of pitch is
displayed.
18. TIME BAR –shows either time remaining or elapsed
depending on the setting of the TIME BUTTON (2).
pause at that point
2) Press the CUE button(16) during playback to return to
the position at which playback started(Back Cue)
6. Pausing
Press the PLAY/PAUSE button(18) to switch between
play and pause.
OPERATING INSTRUCTIONS
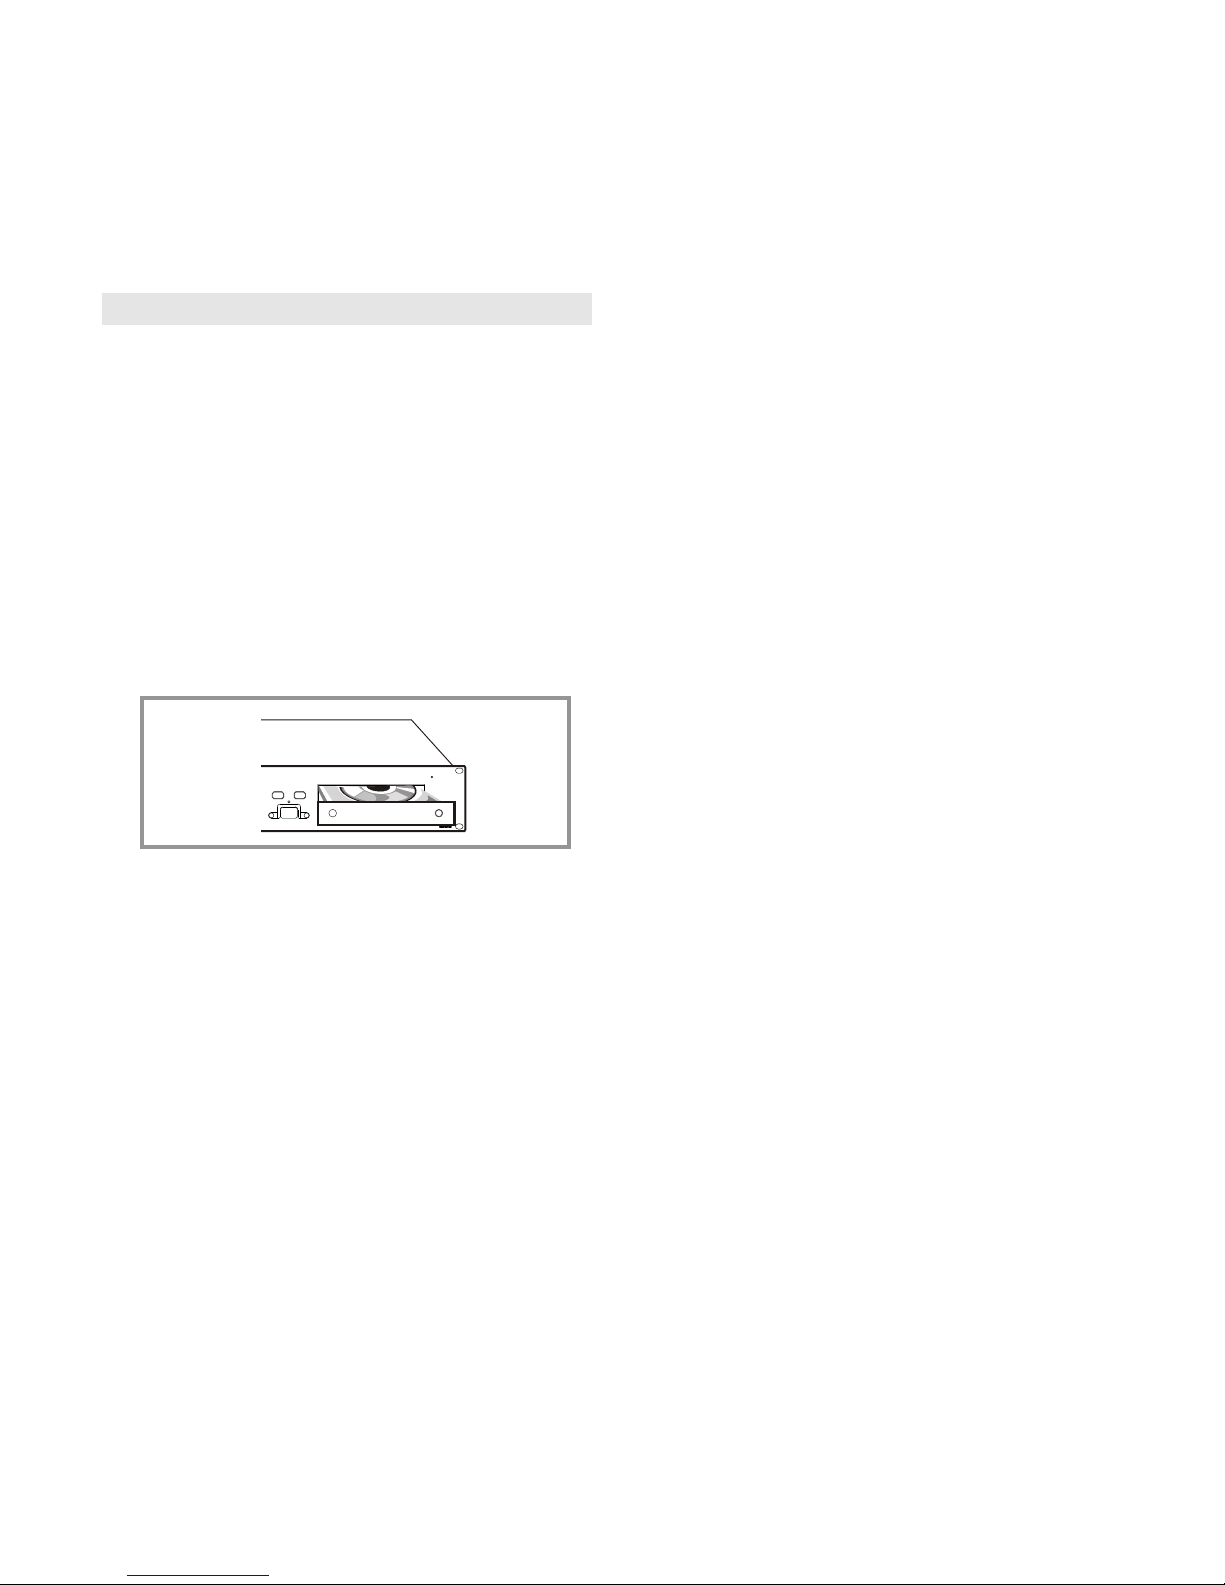
1.Opening and Closing the Disc Tray and Loading Discs
a)Opening and closing the disc tray
This operation only works when the power is on.
Press the OPEN/CLOSE button(10) to open or close
the disc tray. OPEN/CLOSE button(10) are provided on
both the main unit and control unit or
Press PLAY button tray automatically closes.
If tray is not closed after 60 seconds it will close
automatically and pause.
The disc trays cannot be opened during playback to
prevent playback from being interrupted if the
OPEN/CLOSE button is pressed accidentally. Stop
playback, then press the OPEN/CLOSE button(10).
2. Loading discs
Hold the disc by the edges and place it in the disc tray.
Do not touch the single surface (the glossy side).
When using 12cm discs, place the disc in the outer tray
guides.
CAUTION:
Do not play foreign objects in the disc tray, and do not
place more than one disc in the disc tray at a time.
Doing so may result in malfunction.
Do not push the disc tray in manually when the power is
off, as this may result in malfunction and damage the
player.
3. Selecting Tracks
Select desired track using NUMBER Button(6) or press
the TRACK Buttons once to move to one higher or
lower track or Hold the TRACK buttons(14) in to change
tracks continuously at a higher speed.
When a new track is selected during playback, playback
begins as soon as the search operation is completed.
4. Starting Playback
Press the PLAY/PAUSE button(18) during the pause or
cue to start playback.
The PLAY indicator lights when playback starts.
5. Stopping Playback
There are two ways to stop playback.
1)Press the PLAY/PAUSE button(18) during playback to
7. Cueing
"Cueing" is the action of preparing for playback; when
the Cue button(16) is pressed, playback return to the
cue point and enters pause mode. When the
PLAY/PAUSE button(18) is pressed during the cue
mode, playback starts.
Cue point setting:
A.Playback starts from pause ( using the jog wheel to
set the starting point )or skip to a new track during
play or pause.
The beginning play point will be set to the cue point.
Or
B.Press the IN REALTIME CUE button(13) during
playback to set the new cue point.
Or
C.Memorize any of 10 CUE points by pressing
MEMORY(1) toset desired Cue then press any of 10
number buttons(6).
To return to Cue point press Cue Button(16). This will
return to point A or B above.
The player has completed the cue or pause operation
and is waiting for the play start command.
When the PLAY/PAUSE button(18) is pressed,
playback starts.
D. To recall cues, if the recall LED is lit you can press
the last number button cue stored and create a
STUTTER EFFECT (see also p8). The last cue that
was stored or recalled will flash in the LED screen to
let you know it was last cued up.
8.Auto cue
When disk is loaded, the cue point is set to the first
source of music.
If track is changed before pressing play, the cue point is
changed to the new starting point.
If you pause during playback this also sets the new cue
point.
9.Frame search
This is done by first pausing then using the jog
wheel(12) to set the starting point.(When you use the
jog wheel the monitor function allows you to hear what
is playing. Once you have set starting point press
PLAY(18) then CUE(16) to again mute output.)
10.Scanning (fast forward/fast reverse )
To do this rotate Shuttle wheel(11) forward or reverse
You will scan or reverse at 4 different speeds
depending on how much you rotate the wheel.
DISC2

7
11.Loop play
You can create a seamless loop between two points
continuously.
(1) Press PLAY/PAUSE BUTTON (18) so a CD is playing.
The PLAY/PAUSE BUTTON’S LED lights (figure 1).
(2) Press IN REAL TIME CUE BUTTON (13). This sets
the starting point of the SEAMLESS LOOP. The IN
REAL TIME CUE’S BUTTON LED will light (figure 2).
(3) Press OUT/EXIT BUTTON (15) to set desired ending
point of the SEAMLESS LOOP. You will know you are
in SEAMLESS LOOP mode because IN REAL TIME
and OUT/EXIT LEDs will light and flash. LOOP
INDICATOR (8) in LCD DISPLAY will also flash.
Sound will continue with no interruption (SEAMLESS
LOOP)(figure 3).
(4) To exit SEAMLESS LOOP, press OUT/EXIT
BUTTON (15). LEDs will stay on but not flash. Music
will resume normal play (figure 4).
(5) To replay loop, press the RELOOP BUTTON (17). IN
REAL TIME and OUT/EXIT LEDs and LOOP
INDICATOR (8) in LCD DISPLAY will all begin
flashing again (figure 5).
12.SEAMLESS LOOP PLAY (CONT.)
(1) (Must be in SEAMLESS LOOP mode). If a
SEAMLESS LOOP has not been created, follow
instructions on this page for creating a SEAMLESS
LOOP. If a SEAMLESS LOOP has already been
created, press RELOOP BUTTON (17) to reenter the
SEMALESS LOOP mode (figure 5).
(2) Next, press OUT/EXIT BUTTON (15) to return to
normal play (figure 6). This disengages the
SEAMLESS LOOP mode.
(3) Press OUT/EXIT BUTTON (15) again for new desired
ending point of the loop (figure 7).
FOR SHORTER LOOP: press OUT/EXIT BUTTON
(15) quickly.
FOR LONGER LOOP: Wait until the song plays
several frames, then press OUT/EXIT BUTTON (15).
NOTE: YOU CAN ONLY EDIT THE ENDING PART OF
THE LOOP.
13.SLEEP MODE
The CD player automatically shuts off the transport and
laser after 15 minutes (when in pause or cue mode).
This will lengthen the life of your motor drive and laser.
To restart player, just press cue(16) or play(18) buttons.
14.Time Display
During normal play, each time you press TIME
button(2), the display changes as following information.
A=Elapsed playing time
B=Remaining time in a selection
C=Total remaining time of the disc.
15.Pitch Bending
The speed increases or decreases respectively while
the PITCH BEND+(7) or PITCH BEND-(7) button is
pressed. The extent to which the speed changes is
proportionated to the amount of time the button is
pressed. For example, if the PITCH BEND+ button is
held in continuously, the speed increases continuously.
The pitch changes within a range of +/-16%.
The jog wheel will temporarily bend the pitch of the
music if the song is already playing by rotating the
wheel clockwise to speed up or counterclockwise to
slow down.The speed that you rotatethe JOG Wheel
determines the percent of pitch bend.
16.Program play
Press PROG Button(8) to make the unit enter the
program mode and stop condition.
The PROGRAM indicator lights.
Select Track using NUMBER button(6) or TRACK
SEARCH button(14) press PROG. again.
Repeat this up to 30 times.
Press PLAY button(18) to begin playing programmed
tracks.
To cancel Program press and hold PROG. Button(8)
more than 2 sec.
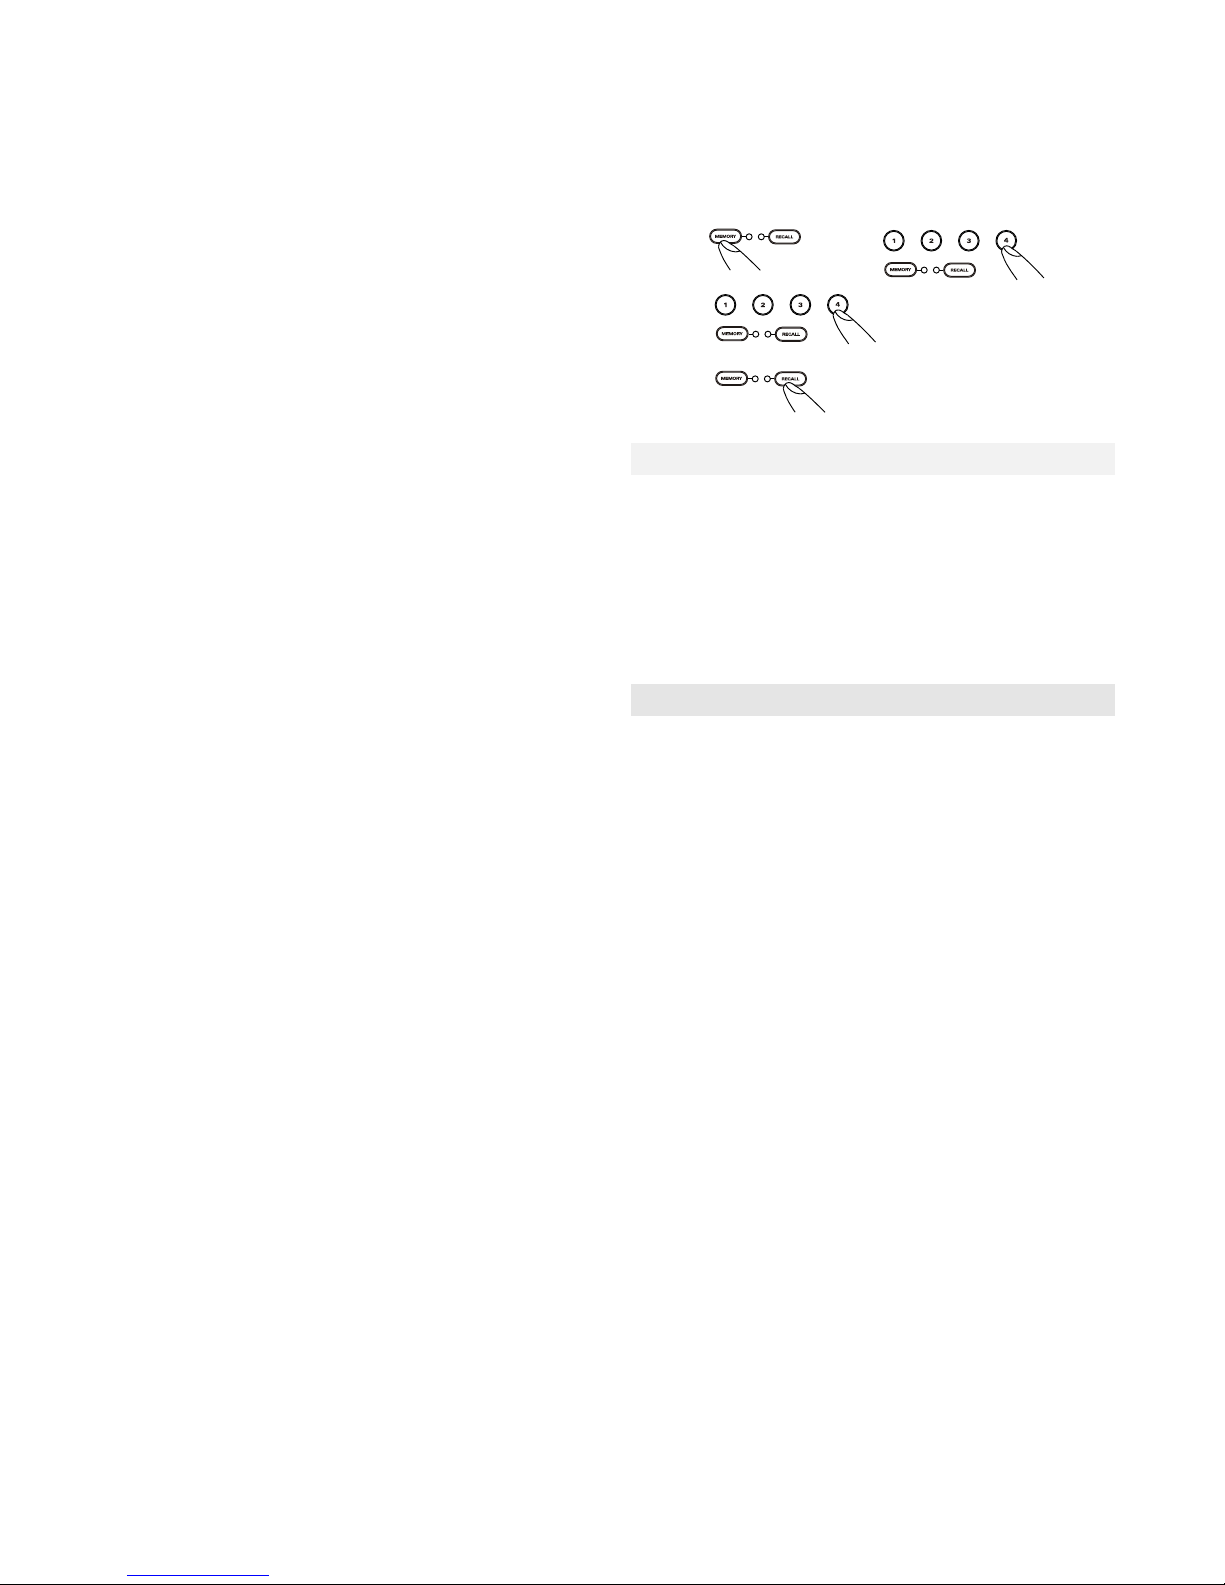
17.Memory Cueing (setting a cue point)
wPress the MEMORY button(1) to make the unit enter
cue memory mode, then press the desired
numerical button(6) at the desired cue point to
memorize. The numeral(4) on the display will flash
twice then lit steadily to indicate the cue memory
has been set.
wPress the RECALL button(5) to make the unit enter
cue recall mode, then press the desired numerical
button(6) to recall the desired cue memory point. A
new cue point will be set.
wTo clear all the cue memory, just press and hold the
MEMORY button(1) for more than 2 seconds. All the
cue memory will be clear.
fig.1
fig.2
SEAMLESS LOOP
fig.7
SEAMLESS LOOP
fig.6
SEAMLESS LOOP
fig.4
SEAMLESS LOOP
fig.3
SEAMLESS LOOP
fig.5
SEAMLESS LOOP
C B
TIME
TIME
A
TIME
8
18. Fader Start Playback
Both player’s CONTROL jack are connected to Mixer’s
CROSS FADER signal output CH1 or CH2; when the
jack are connected, the operation for both player as
following:
Left player will return to standby mode at CUE point
automatically when move CROSS FADER from left to
right to start playback on right player.
Right player will return to standby mode at CUE point
automatically when move CROSS FADER from right
to left to start playback on left player.
19. Relay Play using two players
How to set the Relay function:
a. By either the both player’s CONTROL jack are
connected to each other without pressing the RELAY
button; when the both player’s CONTROL jack are
connected to each other, the relay-play effects can be
produced. The relay play is explained as below.
wSet both players to single play mode (the SINGLE
indicators(6) will lit in the displays).
wBegin playback on the first player.
wWhen the currently playing track ends, playback
will begin automatically on the standby player.
wThe first player will enter standby mode at the
beginning of the next track on its disc.
wBy repeating this operation, the two players can
be used to perform continuous relay play.
wBy loading new discs on the standby player, you
can construct a continuous program of whatever
tracks you wish.
wBy setting a cue point on the standby player, you
can perform relay to any desired cue point on the
selected track.
NOTE:
Relay play may not work properly if the audio out jacks on
the two players are not connected to the same audio
amplifier.
b. or press the RELAY button(21) on the front plane of
Controller.
1. The default has no Relay function when power on.
2. Pressing the RELAY button to enable Relay function.
3. While the Relay is enabled, the LED will light on.
4. In the single mode, the CD player will be paused at
the next track when finish playing current track;
5. And only the other side of CD player that is standby
in pause mode will start playing automatically.
6. There is no Fader start function when in the Relay
mode.
To disable the Relay:
1.Pressing the RELAY button(21) to disable Relay
function.
2. The LED will light off when Relay is disabled.
3. The Fader Start function can be worked.
20.STUTTER EFFECT: It can create a sound similar to a
CD skipping. The STUTTER Effect can be created in 2
ways.
(1) By rapidly pressing the CUE BUTTON (16)
a. Press PLAY/PAUSE BUTTON (18) so that music is
playing. PLAY/PAUSE LED will light (figure 9).
b. Next, rapidly press the CUE BUTTON (16) in sync
with the music (figure 10).
(2) By Hitting The DIRECT TRACK ACESS BUTTONS (6)
a. Press PLAY/PAUSE BUTTON (18) so that music is
playing. PLAY/PAUSE LED will light (figure 11).
Press MEMORY BUTTON (2) to set a CUE POINT
in memory. MEMORY LED will light (figure 12).
c.Press desired DIRECT TRACK ACCESS BUTTON
(6) (figure 13).
d. Press RECALL BUTTON (5) (figure 14).
e. Once RECALL LED lights, rapidly press the DIRECT
TRACK ACCESS BUTTON (6) previously selected.
(figure 15)
PREPARATIONS
Checking the Contents
Check that the carton contains the following items:
1. Main unit
2. Control unit
3. Operating instructions
4. Pair of RCA pin cord.
SPECIFICATIONS
Power Supply:
AC 115/230V, 50/60Hz
Power Consumption: 25W
Dimensions:
Main unit 482(W) x 88.8(D) x 262(H)mm
Control unit 482(W) x 132(D) x 74(H)mm
Weight:
Main unit 5Kgs
Control unit 2Kgs
fig.12
fig.13
fig.14
fig.15
Table of contents
Other DAS CD Player manuals


