Daum electronic 8080 TRS3 User manual
8080 TRS
3
3
3
User Manual

Table of contents
Please Note
Setting Up
Dashboard
Dashboard windows
Using the Menu and Language Selection
Choosing the User
Stand by mode
System Settings
User's data
Device data
Monitoring the Heart Rate
Training
Programs
Programs overview
How to create your own personal programs
Training data
Fitness mark
Conconi Test
Description
Test programs
Test protocols
Description
Coaching
What is Coaching?
Entering Personal Data
Training with the Coaching program
Taking the capacity test
Display the training plan / training unit
Running the training unit
Training process
Downgrading
Loading scheme of the Coaching program
Team Award
The Relaxation function
Transport and storage
Accessories (sold separately)
Specifications
Glossary
What to do, if...?
Warranty conditions
Menu Diagram
Sample Diagrams, supplement to the Individual Program
Assembling
Maintenance
1
2
2
3
4
4
5
5
6
7
8
9
13
14
14
15
16
17
18
20
20
21
22
23
24
26
28
30
31
32
32
33
35
36
38
39
41
42
49

1
Read this user manual thoroughly before using the device.
Please follow the recommendations about your health.
Recommendations about the training location
Safety notes
You should undergo a general medical examination before you start a training program.
You should interrupt immediately the training session if you fill uncomfortable, dizzy or in any way ill during a training
session. Always start a training with a low load and then increase the load gradually. At the end of the training
reduce the load. After the training you should execute a few stretching and gymnastics exercises to relax your
muscles.
Install your training device on a level ground. The device may damage wooden floors. We therefore recommend the
installation of a protective underlay on wooden floors. We also recommend not to in-stall the device on white or light-
coloured carpets or mats because they could be stained by the black colour of the device's feet. We recommend
that the training location be properly aerated to provide enough fresh air, but nevertheless avoid draught.
You can use this device in a temperature range from +10 C to +35 C.
Children should only use this device under supervision and they must be provided with a proper explanation of its
operating principles. This device is not a toy. Please make sure the device is in working order. You should never
train on a defective device. The device may only be used by one person at a time. You should wear appropriate
clothing and shoes while training. The device may only be used if all the parts are firmly attached and no part is
loose. You may only execute the repair operations described in this user manual. Other repair and service
operations may only be carried out by qualified specialists. Do not press the buttons with the fingernails, always use
the fingertips to avoid scratching the buttons. Avoid wetting the dashboard. If during a training session your
dashboard is wetted by sweat you should wipe it with a soft cloth after training. The device surface should not come
into contact with corrosive or strong chemicals.
The maximum allowable user weight is 120kg.
Daum electronic gmbh provides a 24 months warranty for the device for private use, and a three (3) months
warranty for commercial use. The warranty is voided in the case of improper utilisation.
° °
Please note
This ergometer is specially designed for health and endurance training.
High quality manufacturing, a user friendly dashboard, ease of use and maintenance all
contribute to make this appliance an ideal training device for sport and fitness purposes.
Also note that the complete equipment and the wide performance range should appeal to
sport or fitness conscious persons of every age group.
8080 TRS
3
3
3

The Dashboard
2
The is located
on the rear of the device.
On/Off switch
Setting Up
When the device is switched On,
the LCD screen displays a big “d”
and the system plays a start-up tune.
After this the system displays
the program last used. The manual
program is displayed on the first start-up.
watt
On / Off
1.
2.
3.
4.
5.
6.
7.
8.
9.
10.
11.
12.
13.
14.
15.
16.
17.
18.
19.
20.
6.
5.
2.
16.
1.
17.
4.
3.
9. 8.
7.
10. 11. 12. 13.
menu fitne ss
info
18.
15.
14.
19.
20.
Heart rate display
Dissipated energy and time display
RPM display
Speed and distance display
Load in watt display
Graphic screen
Control button
Heart rate sensor connector
Relax sensor connector
Menu key
Info key
Fitness key
Function key
Reset key (recessed)
PC connector
User display
Memory card reader/writer
Sliding switch: 1. card reader operation
2. ErgoWin u. dashboard update operation
3. Card reader update operation
Connector dashboard cable
Dashboard battery

3
Dashboard Displays
watt
The heart rate displays the heart rate. When only the upward pointing arrow is
displayed in the middle, then this means that the heart rate is too low to ensure
an effective training. Inversely, when only the downward pointing arrow is
displayed then the heart rate is too high. If the arrow starts blinking then the
load is too high and the user should moderate the training.
Speed and distance window: this window shows the actual speed or the
corresponding distance covered. Pressing the control button switches back and
forth between these two values. See also page 5.
The RPM display indicates the velocity in revolutions per minute.
(+ = pedal faster, - = pedal slower).
The graphic screen displays the programs. The load (in watt) is shown on the
scale on the left side of the screen. The training time is shown on the lower axis.
In heart rate controlled programs the system displays 100 beats per minute at
the 200 watt position.
In height profile programs the time axis shows the distance covered, while the
watt axis shows the height profile.
Note: the illustrations may be changed without notice!
13
:
08
3
250
0.0
+
0
128
OK
The watt window shows the load in watt. The displayed watt value will blink to
indicate reaching either the watt load limit of the device or the watt load limit of
the user. It also shows the relax value with relaxation exercises.
You can individually set up which data you whish to view: clock, training time,
speed, distance or dissipated energy (in kJoule). You can switch back and forth
with a second display by pressing the control button. See page 5.
The user window specifies the user number (1 to 4 or guest 0).
4
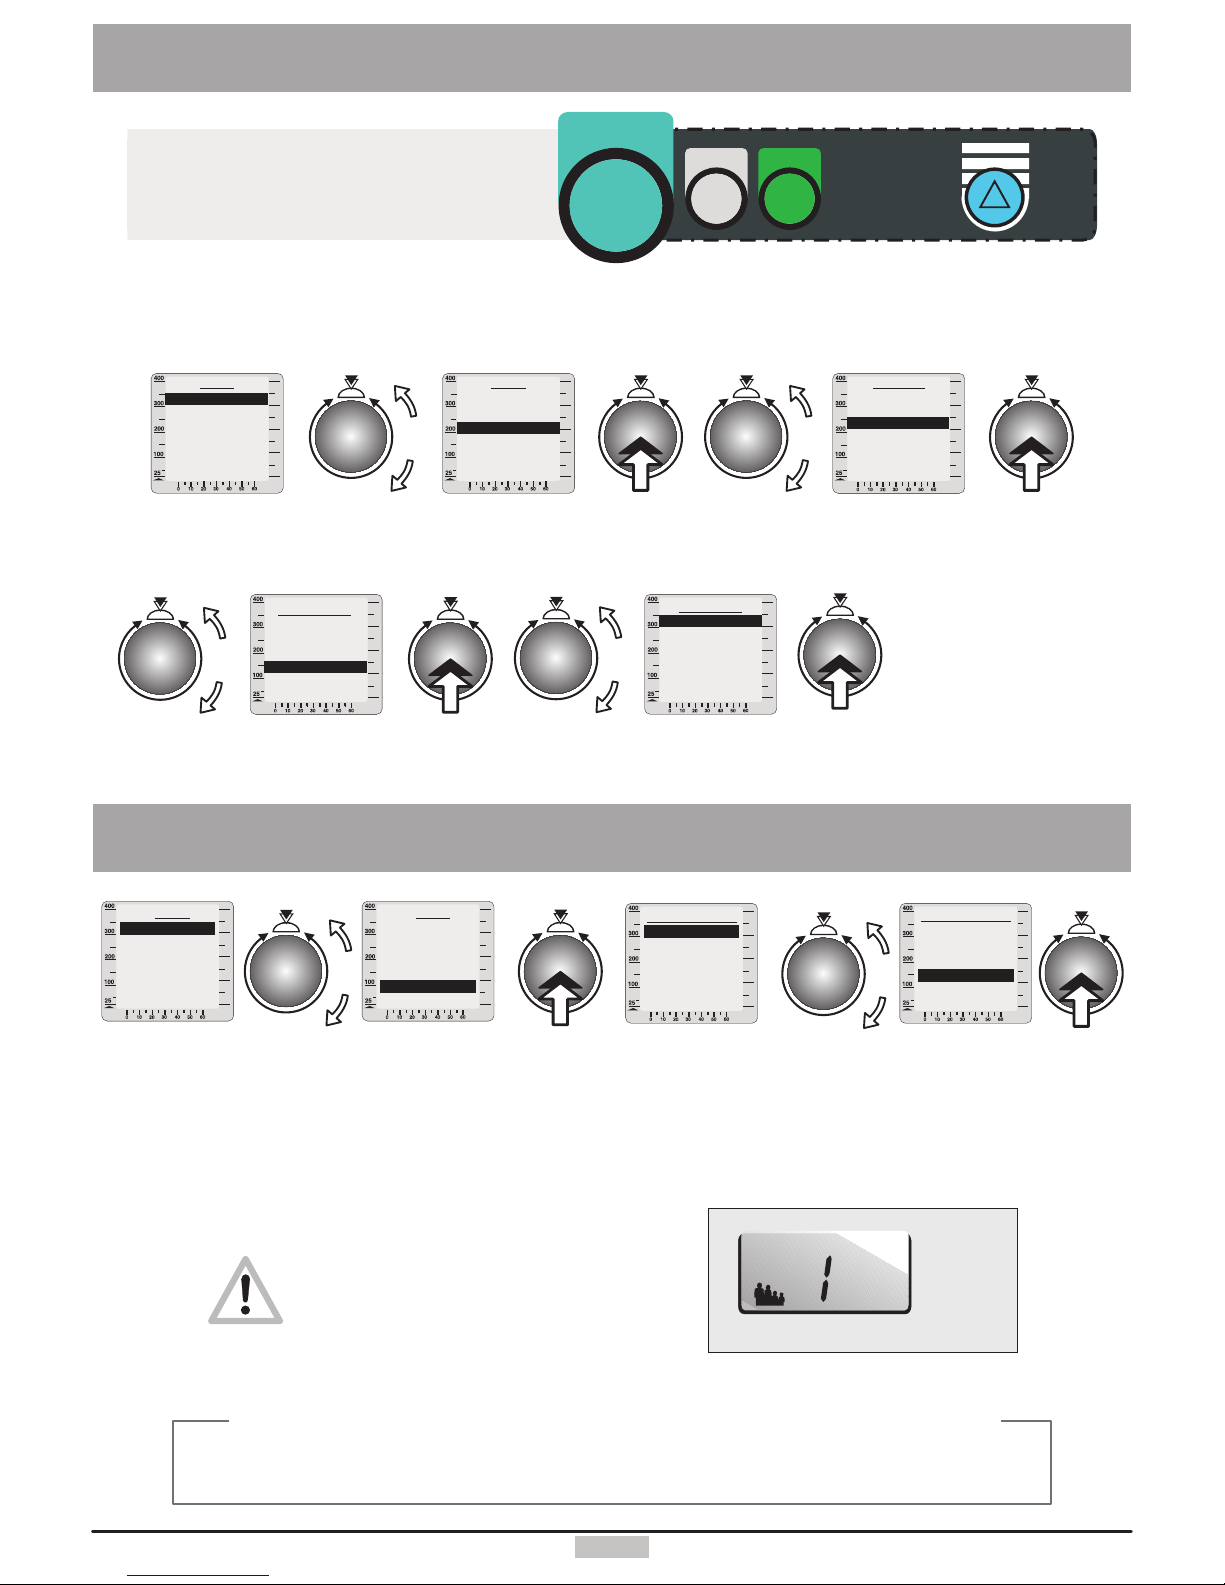
Using the Menu and Language Selection
Turn the control button to move up or down in the menu.
Press the control button to open the selected option, e.g. language selection:
menu
fitne ss
info
1. Press the menu key
2. Turn the control button to select “User”
3. Press the control button
4. Turn and press the control button to select a user from 1 to 4 or Guest.
5. The selected user is then indicated in display window 16.
6. Press the menu key to return to the start.
watt watt watt watt
watt
Device data
Date
Time
Contrast
RPM-Adaptation
Language
watt
Language
Deutsch
English
Français
Italiano
Portuguese
User display window
The device will store the training data of
four users. It is therefore important that
each user selects his own “number” when
training. Guest data are not stored.
watt
Menu
watt
watt
Settings
User data
Device data
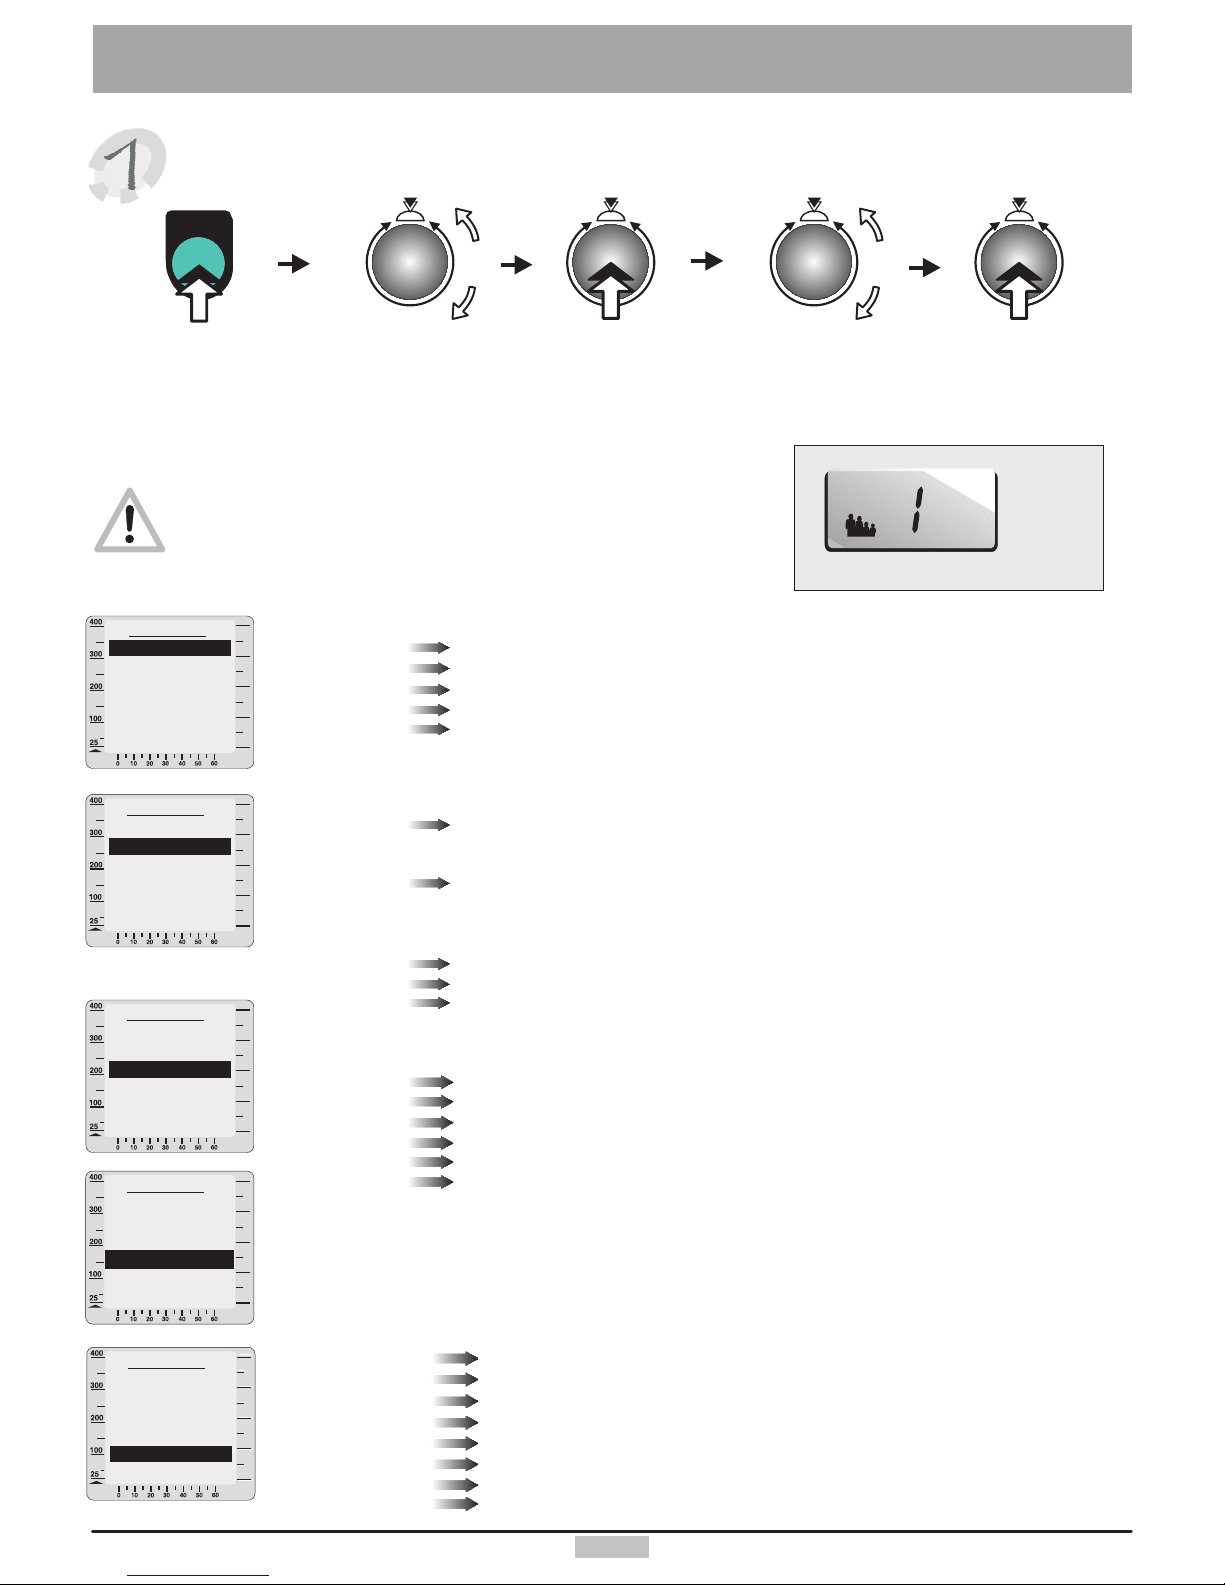
1. Press the menu key
2. Turn the control button to select “Settings”
3. Press the control button
4. Turn and press the control button to select “Device Data”.
5. Turn and press the control
button to select “Language”.
6. Turn and press the control button
to select required language.
Note: 2 languages are available for each software version.
7. Press the Menu key
to return to
your training program,
Press the function key
to return to “Device Data”.
Back
Back
User selection
Guest
User 1
User 2
User 3
User 4
Back
Menu
Back
Training data
Settings
Information
User
Training Training
Training data
Information
User
Settings
Mum
Person 1 Person 2
Dad Daughter
Person 3 Person 4
Son
The following is an example of a possible user's number attribution scheme in a family:
16.
Use the Menu key to call and leave the menu.
Use the function key to move back one step in
the menu. Press the info key to display
information about the use of the menu.
If you press the info key during a training (workout) session the system will display actual training and program data.
Back
Back
User selection
Guest
User 1
User 2
User 4
User 3
Back
Menu
Back
Training data
Settings
Information
User
Training
Menu
Back
Training data
Settings
Information
Training
User
User display window
User's data
System Settings
If you want to change the user's data you should always note
the presently selected user. This information will always be shown
in the user window (16). (See Choosing the User p. 4)
watt
User data
Back
Physical data
Limit values
Coaching
Delete
Miscellaneous
watt
watt
You can also enter your own limit values.
You would then be informed if one of these values is exceeded.
Watt
Heart rate
Training time
Distance
Phys. kJoule
You can select here the maximal load (between 25 and 400 watts).
If you choose e.g. 180W the load will not exceed this value,
and the watt display will blink.
When the actual heart rate exceeds the entered limit value
the system reduces automatically the applied load, and
an audible alarm sounds. “OFF” means no heart rate limit active,
“Auto” means heart rate corresponding to the age of the user applied.
A signal melody plays when the time limit is exceeded.
A signal melody plays when the distance limit is exceeded.
A signal melody plays dissipated kJoule values reaches the entered value.
Turn and press the control button to enter and store your physical data
Birth date
Gender
Height
Weight
Fat content (%)
Enter your birth date
Choose M (male) or F (female) to enter your gender.
Enter you height in cm.
Enter your weight in kg.
Enter your body fat content (if known).
Press
control
button
menu
menu
Press the
menu key
Turn to
select
“User's data”
Press
control
button
Turn to
select
“Settings”
watt
The delete function will reset all the data of the selected user to the initial state.
watt
Enter your actual performance capacity.
Enter the number of times you want to train per week.
Choose your target.
The minimum heart rate achieved during the last Coaching performance test.
The maximum heart rate achieved during the last Coaching performance test.
The performance achieved during the last Coaching performance test.
You can also enter and save the Coaching data by turning and pressing the control button
Evaluation
Frequency
Training type
Min. heart rate
Max. heart rate
Max. Perfor-
mance
User display window
16.
5
Start point
Cool down
Start-up
Window 2
Window 4
Watt increase
Watt decrease
Heart rate adapting
Choose start point “ON” if you want to start the program at the point of your choice.
Choose a program to run at the end of a training session (see page 12)
Choose the program that you wish to run after switching the device on.
Choose the data to display in Window 2.
Choose the data to display in Window 4.
Set the watt increase rate (in seconds) for heart rate controlled programs.
Set the watt decrease rate (in seconds) for heart rate controlled programs.
Adapt the fixed heart rate programs to your own heart rate range
User data
Back
Physical data
Coaching
Delete
Miscellaneous
Limit values
User data
Back
Physical data
Limit values
Delete
Miscellaneous
Coaching
User data
Back
Physical data
Limit values
Coaching
Miscellaneous
Delete
User data
Back
Physical data
Limit values
Coaching
Delete
Miscellaneous
66
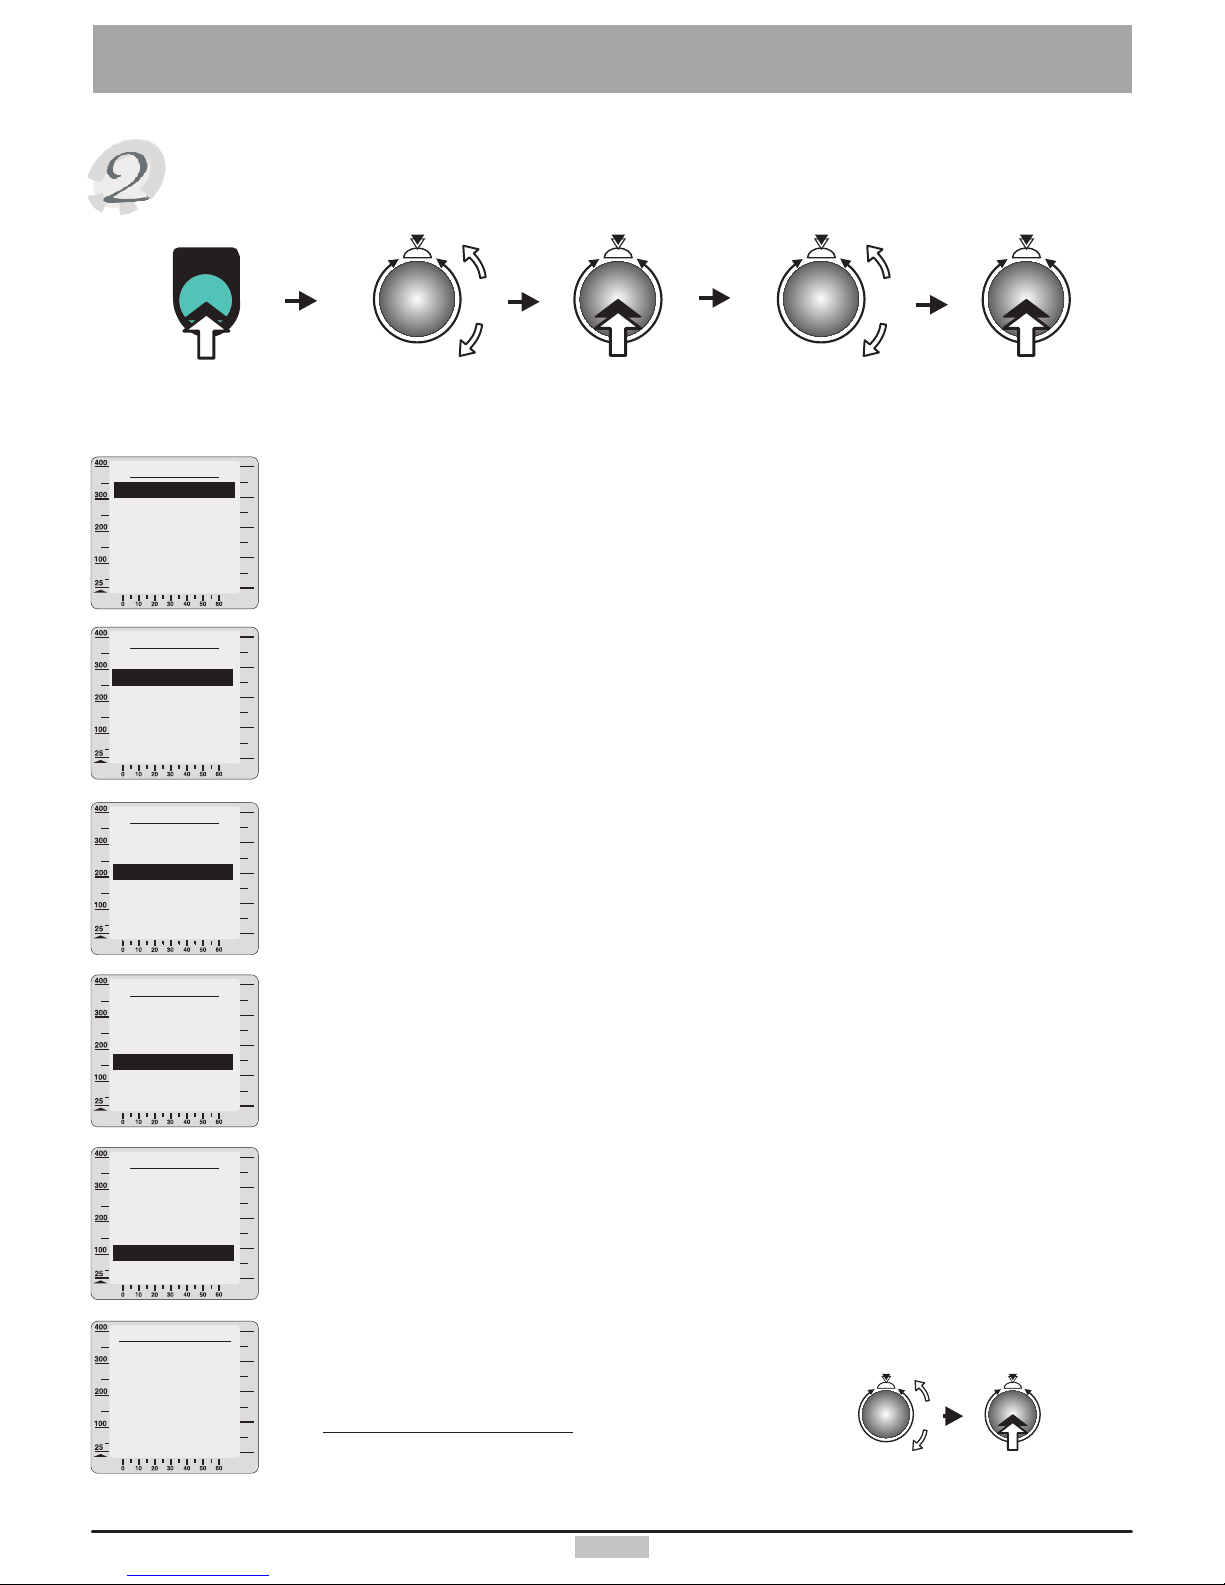
System Settings
Device data
Date entry
1. Turn and press the control button to set the day.
2. Turn and press the control button to set the month.
3. Turn and press the control button to set the year.
(DD/MM/YYYY).
Setting the time
1. Turn and press the control button to set the hour.
2. Turn and press the control button to set the minute.
3. Turn and press the control button to set the seconds.
(HH:MM:SS).
Contrast
You can choose a value for the contrast for the graphic screen from 10 to 25.
The optimal value lies normally around 16.
Language
Choose the appropriate language:
German, English, French, Italian, Portuguese, Finnish, Danish, Dutch.
Note: Only 2 languages are available for any software edition.
Adjusting the RPM (for the high performance sport domain)
Material wear and deviations of mechanical settings may result in a
discrepancy between the displayed RPM value and real pedalling speed
achieved. We have therefore provided the software with a “RPM adjusting”
function, which you can use to check the displayed RPM values and adjust it
if needed.
Pedal at constant speed (e.g. 60 RPM) for 1 minute
(the clock in window No. 2 will show time progress)
and count the pedal revolutions (measured value).
The following formula gives the setting value:
Displayed value (Window No. 3)
= Setting value (%)
Measured value x 100%
watt
Device data
Date
Time
Contrast
Language
Adjusting the RPM
Back
watt
watt
watt
watt
watt
RPM Adjusting
100.0 %
Back
Press
control
button
menu
menu
Press
key Turn to
select
“Device data”
Press
control
button
Press
control
button
Turn to
select
“Settings”
“Set value”
(turn)
Device data
Date
Contrast
Language
Adjusting the RPM
Time
Back
Device data
Date
Time
Contrast
Adjusting the RPM
Language
Back
Device data
Date
Language
Time
Contrast
Adjusting the RPM
Back
Device data
Date
Time
Language
Adjusting the RPM
Contrast
Back
7
Monitoring the Heart Rate
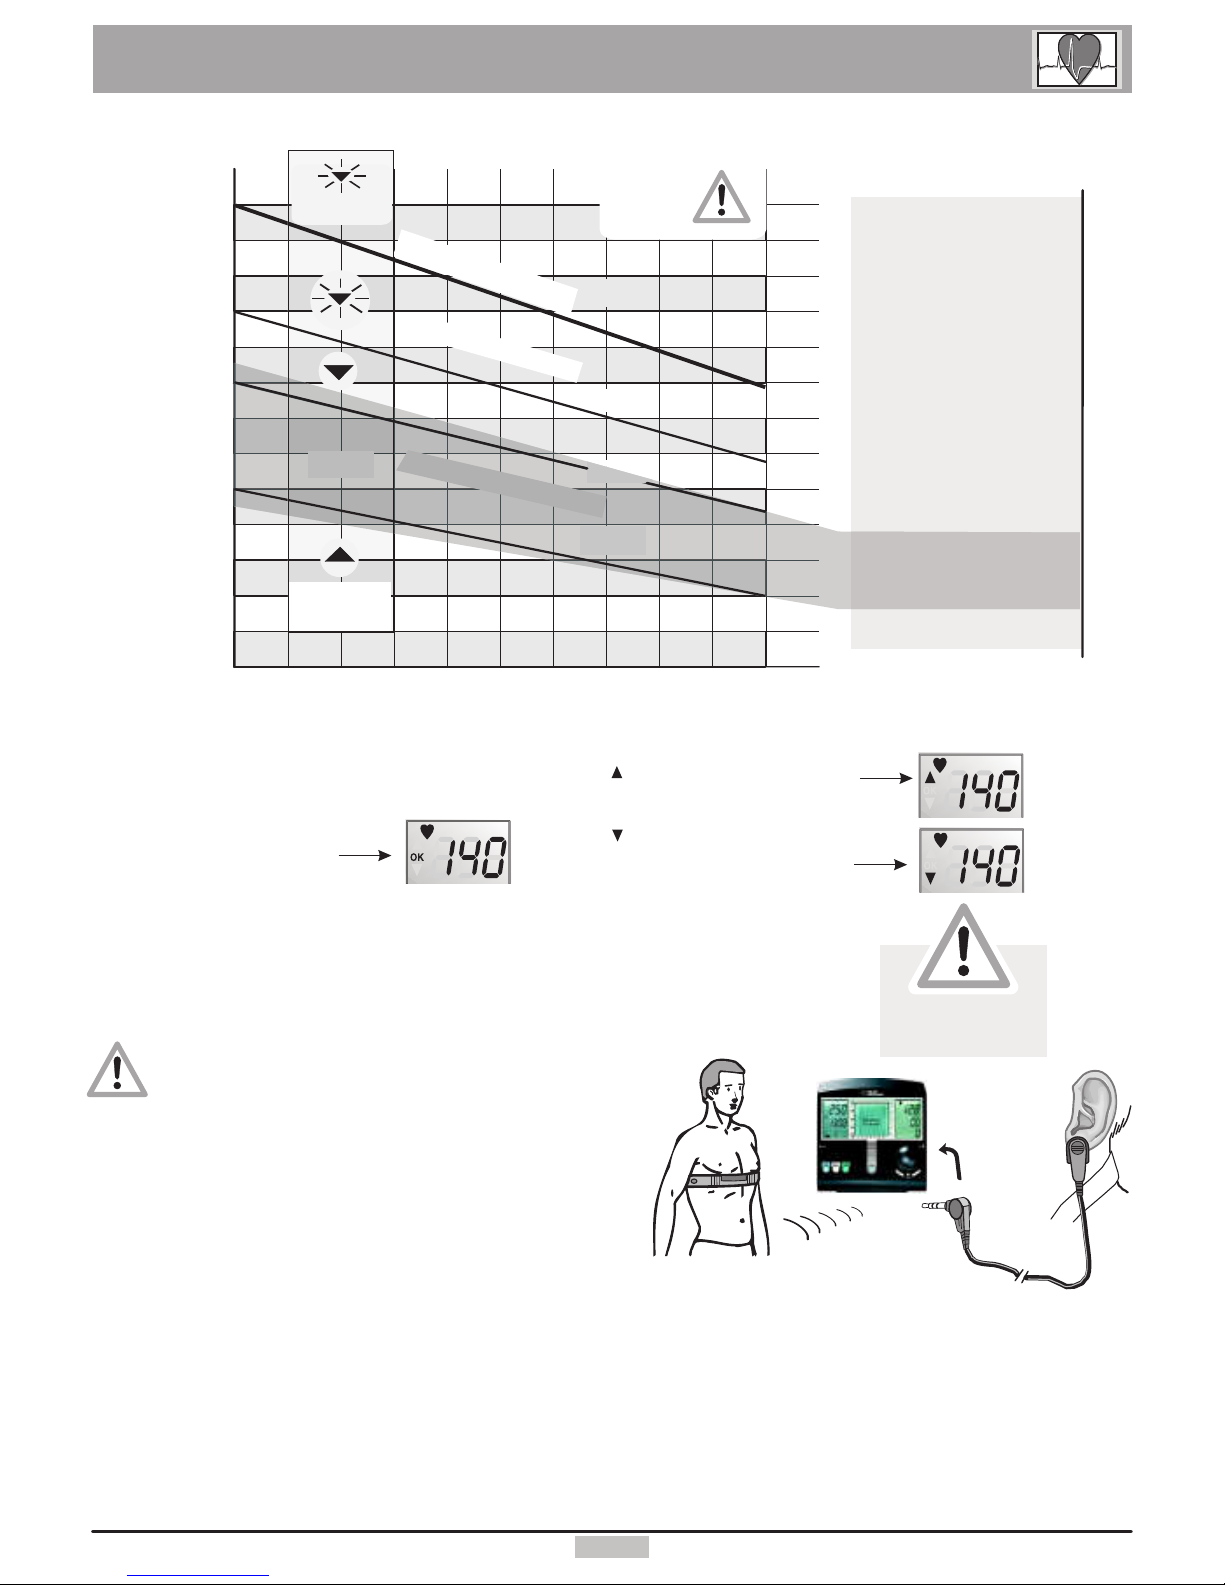
Please take serious care to watch your heart rate while training and not to exceed the limits!
70
80
90
100
110
120
130
140
150
160
170
180
190
200
20 25 30 35 40 45 50 55 60 65 70
100%
85%
85%
60%
OK
75%
Example
for a person 50 years old
or heart rate limit of 170
Heart rate 40 to 101
Heart rate 128 to 144
Danger Zone
Heart rate 145 to 169
Alarm Zone
Heart rate above 170
Aerobic Zone
Heart rate 102 to 127
Health
Hazard!
Alarm zone
Danger zone
Aerobic zone
Heart beats
Age
A v e r y h i g h
h e a r t r a t e c a n
be very dangerous!
Training in the aerobic zone will always be healthy and safe. This zone is
located at 60% to 75% of the maximum heart rate or of the heart rate limit.
You will always achieve your training target optimally if you train in the appropriate
zone, whether your target is the improvement of your fitness level, the reduction
of your body fat content or the development of muscular mass.
the widely accepted recommendation is to
train at 55% to 65% of the maximum heart rate. This zone
is very well suited for weight loss or for returning users after
an extended interruption due to illness.
Plug the connector on the right side of the dashboard,
attach the clip on the other end of the cable to your ear.
Display window 1 will then display your heart rate after
a short delay.
Apply some water on the inner side of the band to the left and right side of the serration and then fasten it to your
chest firmly to prevent it from sliding off and insuring the electrodes are in direct contact with the skin.
If you have in the room many devices that may interfere with the signals of a wireless heart rate measuring device,
then these devices must be located at a distance of at least 1.5m from the heart rate measuring device. If more than
one wireless heart rate measuring systems are used in the same room then only one of these systems may be
located close to the training device.
For beginner:
Heart rate measure using the ear clip
Heart rate measure using the chest band (optional accessory)
Warning! If you have a heart pacemaker you should consult your physician to find out if you can safely
use the chest band transmitter!
OK
OK
Training in the aerobic heart rate zone
“OK” indicates that you the
user is training within the
aerobic heart rate zone.
Whenever the actual heart rate exceeds that of the alarm zone and the heart rate limit for age / limit heart
rate is set to active (see page 5) the system will give a beep signal and the load will be automatically reduced.
The “ ” indicates training above
the aerobic heart rate zone. A blinking
display indicates reaching the alarm zone.
The “ ” indicates training below
the aerobic heart rate zone.
Display set
to heart rate
Beep Signal
8
Training
Watt
Heart rate
Height profiles:
Special programs:
Personal programs:
controlled programs: the applied load in independent of the speed.
controlled programs:
when the heart rate exceeds the set value the load is decreased and vice versa.
not available for this model.
strength and RPM programs.
you can create your own programs.
watt
Programs
Watt
Heart rate
Height profile
Special
Personal Prog
Back
Standard programs:
Cool-down:
Capacity test:
Manual:
you can choose from 28 programs already stored in the machine.
short programs for cool down after the actual training.
use it to test how long you can go under an increasing load.
you can here increase or decrease the load by turning the control button.
watt
Watt
Standard
Cooldown
Performance test
Manual
Back
Built-in programs:
Manual heart rate program:
with the built-in programs the heart rate is directly controlled. The set heart rate
varies in the course of the program and thus the corresponding load. If the heart rate increases
above the set value the load drops automatically; if the heart rate drops below the set value the load
increases.
you decide at what heart rate in pulses per minute you want to train,
and the device will adjust the load so that this value is maintained.
watt
Heart rate
Built-in programs
Manual
Back
Watt:
Heart rate programs:
Speed:
you can create your own program for a load independent of the speed.
you can here develop your own program that will individually control your heart
rate during the course of the program.
create a program controlled by the running speed. When your speed drops below the set value,
the load will decrease, when your speed exceeds the set value the load will increase.
watt
Personal prog.
Watt
Heart rate
Speed
Back
Zurück
Height profile programs: Not available for this model.
watt
Programs
Back
Watt
Heart rate
Special
Personal Prog
Height profile
Strength programs:
Constant RPM programs:
these programs are based on 15 braking levels (1 to 15), and the effort there
is a function of the pedalling speed. The load in watt corresponding to the braking level and speed is
displayed in window No. 5. The load in watt corresponding to the braking level is determined from
the actual speed multiplied by a factor specific to the program and rounded to 5 watt units.
this program was specially developed for joggers, as they want to run at
their own personal jog frequency (speed).
watt
Special
Strength programs
RPM
Back
Programs
menu
menu
Press
key
Select
“programs”
(turn button)
Press
control
button
Press
control
button
Select
“Training”
(turn button)
Note: Training with the ergo_memo-card1 is described in the user manual on the companion CD.
Choose
“Starting point”
(turn)
press
control button
press
control button
When the starting point setting is set to “ON” (see also p. 5) you can
choose the point at which the training will start with the built-in programs.
Select a starting point
Please
choose
start point
watt watt
display sample display sample
9
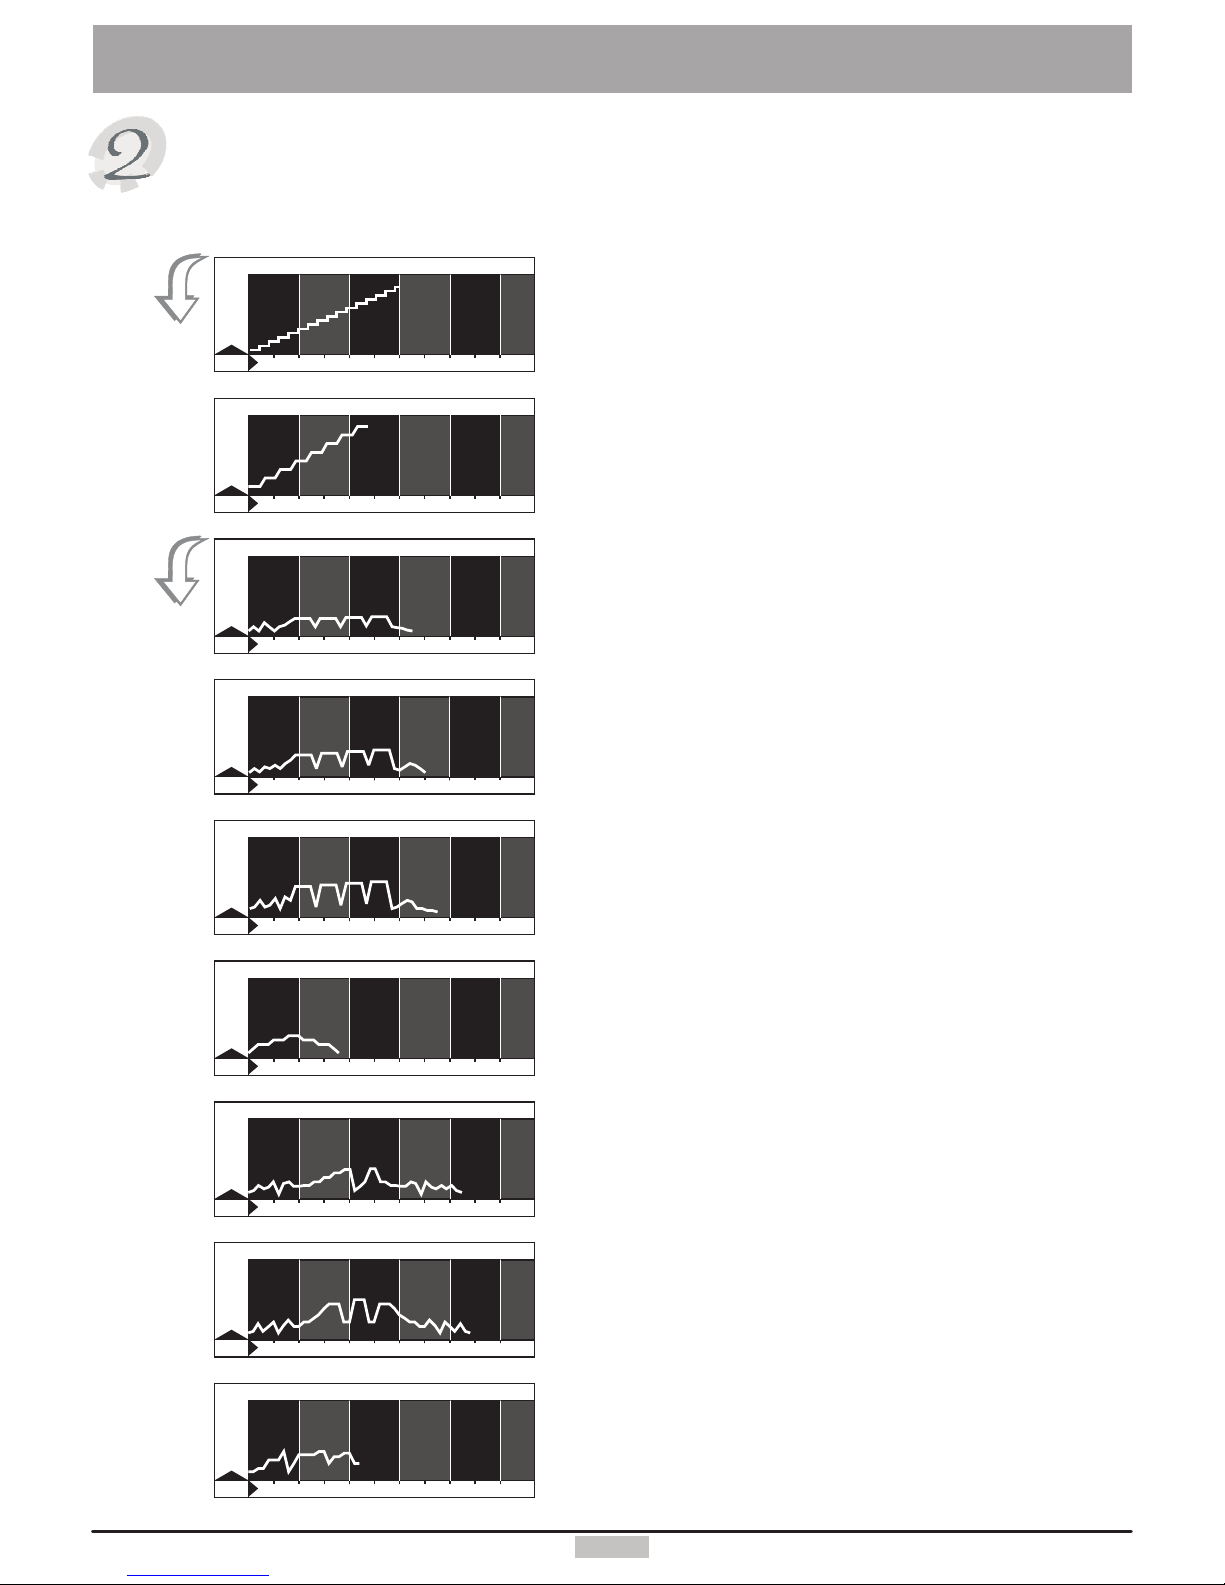
Programs overview
You will find below a presentation of the available programs:
010 20 30 40 50 min
1
WATT
010 20 30 40 50 min
2
WATT
010 20 30 40 50 min
3
WATT
010 20 30 40 50 min
4
WATT
010 20 30 40 50 min
5
WATT
010 20 30 40 50 min
6
WATT
010 20 30 40 50 min
7
WATT
010 20 30 40 50 min
8
WATT
010 20 30 40 50 min
9
WATT
Watt controlled
WATT
WATT
WATT
WATT
Test programs
Standard programs
Program 1
Capacity test 25 Watt / WHO-Standard
32 Min.
Program 0
manual program (Watt)
Program 3
Interval training “Low”
33 Min.
Light load training for women and men
with little training experience
Program 4
Interval training “Medium”
35 Min.
for women and men
with little training experience
Program 5
Interval training “High”
38 Min.
for women and men
with a good training experience
Program 2
Capacity test 50 Watt / BAL-Standard
24 Min.
for trained users
Program 6
Pyramid “Low”
19 Min.
for untrained women and men
age up to 35 years
Program 7
Pyramid “Mid”
43 Min.
for trained users
Program 8
Pyramid “High”
45 Min.
for trained users
Program 9
The Alps
23 Min.
for trained users
Training

10
010 20 30 40 50 min
11
WATT
010 20 30 40 50 min
12
WATT
010 20 30 40 50 min
13
WATT
010 20 30 40 50 min
14
WATT
010 20 30 40 50 min
15
WATT
010 20 30 40 50 min
17
WATT
010 20 30 40 50 min
16
WATT
010 20 30 40 50 min
18
010 20 30 40 50 min
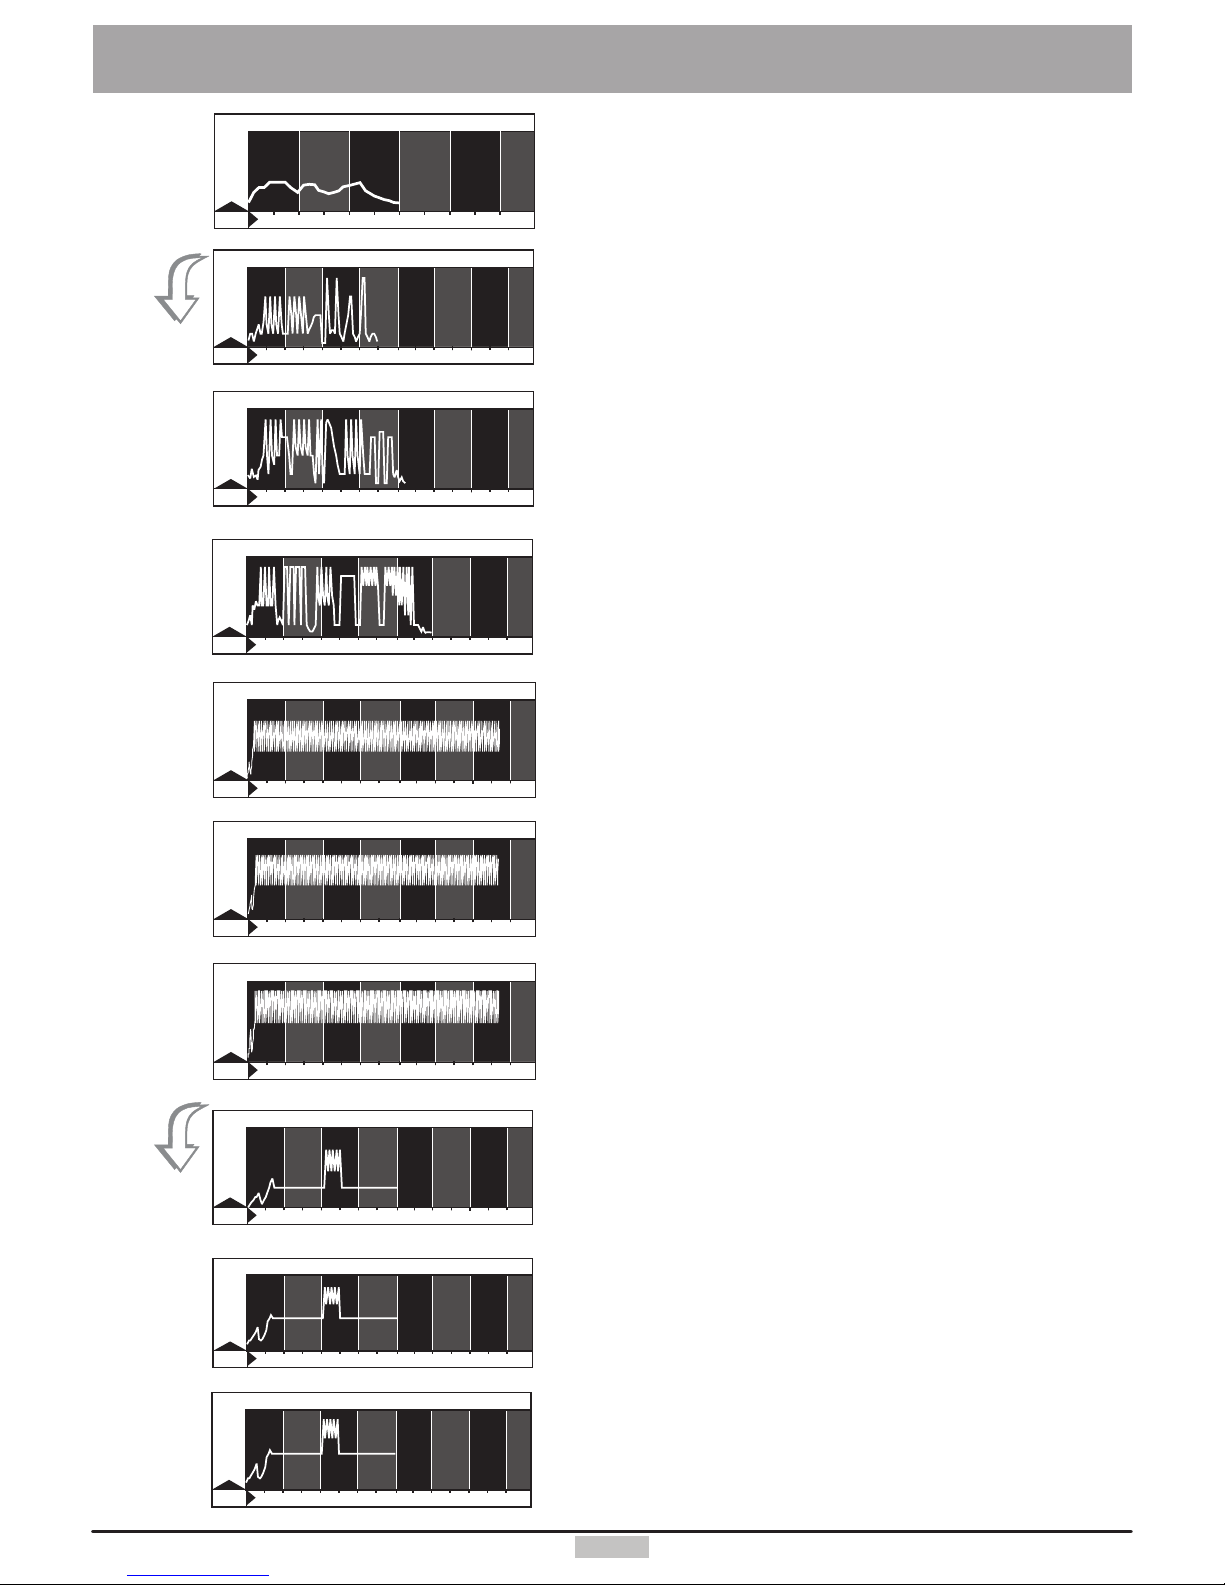
10
WATT
Program 10
Matterhorn
30 Min.
for trained users
Program 11
Mount Everest
40 Min.
for trained users
Program 12
Active Profi Lady
25 Min.
for untrained women
up to 40 years of age
Program 13
Active Sport Lady
22 Min.
for untrained women
up to 60 years of age
Program 14
Beginners Training 1
18 Min.
For young users up to 14 years of age
Program 15
Beginners Training 2
23 Min.
for untrained men up to 70 years of age
Program 16
Body Watching 1
34 Min.
for trained women up to 30 years of age
Program 18
Short 1
20 Min.
suitable for squeezing a training
session between two appointments
Program 17
Body Watching 2
53 Min.
for trained women up to 50 years of age
The duration of this training of almost one hour
requires strong will and will make you sweat!
Training
11
Program 19
Short 2
30 Min.
for trained users, who want
to check out their performance
rainieren
010 20 30 40 50 min
19
Speed training
Endurance programs
020 40 60 80 100 120 140min
21
020 40 60 80 100 120 140min
22
020 40 60 80 100 120 140min
20 Program 20
Easy excursion,
Demanding training for performance sport activity
70 min
This program is suited to improve your endurance, to train for
strength and endurance strength and to improve your tolerance
to lactic acid.
Program 21
Medium excursion,
Very demanding training for high performance sport
84 min
This program with high loads with continually varying loading.
The loading conditions correspond to what is encountered in
competitions.
Program 22
Heavy excursion,
Very demanding training for professional sport
100 min
This program has extreme loading conditions! Please do not
develop any exaggerated ambitions and do not overwork!
WATT
WATT
WATT
020 40 60 80 100 120 140min
23
020 40 60 80 100 120 140min
24
0
20 40 60 80 100 120 140
min
25
Program 23
Easy speed training
134 Min.
Program 24
Medium speed training
134 Min.
Program 25
Heavy speed training
134 Min.
WATT
WATT
WATT
020 40 60 80 100 120 140min
26
0
20 40 60 80 100 120 140
min
27
020 40 60 80 100 120 140min
28
Program 26
Endurance load test
“Performance sport”
80 Min.
Program 27
Endurance load test
“High performance sport”
80 Min.
Program 28
Endurance load test
“Professional sport”
80 Min.
WATT
WATT
WATT
Training

12
Program 31
long basic endurance program
60 Min. / max. 140 pulses / min.
Endurance training for women and men with training experience
50
100
150
200
010 20 30 40 50 60 70 min
31
PULS
Program 32
Basic endurance program with peak loads
50 Min. / max. 160 pulses / min.
Demanding endurance training for women and men with training
experience
50
100
150
200
010 20 30 40 50 60 70 min
32
PULS
Program 36
Step test with 10 min load duration
60 Min. / max. 150 Pulses / min.
Load test for the leisure and sport zone
50
100
150
200
010 20 30 40 50 60 70 min
36
PULS
Program 37
Senior I, low heart pulse rate
25 Min. / max. 120 Pulses / min.
This program is suited for pulse rate characteristics of senior users
50
100
150
200
010 20 30 40 50 60 70 min
37
PULS
Program 38
Senior II, low heart rate
40 Min. / max. 130 Pulses / min.
Demanding endurance training in the lower heart rate zone for active
senior users
50
100
150
200
010 20 30 40 50 60 70 min
38
PULS
Program 34
Interval program
(average load level)
60 Min. / max. 160 Pulses / min.
Interval training in the basic zone for women and men with training
experience
50
100
150
200
010 20 30 40 50 60 70 min
34
PULS
Program 35
Interval program
(average load level)
70 Min. / max. 170 Pulses / min.
very demanding interval training in the higher heart pulse rate zone
50
100
150
200
010 20 30 40 50 60 70 min
35
PULS
50
100
150
200
010 20 30 40 50 60 70 min
33 Program 33
Interval program basic endurance
35 Min. / max. 140 pulses / min.
Endurance training for women and men with little training experience
PULS
50
100
150
200
010 20 30 40 50 60 70 min
29
PULS Program 29
preventive, easy short program
20 Min. / max. 130 pulses / min.
light load training for women and men
with little training experience
50
100
150
200
010 20 30 40 50 60 70 min
30
PULS Program 30
Average Optimal Program
30 Min. / max. 130 pulses / min.
light loading training for women and men
with little training experience
Heart rate programs
0105 15 20 25 min
42
0105 15 20 25 min
43
0105 15 20 25 min
44
Cool-Down Programs are the perfect way to end a training.
Program 42
Easy cool-down
10 Min.
For women and men with little training experience
and following a very light training load
Program 43
Medium cool-down
15 Min.
For women and men with training experience a
nd following an medium to heavy training load
Program 44
Heavy cool-down
20 Min.
For athletes with high performance training. The program
allows an accelerated regeneration after the most heavy training loads.
WATT
WATT
WATT
Program 45
Program 46
Program 47
Program 48
Program 50
Program 77
Program 78
Program 79
Conconi 1
Conconi 2
Cardio program
RPM program
strength program
personal watt controlled program
personal heart rate controlled program
personal speed controlled program
Training
13
watt
Personal prog.
Back
Watt
Heart rate
Speed
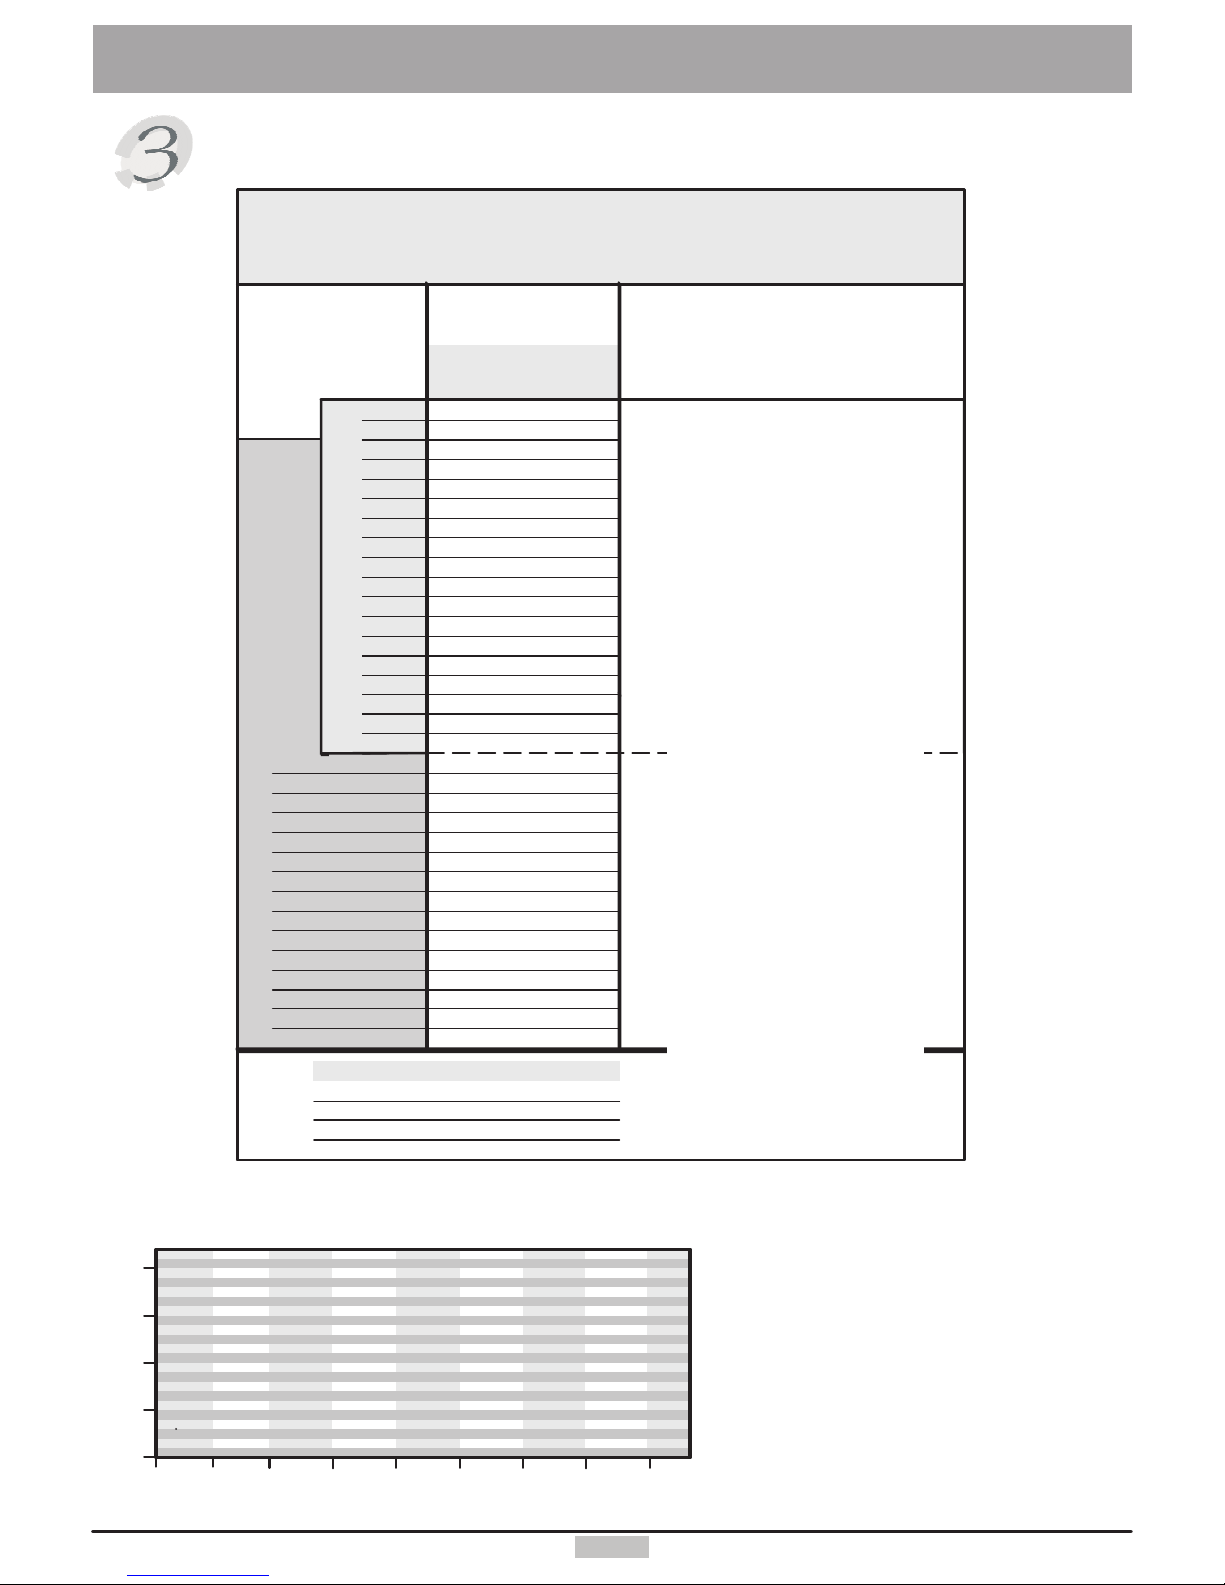
Every user can create one program of each of the following: watt, heart rate and speed controlled
pro-gram. Users number 1 to 3 can create programs with a duration of up to 60 minutes, user
number 4 can create programs with a duration of up to 240 minutes. Start by choosing the type
of program you want to create. Make copies of the blank diagrams provided at the end of this
user manual (page 42) and use them to design your programs.
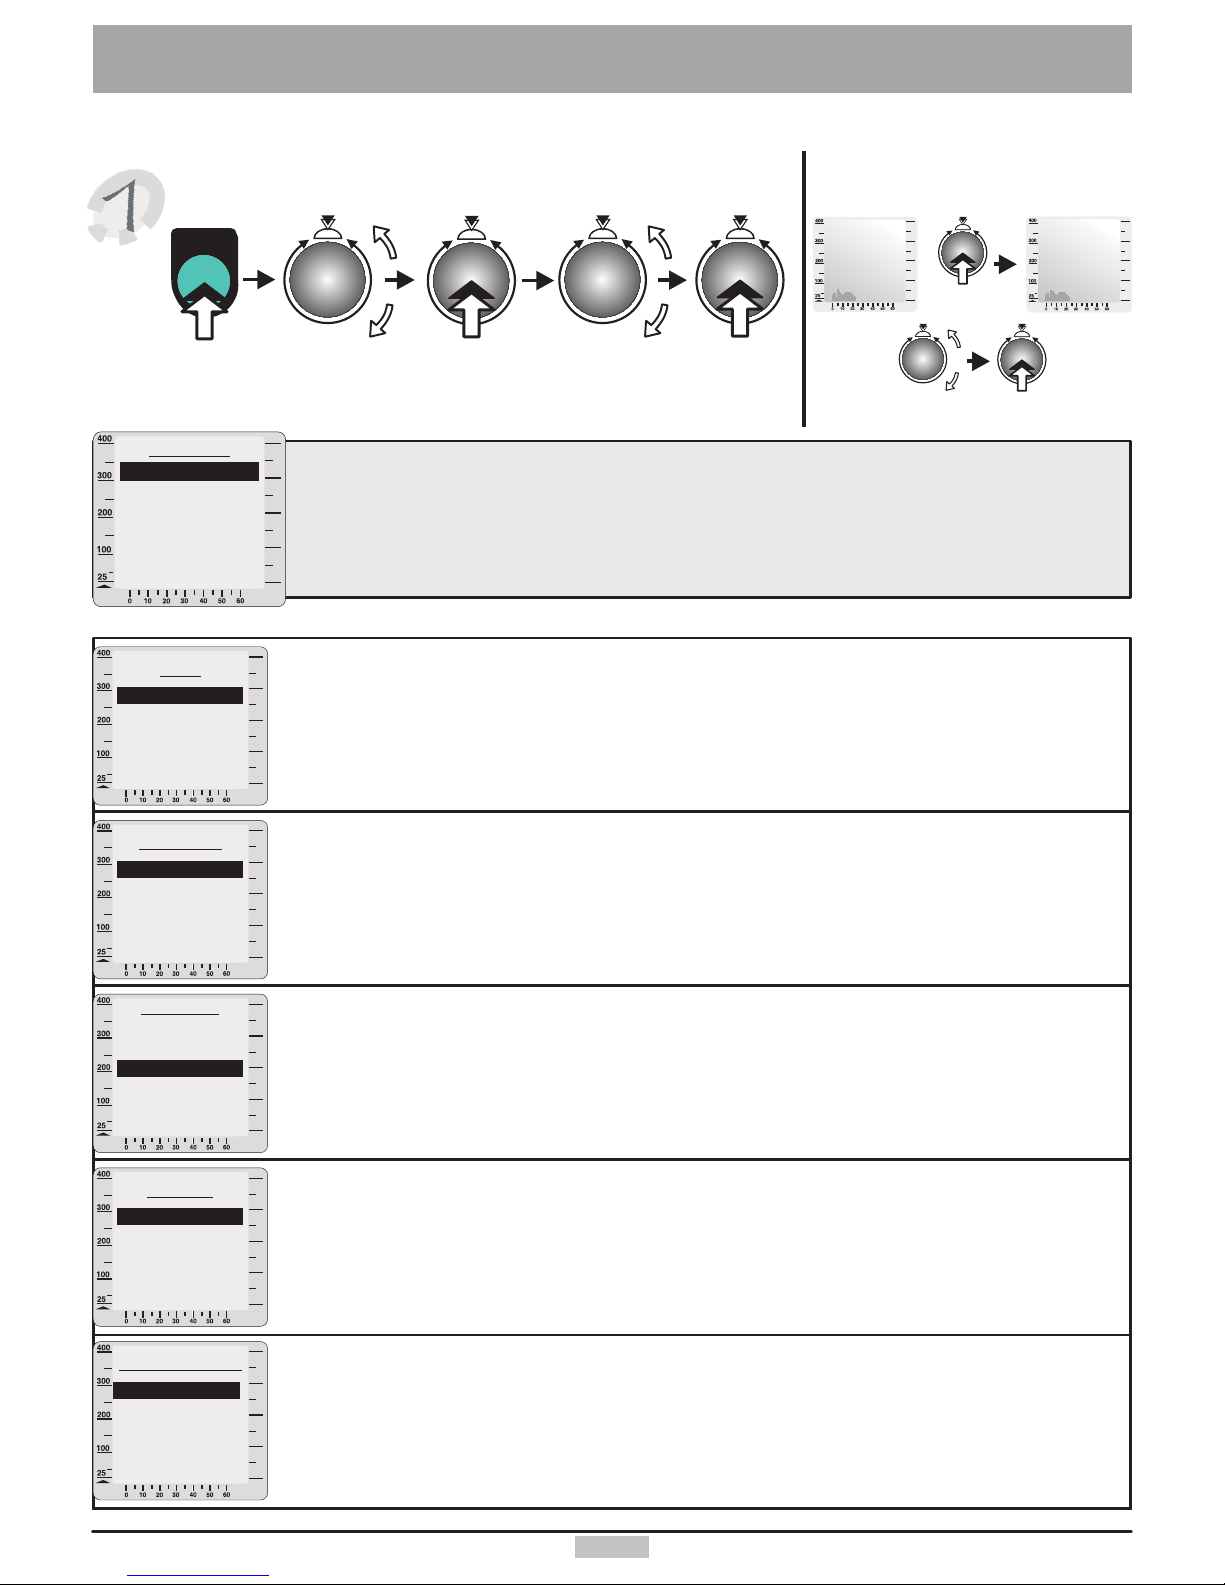
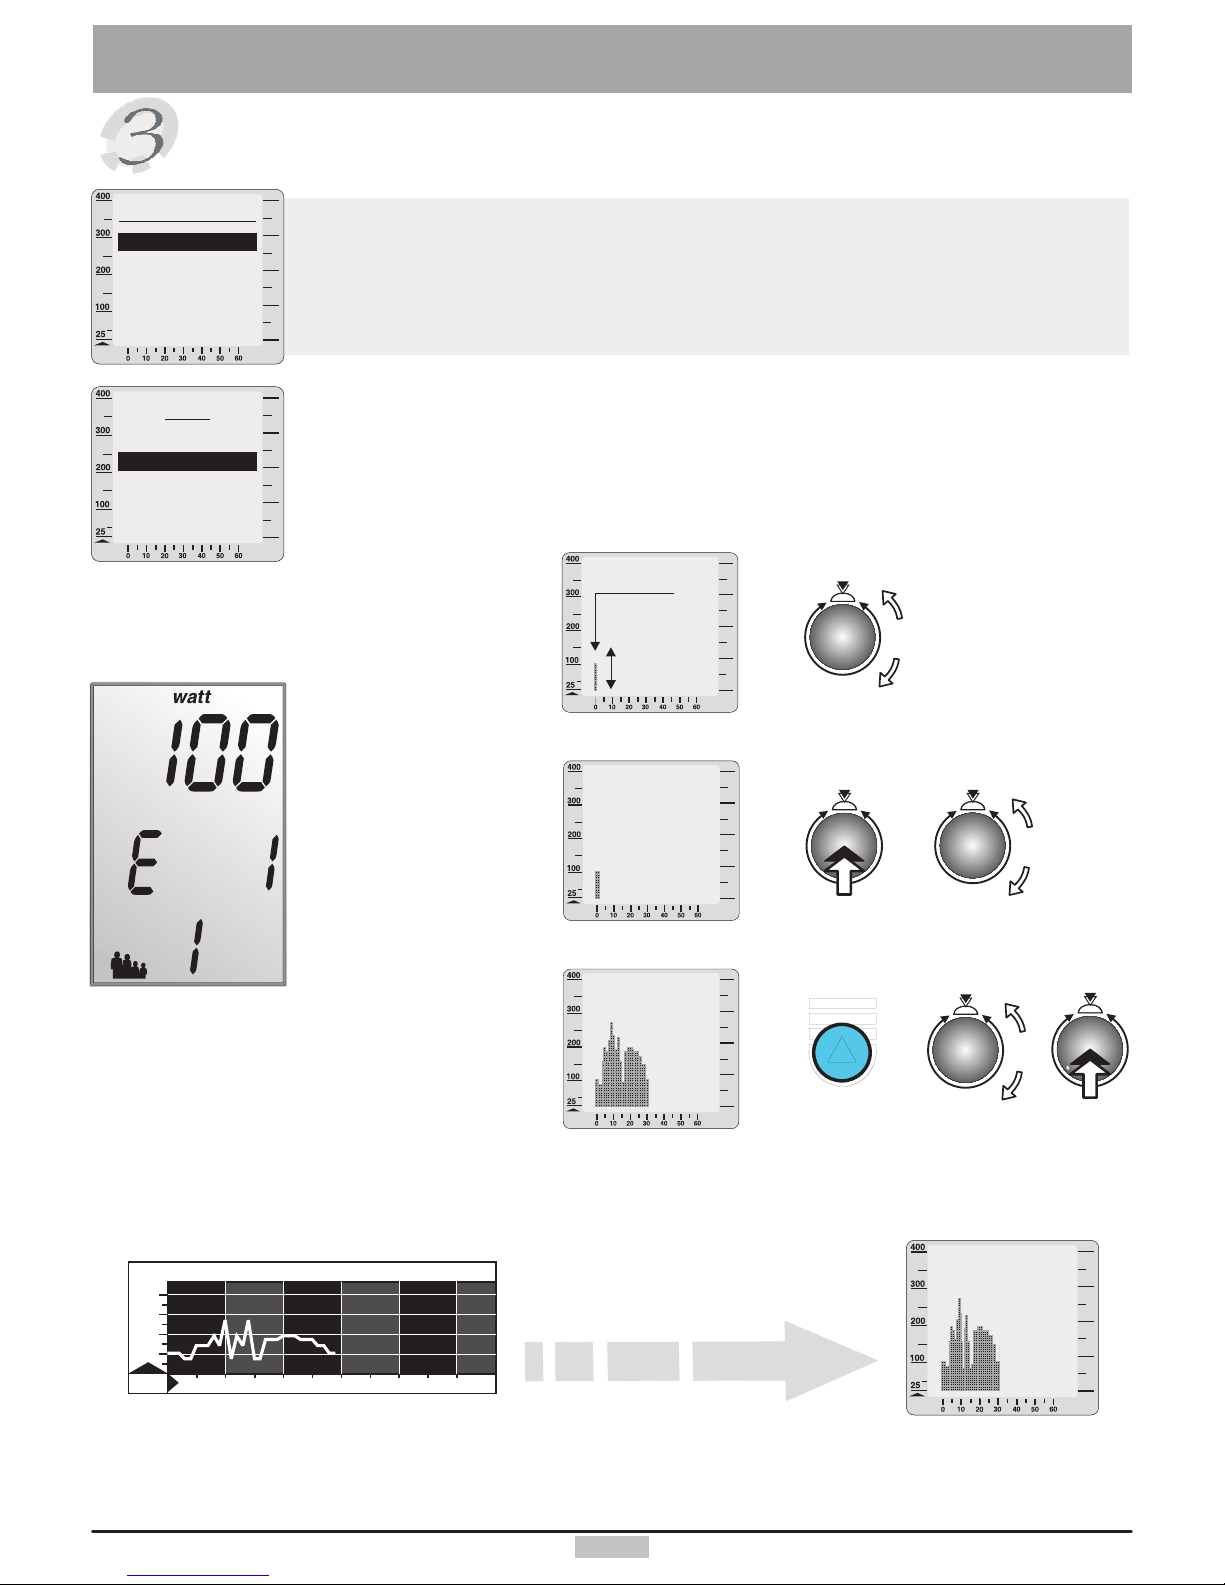
Here is, for instance, the procedure to create a watt controlled program:
Select Watt.
Select Modify and start “drawing”.
Turn the control button to the left/right to increase/decrease the height of the bar on the display
until you set the bar to the proper height.
Every drawn bar corres-
ponds to a training duration
of one minute. Display win-
dow No. 2 will show the mi-
nute at which you are now
located.
When you set up this step
(bar) to the required watt
value press the control but-
ton. Repeat the same proce-
dure with the following bars.
Repeat this procedure until
you finish creating your program.
When your program is finished press the function key and answer the question:
“Erase the bars starting here?” Answer “Yes” or “No” (meaning: program ends either after the last value/bar
entered or, if pre-sent, after the last existing value/bar) and select Training.
The same procedure applies also for the modification of an existing personal program.
For heart rate controlled programs you design a heart rate curve instead of a watt curve.
If the heart rate measured during the actual training is below the curve the load will be raised and vice versa.
For speed controlled programs you design a speed curve. When the actual speed during the training is below the curve
the load is reduced and vice versa.
How to create your own personal programs
watt
Watt
Training
Modify
watt
watt
1 min.
watt
A program designed on the blank diagram to
look like the illustration to the left will appear
on the screen as illustrated to the right.
100
200
300
400
010 20 30 40 50 min
WATT
Back
watt
…
Display example
for entry step 1
Training
14
Training data
watt watt
Training data Actual
Back Back
Actual
Total
Weight
Fat content
Coaching
Ø-kmh 23.0
Max-kmh 31.0
Time 56.4
Distance 18.0
You review the training data of the selected user:
- Actual: the training values of the last training
- Total: the values of all the training units together
- Weight: the distribution over a period of 60 days and of 1 year
- Fat content: the distribution over a period of 60 days and of 1 year
- Coaching: the values of the last capacity test and the actual coaching stand
if you don't run a program to its end you should press the menu key
before switching the device off in order to save the training data.
Note:
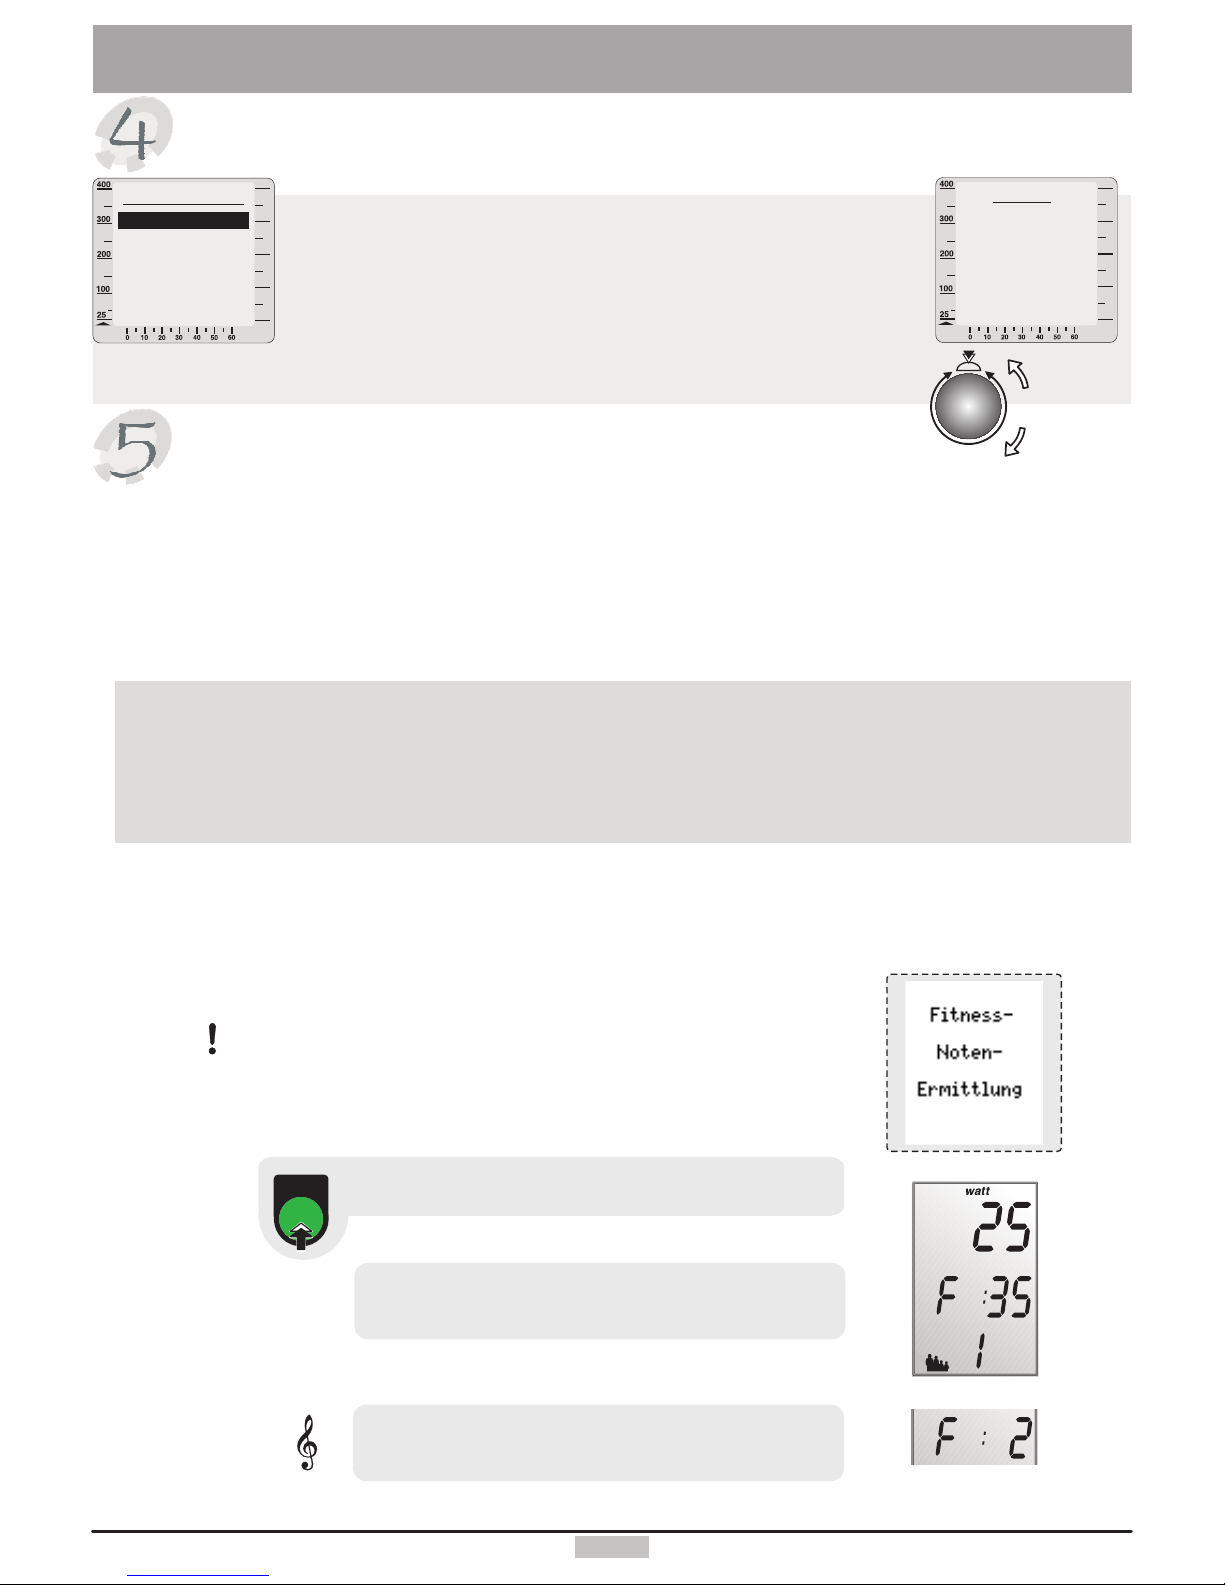
Fitness mark
The device can carry out an evaluation your .
The measurement principle is based on the fact that the pulse rate falls faster within the first minute following a
load period for healthy, well-trained users than for healthy, less trained users.
If the user presses the Fitness key during a training session, the present training will be interrupted and the load
will be . The graphical screen will display the message “Fitness mark
determination”. The drop in pulse rate will be measured (see window no. 2) and the mark computed
according to the following scheme and displayed:
fitness
lowered to 25 watts within a few seconds
within 60sec
The mark of is awarded if no usable result can be measured. After the evaluation process the training
program resumes at the same position at which the fitness test was started. The load in Watt is raised within a few
seconds to its value just before the evaluation and the training can be continued.
“F 0”
A fitness evaluation is not possible after the training session is finished.
The measuring process takes one minute and its progress is displayed.
1.
A pulse measuring device (pulse sensor ear clip or the cardio sensor chest belt)
must be connected and functional during the whole fitness evaluation process.
After one minute window no 2 F markdisplays the
and the system plays a short melody.
Window No. 2 “F” 1 to
60
displays an , and a timer from
seconds during the measurement process.
4.
Press the fitness key.
5.
Fitness evaluation process
2.
3.
Continue pedalling “loosely” at the load of
25 Watt during the measurement process.
Example for
fitness mark 2
Graphic window
The fitness mark F1 is awarded for a pulse rate drop of more than 25.0% within 60 sec
The fitness mark F2 is awarded for a pulse rate drop of 20.0% to 24.9% within 60 sec
The fitness mark F3 is awarded for a pulse rate drop of 16.0% to 19.9% within 60 sec
The fitness mark F4 is awarded for a pulse rate drop of 12.0% to 15.9% within 60 sec
The fitness mark F5 is awarded for a pulse rate drop of 8.0% to 11.9% within 60 sec
The fitness mark F6 is awarded when the pulse rate drop is less than 8% within 60 sec
Train at least in the .15 minutes OK-area
fitne ss
Abbrechen
Display example for
actual training data
Other
Training
Data
(turn)
(see also the menu diagram pages 39/40)
Training

Description
The Conconi test was originally developed for running to control the training intensity and to determine the
performance ability. This test uses the fact that the heart pulse rate increases linearly with the load. This is true
only up to a certain pulse rate and load. The pulse rate curve deviates from the linear if the load is further increased
above this point (see fig. 3 page 18). This deviation point indicates the so-called anaerobic threshold according to
researches by Conconi (for the Conconi test also known as the Conconi threshold).
The anaerobic threshold is the point where the organism produces more lactic acid than it can eliminate. This
means that, from this point, lactic acid starts to accumulate in the body and eventually leads to a load
collapse. The threshold is used to determine the training domains and to evaluate the performance ability
(you will find some practical hints about determining the training domains below).
The main advantage of the Conconi test, as compared to e. g. the lactate performance test, is the small-ness
of the necessary financial, technical and personal investment. At this point we should also mention that the
Conconi test is controversial among many training professionals. It is widely used in Italy and Switzerland.
Others have a critical approach toward the Conconi test for the following reasons:
A maximum loading is necessary when undergoing the test. For this reason it is recommended to pass a
medical examination before taking the test. The Conconi test should only be taken by healthy individuals.
About 20% of all the tests do not show a deviation point. Sometimes the pulse rate increases linearly up to
more than 190 pulses per minute.
Nevertheless, the Conconi test permits an easy and accurate control of the training for many athletes, and an
evaluation of their performance ability.
The Conconi test should in principle starts with an easy start-up program. One of the easier and shorter
warm-up programs should be used here. The pulse rate should not exceed 130 pulses per minute during
warm-up. Since the performance ability of users is widely spread, two special programs are provided for
taking the Conconi test.
begins with a load of 60 watts and is intended for users with lesser training experience, while
is intended for the more capable users. The load is increased by 20 watts every program step for
both programs
You will find a test protocol on page 17. Write down the pulse rate values achieved and the corresponding
load levels (in watt). You can then fill in the values for for the Conconi test (program 45, from 60 to
400 watts) in the upper part of the protocol.
For the higher Conconi test corresponding to (program 46) fill in the heart rate values for load
values of 120 to 700 watts maximum.
The test should be terminated whenever the user feels he reached his maximum load capacity. An overload
should absolutely be avoided!
Taking the Conconi test with the :
Program 45
program 46
.
protocol 1
protocol 2
ergo_lyps
The Conconi Test / E
15
Conconi-Test

16
Conconi-Test
Test programs
1
02345 6 78 9 10 11 12 13 14 15 16
100
200
300
400
0
Watt Conconi-Test program 46
min
2,72 3,82 4,80 5,68 6,48 7,22
7,88
9,10
9,65
10,17
11,13
10,67
11,57
8,52
1,47
1
02345 6 78910 11 12 13
100
200
300
400
0
Conconi-Test program 45
Watt
min
2,0 3,50 4,70 5,70 6,55 7,30
7,97
8,57
9,12
9,62
10,08
10,52
10,92
11,28
11,63
11,97
12,28 12,58
Press
Control
button
Press
Control
button
Select
“Training”
(turn)
Select
“Performance test”
(turn)
Select
“Programs”
(turn)
Select
45 or 46
(turn)
menu
menu
Press
key
Select
“Watt”
(turn)
Press
Control
button
Press
Control
button
Press
Control
button
17
Conconi-Test
Test protocols
120
140
160
180
200
220
240
260
280
300
320
340
360
380
400
60
80
100
120
140
160
180
200
220
240
260
280
300
320
340
360
380
400
TEST PROTOCOL / Conconi Test ergo_lyps 8080 TRS 3
Name............................................. Date.......................... Time...................
Power in Watt
Heart rate at rest .......................
Heart pulse rate
in beats / min
Notes about the test
PROTOCOL 1 / Program E 45
PROTOCOL 2 / Program E 46 (from 120 to )
400 Watt
Program E 45 ( 60 - 400 Watt )
Program E 46 ( 120 - 400 Watt )
Heart pulse rates
after 1 minute
after 2 minute
after 3 minute
0400
300
200
100
50
100
150
200
0
Conconi test program 45 (blank diagram)
Heart rate
Watt
Heart rate in beats/min
Maximum loading is necessary when running the
Conconi test. Therefore we recommend
undergoing a medical examination before taking
the test. Only healthy individuals may take the
Conconi test! There is no valid correspondence
between the Conconi threshold and the lactate
threshold.

30022018014010060
80
90
100
70
260
38034030022018014010060
80
100
120
140
160
180
200
260
Evaluating the Conconi test
After the achieved heart rates have been properly recorded in the protocol, you can proceed with the
graphical evaluation of the Conconi Test. Therefore construct a co-ordinate system as shown in
below. The horizontal axis represents the performance in watt, starting with the lowest test value.
For the Conconi test program 45 this value is, for instance, 60 watts. The vertical axis represents
the heart pulse rate for every test step. In the example below the heart rate for the first test step (60 watts)
is around 105 beats per minute, for the second step (80 watts) it is 120 beats per minute, etc.
After all the heart pulse rate points have been represented in the co-ordinate system, proceed with joining
the individual points to form the line representing the linear increasing portion of the curve. In the figure this
is the straight line with the steep slope.
The higher points (higher load steps) will generally lie underneath this line. These points can also be joined
by a straight line as shown in the figure (this is the second line with the lesser slope).
figure 1
(X axis)
(Y axis)
The intersection of these two lines is shown in fig
1 by an arrow.
This intersection point is called the deflection
point and corresponds to the anaerobic Conconi
thresh-old. In fig. 1 this threshold is at 181 beats
per minute. This heart rate is determined by
drawing a straight line parallel to the lower axis
(X axis) starting at the deflection point toward left.
The point where this line intersects with the
vertical Y axis (heart rate) is the point we want to
determine (in our example 181 beats/min.).
The individual training domains can be determined
using the heart rate at the deflection point (in our
example 181 beats/min.) as shown in figure 2. The
heart rate at the deflection point is assigned a value
of 100%.
Description
Heart pulse rate in beats / min
Power in Watt
Fig. 1: Graphical evaluation of the Conconi Test
Heart rate in %
Conconi threshold = 100 %
Compensation
WSA
GA 2
GA 1
80%
Fig. 2: Determining the training domains
Performance in watt
18
Conconi-Test
Table of contents
Other Daum electronic Elliptical Trainer manuals


Popular Elliptical Trainer manuals by other brands

Garmin
Garmin Forerunner 310XT - Running GPS Receiver Declaration of conformity

Schwinn
Schwinn Fitness A40 owner's manual

Precor
Precor 5.17 Service manual

NordicTrack
NordicTrack E 11.5 Elliptical Manuel de l'utilisateur

Sportplus
Sportplus SP-ET-9910-W-iE Instructions for use

Impex
Impex MARCY PL-21930 owner's manual


