manuals.online logo
Brands
  1. Home
  2. •
  3. Brands
  4. •
  5. Davis & Waddell
  6. •
  7. Grill
  8. •
  9. Davis & Waddell DES0266 User manual

Davis & Waddell DES0266 User manual

essentials
2 in 1 Electric BBQ Indoor and
Outdoor Grill
DES0266
Thank you for choosing the Davis
& Waddell 2 in 1 Electric BBQ Indoor
and Outdoor Grill. To ensure proper
operation and to maintain the lifespan
of your appliance, please read these
instructions carefully before use.
Features
• Removable non-stick cooking grill
• Easy access drip tray
• Easy assemble powder-coated
steel frame
• Adjustable thermostat
• Indicator light
• Storage shelf
• Windshield
Parts Included
• Windshield
• Removable cooking grill plate
• Grill base
• Drip tray (behind)
• Support legs
• Storage tray
• Screws
• Wing nuts
Important Safety Instructions
WARNING: Charcoal or similar
combustible fuels must not be
used with this appliance.
This appliance is intended for Indoor
and outdoor household use only.
Children should be supervised to ensure
that they do not play with the appliance.
• Read all the instructions before
operating appliance and retain for
future use
• The supply cord should be regularly
examined for signs of damage, and if
the cord is damaged, the appliance
must not be used
• The appliance must be supplied
through a residual current device
(RCD) having rated residual operating
current not exceeding 30 mA
• The appliance is to be connected to
a socket-outlet having an earthing
contact
• The symbol means: CAUTION:
Hot Surface. Do not touch.
• This appliance is not to be operated by
means of an external timer or separate
remote-control system
• Do not immerse appliance, plug or
cord in water or any other liquid
• Do not allow cord to touch hot
surfaces
• Unplug appliance when not in use or
when being cleaned
• Allow to cool before cleaning and
storing
• Slide thermostat control to ‘MIN’ with
light o to turn o appliance before
unplugging
• Pull out from power outlet by grasping
the plug - do not pull the cord
• If the supply cord is damaged, it must
be replaced by qualified persons in
order to avoid a hazard
• Do not use an extension cord
• The appliance should always be used
on a hard and stable surface, such as
a table or benchtop or using stand
provided
• Do not use appliance for anything
other than its intended use
• The heating element surface is subject
to residual heat after use
• Appliance will become hot during use.
Use oven mitts or tongs if handling is
required
• Do not disassemble other than as
specified by assembly instructions
• Do not use a damaged appliance
• Warning: Avoid spillage on the
connector
• Caution: To prevent damage to the
appliance do not use alkaline cleaning
agents when cleaning, use a soft cloth
and a mild detergent
• Store these instructions for future
reference
How To Assemble
Indoor Grill
Place the cooking grill plate on the
indoor grill base so that both drains are
vertically aligned and lock into place, so
no sliding will occur.
BBQ Frame
Note: Only attach grill to frame when
grill is unplugged and cool.
1. From below, insert one of the support
legs through one of the openings at
the corners of the shelf.
2. Push the support leg up until the
holes in the shelf and support leg are
vertically aligned.
3. Insert a screw through the hole
from the front, secure the screw by
screwing the provided wing nut
onto it.
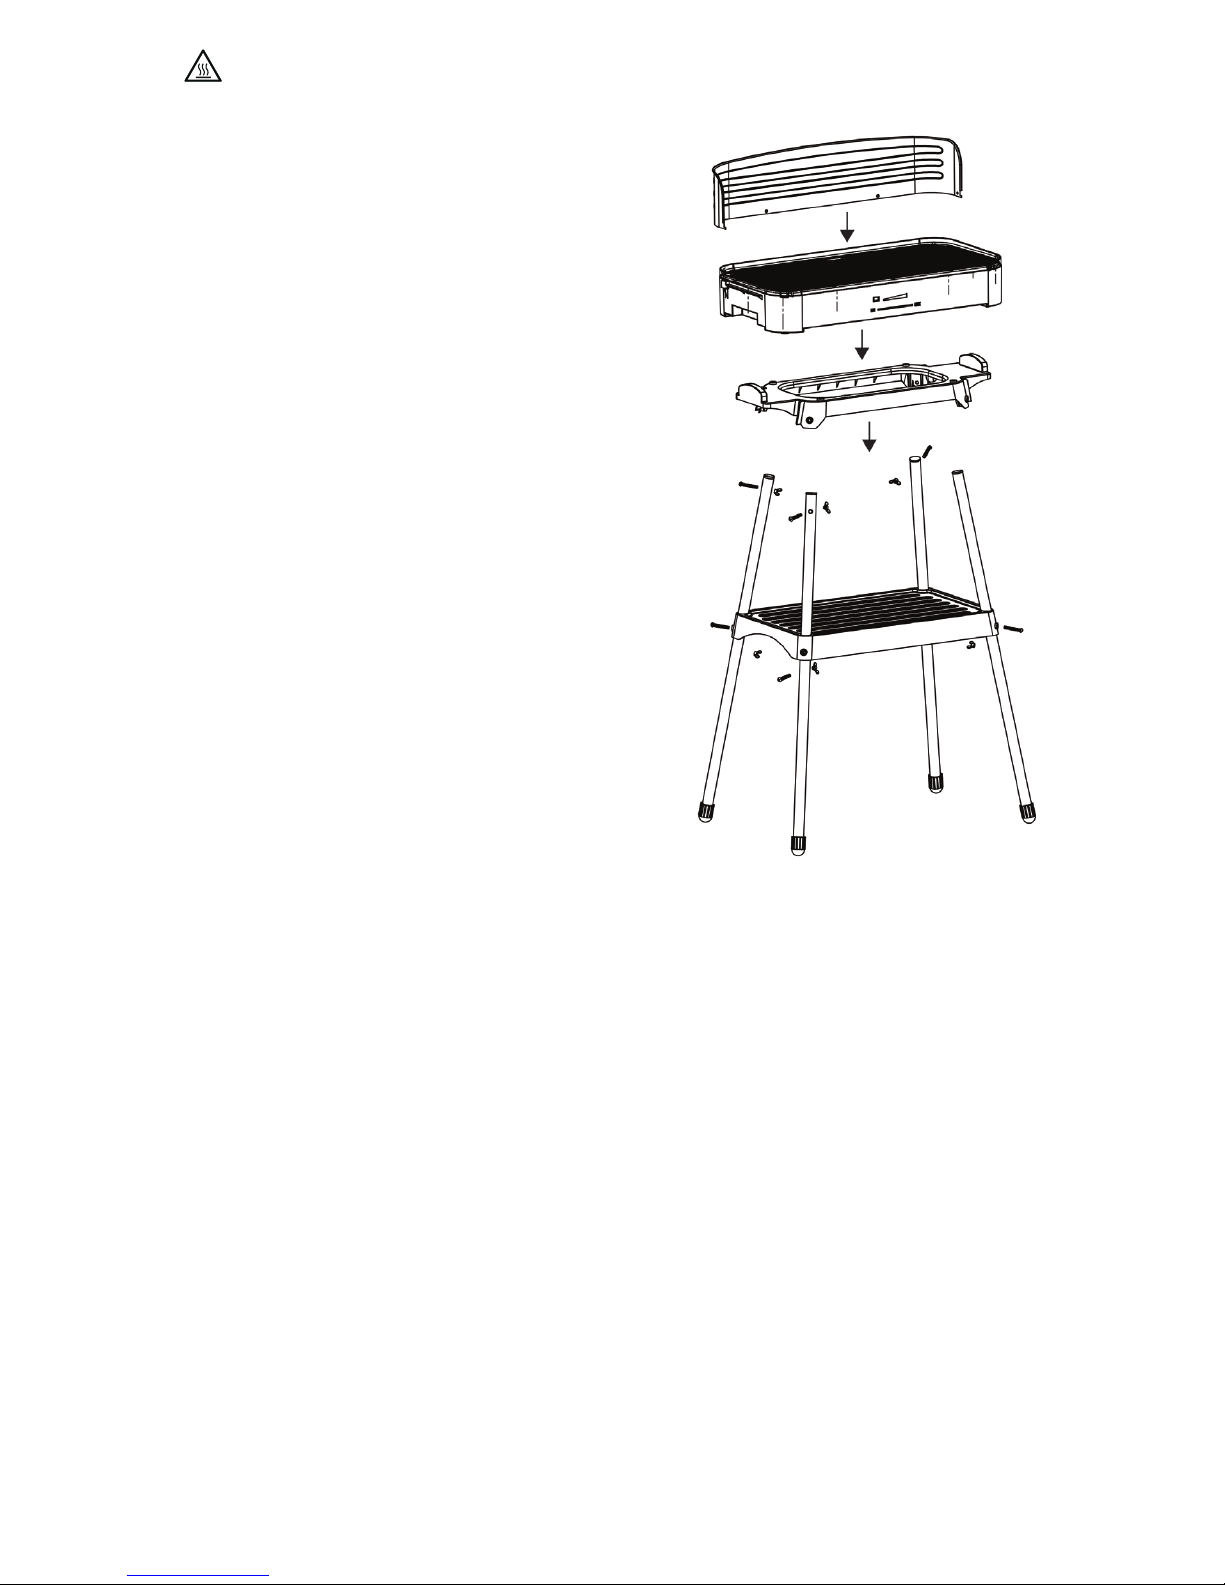
5. Mount the three other support legs in
the same way.
6. Place the tray on the four support
legs from above so that the support
legs run into the guide bars. Ensure
the holes in the support legs and the
guide bars are vertically aligned
7. Insert a screw through the hole
from the front, secure the screw by
screwing a wing nut onto it.
8. Follow the same steps for all other
corners.
9. Place the grill on the support frame.
10. Make sure that the grill locks into the
support frame so no sliding occurs.
Windshield
1. Place the side ends of the windshield
on the left or right side of the grill
base, push forward to lock in.
2. From above, push the back wall of the
windshield into the two windshield
brackets on the back wall of the grill
tray.
Operating Instructions
Before First Use
Wash the grill plate and windshield
(refer to Cleaning instructions).
Assemble grill using the How To
Assemble instructions. Set up in a
suitable location. Connect the grill
power cord to a socket. Slide the
thermostat control to MAX setting.
Let the grill heat up at the highest
temperature setting for 10-15 minutes.
Switch grill o by sliding thermostat to
MIN and unplugging power cord from
mains. Allow unit to cool.
To Cook
Slide the thermostat control to a level
that suits what you are cooking (e.g.
when barbecuing delicate foods such
as fish or mushrooms, leave toward the
left). The grill will now automatically
heat up when thermostat control is slid
to correct temperature. As soon as the
selected temperature setting is reached,
the red indicator light will go out. The
heating process will automatically end.
As soon as the selected temperature
setting drops, the red indicator light will
illuminate again. The heating process
will then resume until the grill returns
to selected temperature ensuring the
heat is always maintained. For best
results, let the grill heat up for 10-15
minutes before sliding to your preferred
temperature.
Switch grill o, as previously described.
Let the grill cool o completely. Clean
the grill as described in below before
storing.
Cleaning
Prior to first use we recommend you
wash the grill tray in warm soapy water,
rinse and dry thoroughly. Let the grill
cool o completely and remove plug
from socket. Slide out the fat drip tray
and empty. Remove windshield if on.
Remove grill plate from the base. Wipe
the outside of the base with a damp
cloth. Clean the grill plate, the fat drip
tray and the windshield with warm
water and detergent. To preserve non-
stick coating do not use metal scourers
or harsh chemicals. Do not cut food on
cooking grill and use wood or silicone
utensils. Not dishwasher safe.
Contact
Albi Imports
87 Chifley Drive, Preston, Victoria 3072
E: [email protected]om.au
P: +61 (03) 9474 1300
Recipes
Sweet Potato Wedges
Ingredients
500g sweet potatoes, washed and dried
2 tsp. oil
2 tsp. finely chopped coriander
BBQ rub
1 tbsp. salt
1 tbsp. white sugar
1 tbsp. brown sugar
1 tbsp. mustard powder
2 tsp. garlic powder
2 tsp. cayenne pepper
½ tsp. cinnamon
Method
1. Leaving skin on place sweet potatoes
in a pot, covered with cold salted
water then bring to a boil. Simmer
until slightly soft when pierced with a
fork, about 10 minutes. Drain well and
allow to cool.
2. Cut the sweet potatoes into small
wedges. Transfer the cut sweet
potatoes to a large baking sheet and
drizzle with oil, tossing to coat evenly.
Turn on grill to medium-high heat.
3. Sprinkle BBQ rub evenly over the
oiled sweet potatoes. Toss to create
an even coat of BBQ rub on wedges.
4. Remove the sweet potatoes from
the baking sheet and transfer them
directly onto the hot grill. Cook for
3 - 4 minutes. Flip, and cook for an
additional 3 - 4 minutes on the other
side.
5. Remove the sweet potatoes from
the grill, transfer to the baking sheet
previously used and sprinkle with
coriander. Serve.
Chicken Skewers
Ingredients
Marinade
1 medium clove garlic, finely minced
1 tsp. ground cumin
1 tsp. chili powder
½ tsp. crushed red pepper flakes
1 tsp. smoked paprika
2 tbsp. brown sugar
2 tbsp. extra virgin olive oil
2 tbsp. soy sauce
2 tbsp. fresh lime juice
2 tbsp. finely minced fresh ginger
Chicken
1kg diced boneless skinless chicken
thighs
Method
1. Combine all marinade ingredients in a
medium-size bowl. Add chicken to a
zip lock bag with half of the marinade.
Massage bag well to evenly coat
chicken with marinade. Refrigerate for
at least 30 minutes or over night for a
stronger flavour.
2. Heat grill to medium high. Thread
chicken onto skewers.
3. Clean grill surface and oil with spray
if you wish. Place skewers on grill and
cook, rotating one-quarter turn every
5 minutes until brown, approx. 20-25
minutes.
4. Brush with the remaining sauce,
turning frequently until chicken is
charred in spots. Exact timing will
vary, depending on the size of diced
chicken. Remove the skewers from
the grill, tent with foil and let rest for
5 minutes.
5. Serve with grilled sweet potato
wedges and a fresh cucumber salad.

Other Davis & Waddell Grill manuals

Davis & Waddell D1516 User manual

Davis & Waddell

Davis & Waddell D1516 User manual

Davis & Waddell DES0486 User manual

Davis & Waddell

Davis & Waddell DES0486 User manual

Davis & Waddell D1516 User manual

Davis & Waddell

Davis & Waddell D1516 User manual

Popular Grill manuals by other brands

DS Produkte Z 05599 instruction manual

DS Produkte

DS Produkte Z 05599 instruction manual

Cuisinart Gourmet 600S Assembly manual

Cuisinart

Cuisinart Gourmet 600S Assembly manual

Nexgrill 820-0012 Use and care guide

Nexgrill

Nexgrill 820-0012 Use and care guide

TEC 463268307 Product guide

TEC

TEC 463268307 Product guide

Premier ED-5373GR instruction manual

Premier

Premier ED-5373GR instruction manual

Kogan KAGRLSMARTA user manual

Kogan

Kogan KAGRLSMARTA user manual

Mayer Barbecue BRENNA MGK-1150 Assembly instructions

Mayer Barbecue

Mayer Barbecue BRENNA MGK-1150 Assembly instructions

Sitro Group ORION1 manual

Sitro Group

Sitro Group ORION1 manual

Weber MASTER-TOUCH PREMIUM Assembly guide

Weber

Weber MASTER-TOUCH PREMIUM Assembly guide

Char-Broil 466247109 Product guide

Char-Broil

Char-Broil 466247109 Product guide

Landmann CG-III-780 Assembly and operating instructions

Landmann

Landmann CG-III-780 Assembly and operating instructions

Uniflame GBC1059WB owner's manual

Uniflame

Uniflame GBC1059WB owner's manual

Heston Blumenthal Everdure HUB Quick user guide

Heston Blumenthal

Heston Blumenthal Everdure HUB Quick user guide

Grandhall IT1002 Assembly manual

Grandhall

Grandhall IT1002 Assembly manual

Weber Summit 43267 installation guide

Weber

Weber Summit 43267 installation guide

Weber Genesis E-330 owner's guide

Weber

Weber Genesis E-330 owner's guide

ACME GE-200 user manual

ACME

ACME GE-200 user manual

Char-Broil 463320108 Product guide

Char-Broil

Char-Broil 463320108 Product guide

manuals.online logo
manuals.online logoBrands
  • About & Mission
  • Contact us
  • Privacy Policy
  • Terms and Conditions

Copyright 2025 Manuals.Online. All Rights Reserved.