Daza Pager 2 User manual

PAGER2 MANUAL 2016 0 905

CONTENTS
1. WHAT'S IN THE BOX ....................................................................................................................1
1) The pager ................................................................................................................................1
2) Cradle .....................................................................................................................................1
3) USB Cable................................................................................................................................1
2. BEFORE YOU BEGIN.....................................................................................................................2
2.1 DazaTools software for the Pager ....................................................................................2
3. INSTALL THE SOFTWARE IN 3 EASY STEPS....................................................................................3
Step 1: Download the software ...................................................................................................3
Step 2: Start the installation proces.............................................................................................3
Step 3: complete the installation process ....................................................................................4
4. CONNECTING THE PAGER TO DAZATOOLS ...................................................................................5
4.1 Step1: Connect the pager to the computer ......................................................................5
4.2 Step2: Connect the pager to DazaTools............................................................................5
4.3 DazaTools: Change back-up location ................................................................................6
4.4 DazaTools: Select LAnguage.............................................................................................6
5. ADDING AND REMOVING TRANSMITTERS (DazaTools) ................................................................7
5.1 Step1: Assign the transmitter with a recognisable name ..................................................7
5.2 Step 2: Select the type of alarm transmitter.....................................................................7
5.3 Step 3: Add the transmitter .............................................................................................7
5.4 To remove a transmitter ..................................................................................................8
6. SETTINGS ....................................................................................................................................9
6.1 The name of the pager.....................................................................................................9
6.2 Buzzer volume / Vibration mode......................................................................................9
6.3 Man down delay ............................................................................................................10
6.4 Security / PIN code ........................................................................................................10
6.5 Save a backup of the current configuration on the computer.........................................11
6.6 Install a backup configuration on a pager via the computer ...........................................11
7. LOG...........................................................................................................................................11
8. UPDATES...................................................................................................................................12
8.1 Check the version of the software on the pager .............................................................12
8.2 Install a software update on the pager...........................................................................12
9. CONFIGURE SETTINGS VIA THE PAGER ......................................................................................13
9.1 Switching the pager on ..................................................................................................13
9.2 Open the pager menu....................................................................................................13
9.3 Navigating through the menu and selecting options in the menu...................................13

9.4 Exiting the menu............................................................................................................14
9.5 Adjust the volume of the pager......................................................................................14
9.6 Switch vibration mode on or off.....................................................................................14
9.7 Add new transmitters via the pager ...............................................................................15
9.8 Remove Transmitters via the pager................................................................................16
9.9 Switch the pager On / OFF .............................................................................................16
9.10 Change the PIN code......................................................................................................17
10. USING THE PAGER .................................................................................................................18
10.1 Confirm receipt of the alarm signal................................................................................18
10.2 View the log in the pager ...............................................................................................18
10.3 ‘Empty battery’ alarm ....................................................................................................19
10.4 Transmitting with the Pager / Assistance .......................................................................19
11. SPECIAL SETTINGS .................................................................................................................20
11.1 Adjust screen resolution for DazaTools ..........................................................................20

1
1. WHAT'S IN THE BOX
1) THE PAGER
2) CRADLE 3) USB Cable

2
2. BEFORE YOU BEGIN...
We recommend that you charge the pager fully before
using it for the first time. This can be done with the
cradle that comes with the pager.
Place the bottom end of the pager in the cradle and
make sure that the contact points (F) are properly
connected to the cradle.
Then plug the adapter into the wall socket. The
‘Charging’ pictogram will appear on the display. Once
the pager is fully charged, the ‘FULL’ pictogram will
appear on the display.
Charging
Battery fully charged
2.1 DAZATOOLS SOFTWARE FOR THE PAGER
DazaTools is a program that has been developed to enable optimal use of the pager. This software
makes it easy to operate and manage the pager. So we recommend that you use the functionality
provided by the software as much as possible. This is also necessary so that further updates for the
pager can be installed. The software can be installed in three easy steps. You will need an internet
connection to download the software. For more information about the installation of DazaTools we
advise you to go to chapter 3: INSTALL THE SOFTWARE IN 3 EASY STEPS

3
3. INSTALL THE SOFTWARE IN 3 EASY STEPS
Attention!
•Please remove all previous versions of PagerTools before installing the latest version.
•Do not connect the Pager to the pc before finishing the DazaTools installation.
You can install the software in 3 simple steps. An internet connection is required to download the
software.
Minimum system requirements:
* Windows XP SP3 or higher
* XGA-monitor (Minimum Resolution 1024x768)
STEP 1: Download the software
You can download the software for the pager free
of charge from our website: http://www.daza.nl
The DazaTools software can be found in the Pagers
section of the Downloads page.
-Download the software onto your computer.
-Extract the files to a folder of your choice
on your computer.
-Make sure the Pager is NOT connected
while you are installing the software.
-Double click on the file Setup.exe.
Note.
You might want to ask your IT Department
to ensure that the software is correctly installed.
STEP 2: Start the installation proces
The software is now ready to be installed.
Click on ‘Next’.

4
STEP 3: complete the installation process
Follow all of the instructions on the screen and
complete the installation process.
During the installation all necessary drivers are
automatically installed.
The DazaTools pictogram will automatically appear
on your desktop once the installation process is
completed.
With some PC’s you will get an install screen for the
PL2303 USB driver. Here you can choose the option
REPAIR. Do not restart the pc when asked. Please
press NO and finish the Dazatools installation first.
Restart your pc after finishing the installation.

5
4. CONNECTING THE PAGER TO DAZATOOLS
Information about how to download and install the software can be found in chapter 3: INSTALL THE
SOFTWARE IN 3 EASY STEPS.
4.1 STEP1: CONNECT THE PAGER TO THE COMPUTER
The USB port can be found at the bottom of the pager
behind the USB port slide (H). To access the port you
need to push the port slide down.
The original USB cable supplied with the pager is the
only cable that should be connected to the USB port
(G) on the pager. Connect the other end of the USB
cable to the computer or laptop on which the
DazaTools software is installed.
4.2 STEP2: CONNECT THE PAGER TO DAZATOOLS
Make sure the Pager is turned on before starting the
DazaTools Program.
- To start the Pager, press the OK button for 5 seconds
until you hear a victory tune.
When the pager is connected to the
computer it will emit a beep and the
‘Connection’ icon will appear on the
pager display. All of the data on the
pager will now be synchronized with the computer.
Note!Do NOT disconnect the pager while the
synchronization process is in progress.
Unable to establish a connection?Check if the USB
cable is properly connected to the pager and the
computer or laptop. Then click ‘Connect’ in the Quick
Access Toolbar.
Once the synchronization process has successfully
completed the Home tab will appear on the screen
and you will see the serial number and name you have
assigned to the pager in the bottom right-hand corner.

6
4.3 DAZATOOLS: CHANGE BACK-UP LOCATION
After a successful installation and connection with the pager a folder will be created on your pc
located in "Your Documents" with a subfolder named Daza. This folder is used to store all settings
off your pager.
Change location
-Open DazaTools
-Click on "Settings"
-Click on the "Browse" button behind the Data
storage option
-Select your new location
4.4 DAZATOOLS: SELECT LANGUAGE
Select language
-Open DazaTools
-Make sure the Pager is connected
-Click on "Settings"
-Choose the language you want
-! please note: de language settings are not
yet saved into the pager and DazaTools,
please click on the save button in the tab
settings
-Both DazaTools and the Pager itself will be
shown in your selected language

7
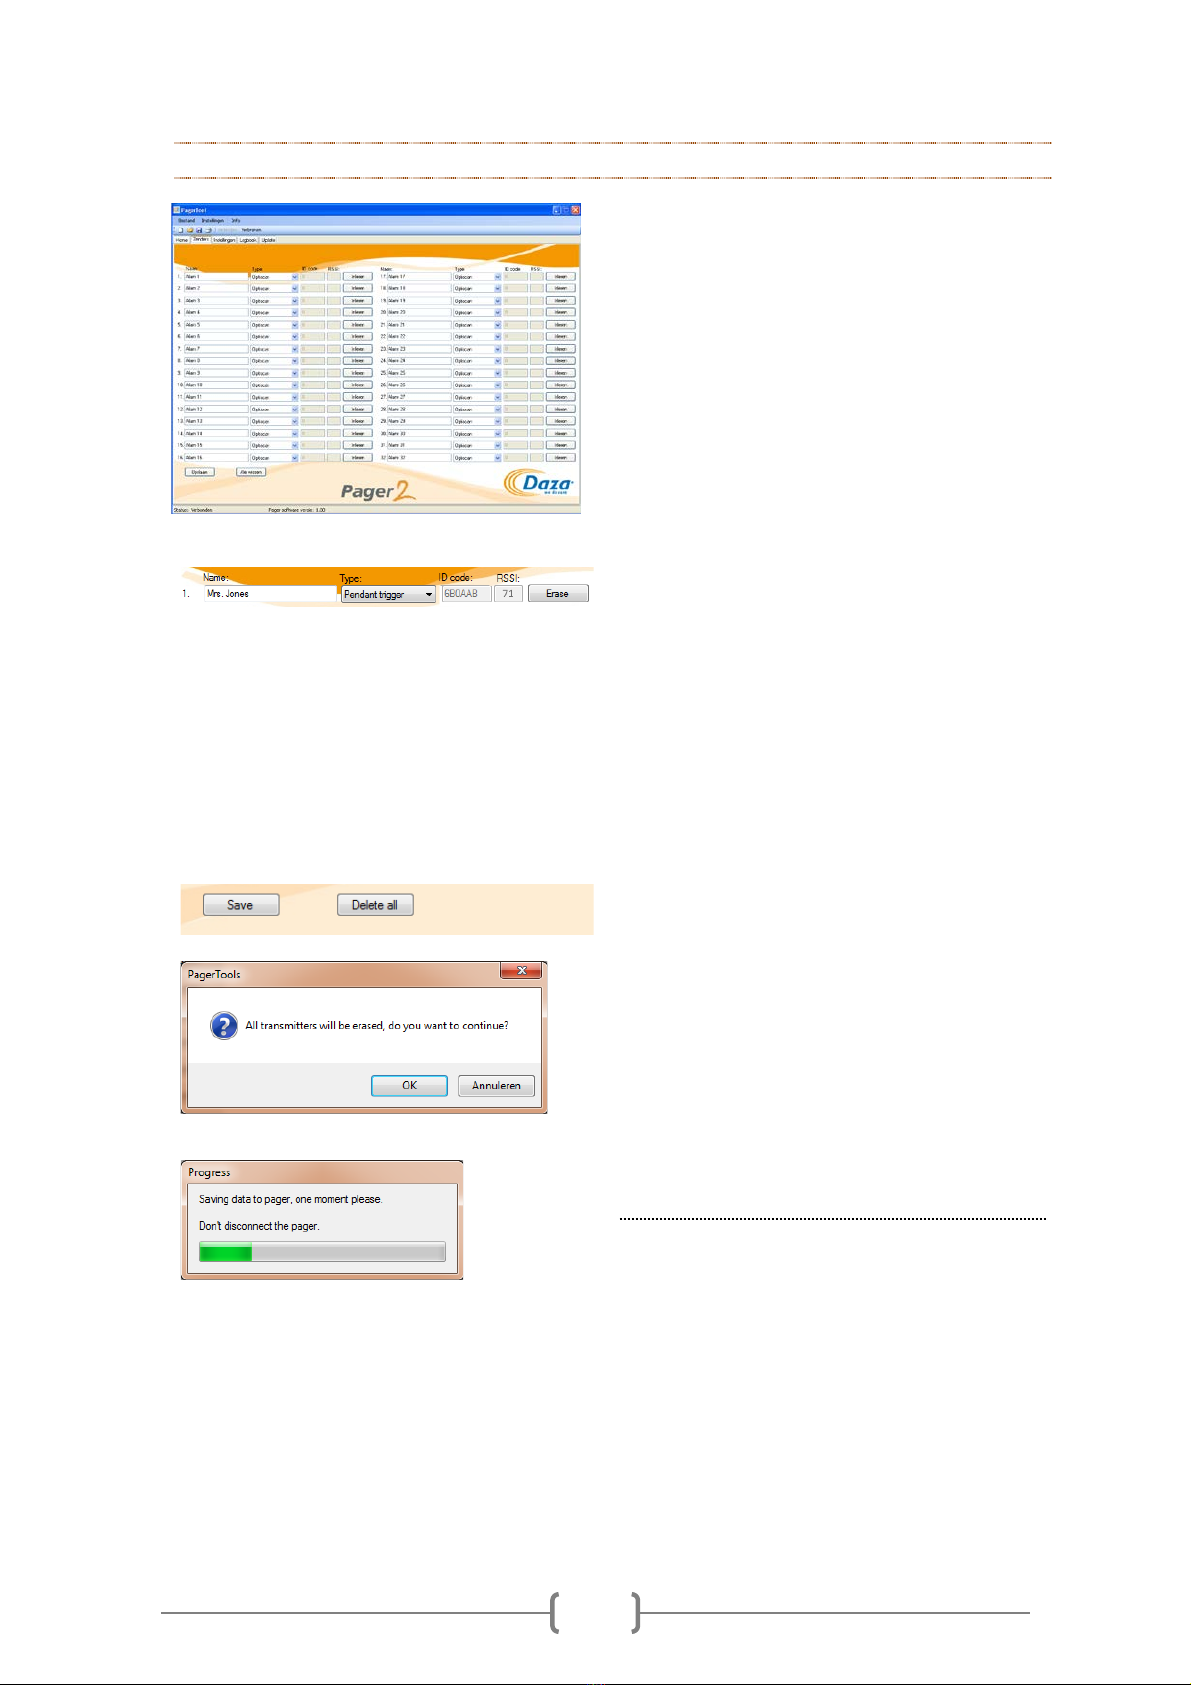
5. ADDING AND REMOVING TRANSMITTERS (DAZATOOLS)
Once you have connected the pager to the
DazaTools software you can add and remove
Daza alarm transmitters. You can add a
transmitter in 3 easy steps. On the ‘Transmitters’
tab you will see a list of all of the transmitters
that have been added to the pager.
5.1 STEP1: ASSIGN THE TRANSMITTER WITH A RECOGNISABLE NAME
Click on a available row in the column headed
‘Name:’, were no transmitter is currently stored
and type in a recognizable name (up to 16
characters).
Note.
When the alarm transmitter transmits an
alarm the name you assigned to the transmitter
will appear on the pager display. So it is important
that you give the transmitter a recognizable name.
5.2 STEP 2: SELECT THE TYPE OF ALARM TRANSMITTER
In the second column headed ‘Type:’ select the
type of transmitter you want to add by clicking on
the type of transmitter in the drop-down menu.
5.3 STEP 3: ADD THE TRANSMITTER
Then click on the ‘Learn’button. The status of
the button will now change to ‘Wait?’.
Now transmit an alarm with the transmitter you
want to add. Once the transmitter has been
successfully added the pager will emit a ‘victory’
tone. The corresponding ID code and signal
strength will automatically be displayed.
The status of the ‘Wait...’ button will change to
‘Erase’. To
add several transmitters simply
repeat this procedure.
You will save the
transmitters into the pager by clicking on the
'Save'button. A progress bar will show that all
the transmitters are being stored in the pager
8
5.4 TO REMOVE A TRANSMITTER
Once you have connected the pager to the
DazaTools software you can add and remove
Daza alarm transmitters. To remove a
transmitter from the pager proceed as followed:
On the ‘Transmitters’
tab you will see a list of all
of the transmitters that have been added to the
pager.
Remove a transmitter:
Click on the 'Erase'
button behind the
transmitter you want to erase from the pager.
The corresponding ID code will be erased and
stored in the pager when the 'Save' button is
pressed.
You can erase multiple transmitters before you
apply this to the pager with the 'Save' button
To remove all of the transmitters:
You can also remove all of the transmitters at
once. To do this click on ‘Delete all’
at the
bottom of the ‘Transmitters’ tab.
The computer will display a dialogue box that
says: ‘All transmitters will be erased
. Do you
want to continue?’
To confirm that you wish to continue, click on
‘OK’ and wait for the new settings to be saved
in the pager.
Note!
When all of the transmitters are removed,
all of the names and types of transmitters that
have been entered will revert to the standard
settings.

9
6. SETTINGS
Once you have connected the pager to the
DazaTools software you can view and change the
current settings in the 'Settings' tab.
These settings are:
•Pager name
•Buzzer volume (Day / Night)
•Vibration mode
•Man down delay
•PIN code / Security
6.1 THE NAME OF THE PAGER
Type in the name of the pager:
Click on the field next to ‘Pager name:’ and type
in the name you want to give the pager. This
name will appear on the pager display and on the
DazaTools ‘Home’tab. This will enable you to
identify the pager.
Note!
These changes have not yet been activated
in the pager. To do this, click on ‘Save’
in the
bottom left corner of the DazaTools screen.
6.2 BUZZER VOLUME / VIBRATION MODE
Day / Night profile
It is possible to configure the Pager in a way that the volume of the Pager will automatically be
decreased in the night to prevent unrest. To use this option you can configure the Day and Night
profile.
To aplly this option, please select the 'ON' option behind the Day/Night profile
Please set the time of the Day profile and configure the volume and vibration option to your
needs (0 is buzzer off, 5 is maximum volume). Repeat this step with the Night profile.
If you do not want to use the night profile, please select the 'Off' option behind the Day/Night
profile and set the Day volume and vibration options.
!Please note that it is not possible to switch off both volume and vibration.

10
6.3 MAN DOWN DELAY
Man down delay:
The Man down delay option only applies to
certain transmitters. These are transmitters that
allow for a delay between the alarm and the
notification of the alarm on the pager. During this
delay the alarm can be cancelled.
The delay setting can be adjusted on the pager (5-
to 60 seconds).
Note!
These changes have not yet been activated
in the pager. To do this, click on ‘Save’
in the
bottom left corner of the DazaTools screen.
6.4 SECURITY / PIN CODE
PIN code:
It is possible to set a PIN code to protect settings
that can be changed on the pager without using
the computer.
-Enter a PIN code of your choice (4
numbers).
-The default settings of the PIN is set to
1234 with all options activated.
Security:
Then select the settings you want to protect with
the PIN code (Yes = PIN code protection).
Note!
These changes have not yet been activated
in the pager. To do this, click on ‘Save’
in the
bottom left corner of the DazaTools screen.

11
6.5 SAVE A BACKUP OF THE CURRENT CONFIGURATION ON THE COMPUTER
Save:
All settings of the pager including the transmitters
are stored on a file on your pc. This file has the
same name as the serial number of the Pager.
Back-up:
It is possible to save the complete configuration
of the pager on the computer as a back-up. This
can be helpful if the configuration
needs to be
transferred to a replacement pager
-Click on ‘File’ => ‘Save (to pc)’. Or click on
the ‘Save’ icon in the toolbar.
-Change the location if necessary and give
the configuration a recognizable name.
(
The computer will automatically show
the serial number of the pager.)
-Click on ‘Save’.
6.6 INSTALL A BACKUP CONFIGURATION ON A PAGER VIA THE COMPUTER
Open the backup file:
-To install a
backup configuration on a
pager connect the pager on which you
want to install the backup configuration
to the computer.
-Click on ‘File’ => ‘Open (from computer)’
or click on the ‘Open’ icon in the
toolbar.
-Select the file (.bin) and click on ‘Open’.
-The backup configuration
will now be
installed on the pager.
-Please check the settings and transmitters
tabs.
-Click on ‘Save’
at the bottom of the
‘Transmitters’ tab to save all
of the
settings in the pager.
7. LOG
The pager has an internal memory that can log the details of up to 1000 events (alarm, reset, battery
empty, etc.). This log of events is automatically synchronized with the DazaTools program whenever
the pager is connected to the program. Once the pager has synchronized with the computer, the log
will be deleted from the pager so the pager can log the details of another 1000 new events. If the
pager logs the details of more than 1000 events before it is synchronized with the computer, the
oldest events will be lost and the most recent events will continue to be added to the log.
You can view the history of the events via the ‘Log’ tab in the DazaTools program. The most recent
events are shown at the top of the list.

12
8. UPDATES
Software updates that contain improvements and new functionalities are issued on a regular basis.
So we recommend that you check the Pagers section of the Downloads page on our website,
http://www.daza.nl, regularly to see if a new version of the software has been released.
8.1 CHECK THE VERSION OF THE SOFTWARE ON THE PAGER
The version of the software currently installed on
the pager is shown at the bottom of the
DazaTools screen when the pager is connected to
the program.
You can also check the version of the software via
the ‘OK’ button on the pager.
-Wait until the Daza logo has disappeared.
-The serial number of the pager and the
version of the software currently installed
on the pag
er are shown beneath the
name of the pager.
8.2 INSTALL A SOFTWARE UPDATE ON THE PAGER
To install a new version of the software on the
pager proceed as followed:
-Download the latest version of the software
onto your computer from the Pagers section
of the Downloads page on our website,
http://www.daza.nl.
-Connect the pager to the DazaTools program.
-Open the ‘Update’ tab.
-Click on ‘Browse’and select the latest version of
the software downloaded onto your computer.
-Click on ‘Update’.
-Wait for the installation of the update to
complete (this takes approximately 4 minutes).
-Reconnect the pager to the DazaTools
program. Check the version of the software on
the pager.
-Check if the pager is working.
Note!Do NOT disconnect the pager while the
update is being installed. This may
cause the
pager to stop working properly.

13
9. CONFIGURE SETTINGS VIA THE PAGER
As well as installing settings via the DazaTools software, in case of emergency it is also possible to
install settings via the pager itself.
9.1 SWITCHING THE PAGER ON
‘OK’ button
If the Pager is turned off, you can activate it by
pressing the ‘OK’ button down for 5 seconds until
the pager emits a beep
9.2 OPEN THE PAGER MENU
‘OK’ button
Hold the ‘OK’ button down until the pager emits a
beep and the menu appears on the display.
Note!If you take no action in the menu for 5
seconds the menu will automatically close.
9.3 NAVIGATING THROUGH THE MENU AND SELECTING OPTIONS IN THE MENU
Down / Up selection button
Navigate through the options in the menu by
pressing the ‘Up’ or ‘Down’ selection button.
Then click once on the ‘OK’ button to select the
desired option in the menu.
Note!
If you take no action in the menu for 5
seconds the menu will automatically close.

14
9.4 EXITING THE MENU
Navigate to the ‘Exit menu’ option.
Then click once on the ‘OK’ button to exit the
menu.
Note!
If you take no action in the menu for 5
seconds the menu will automatically close.
9.5 ADJUST THE VOLUME OF THE PAGER
Adjust the volume of the pager
-Open the pager menu.
-Navigate to the ‘VOLUME’ option.
-Press the ‘OK’ button to confirm your
selection.
-Select the desired volume by pressing the
‘Up’ or ‘Down’ selection button.
-The volume level is audible at each step.
-Press the ‘OK’ button to confirm your
selection.
Note!In DazaTools
you can install security
settings so this option can only be accessed by
entering a PIN code.
It is not possible to switch of both the volume
and vibration.
9.6 SWITCH VIBRATION MODE ON OR OFF
Vibration mode ON / OFF
-Open the pager menu.
-Navigate to the ‘VIBRATE’ option.
-Press the ‘OK’ button to confirm your
selection.
-Select ‘Vibration mode ON’ or ‘Vibration
mode OFF’ by pressing the ‘Up’ or ‘Down’
selection button.
-Press the ‘OK’ button to confirm your
selection.
Note!In DazaTools
you can install security
settings so this option can only be accessed by
entering a PIN code.
It is not possible to switch of both the volume
and vibration.

15
9.7 ADD NEW TRANSMITTERS VIA THE PAGER
Select the position
-Open the pager menu.
-Navigate to the ‘ADD’ option.
-Press the ‘OK’ button to confirm your
selection.
-Select the position where you
want to
add the transmitter. The pager
will only
show the positions that are available. To
add a transmitter to a
position that is
already in use, first remove the existing
transmitter (see paragraph 9.7).
-Press the ‘OK’ button to confirm your
selection.
Type of transmitter
-Select the type of transmitter you want to
add.
-Press the ‘OK’ button to confirm your
selection.
Activate
-Activate the transmitter so it transmits an
alarm when the words ‘ACTIVATE NOW!’
appear on the display.
If you do not
activate an alarm within 10 seconds the
pager will automatically exit the menu.
Completion
-Once the transmitter
has been
successfully added to the pager the word
‘ADDED!’ will appear on the display and
the pager will emit a ‘success’ tone.
Note!If the transmitter has already been added
to the pager the words ‘DOUBLE ID Ax’ will
appear on the display. This means that the
transmitter is already listed in the pager at
position x and therefore cannot be added again.
Note!In DazaTools
you can install security
settings so this option can only be accessed by
entering a PIN code.

16
9.8 REMOVE TRANSMITTERS VIA THE PAGER
-Open the pager menu.
-Navigate to the ‘REMOVE’ option.
-Press the ‘OK’ button to confirm your
selection.
-Select the transmitter you
want to
remove.
-Press the ‘OK’ button to confirm your
selection.
Note!In DazaTools
you can install security
settings so this option can only be accessed by
entering a PIN code.
9.9 SWITCH THE PAGER ON / OFF
Shutdown
-Open the pager menu.
-Navigate to the ‘Shutdown' option.
-Press the ‘OK’ button to confirm your
selection.
-The pager will emit five short beeps to
indicate that it has been shutdown.
-
All settings, date & time and logbook will
be stored.
To re-activate the pager:
-To turn on the pager simply press the ‘OK’
button for 5 seconds.
-The pager will emit a victory tune.
Note!In DazaTools
you can install security
settings so this option can only be accessed by
entering a PIN code.

17
9.10 CHANGE THE PIN CODE
To change the PIN code:
-Open the pager menu.
-Navigate to the ‘Change PIN 'option.
-Press the ‘OK’ button to confirm your
selection.
-Enter the current PIN code by pressing
the ‘Up’ and ‘Down’ selection buttons.
-Choose the first number and confirm with
the 'OK' button.
-
Repeat these steps for the next 3
numbers.
-Then enter the new PIN code in the same
way.
Table of contents


