DCS RF24TR Manual

OUTDOOR BEER DISPENSERS
Installation, Operation and Maintenance Instructions
MODELS:
RF24TR
RF24TL
RF24BTR
RF24BTL

2
NOTE
!CAUTION
Contents:
Safety information ...............................................................2
Unpacking your appliance ...................................................3
Warranty registration............................................................3
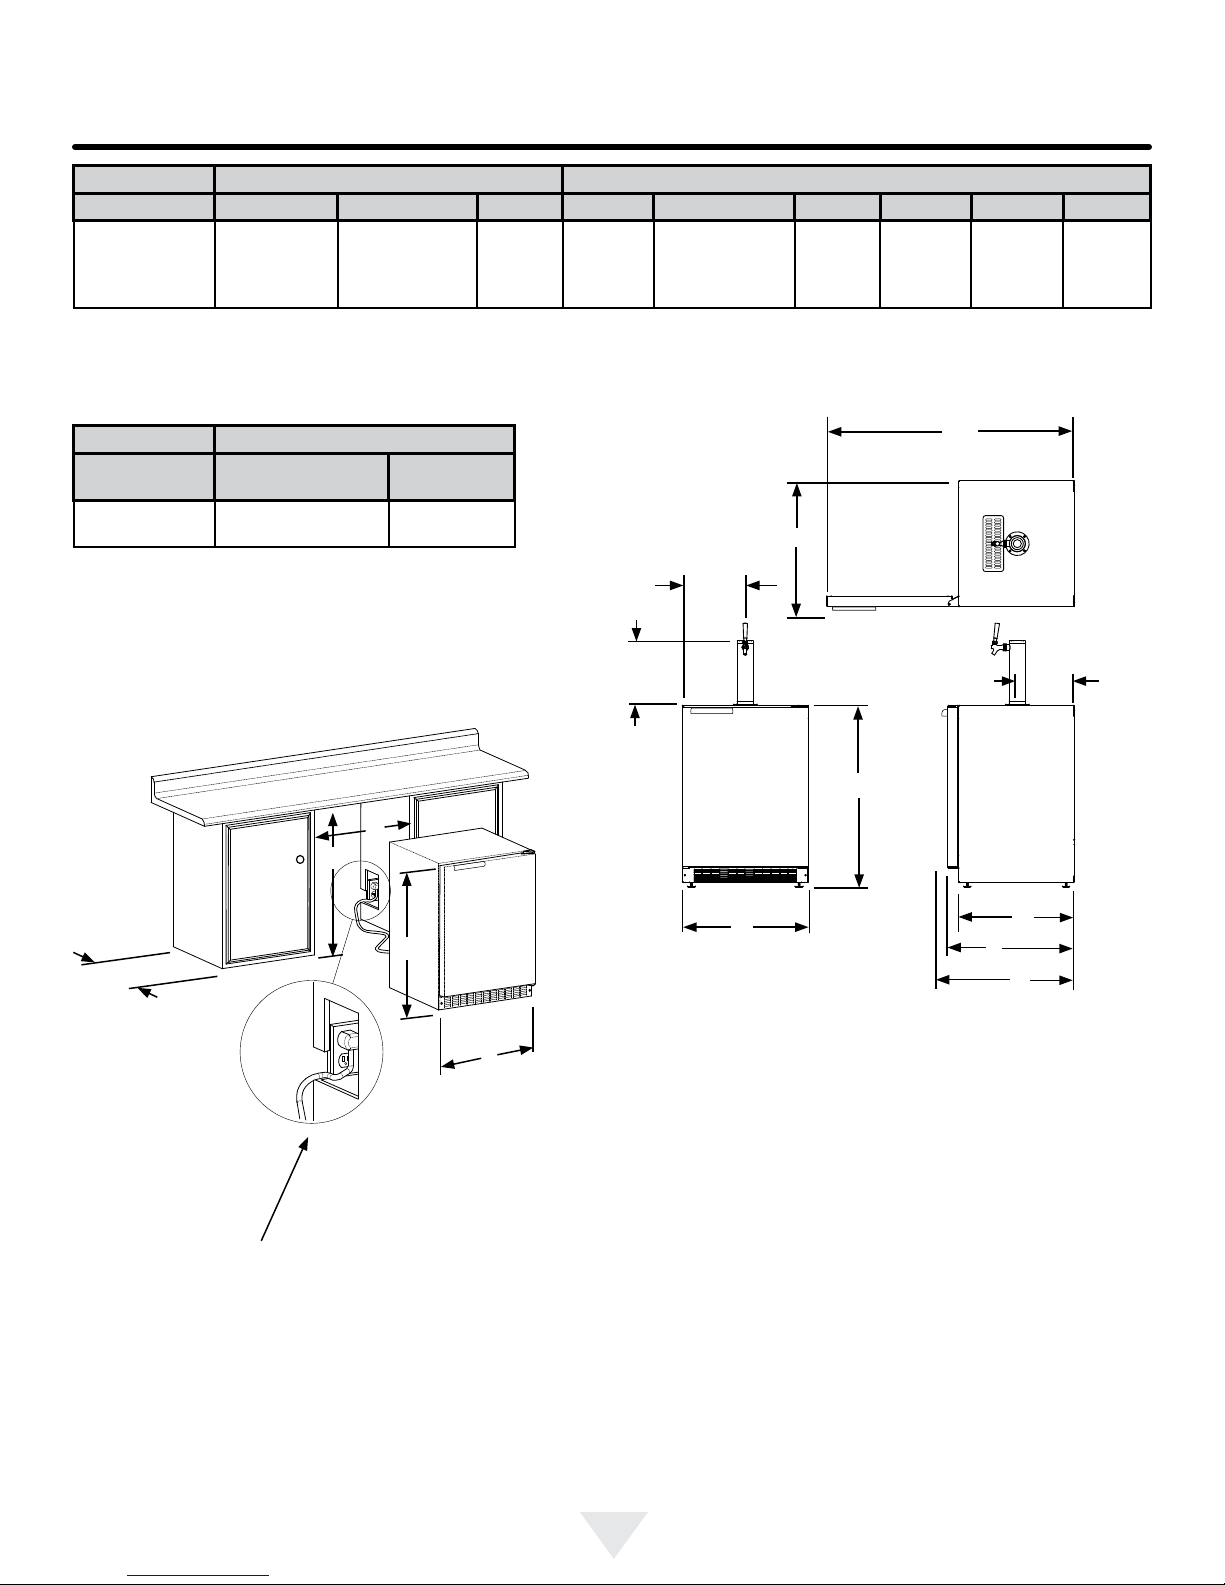
Installing your appliance ......................................................4
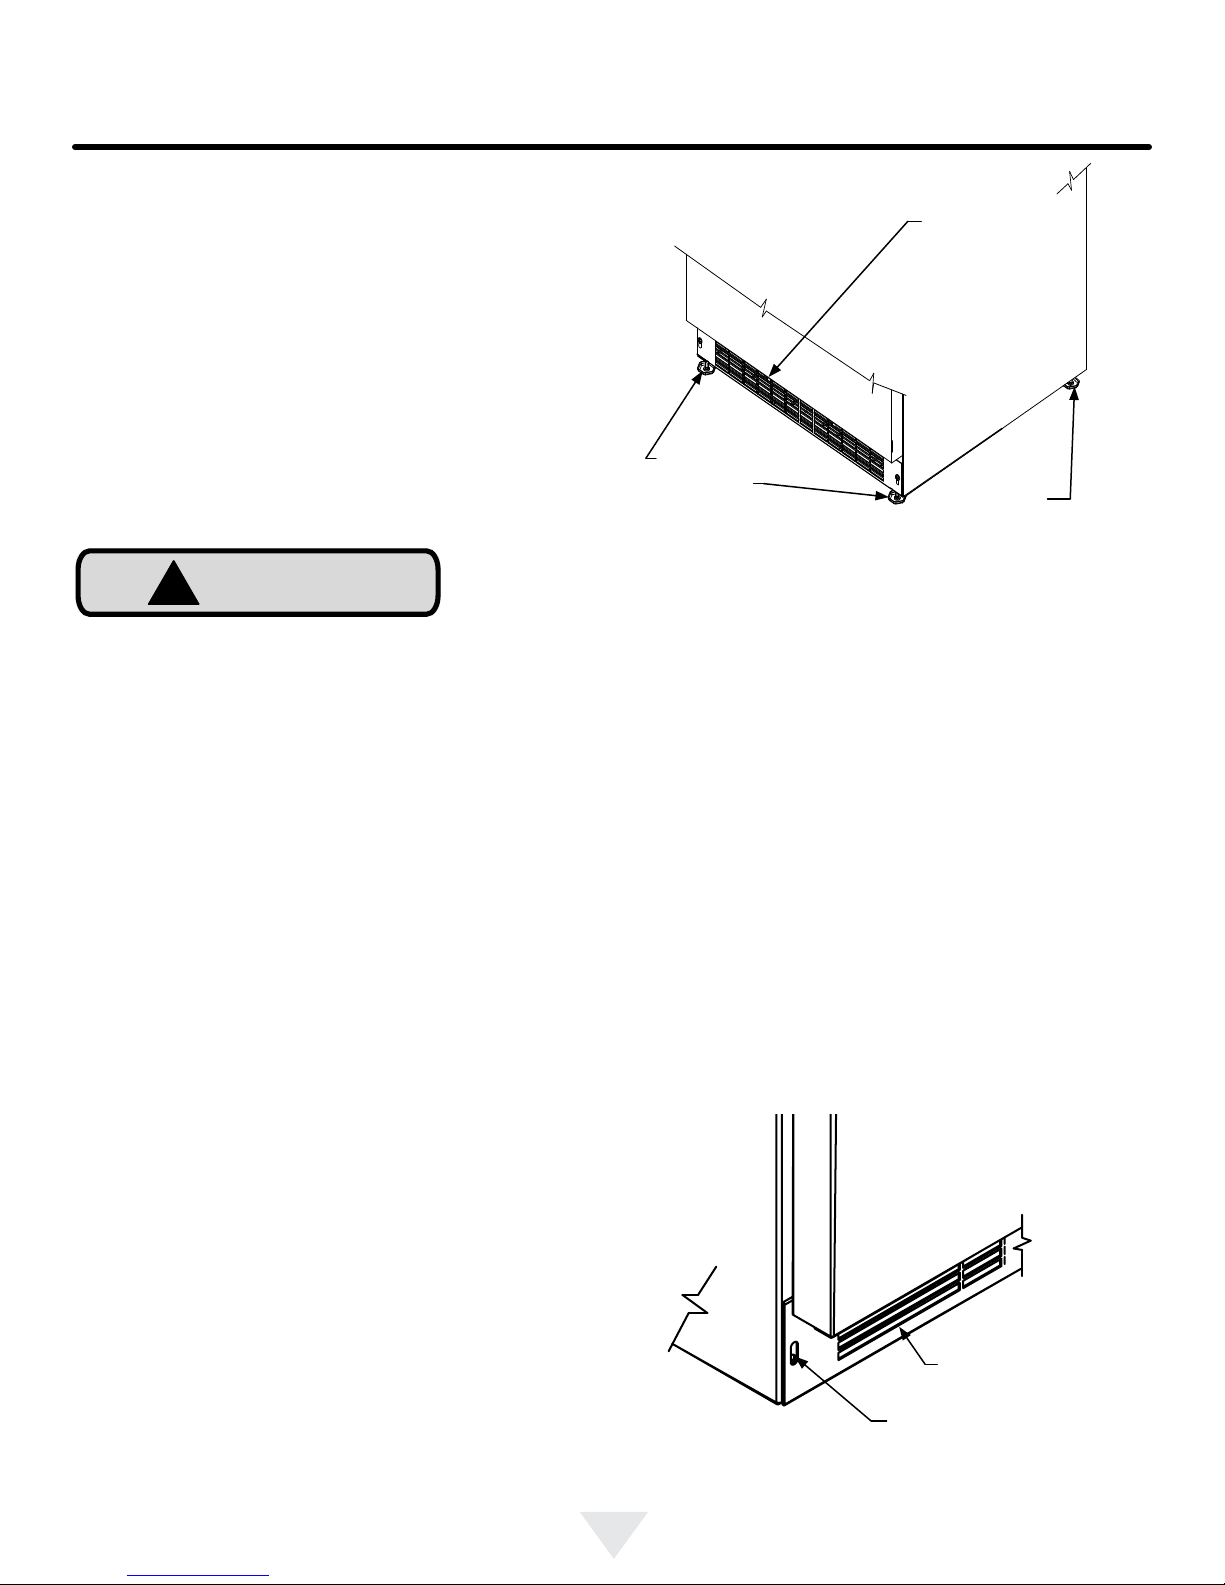
Cabinet clearances .........................................................4
Leveling the appliance ....................................................4
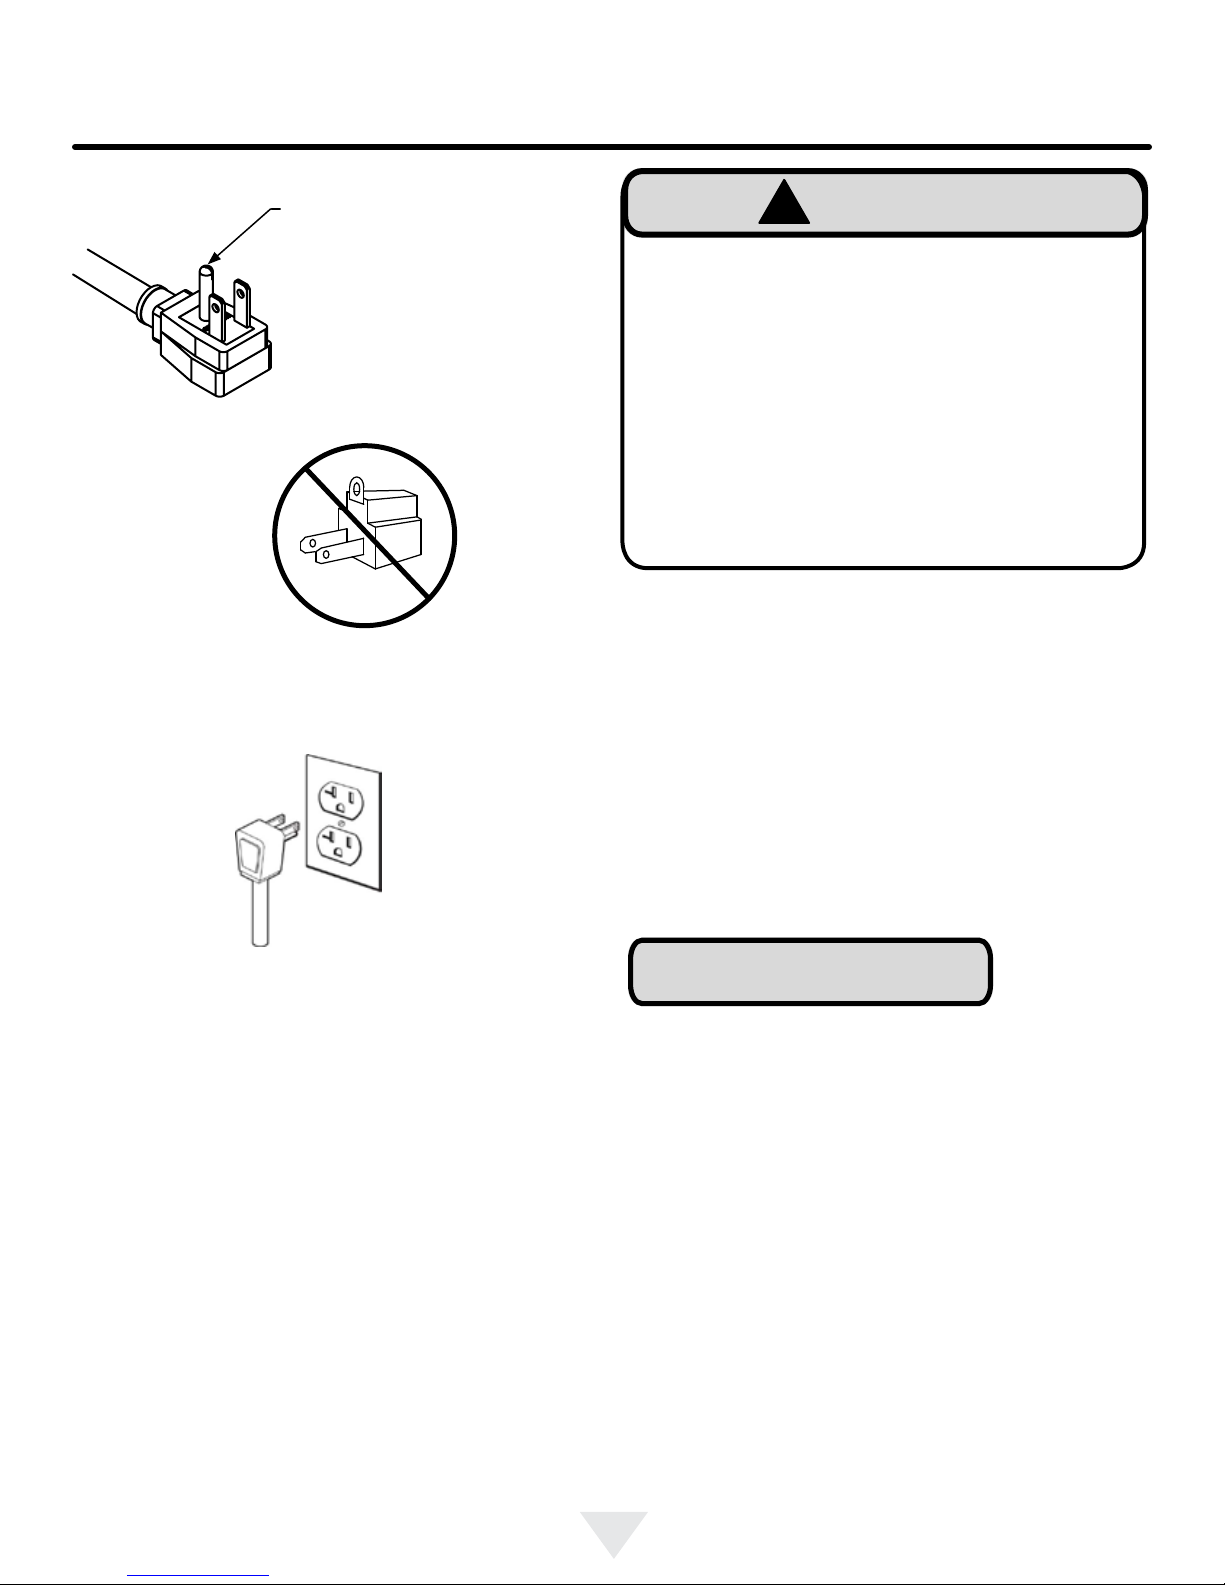
Electrical connection ......................................................5
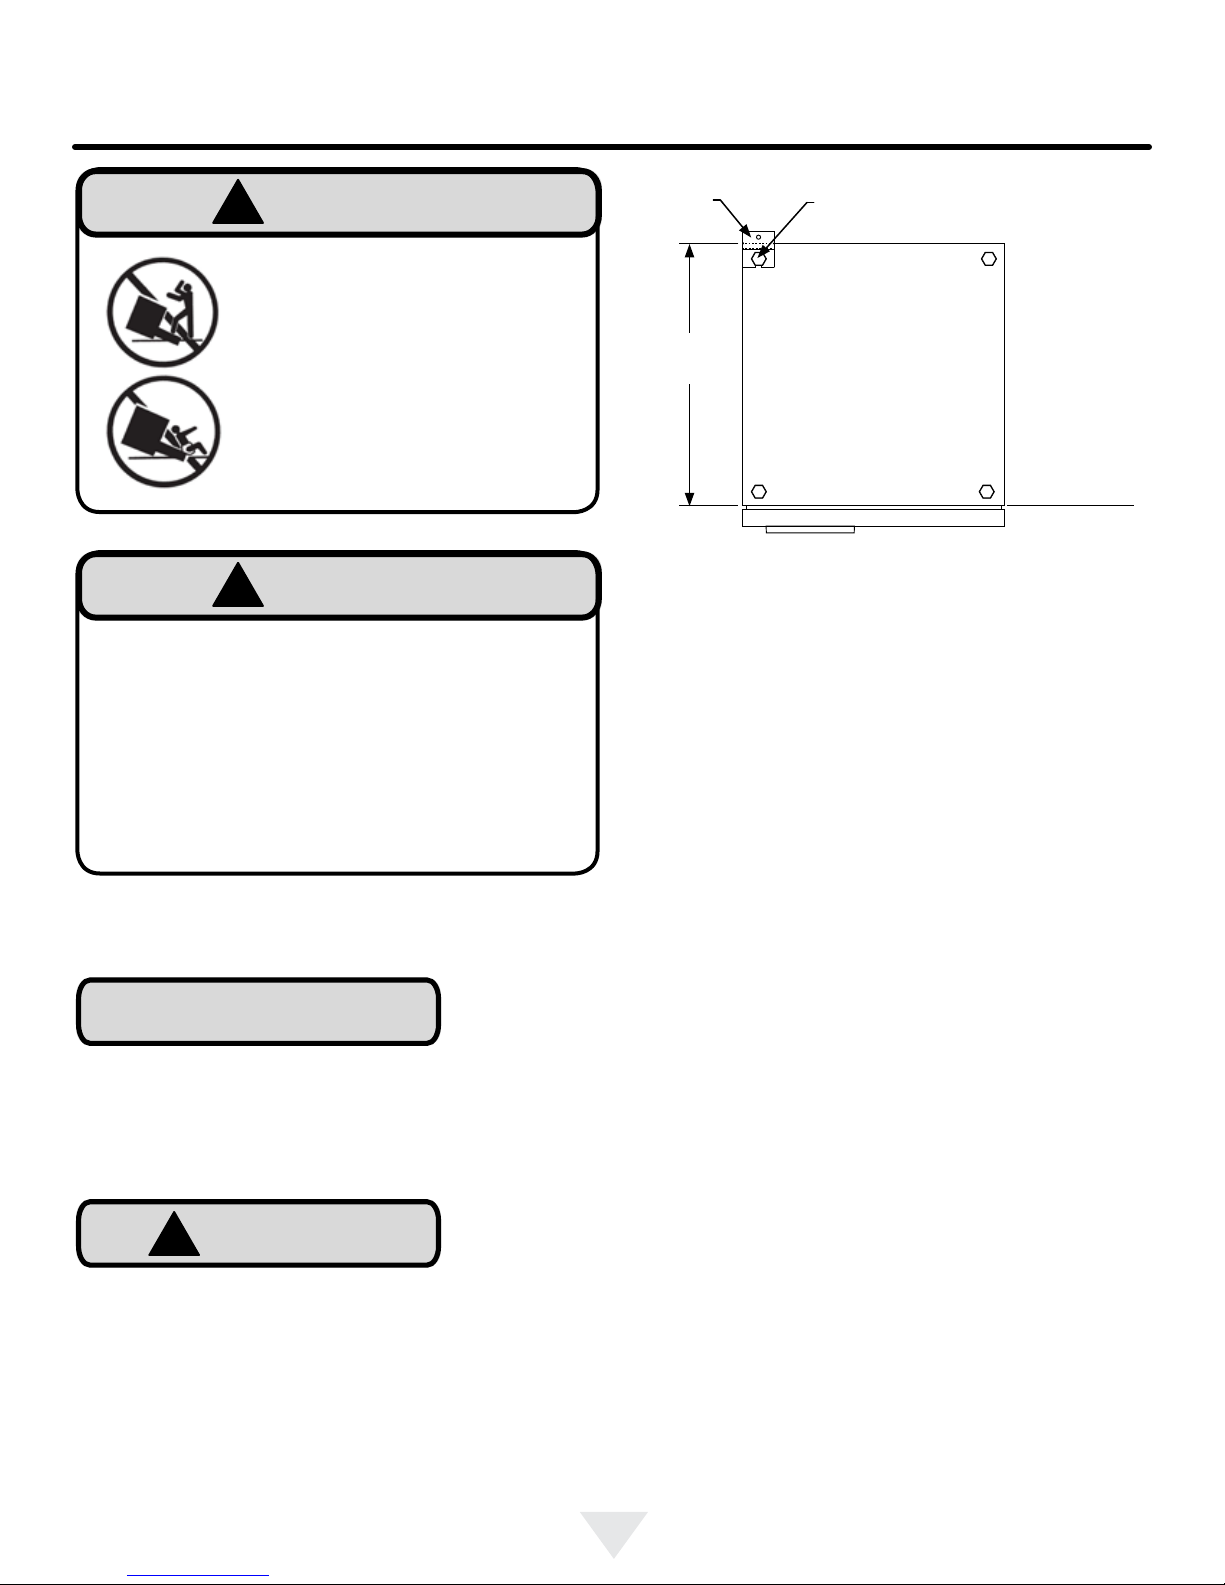
Installing the anti-tip device .................................................6
Product dimensions RF24T.................................................8
Using your Electronic control...............................................9
Starting your appliance....................................................9
Turning your appliance "ON" or "OFF".............................9
Adjusting the temperature................................................9
Beer dispenser operation..................................................9
Alarms..............................................................................9
Door ajar...........................................................................9
Temperaturesensorfault...................................................9
Alarmmute........................................................................9
Using your beer dispenser.................................................10
Tap equipment and assembly.........................................10
CO2 regulator.................................................................14
Drain kit...........................................................................15
Care and cleaning ............................................................15
Cleaning the drain sump................................................15
Keg coupler cleaning.....................................................16
Faucet cleaning ............................................................16
Front grille .....................................................................16
Cabinet...........................................................................16
Interior.............................................................................16
Long term storage / winterization .......................................17
Stainless steel maintenance ............................................19
Door alignment .................................................................20
Energy saving tips .............................................................20
Troubleshooting.................................................................21
Obtaining service .............................................................21
Warranty ............................................................................22
Important Safety Instructions
Warnings and safety instructions appearing in this guide
are not meant to cover all possible conditions and situa-
tions that may occur. Common sense, caution, and care
must be exercised when installing, maintaining, or operat-
ing this appliance.
Recognize Safety Symbols,
Words, and Labels.
!WARNING
WARNING - You can be killed or seriously injured
if you do not follow these instructions.
CAUTION-Hazards or unsafe practices which could re-
sult in personal injury or property / product damage.
NOTE-Important information to help assure a problem
free installation and operation.
CONTENTS
State of California Proposition 65 Warnings:
WARNING: This product contains one or more chemicals
known to the State of California to cause cancer.
WARNING: This product contains one or more chemicals
known to the State of California to cause birth defects or
other reproductive harm..

3
NOTE
!CAUTION
!CAUTION
!CAUTION
A Message To Our Customers
Thank you for selecting this DCS Outdoor Refrigerator.
Because of this appliances’ unique features we have devel-
oped this Use and Care and Installation Guide. It contains
valuable information on how to properly install, operate and
maintain your new appliance for years of safe and enjoy-
able operation.
For your convenience, product questions can be answered
by a DCS Customer Care Representative at
1-888-936-7872, or email: customer.care@sherpaykel.com
NOTE: Please write the Model, Code, and Serial Number
on this page for references (the serial plate is located on
the upper left side, inner wall).
MODEL NUMBER:
CODE:
SERIAL NUMBER:
NOTE: Inspect the product to verify that there is no ship-
ping damage. If any damage is detected, call the shipper
and initiate a damage claim. DCS by Fisher & Paykel is not
responsible for shipping damage.
DO NOT discard any packing material (box, pallet, straps)
until the unit has been inspected.
Help Prevent Tragedies
Child entrapment and suffocation are not problems of the
past. Junked or abandoned refrigerators are still dangerous
- even if they sit out for "just a few hours".
If you are getting rid of your old refrigerator, please follow
the instructions below to help prevent accidents.
Before you throw away your old refrigerator or freezer:
• Take off the doors or remove the drawers.
• Leave the shelves in place so children may not easily
climb inside.
Remove Interior Packaging
Your appliance has been packed for shipment with all parts
that could be damaged by movement securely fastened.
Remove internal packing materials and any tape holding in-
ternal components in place. The owners manual is shipped
inside the product in a plastic bag along with the warranty
registration card, and other accessory items.
Important
Keep your carton and packaging until your appliance has
been thoroughly inspected and found to be in good condi-
tion. If there is damage, the packaging will be needed as
proof of damage in transit. Afterwards please dispose of all
items responsibly.
Dispose of the plastic bags which can be a suffocation
hazard.
Note to Customer
This merchandise was carefully packed and thoroughly
inspected before leaving our plant. Responsibility for its
safe delivery was assumed by the retailer upon acceptance
of the shipment. Claims for loss or damage sustained in
transit must be made to the retailer.
DO NOT RETURN DAMAGED MERCHANDISE TO THE
MANUFACTURER - FILE THE CLAIM WITH THE
RETAILER.
If the appliance was shipped, handled, or stored in other
than an upright position for any period of time, allow the ap-
pliance to sit upright for a period of at least 24 hours before
plugging in. This will assure oil returns to the compressor.
Plugging the appliance in immediately may cause damage
to internal parts.
!WARNING
EXCESSIVE WEIGHT HAZARD
Use two or more people to move product.
Failure to do so can result in personal injury.
UNPACKING YOUR APPLIANCE

4
!CAUTION
Figure 1
Front Leveling
Legs
Front Grille,
keep this area
open.
Rear
Leveling
Legs
Select Location
The proper location will ensure peak performance of your
appliance. We recommend a location where the unit will
be out of direct sunlight and away from heat sources. To
ensure your product performs to specications, the recom-
mended installation location temperature range is from 55
to 115°F (13 to 46°C).
Cabinet Clearance
Ventilation is required from the bottom front of the appli-
ance. Keep this area open and clear of any obstructions.
Adjacent cabinets and counter top can be installed around
the appliance as long as the front grille remains unobstructed.
Front Grille
Do not obstruct the front grille. The openings within the
front grille allow air to ow through the condenser heat ex-
changer. Restrictions to this air ow will result in increased
energy usage and loss of cooling capacity. For this reason
it is important this area not be obstructed and the grille
openings kept clean (See Figure 1). The use of a custom
made grille is not recommended as it may restrict air ow.
INSTALLING YOUR APPLIANCE
Leveling Legs
Adjustable legs at the front and rear corners of the appli-
ance should be set so the unit is rmly positioned on the
oor and level from side to side and front to back. The
overall height of your appliance may be adjusted between
the minimum, 333⁄4" (85.7 cm), by turning the leveling leg in
(CW ↷) and the maximum, 343⁄4" (88.3 cm) by turning the
leveling leg out (CCW ↶).
To adjust the leveling legs, place the appliance on a solid
surface and protect the oor beneath the legs to avoid
scratching the oor. With the assistance of another person,
lean the appliance back to access the front leveling legs.
Raise or lower the legs to the required dimension by turning
the legs. Repeat this process for the rear by tilting the appli-
ance forward using caution. On a level surface check the
appliance for levelness and adjust accordingly.
The front grille screws may be loosened and the grille ad-
justed to the desired height. When adjustment is complete
tighten the two front grille screws. (See Figure 2).
Figure 2
Front grille screw
Front grille

5
NOTE
Figure 5
Ground Fault Circuit Interrupters (GFCI) are prone to nui-
sance tripping which will cause the appliance to shut down.
GFCI’s are generally not used on circuits with power equip-
ment that must run unattended for long periods of time, un-
less required to meet local building codes and ordinances.
Electrical Connection
A grounded 115 volt, 15 amp dedicated circuit is required.
This product is factory equipped with a power supply
cord that has a three-pronged, grounded plug. It must be
plugged into a mating grounding type receptacle in accor-
dance with the National Electrical Code and applicable lo-
cal codes and ordinances (see Figure 5). If the circuit does
not have a grounding type receptacle, it is the responsibility
and obligation of the customer to provide the proper power
supply. The third ground prong should not, under any cir-
cumstances, be cut or removed.
INSTALLING YOUR APPLIANCE
Figure 3
Figure 4
Do not remove
ground prong
Electrical Shock Hazard
• Do not use an extension cord with this appliance.
They can be hazardous and can degrade product
performance.
• This appliance should not, under any circumstanc-
es, be installed to an un-grounded electrical supply.
• Do not remove the grounding prong from the power
cord. (See Figure 3).
• Do not use an adapter. (See Figure 4).
• Do not splash or spray water from a hose on the
appliance. Doing so may cause an electrical shock,
which may result in severe injury or death.
!WARNING
This manual suits for next models
3
Table of contents
Other DCS Beverage Dispenser manuals
Popular Beverage Dispenser manuals by other brands

CDS AUTOMATEN
CDS AUTOMATEN ML-16C2-C user manual

Siemens
Siemens GA 3000 OPERATING & SERVICE MANUAL

Bunn
Bunn IMIX Service & repair manual

Fizz Creations
Fizz Creations Slush Puppie Instructions for use

Cornelius
Cornelius IntelliCarb Cold Beverage Dispenser Training manual

TAPRITE
TAPRITE Rattler II Instructional manual