DCS UT624 User manual

DCS OUTDOOR REFRIGERATOR
How to operate and care for your appliance and how to get the best,
as well as lowest cost, and performance.
This merchandise was carefully packed and thoroughly inspected before leaving our plant. Responsibility for its safe
delivery was assumed by the carrier upon acceptance of the shipment. As directed on the side of your packing carton,
claims for loss or damage sustained in transit must be made on the carrier as follows:
A) Exterior Damage: Make thorough damage notation on your delivery receipt and have driver acknowledge by
signature and date. Send a written request asking for an inspection report from carrier. Include the name of carrier
representative and the date the inspection was requested. Retain inspection report and receipt for filing of a claim.
B) Concealed Damage: This must be reported to carrier within fifteen days. Obtain inspection report from the carrier.
Retain the inspection report for filing of the claim. DO NOT RETURN DAMAGED MERCHANDISE TO MANUFAC-
TURER -- FILE THE CLAIM WITH THE CARRIER.
DYNAMIC COOKING SYSTEMS, INC.
5800 Skylab Road
Huntington Beach, CA 92647
Telephone 1-800-433-8466
P/N 17312
P/N 41006292
Revision "A"
Owner's
Guide
AND BEVERAGE ALL REFRIGERATOR
OWNER'S INSTRUCTIONS
Note to Customer:
READ AND KEEP THESE INSTRUCTIONS!

HOW TO INSTALL YOUR
OUTDOOR REFRIGERATOR . . .
1. Select Location: Theproperlocationwillensurepeak
performance of your appliance. Choose a location
where the unit will be out of direct sunlight and away
from heat sources. Units with fan cooled condensers
can be built in.
Unit should be operated in a properly ventilated area
with ambient temperatures above 40 degrees and be-
low 100 degrees Fahrenheit.
Installation should be such that the cabinet can be
moved for servicing if necessary.
2. Cabinet Clearance: Ventilationisrequiredfromthebot-
tomfrontsection of the unit. Keep this area open and
clear of any obstructions.
The adjacent cabinets and counter top can be built
around the unit as long as no top trim or counter top is
installed lower than the top of the hinge.
3. Electrical Connection: Check serial plate for correct
powersupply. Useonlyelectrical powersupplyasspeci-
fiedonyour appliance serial nameplate. Do not use
an extension cord!
FIGURE 1
The plug shown is for 115V. units. The prongs on your
model may be different than the one shown if your unit
is other than 115 volts.
- 2 -
WARNING!
Do not splash or spray water from a hose on the
refrigerator!
Doing so may cause an electrical shock, which
may result in severe injury or death.
Grounding Method -- This product is factory equipped with a power supply cord that has a three-pronged grounded
plug. It must be plugged into a mating grounding type receptacle in accordance with the National Electrical Code and
applicable local codes and ordinances. If the circuit does not have a grounding type receptacle, it is the responsibility
and obligation of the customer to exchange the existing receptacle in accordance with the National Electrical Code and
applicablelocal codes and ordinances. Thethirdgroundprong should not, underanycircumstances,be cut or removed.
All U.L. listed refrigerated products are equipped with this type of plug.
A ground fault circuit interrupter electrical receptacle is to be used to supply electrical power to the refrigerator for
outdoorapplications. Contactan electricianifyou needto installoneto supplyelectrical powertoyour outdoorrefrigerator.

INTERIOR LIGHT . . .
(Optional Feature)
When supplied with an interior light, your refrig-
erator uses a 15 watt appliance light bulb. To replace
the light bulb, proceed as follows:
1. Unplug the power cord from the wall receptacle.
2. Open the cabinet door.
3. Remove the 3 screws on the front face of the light
lens using a Phillips screwdriver.
4. Remove the lens.
5. Unscrew the existing bulb and replace with an
equivalent15 watt,threaded,intermediate baseap-
pliancebulb. Do not replacewithabulb higher than
15 watts.
6. Reassemble.
To clean the light assembly, disconnect the power cord and wipe the assembly with a mildly damp cloth.
Dry the unit completely before connecting the power cord. Make sure you disconnect the refrigerator’s power cord
plug from the electrical receptacle BEFORE you clean the light assembly.
THINGS TO REMEMBER . . .
1. Allow 24 hours for your refrigerator to reach a new temperature setting.
2. The motor will start and stop often. It must do this to maintain the temperature you select.
3. Keep your refrigerator reasonably level.
4. Unplug the refrigerator before working on anything with the electrical system.
5.
Exercise caution when sweeping, vacuuming, or mopping near the front of the unit. Damage to the grille and/or
the light fixture switch can occur.
6. For all cleaning of the refrigerator, mix 2 tablespoons baking soda with 1 quart warm water or use mild soap. Do not
use strong cleaners or scouring powder or pads.
7. Keep your refrigerator out of direct sunlight.
8. Do not splash or spray water on or under the refrigerator.
9. Clean your refrigerator’s condenser periodically to maintain proper cooling performance.
- 3 -
NOTE:
The rocker switch located on the right side of grille
controlsthe interiorlight andoverrides thedoorplunger
switch allowing the light to stay on even with the door
closed. To have the interior light go out after the door
is shut, make sure the rocker switch is pushed in to
the “off” position.
(Optional Feature)

WAYS TO SAVE POWER, SAVE MONEY, AND STILL ENJOY YOUR REFRIGERATOR.
1. Reduce door openings.
2. Close the door as soon as you can.
3. Keep the coils on bottom of the refrigerator clean.
4. Adjustthe temperaturecontrol toawarmersettingwhen practical.
5. Don’t put hot foods in the refrigerator.
6. Keep unit away from the stove or other heat sources.
HOW TO CLEAN AND
MAINTAIN YOUR CABINET . . .
•Condenser: The condenser tubing under the cabi-
net for forced air units does not require frequent
cleaning; however, satisfactory cooling depends on
adequate ventilation over the condenser. Be sure
that nothing obstructs the air flow openings in the
lower front of the cabinet. At least once or twice a
yearbrushorvacuumlint anddirtfromthecondenser
forefficient performance byunscrewingthegrille on
the bottom front of the cabinet.
•Cabinet: The painted cabinet can be washed with
mildsoap andwaterand thoroughlyrinsed withclear
water. Never use abrasive scouring powders.
•Interior and Door Gasket: Wash interior compart-
ment with mild soap and water. Mix 2 tablespoons
ofbakingsoda with one quart of warm water. Do not
use an abrasive powder, solvent, polish cleaner or
undiluteddetergent.
- 4 -
ENERGY SAVING TIPS . . .

Check the following Trouble Shooting Table.
Possible
Problem Cause/Solutions
Odor in cabinet • Interior needs cleaning
Noisyoperation • Cabinet not level
Cabinet vibrates • Cabinet not level
Cabinet light not • Bulb burned out
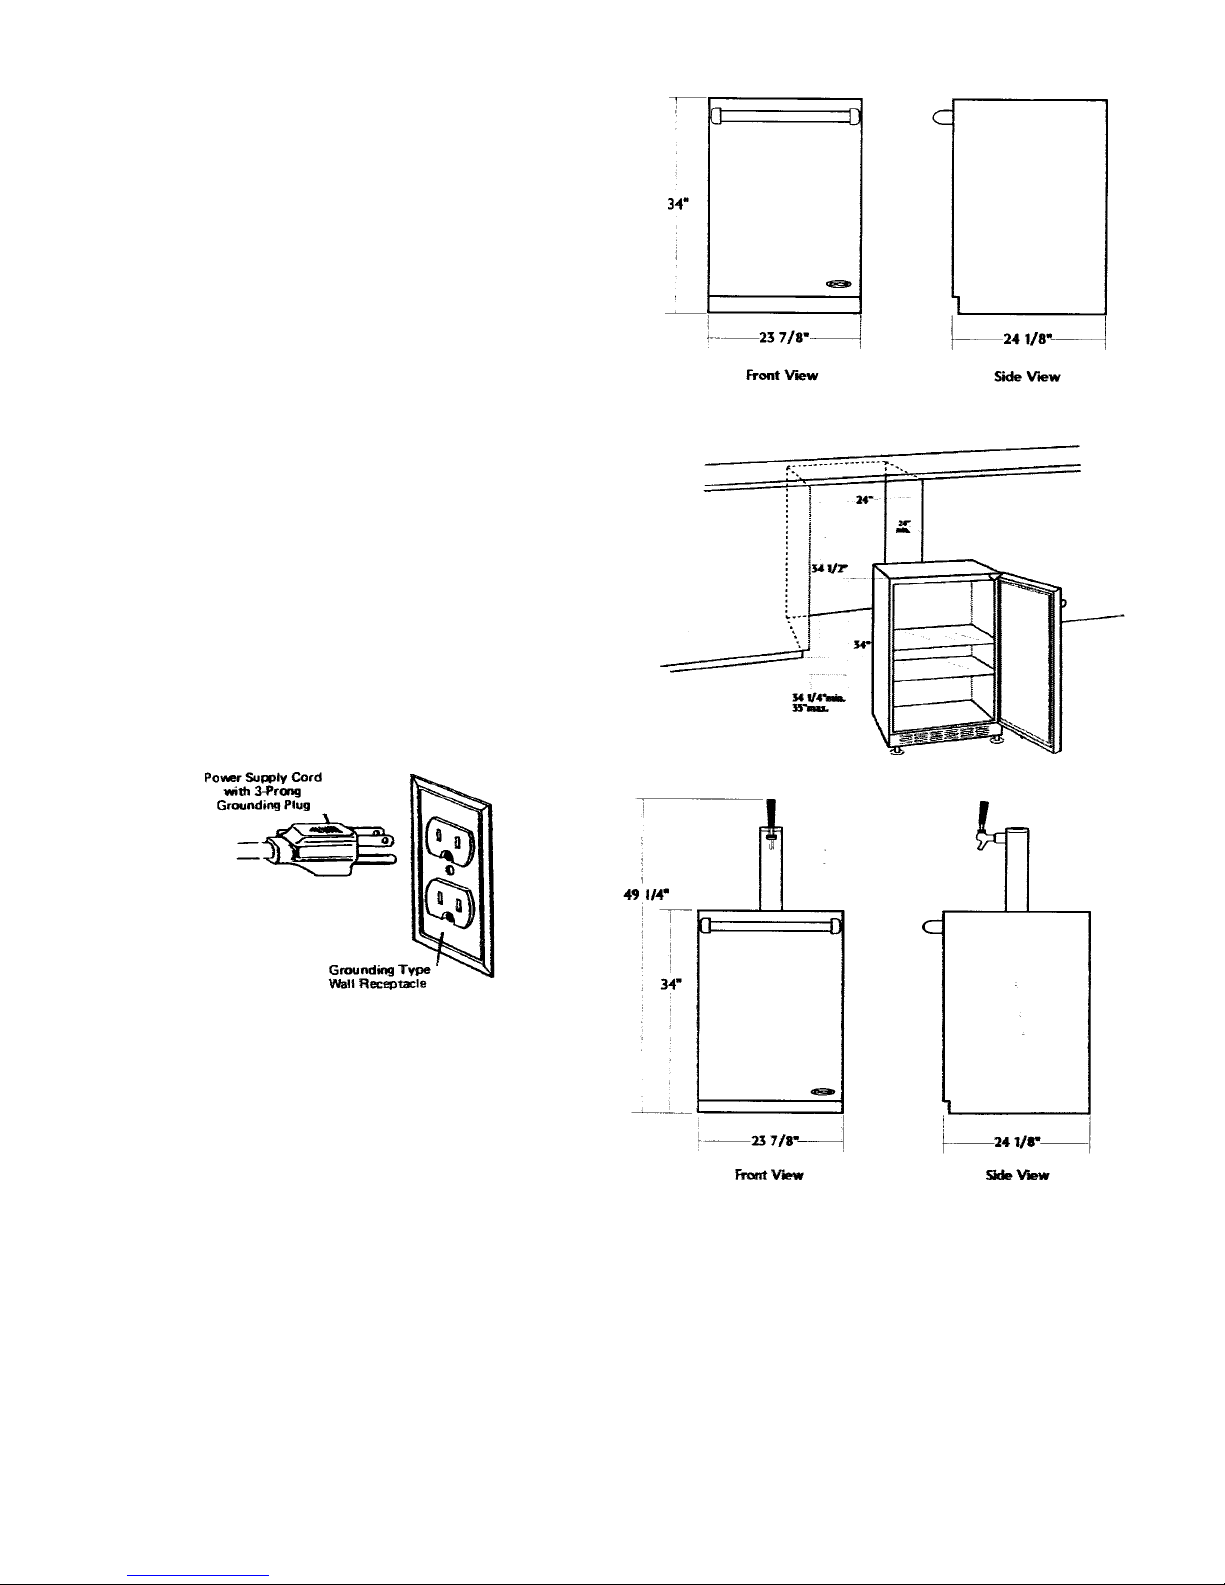
working • No power at outlet
(Optional Feature)
Appliance will not • Temperature control
run turned to “OFF”
• Line cord not
plugged in
• No power at electrical
outlet
• House fuse blown
Appliance runs too • Prolonged door
openingslong
• Control set too cold
• Condenser needs
cleaning
Moisture collects • Too many door
inside openings
• Prolonged door openings
• Hot, humid weather
increases condensation
Moisture collects on • Hot, humid weather
outside surface
increasescondensation.
Ashumidity decreases,
moisturewill disappear.
• Control improperly set
Interior too hot/ • Control improperly set
too cold • Faulty thermometer
BEFORE CALLING
FOR SERVICE . . . HOW TO OBTAIN
SERVICE . . .
Your refrigerator/freezer requireslittleservicebecause
thebest andmostup-to-date materials, equipmentand
quality control methods are employed throughout the
manufacturing process.
If trouble occurs during normal operation, first check
theproblems in the trouble shootingguideto see if any
of these simple steps may correct the problem. If ser-
vicebecomesnecessary,refer tothewarrantyenclosed
with the owner’s guide for instructions.
IT IS IMPORTANT THAT YOU SEND IN YOUR WAR-
RANTYRECORD CARDIMMEDIATELY AFTERTAK-
ING DELIVERY OF YOUR REFRIGERATION APPLI-
ANCE.
Every new refrigeration appliance that leaves the fac-
tory contains this Owner’s Guide. Keep this Owner’s
Guide in a safe place for convenient reference.
In the event that you need service, be sure to report
the model number, serial number and proof of pur-
chase. Refer to warranty for instructions. Model num-
ber and serial number are found on the serial plate
which is located on the lower front cabinet flange. For
your convenience you may want to record the follow-
ing information for your records.
DYNAMIC COOKING SYSTEMS PARTS&
SERVICE DEPARTMENT: (888) 281-5698.
Date of Purchase ____________________________
Dealer’s Name______________________________
Dealer’sAddress_____________________________
Dealer’sCity________________________________
Dealer’sState______________Zip______________
ApplianceSerial No. __________________________
ModelNo. __________________________________
DateWarranty Card Sent ______________________
(Within 10 days of purchase)
- 5 -

TEMPERATURE
CONTROL . . .
Initially set the
cold control knob
midwaybetween
the numbers.
After at least 2
hours, adjust to
the temperature
that suits you.
The higher the
number you
select, the cooler
the temperature.
Thetemperaturecontrol knob is located at the bottom,
front of the cabinet, just behind the square opening
near the middle of the grille.
HELP PREVENT
TRAGEDIES . . .
Eachyear children diebecausethey climb insideadis-
carded refrigeration product, get trapped inside and
suffocate. Take precautions to prevent such tragedies
by removing the door, taping or chaining it shut before
discarding.
DEFROSTING
INSTRUCTIONS . . .
Never use a scraper or any tool that might scratch or
pierce the cooling plate. Follow these steps whenever
1/4 inch or more of frost accumulates:
1. Disconnect the power cord and set the cold control
knob to “OFF” position.
2. Remove contents.
3. Place pans of hot water on the cooling plate if you
wish to speed up defrosting.
4. Wipe out the interior and replace contents.
5. Connect power cord to outlet.
6. Set temperature control to desired level.
ALL REFRIGERATOR
MODELS . . .
ALL REFRIGERATOR MODELS AUTOMATICALLY
DEFROST THEIR COOLING PLATE DURING EACH
COMPRESSOR OFF CYCLE. NO MANUAL DE-
FROSTING IS REQUIRED.
- 6 -

Thislimited warranty isgiven by DCStothe originalpurchaser
ofthe refrigeration equipment supplied byDCSaslong as the
eqiupmentremainsinthepossessionoftheoriginal purchaser.
FIRST YEAR LIMITED WARRANTY
Your DCS refrigerated equipment is warranted against de-
fectsinworkmanship or material for a period of one year from
date of purchase under the following date.
1. Registration card must be completed and mailed back to
DCS within 10 days from purchase date.
2. Defects must be proven to the satisfaction of DCS to have
been caused by defects in workmanship or material. DCS
may request that defective parts be returned for inspec-
tion at the owner’s expense.
3. The owner is responsible for the following:
a. All freight charges
b. Damage sustained in transit
c. Mileage charges for service calls
d. Proper installation
e. Alterations to original equipment
f. Removal or installation
4. During the First Year Limited Warranty, labor and parts
for the repairs will be provided by DCS at the customer’s
location.
ADDITIONAL SECOND THROUGH FIFTH YEAR LIMITED
WARRANTY.
During the four years following the First Year Limited War-
ranty, DCSwillsupplyreplacement parts for the sealed refrig-
eration system that are proven to DCS’s satisfaction to be
defectivedueto workmanship or materials. Other parts, labor
costs and freight charges are the responsibility of the owner.
__________________________________________
Sealed refrigeration system parts are: compressor, evapo-
rator, condenser, drier and connecting tubing.
In-warranty repair must be performed by factory authorized
service centers.
For authority to proceed with repairs contact:
Dynamic Cooking Systems, Inc.
5800 Skylab Road
Huntington Beach, CA 92647
1-800-433-8466
IN NO EVENT SHALL DCS BE LIABLE FOR INCIDENTAL
OR CONSEQUENTIAL DAMAGES INCLUDING, BUT NOT
LIMITED TO, CONTENT LOSS.
Some states do not allow limitations on length of time implied
warrantymay last, so theabovelimitations may notapplyto you
.
ADDITIONAL RIGHTS
This warranty gives you specific legal rights. You may also
have other rights which vary from state to state.
DCS LIMITED WARRANTY
- 7 -

This manual suits for next models
1
Table of contents
Other DCS Refrigerator manuals

DCS
DCS ActiveSmart RS36A72JC User manual

DCS
DCS ActiveSmart RS36A80JC User manual

DCS
DCS RF24RE Manual

DCS
DCS RF48SS User manual

DCS
DCS RF24RE4 Troubleshooting guide

DCS
DCS RF195A Mounting instructions

DCS
DCS RF24RE3 Manual

DCS
DCS RF24R Training manual

DCS
DCS RX215UJX1 Parts list manual

DCS
DCS RF48SS User manual

DCS
DCS RX215UJX1 Mounting instructions

DCS
DCS RF48SS User manual

DCS
DCS RF195A Mounting instructions

DCS
DCS RF24-D User manual

DCS
DCS ActiveSmart RF201A Wiring diagram

DCS
DCS RX215 Series Mounting instructions

DCS
DCS ActiveSmart RS36A72JC User manual

DCS
DCS RF195A User manual

DCS
DCS RF24-D Training manual

DCS
DCS RX215PJX1 Mounting instructions