decakila KMHS004W User manual

KMHS004W
HAIR CLIPPER

SAFETY WARNING
PRODUCT OVERVIEW
CHARGING
OPERATING INSTRUCTIONS
FIT A COMB ATTACHMENT
SETTING THE CUTTING LENGTH
CUTTING HAIR
TO CONTOUR THE NECKLINE AND AREA AROUND THE EARS
01
02
02
02
02
03
03
04
CONTENTS

05
05
05
06
06
06
06
AFTER USE
CARE AND CLEANING
TO REMOVE THE CUTTING BLADES
STORAGE
SPECIFICATION
CHARGER, COMPUTER OR POWER BANK
DISPOSAL


01
SAFETY WARNING
For your continued safety and to reduce the risk of injury or electric shock, please follow all the safety precautions listed
below.
This appliance can be used by children aged from 8 years and above and persons with reduced physical, sensory or mental
capabilities or lack of experience and knowledge if they have been given supervision or instruction concerning use of the appliance
in a safe way and understand the hazards involved. Children shall not play with the appliance. Cleaning and user maintenance
shall not be made by children without supervision.
Do not use the appliance if the blade damaged.
The appliance can become hot during use, only use for a maximum of 30 minutes then allow to cool for 30 minutes.
Never use the appliance on any part of the body other than for shaving the face.
Always check the appliance for damage prior to use. If any damage is observed, do not use the appliance.
Do not place the appliance on or near a heat sensitive surface.
Do not use the appliance or handle the USB cable with wet hands.
Recharge the appliance using the supplied USB cable only connect to power supply must be 5V 1A.
To protect against electric shock, never allow the appliance or USB cable with charger to come into contact with water or any other
liquid.
Never leave the appliance unattended when connected to the mains power supply. And keep the appliance dry.
Do not attempt to replace the battery.
Do not use for wet shaving - use the appliance only for shaving on dry skin.
Do not throw away the appliance with the normal household waste at the end of its life, but hand it in at an oicial collection point
for recycling. By doing this, you help to preserve the environment.

02
PRODUCT OVERVIEW
1.Clipper blades
2.Cutting length control: (0.8/1.2/1.6/2.0/2.5mm)
3.On/O switch
4.LCD charging display
5.Charging socket
6. Guide comb: (12mm cut)
7. Guide comb: (9mm cut)
8. Guide comb: (6mm cut)
9. Guide comb: (3mm cut)
10. Cleaning Brush
11. USB charging cable
CHARGING
Before charging the clipper, ensure that the adaptor, computer
or power bank’s input rating is the same as that indicated on
the instruction (5V 1A). Your clipper contains re-chargeable
batteries and used cordless for more than 180 minutes
when the batteries are fully charged. Once clipper fully
charged, the LCD display shows 100% .
During charging, the display will show as in blue color,
once fully charged, the blue light will be o.
Important note: The batteries must be charged for a
minimum of 3 hours for the rst charge cycle.
This will ensure the maximum life for the batteries.
OPERATING INSTRUCTIONS
FIT A COMB ATTACHMENT
The comb attachments each cut hair to a different length.
The cutting length is marked on the comb. Comb cut
length:3/6/9/12mm
Select the comb attachment for the cutting length you
require. Fit one of the comb attachments by sliding it onto
the clipping blade as shown until it is fully engaged.

03
NOTE: It is advisable to start with the longest cut (12mm) and
cut again with a dierent comb if a shorter cut is required.
SETTING THE CUTTING LENGTH
To set the cutting length, rotate the cutting length control ring
to your desired cutting length(0.8/1.2/1.6/2.0/2.5mm).The
cutting length is marked on the cutting length control ring as
shown.
CUTTING HAIR
1.Before starting, comb the hair in the direction of your hair
growth as shown.
2.Switch on the clipper by sliding the On/off switch to “O”
position. When the clipper has adequate power, the LCD
display will illuminate. If the LCD charger plug signs flashes,
the clipper should be recharged at the rst opportunity.
3.Pressing the comb against the head, start by clipping the
sides from the bottom of the head upwards. Slowly move the
clipper up towards the top of head cutting small amounts at a
time.

04
4.Repeat step 3 around both sides and the back.
5.Clip the top of the head from front to back.
Note: Do not push the clipper or force the clipper through
the hair.
Turbo Mode
Clipper has 2 setting, “1” for normal cutting. If you want
to cut the hair more efficient, you can choose turbo
mode for cutting hair. Slide upward the on/off switch
and ‘2’ showed up meanwhile LCD display change to
, then you can use your hair clipper.
TO CONTOUR THE NECKLINE AND AREA
AROUND THE EARS
Warning: The Clipper blades are very sharp when
unguarded.
Caution: Care should be taken when using the Clippers
without the Clipping guide tted as the Clippers will remove
any hair that comes into contact with the blades.
Switch o the Clippers.
Remove the Comb attachment.
Switch on the Clippers.
Position the Clippers so that only one edge contacts the hair.
Slowly shape the hair around the ears and contour the
neckline by positioning the blades against the neck and
moving downwards.
For nal trimming of the hair, fringe or beard, use scissors
(not provided).

05
AFTER USE
When you have nished, switch o the clipper by setting
the On/O switch to “1”position. Always clean the blades
aer use.
Care and Cleaning
The hair clipper must be unplugged before cleaning.
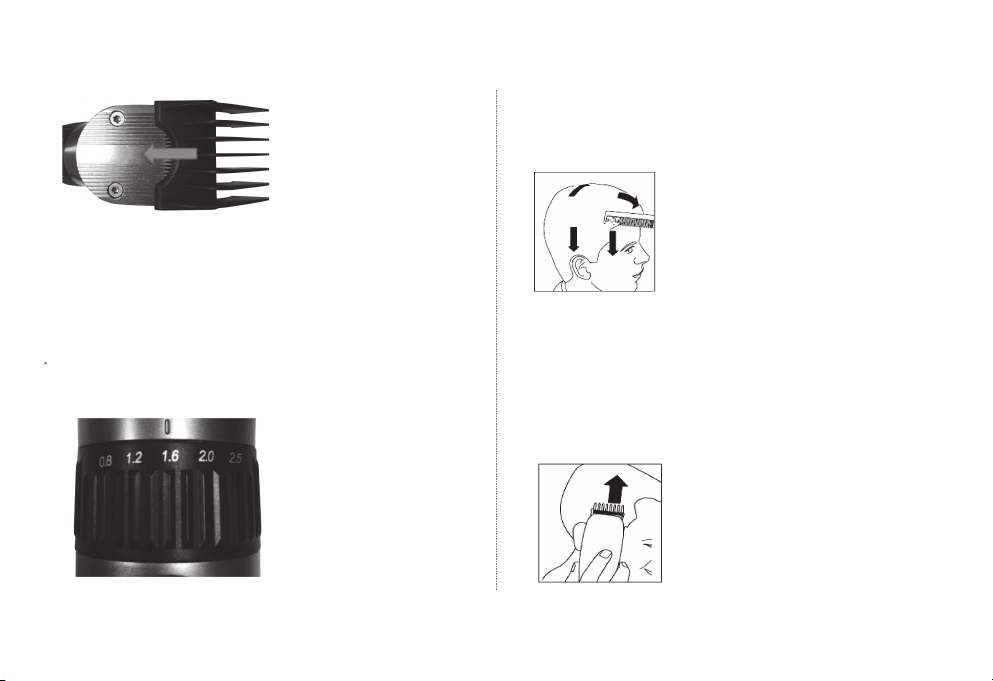
1.Remove the comb attachment (if tted).
2.Clean the blades and comb attachments with the
cleaning brush (supplied) to remove remaining loose hair
clippings.
3.Clean the housings of the clipper with a so, dry cloth.
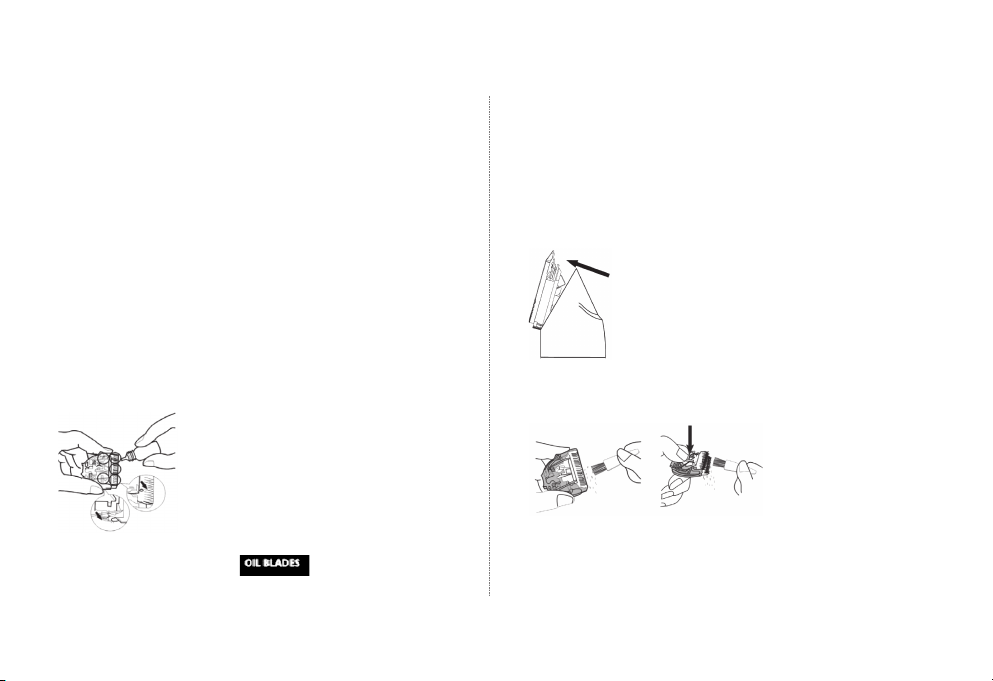
4.The cutting blades should be tightly oiled with your own
oil once every few haircuts as show.
5.The LCD display will remind you to add oil every 2 hours
of cutting. The “Oil blades” will shine.
TO REMOVE THE CUTTING BLADES
Periodically it is advisable to remove the blade assembly for
more thorough cleaning.
1.Ensure that the On/O switch is set to the “1’postion.
2.Using your thumb from the front of the clipper, Press back
against the cutting blades. The blade assembly will snap out
of the blade holding base.
3.Clean the blade assembly and inside the blade holding base
thoroughly with the cleaning brush (Supplied).
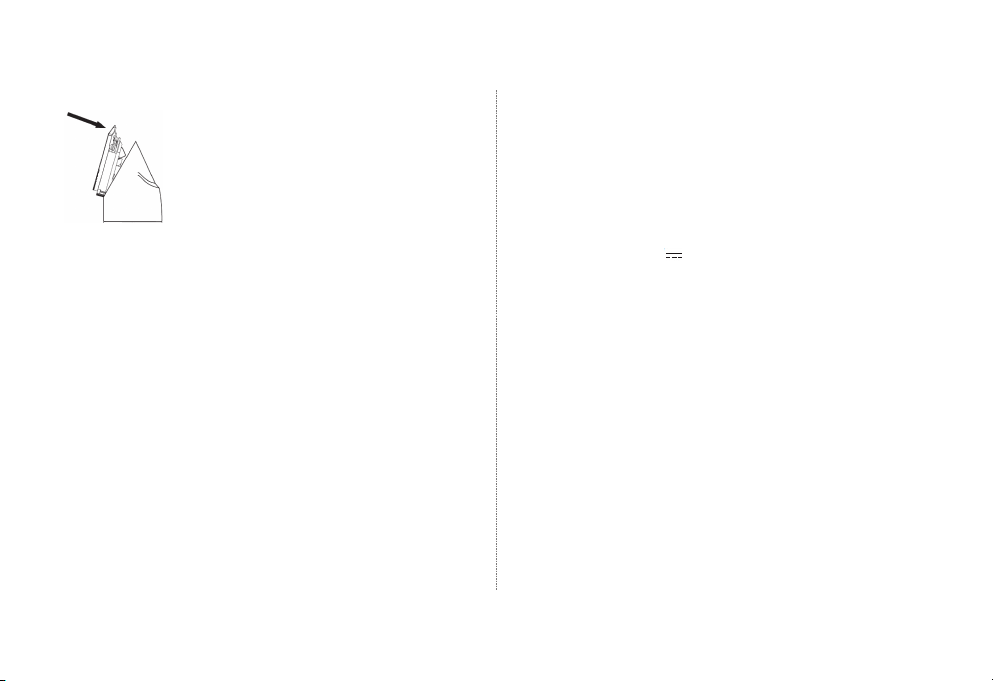
4.Re-assemble the blade assembly by engaging the bottom
latch, then pressing the top into the blade holding base.
Do not use any harsh detergents, abrasives, solvents or

06
cleaners. NEVER immerse in water to clean.
Do not use any harsh detergents, abrasives, solvents or
cleaners. Never immerse in water to clean.
5.Dry thoroughly before use.
Storage
The hair clipper should never be stored whilst hot or whilst
still connected to the mains. Always ensure the hair clipper
is switched o, unplugged from the charger and has cooled
down before storing.
Specication
Model: KMHS004W
Noise gure: 72 dB
Hair clipper
Power supply: 3.6V 2500mAh
Charging time: approx.3hours
Operating time with fully charged battery: approx. 180
minutes
CHARGER, COMPUTER OR POWER BANK
Output rating :5V , 1A
Waterproof: IPX4
DISPOSAL
Before disposing of this appliance, the internal rechargeable
battery must be removed for separate disposal.
NOTE: This process is not reversible, please give it to the
professional team
Disposal
In accordance with European Directive 2012/19/EC(WEEE),
the scrapped appliance must be disposed of appropriately
at the end of its life cycle. This concerns the recycling of
useful parts of the appliance and allows a reduction in the

07
environmental impact. For more information, please contact your local waste disposal facility or appliance retailer.
Notes for battery disposal:
The batteries used with this product contain chemicals that are harmful to the environment.
To preserve our environment, dispose of used batteries according to your local laws or regulations. Do not dispose
of batteries with normal household waste. For more information, please contact the local authority or your retailer
where you purchased the product.

www.decakila.com Decakila Co.,Limited
Made in China Jiangsu China. 2021.D01
decakila decakila
User guide
Table of contents
Other decakila Hair Clipper manuals