DecaLED 94000115 User manual
DecaLED®
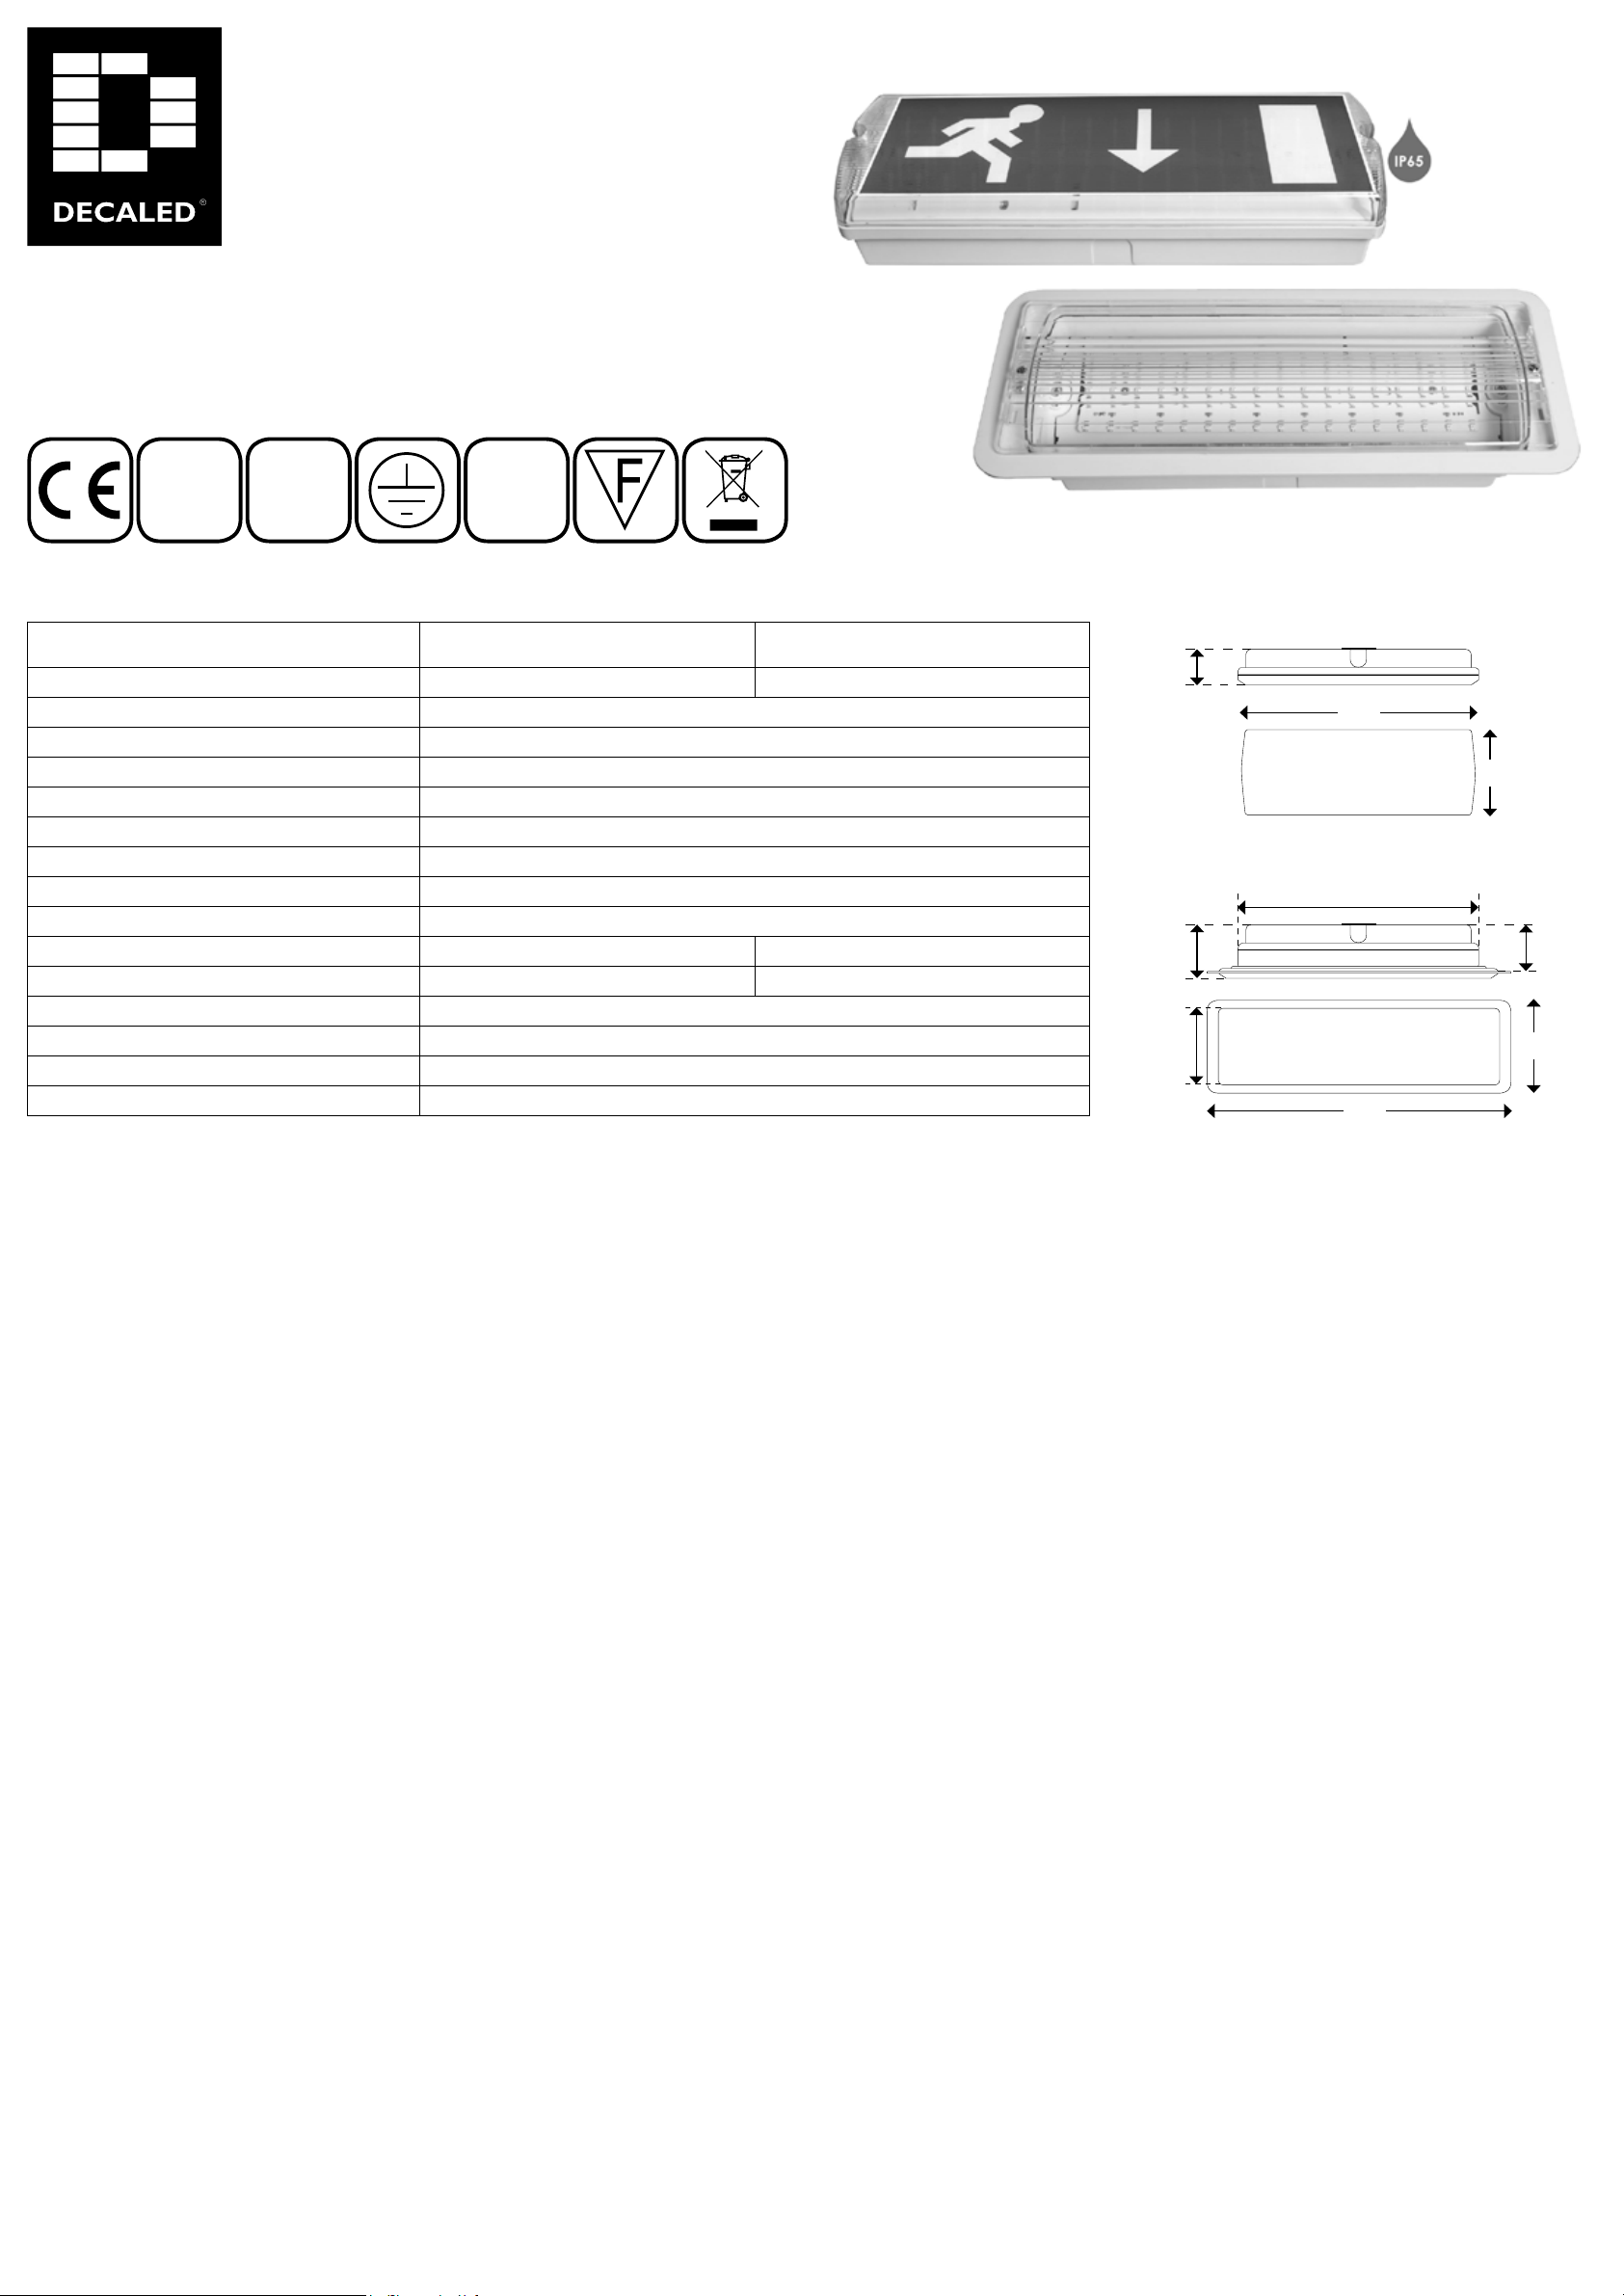
Emergency Range
Noodverlichtingsarmatuur 5-7W
Product code(s)
94000115, 94000120
ErP
COMPLIANT
RoHS IP20
IP65
www.decaled.com
Technische specicaties | Technical specications
Opbouw armatuur 5-7W (IP65)
94000115
Inbouw armatuur 5-7W (IP20)
94000120
Wattage | Power 5-7 W 5-7 W
Voltage driver 230 VAC
Dimbaar | Dimmable -
Power factor > 0,75
Kleur | Colour cool white
Kleurtemperatuur | Color temperature 6000 °K
Lumenstroom | Luminous ux (AC) 230-250 Lm
Lumenstroom | Luminous ux (DC batt.) 100-130 Lm
Gemid. levensduur | Expected life time 25000 - 40000 hours
Afmetingen | Dimensions H1/ W2/ L376 / 117 / 350 mm 96 / 164 / 420 mm
Inbouwmaat | Cut out D4/ W5/ L6- 85 / 136 / 385 mm
Accu type | Battery type 4,8V 1800mAh Ni-Cd
Accu beveiliging | Battery protection Over- and unloading
Accu autonomie | Battery autonomy 3 hours
Accu vervangen | Battery replacement Every 4 years
Veiligheidsinstructies
• Laat dit product installeren en onderhouden door een erkend installateur.
• De beschikbare netspanning mag niet hoger zijn dan de spanning in de specicaties
van deze handleiding.
• Houd dit product buiten het bereik van kinderen en onbevoegden.
• Elektrocutiegevaar bij het openen van het product. Raak geen kabels aan die onder
spanning staan om dodelijke elektrische schokken te vermijden. Open de behuizing
niet zelf. Laat het onderhoud van het product over aan een erkend installateur.
• Dit verlichtingsproduct heeft geen ingebouwde voorziening om het los te koppelen
van het spanningsnet. Isoleer het product elektrisch voor de installatie of onderhoud.
Zorg ervoor dat het stroomsnoer niet gekneld of geplooid is en bescherm het tegen
beschadigingen. Waarschuwing! Indien de voedingskabel beschadigd is, dan moet
deze door de fabrikant, diens servicedienst, of een gelijkwaardig bekwaam persoon
vervangen worden om gevaar te voorkomen.
• Attentie: mogelijk gevaarlijke optische straling uitgezonden door dit product. Kijk nooit
rechtstreeks in de lichtbron. Dit kan leiden tot oogletsel.
• Attentie: dit product wordt warm tijdens het gebruik.
• Gebruik het product enkel binnenshuis. Bescherm het product tegen regen,
vochtigheid en opspattende vloeistoffen. Plaats geen objecten gevuld met vloeistof
op of naast het product.
• Gebruik het led armatuur niet indien de beschermplaat / cover gebarsten of
gebroken is. Ontkoppel het product onmiddellijk. De beschermplaat / cover is niet
vervangbaar.
• Alle elektrotechnische installaties dienen te worden uitgevoerd volgens de IEE
bedradingsrichtlijnen.
Safety instructions
• A qualied technician shall install and service this device.
• Make sure that the available voltage does not exceed the voltage stated in the
specications of this manual.
• Keep this device away from children and unauthorized users.
• Risk of electroshock when opening the cover. Touching live wires can cause life-
threatening electroshocks. Do not disassemble or open the housing yourself. Have the
device repaired by qualied personnel.
• This luminaire does not have a built-in device to disconnect it from the electric mains.
Make sure to electrically isolate the luminaire before installation or maintenance
activities are performed. Do not crimp the power cord and protect it against
damage. Warning! If the power cord is damaged, it must be replaced by the
manufacturer, its service agent, or similarly qualied persons in order to avoid any
hazard.
• Caution: possibly hazardous optical radiation emitted from this product. Do not look
straight into the light source. Eye injury may result.
• Caution: device heats up during use.
• Indoor use only. Keep this device away from rain, moisture, splashing and dripping
liquids. Never put objects lled with liquids on top of or close to the device.
• Do not use the luminaire with a cracked or broken protective shield. Disconnect
immediately from the mains. The protective shield is not replaceable.
• All electrical installations must be carried out according to IEE wiring regulations.
Reiniging en onderhoud
• Dit verlichtingsproduct heeft geen ingebouwde voorziening om het los te koppelen
van het spanningsnet. Isoleer het product elektrisch voor de installatie of onderhoud.
• Alle gebruikte schroeven moeten goed zijn aangespannen en mogen geen sporen
van roest vertonen.
• De behuizing, de zichtbare delen, de montagebeugels en de montageplaats (bv. het
plafond of bevestingsveren) mogen niet vervormd zijn of aangepast worden (geen
extra gaten in montagebeugels boren, aansluitingen niet verplaatsen, enz.).
• Mechanisch bewegende delen mogen geen sporen van slijtage vertonen en mogen
niet onregelmatig bewegen.
• De voedingskabels mogen niet beschadigd zijn. Laat het product onderhouden door
een erkend installateur.
• Indien de beschermplaat / cover beschadigd is, moet u het armatuur onmiddellijk
loskoppelen van het spanningsnet. Gebruik het armatuur niet indien de
beschermplaat / cover gebarsten of gebroken is. De beschermplaat / cover is niet
vervangbaar.
• De gebruiker mag geen onderdelen vervangen.
• Bestel eventuele reserveonderdelen bij uw plaatselijke verdeler.
• Maak het product geregeld schoon met een vochtige, niet pluizende doek.
• Gebruik geen alcohol of oplosmiddelen voor de reiniging.
• Test de verlichting en de accu periodiek, conform landelijke en/of Europese
richtlijnen.
Cleaning and maintenance
• This luminaire does not have a built-in device to disconnect it from the electric mains.
Make sure to electrically isolate the luminaire before installation or maintenance
activities are performed.
• All screws shall be tight and free of corrosion.
• The housing, the visible parts, the mounting supports and the installation location
(e.g. ceiling, suspension, etc.) shall not be deformed, modied or tampered with;
e.g. do not drill extra holes in mounting supports, do not change the location of the
connections.
• Mechanically moving parts must not show any signs of wear and tear.
• The electric power supply cables must not show any damage.
• Have a qualied technician maintain the device.
• If the protective shield / cover is damaged, disconnect the luminaire immediately
from the mains. Do not use the luminaire with a cracked or broken protective shield /
cover. The protective shield / cover is not replaceable.
• There are no user-serviceable parts.
• Contact your dealer for spare parts if necessary.
• Wipe the device regularly with a moist, lint-free cloth.
• Do not use alcohol or solvents for cleaning.
• Test the lighting and the battery periodically, in accordance with national and / or
European regulations.
Versie 2015.11
H1
H2
L3
W2
L3
W2
D4
L3
W5

Installatie
• Respecteer altijd de veiligheidsinstructies! Neem deze door voordat u met de
installatie begint.
• Schakel de spanning af / los, voordat u begint aan de installatie of de bedrading.
• Inbouwen: Zaag een montagegat in overeenstemming met de afmetingen conform
de specicaties op de andere zijde van deze handleiding.
• Verwijder de kap van het armatuur door de twee kruiskopschroeven los te draaien.
• Duw de twee bevestigingsveren (gemarkeerd met >>) naar buiten. Het binnenwerk
scharniert.
• Opbouwen: Monteer het armatuur met geschikte schroeven en pluggen op de
gewenste locatie.
• Zorg ervoor dat de secundaire zijde van de driver is aangesloten aan het armatuur,
voordat u de primaire zijde van stroom voorziet.
• Leg de bedrading aan conform IEE regelgeving. Verbind een ongeschakelde 240V
AC-voeding met Fase (L), Aarde (E) en Nul (N) aansluitingen op de printplaat. Voor
een geschakelde noodvariant, sluit u de schakelaar aan op Fase (LS) in plaats van de
draadlus.
• Voor gebruik dient u de accu connector aan te sluiten op het vrije contact CN3 “BATT”
van de LED driver aan te sluiten (zie foto).
• Klap het binnenwerk terug naar binnen en druk het aan om vast te klikken. Plaats
daarna de kap terug en schroef deze vast met de twee schroeven.
• Inbouwen: Druk de klemveren omhoog en plaats het armatuur in het montagegat.
Installation
• Always respect the safety instructions! Check them out before you begin the
installation.
• Turn the power off / disconnect, before starting the installation or wiring.
• Recessed mounting: Cut a mounting hole in accordance with the dimensions in the
specications on the other page of this manual.
• Remove the diffuser from the body by removing two crosshead screws.
• Push the two feather clamps (marked >>)outwards. Gear tray hinges.
• Surface mounting: Mount the luminaire with suitable screws and dowels at the desired
location.
• Make sure the secondary side of the driver is connected to the luminaire before
connecting the primary side with power.
• Wire up the luminaire in accordance to IEE wiring regulations. An unswitched 240V AC-
supply must be connected to Live (L), Earth (E) and Neutral (N) terminals on the PCB.
For Maintained variants, switched illumination is provided by connecting a switched
Live (LS) in place of the wire loop.
• Before use plug battery lead connector into the empty terminal CN3 “BATT” on the LED
driver (see picture).
• Hinge back gear tray, press down to lock. Then place the diffuser onto the body with
two screws.
• Recessed mounting: Press the retaining springs up and place the luminaire into the
mounting hole.
Algemeen gebruik
Het DecaLED®Noodverlichtingsarmatuur 5-7W kan worden ingezet als decentrale
noodverlichting voor vluchtwegen, maar ook als permanente of reguliere verlichting
op bijvoorbeeld een galerij. De opbouw-versie (94000115) kan met de bijgeleverde
pictogram stickers ook als vluchtroute aanduiding worden gebruikt. Dit LED armatuur
wordt geleverd inclusief een ingebouwde LED driver en een accu-pack waarmee de
noodverlichting bij een stroomonderbreking circa 3 uur autonoom blijft branden.
• Bescherm dit product tegen extreme temperaturen.
• Bescherm het product tegen schokken. Vermijd brute kracht tijdens de bediening.
• Bestudeer eerst de functies van het product voordat u het gaat gebruiken.
• Om veiligheidsredenen mag u geen wijzigingen aanbrengen aan het product.
Schade door wijzigingen die de gebruiker heeft aangebracht aan het product, valt
niet onder de garantie.
• Gebruik het product enkel waarvoor het gemaakt is. Andere toepassingen kunnen
leiden tot kortsluitingen, brandwonden, elektrische schokken, enz.
• De garantie vervalt automatisch bij ongeoorloofd gebruik.
• De garantie geldt niet voor schade door het negeren van bepaalde richtlijnen in
deze handleiding. Uw dealer zal de verantwoordelijkheid afwijzen voor defecten of
problemen die hier rechtstreeks verband mee houden.
• Gebruik de oorspronkelijke verpakking wanneer u het product vervoert.
• Bewaar deze handleiding voor verdere raadpleging.
Testen
Het wordt aanbevolen om het armatuur periodiek te testen / inspecteren. Hiervoor
dienen de batterijen minimaal 24 uur ononderbroken geladen te zijn. Door het indrukken
van de testknop gaat de noodverlichting branden. Voor een brandduurtest (1 of 3 uur)
dient u de netspanning van de armatuur af te schakelen. De groene indicatie-LED geeft
aan dat er netspanning aanwezig is en dat de batterij wordt geladen.
Accu
Wanneer de brandduur niet langer voldoet aan de opgegeven autonomie dient de
batterij te worden vervangen. Voor specicaties zie de sticker op de batterij. Gezien
de technische levensduur van de batterij wordt het aanbevolen deze na 4 jaar te
vervangen.
General usage
The DecaLED® Emergency LED lighting luminaire 5-7W can be used as local emergency
lighting for escape routes, but also for permanent or regular lighting such as a gallery.
The surface mounted version (94000115) can be used as escape route indication, using
the included icon stickers. This LED luminaire comes with a built-in LED driver and battery
pack with which the emergency lighting remains lit independently during a power outage
about 3 hours.
• Keep this device away from extreme temperatures.
• Protect this device from shocks and abuse. Avoid brute force when operating the
device.
• Familiarise yourself with the functions of the device before actually using it.
• All modications of the device are forbidden for safety reasons. Damage caused by
user modications to the device is not covered by the warranty.
• Only use the device for its intended purpose. All other uses may lead to short circuits,
burns, electroshocks, luminaire explosion, crash, etc.
• Using the device in an unauthorised way will void the warranty.
• Damage caused by disregard of certain guidelines in this manual is not covered by
the warranty and the dealer will not accept responsibility for any ensuing defects or
problems.
• Use the original packaging if the device is to be transported.
• Keep this manual for future reference.
Testing
It is recommended to test the luminaire periodically. For this purpose, the batteries must
be charged for 24 hours prior to any test. By means of the test switch, isolate the un-
switched live supply and the emergency luminaire will be lit. For a 1 or 3 hour duration
test, the supply is switched off to ensure the rated duration is achieved. The green LED
indicates that power is on and the battery is charged.
Batteries
When the test results no longer meet the requirements for duration indicated for the
luminaire the batteries must be replaced. Please see the label on the batteries for the
type required. Given the technical life cyle of the battery, it is recommended to replace it
every 4 years.
Afvoeren van het product (WEEE)
Dit symbool op het toestel of de verpakking geeft aan dat, als het na zijn
levenscyclus wordt weggeworpen, dit toestel schade kan toebrengen aan
het milieu. Gooi dit toestel (en eventuele batterijen) niet bij het gewone
huishoudelijke afval; het moet bij een gespecialiseerd bedrijf terechtkomen
voor recyclage. U moet dit toestel naar uw verdeler of naar een lokaal
recyclagepunt brengen. Respecteer de plaatselijke milieuwetgeving.
Disposal of the product (WEEE)
This symbol on the device or the package indicates that disposal of the
device after its lifecycle could harm the environment. Do not dispose of
the unit (or batteries) as unsorted municipal waste; it should be taken to a
specialized company for recycling. This device should be returned to your
distributor or to a local recycling service. Respect the local environmental
rules.
LS
NL
N neutral / nulleider / neutral (blue / blauw / blau)
L constant phase / constante fase / konstanter Phase (brown / bruin / braun)
LS switched phase / geschakelde fase / geschaltete Phase (black / zwart / schwarz)
earth / aarde / erd (yellow-green / geel-groen / gelb-grün)
220-240V (50/60Hz)
central supply
centrale voeding
zentrale Stromversorgung
not continuous
niet continu
nicht kontinuierlich
continuous / switched
continu / geschakeld
kontinuierlich / geschaltet
continuous
continu
kontinuierlich
220-240V AC
NL
LS NL
LS NL
Connection diagram
Function Status LS L N E Battery Control LED
Emergency light ON Always ON x x x x x green
Emergency light OFF Only in case of emergency ON x x x x green
Emergency light OFF Switchable ON/OFF S x x x x green
è
LS NL
N neutral / nulleider / neutral (blue / blauw / blau)
L constant phase / constante fase / konstanter Phase (brown / bruin / braun)
LS switched phase / geschakelde fase / geschaltete Phase (black / zwart / schwarz)
earth / aarde / erd (yellow-green / geel-groen / gelb-grün)
220-240V (50/60Hz)
central supply
centrale voeding
zentrale Stromversorgung
not continuous
niet continu
nicht kontinuierlich
continuous / switched
continu / geschakeld
kontinuierlich / geschaltet
continuous
continu
kontinuierlich
220-240V AC
NL
LS NL
LS NL
This manual suits for next models
1
Other DecaLED Safety Equipment manuals

Popular Safety Equipment manuals by other brands


STI
STI STI-7554 instruction manual

Petzl
Petzl SCORPIO Instructions for use

3M
3M SEALED-BLOK 3400944 instruction manual

Singing rock
Singing rock W2001 quick start guide

SECUMAR
SECUMAR 9 S Instructions for use

Safety Technology International
Safety Technology International STI-13000 Series Installation notes

Clevertronics
Clevertronics L10 Jumbo LJELED-40 Series Installation & maintenance instructions

ultraMEDIC
ultraMEDIC ultraHEAD-LOCK II operating manual

Pelsue
Pelsue DBF-43A product manual

Innotech
Innotech VERT-SET-50 Safety instructions and instruction manual

Assa Abloy
Assa Abloy 179B Mounting instruction

SafeWaze
SafeWaze FS888 instruction manual