DECKORATORS ALX CLASSIC User manual
Your complete guide for inspiration, product offerings,
how-to-buy guides, installations and warranties.
2014 Pro Guide
RAILING • BALUSTERS • POST CAPS • LIGHTING • ACCESSORIES
2020 TECHNICAL GUIDE
DECKING •RAILING •BALUSTERS • ACCESSORIES • POST CAPS •LIGHTING • L ATTICE • PORCH
TECH GUIDE

HOW TO BUY
3 ALX Contemporary Pre-assembled
Railing
4 ALX Contemporary Cable Railing
5 ALX Pro with Face Mount
Balusters Railing
6 ALX Pro with Center Mount
Balusters Railing
7 Cable Railing
8 ALX Classic Railing
INSTALLATION GUIDES
9 Eovations
12 Deckorators Solid Decking
14 Deckorators Grooved Decking
18 Porch Flooring
20 Stair Tread
22 Fascia
23 Sleeper System
24 ALX Contemporary Railing
27 ALX Contemporary Cable Railing
38 ALX Pro Railing
42 Cable Railing
44 ALX Classic Railing
47 Secondary Handrail
49 Classic Balusters
51 Estate Balusters
53 Arc, Traditional and
Baroque Balusters
55 Scenic Glass
59 Post Caps
61 Deckorators®by Hinkley
67 Postcovers
70 Plastic Lattice
WARRANTY INFORMATION
71 Warranties
GO BEYOND ORDINARY.
Deckorators takes the enjoyment of personalizing your outdoor living
space to a whole new level. With decking and railing products that excite
and inspire, you can accessorize and enhance the world outside your four
walls with the newest, on-trend styles from the brand always leading design
innovation. Deckorators offers the quality and selection to transform decks
into a reflection of each homeowner. The first name in outdoor decorating,
we’ve staked our reputation on your satisfaction.
In fact, we’re so confident, we stand firmly behind that reputation with
some of the best, first-of-their-kind product warranties in the industry.
DECKORATORS CERTIFIED PRO PROGRAM
Our 2020 Deckorators Certified Pro program is designed to help your
business by aligning you with the leader in decking, railing, post caps,
and accessories. Certified Pros receive:
· Preferred contractor listing on Deckorators.com
· Access to the Deckorators Pro-Only site
· Sample kits
· Special promotions
· Hands-on training by a Deckorators representative
· Deckorators Rewards Program
Our new rewards program allows you to earn points for every Deckorators
purchase you make. Use points to purchase Deckorators products,
marketing materials, apparel or cash.
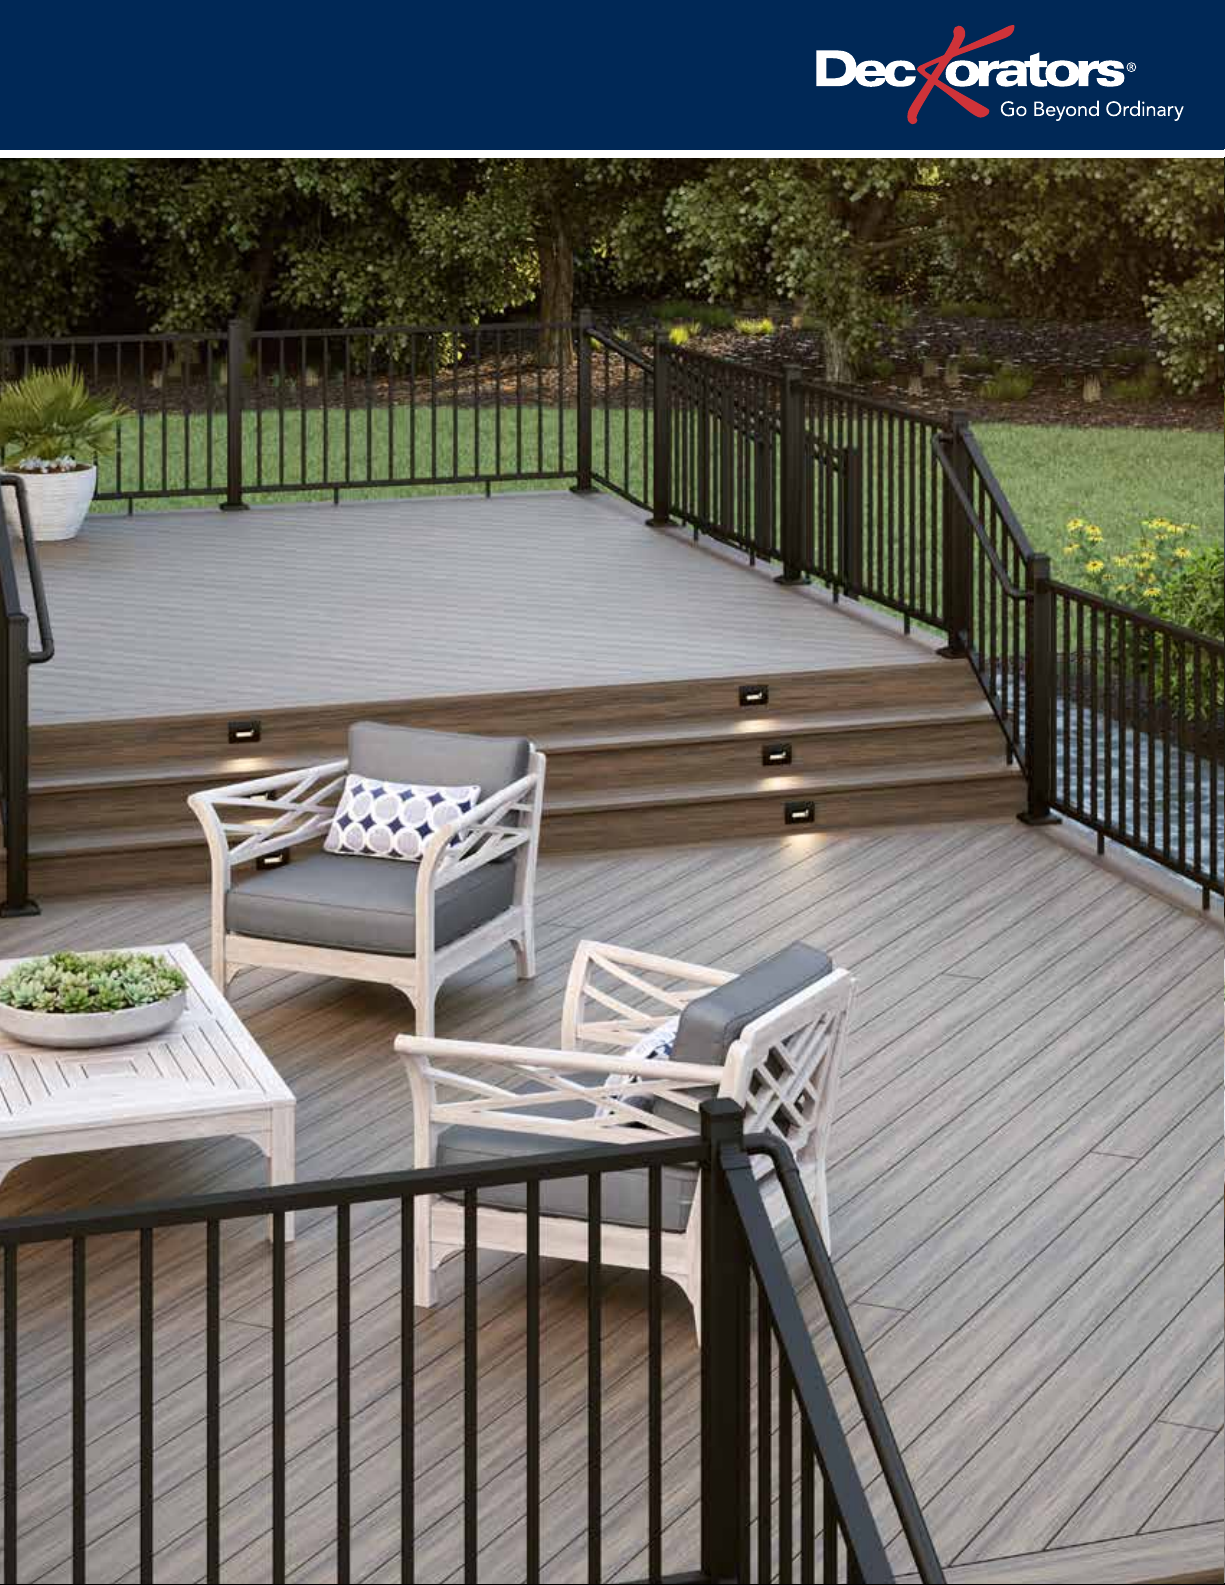
ON COVER:
Voyage Decking in Khaya paired with ALX
Contemporary Railing in Textured Black,
Deckorators®by Hinkley Luna Step Lights in
Black and Aluminum Secondary Handrail in
Tex tured Black
STEP 1 - CHOOSE YOUR RAILING
ALX CONTEMPORARY PREASSEMBLED RAIL - PURCHASE (1) KIT PER 6'OR 8'ON-CENTER IN-LINE RAIL SECTION. HARDWARE INCLUDED.
6' On-Center* Rectangle ALX Contemporary Preassembled Rail (36"or 42")Available colors: Textured Black, Textured White, Weathered
Brown, Textured Bronze and Brushed Titanium
8' On-Center* Rectangle ALX Contemporary Preassembled Rail (36"or 42")
*Sized for on-center lengths when installed with 2.5"posts
STEP 2 - CHOOSE YOUR POSTS
2.5"x 2.5"ALUMINUM POST KITS - PURCHASE (1) POST KIT PER RAILING, PLUS (1) TO END EACH RUN. TRIM AND POST CAP INCLUDED.
39"Aluminum Post Kit with Leveling Plate (for 36"rail) Available colors: Textured Black, Textured White, Weathered
Brown, Textured Bronze and Brushed Titanium
44"Aluminum Post Kit with Leveling Plate (for 42"rail)
STEP 3 - CHOOSE YOUR STAIR RAILING
ALX CONTEMPORARY PREASSEMBLED RAIL - PURCHASE (1) KIT PER 6'OR 8'STAIR RAIL SECTION. HARDWARE INCLUDED.
6' Rectangle ALX Contemporary Preassembled Stair Rail (36"or 42")Available colors: Textured Black, Textured White, Weathered
Brown, Textured Bronze and Brushed Titanium
8' Rectangle ALX Contemporary Preassembled Stair Rail (36"or 42")
STEP 4 - CHOOSE YOUR STAIR POSTS
2.5"x 2.5"ALUMINUM POST KITS - PURCHASE (1) POST KIT PER STAIR RAILING, PLUS (1) TO END EACH RUN. TRIM AND POST CAP INCLUDED.
49"Aluminum Post Kit with Leveling Plate (for 36"stair rail) Available colors: Textured Black, Textured White, Weathered
Brown, Textured Bronze and Brushed Titanium
54"Aluminum Post Kit with Leveling Plate (for 42"stair rail)
STEP 5 - CHOOSE YOUR POST CAPS
2.5"Luna Low voltage post caps Available colors: Matte Black, Textured White and Weathered
Brown
2.5"Solar Post Cap Available colors: Black, White, Weathered Brown
2.5"Nouveau Solar Post Cap Available colors: Black and White
HOW TO BUY:
ALX CONTEMPORARY PREASSEMBLED
2
1
NOTE: STEP 3 AND STEP 4 NOT SHOWN ON DIAGRAM
5
HOW TO BUY • ALX CONTEMPORARY PREASSEMBLED RAILING 3
HOW TO BUY • ALX CONTEMPORARY PREASSEMBLED RAILING
4 HOW TO BUY • ALX CONTEMPORARY CABLE RAILING
HOW TO BUY • ALX CONTEMPORARY CABLE RAILING
STEP 1 - CHOOSE YOUR RAILING
ALX CONTEMPORARY CABLE RAIL - PURCHASE (1) KIT PER 6'OR 8'ON-CENTER IN-LINE RAIL SECTION. HARDWARE INCLUDED.
6' On-Center* Rectangle ALX Contemporary Top Rail (36"or 42")Available colors: Textured Black, Textured White,
Weathered Brown and Textured Bronze
8' On-Center* Rectangle ALX Contemporary Top Rail (36"or 42")
*Sized for on-center lengths when installed with 2.5"posts
STEP 2 - CHOOSE YOUR POSTS
2.5"x 2.5"CABLE POST KITS - PURCHASE (1) LINE POST KIT FOR IN BETWEEN TWO RAILING SECTIONS, PLUS (1) END POST TO END EACH CABLE RUN.
TRIM AND POST CAP INCLUDED.
39"Cable Line Post Kit with Leveling Plate (for 36"rail), 10 pre-drilled holes
Available colors: Textured Black, Textured White,
Weathered Brown and Textured Bronze
39"Cable End Post Kit with Leveling Plate (for 36"rail), 10 pre-drilled holes
44"Cable Line Post Kit with Leveling Plate (for 42"rail), 12 pre-drilled holes
44"Cable End Post Kit with Leveling Plate (for 42"rail), 12 pre-drilled holes
STEP 3 - CHOOSE YOUR STAIR RAILING
ALX CONTEMPORARY CABLE RAIL - PURCHASE (1) KIT PER 6'STAIR RAIL SECTION. HARDWARE INCLUDED.
6' Rectangle ALX Contemporary Cable Stair Rail Available colors: Textured Black, Textured White,
Weathered Brown and Textured Bronze
8' Rectangle ALX Contemporary Cable Stair Rail
*46"stair spacers included for 36"and 42"stair heights. Trim to fit.
STEP 4 - CHOOSE YOUR STAIR POSTS
2.5"x 2.5"ALUMINUM POST KITS - PURCHASE (1) MIDDLE STAIR POST KIT FOR IN BETWEEN TWO STAIR RAILING SECTIONS, PLUS (1) BOTTOM STAIR
POST TO END THE CABLE RUN AT THE BOTTOM. TRIM AND POST CAP INCLUDED.
49"Cable Stair Middle Post Kit with Leveling Plate (for 36"stair rail), 10 pre-drilled slots
Available colors: Textured Black, Textured White,
Weathered Brown and Textured Bronze
49"Cable Stair Bottom Post Kit with Leveling Plate (for 36"stair rail), 10 pre-drilled holes
54"Cable Stair Middle Post Kit with Leveling Plate (for 42"stair rail), 12 pre-drilled slots
54"Cable Stair Bottom Post Kit with Leveling Plate (for 42"stair rail), 12 pre-drilled holes
STEP 5 - CHOOSE YOUR CABLE
CABLE IS AVAILABLE IN INDIVIDUAL PRE-CUT LENGTHS. PURCHASE (10) FOR EACH 36"RAILING RUN AND (12) FOR EACH 42"RAILING RUN. MULTIPLE
LENGTHS MAY BE REQUIRED BASED ON THE DECK LAYOUT. TRIM TO FIT.
1/8"SS Cable with pre-attached threaded stud and pull-lock fitting, in 5', 10', 15', 20', 25',
30', 40'and 50'lengths
Available colors: 316 Stainless
STEP 6 - CHOOSE YOUR POST CAPS
2.5"Luna Low voltage post caps Available colors: Matte Black, Textured White and
Weathered Brown
2.5"Solar Post Cap Available colors: Black, White, Weathered Brown
2.5"Nouveau Solar Post Cap Available colors: Black and White
1
2
5
6
NOTE: STEP 3 AND STEP 4 NOT SHOWN ON DIAGRAM
HOW TO BUY:
ALX CONTEMPORARY CABLE

HOW TO BUY • ALX PRO ALUMINUM RAILING WITH FACE MOUNT BALUSTERS 5
HOW TO BUY • ALX PRO ALUMINUM RAILING WITH FACE MOUNT BALUSTERS
HOW TO BUY: ALX PRO
WITH FACE MOUNT BALUSTERS
For more information visit Deckorators.com
STEP 1 - CHOOSE YOUR RAILING
ALX PRO RAIL KITS – PURCHASE (1) RAIL KIT PER 6'OR 8'SECTION.*
6' Rail kit with brackets
Available colors: Black and White
8' Rail kit with brackets
* To create stair rails, you will need to purchase (2) stair bracket kits per stair rail.
CAP RAIL KITS (OPTIONAL) – PURCHASE (1) CAP RAIL KIT PER 6'OR 8'RAIL SECTION.
6' Cap rail kit with insert rail
Available colors: Black and White
8"Cap rail kit with insert rail
STEP 2 - CHOOSE YOUR BALUSTERS (FACE MOUNT)
ARCHITECTURAL ALUMINUM BALUSTERS – PURCHASE (3) 5-PACKS PER 6'RAIL OR (4) 5-PACKS PER 8'RAIL.
32-1/4" Baroque (for 36" line rail) – 5-pack (screws included)
Available colors: Black, White and Bronze
40" Baroque (for 42" line rail) – 5-pack (screws included)
32-1/4" Arc (for 36" line rail) – 5-pack (screws included) Available colors: Black and Bronze
TRADITIONAL ALUMINUM BALUSTERS – PURCHASE (1.5) 10-PACKS PER 6’ RAIL OR (2) 10-PACKS PER 8’ RAIL.
32"Traditional (for 36"line rail) – 10-pack (screws included)
Available colors: Black and Bronze
40"Traditional (for 42"line rail) – 10-pack (screws included)
GLASS BALUSTERS – PURCHASE 9 BALUSTERS PER 6'SECTION AND 12 PER 8'SECTION.
32"Clear Scenic Glass (for 36"rail) – 5-pk (screws included)
STEP 3 - SELECT YOUR POST SLEEVES AND POST BASE TRIM
4x4 POST SLEEVE AND TRIM – PURCHASE (1) POST SLEEVE PER RAILING KIT PLUS (1) TO END EACH RUN. TRIM OPTIONAL.
40-1/4"Post sleeve (for 36"rail)
Available colors: Black and White
52"Post sleeve (for 42"rail)
4x4 Post base trim
STEP 4 - CHOOSE YOUR POST CAPS
Aluminum base post caps – Purchase (1) post cap per post sleeve.
1
3
4
2
7883FaceMnt.ai
6 HOW TO BUY • ALX PRO RAILING WITH CENTER MOUNT BALUSTERS
HOW TO BUY • ALX PRO RAILING WITH CENTER MOUNT BALUSTERS
HOW TO BUY: ALX PRO
WITH CENTER MOUNT BALUSTERS
7880CntMnt.ai
1
4
5
2
3
STEP 1 - CHOOSE YOUR RAILING
ALX PRO RAIL KITS – PURCHASE (1) RAIL KIT PER 6'OR 8'SECTION.*
6' Rail kit with brackets Available colors: Black and White
8' Rail kit with brackets
* To create stair rails, you will need to purchase (2) stair bracket kits per stair rail.
CAP RAIL KITS (OPTIONAL) – PURCHASE (1) CAP RAIL KIT PER 6'OR 8'RAIL SECTION.
6' Cap rail kit with insert rail Available colors: Black and White
8' Cap rail kit with insert rail
STEP 2 - CHOOSE YOUR BALUSTERS (CENTER MOUNT)
ALUMINUM BALUSTERS – PURCHASE (1.5) 10-PACKS PER 6'RAIL OR (2) 10-PACKS PER 8'RAIL.
26"Classic (for 36"line rail) – 10-pack
Available colors: Black, Matte Black,
Bronze, White, Textured White and
Weathered Brown
32"Classic (for 42"line rail) – 10-pack
36"Classic (for 46"line rail) – 10-pack
26"Estate (for 36"line rail) – 10-pack
32"Estate (for 42"line rail) – 10-pack
GLASS BALUSTERS – PURCHASE 9 BALUSTERS PER 6'SECTION AND 12 PER 8'SECTION.
26"Clear Scenic Glass (for 36") – 5-pack
32"Clear Scenic Glass (for 42") – 5-pack (screws included)
STEP 3 - SELECT YOUR CORRESPONDING BALUSTER CONNECTORS
ALUMINUM BALUSTER CONNECTORS – PURCHASE (1) 20-PACK PER (1) BALUSTER PACK. ADD STAIR ADAPTORS AS NEEDED.
Baluster Connectors – 20-pack (use with Classic Balusters) Available colors: Black and White
Stair Connectors – 20-pack (use with Classic Balusters)
Available colors: Black, White and BronzeDesigner Baluster Connectors – 20-pack (use with Classic Balusters)
Designer Baluster Stair Adaptors – 20-pack (use with Classic Balusters)
Standard Estate Baluster Connectors – 20-pack (use with Estate Balusters) Available colors: Black and White
Standard Estate Stair Connectors – 20-pack (use with Estate Balusters)
GLASS BALUSTERS CONNECTORS – PURCHASE (1) CONNECTOR KIT PER (1) SCENIC BALUSTER.
Frontier Scenic Connectors – 2-pack Available colors: Black, Cedar, Gray and
White
Scenic Stair Connectors – 2-pack
STEP 4 - SELECT YOUR POST SLEEVES AND POST BASE TRIM
4x4 POST SLEEVE AND TRIM – PURCHASE (1) POST SLEEVE PER RAILING KIT PLUS (1) TO END EACH RUN. TRIM OPTIONAL.
40-1/4"Post sleeve (for 36"rail)
Available colors: Black and White
52"Post sleeve (for 42"rail)
4x4 Post base trim
STEP 5 - CHOOSE YOUR POST CAPS
Aluminum base post caps – Purchase (1) post cap per post sleeve.

HOW TO BUY: CABLE RAILING
1
4
7
6
2
3
5
STEP 1 - CHOOSE YOUR RAILING
(BOTTOM RAILING OPTIONAL)
Works with ALX Pro railing or wood posts/rail.
Cable can extend up to 30'and turn one corner.
Hardware packs include: 2 Eye lags, 1 fork jawand 1 turnbuckle.
STEP 2 - HARDWARE
Purchase 10 packs for a 36"rail height or 12 packs for a 42"rail height, required for each start or stop of a run/post.
STEP 3 - CABLE
Available in 100'and 500'lengths.
STEP 4 - SUPPORT
One spacer required for a 6'section, two spacers required for an 8'section.
STEP 5 - POST PROTECTORS
Post protectors are required for turning 45-degree corners – sold in packs of 10.
STEP 6 - ADD YOUR ALX PRO POST SLEEVE KITS
(if applicable)
STEP 7 - CHOOSE YOUR POST CAPS
Purchase (1) post cap per post sleeve.
HOW TO BUY • CABLE RAILING
HOW TO BUY • CABLE RAILING 7

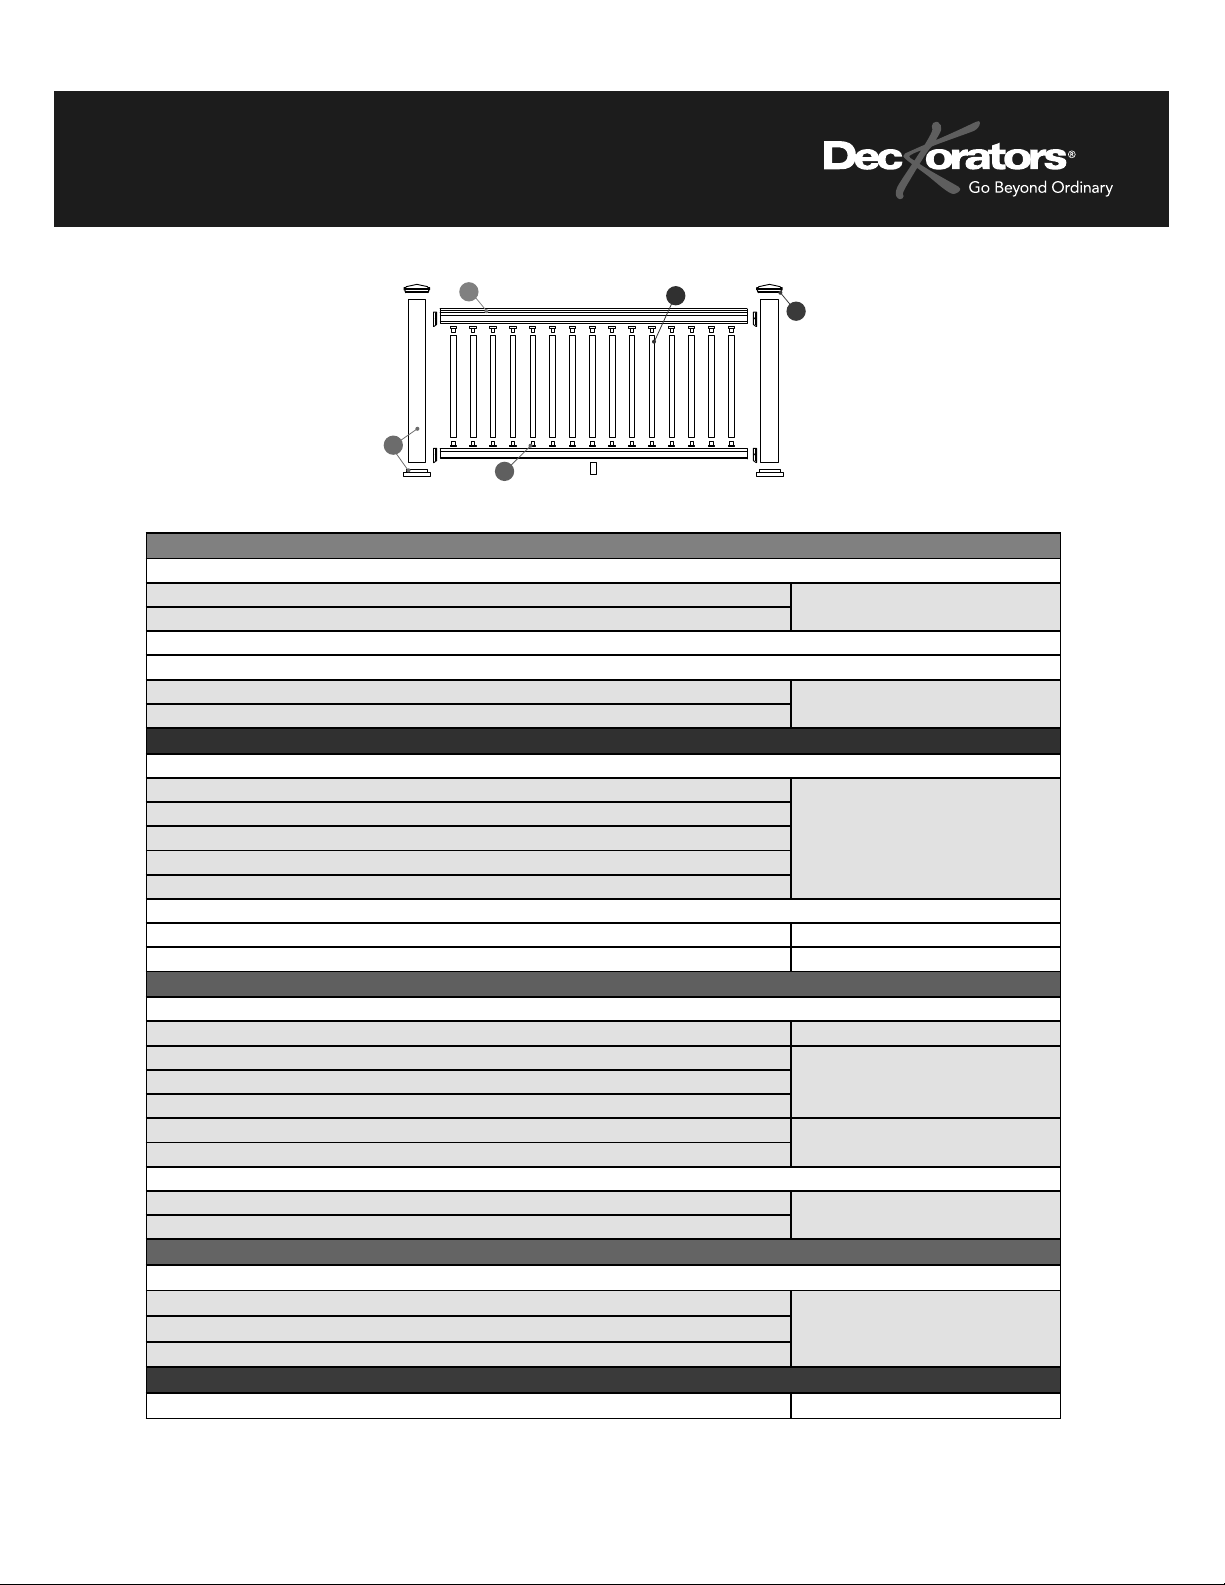
STEP 1 - CHOOSE YOUR ALX CLASSIC COMPLETE RAIL KIT
TOP & BOTTOM RAIL WITH CONNECTORS INSTALLED, BALUSTERS AND BRACKETS INCLUDED
6' On Center Rail Kit - Classic (Round) Balusters for 36"or 42"Rail Height
Available colors: Satin Black, Matte Black, Textured White,
Weathered Brown
6' On Center Rail Kit - Estate (Square) Balusters for 36"or 42"Rail Height
8' On Center Rail Kit - Classic (Round) Balusters for 36"or 42"Rail Height
8' On Center Rail Kit - Classic (Round) Balusters for 36"or 42"Rail Height
STEP 2 - CHOOSE YOUR ALUMINUM POST KITS (2.5"x 2.5"ALX CLASSIC POST KITS)
PURCHASE (1) POST KIT PER RAILING KIT PLUS (1) TO END EACH RUN. TRIM AND POST CAP INCLUDED
39"Post Kit (with leveling plate) for 36"Rail Height Available colors: Satin Black, Matte Black, Textured White,
Weathered Brown
44"Post Kit (with leveling plate) for 42"Rail Height
STEP 3 - CHOOOSE YOUR ALX CLASSIC COMPLETE STAIR RAIL KIT
EACH KIT INCLUDES (2) ALUMINUM RAILS WITH BALUSTER CONNECTORS INSTALLED, (1) STAIR HARDWARE KIT THAT INCLUDES (4) METAL STAIR
BRACKETS (8) #8 x3/4"& (8) #8 x1-3/4"SCREWS, (12) BALUSTERS FOR 6'FOR 35 DEGREE STAIR INSTALLATIONS
6' Stair Rail Kit - Classic (Round) Balusters for 36"or 42"Rail Height
Available colors: Satin Black, Matte Black, Textured White,
Weathered Brown
6' Stair Rail Kit - Estate (Square) Balusters for 36"or 42"Rail Height
8' Stair Rail Kit - Classic (Round) Balusters for 36"or 42"Rail Height
8' Stair Rail Kit - Estate (Square) Balusters for 36"or 42"Rail Height
STEP 4 - CHOOSE YOUR STAIR POST KITS
2.5"x 2.5"ALUMINUM POST KITS - PURCHASE (1) POST KIT PER STAIR RAILING, PLUS (1) TO END EACH RUN. TRIM AND POST CAP INCLUDED.
49"Aluminum Post Kit with Leveling Plate (for 36"stair rail) Available colors: Satin Black, Matte Black, Textured White,
Weathered Brown
54"Aluminum Post Kit with Leveling Plate (for 42"stair rail)
STEP 5 - CHOOSE YOUR OPTIONAL, ALTERNATIVE POST CAPS
ALUMINUM BASE POST CAPS - PURCHASE (1) OPTIONAL, ALTERNATIVE POST CAP PER POST IF DESIRED
2.5"Luna Low voltage post caps Available colors: Matte Black, Textured White and Weathered
Brown
2.5"Solar Post Cap Available colors: Satin Black, White, Weathered Brown
2.5"Nouveau Solar Post Cap Available colors: Black and White
HOW TO BUY: ALX CLASSIC
ALXClassic.ai
1
4
5
2
3
For more information visit Deckorators.com ©2020 UFP Retail, LLC. All rights reserved. Deckorators is a registered trademark
of UFP Industries, LLC 11126_3/20
HOW TO BUY • ALX CLASSIC RAILING
8 HOW TO BUY • ALX CLASSIC RAILING

INSTALLATION INSTRUCTIONS • EOVATIONS
EOVATIONS INSTALLATION INSTRUCTIONS 9
EOVATIONS INSTALLATION GUIDE
Items you will need
• Safety glasses
• Pencil or pen
• Tape measure
• Utility knife
• Jigsaw
• Carpenter square
(speed square)
• Power screw gun or drill
• Soft mallet
• Portable power saw
•Fine-tooth saw blades
(40-tooth minimum, sharp
carbide-tipped wood or
nish/trim blades)
•Large le or medium-grit
sandpaper
• Chalk line
• Spacing tools
• Fastener-specic tools
recommended by
manufacturer
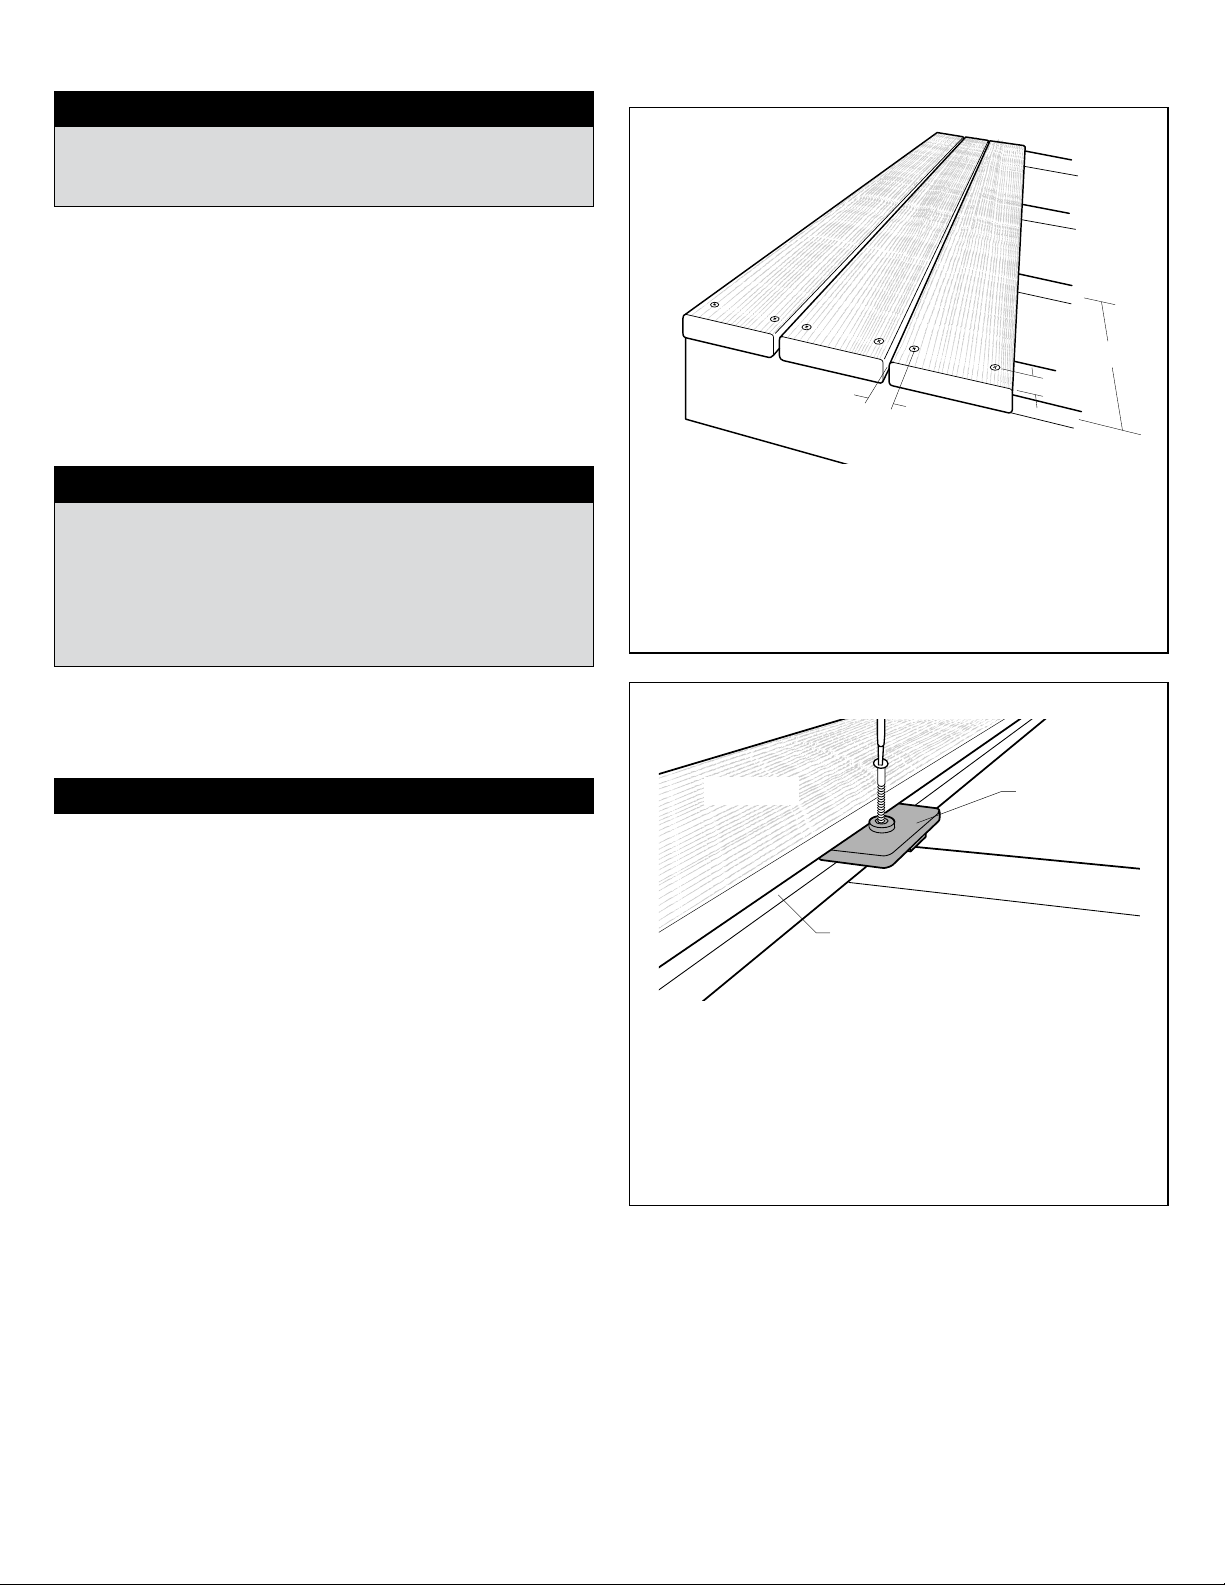
Joist spacing requirements
Gapping requirements
©2019 Universal Forest Products, Inc. Deckorators is a registered trademark of Deckorators, Inc. in the U.S. All rights reserved.
5 Meadowcraft Parkway, Selma, AL 36701 800.332.5724 8529_3/19
Deckorators.com
Each Deckorators®Voyage™ and Vault board has a unique appearance
and should be arranged according to the end user’s preference. Prior to
construction, check with your local regulatory agency's code requirements.
For best results, follow all installation instructions, paying close attention to
gapping, spacing and fastener requirements.
•
•
16"
•
•
16"
•
•
12"
Eotek4.pdf
Standard Picture frame Diagonal (45°)
Residential 16" 16" 12"
Commercial 12" 12" 12"
Note: All dimensions are on-center.
Note: Joist spacing, stair stringer spacing and fastener requirements remain the
same for all Eovations deck board widths (3.5", 5.5" 7.25").
Installation style
Above 32º F
(0º C)
Below 32º F
(0º C)
Side-to-Side 1/8" 3/16"
End-to-End 1/16" 1/8"
End-to-Side 1/16" 1/8"
Abutting Solid
Objects 1/8" 1/4"
Installation temperature
Each variegated
Deckorators board
has a unique
appearance and
should be arranged
according to the
end user's
preference.
Almacenamiento
Mantenga cubierto antes de ser instalado.
Instalación
• Todas las tablas deben distribuirse de forma adecuada
para permitir la expansión y contracción. Refiérase a las
instrucciones para la instalación completa para detalles.
• Distribuya todo el material para terrazas a 1/4
(6.4 mm) de distancia de cualquier estructura
permanente o poste.
• Utilice como mínimo sujetadores para piso de terraza
de 2-1/2 pulg., resistentes a la corrosión, con rosca
inversa y con recubrimiento.
Espaciado de las vigas
• Espaciado de la viga 16 in (41 cm) en el centro para la
instalación perpendicular a la viga.
• Espaciado de la viga 12 in (31 cm) en el centro para la
instalación diagonal a la viga.
Visite Deckorators.com para instrucciones completas
de instalación, e información de la garantía y el cuidado
y limpieza.
Deckorators es una marca comercial de Universal Consumer Products, Inc. en
los EE.UU.
La garantía está disponible en www.deckorators.com.
Guarde las etiquetas UPC como comprobante de compra.
Rangement
Gardez couvert avant l'installation.
Installation
• Toutes les planches doivent être espacées
correctement pour permettre la dilatation et le retrait.
Consultez les directives d’installation complètes pour
obtenir les détails.
• Éloignez tout le matériau de terrasse de 6,4 mm (1/4
po) de toute structure permanente ou de tout poteau.
• Utiliser des attaches de terrasse en composite enduit,
à filetage inverse, résistantes à la corrosion de au
moins 2-1/2 po.
Espacement des solives
• Espacement aux solives de 41 cm (16 po) entre axes
pour l’installation perpendiculaire aux solives.
• Espacement des solives de 31 cm (12 po) entre axes
pour l’installation diagonale aux solives.
Visitez Deckorators.com pour les instructions complètes
d’installation, garantie et l’entretien.
Deckorators est une marque de commerce déposée de Universal Consumer
Products, Inc. aux États-Unis.
Le texte de la garantie est disponible à l’adresse www.deckorators.com.
Conservez l’étiquette d’extrémité à code UPC comme preuve d’achat.
Storage
Keep covered prior to installation.
Installation
• All boards must be spaced properly to allow for
expansion and contraction. Refer to complete
installation instructions for details.
• Space all decking material 1/4-in away from any
permanent structure or post.
• Use minimum 2-1/2" corrosion-resistant, reverse-thread,
coated composite decking fasteners.
Joist Spacing
• 16-in on-center for installation perpendicular to the joist.
• 12-in on-center for installation diagonal to the joist.
Visit Deckorators.com for complete installation
instructions, warranty and care and cleaning information.
Deckorators is a trademark of Universal Consumer Products, Inc., in the U.S.
Warranty available at www.deckorators.com.
Save UPC end tags for proof of purchase.
8560 10/15
©2014-2015 Universal Forest Products, Inc. All rights reserved.
5 Meadowcraft Parkway, Selma, AL 36701 (800) 332-5724
Chaque planche de
platelage possède
une apparence
unique et devrait
donc être
disposée au goût
de l'utilisateur.
Cada tablón tiene
una apariencia
únicay debe ser
colocado de
acuerdo a la
preferencia
del usuario final.
VAULT DECKING
•
•
16"
•
•
16"
•
•
12"
Eotek4.pdf
End Tag
Product Sticker
1X6-16' GR. DKR.
• •
12"
DeckConstr.ai
• •
16"
• •
16"
• •
12"
DeckConstr.ai
• •
16"
• •
16" • •
12"
DeckConstr.ai
• •
16"
• •
16"
SIDE
VIEW
Standard Picture frame Diagonal
TOP
VIEW
•
•
16"
•
•
16"
•
•
12"
Eotek4.pdf
Note: Always follow best
workmanship practices.
Including, and not limited to,
square cutting both board ends
prior to installation.
INSTALLATION INSTRUCTIONS • EOVATIONS
10 EOVATIONS INSTALLATION INSTRUCTIONS
EOVATIONS INSTALLATION INSTRUCTIONS, CONTINUED
Cutting
Installation
©2019 Universal Forest Products, Inc. Deckorators is a registered trademark of Deckorators, Inc. in the U.S. All rights reserved.
5 Meadowcraft Parkway, Selma, AL 36701 800.332.5724 8529_3/19
Deckorators.com
• Upcut with a clean/smooth saw blade.
• Cut deck boards with the leading edge of the saw blade,
cutting into the exposed face. Use a sharp utility knife or jigsaw
to nish cuts where a circular saw cannot fully complete cut.
• Use a jigsaw to cut openings for protrusions.
• If necessary, use a large le or medium-grit sandpaper
to clean cut edges.
• Use utility knife to cut any bers or strands.
(In the rare event that a strand or fiber protrudes from
the board, do not pull it.)
•Set power driver such that screws are slightly counter sunk.
Do not overdrive.
•If using a hidden fastener system, use the manufacturer’s
recommended fastener and follow the manufacturer’s instructions.
•Two fasteners per joist minimum.
• Ends of each board must fall on a joist.
• Double joist or use blocking where two board ends meet.
• 1" maximum cantilever.
• Install entire deck at same temperature.
•Install the deck boards starting from the outside edge of the platform
and work toward anchor wall so that ripped pieces abut the wall. Start
installing from one end of the board and work toward the other end
of the board.
OR: Start installing from the center of the board and work out toward
the ends of the board. Do not install by fastening each end rst and
working toward the middle.
•Continue installing deck boards, adhering to the gapping
requirements. Ensure consistent appearance by aligning each
plank so that the cathedrals of the emboss pattern point in the
same direction.
NOTE: Cutting all ends of boards prior to installation recommended.
Fastener requirements
• 10" 40T, 80T circular blade
• 12" 40T, 72T, 80T circular blade
• Corrosion-resistant, galvanized or
stainless steel fasteners
• Reverse-thread composite screw
• Minimum of 2-1/2" long screws
• 1-1/4" minimum penetration into joist
Face screw installation
Hidden fastener installation
3/8"-1"
3/8"-1"
••
Eotek 6.pdf
16" max.
•
•
•
•
Eotek 7.pdf
Hidden
fastener
Joist
Slot
•
•
Deck board
• Use reverse-threaded composite deck screws.
• Screws should be 3/8" to 1" from side of board,
3/8" to 1" from end of board.
• Use color-matched screws for best results.
• Use caution not to overdrive screw.
• Please refer to the compatible fastener information
on Deckorators.com/FastenerInfo.
• Fastener slots may be routed into the side of the
deck boards, as needed.
• Follow hidden fastener manufacturer’s instructions.
INSTALLATION INSTRUCTIONS • EOVATIONS
EOVATIONS INSTALLATION INSTRUCTIONS 11
8529
EOVATIONS INSTALLATION INSTRUCTIONS, CONTINUED
Stair installation
©2020 UFP Retail, LLC. Deckorators is a registered trademark of UFP Industries, LLC. in the U.S. All rights reserved.
5 Meadowcraft Parkway, Selma, AL 36701 800.332.5724 8529_4/20
Deckorators.com
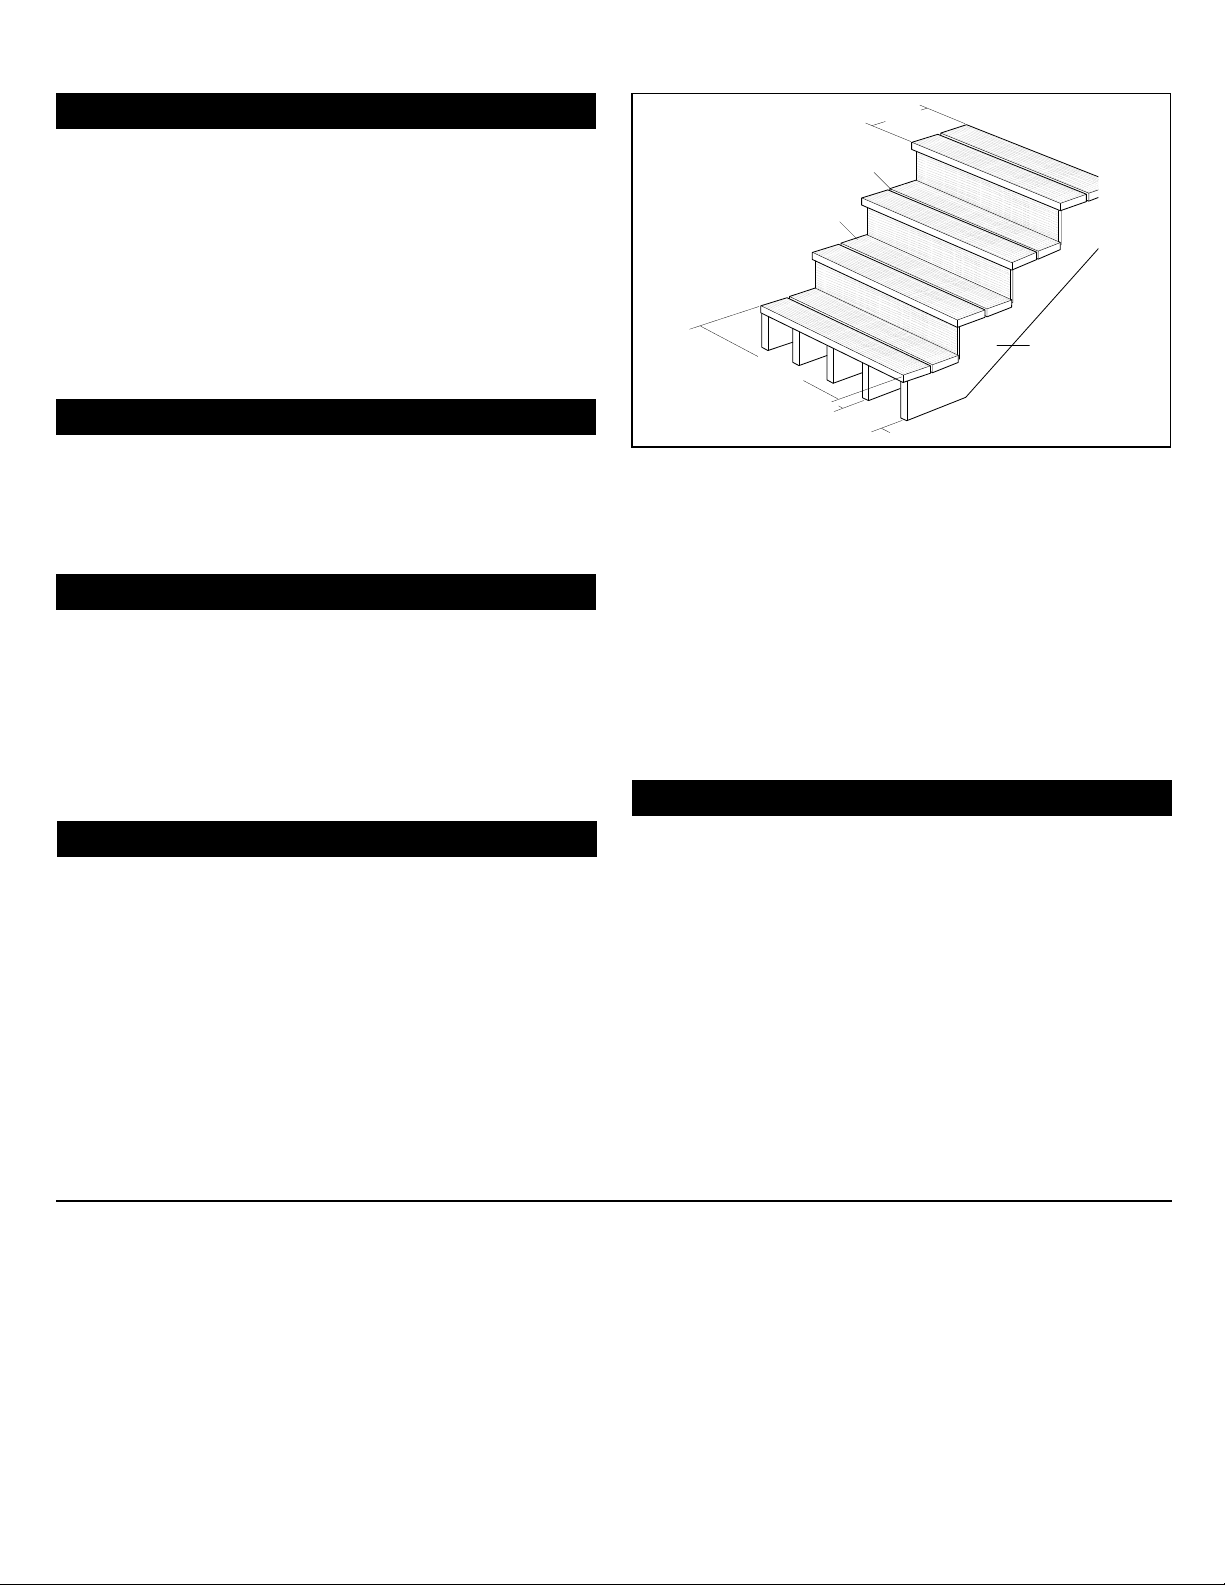
•Stairs must be constructed according to national and local building
codes. Generally, building codes require 3' minimum wide treads and
11" minimum tread depth.
• 9" maximum center-to-center spacing of stringers is required.
•Stair treads should be fastened over a minimum of 5 stringers to
meet code requirements.
• 1/2" maximum tread overhang over stringers.
•1/8" minimum gap between stair-tread boards. Local building codes
may require the gap to be increased to 1/4" - 3/8" in order to maintain
the minimum tread depth.
Like most composites, Deckorators Decking will have color variations
from piece to piece. This is due to naturally occurring variations in
polymers. Purchasing all required decking material at one time is
recommended, as manufacturing runs can produce slightly different
colors. Do not install if color variation is not acceptable.
Mold and mildew can be a nuisance on any exterior building surface,
regardless of the material. If the conditions are right, they will grow on
wood, plastic, concrete, metal and other surfaces. Mold formation is
most prevalent in consistently wet, shaded areas. Spores from the nat-
ural environment are carried by the wind and commonly land on decks
surfaces. It is important to note that the appearance of mold/
mildew is a function of nature, not necessarily a deciency with any
of the material on which it grows.
Periodic washing with soap/mild detergent and water will help remove
surface dirt. This will also help prevent the buildup of pollen, debris and
spores that can cause and accelerate mold/mildew growth.
Caution: A pressure washer should not be used to “blast” mold/mildew
or soils from a deck surface. The abrasive nature of the water stream can
potentially cause damage by driving the spores deeper into the material,
which may create a more challenging problem to remedy. A pressure
washer with a fan-tipped nozzle should be used only to lightly wet or
rinse wood or composite deck surfaces.
There are many deck wash and exterior cleaning products available at
retail. It is important to make sure you use a cleaner specically intended
for your application. After selecting a product, be certain to read,
Stringer
Stair tread
Eotek2.pdf
9" max.
36" min.
5 stringers
required
11" min.
depth
1/8" min.
gap
•
•
•
•
•
•
•
•
•
THE DIAGRAMS AND INSTRUCTIONS IN THIS BROCHURE ARE FOR ILLUSTRATION PURPOSES ONLY AND ARE NOT MEANT TO REPLACE A LICENSED PROFESSIONAL. ANY CONSTRUCTION OR
USE OF THE PRODUCT MUST BE IN ACCORDANCE WITH ALL LOCAL ZONING AND/OR BUILDING CODES. THE CONSUMER ASSUMES ALL RISKS AND LIABILITY ASSOCIATED WITH THE
CONSTRUCTION OR USE OF THIS PRODUCT. THE CONSUMER OR CONTRACTOR SHOULD TAKE ALL NECESSARY STEPS TO ENSURE THE SAFETY OF EVERYONE INVOLVED IN THE PROJECT,
INCLUDING, BUT NOT LIMITED TO, WEARING THE APPROPRIATE SAFETY EQUIPMENT. UNIVERSAL FOREST PRODUCTS, INC., MAKES NO WARRANTY, EITHER EXPRESS OR IMPLIED,
AND SHALL NOT BE LIABLE FOR ANY DAMAGES, INCLUDING CONSEQUENTIAL DAMAGES.
Color variation
Mold and mildew growth
Cleaning
Mold inhibitors
understand and follow all instructions supplied by the manufacturer.
Some cleaning products and inhibitors may be more effective than
others, depending on the environmental conditions your deck is
subjected to. Additionally, it is always a good idea to test the cleaner
in a small, inconspicuous area prior to applying it to the entire deck
(www.deckorators.com).
Tips for snow removal: Care should be taken when removing snow from
your deck to avoid damaging the deck surface. Use a plastic snow
shovel, one without a metal edge. A stiff push broom can work very well
and minimizes lifting. Light snow can be cleared using a leaf blower. Do
not attempt to break up or scrape ice from the deck surface; use ice
melt products when needed. No concerns have been reported using ice
melt products labeled “Safe for Pets”.
As with deck washes, there are several mold-inhibitor products available
from paint stores, hardware stores, online outlets and home centers to
help prevent long-term mold/mildew growth. For any product selected,
be certain to read, understand and follow all instructions provided by the
manufacturer. Depending upon the environmental factors affecting your
deck, some preventive cleaning products may be more effective than
others. It may be necessary to try more than one product. For ongoing
preventive maintenance, follow the manufacturer’s recommendation.
Note: Deckorators is not suitable for structural use. It should not be
used for primary load-bearing members such as posts, joists, beams or
stringers. The same commonsense precautions should be taken when
handling Deckorators as with wood or other building materials. Dust
masks and eye protection devices are recommended to avoid possible
irritation from sawdust and chips. Gloves will help protect hands.
Hands should be washed after construction work.

INSTALLATION INSTRUCTIONS • SOLID DECKING
12 SOLID DECKING INSTALLATION INSTRUCTIONS
Warmest annual temperature °F expected in region
°F 20 30 40 50 60 70 80 90 100 110 120
20 1/8 1/8 1/8 1/8 1/8 3/16 3/16 1/4 1/4 5/16 5/16
30 1/8 1/8 1/8 1/8 1/8 3/16 3/16 1/4 1/4 5/16
40 1/8 1/8 1/8 1/8 1/8 3/16 3/16 1/4 1/4
50 1/8 1/8 1/8 1/8 1/8 3/16 3/16 1/4
60 1/8 1/8 1/8 1/8 1/8 3/16 3/16
70 1/8 1/8 1/8 1/8 1/8 3/16
80 1/8 1/8 1/8 1/8 1/8
90 1/8 1/8 1/8 1/8
100 1/8 1/8 1/8
110 1/8 1/8
120 1/8
Temperature °F on day of installation
Board-End to Board-End Gapping Requirements
Each variegated
Deckorators board
has a unique
appearance and
should be arranged
according to the
end user's
preference.
Almacenamiento
Cubra antes de la instalación para evitar manchas
por agua.
Instalación
• Todas las tablas deben distribuirse de forma adecuada
para permitir la expansión y contracción. Permita un
espacio de 1/4 (6.4 mm) entre las orillas de las tablas.
Refiérase a las instrucciones para la instalación completa
para detalles.
• Distribuya todo el material para terrazas a 1/4
(6.4 mm) de distancia de cualquier estructura
permanente o poste.
• Use sujetadores para terrazas resistentes a la corrosión,
de compuesto recubierto para evitar el “efecto hongo”
y la posible decoloración de la terraza.
Espaciado de las vigas
• Espaciado de la viga 16 in (41 cm) en el centro para la
instalación perpendicular a la viga.
• Espaciado de la viga 12 in (31 cm) en el centro para la
instalación diagonal a la viga.
• Consulte el reporte ESR-1573 para opciones de soporte
del escalón.
Visite Deckorators.com para instrucciones completas
de instalación, e información de la garantía y el cuidado
y limpieza.
Deckorators es una marca comercial de Universal Consumer Products, Inc. en
los EE.UU.
La garantía está disponible en www.deckorators.com.
Guarde las etiquetas UPC como comprobante de compra.
Rangement
Couvrez avant l’installation pour prévenir les
taches d’eau.
Installation
• Toutes les planches doivent être espacées
correctement pour permettre la dilatation et le retrait.
Prévoyez un écart d’au moins 6,4 mm (1/4 po) entre
les bords des planches. Consultez les directives
d’installation complètes pour obtenir les détails.
• Éloignez tout le matériau de terrasse de 6,4 mm (1/4
po) de toute structure permanente ou de tout poteau.
• Utilisez des attaches pour matériaux de terrasse
composites, revêtues et résistantes à la corrosion
pour éviter la formation de cloques autour de la tête
d’attache et la décoloration possible de la terrasse.
Espacement des solives
• Espacement aux solives de 41 cm (16 po) entre axes
pour l’installation perpendiculaire aux solives.
• Espacement des solives de 31 cm (12 po) entre axes
pour l’installation diagonale aux solives.
• Veuillez consulter ESR-1573 pour les différentes
options de support de giron.
Visitez Deckorators.com pour les instructions complètes
d’installation, garantie et l’entretien.
Deckorators est une marque de commerce déposée de Universal Consumer
Products, Inc. aux États-Unis.
Le texte de la garantie est disponible à l’adresse www.deckorators.com.
Conservez l’étiquette d’extrémité à code UPC comme preuve d’achat.
Storage
Cover prior to installation to prevent water stains.
Installation
• All boards must be spaced properly to allow for
expansion and contraction. Allow a minimum 1/4-in
gap between board edges. Refer to complete installation
instructions for details.
• Space all decking material 1/4-in away from any
permanent structure or post.
• Use corrosion-resistant, coated composite decking
fasteners to minimize “mushrooming” and possible
decking discoloration.
Joist Spacing
• 16-in on-center for installation perpendicular to the joist.
• 12-in on-center for installation diagonal to the joist.
• Refer to ESR-1573 for stair tread support options.
Visit Deckorators.com for complete installation
instructions, warranty and care and cleaning information.
Deckorators is a trademark of Universal Consumer Products, Inc., in the U.S.
Warranty available at www.deckorators.com.
Save UPC end tags for proof of purchase.
7928 11/14
©2014-2015 Universal Forest Products, Inc. All rights reserved.
1801 E. Lessard, Prairie du Chien, WI 53821, (877) 463-8379
Chaque planche de
platelage possède
une apparence
unique et devrait
donc être
disposée au goût
de l'utilisateur.
Cada tablón tiene
una apariencia
únicay debe ser
colocado de
acuerdo a la
preferencia
del usuario final.
16" on-center for residential perpendicular applications. Residential parquet
patterns and diagonal or herringbone designs all require joist spacing
12" on-center. Contact Deckorators product support at 800-332-5724
for commercial applications. Use 1/4" for side gapping.
(A) End Tag
(B) Product Sticker
fig. 1
DECKORATORS SOLID DECKING
INSTALLATION INSTRUCTIONS
Tools and Items Needed
• Drill/power screwdriver
• 1/8" drill bit
• Circular saw with
carbide-tip blade
• 2½" composite wood
deck screws
• Tape measure
• Carpenter’s pencil
• Safety glasses/goggles
Notice to installers
• DO NOT use cordless
impact drivers
Joist Span
Each Deckorators®Vista™, Heritage™, Vault™and Voyage™board has a unique
appearance and should be arranged according to the end user’s preference.
Prior to construction, check with your local regulatory agency for special code
requirements in your area. For best results, follow these simple installation
instructions, paying close attention to gapping, spacing and fastener requirements.
1X6-16' GR. DKR.
Allow a minimum of 1/16"gap between board ends for every
20°F of difference between installation temperature and
the hottest temperature expected (fig. 1). Additional blocking
may be needed for support (fig. 2). Allow 1/4" distance
between all decking material and any permanent structure
or post. After all decking has been attached, snap a chalk
line (white or yellow chalk recommended) flush with or up to
1-1/2"out from the deck framing and trim with a circular saw.
Deckorators decking, like all wood and composite decking
products, requires proper ventilation and drainage in order to
ensure its longevity. When using a minimum 2x6 joist standing
on edge, with the suggested 1/4"side gap, there should be a 2"
clear space between the bottom edge of the joists and grade to
allow for proper ventilation. Adequate drainage is also needed
to prevent water from pooling under the deck.
NOTE: ONLY Deckorators Voyage, Vault and Frontier deck
material, manufactured with Eovations™technology, may be
installed in contact with the ground or incidental submersion in
water when a project design requires those conditions.
End-to-End Spacing
• Set drill speed to
1500-1750 RPM
• Max torque not to
exceed 23 inch pounds
• Pre-drill knots
or dense hardwood
Fasteners
For a list of recommended and compatible fasteners please visit
www.Deckorators.com/FastenerInfo. Recommended fasteners are those
which are recommended by the manufacturer of Deckorators Decking.
Compatible fasteners are those which have been tested and recommended
for use with Deckorators Decking by the fastener manufacturer. The use of a
non-recommended fastener will not void the Deckorators Decking Warranty;
however if a decking failure is caused by the use of a non-recommended
fastener, any corresponding warranty claim will be denied.
For ease of installation, we recommend using 2-1/2"corrosion-resistant,
composite wood deck screws. These screws help minimize the common
“mushroom” effect that sometimes occurs when using standard fasteners.
They can also reduce the amount of pre-drilling and countersinking. If using
ordinary coarse thread deck screws, always pre-drill a pilot hole and countersink
prior to driving screws.
Pre-drill and countersink all deck screws, regardless of type,
that are within 1-1/2"of the end of the deck board.
fig. 2
Note: Cutting all ends of boards prior to installation
recommended.
Note: Always follow best workmanship
practices. Including, and not limited to,
square cutting both board ends prior to
installation.
SOLID DECKING INSTALLATION INSTRUCTIONS 13
INSTALLATION INSTRUCTIONS • SOLID DECKING
7903
THE DIAGRAMS AND INSTRUCTIONS IN THIS BROCHURE ARE FOR ILLUSTRATION PURPOSES ONLY AND ARE NOT MEANT TO REPLACE A LICENSED PROFESSIONAL. ANY CONSTRUCTION OR USE
OF THE PRODUCT MUST BE IN ACCORDANCE WITH ALL LOCAL ZONING AND/OR BUILDING CODES. THE CONSUMER ASSUMES ALL RISKS AND LIABILITY ASSOCIATED WITH THE CONSTRUCTION
OR USE OF THIS PRODUCT. THE CONSUMER OR CONTRACTOR SHOULD TAKE ALL NECESSARY STEPS TO ENSURE THE SAFETY OF EVERYONE INVOLVED IN THE PROJECT, INCLUDING, BUT NOT
LIMITED TO, WEARING THE APPROPRIATE SAFETY EQUIPMENT. EXCEPT AS CONTAINED IN THE WRITTEN LIMITED WARRANTY, THE WARRANTOR DOES NOT PROVIDE ANY OTHER WARRANTY,
EITHER EXPRESS OR IMPLIED, AND SHALL NOT BE LIABLE FOR ANY DAMAGES, INCLUDING CONSEQUENTIAL DAMAGES.
©2020 UFP Retail, LLC. All rights reserved. Deckorators is a registered trademark of UFP Industries, LLC.
7903 1/20
Deckorators.com
Mold Inhibitors
Preventing Mold and Mildew Growth
Color Variation
Cleaning
Like most composites, Deckorators Decking will have color variations from piece to piece. This is due to naturally occurring variations in
wood fibers and polymers. Purchasing all required decking material at one time is recommended, as manufacturing runs can
produce slightly different colors. Do not install if color variation is not acceptable.
Mold and mildew can be a nuisance on any exterior building surface, regardless of the material. If the conditions are right, they will
grow on wood, plastic, concrete, metal and other surfaces. Mold formation is most prevalent in consistently wet, shaded areas.
Spores from the natural environment are carried by the wind and commonly land on decks surfaces. It is important to note that the
appearance of mold/mildew is a function of nature, not necessarily a deficiency with any of the material on which it grows.
Periodic washing with soap/mild detergent and water will help remove surface dirt. This will also help prevent the buildup of pollen,
debris and spores that can cause and accelerate mold/mildew growth. Caution: A pressure washer should not be used to “blast” mold/
mildew or soils from a deck surface. The abrasive nature of the water stream can potentially cause damage by driving the spores
deeper into the material, which may create a more challenging problem to remedy. A pressure washer with a fan-tipped nozzle should be
used only to lightly wet or rinse wood or composite deck surfaces.
There are many deck wash and exterior cleaning products available at retail. It is important to make sure you use a cleaner specifically
intended for your application. After selecting a product, be certain to read, understand and follow all instructions supplied by the
manufacturer. Some cleaning products and inhibitors may be more effective than others, depending on the environmental conditions
your deck is subjected to. Additionally, it is always a good idea to test the cleaner in a small, inconspicuous area prior to applying it to
the entire deck (www.deckorators.com).
Tips for snow removal: Care should be taken when removing snow from your deck to avoid damaging the deck surface. Use a plastic
snow shovel, one without a metal edge. A stiff push broom can work very well and minimizes lifting. Light snow can be cleared using
a leaf blower. Do not attempt to break up or scrape ice from the deck surface; use ice melt products when needed. No concerns have
been reported using ice melt products labeled “Safe for Pets”.
As with deck washes, there are several mold-inhibitor products available from paint stores, hardware stores, online outlets and
home centers to help prevent long-term mold/mildew growth. For any product selected, be certain to read, understand and follow all
instructions provided by the manufacturer. Depending upon the environmental factors affecting your deck, some preventive cleaning
products may be more effective than others. It may be necessary to try more than one product. For ongoing preventive maintenance,
follow the manufacturer’s recommendation.
Note: Deckorators is not suitable for structural use. It should not be used for primary load-bearing members such as posts, joists,
beams or stringers. The same common-sense precautions should be taken when handling Deckorators as with wood or other
building materials. Dust masks and eye protection devices are recommended to avoid possible irritation from sawdust and chips.
Gloves will help protect hands. Hands should be washed after construction work.
Screws should be driven flush with the Deckorators decking surface. Do not over-tighten. Use two fasteners per deck board at each
joist. For any decking where two boards meet end-to-end over a joist, add additional blocking (fig. 2). Always pre-drill a pilot hole
and countersink at board ends when using either composite or wood screws. Be careful not
to over-tighten screws near board ends.
Please refer to PFS-TECO RR-0100 for stringer spacing when deck boards are used as stair treads.

14 STOWAWAY INSTALLATION INSTRUCTIONS
INSTALLATION INSTRUCTIONS • STOWAWAY HIDDEN FASTENER
Follow the gapping requirements listed in fig. 1.
For any decking where two boards meet end-to-
end over a joist, add additional blocking (fig. 2 on
the following page). Allow 1/4" distance between
all decking material and any permanent structure
or post. After all of the decking has been attached,
snap a chalk line (white or yellow chalk
recommended) flush with or up to 1-1/2" out from
the deck framing and trim with a circular saw.
All wood and composite decking products
require proper ventilation and drainage to ensure
their longevity. When using a minimum 2x6 joist
standing on edge and the suggested 1/4" side
gap, there should be a 2" clear space between
the bottom edge of the joists and grade in order to
allow for proper ventilation. Adequate drainage is
also needed to prevent water from pooling under
the deck.
Note: ONLY Deckorators Voyage, Vault and
Frontier decking material, manufactured with
Eovations technology, may be installed with the
ground or incidental submersion in water when a
project design requires those conditions.
GROOVED DECKING INSTALLATION INSTRUCTIONS
USING STOWAWAYTM HIDDEN FASTENERS
Each Deckorators Vista, Heritage, Vault and Voyage
board has a unique appearance and should be
arranged according to the end user’s preference.
Prior to construction, check with your local
regulatory agency for special code requirements in your
area. For best results, follow these simple installation
instructions, paying close attention to gapping,
spacing and fastener requirements.
Joist Span
End-to-End Spacing
16" on-center for residential perpendicular appli-
cations. Residential parquet patterns and diago-
nal or herringbone designs require joist spacing
of 12" on-center. Contact Deckorators product
support at 800-332-5724 for commercial appli-
cations. Use 1/4"for side gapping.
fig. 1
Warmest annual temperature °F expected in region
°F 20 30 40 50 60 70 80 90 100 110 120
20 1/8 1/8 1/8 1/8 1/8 3/16 3/16 1/4 1/4 5/16 5/16
30 1/8 1/8 1/8 1/8 1/8 3/16 3/16 1/4 1/4 5/16
40 1/8 1/8 1/8 1/8 1/8 3/16 3/16 1/4 1/4
50 1/8 1/8 1/8 1/8 1/8 3/16 3/16 1/4
60 1/8 1/8 1/8 1/8 1/8 3/16 3/16
70 1/8 1/8 1/8 1/8 1/8 3/16
80 1/8 1/8 1/8 1/8 1/8
90 1/8 1/8 1/8 1/8
100 1/8 1/8 1/8
110 1/8 1/8
120 1/8
Temperature °F on day of installation
Board-End to Board-End Gapping Requirements
Tools and Items Needed
• Drill/power screwdriver
• 1/8" drill bit
• Circular saw with
carbide-tip blade
• Assorted fasteners
(see instructions)
• Tape measure
• Carpenter’s pencil
• Safety glasses/goggles
Notice to installers:
• Use 305 stainless steel,
black head screws
• DO NOT use cordless
impact drivers
• Set drill speed at
1500-1750 RPM
• Max torque not to
exceed 23 inch pounds
• Pre-drill knots
or dense hardwood
JOIST SPACING
DECK SIZE 12” on-center 16” on-center
100 sq. ft. 210 fasteners 175 fasteners
200 sq. ft. 441 fasteners 336 fasteners
300 sq. ft. 672 fasteners 512 fasteners
400 sq. ft. 882 fasteners 672 fasteners
500 sq. ft. 1,113 fasteners 848 fasteners
STOWAWAY™
HIDDEN FASTENERS
Page 1
Note: Always follow best workmanship practices. Including, and not limited to, square
cutting both board ends prior to installation. Cutting all ends of boards prior to installation
recommended.
Fasten the outside edge of the first board to the rim joist with screws. Pre-drill and countersink all deck
screws, regardless of type, that are within 1-1/2" of the end of the deck board. On the other side of
the board, place a Stowaway hidden fastener into the slot and center on the joist.
fig. 2

STOWAWAY INSTALLATION INSTRUCTIONS 15
INSTALLATION INSTRUCTIONS • STOWAWAY HIDDEN FASTENER
Fasteners
For ease of installation, our Stowaway fastener
fits into the groove on each side of the deck board
to eliminate pre-drilling and provide a fastener-free
deck surface. The deck boards require traditional
fasteners on the outside and inside edges of
the deck.
Step 1
Begin by fastening the outside edge of
the first board to the rim joist every 16". For this,
we recommend using 2-1/2" corrosion-resistant,
composite wood deck screws. These screws
help minimize the common “mushroom” effect
that sometimes occurs when using standard
fasteners. They can also reduce the amount of
pre-drilling and countersinking.
N
ote: If using ordinary coarse-thread deck
screws, always pre-drill a pilot hole and countersink
prior to driving screws. Screws should be driven
flush with the surface. Do not over-tighten. Use
one fastener per board every 16".
Step 2
For any decking where two boards meet
end-to-end over a joist, add additional blocking.
Always predrill a pilot hole when fastening within
1-1/2" of board ends, whether using composite
or wood screws. Do not over-tighten screws at
board ends.
Step 3
On the other side of the board, place a
Stowaway hidden fastener into the groove and cen
-
ter on the joist (fig. 3). Install the preset screw at
a 90° angle through the Stowaway fastener and
drive flush. Do not over-tighten. The fastener wings
must remain level with the joist for the next board
to fit correctly (fig. 4).
Step 4
Install one Stowaway fastener at each
joist location. Slide the next board into place so
the wings on the previous fasteners fit into the
groove on the side of the board. Make sure the
side gap between the boards is 1/4".
Step 5
To keep the interior boards from moving
over time, we recommend pinning the boards at
the center of their length using a #8, 2" stainless
steel screw. This holds the deck board in place at
the center of each board and allows the decking
to expand/contract at the ends. Pre-drill in the
groove of the deck board with an 1/8" drill bit (fig.
5a). Drive screw into the groove so it’s flush with
the bottom of the groove (fig. 5b). This will allow
you to properly fit a Stowaway hidden fastener into
the groove.
Step 6
Install a Stowaway hidden fastener clip over
the screw and centered over the joist. Fasten using
preset screw at a 90° angle through the Stowaway
hidden fastener and drive flush with the clip (fig. 6).
The fastener wings must remain level with the joist
for the next board to fit correctly (fig. 4).
Warning.eps
Deck boards
If desired, the board profile
may be concealed with fascia
Fig.2.eps
Fig.1.eps
Joist
fig. 3 fig. 4
fig. 5a fig. 5b
Page 2
fig. 6

16 STOWAWAY INSTALLATION INSTRUCTIONS
INSTALLATION INSTRUCTIONS • STOWAWAY HIDDEN FASTENER
Mold and mildew can be a nuisance on any
exterior building surface, regardless of the material.
If the conditions are right, they will spawn on wood,
plastic, concrete, metal and other surfaces. Mold
formation is most prevalent in consistently wet,
shaded areas. Spores from the natural environment
are carried by the wind and commonly land on
deck surfaces. It is important to note that the
appearance of mold/mildew is a function of
nature, not necessarily a deficiency with any
of the material on which it grows.
Preventing Mold and Mildew Growth
Cleaning
Periodic washing with soap/detergent and water
will help remove surface
dirt. This will also help
prevent the buildup of pollen, debris and spores
that can cause and accelerate mold/mildew
growth.
CAUTION
: A pressure washer should not be used
to “blast” mold/mildew or soils from a deck surface.
The abrasive nature of the water stream can
potentially damage the material by driving the
spores into the material, which may create
a more
challenging problem to remediate. A pressure
washer with a fan-tipped nozzle should be used
only to lightly wet or rinse wood or composite
deck surfaces
.
There are many deck wash and exterior cleaning
products available at
retail stores. It is important
to make sure you use a cleaner specifically
Note: To predrill a groove on one side of deck
board, we recommend using a 5/32" T-slot cutter.
Step 7
Install one Stowaway fastener at each
joist location along the length of the board. For
installations where deck boards are butted
end-to-end at the joist, we recommend add
-
ing an 8” block and using a Stowaway hidden
fastener clip at the end of each board (fig. 7 and
fig. 8). Be sure to gap the boards as previously
described.
Step 8
Repeat the process for each board until
the outside edge of the final board is fastened
with screws. Use fascia to conceal the board
profile and inhibit board movement over time.
Please refer to the fascia installation instructions
for the approved fastening methods for fascia
boards.
Step 9
If no fascia is being used, the entire
perimeter of the deck should be fastened to the
rim joist with screws. Use two screws per joist on
the perimeter board. These screws will be incon
-
spicuous once the railing is installed. Decking
should be fastened with screws when being used
as stair treads.
fig. 7
fig. 8
Page 3

STOWAWAY INSTALLATION INSTRUCTIONS 17
INSTALLATION INSTRUCTIONS • STOWAWAY HIDDEN FASTENER
7904
THE DIAGRAMS AND INSTRUCTIONS IN THIS BROCHURE ARE FOR ILLUSTRATION PURPOSES ONLY AND ARE NOT MEANT TO REPLACE A LICENSED PROFESSIONAL. ANY CONSTRUCTION OR USE
OF THE PRODUCT MUST BE IN ACCORDANCE WITH ALL LOCAL ZONING AND/OR BUILDING CODES. THE CONSUMER ASSUMES ALL RISKS AND LIABILITY ASSOCIATED WITH THE CONSTRUCTION
OR USE OF THIS PRODUCT. THE CONSUMER OR CONTRACTOR SHOULD TAKE ALL NECESSARY STEPS TO ENSURE THE SAFETY OF EVERYONE INVOLVED IN THE PROJECT, INCLUDING, BUT NOT
LIMITED TO, WEARING THE APPROPRIATE SAFETY EQUIPMENT. EXCEPT AS CONTAINED IN THE WRITTEN LIMITED WARRANTY, THE WARRANTOR DOES NOT PROVIDE ANY OTHER WARRANTY,
EITHER EXPRESS OR IMPLIED, AND SHALL NOT BE LIABLE FOR ANY DAMAGES, INCLUDING CONSEQUENTIAL DAMAGES.
©2019 Universal Forest Products. Deckorators is a registered trademark of Deckorators, Inc. in the U.S. All rights reserved.
1801 E. Lessard St. Prairie du Chein, WI 53821
7904 9/19
Deckorators.com
intended for
your application. After selecting
a product, be certain to read, understand
and follow all instructions supplied by the
manufacturer. Some cleaning products and
inhibitors may be more effective than others,
depending on the environmental conditions
your deck is subjected to. Additionally,
it is
always a good idea to test the cleaner in a small,
inconspicuous area
prior to applying it to the
entire deck.
Tips for snow removal: Care should be taken
when removing snow from your deck to avoid
damaging the deck surface. Use a plastic snow
shovel, one without a metal edge. A stiff push
broom can work very well and minimizes lifting.
Light snow can be cleared using a leaf blower.
Do not attempt to break up or scrape ice from
the deck surface; use ice melt products when
needed. No concerns have been reported using
ice melt products labeled “Safe for Pets”.
Mold Inhibitors
As with deck washes, there are several mold-
inhibitor products available from paint stores,
hardware stores, online outlets and home
centers to help prevent long-term mold/mildew
growth. For any product selected,
be certain
to read, understand and follow all instructions
provided by the
manufacturer. Depending upon
the environmental factors affecting your deck,
some preventive cleaning products may be
more effective than others. It may be necessary
to try more than one. For ongoing preventive
maintenance, follow the manufacturer’s
recommendation.
Note:
Deckorators is not suitable for structural
use. It should not be used for primary load-bearing
members such as posts, joists, beams or stringers.
The same common-sense precautions should
be taken when handling Deckorators as with
wood or other building materials. Dust masks
and eye protection devices are recommended
to avoid possible irritation from sawdust and
chips. Gloves will help
protect hands. Hands
should be washed after construction work.
Page 4

18 PORCH FLOORING INSTALLATION INSTRUCTIONS
INSTALLATION INSTRUCTIONS • PORCH FLOORING
PORCH FLOORING INSTALLATION INSTRUCTIONS
MADE WITH EOVATIONS™TECHNOLOGY
Tools and Items Needed
• Safety glasses
• Pencil or pen
• Tape measure
• Utility knife
• Jigsaw
• Carpenter’s square
(speed square)
• Power screw gun or drill
• Flooring nailer
• Soft mallet
• Portable power saw
• Fine-tooth saw blades (40-
tooth minimum, sharp car-
bide-tipped wood or finish/
trim blades
Joist Spacing Requirements
• Large file or medium-grit
sandpaper
• Chalk line
• Spacing tools
• Fastener-specific tools
recommended by
manufacturer
Deckorators®porch flooring has a unique appearance and should be arranged according to the end user’s preference. Prior to
construction, check with your local regulatory agency’s code requirements. For best results, follow all installation instructions, paying
close attention to gapping, spacing and fastener requirements.
Deckorators porch flooring is a one-sided product and must be installed with the embossed surface up. Deckorators porch flooring
must be installed over a code-compliant substructure and is not intended to support structural columns or porch posts. Structural
support for columns and porch posts must be incorporated into the substructure design. Deckorators porch flooring is not intended to
be used in applications that require a watertight surface. Caulk and adhesives should not be used in the tongue and groove. Painting is
not recommended.
Standard Picture Frame Diagonal (45˚)
16" 16" 12"
Gapping Requirements
Above 32˚F (0˚C) Below 32˚F (0˚C)
End-to-End 1/8" 3/16"
End-to-Side 1/8" 3/16"
Abutting Solid Objects 1/8" 1/4"
Cutting
• 10" 40T, 80T circular blade.
• 12" 40T, 72T, 80T circular blade.
• Upcut with a clean/smooth jigsaw blade.
• Cut porch flooring with the leading edge of the saw blade, cutting into the
exposed face. Use a sharp utility knife or jigsaw to finish cuts where a circular
saw cannot fully complete cut.
Fastener Requirements
• For best results, use a 2" SS "L" or "T" shape cleat nails.
• Where face fasteners are used, use corrosion-resistant, galvanized or stainless steel fasteners.
• #8x2" SS trim head screws.
• Reverse thread composite screws.
• Set power driver such that screws are slightly counter sunk. Do not overdrive.
PorchFloor1
PorchFloor2
45°
Face Screw
•
•
•
PorchFloor3
• Use a jigsaw to cut openings to protrusions.
• If necessary, use a large file or medium-grit sandpaper to clean cut edges.
• Use a utility knife to cut any fibers or strands. (In the rare even that a strand or fiber protrudes from the board, do not pull it.)
Note: Always follow best workmanship practices. Including, and not
limited to, square cutting both board ends prior to installation.

PORCH FLOORING INSTALLATION INSTRUCTIONS 19
INSTALLATION INSTRUCTIONS • PORCH FLOORING
©2018 Universal Forest Products. Deckorators is a registered trademark of Universal Consumer Products, Inc. in the U.S. All rights reserved.
1801 E. Lessard St. Prairie du Chein, WI 53821
9716_2/18
Deckorators.com
THE DIAGRAMS AND INSTRUCTIONS IN THIS BROCHURE ARE FOR ILLUSTRATION PURPOSES ONLY AND ARE NOT MEANT TO REPLACE A LICENSED PROFESSIONAL. ANY CONSTRUCTION OR USE
OF THE PRODUCT MUST BE IN ACCORDANCE WITH ALL LOCAL ZONING AND/OR BUILDING CODES. THE CONSUMER ASSUMES ALL RISKS AND LIABILITY ASSOCIATED WITH THE CONSTRUCTION OR
USE OF THIS PRODUCT. THE CONSUMER OR CONTRACTOR SHOULD TAKE ALL NECESSARY STEPS TO ENSURE THE SAFETY OF EVERYONE INVOLVED IN THE PROJECT, INCLUDING, BUT NOT LIMITED
TO, WEARING THE APPROPRIATE SAFETY EQUIPMENT. EXCEPT AS CONTAINED IN THE WRITTEN LIMITED WARRANTY, [UNIVERSAL CONSUMER PRODUCTS, INC.] DOES NOT PROVIDE ANY OTHER
WARRANTY, EITHER EXPRESS OR IMPLIED, AND SHALL NOT BE LIABLE FOR ANY DAMAGES, INCLUDING CONSEQUENTIAL DAMAGES.
• If using a hidden fastener system, use the manufacturer's recommended fastener and follow the manufacturer's instructions.
• One fastener per joist minimum.
• Ends of each board must fall on a joist.
• Double joist or use blocking where two board ends meet.
• 1" maximum cantilever.
• Install entire porch at same temperature.
• Square the first board to the house, paying attention to gapping requirements, and secure in place using face screws on the groove
side.
• The tongue side is fastened using cleat nails with a flooring nailer, or screws. If using screws, insert the screw just above the tongue
at a 45˚angle and counter sink the screw 1/6" into the material to allow for the next board. If using a flooring nailer, ensure the nailer
is properly seated on the tongue side of board and drive cleat into the board, following the proper nailer instructions. If the nailer is not
properly seated it could cause difficulty installing the next board and in some instances, even cause blemishes on the surface of
the porch flooring.
• Install the porch flooring starting from the outside edge of the platform and work toward anchor wall so that ripped pieces abut the
wall.
• Start installing from one end of the board and work toward the other end of the board. OR: Start installing from the center of the board
and work out toward the ends of the board. Do not install by fastening each end first and working toward the middle.
• Continue installing porch flooring, adhering to the gapping requirements. Note: ONLY Deckorators Frontier and Vault decking material
and porch flooring, manufactured with Eovations™technology, may be installed in contact with the ground or incidental submersion in
water when a project design requires those conditions.
Like most composites, Deckorators porch flooring will have color variations from piece to piece. This is due to naturally occuring
variations in polymers. Purchasing all required porch flooring material at one time is recommended, as manufacturing runs can produce
slightly different colors. Do not install if color variation is not acceptable.
Mold and mildew can be a nuisance on any exterior building surface, regardless of the material. If the conditions are right, they will grow
on wood, plastic, concrete, metal and other surfaces. Mold formation is most prevalent in consistently wet, shaded areas. Spores from
the natural enviornment are carried by the wind and commonly land on porch surfaces. It is important to note that the apperance of
mold/mildew is a function of nature, not necessarily a deficiency with any of the material on which it grows.
Periodic washing with soap/mild detergent and water will help remove surface dirt. This will also help prevent the buildup of pollen, debris
and spores that can cause and accelerate mold/mildew growth. Caution: A pressure washer should not be used to "blast" mold/mildew
or soils from a porch surface. The abrasive nature of the water stream can potentially cause damage by driving the spores deeper into
the material, which may create a more challenging problem to remedy. The water stream can also cut into the surface of the board if it is
too intense. A pressure washer with a fan-tipped nozzle should be used only to lightly wet or rinse wood or composite porch surfaces.
There are many deck/porch wash and exterior cleaning products available at retail. It is important to make sure you use a cleaner
specifically intended for your application. After selecting a product, be certain to read, understand and follow all instructions supplied by
the manufacturer. Some cleaning products and inhibitors may be more effective than others, depending on the enviornmental conditions
your porch is subjected to. Additionally, it is always a good idea to test the cleaner in a small, inconspicuous area prior to applying it to
the entire porch (www.deckorators.com).
As with deck/porch washes, there are several mold-inhibitor products available from paint stores, hardware stores, online outlets and
home centers to help prevent long-term mold/mildew growth. For any product selected, be certain to read, understand and follow all
instructions provided by the manufacturer. Depending upon the enviornmental factors affecting your porch, some preventive cleaning
products may be more effective than others. It may be necessary to try more than one product. For ongoing preventive maintenance,
follow the manufacturer's recommendation.
Note: Deckorators is not suitable to structural use. It should not be used for primary load-bearing members such as posts, joists, beams
or stringers. The same commonsense precautions should be taken when handling Deckortaors as with wood or other building materials.
Dust masks and eye protection devices are recommended to avoid possible irritation from sawdust and chips. Gloves will help protect
hands. Hands should be washed after construction work.
9716

20 STAIR TREAD INSTALLATION INSTRUCTIONS
INSTALLATION INSTRUCTIONS • STAIR TREAD
STAIR TREAD INSTALLATION INSTRUCTIONS
Tools and Items Needed
• Drill/power screwdriver
• 1/8" drill bit
• Circular saw with carbide-tip blade
• 2 1/2" composite wood deck screws
• Tape measure
• Carpenter’s pencil
• Safety glasses/goggles
Notice to installers:
• DO NOT use cordless impact drivers
• Set drill speed to 1500-1750 RPM
• Max torque not to exceed 23 inch pounds
• Pre-drill knots or dense hardwood
Prior to construction, check with your local regulatory agency for special code
requirements in your area. For best results, follow these simple installation
instructions, paying close attention to gapping, spacing and fastener requirements.
Allow a minimum of 1/8" between board ends. Allow 1/4" distance between all stair tread material and any permanent structure or post.
Spacing
Fasteners
For a list of recommended and compatible fasteners please visit http://deckorators.com/plan-install/literature.aspx. Recommended
fasteners are those which are recommended by the manufacturer of Deckorators Stair Tread. Compatible fasteners are those which
have been tested and recommended for use with Deckorators Stair Tread by the fastener manufacturer. The use of a non-recommend-
ed fastener will not void the Deckorators Decking Warranty; however if a stair tread failure is caused by the use of a non-recommended
fastener, any corresponding warranty claim will be denied.
For ease of installation, we recommend using 3" corrosion-resistant, composite wood deck screws. These screws help minimize the
common “mushroom” effect that sometimes occurs when using standard fasteners. They can also reduce the amount of pre-drilling
and countersinking. If using ordinary coarse thread deck screws, always pre-drill a pilot hole and countersink prior to driving screws.
Screws should be driven flush with the Deckorators stair tread surface. Do not over-tighten.
Use two fasteners per stair tread at each stringer. For any stair tread where two boards meet end-to-end, an additional stringer is
required so each end is supported (Figure 2). Always pre-drill a pilot hole and countersink at board ends when using other composite or
wood screws. Be careful not to over-tighten screws near board ends.
Stringers spacing is a maximum of 9” on-center. Minimum of 5 stringers with 4 spans. For commercial applications, maximum of 8”
on-center.
Stringer Spacing
Color Variation
Like most composites, Deckorators stair tread will have color variations from piece to piece. This is due to naturally occuring variations
in wood fibers and polymers. Purchasing all required stair tread material at one time is recommended, as manufacturing runs can pro-
duce slightly different colors. Do not install if color variation is not acceptable.
Preventing Mold and Mildew Growth
Mold and mildew can be a nuisance on any exterior building surface, regardless of the material. If the conditions are right, they will grow
on wood, plastic, concrete, metal and other surfaces. Mold formation is the most prevalent in consistently wet, shaded areas. Spores
from the natural enviornment are carried by the wind and commonly land on deck surfaces. It is important to note that the appearance
of mold/mildew is a function of nature, not necessarily a deficiency with any of the material on which it grows.
Cleaning
Periodic washing with soap/mild detergent and water will help remove surface dirt. This will also help prevent the buildup of pollen,
debris and spores that can cause and accelerate mold/mildew growth. Caution: A pressure washer should not be used to “blast” mold/
mildew or soils from a deck surface. The abrasive nature of water stream can potentially cause damage by driving spores deeper into the
Stringer
Stair tread
Eotek2.pdf
9" max.
36" min.
5 stringers
required
11" min.
depth
1/8" min.
gap
•
•
•
•
•
•
•
•
•
Note: Always follow best workmanship practices. Including, and
not limited to, square cutting both board ends prior to installation.
Other manuals for ALX CLASSIC
2
This manual suits for next models
4
Table of contents


