Each HOG weighs 440lb (200kg)
when full.
HOGs must always be installed
so that the weight is supported
on a firm surface.
Always ensure that the HOG is
secure.
The Wall Kit stabilizes the HOG
laterally and is NOT intended to
carry any weight. Wall mounted
HOGs must be installed bearing
on the ground or another
stable structure.
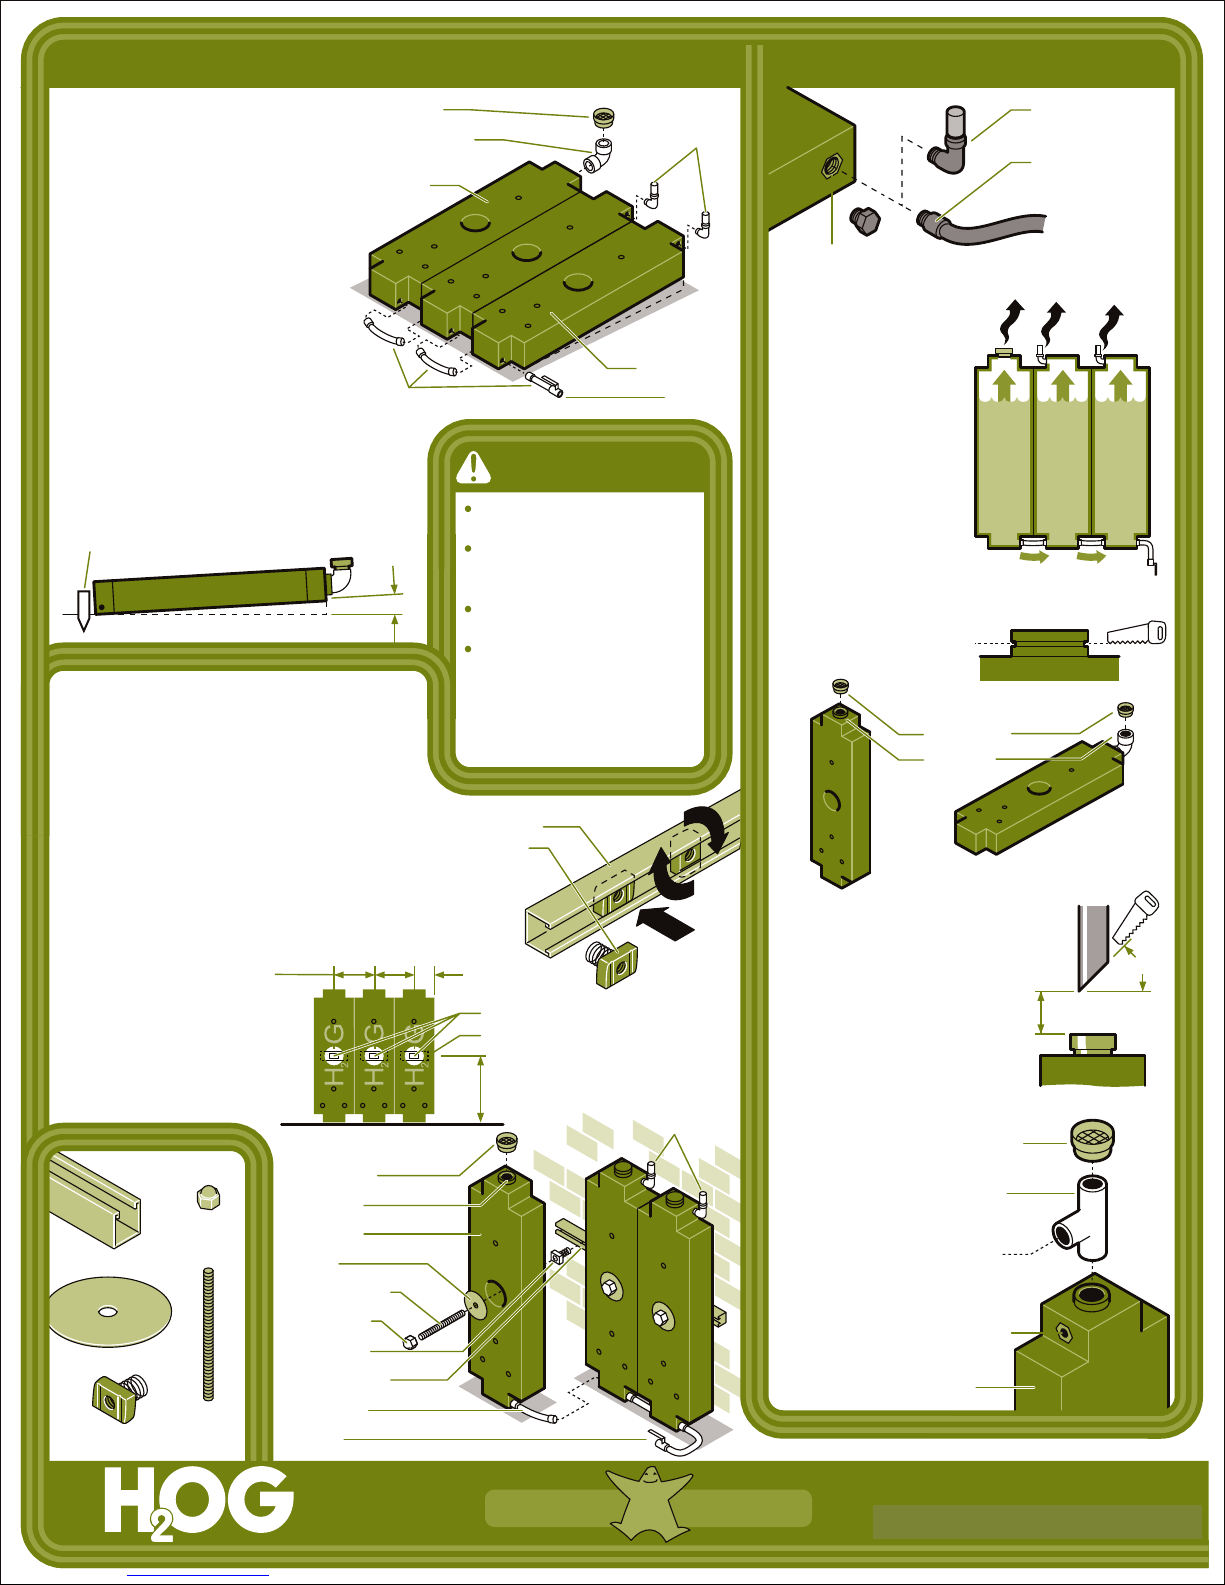
PLUMBING
INSTALLATION
WALL KIT
Inlet Screen
90° Ø3½” elbow
(not supplied)
Elbow Vents
(always turned
upward)
OutletConnectors
HORIZONTAL
(ON GROUND / UNDER DECKS)
1. Arrange HOGs on a slope of 1 in 100 (1°)
with the inlet (top) end higher than the
outlet (bottom) end. You may need to
provide a thin layer of sand to ensure an
even bearing surface and to create the
required fall.
2. Ensure HOGs don’t slip or move when
full. Use stakes, blocks or bedded sand if
necessary.
3. Saw top off nub of inlet HOG (see ‘Inlet’).
Affix 90° Ø3½” elbow (not supplied) with
plumbers tape over collar of inlet.
4. Attach elbow vents to the top holes, and
Connectors and Outlet to bottom holes.
5. Attach and direct overflow hose (see
‘Plumbing’).
6. Place Inlet Screen over inlet opening
under downspout (see ‘Plumbing’).
VERTICAL (ON WALL)
1. Place Wall Channels horizontally at center height of
35½” (900mm) from base level and fix to wall using
appropriate fixings (not supplied). Ensure the HOGs
are sitting on a firm, stable and level surface.
2. Position Spring Nuts 19½” (500mm) apart between
HOGs and 9 ¾” (250mm) from edge.
3. Saw the top off the inlet HOG nub along the ridged
line to form a 3½ inch opening.
4. Attach Elbow Vents to the top holes and attach
Connectors and Outlet to
bottom holes.
5. Attach and direct overflow
hose (see ‘Plumbing’).
6. Place Inlet Screen over
inlet opening under
downspout (see Plumbing).
7. Stand HOG in position and
bolt the Plate through the
HOG into the Spring Nut.
WARNING
Inlet HOG
Outlet HOG
Plate
Threaded
Rod
Domed
Nut
Wall Channel
Spring Nut
Wall Channel
Spring Nut
Inlet
Outlet
Stake base if necessary
1°
100
1
www.rainwaterhog.com
Toll Free Number 1888 700 1096
LOCATING WALL CHANNEL
20”
(508mm) typ
35½”
(900mm )
10”
(254mm)
Wall Channels located
in centre of “O”
Spring Nuts
VENTING
INLET
Air Air
Water Water Water
Install Elbow Vents at
the highest point on
all HOGs to allow air to
escape. The Inlet HOG
is automatically vented
by the Inlet Screen.
OVERFLOW
For heavy flows, affix
“T” piece of Ø3½” pipe
(not supplied) over
inlet collar with trunk
to side. Otherwise,
attach an extra hose
(not supplied) for any
overflow water by
screwing the hose
fitting into the top
threaded connector
point in any of the
HOGs. Direct the
overflow as desired
using the hose.
DOWNPIPE
45°
3” (80mm)
Cut the downpipe on a 45° angle, with
the lowest point 3” (80mm) above the
screen to allow leaves to disperse.
Clean screen out periodically.
Saw the top off the Inlet
Nub on the Inlet HOG .
This will form a 3½” raised
opening. Take care to saw
along the indent indicated.
The Inlet HOG is the HOG
located below the
downspout. Place Inlet
Screen over the Inlet hole.
saw along
indent guideline
Patent Pending
Inlet Screen
Inlet hole
Elbow Vents
Outlet
Plate
Threaded Rod
Wall Channel
Spring Nut
Domed Nut
Connector
Inlet HOG
Elbow Vent (always
turned upward)
Threaded Brass Insert
Remove plug taking care not to damage the threads.
Connector,
Outlet or
Overflow
vertical installation
inlet hole
horizontal installation
inlet screen
inlet screen
T section
Top
threaded
connector
HOG
Tap into
existing
gulley
every drop helpsrainwater rescue


