Deco Pixel Strip Drive3.0 User manual
Pixel Strip Drive30 QRG EN
Pixel Strip Drive QRG EN
1
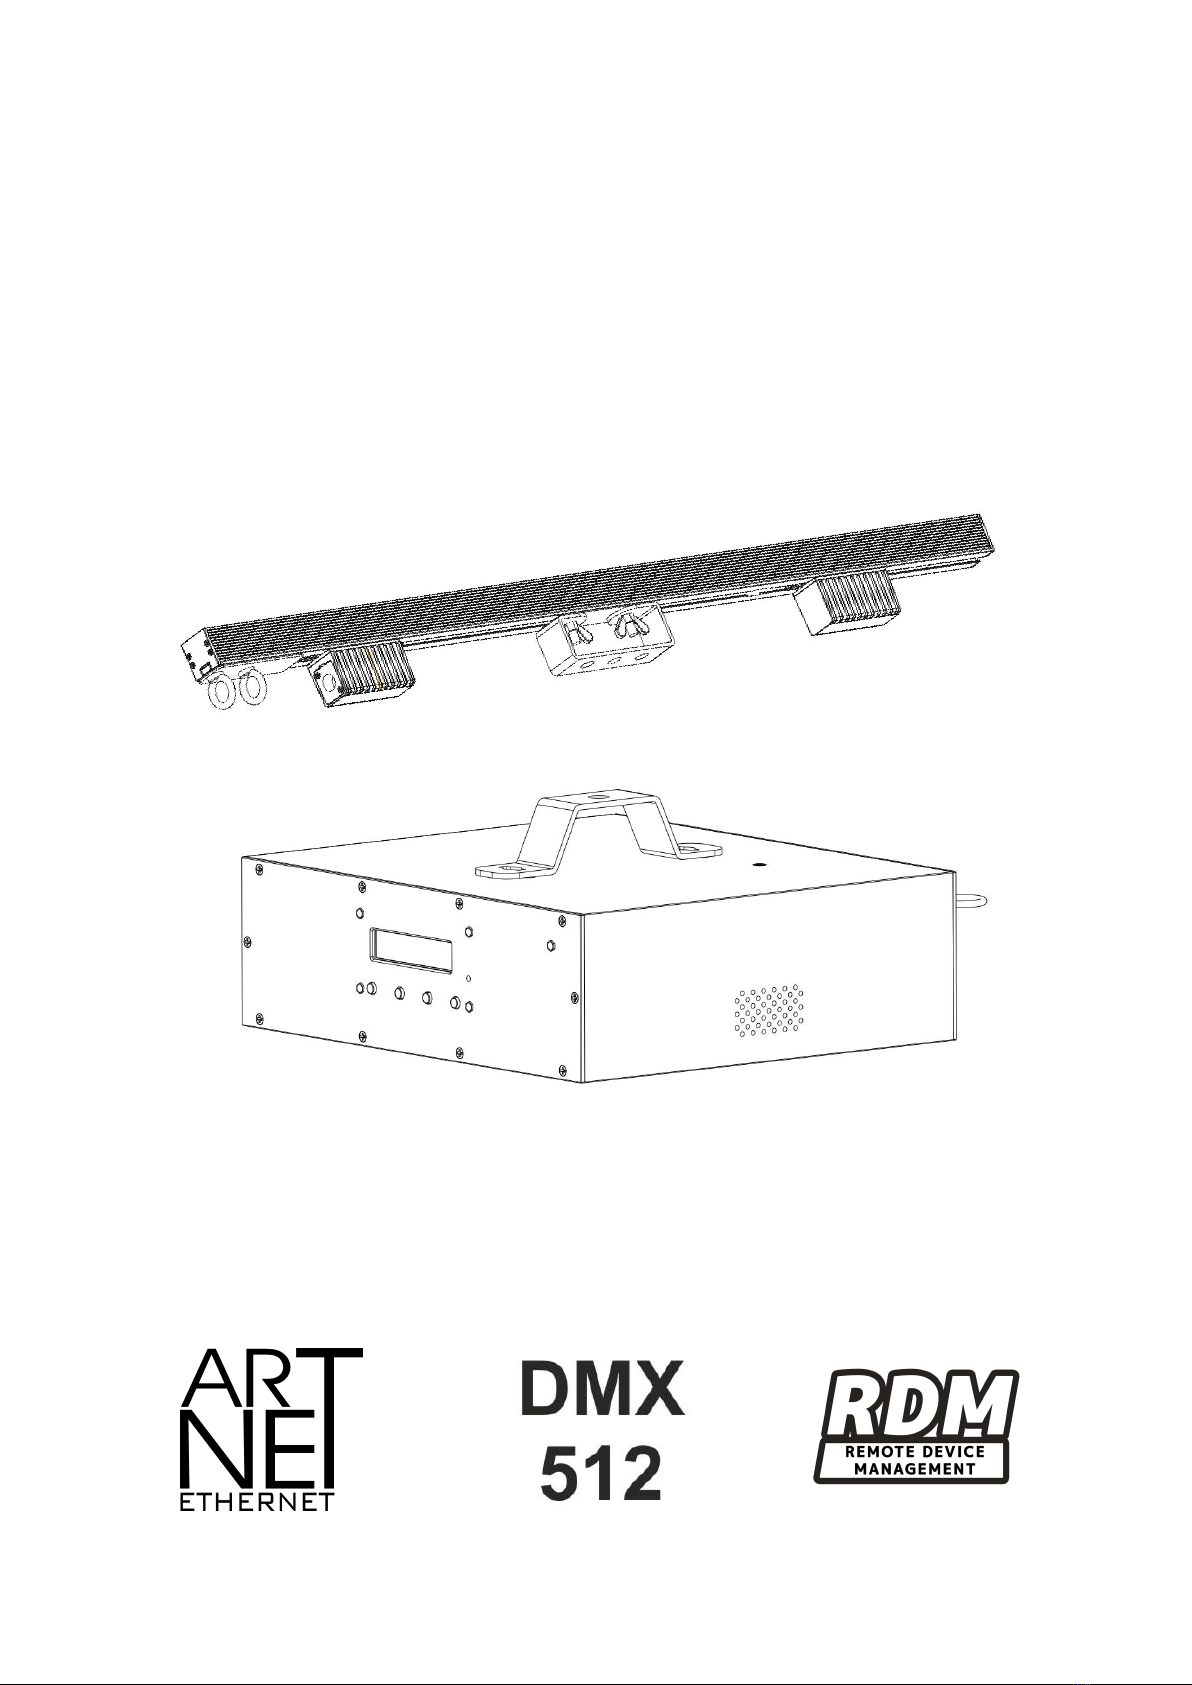
IP65 Pixel-Strip
Drive3.0

Pixel Strip Drive30 QRG EN
Pixel Strip Drive QRG EN
2
Safety Notes:Read all the following Safety Notes before working with this product. These
notes include important information about the installation, usage, and maintenance of this
product.
This icon indicates critical installation, configuration, or operation information.
Failure to comply with this information may render the fixture partially or completely
inoperative, damage third-party equipment, or cause harm to the user.
There are no user-serviceable parts in this product. Any reference to servicing
in this guide applies only to properly certified technicians. Do not open the housing or
attempt any repairs unless you are certified.
This icon indicates useful, although non-critical information.
· DO NOT open this product. It contains no user-serviceable parts.
· CAUTION: This product’s housing may be hot when lights are operating.
· Mount this product in a location with adequate ventilation, at least 20 in (50 cm)
from adjacent surfaces.
· DO NOT leave any flammable material within 50 cm of this product while
operating or connected to power.
· This product is for indoor use only! To prevent risk of fire or shock, do not expose
this product to rain or moisture.
· DO NOT connect this product to a dimmer or rheostat.
· ONLY connect this product to a grounded and protected circuit.
· Always make sure you are connecting this product to the proper voltage, as per
the Technical Specifications in this guide or on the product’s specification label.
· Do not operate this product if you see damage on the housing, I/O ports, or
cables. Have the damaged parts replaced by an certified technician at once.
· Do not cover the ventilation slots when operating to avoid internal overheating.
· The maximum ambient temperature is 104 °F (40 °C). Do not operate this product
at a higher temperature.
· In case of a serious operating problem, stop using this product immediately!
Pixel Strip Drive30 QRG EN
Pixel Strip Drive QRG EN
3
What Is Included
Once you receive the product, carefully open the package and make sure all the
pieces included are in good condition. The followng items should be included in the
package:
· Pixel Strip Drive3.0
· 1.5M CAT-5 Net-cable+1.2M Power Cable
· Quick Reference Guide
If there are any missing pieces, please contact the local dealer where you
purchased the product.
Installation Procedure
Before installing any product, you should completely read through the guide that was shipped
with the product.
1. Carefully remove all items from the package and place on a secure foundation.
2. Mount product.
3. Install power cable and connect to power.
4. Connect product to computer/controller via router.
5. Connect Pixel Strip 3.0

Pixel Strip Drive30 QRG EN
Pixel Strip Drive QRG EN
4
Product Overview:

Pixel Strip Drive30 QRG EN
Pixel Strip Drive QRG EN
5
Mounting
The pixel-Strip Drive has four (4) mounting points (one on each corner) with 10mm holes to which you
can install screws and mount this product directly to almost any flat surface, truss, or other load bearing
structure in any orientation. The product may also be installed with clamps for hanging on truss. You must
supply your own clamps and make sure the clamps are capable of supporting the weight of this product.
Mounting Guidelines
We recommends using the following guidelines when mounting this product:
· Make sure to mount this product away from any flammable material as indicated in the Safety Notes
section.
· Never mount in places where rain, high humidity, extreme temperature changes, or restricted ventilation
may affect the product.
· Before deciding on a location, always make sure there is easy access to the product for maintenance
and programming.
· Make sure that the structure or surface onto which you are mounting the product can support the
product’s weight (see the Technical Specifications).
· When mounting the product overhead, always use a safety cable. Mount the product securely to a
rigging point, such as an elevated platform or a truss.
· When rigging the product onto a truss, you should use a mounting clamp of appropriate weight capacity.
· When mounting the product on the floor, make sure that the product and cables are away from people
and vehicles.
Mounting Instructions
Mounting hardware is not included with the product .
Using Mounting Clamps:
1. Attach the clamp to the mounting bracket.
2. Attach a safety cable to the product’s safety loop.
3. Attach the clamp to the desired structure or surface.
4. Attach a safety cable through the mounting points
Using Mounting Points:
Pixel Strip Drive30 QRG EN
Pixel Strip Drive QRG EN
6
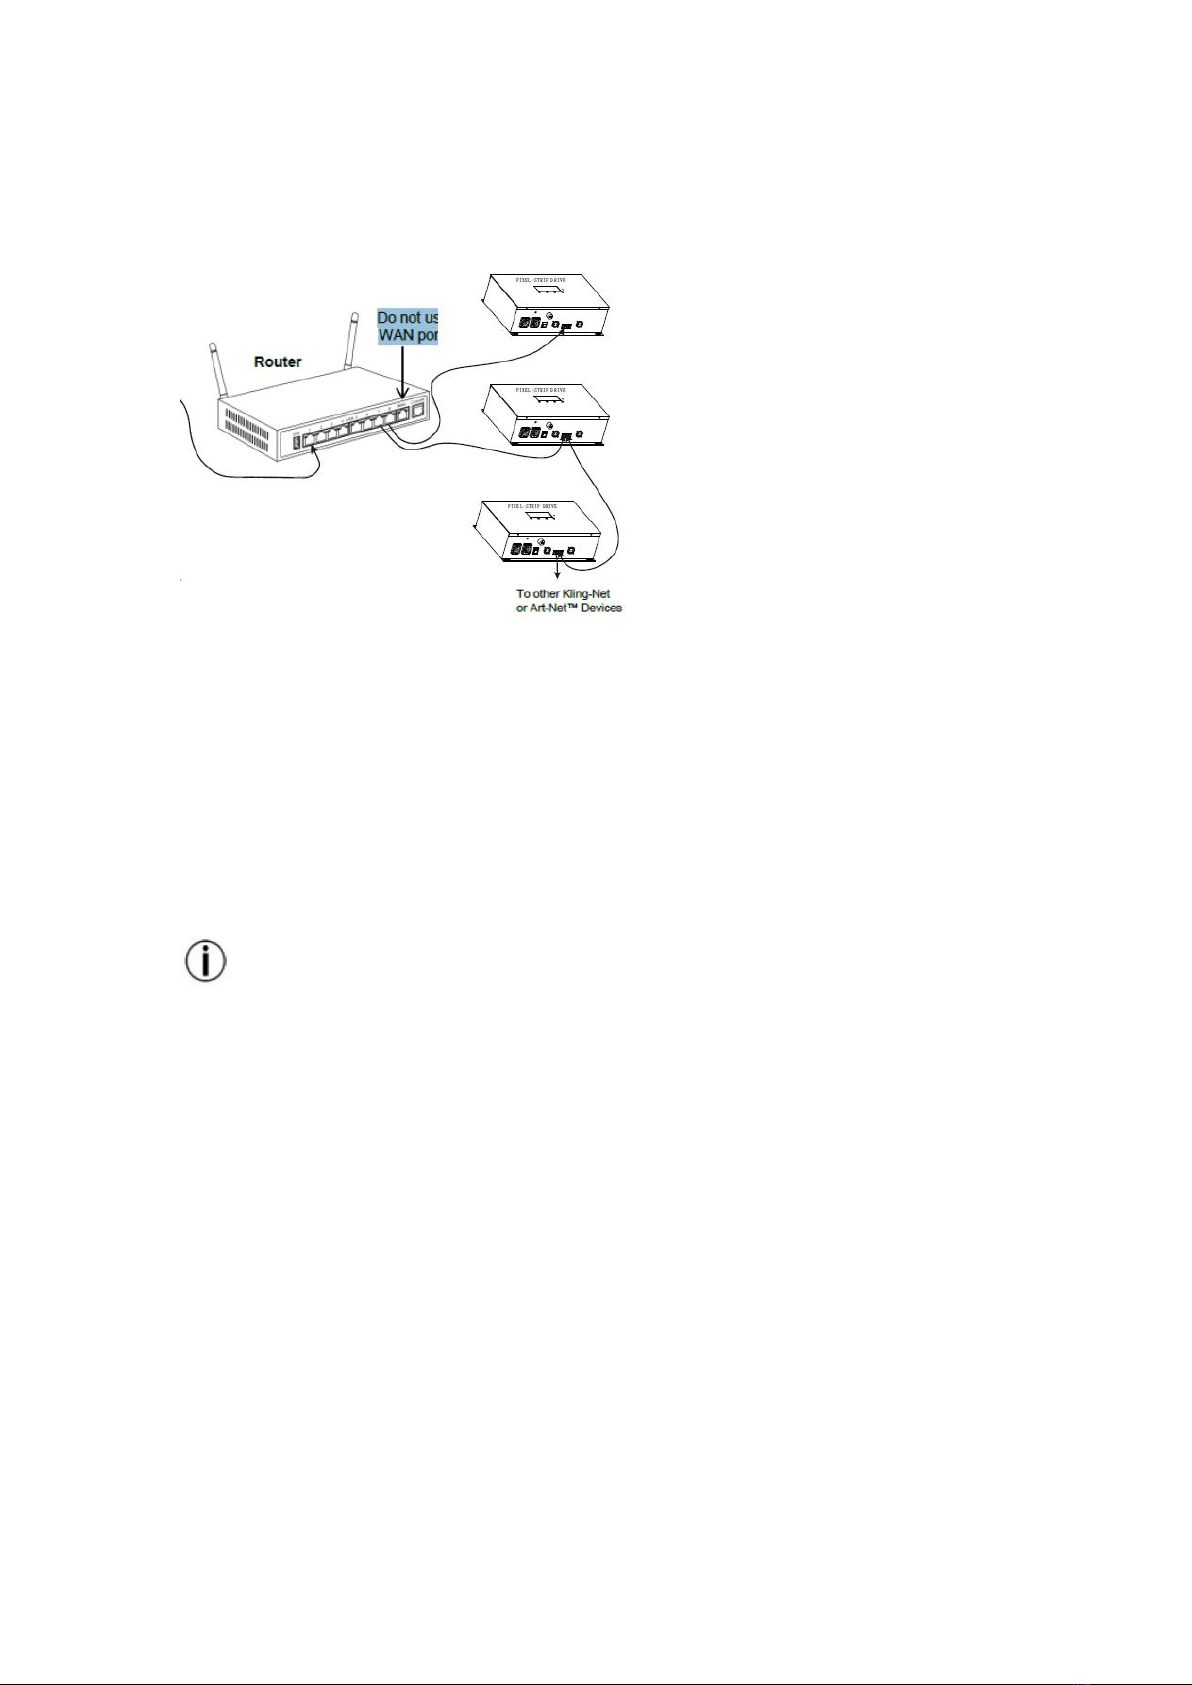
Signal Connections
Art-Net™ Connection
Art-Net™ is an Ethernet protocol that uses TCP/IP that transfers large amount of DMX512 data using an
etherCON® RJ45 connection over a large network.
Kling-Net Connection
Kling-Net is a network protocol that allows auto configuration of display devices using an etherCON RJ45
Ethernet connection. Refer to the ArKaos MediaMaster™ software manual for detailed instructions on
programming this product.
For smooth-running operation, ArKaos Kling-Net requires a gigabit (1000 Mbps) Ethernet
card and network router
Connecting Pixel Strip Products to the Power Supply:
The Pixel Strip ™Drive uses an RJ45 data connection to link all data ports. You can connect either 4 or
Pixel Strips per output on the Pixel Strip Drive The following diagram illustrates how to assemble the data
connections

Pixel Strip Drive30 QRG EN
Pixel Strip Drive QRG EN
7
Each port of Drive can support 4Pcs. Pixel Strip Make sure the total length of the connecting
network cables (RJ45) does not exceed 10 meters.
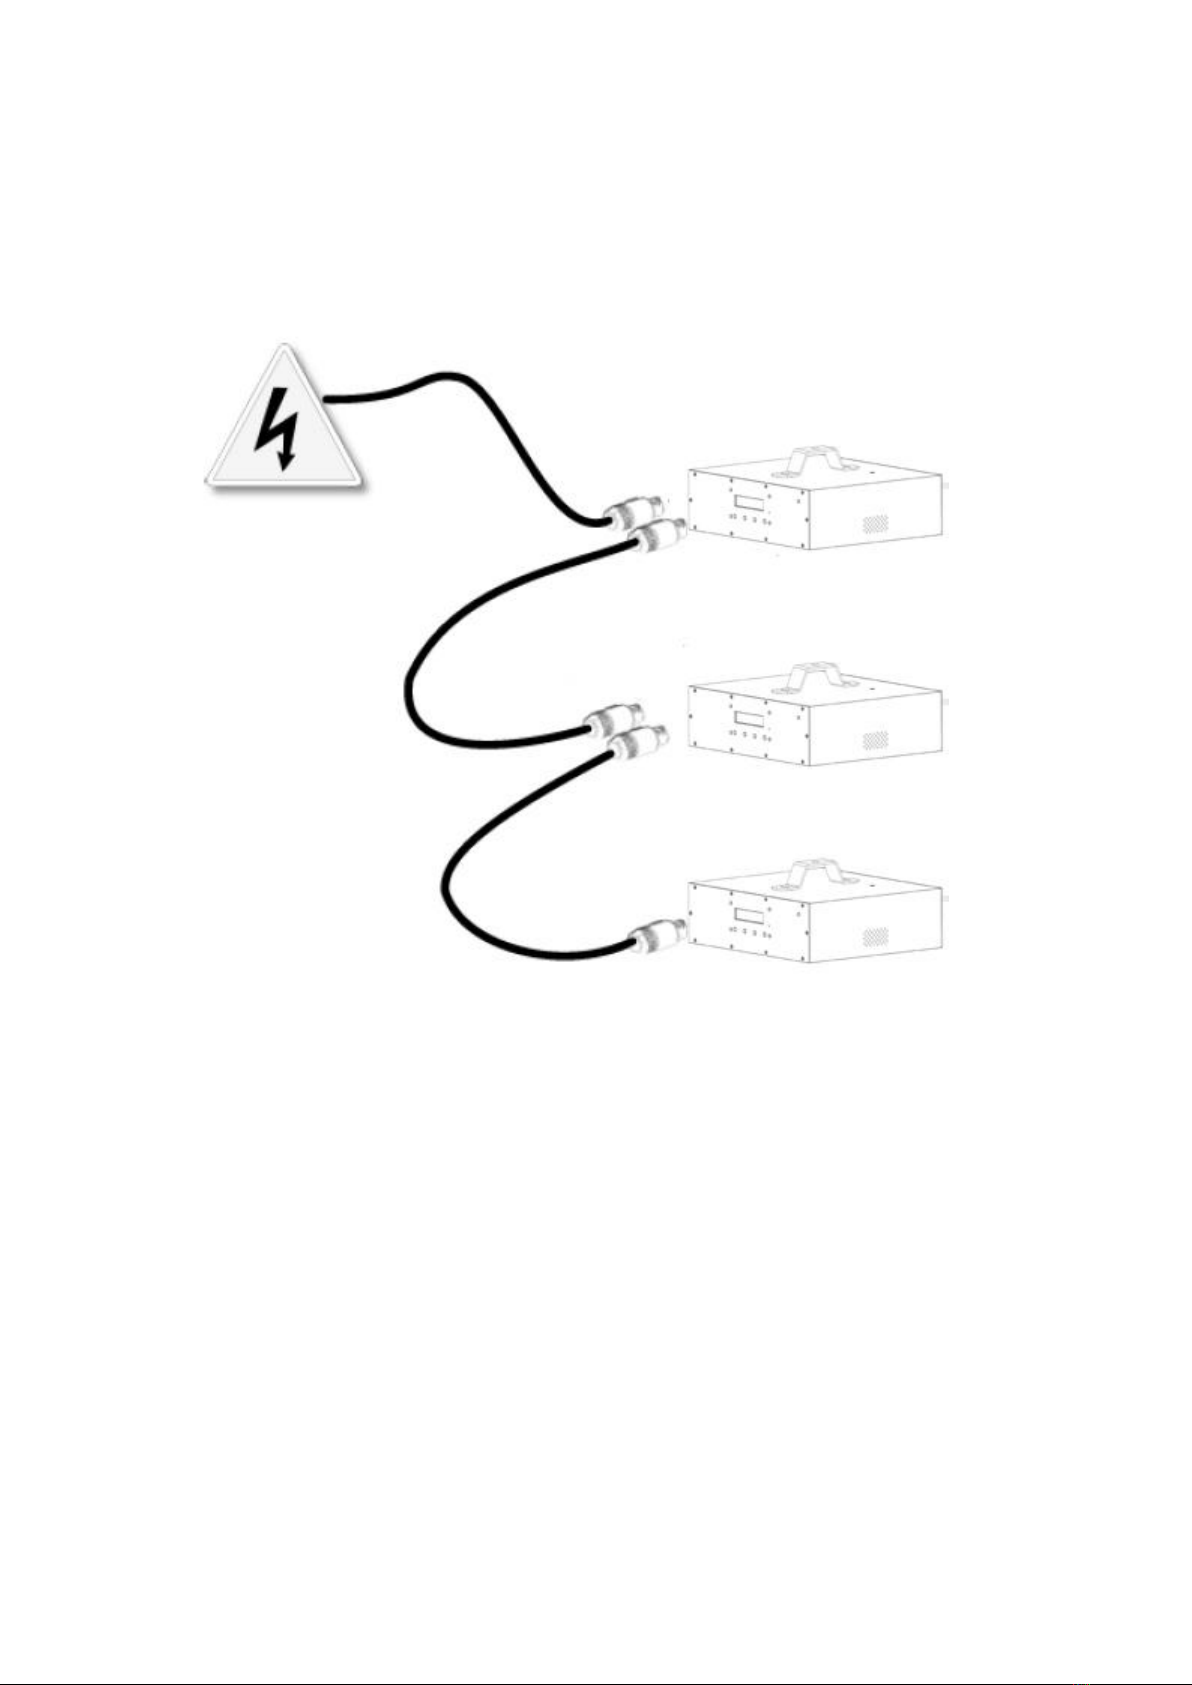
Power Linking
The \Drive supports power linking. You can power link up to
· Seven (7) Drive drives at 120 VAC; or
· Eleven (11) Drive drives at 230 VAC
A power input cord is included with the Drive . A power linking cord is not included; however, is available
as an option.
Pixel Strip Drive30 QRG EN
Pixel Strip Drive QRG EN
8
Drive Power Linking Diagram:

Pixel Strip Drive30 QRG EN
Pixel Strip Drive QRG EN
9
MENU:

Pixel Strip Drive30 QRG EN
Pixel Strip Drive QRG EN
10
Technical Parameters:
Size:204x260x88mm
Power Supplier:Auto-ranging 100v to 240v,50/60Hz
Output Voltage:48V
Consumption:500W
Date Connections:RJ45 for Kling-net & Art-net and DMX
DMX CH Model:
10CH Model:
Channe
l
DMX
address
Description
1CH
0-255
General Dimmer
2CH
0-255
Strobe
3CH
0-255
Red
4CH
0-255
Green
5CH
0-255
Blue
6CH
0-255
Built-in program 1 (multi-color effect. The last one is auto running)
7CH
0-255
Built-inprogram2(singlecoloreffect,canbecontrolledbychannel9.Thelast one
is auto-running
8CH
0-255
Speed for built-in effects
9CH
0-255
Color for built-in effects
10CH
0-255
Sensitivity of sound control (weak -> strong)

Pixel Strip Drive30 QRG EN
Pixel Strip Drive QRG EN
11
55CH Model:
480CH Model:
8 leds as a group,so there are 10 groups as there are 80pcs leds in one strip.
10groupsx16pcs(One controller)xRGB Color=480CH
Pixel-Net Model(For Net-Working protocol,Such as Art-net)
Each 2Leds as a Pixel,80/2=40Pixel per strip, and each port of the Drive Box
support 4pcs strip,40pixelx4pcsxRGB=480CH.
Channel
DMX
address
Description
1CH
0-255
General Dimmer
2CH
0-255
Strobe
3CH
0-255
Built-in program 1 (multi-color effect. The last one is auto running)
4CH
0-255
Built-inprogram2(singlecoloreffect,canbecontrolledbychannel9.Thelastone
is auto-running
5CH
0-255
Speed for built-in effects
6CH
0-255
Color for built-in effects
7CH
0-255
Sensitivity of sound control (week -> strong)
8CH
0-255
Red for 1. Light of 1. Output
9CH
0-255
Green for 1. Light of 1. Output
10CH
0-255
Blue for 1. Light of 1. output
…
55CH
0-255
Blue for 4. Light of 4. output
Table of contents
Popular Dj Equipment manuals by other brands


Equinox Systems
Equinox Systems EQLED127 user manual

Chauvet Professional
Chauvet Professional Amhaze Whisper user manual

Chauvet DJ
Chauvet DJ COLORado 1 Tri TOUR user manual

Chauvet Professional
Chauvet Professional Maverick MK3 Profile Quick reference guide

ecoStage
ecoStage 5R BEAM200 manual

Show Tec
Show Tec Spectral D5000 manual


