ADJ Focus Spot Three Z User manual

A.D.J. Supply Europe B.V. –www.americandj.eu –Focus Spot Three Z Instruction Manual Page 2
©2016 ADJ Products, LLC all rights reserved. Information, specifications, diagrams, images, and instructions
herein are subject to change without notice. ADJProducts, LLC logo and identifying product namesand numbers
herein are trademarks of ADJ Products, LLC. Copyright protection claimed includes all forms and matters of
copyrightable materials and information now allowed by statutory or judicial law or hereinafter granted. Product
names used in this document may be trademarks or registered trademarks of their respective companies and
are hereby acknowledged. All non-ADJ Products, LLC brands and product names are trademarks or registered
trademarks of their respective companies.
ADJ Products, LLC and all affiliated companies hereby disclaim any and all liabilities for property, equipment,
building, and electrical damages, injuries to any persons, and direct or indirect economic loss associated with
the use or reliance of any information contained within this document, and/or as a result of the improper, unsafe,
unsufficient and negligent assembly, installation, rigging, and operation of this product.

A.D.J. Supply Europe B.V. –www.americandj.eu –Focus Spot Three Z Instruction Manual Page 3
Contents
GENERAL INFORMATION ........................................................................................................................................................4
GENERAL INSTRUCTIONS........................................................................................................................................................4
FEATURES................................................................................................................................................................................4
HANDLING PRECAUTIONS.......................................................................................................................................................4
SAFETY PRECAUTIONS ............................................................................................................................................................4
MOUNTING.............................................................................................................................................................................5
CAD DRAWING........................................................................................................................................................................6
BASE LAYOUT ..........................................................................................................................................................................7
DMX SET UP ............................................................................................................................................................................8
18 CHANNEL MODE ..............................................................................................................................................................10
21 CHANNEL MODE ..............................................................................................................................................................13
SYSTEM MENU......................................................................................................................................................................15
HOME ADJUSTEMENT MENU ...............................................................................................................................................19
OPERATION...........................................................................................................................................................................21
MASTER-SLAVE SET UP .........................................................................................................................................................21
POWER CORD DAISY CHAIN..................................................................................................................................................22
REMOTE OPERATION............................................................................................................................................................22
CHANGING THE GOBO ..........................................................................................................................................................23
PHOTOMETRIC CHART..........................................................................................................................................................23
DIMMER CURVE CHART........................................................................................................................................................23
FUSE REPLACEMENT .............................................................................................................................................................24
CLEANING..............................................................................................................................................................................24
TROUBLE SHOOTING.............................................................................................................................................................24
SPECIFICATIONS....................................................................................................................................................................24
ROHS - A great Contribution to the Conservation of Environment.....................................................................................25
WEEE –Waste of Electrical and Electronic Equipment ........................................................................................................26
NOTES ...................................................................................................................................................................................27

A.D.J. Supply Europe B.V. –www.americandj.eu –Focus Spot Three Z Instruction Manual Page 4
INOZIONE
GENERAL INFORMATION
Unpacking: Thank you for purchasing the Focus Spot Three Z by ADJ Products, LLC. Every Focus Spot Three
Z has been thoroughly tested and has been shipped in perfect operating condition. Carefully check the shipping
carton for damage that may have occurred during shipping. If the carton appears to be damaged, carefully
inspect your fixture for any damage and be sure all equipment necessary to operate the unit has arrived intact.
In the event damage has been found or parts are missing, please contact our toll free customer support number
for further instructions. Please do not return this unit to your dealer without contacting customer support first.
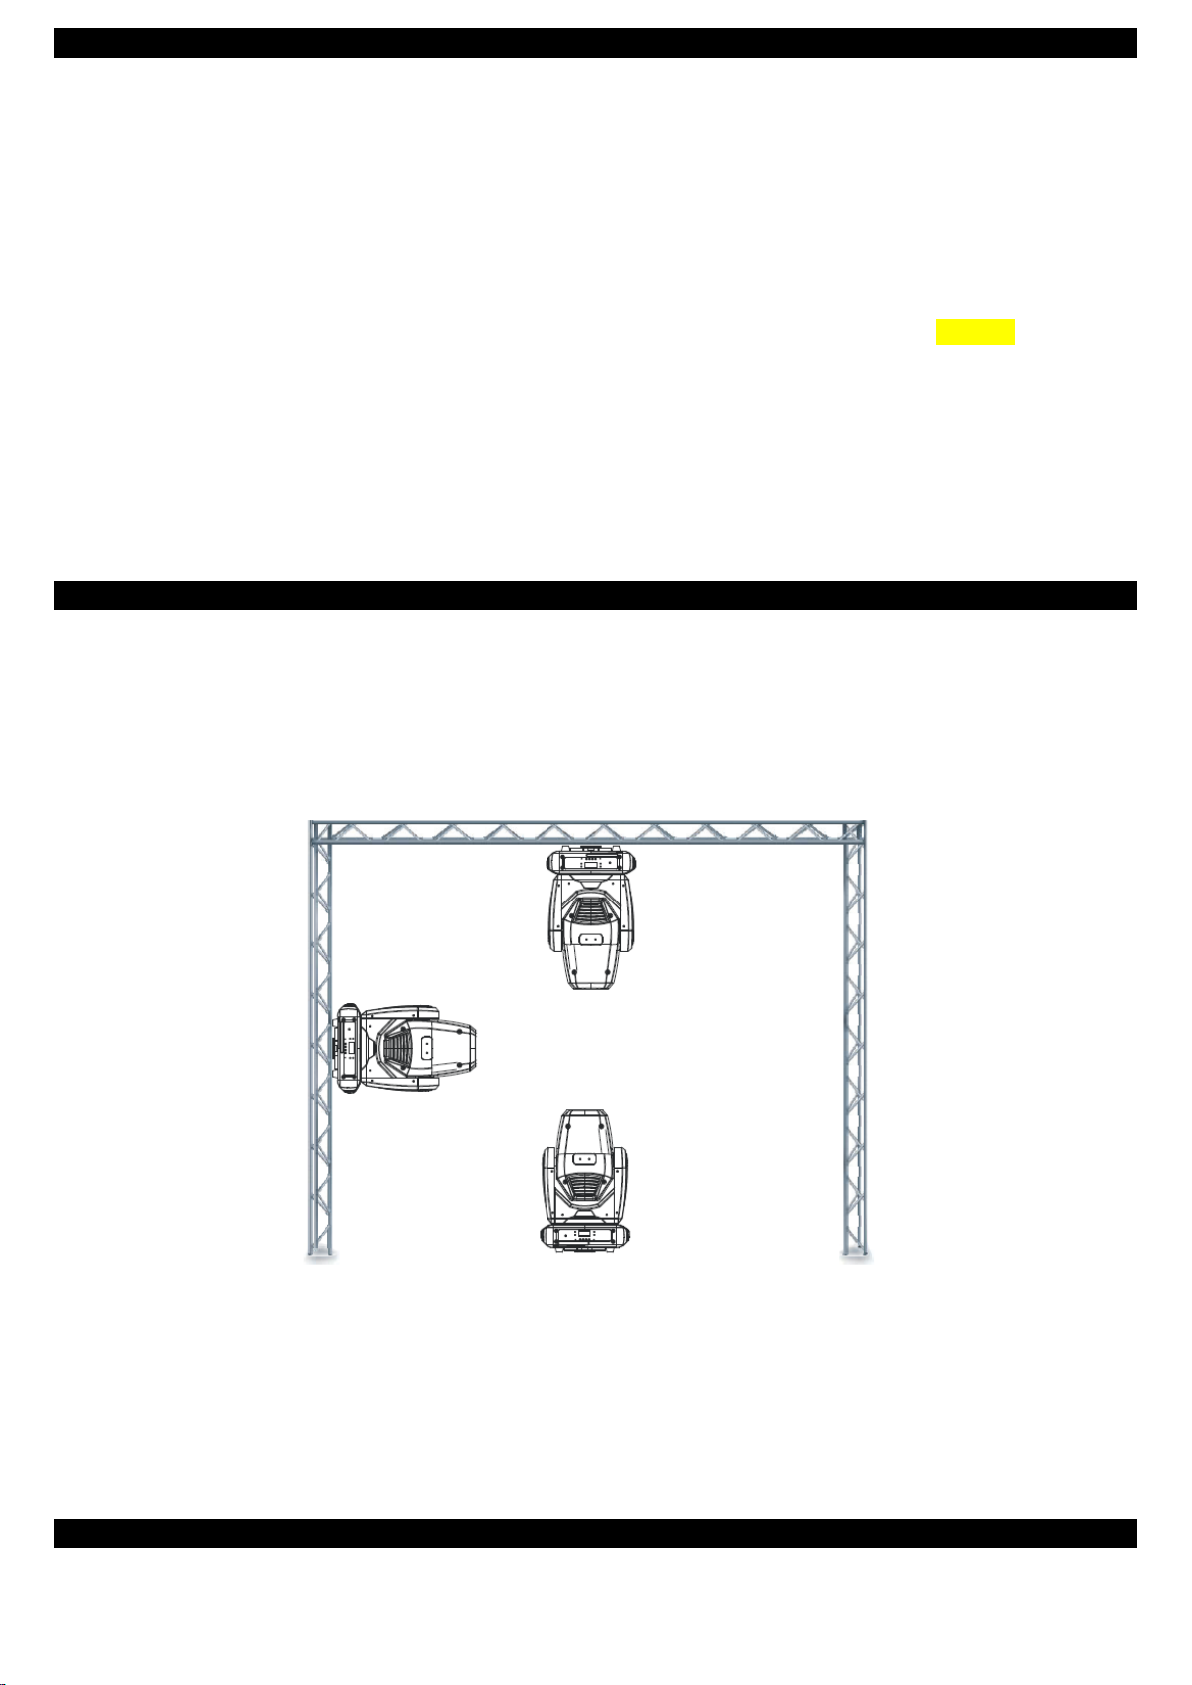
Introduction: The Focus Spot Three Z is a DMX intelligent, moving head, mini LED was. The Focus Spot Three
Z can operate as a stand alone fixture or in a Master/Slave set up. The Focus Spot Three Z has three operating
modes; a sound active, show mode, DMX controlled. This fixture is suitable for theaters, studios, retail stores,
and other similar locations. For best results use fog or special effects smoke to
enhance the beams projections.
Customer Support: If you encounter any problems, please contact your trusted American Audio shop.
We also offer the possibility, to contact us directly: You can contact us via our website www.americandj.eu or
via email: support@americandj.eu
Warning! To prevent or reduce the risk of electrical shock or fire, do not expose this unit to rain or moisture.
Warning! This may cause severe eye damage. Avoid looking directly into the light source at all times!
GENERAL INSTRUCTIONS
To optimize the performance of this product, please read these operating instructions carefully to familiarize
yourself with the basic operations of this unit. These instructions contain important safety information regarding
the use and maintenance of this unit. Please keep this manual with the unit, for future reference.
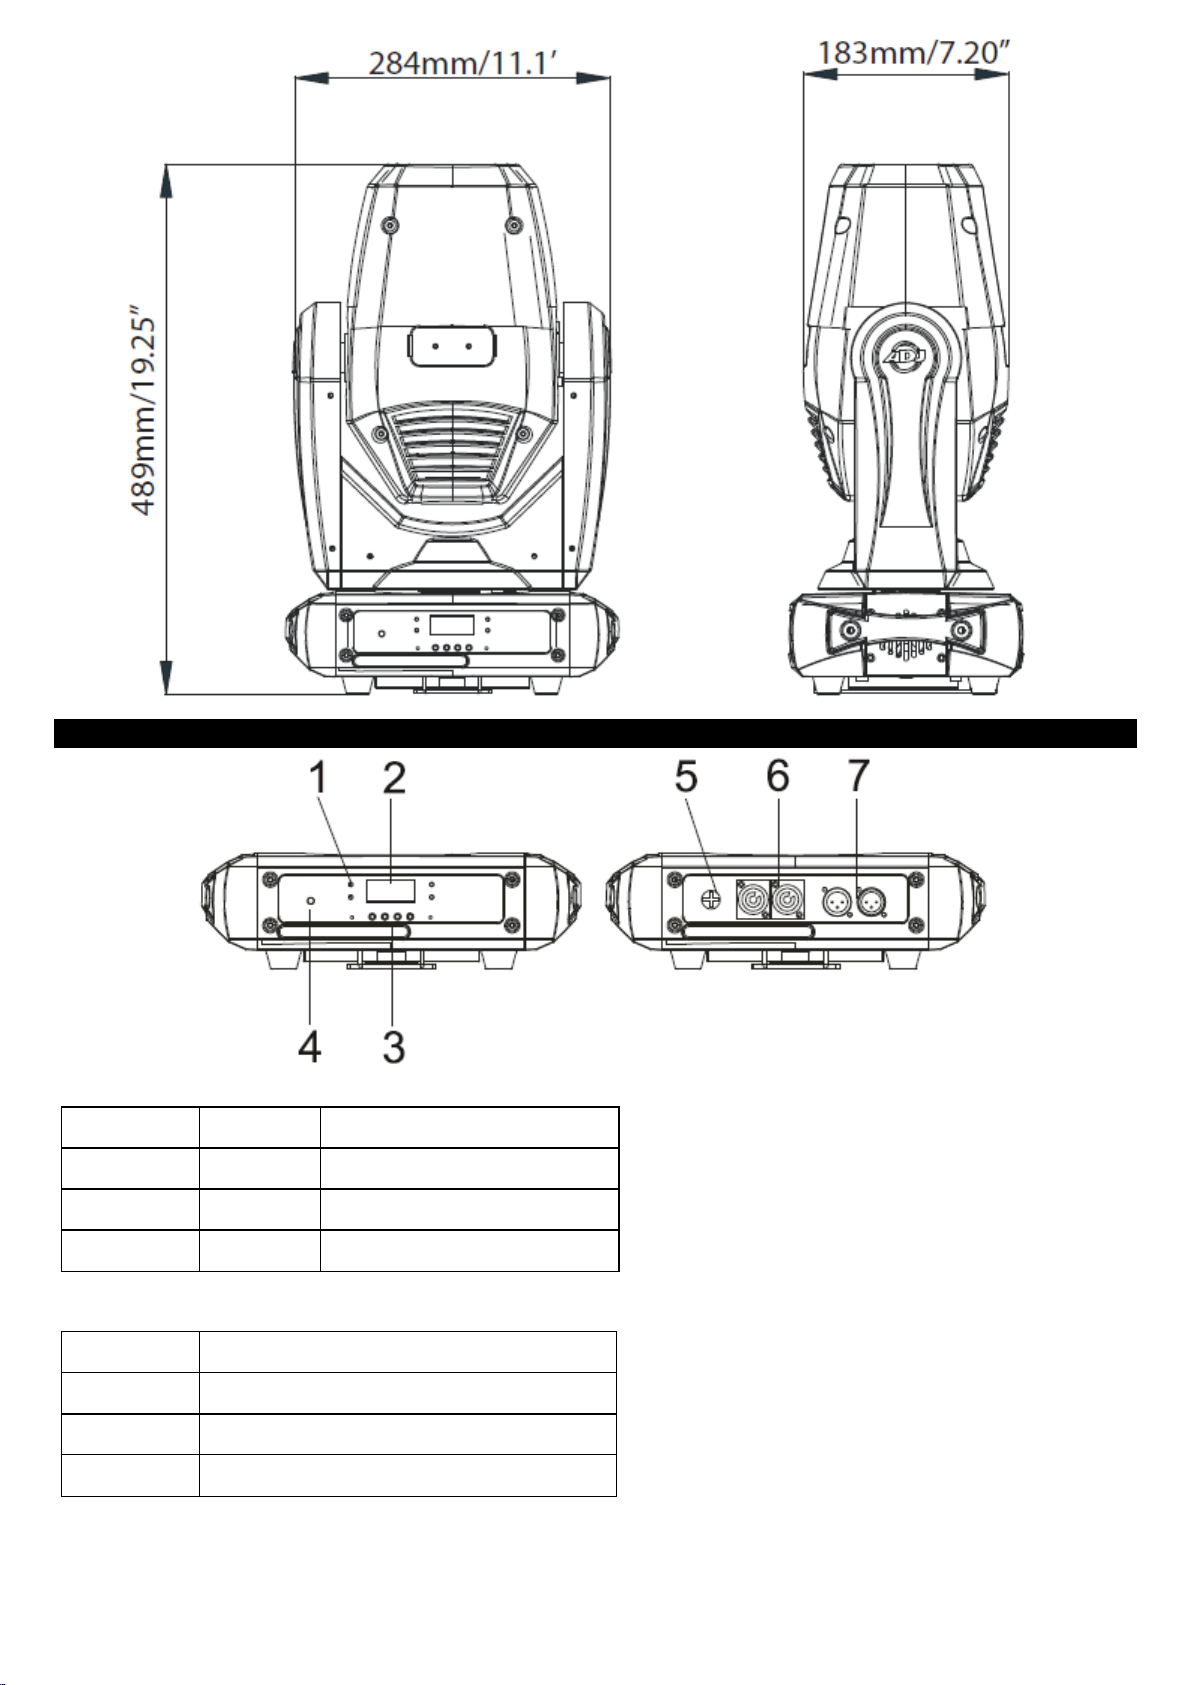
FEATURES
• DMX-512 Protocol Compatible (2 DMX Channel Modes: 18 Channels & 21 Channels)
• 3 Operating Modes - Sound Active, Show Mode, & DMX Control
• 5 Dimmer Curves (Standard, Stage, TV, Architectural, & Theatre)
• Internal Microphone
• Digital Display for Address and Function Setting
• 4 Preprogrammed Shows
• UC IR and Airstream IR Compatiable (Not Included)
HANDLING PRECAUTIONS
Caution! There are no user serviceable parts inside this unit. Do not attempt any repairs yourself, doing so will
void your manufactures warranty. In the unlikely event your unit may require service please contact ADJ
Products, LLC.
During operation the housing may become extremely hot. Avoid touching the unit with bare hands while in use.
ADJ Products, LLC will not accept any liability for any resulting damages caused by the non-observance of this
manual or any unauthorized modification to this unit.
SAFETY PRECAUTIONS
For Your Own Personal Safety, Please Read and Understand This Manual Completely Before You
Attempt To Install Or Operate This Unit!
• To reduce the risk of electrical shock or fire, do not expose this unit rain or moisture
• Do not spill water or other liquids into or on to your unit.
• Be sure that the local power outlet match that of the required voltage for your unit.
• Do not attempt to operate this unit if the power cord has been frayed or broken.
• Do not attempt to remove or break off the ground prong from the electrical cord. This prong is used to reduce
the risk of electrical shock and fire in case of an internal short.
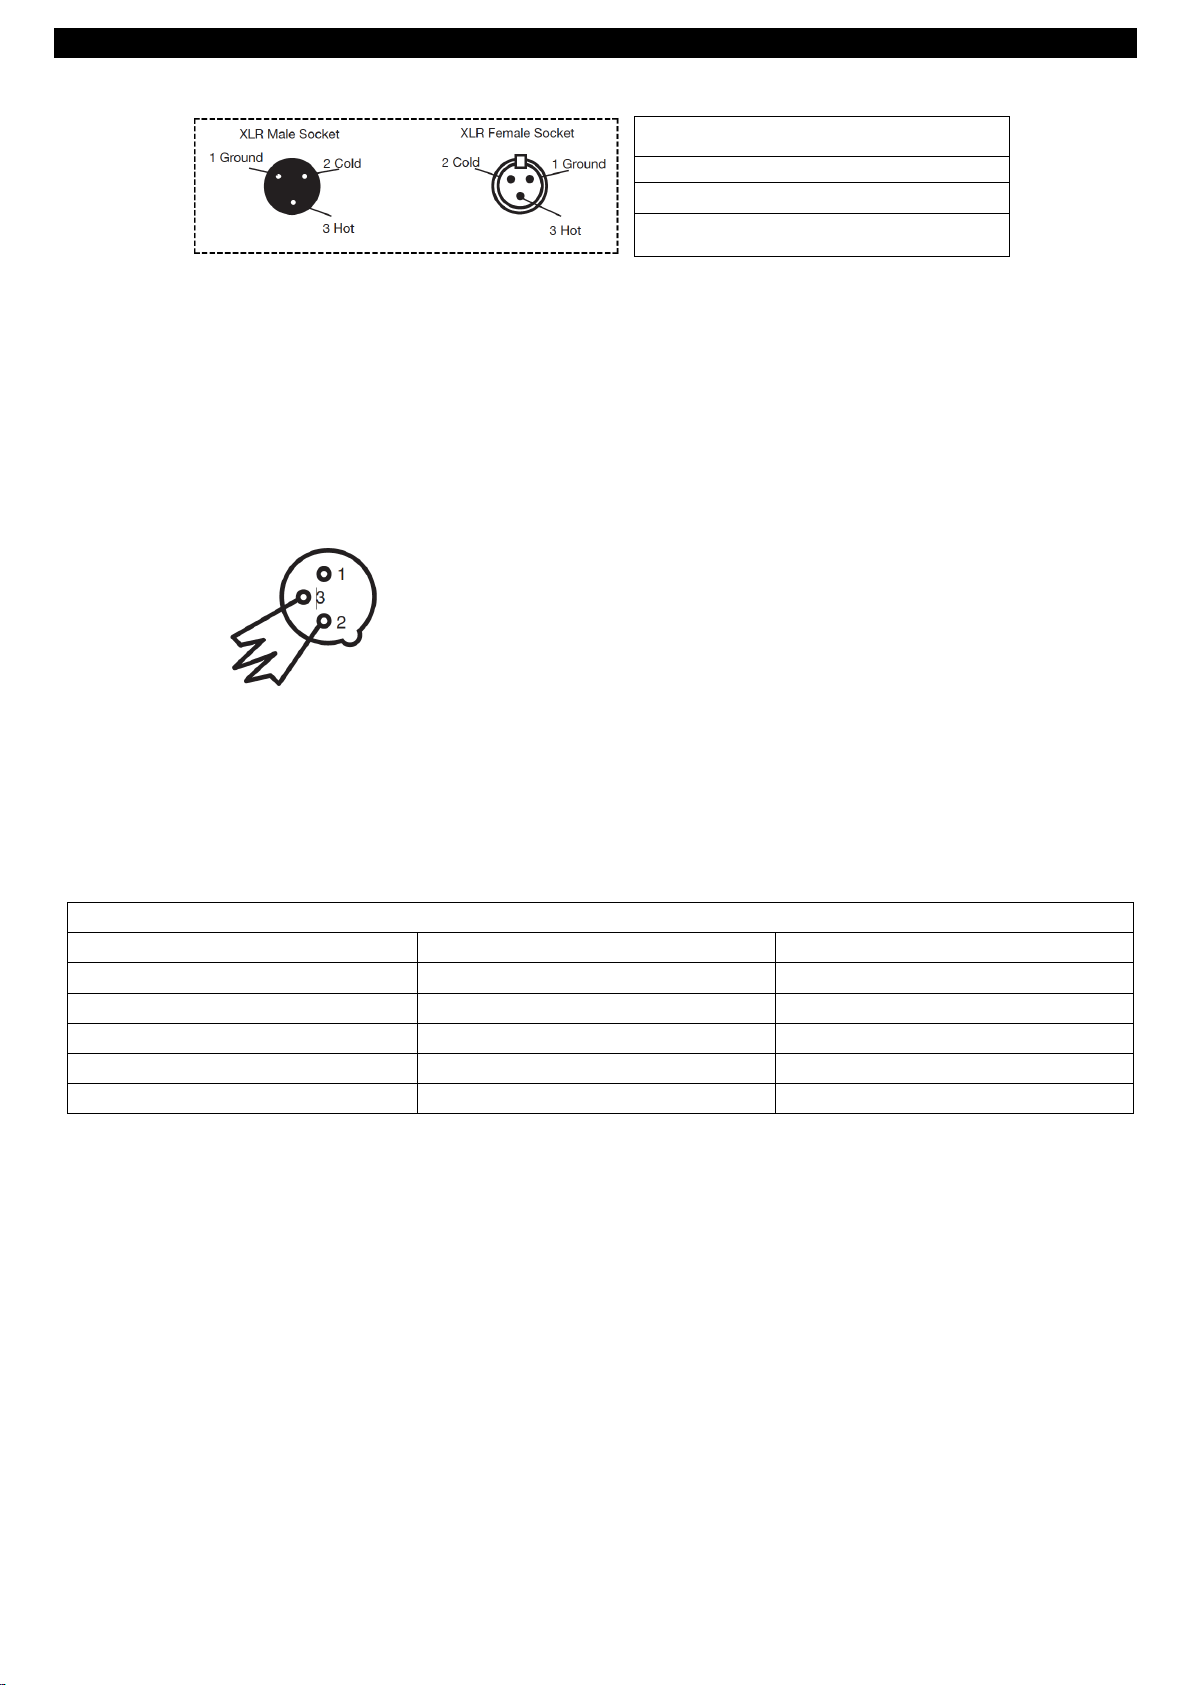
• Disconnect from main power before making any type of connection.
• Do not remove the cover under any conditions. There are no user serviceable parts inside.

A.D.J. Supply Europe B.V. –www.americandj.eu –Focus Spot Three Z Instruction Manual Page 5
SAFETY PRECAUTIONS (continued)
• Never operate this unit when it’s cover is removed.
• Always be sure to mount this unit in an area that will allow proper ventilation. Allow about 6” (15cm) between
this device and a wall.
• Do not attempt to operate this unit, if it becomes damaged.
• This unit is intended for indoor use only, use of this product outdoors voids all warranties.
• Always mount this unit in safe and stable matter.
• Power-supply cords should be routed so that they are not likely to be walked on or pinched by items placed
upon or against them, paying particular attention to cords at plugs, convenience receptacles, and the point where
they exit from the appliance.
• Cleaning -The fixture should be cleaned only as recommended by the manufacturer. See page 24 for cleaning
details.
• Heat -This fixture should be situated away from heat sources such as radiators, heat registers, stoves, or other
appliances (including amplifiers) that produce heat.
• The fixture should be serviced by qualified service personnel when:
A. Objects have fallen, or liquid has been spilled into the appliance.
B. The appliance has been exposed to rain or water.
C. The appliance does not appear to operate normally or exhibits a marked change in performance.
MOUNTING
When installing the unit, the trussing or area of installation must be able to hold 10 times the weight without any
deformation.When installing the unit must be secured with a secondary safety attachment, e.g. and appropriate
safety cable. Never stand directly below the unit when mounting, removing, or servicing the unit.
Overhead mounting requires extensive experience, including calculating working load limits, installation material
being used, and perodic safety inspection of all installation material and unit. If you lack these
qualifications, do not attempt the installation yourself. The installaiton should be checked by a skilled person
once a year.
The Focus Spot Three Z is fully operational in three different mounting positions, hanging upside-down from a
ceiling, mounted sideways on trussing, or set on a flat level surface. To avoid internal damage to the unit,
never mount the unit on its side as illustrated above. Be sure this fixture is kept at least 0.5m away from any
flammable materials (decoration etc.). Always use and install the supplied safety cable as a safety measure to
prevent accidental damage and/ or injury in the event the clamp fails (see next page).
MOUNTING (continued)

A.D.J. Supply Europe B.V. –www.americandj.eu –Focus Spot Three Z Instruction Manual Page 6
NOTICE: The suitable enviromental temperature for this lighting fixture is between -25˚ C to 45˚ C. Do not
place this lighting fixture in an enviroment where the temperatures are under or above the temperatures stated
above. This will allow the fixture to run at its best and help prolong the fixture life.
Clamp
Screw
Suspender
Screw one clamp via a M12 screw and nut to the included bracket. Attach the bracket using the omega locks
to the bottom of the Focus Spot Three Z. Attach and pull the safetycable through one of the safety holes
located on the bottom base and over the trussing system or a safe fixation spot. Insert the end in the carabine
and tighten the safety screw.
CAD DRAWING

A.D.J. Supply Europe B.V. –www.americandj.eu –Focus Spot Three Z Instruction Manual Page 7
BASE LAYOUT
1. LED:
DMX
On
DMX input present
MASTER
On
Master Mode
SLAVE
ON
Slave Mode
SOUND
Flashing
Sound activation
2. Display: To show the various menus and the selected function;
3. Button:
MENU
To select the programming functions
▲UP
To go forward in the selected functions
▼DOWN
To go backward in the selected functions
ENTER
To confirm the selected functions

A.D.J. Supply Europe B.V. –www.americandj.eu –Focus Spot Three Z Instruction Manual Page 8
BASE LAYOUT (continued)
4. IR receiver: To receive the IR signal;
5. Fuse(T5Amp): Protects the unit from over-voltage or short circuit;
6. Power In/out: power cable connectors for power input/output;
7. DMX In/Out: 3-pin XLR connectors for DMX512 operation
DMX SET UP
Power Supply: The ADJ Focus Spot Three Z contains a automatic voltage switch, which will auto sense the
voltage when it is plugged into the power source. With this switch there is no need to worry about the correct
power voltage, this unit can be plugged in anywhere.
DMX-512: DMX is short for Digital Multiplex. This is a universal protocol used by most lighting and controller
manufactures as a form of communication between intelligent fixtures and controllers. A DMX controller sends
DMX data instructions from the controller to the fixture. DMX data is sent as serial data that travels from fixture
to fixture via the DATA “IN” and DATA “OUT” XLR terminals located on all DMX fixtures (most controllers only
have a DATA “OUT” terminal).
DMX Linking: DMX is a language allowing all makes and models of different manufactures to be linked together
and operate from a single controller, as long as all fixtures and the controller are DMX compliant. To ensure
proper DMX data transmission, when using several DMX fixtures try to use the shortest cable path possible. The
order in which fixtures are connected in a DMX line does not influence the DMX addressing. For example; a
fixture assigned a DMX address of 1 may be placed anywhere in a DMX line, at the beginning, at the end, or
anywhere in the middle. Therefore, the first fixture controlled by the controller could be the last fixture in the
chain. When a fixture is assigned a DMX address of 1, the DMX controller knows to send DATA assigned to
address 1 to that unit, no matter where it is located in the DMX chain.
Data Cable (DMX Cable) Requirements (For DMX and Master/Slave Operation): The Focus Spot Three Z
can be controlled via DMX- 512 protocol. The Focus Spot Three Z has 2 DMX channel modes; 18 channel mode
& 21 channel mode. The DMX address is set electronically using the controls on the front
panel of the unit. Your unit and your DMX controller require a approved DMX-512 110
Ohm Data cable for data input and data output (Figure 1). We recommend Accu-Cable
DMX cables. If you are making your own cables, be sure to use standard 110-120 Ohm
shielded cable (This cable may be purchased at almost all professional sound and lighting
stores). Your cables should be made with a male and female XLR connector on either end
of the cable. Also remember that DMX cable must be daisy chained and cannot be split.
NOTICE: Be sure to follow figures two and three when making your own cables. Do not use the ground lug on
the XLR connector. Do not connect the cable’s shield conductor to the ground lug or allow the shield conductor
to come in contact with the XLR’s outer casing. Grounding the shield could cause a short circuit and erratic
behaviour.
Figure 2
Figure 1

A.D.J. Supply Europe B.V. –www.americandj.eu –Focus Spot Three Z Instruction Manual Page 9
DMX SET UP (continued)
XLR Pin Configuration
Pin1 = Ground
Pin2 = Data Compliment (negative)
Pin3 = Data True (positive)
Figure 3
Special Note: Line Termination. When longer runs of cable are used, you may need to use a terminator on
the last unit to avoid erratic behavior. A terminator is a 110-120 ohm 1/4 watt resistor which is connected
between pins 2 and 3 of a male XLR connector (DATA + and DATA -). This unit is inserted in the female XLR
connector of the last unit in your daisy chain to terminate the line. Using a cable terminator (ADJ part number Z-
DMX/T) will decrease the possibilities of erratic behaviour.
Termination reduces signal errors and
avoids signal transmission problems and
interference. It is always advisable to
connect a DMX terminal, (Resistance
120 Ohm 1/4 W) between PIN 2 (DMX-)
and PIN 3 (DMX +) of the last fixture.
Figure 4
5-Pin XLR DMX Connectors Some manufactures use 5-pin DMX- 512 data cables for DATA transmission in
place of 3-pin. 5-pin DMX fixtures may be implemented in a 3-pin DMX line. When inserting standard 5-pin data
cables in to a 3-pin line a cable adaptor must be used, these adaptors are readily available at most electric
stores. The chart below details a proper cable conversion.
3-Pin XLR to 5-Pin XLR Conversion
Conductor
3-pin XLR Female (Out)
5-pin XLR Male (In)
Ground/Shield
Pin 1
Pin 1
Data compliment (- signal)
Pin 2
Pin 2
Data True (+ signal)
Pin 3
Pin 3
Not used
Pin 4 - Do Not Use
Not used
Pin 5 - Do Not Use

A.D.J. Supply Europe B.V. –www.americandj.eu –Focus Spot Three Z Instruction Manual Page 10
18 CHANNEL MODE
Channel
Value
Function
1
0 - 255
PAN MOVEMENT 0° - 630°
2
0 - 255
TILT MOVEMENT 0° - 270°
3
COLOR
0 - 7
WHITE
8 - 14
RED
15 - 21
ORANGE
22 - 28
YELLOW
29 - 35
GREEN
36 - 42
BLUE
43 - 49
PURPLE
50 - 56
LIGHT BLUE
57 - 63
PINK
64 - 127
COLOR MIXING
128 - 189
COUNTER CLOCKWISE ROTATION FAST - SLOW
190 - 193
STOP
194 - 255
CLOCKWISE ROTATION SLOW - FAST
4
GOBOS (STATIC)
0 - 7
OPEN
8 - 15
GOBO 1
16 - 23
GOBO 2
24 - 31
GOBO 3
32 - 39
GOBO 4
40 - 47
GOBO 5
48 - 55
GOBO 6
56 - 63
GOBO 7
64 - 72
GOBO 1 SHAKE
73 - 81
GOBO 2 SHAKE
82 - 90
GOBO 3 SHAKE
91 - 99
GOBO 4 SHAKE
100 - 108
GOBO 5 SHAKE
109 - 117
GOBO 6 SHAKE
118 - 127
GOBO 7 SHAKE
128 - 189
COUNTER CLOCKWISE ROTATION FAST - SLOW
190 - 193
STOP
194 - 255
CLOCKWISE ROTATION SLOW - FAST
5
GOBOS (ROTATING)
0 - 9
OPEN
10 - 18
GOBO 1
19 - 27
GOBO 2
28 - 36
GOBO 3
37 - 45
GOBO 4
46 - 54
GOBO 5
55 - 63
GOBO 6
64 - 73
OPEN
74 - 82
GOBO 1 SHAKE
83 - 91
GOBO 2 SHAKE
92 - 100
GOBO 3 SHAKE
101 - 109
GOBO 4 SHAKE
110 - 118
GOBO 5 SHAKE
119 - 127
GOBO 6 SHAKE
128 - 189
COUNTER CLOCKWISE ROTATION FAST - SLOW
190 - 193
STOP
194 - 255
CLOCKWISE ROTATION SLOW - FAST

A.D.J. Supply Europe B.V. –www.americandj.eu –Focus Spot Three Z Instruction Manual Page 11
18 CHANNEL MODE (continued)
Channel
Value
Function
6
GOBO WHEEL 2 GOBO ROTATION
0 - 127
INDEXING
128 - 189
CLOCKWISE ROTATION SLOW - FAST
190 - 193
NO ROTATION
194 - 255
COUNTER-CLOCKWISE ROTATION FAST - SLOW
7
PRISM
0
STOP
1 - 126
6 FACET PRISM
127 - 128
NO EFFECT
129 - 255
LINEAR PRISM
8
PRISM ROTATION
0 - 3
STOP
4 - 127
CLOCKWISE ROTATION FAST - SLOW
128 - 131
STOP
132 - 255
COUNTER-CLOCKWISE ROTATION SLOW - FAST
9
STROBE/SHUTTER
0 - 7
OFF
8 - 15
OPEN
16 - 131
STROBING SLOW - FAST
132 - 139
OPEN
140 - 181
SLOW OPEN - FAST CLOSE
182 - 189
OPEN
190 - 231
FAST OPEN - SLOW CLOSE
232 - 239
OPEN
240 - 247
RANDOM STROBE SLOW - FAST
248 - 255
OPEN
10
0 - 255
MASTER DIMMER 0% - 100%
11
0 - 255
FOCUS 0% - 100%
12
AUTO FOCUS
0 - 7
NOTHING
8 - 63
5M FOR AUTO FOCUS
64 - 127
10M FOR AUTO FOCUS
128 - 255
15M FOR AUTO FOCUS
13
0 - 255
ZOOM 18° - 12°
14
SHOWS
0
OFF
1 - 21
SHOW 1
22 - 41
SHOW 2
42 - 61
SHOW 3
62 - 81
SHOW 4
91 - 255
RANDOM SHOW WITH SOUND ACTIVITY
15
0 - 255
SHOW SPEED FAST - SLOW
16
DIMMER MODES
0 - 20
STANDARD
22 - 40
STAGE
41 - 60
TV
61 - 80
ARCHITECTURAL
81 - 100
THEATRE
101 - 255
DEFAULT TO UNIT
17
0 - 255
PAN/TILT SPEED FAST - SLOW

A.D.J. Supply Europe B.V. –www.americandj.eu –Focus Spot Three Z Instruction Manual Page 12
18 CHANNEL MODE (continued)
Channel
Value
Function
18
FUNCTION
0 - 69
NOTHING
70 - 79
ENABLE BLACKOUT WITH PAN/TILT
80 - 89
DISABLE BLACKOUT WITH PAN/TILT
90 - 99
ENABLE BLACKOUT W/ COLOR CHANGE
100 - 109
DISABLE BLACKOUT W/ COLOR CHANGE
110 - 119
ENABLE BLACKOUT W/ GOBO CHANGE
120 - 129
DISABLE BLACKOUT W/ GOBO CHANGE
130 - 139
PAN/TILT MOTOR RESET
140 - 149
COLOR WHEEL MOTOR RESET
150 - 159
GOBO WHEEL MOTOR RESET
160 - 169
EFFECTS RESET (PRISM/FOCUS/ZOOM)
170 - 199
NOTHING
200 - 209
RESET ALL
210 - 255
NOTHING
Gobo Wheel 1
Gobo Wheel 2

A.D.J. Supply Europe B.V. –www.americandj.eu –Focus Spot Three Z Instruction Manual Page 13
21 CHANNEL MODE
Channel
Value
Function
1
0 - 255
PAN MOVEMENT 0° - 630°
2
0 - 255
PAN FINE 0% - 100%
3
0 - 255
TILT MOVEMENT 0° - 270°
4
0 - 255
TILT FINE 0% - 100%
5
COLOR
0 - 7
WHITE
8 - 14
RED
15 - 21
ORANGE
22 - 28
YELLOW
29 - 35
GREEN
36 - 42
BLUE
43 - 49
PURPLE
50 - 56
LIGHT BLUE
57 - 63
PINK
64 - 127
COLOR MIXING
128 - 189
COUNTER CLOCKWISE FAST - SLOW
190 - 193
STOP
194 - 255
CLOCKWISE ROTATION SLOW - FAST
6
GOBOS (STATIC)
0 - 7
OPEN
8 - 15
GOBO 1
16 - 23
GOBO 2
24 - 31
GOBO 3
32 - 39
GOBO 4
40 - 47
GOBO 5
48 - 55
GOBO 6
56 - 63
GOBO 7
64 - 72
GOBO 1 SHAKE
73 - 81
GOBO 2 SHAKE
82 - 90
GOBO 3 SHAKE
91 - 99
GOBO 4 SHAKE
100 - 108
GOBO 5 SHAKE
109 - 117
GOBO 6 SHAKE
118 - 127
GOBO 7 SHAKE
128 - 189
COUNTER CLOCKWISE FAST - SLOW
190 - 193
STOP
194 - 255
CLOCKWISE ROTATION SLOW - FAST
7
GOBOS (ROTATING)
0 - 9
OPEN
10 - 18
GOBO 1
19 - 27
GOBO 2
28 - 36
GOBO 3
37 - 45
GOBO 4
46 - 54
GOBO 5
55 - 63
GOBO 6
64 - 73
OPEN
74 - 82
GOBO 1 SHAKE
83 - 91
GOBO 2 SHAKE
92 - 100
GOBO 3 SHAKE
101 - 109
GOBO 4 SHAKE
110 - 118
GOBO 5 SHAKE
119 - 127
GOBO 6 SHAKE
128 - 189
COUNTER CLOCKWISE ROTATION FAST - SLOW
190 - 193
STOP
194 - 255
CLOCKWISE ROTATION SLOW - FAST

A.D.J. Supply Europe B.V. –www.americandj.eu –Focus Spot Three Z Instruction Manual Page 14
21 CHANNEL MODE (continued)
Channel
Value
Function
8
GOBO WHEEL 2 GOBO ROTATION
0 - 127
INDEXING
128 - 189
CLOCKWISE ROTATION FAST - SLOW
190 - 193
NO ROTATION
194 - 255
COUNTER-CLOCKWISE ROTATION SLOW - FAST
9
PRISM
0
STOP
1 - 126
6 FACET PRISM
127 - 128
NO EFFECT
129 - 255
LINEAR PRISM
10
PRISM ROTATION
0 - 3
STOP
4 - 127
CLOCKWISE ROTATION FAST - SLOW
128 - 131
STOP
132 - 255
COUNTER-CLOCKWISE ROTATION SLOW - FAST
11
STROBE/SHUTTER
0 - 7
OFF
8 - 15
OPEN
16 - 131
STROBING SLOW - FAST
132 - 139
OPEN
140 - 181
SLOW OPEN - FAST CLOSE
182 - 189
OPEN
190 - 231
FAST OPEN - SLOW CLOSE
232 - 239
OPEN
240 - 247
RANDOM STROBE SLOW - FAST
248 - 255
OPEN
12
0 - 255
MASTER DIMMER 0% - 100%
13
0 - 255
MASTER DIMMER FINE 0% - 100%
14
0 - 255
FOCUS 0% - 100%
15
AUTO FOCUS
0 - 7
NOTHING
8 - 63
5M FOR AUTO FOCUS
64 - 127
10M FOR AUTO FOCUS
128 - 255
15M FOR AUTO FOCUS
16
0 - 255
ZOOM 18° - 12°
17
SHOWS
0
OFF
1 - 21
SHOW 1
22 - 41
SHOW 2
42 - 61
SHOW 3
62 - 81
SHOW 4
91 - 255
RANDOM SHOW WITH SOUND ACTIVITY
18
0 - 255
SHOW SPEED FAST - SLOW
19
DIMMER MODES
0 - 20
STANDARD
22 - 40
STAGE
41 - 60
TV
61 - 80
ARCHITECTURAL
81 - 100
THEATRE
101 - 255
DEFAULT TO UNIT
20
0 - 255
PAN/TILT SPEED FAST - SLOW

A.D.J. Supply Europe B.V. –www.americandj.eu –Focus Spot Three Z Instruction Manual Page 15
21 CHANNEL MODE (continued)
Channel
Value
Function
21
FUNCTION
0 - 69
NOTHING
70 - 79
ENABLE BLACKOUT WITH PAN/TILT
80 - 89
DISABLE BLACKOUT WITH PAN/TILT
90 - 99
ENABLE BLACKOUT W/ COLOR CHANGE
100 - 109
DISABLE BLACKOUT W/ COLOR CHANGE
110 - 119
ENABLE BLACKOUT W/ GOBO CHANGE
120 - 129
DISABLE BLACKOUT W/ GOBO CHANGE
130 - 139
PAN/TILT MOTOR RESET
140 - 149
COLOR WHEEL MOTOR RESET
150 - 159
GOBO WHEEL MOTOR RESET
160 - 169
EFFECTS RESET (PRISM/FOCUS/ZOOM)
170 - 199
NOTHING
200 - 209
RESET ALL
210 - 255
NOTHING
Gobo Wheel 1
Gobo Wheel 2
SYSTEM MENU

A.D.J. Supply Europe B.V. –www.americandj.eu –Focus Spot Three Z Instruction Manual Page 16
SYSTEM MENU (continued)

A.D.J. Supply Europe B.V. –www.americandj.eu –Focus Spot Three Z Instruction Manual Page 17
System Menu: When making adjustments press ENTER to confirm your setup then press and hold the
MENU button for at least 3 seconds. To exit without making any adjustments press the MENU button.
The display will lock after 30 seconds, press the MENU button for 3 seconds to unlock.
DMX Address - Set the DMX Address -
1. Press the MENU button until “DMX Addresss” is displayed, press ENTER.
2. “X” will now be displayed, “X” represents the displayed address. Press the UP or DOWN buttons to find your
desired address.
3. Press ENTER to confirm, and then press and hold the MENU button for at least three seconds to assign.
Channel Mode - This will let you select your desired DMX Channel mode.
1. Press the MENU button until “Channel Mode” is displayed, press ENTER.
2. “X Chan” will now be displayed, “X” represents the displayed DMX channel mode. Press the UP or DOWN
buttons to find your desired Channel mode.
3. Press ENTER to confirm.
Slave Mode - This will let you set unit as a master or slave in a master/slave configuration.
1. Press the MENU button until “Slave Mode” is displayed, press ENTER. Either “Master”, “Slave 1” or “Slave 2”
will be displayed.
2. Press the UP or DOWN buttons until your desired setting is displayed, then press ENTER to confirm.
NOTE: In a Master/Slave configuration you can make one fixture the Master and then set the next fixture to
“Slave 2”, the fixtures will now have contrast movement to each other.
Show Mode - Show modes 1 - 4 (Factory Shows).
1. Press the MENU button until “Show Mode” is displayed, press ENTER.
2. “Show X” will now be displayed, “X” representing a number between 1-4. Press the UP or DOWN buttons to
find your desired show and press ENTER to confirm. After pressing ENTER, press and hold the MENU button
for at least 3 seconds to activate.
Sound State - In this mode the unit will run in sound active mode.
1. Press the MENU button until “Sound State” is displayed, press ENTER.
2. Either “On” or “Off” will now be displayed. Use the UP or DOWN buttons to toggle between “On” and “Off”.
3. Press ENTER to confirm your selection, the press and hold the MENU button to activate.
Sound Sense - In this mode you can adjust the sound sensitivity of the sound active
mode.
1. Press the MENU button until “Sound Sense” is displayed, press ENTER.
2. Press the UP or DOWN buttons to adjust the sensitivity level. The sensitivity level can be adjusted between
0 (the lowest) and 100 (most sensitive).
3. Press ENTER to set you desired level.
DMX Last State - This mode can be used as a precaution mode, that in case the DMX
signal is lost, the operating mode chosen in the setup is the running mode the fixture will go
into when the DMX signal is lost. You can also set this as the operating mode you would like
the unit to return to when power is applied.
1. Press the MENU button until “DMX State” is displayed, press ENTER.
2. Either “Master/Slave”, “Blackout”, or “Last State” will be displayed. Choose an operating mode you would like
the unit tostart up in when power is applied or the DMX signal is lost.
SYSTEM MENU (continued)
• Master/Slave - If the DMX signal is lost or power is applied, the unit will automatically go into Master Slave
mode.
• Blackout - If the DMX signal is lost or power is applied, the unit will automatically go into stand by mode.

A.D.J. Supply Europe B.V. –www.americandj.eu –Focus Spot Three Z Instruction Manual Page 18
• Last State - If the DMX signal is lost the fixture will stay in the last DMX set up. If power is applied and this
mode is set, the unit will automatically go into the last DMX set up.
3. Press ENTER to confirm your desired set up.
Dimmer Curve - In this mode you can select the dimmer curve.
1. Press the MENU button until “Dimmer Curve” is displayed, press ENTER.
2. The current dimmer curve setting will be displayed.
3. Press the UP or DOWN buttons to find your desired dimmer curve and press ENTER to confirm. See the
Dimmer Curve Chart on page 22 for the settings.
Pan Invert - Pan Inversion
1. Press the MENU button until “Pan Invert” is displayed, press ENTER. Either “Yes” or “No” will be displayed.
2. To activate the Pan inversion press the UP or DOWNbuttons until “Yes” is displayed, press ENTER to confim.
To deactivate Pan inversion, select “No” and press Enter.
Tilt Invert - Tilt Inversion
1. Press the MENU button until “Tilt Invert” is displayed, press ENTER. Either “Yes” or “No” will be displayed.
2. To activate the Tilt inversion press the UP or DOWN buttons until “Yes” is displayed, press ENTER to confim.
To deactivate Tilt inversion, select “No” and press Enter.
Back Light - With this function you can make the backlight automatically turn off after one
minute.
1. Press the MENU button until “Back Light” is displayed, press ENTER.
2. Either “On” or “Off” will now be displayed. Press the UP or DOWN buttons to select “On” to keep the backlight
on at all times, or “Off” to allow the backlight to turn off after 1 minute. Press any button to turn the backlight on
again.
Manual Test - This function will let you manually test the individual features.
1. Press the MENU button until “Manual Test” is displayed, press ENTER.
2. Use the UP or DOWN buttons to find the functions that you wish to test.
3. Once you find a function you wish to test, press the ENTER button, the displayed value will begin to flash.
You can now adjust the values by pressing the UP and DOWN buttons. Once you have finished testing press
the ENTER button.
4. To exit the manual test mode, press the MENU button.
Auto Test - This function will run a self test program.
1. Press the MENU button until “Auto Test” is displayed, press ENTER.
2. The fixture will now run a self test. Press the MENU button to exit.
Function Delay - With this function you can set a delay for the reset functions in DMX
mode.
1. Press the MENU button until “Function Delay” is displayed, press ENTER.
2. Either “No Delay” or time between 1s - 3s will be displayed. This number represents the delay setting. Use
the UP and DOWN buttons to adjust the blackout delay. Example: If the delay is set to 3 seconds, and you go
to reset the pan/tilt motors, it will take 3 seconds for the reset to begin.
3. Press ENTER to confirm.
SYSTEM MENU (continued)
Zoom Mode - With this function you can adjust the zoom.
1. Press the MENU button until “Zoom Mode” is displayed, press ENTER.
2. The current zoom setting will be displayed.

A.D.J. Supply Europe B.V. –www.americandj.eu –Focus Spot Three Z Instruction Manual Page 19
3. Press the UP or DOWN buttons to adjust the zoom between 5M, 10M, or 15M. Press ENTER to confirm your
setting.
Fixture Temp. - With this function you can display the running temperature of the unit.
1. Press the MENU button until “Fixture Temp.” is displayed, press ENTER.
2. The current running temperature of the fixture will now be displayed. Press MENU to exit.
Fixture Time - With this function you can display the running time of the unit.
1. Press the MENU button until “Fixture Time” is displayed, press ENTER.
2. The running time of the fixture will now be displayed. Press MENU to exit.
Firmware Version - This will display the firmware/software version
1. Press the MENU button until “Firmware Version” is displayed. Press the ENTER button and the
firmware/software vesion will be displayed.
2. Press the MENU button to leave this function.
PRO Defaults - This function will restore all factory settings.
1. Press the MENU button until “PRO defaults” is displayed, press ENTER. Either “Yes” or “No” will be displayed.
2. To restore factory settings press the UP or DOWN buttons until “Yes” is displayed, press ENTER to confim.
If you do not wish restore the settings, select “No” and press Enter.
Reset - Use this function to reset the motors.
1. Press the MENU button until “Reset” is displayed, press ENTER.
2. The fixture will now reset.
HOME ADJUSTEMENT MENU

A.D.J. Supply Europe B.V. –www.americandj.eu –Focus Spot Three Z Instruction Manual Page 20
To enter the Offset Menu, press the MENU button to unlock the display, then press the ENTER button for at
least 5 seconds. In this submenu you are able to adjust the home position of the pan, tilt, gobo wheels, color
wheel, prisms, focus, and zoom .
Pan Offset - Adjustment of the pan home position.
1. Press the ENTER button for at least 5 seconds, then press the UP or DOWN buttons so that “Pan Offset” is
displayed, press ENTER.
2. Use the UP and DOWN buttons to make your adjustments, and then press ENTER to confirm. Press the
MENU button for one second to exit.
Tilt Offset - Adjustment of the tilt home position.
1. Press the ENTER button for at least 5 seconds, then press the UP or DOWN buttons so that “Tilt Offset” is
displayed, press ENTER.
2. Use the UP and DOWN buttons to make your adjustments, and then press ENTER to confirm. Press the
MENU button for one second to exit.
Gobo 1 Offset - Setting adjustment for the 1st gobo wheel.
1. Press the ENTER button for at least 5 seconds, then press the UP or DOWN buttons so that “Gobo 1 Offset”
is displayed, press ENTER.
2. Use the UP and DOWN buttons to make your adjustments, and then press ENTER to confirm. Press the
MENU button for one second to exit.
Gobo 2 Offset - Setting adjustment for the 2nd gobo wheel.
1. Press the ENTER button for at least 5 seconds, then press the UP or DOWN buttons so that “Gobo 2 Offset”
is displayed, press ENTER.
2. Use the UP and DOWN buttons to make your adjustments, and then press ENTER to confirm. Press the
MENU button for one second to exit.
Color Offset - Setting adjustment for the color wheel.
1. Press the ENTER button for at least 5 seconds, then press the UP or DOWN buttons so that “Color” is
displayed, press ENTER.
2. Use the UP and DOWN buttons to make your adjustments, and then press ENTER to confirm. Press the
MENU button for one second to exit.
HOME ADJUSTEMENT MENU (continued)
Prism 1 Offset - Setting adjustment for the 1st prism.
Other manuals for Focus Spot Three Z
1
Table of contents
Other ADJ Dj Equipment manuals

ADJ
ADJ Quad Phase HP User manual

ADJ
ADJ MEGA HEX PAR User manual

ADJ
ADJ BUBBLETRON User manual

ADJ
ADJ ENCORE LP18IP User manual

ADJ
ADJ MDF2PSUX117 User guide

ADJ
ADJ ELEMENT QA User manual

ADJ
ADJ MEGA TRI BAR User manual

ADJ
ADJ POCKET PRO User manual

ADJ
ADJ UV COB User manual

ADJ
ADJ SABER SPOT RGBW User manual

ADJ
ADJ penta pix User manual

ADJ
ADJ Mega GO Par64 PLUS User manual

ADJ
ADJ ENTOUR ICE User manual

ADJ
ADJ Mega GO Bar 50 RGBA User manual

ADJ
ADJ LTS COLOR User manual

ADJ
ADJ HYDRO WASH X7 User manual

ADJ
ADJ M-101HD User manual

ADJ
ADJ UV LED BAR20 IR User manual

ADJ
ADJ Startec RAYZER User manual

ADJ
ADJ Vizi Beam Hybrid 2R User manual