DeeBee EagleSPY Manual

MAINTENANCE
© 2012 EyeSpy TM is a registered trademark of EyeSpy Toys Ltd. All rights reserved.
Manufactured for and distributed by Citiwell International Inc.
Conforms to the safety Requirements of CPSIA, ASTM F963 and EN-71(1).
WARNING! . Not suitable for children under 3 years of age due to small parts.
In an effort to continually improve our products, the items inside this package may vary slightly
from the photographs
9-401 Magnetic Drive, Toronto,Canada, M3J 3H9
Customer Care:1866 469 9686
MADE IN CHINA
PRINTED IN CHINA
www.eyespytoys.com
Contains LiPo battery pack. • Battery pack must be recycled or disposed of properly. • If at any time in
the future you should need to dispose of this product please note that Waste Electrical Products should
NOT be disposed of with household waste. Please recycle where facilities exist. Check with your Local
Authority or retailer for recycling advice. (Waste Electrical and Electronic Equipment Directive).
INSTRUCTION GUIDE
surveillance technology
12+12+
Do not fly with damaged blades. Please change the blades. To do so gently unscrew the
damaged blade using a small + screwdriver, replace and retighten the screws. Ensure to
use the correct replacement blade.
Additional Replacement blades can be purchased at www.eyespytoys.com or by calling
1866 469 9686.
If at any time the Eagle Spy, or viewer stop working or work in an unexpected
fashion:
1. Check the condition of the batteries, replace the alkaline batteries in the remote
controller and charge the helicopter and viewer.
2. Turn both units off for 15 seconds and then turn them both back on. This will reset the
electronic systems.
For any other problems or concerns,
please contact us
via the EyeSpy website
www.eyespytoys.com or call our Customer Assistance Line at 1866 469 9686
www.eyespytoys.com
EaGlESPy
TROUBLE-SHOOTING
Warning: Changes or modifications to this unit not expressly approved by the party responsible for compliance could void the user’s authority to
operate the equipment.
NOTE: This equipment has been tested and found to comply with the limits for a Class B digital device, pursuant to Part 15 of the FCC Rules.
These limits are designed to provide reasonable protection against harmful interference in a residential installation. This equipment generates,
uses and can radiate radio frequency energy and, if not installed and used in accordance with the instructions, may cause harmful interference to
radio communications.
However, there is no guarantee that interference will not occur in a particular installation. If this equipment does cause harmful interference to
radio or television reception, which can be determined by turning the equipment off and on, the user is encouraged to try to correct the
interference by one or more of the following measures:
- Reorient or relocate the receiving antenna.
- Increase the separation between the equipment and receiver.
- Connect the equipment into an outlet on a circuit different from that to which the receiver is connected.
- Consult the dealer or an experienced radio/TV technician for help.

CONTENTS LIST AND PARTS IDENTIFICATION
1. 6.
Add SD Card
To record a movie, press the Select button (check mark). The red dot in the upper right
corner of the screen will begin to flash on and off and a timer will appear that shows the
duration of the movie. To stop the recording, press the Back button (up-arrow).
You can also instantly start a recording by pressing the large round button on top of the
camera.
REVIEW – When you choose this screen option and press the check mark button, you will
be given the choice of reviewing any photos or movies you have taken. The SD memory
card containing the photos or movies must be inserted in the viewer to use this function.
Once you choose to review either photos or movies you will be shown a list of the items
stored on the SD memory card. Move the cursor with the down-arrow button. Press the
check mark button to choose which item you wish to review. Press the up-arrow button to
return to the item choice menu. Press the up-arrow again to return to the main screen menu.
TIMER – Use the Next button (down-arrow) to choose the timer function, then press the
Select button (check-mark). A timer display is shown and you are given the choice of adding
time or confirming your choice (OK). The timer display will increase by one minute every
time you choose to “Add Time”, up to a maximum of 5 minutes. If you continue pushing the
Select button the timer display will return to “00:01” (one minute). Choosing “OK” will start
the countdown to “00:00.” Movie recording will then start, and will continue for 90 seconds.
The timer will then begin the countdown again, using the preselected time. Another 90
second movie will be recorded. This will continue until the user-installed SD memory card is
full. The number of movies you can record and save will depend on the memory capacity of
the SD card you are using.
DELETE – Choosing this function and pressing the check-mark button lets you delete any
photo or movie by choosing it and then pressing the check-mark button. You will be asked
to confirm your choice by pressing the check-mark button again. Choices are also available
to delete all photos or all movies at once.
Some function screens will show a battery icon in the upper left hand corner of the screen.
As battery power is used the bars that make up the battery icon will disappear one by one.
When the lithium-polymer battery needs to be recharged a “Battery Low” icon will briefly
appear and the battery icon will turn red and flash on and off several times.
Attach the USB cord and connect the viewer to a computer’s USB port as described in the
above section “GETTING STARTED.”
VIEWER BATTERY RECHARGING
The EyeSpy™ EAGLE SPY is an amazing radio-controlled,
camera-equipped helicopter enabling you to see the world just as if
you were sitting in the cockpit!
Landing Skid
Tail
Rotor
Stabilizer
Rotor Blade
Rotor Blade
Rotor Blade
Camera
AC Adapter
USB Cable
Viewer
Controller
Antenna
GETTING STARTED
Controller:
Use a small Philips head (+) screwdriver to remove
the battery compartment cover located on the back
of the controller. Insert six AA 1.5V alkaline batter-
ies, taking care to insert them correctly, using the
images molded into the plastic of each battery
location. Reinsert the battery cover and retighten the
two chromed screws. Do not use inexpensive
carbon-zinc batteries, generally labeled “heavy-
duty.”
1.
Add
Batteries
BATTERY SAFETY INFORMATION
• This unit uses six AA 1.5V batteries. Always use fresh batteries.
• Do not mix old and new batteries. Do not mix batteries of different types.
• Remove exhausted batteries and dispose of them properly.
• If this item will not be used for an extended term please remove the batteries.
• Do not try to recharge a non-rechargeable battery.
• Do not take a battery apart. Do not short-circuit the terminals.
• Do not dispose of batteries in fire – they may explode.

GETTING STARTEDHOW TO USE (Continued)
5. 2.
WATCH
RECORD
REVIEW
TIMER
DELETE
Night Vision OFF /ON
Video Screen
Note: Reception is good in open areas such as arenas, or outdoors on level ground and
away from buildings and transmission towers, poles and wires. Keep a good distance away
from home or business Wi-Fi routers. Keep away from machine rooms.
EyeSpy wireless transmission can suffer from interference caused by other 2.4MHz devices
such as baby monitors, home wireless CCTV security systems and wireless telephones.
Keep away from high voltage cable and towers. Keep away from communication/mobile
stations.
Do not use the units in damp, wet or high temperature conditions.
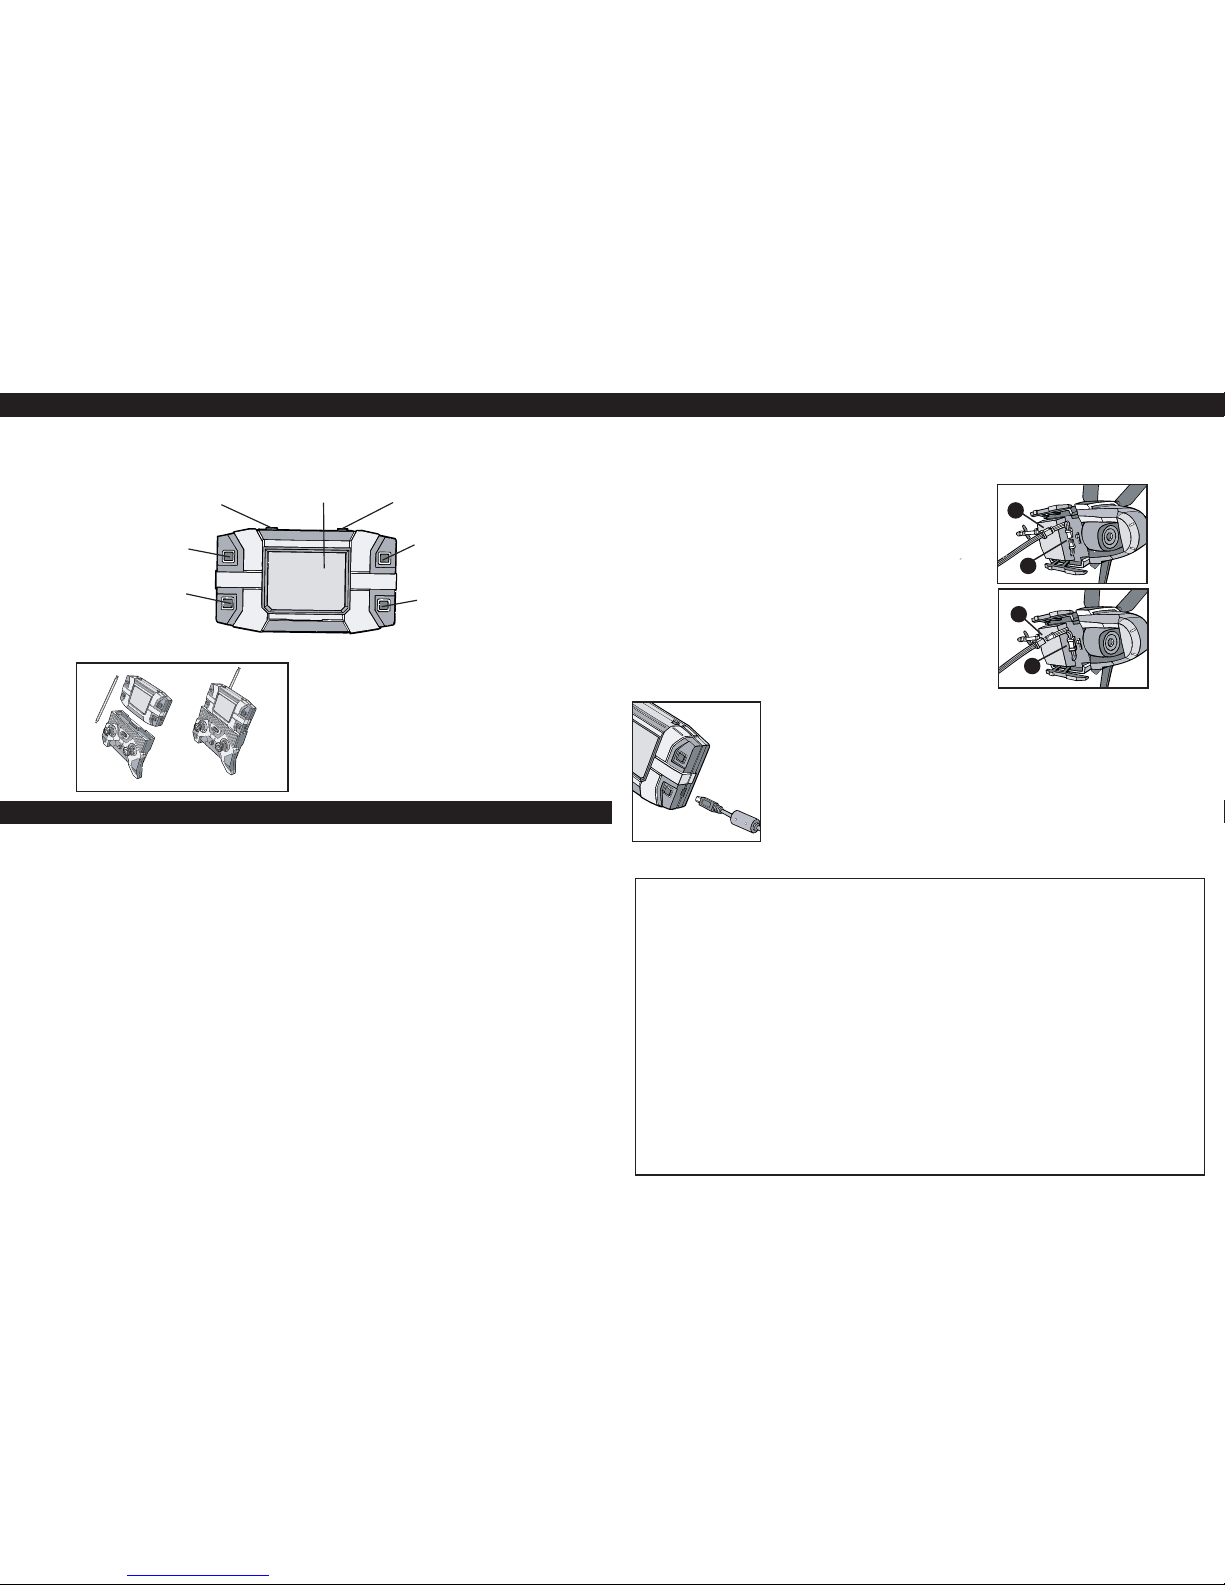
WATCH – When you press the button with the check mark, the screen will show you what
the EyeSpy Eagle Eye camera is seeing. If you are in low-light conditions and the image is
not clear, you can press the small square button on top of the viewer. This will turn on the
amplified Night Vision circuit which will make the image easier to see, and will impart a slight
green tint to the image.
To take a picture, push the button with the icon of a camera on it. Note: To use this feature
you must have an SD memory card inserted in the viewer, and the switch on the bottom of
the Eagle Eye slid to the left.
RECORD – Note: To use this feature you must have an SD memory card inserted into the
card socket located on the left side of the viewer, as shown in the illustration.
Viewer – Slide the power switch on top of the viewer to the left. The screen will light up and
show the EyeSpy logo. In another second or two the menu will appear as below. To
navigate the menu there are four buttons on the front of the viewer.
EXPLANATION OF THE VIEWER FUNCTIONS
Photo - to take a picture
or start a recording
Next - moves the screen
cursor down to choose
another task
Select - to confirm
chosen function
Back - cancels current
function & goes back
one step to previous function
IMPORTANT SAFETY INSTRUCTIONS AND WARNINGS
For LI-ION / POLYMER BATTERIES
• You should read these safety instructions and warnings before using or charging your battery.
• Never disassemble the viewer or try to remove the battery.
• While generally safe, Lithium-Polymer batteries are volatile. Failure to read and follow the below
instructions may result in fire, personal injury and damage to property if charged or used improperly.
• Lithium-Polymer battery may explode and cause fire if misused or defective.
• When charging the battery, please place it on a fire resistant surface. Do not leave the viewer on
a wood surface or on paper, carpet, or grass. Do not leave the unit unattended while it is
charging. If at any time you witness the viewer starting to swell up, emit smoke or feel hot,
discontinue charging process immediately, disconnect the viewer and observe it in a safe place
for approximately 15 minutes. The battery may be leaking, and the reaction with air may cause
the chemicals to ignite, resulting in fire. In the unlikely event of this occurring, please contact us
via the EyeSpy website www.eyespytoys.com or call our Customer Assistance Line at 1866 469 9686.
•
Never store or charge the viewer inside your car in extremely warm temperatures (105ºF or 41ºC),
since extreme temperature could ignite a fire.
• Never drop the viewer, as this may cause a battery to leak.
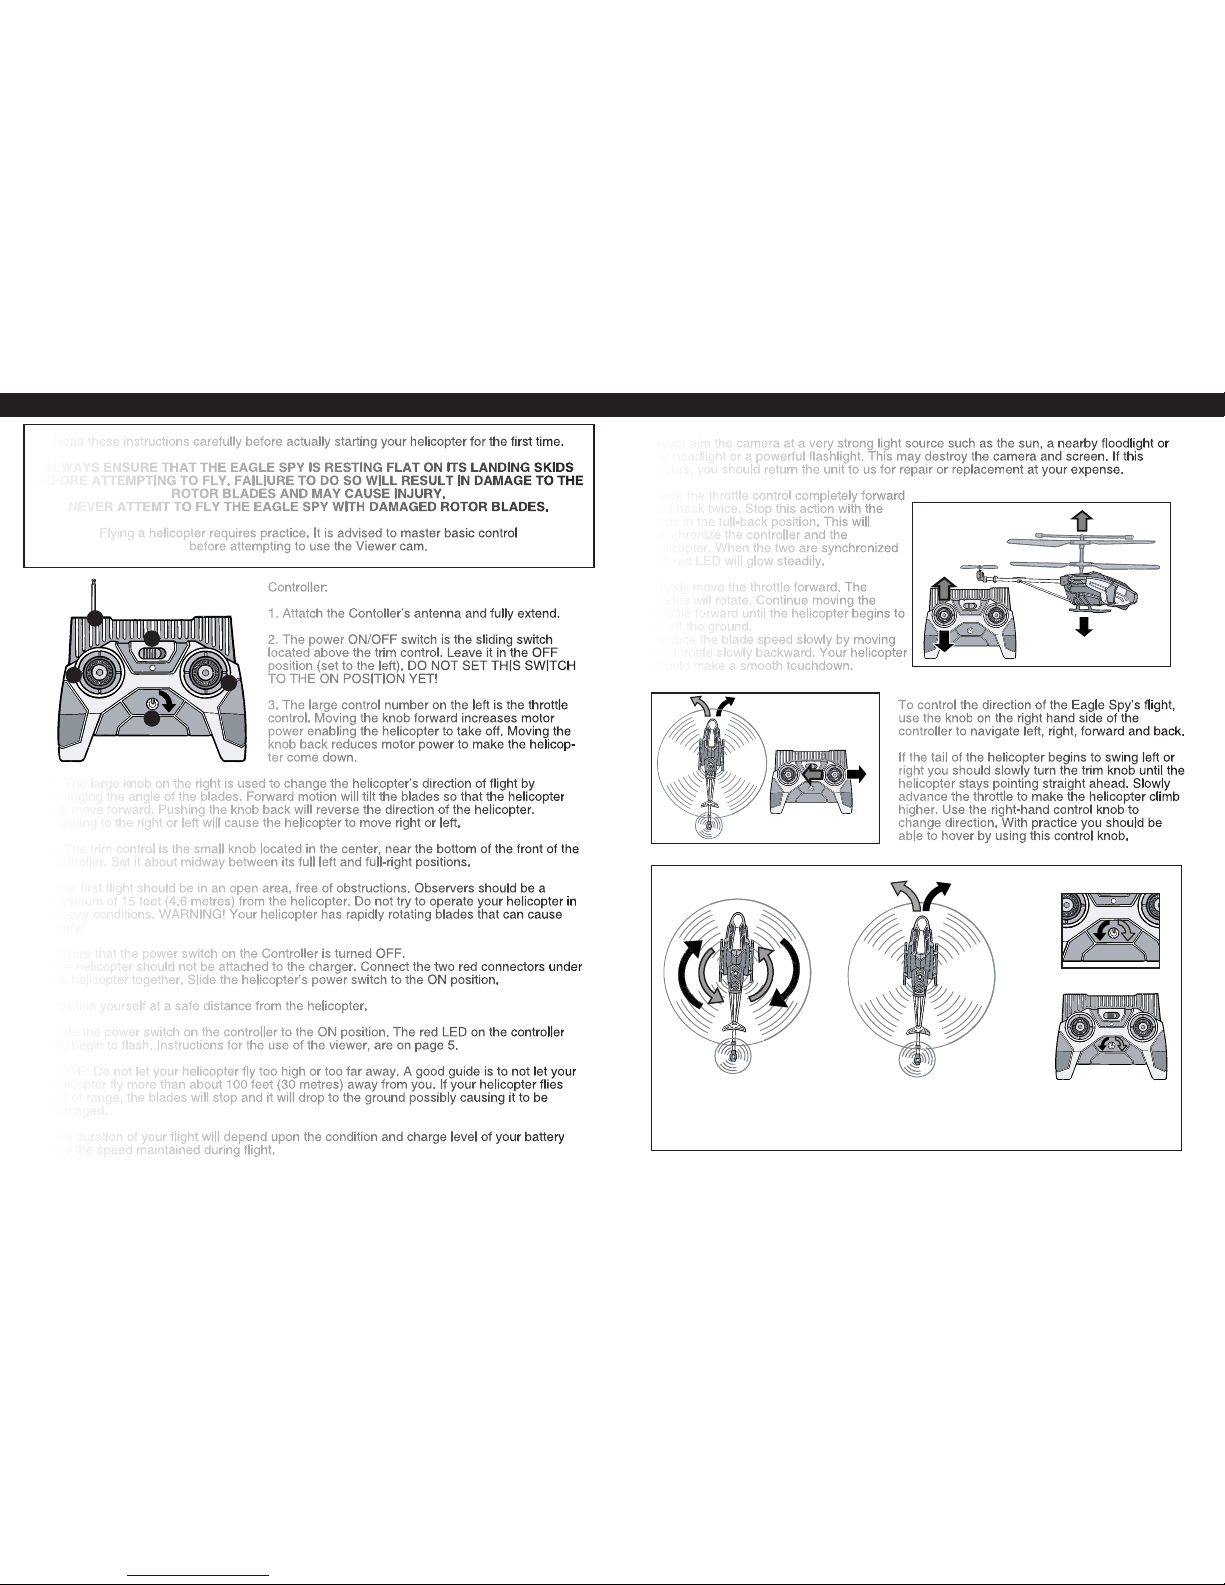
Eagle Spy:
The helicopter is equipped with a Lithium-Polymer battery that is charged with the included
AC wall-plug adapter/charger. To charge the helicopter battery, please do the following:
A – Ensure that the black slide switch on the bottom
of the helicopter is in the OFF position.
B – Separate the two red connectors by gently, yet
firmly pulling the two red connectors apart.
C – Plug the white connector on the bottom of the
helicopter into the connector at the end of the AC
adapter/charger.
D - Plug the AC adapter/charger into a 110V AC wall
plug and let the battery charge for three hours.
E - After charging, unplug the AC adapter from the
wall plug and disconnect from the Eagle Spy.
F - Reconnect the battery.
2.
B
C
To charge
E
F
To Fly
Viewer:
The viewer’s built-in Lithium Polymer rechargeable 800mAh, 3.7 V,
non-removable battery requires charging before its first use. The
small plug on the included USB cord must be carefully inserted into
the jack on the right-side of the viewer. The larger plug is inserted
into an open USB port, found on most desktop, laptop, and
notebook computers.
Leave the USB cord attached for three hours. After three hours,
disconnect the USB cord. The circular opening next to the USB
connection jack is a 1/8” mini-jack.
Add
USB
Cable
3.
The viewer attaches to the top of the
remote controller as shown in the diagram.
For two person play, the screen can be
detatched for one person to hold control
the Eagle Spy and one person to hold the
viewer.
Warning: Changes or modifications to this unit not expressly approved by the party responsible for compliance could void the user’s authority to
operate the equipment.
NOTE: This equipment has been tested and found to comply with the limits for a Class B digital device, pursuant to Part 15 of the FCC Rules.
These limits are designed to provide reasonable protection against harmful interference in a residential installation. This equipment generates,
uses and can radiate radio frequency energy and, if not installed and used in accordance with the instructions, may cause harmful interference to
radio communications.
However, there is no guarantee that interference will not occur in a particular installation. If this equipment does cause harmful interference to
radio or television reception, which can be determined by turning the equipment off and on, the user is encouraged to try to correct the
interference by one or more of the following measures:
- Reorient or relocate the receiving antenna.
- Increase the separation between the equipment and receiver.
- Connect the equipment into an outlet on a circuit different from that to which the receiver is connected.
- Consult the dealer or an experienced radio/TV technician for help.

YOUR FIRST FLIGHT
Never aim the camera at a very strong light source such as the sun, a nearby floodlight or
car headlight or a powerful flashlight. This may destroy the camera and screen. If this
occurs, you should return the unit to us for repair or replacement at your expense.
Move the throttle control completely forward
and back twice. Stop this action with the
knob in the full-back position. This will
synchronize the controller and the
helicopter. When the two are synchronized
the red LED will glow steadily.
Slowly move the throttle forward. The
blades will rotate. Continue moving the
throttle forward until the helicopter begins to
lift off the ground.
Reduce the blade speed slowly by moving
the throttle slowly backward. Your helicopter
should make a smooth touchdown.
To control the direction of the Eagle Spy’s flight,
use the knob on the right hand side of the
controller to navigate left, right, forward and back.
If the tail of the helicopter begins to swing left or
right you should slowly turn the trim knob until the
helicopter stays pointing straight ahead. Slowly
advance the throttle to make the helicopter climb
higher. Use the right-hand control knob to
change direction. With practice you should be
able to hover by using this control knob.
HOW TO USE
3. 4.
Some function screens will show a battery icon in the upper left hand corner of the screen.
As battery power is used the bars that make up the battery icon will disappear one by one.
When the lithium-polymer battery needs to be recharged a “Battery Low” icon will briefly
appear and the battery icon will turn red and flash on and off several times.
Attach the USB cord and connect the viewer to a computer’s USB port as described in the
above section “GETTING STARTED.”
(Continued on page 5)
Hover Up
and Down
BATTERY SAFETY INFORMATION
• This unit uses six AA 1.5V batteries. Always use fresh batteries.
• Do not mix old and new batteries. Do not mix batteries of different types.
• Remove exhausted batteries and dispose of them properly.
• If this item will not be used for an extended term please remove the batteries.
• Do not try to recharge a non-rechargeable battery.
• Do not take a battery apart. Do not short-circuit the terminals.
• Do not dispose of batteries in fire – they may explode.
Controller:
1. Attatch the Contoller’s antenna and fully extend.
2. The power ON/OFF switch is the sliding switch
located above the trim control. Leave it in the OFF
position (set to the left). DO NOT SET THIS SWITCH
TO THE ON POSITION YET!
3. The large control number on the left is the throttle
control. Moving the knob forward increases motor
power enabling the helicopter to take off. Moving the
knob back reduces motor power to make the helicop-
ter come down.
4. The large knob on the right is used to change the helicopter’s direction of flight by
changing the angle of the blades. Forward motion will tilt the blades so that the helicopter
will move forward. Pushing the knob back will reverse the direction of the helicopter.
Pushing to the right or left will cause the helicopter to move right or left.
5. The trim control is the small knob located in the center, near the bottom of the front of the
controller. Set it about midway between its full left and full-right positions.
Your first flight should be in an open area, free of obstructions. Observers should be a
minimum of 15 feet (4.6 metres) from the helicopter. Do not try to operate your helicopter in
breezy conditions. WARNING! Your helicopter has rapidly rotating blades that can cause
injury!
Ensure that the power switch on the Controller is turned OFF.
The helicopter should not be attached to the charger. Connect the two red connectors under
the helicopter together. Slide the helicopter’s power switch to the ON position.
Position yourself at a safe distance from the helicopter.
Slide the power switch on the controller to the ON position. The red LED on the controller
will begin to flash. Instructions for the use of the viewer, are on page 5.
NOTE: Do not let your helicopter fly too high or too far away. A good guide is to not let your
helicopter fly more than about 100 feet (30 metres) away from you. If your helicopter flies
out of range, the blades will stop and it will drop to the ground possibly causing it to be
damaged.
The duration of your flight will depend upon the condition and charge level of your battery
and the speed maintained during flight.
Read these instructions carefully before actually starting your helicopter for the first time.
ALWAYS ENSURE THAT THE EAGLE SPY IS RESTING FLAT ON ITS LANDING SKIDS
BEFORE ATTEMPTING TO FLY. FAILIURE TO DO SO WILL RESULT IN DAMAGE TO THE
ROTOR BLADES AND MAY CAUSE INJURY.
NEVER ATTEMT TO FLY THE EAGLE SPY WITH DAMAGED ROTOR BLADES.
Flying a helicopter requires practice. It is advised to master basic control
before attempting to use the Viewer cam.
- If Helicopter spirals Right... or turns Right...
- Turn the "Trim Button"counter clockwise until
the helicopter flies straight...
- If Helicopter spirals Left... or turns Left...
- Turn the "Trim Button" clockwise until the
helicopter flies straight...
Trimming the helicopter
?
Viewer:
The viewer’s built-in Lithium Polymer rechargeable 800mAh, 3.7 V,
non-removable battery requires charging before its first use. The
small plug on the included USB cord must be carefully inserted into
the jack on the right-side of the viewer. The larger plug is inserted
into an open USB port, found on most desktop, laptop, and
notebook computers.
Leave the USB cord attached for three hours. After three hours,
disconnect the USB cord. The circular opening next to the USB
connection jack is a 1/8” mini-jack.
Turn Left
and Right
1
2
34
5
Popular Toy manuals by other brands

SIG
SIG Award Winning Model Designs P-51D Mustang Assembly instructions

Tamiya
Tamiya M113 manual

MRC
MRC 0001619 quick start guide

M.T.H.
M.T.H. Premier Bavarian Class 3/6 Express Operator's manual

miniature aircraft
miniature aircraft X-Cell Furion 6 Assembly instructions

Horizon Hobby
Horizon Hobby E-Flite EFL089500 instruction manual