DEELAT D1173510 User manual
— Battery capacity Indicator
— Lighting Mode indicator
— LED
Solar Security Light - Outdoor - Remote Control
PIR LED |D1173510
User Manual
SOLAR SECURITY LIGHT - OUTDOOR - REMOTE CONTROL PIR LED
- 1 -
Range of Models for Deelat’s Solar Light with separate charging panel and
Remote
1000 Lumens
2000 Lumens
5000 Lumens
1500 Lumens
4000 Lumens
— Switch
— Bracket
— Solar panel
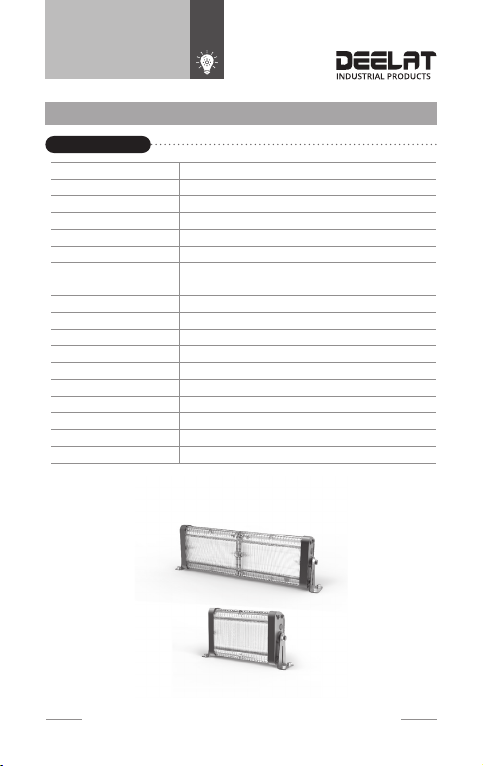
Characteristics
User Manual
Solar panel 2.65W, Monocrystalline silicon
Battery 4 AH, 3.7 V
LED 1000 Lumens
Install Height 6.5~13 ft (2~4 m)
Lighting time More than 8 nights
Solar Charging time 8 hours by bright sunlight
Lighting Mode Adjustable lighting time and brightness by
remote control
Ray sensor <10 Lux
PIR sensor 9.8~16.4 ft (3~5 m), 120°
Cable length 11.5 ft (3.5 m)
Working Temperature -13°F to 149°F (-25°C to 65°C)
Size 8 x 4 x 3.2” (20.4 x 10.4 x 8 cm)
Material Aluminum alloy, steel glass
Motion Sensor No
Accessories Remote Control
Brand Deelat Industrial
Warranty 1 Year
Solar Security Light - Outdoor - Remote Control PIR LED |D1173510
SOLAR SECURITY LIGHT - OUTDOOR - REMOTE CONTROL PIR LED
- 2 -

User Manual
Solar Security Light - Outdoor - Remote Control PIR LED |D1173510
SOLAR SECURITY LIGHT - OUTDOOR - REMOTE CONTROL PIR LED
- 3 -
Press and Hold the button located in image below
to activate the light.
Press and release the button quickly to switch
between indoor and outdoor mode.
There are two indicator lights on the main body.
The lighting indicator light, and the battery
indicator light.
The Lighting indicator light will illuminate Red if
in outdoor mode and Green if set to indoor mode.
Activation
The battery indicator light will display as follows:
Green: <80% life Orange: <60% life Red: <40% life
Flashing Red: Low voltage warning
*Please note that you must connect the light to the solar panel before proceeding,
otherwise the light will not function. After charging the light in bright sunlight for at least
48 hours prior to rst time use, press the activation button. This will now allow the light to
turn on when it senses dark and turn off when it senses that there is insufcient sunlight.
The sensor is located within the solar charging panel.
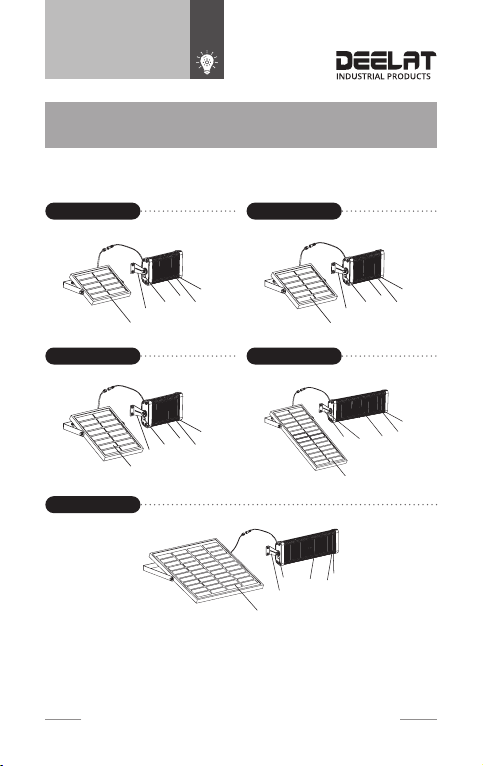
Step 1: Install the Solar charging panel
into your desired area for maximum
sunlight using the supplied bracket
Step 2: Attach the light to your
desired position to emit the light using
the supplied bracket.
Step 3: Attach the solar panel to the
light using the connection cord.
Easy Install
L1/L
2
D1/D2
W
W=29.5mm
L1 =1 68 mm
L2=32
3m m
D=Φ6mm
D=Φ6mm
User Manual
Function
Step 1: During daylight hours, the light is in
charging mode. It will not turn on when there is
sufcient sunlight present.
Step 2: After detecting that it is sufciently dark,
the light will turn on to the desired lighting mode
for the entire night.
Solar Security Light - Outdoor - Remote Control PIR LED |D1173510
SOLAR SECURITY LIGHT - OUTDOOR - REMOTE CONTROL PIR LED
- 4 -
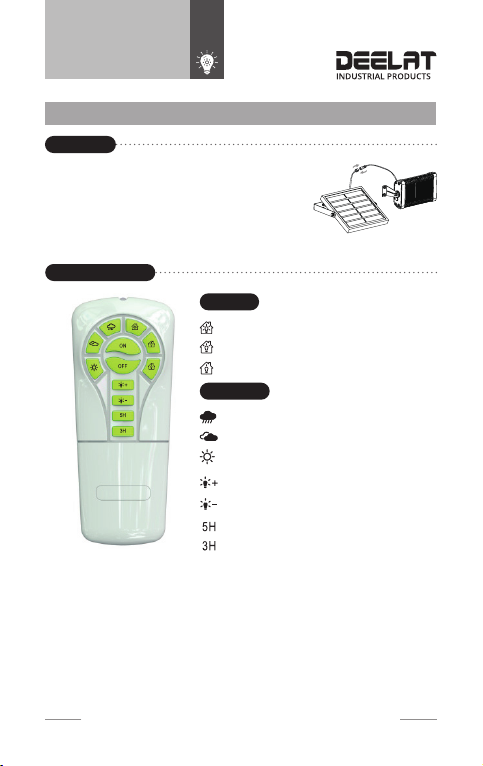
Remote Control
Indoor
Outdoor
If you select any of the 3 “Indoor” lighting modes, the lights will not turn on/off automatically.
You must turn the light on/off by using those buttons on the Remote Control. *The “indoor”
modes can also function when the light is placed outdoors. It simply means that the
light does not activate when it is dark, but that it activates when you turn it on (and
deactivates when you turn it off).
If you select any of the 3 outdoor lighting modes, the lights will turn on/ off automatically
(It will turn on when it detects that it is sufciently dark and turn off when it detects it is
sufciently light).
The timer modes can be used in conjunction with indoor or outdoor modes. You can also
step up or down the brightness using the brightness step up and step down button in either
outdoor or indoor mode.
Reading Mode -> Maximum Brightness
Rainy Mode (30% lighting)
10% step up
Set the Timer 5 hours
Set the Timer 3 hours
10% step down
General Mode -> Medium Brightness
Cloudy Mode(60% lighting)
Atmosphere Mode -> Minimum Brightness
Sunny Mode (100% lighting)

User Manual
Special note
1. Prior to activation, allow for at least 48 hours of charging time in bright
sunlight for the battery to be sufciently charged.
2. Install the solar panel where it will receive optimal sunlight without
any obstructions. If you are using this solar light in extreme conditions
above 113 Degrees Fahrenheit or below 32 Degrees Fahrenheit
(45°C or below 0 °C), the battery an solar charging panel will function
less optimally as it gets colder.
3. When using the solar light in less than optimal conditions (cloudy, or
not much direct sunlight), it may take longer to fully charge the battery.
1. Lamp (with bracket)
2. Solar panel
3. Bracket of solar panel
4. Remote Control
5. Expansion pillar-hinge (4 pcs)
1. Keep device away from re and oil to avoid explosion.
2. Severe shock to Solar powered light is to be avoided.
3. Do not dis-assemble the light without assistance from an expert.
Package Contents
Warning
Solar Security Light - Outdoor - Remote Control PIR LED |D1173510
SOLAR SECURITY LIGHT - OUTDOOR - REMOTE CONTROL PIR LED
- 5 -
6. Small Gasket (4 pcs)
7. Screw PA4*25 (4 pcs)
8. Large Gasket (2 pcs)
9. Screw M5*16 (2 pcs)
Table of contents
Popular Floodlight manuals by other brands

RAB Lighting
RAB Lighting CANVAS78TW installation instructions

Allremote Wireless Technology
Allremote Wireless Technology 970 Series Instruction guide

Wetelux
Wetelux 130 instruction manual

Iluminarc
Iluminarc Ilumipod Inground Tri-3 IP Optic 25 RGB user manual

Osram
Osram NOXLITE LED HP FLOODLIGHT II 23 W manual

PXM
PXM Mono Wall PxArt+ user manual


