DEEP SKY DAD FR1 User manual

1
DEEP SKY DAD FR1 MANUAL
Framing manually can be cumbersome, time consuming and inaccurate. That’s why we decided to create
Deep Sky Dad field rotator. Development was quite lengthy with many stages of testing different
approaches. Our top priority was preventing any tilt and still trying to make it as affordable as possible.
And now, it is finally finished! We have used innovative hybrid combination of precise milled parts and 3D
printed circuit enclosure.

2
Intro
Deep Sky Dad Field Rotator enables framing automation. This way you can fit the target optimally
within your sensor size.
Features
•ASCOM supported
•INDI supported
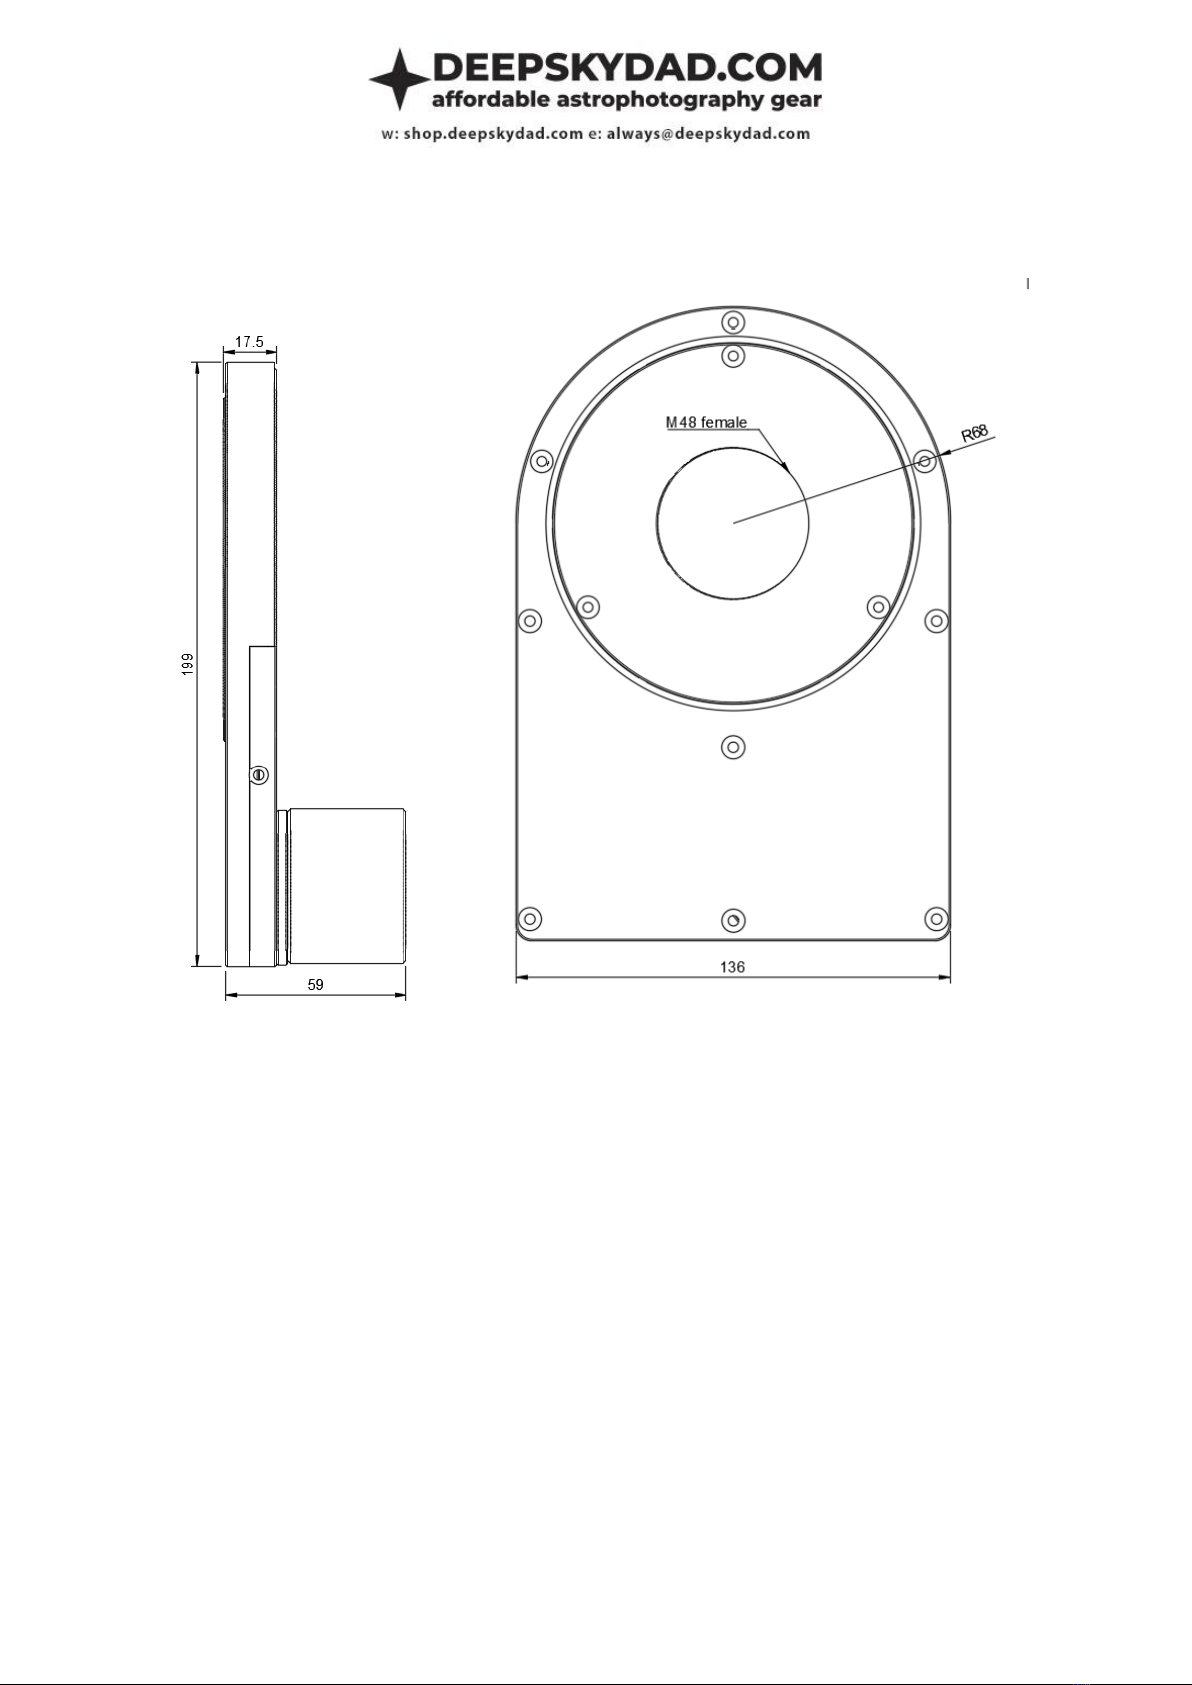
•thickness: 17.5mm
•weight: 750g
•maximum payload: 8kg
•M48 x 0.75 female thread (on both sides)
•optional: hand controller
•optional: M48 female to M48 male adapter
•power adapter NOT included
•Power requirements: 12V 3A (not included)
•PC connectivity: micro USB cable (included)
3
Dimensions
Installation
M48 x 0.75mm thread is available on each side. Orientate rotator with motor towards the
telescope/focuser. Attach the camera on the side without the motor.
FAQ
Basics
What kind of power adapter can I use?
We recommend 12V DC power adapter, as the units are fine tuned to this specific voltage. However,
autofocuser will work up to 14V. Socket specification: tip positive, 5.5mm x 2.1mm. Should you not
have 12V adapter at hand, the units also work in range from 12V-14V without issues. Current output
of the power adapter should be about 1A, but can be more (it will not damage the flap).

4
When I connect the rotator to computer, Windows does not recognize it. What can I do?
If you are using Windows 10, the driver will self install. If you are using Windows 7, please install 32
or 64 bit driver. Should you experience any problems with detection (COM port not visible, no USB
device connected chime), try:
•different USB cable
•direct connection (without USB hub)
•using USB 2.0 port (instead of 3.0)
How can I upgrade the firmware?
Firmware upgrade is a simple yet delicate procedure. That is why I have put together simple and
straightforward step-by-step instructions for installing the latest firmware.
disclaimer
Please follow upgrade instructions very carefully. Deviating from the instructions could cause
bootloader issues or in worse case unresponsive unit, for which we are not responsible.
1. Connect the unit directly to computer (do not use USB hub). In device manager check which
COM port was assigned to it and write it down. If unit is not recognized, check FAQ above for
details
2. Download the latest firmware from our website.
3. Download and unzip FR1 Control Panel from our website
4. Start control panel as administrator and enter following settings
a. COM port –choose com port that you have written down
b. Click »FW UPGRADE« and select .dsd file
c. Click upload and the process will begin
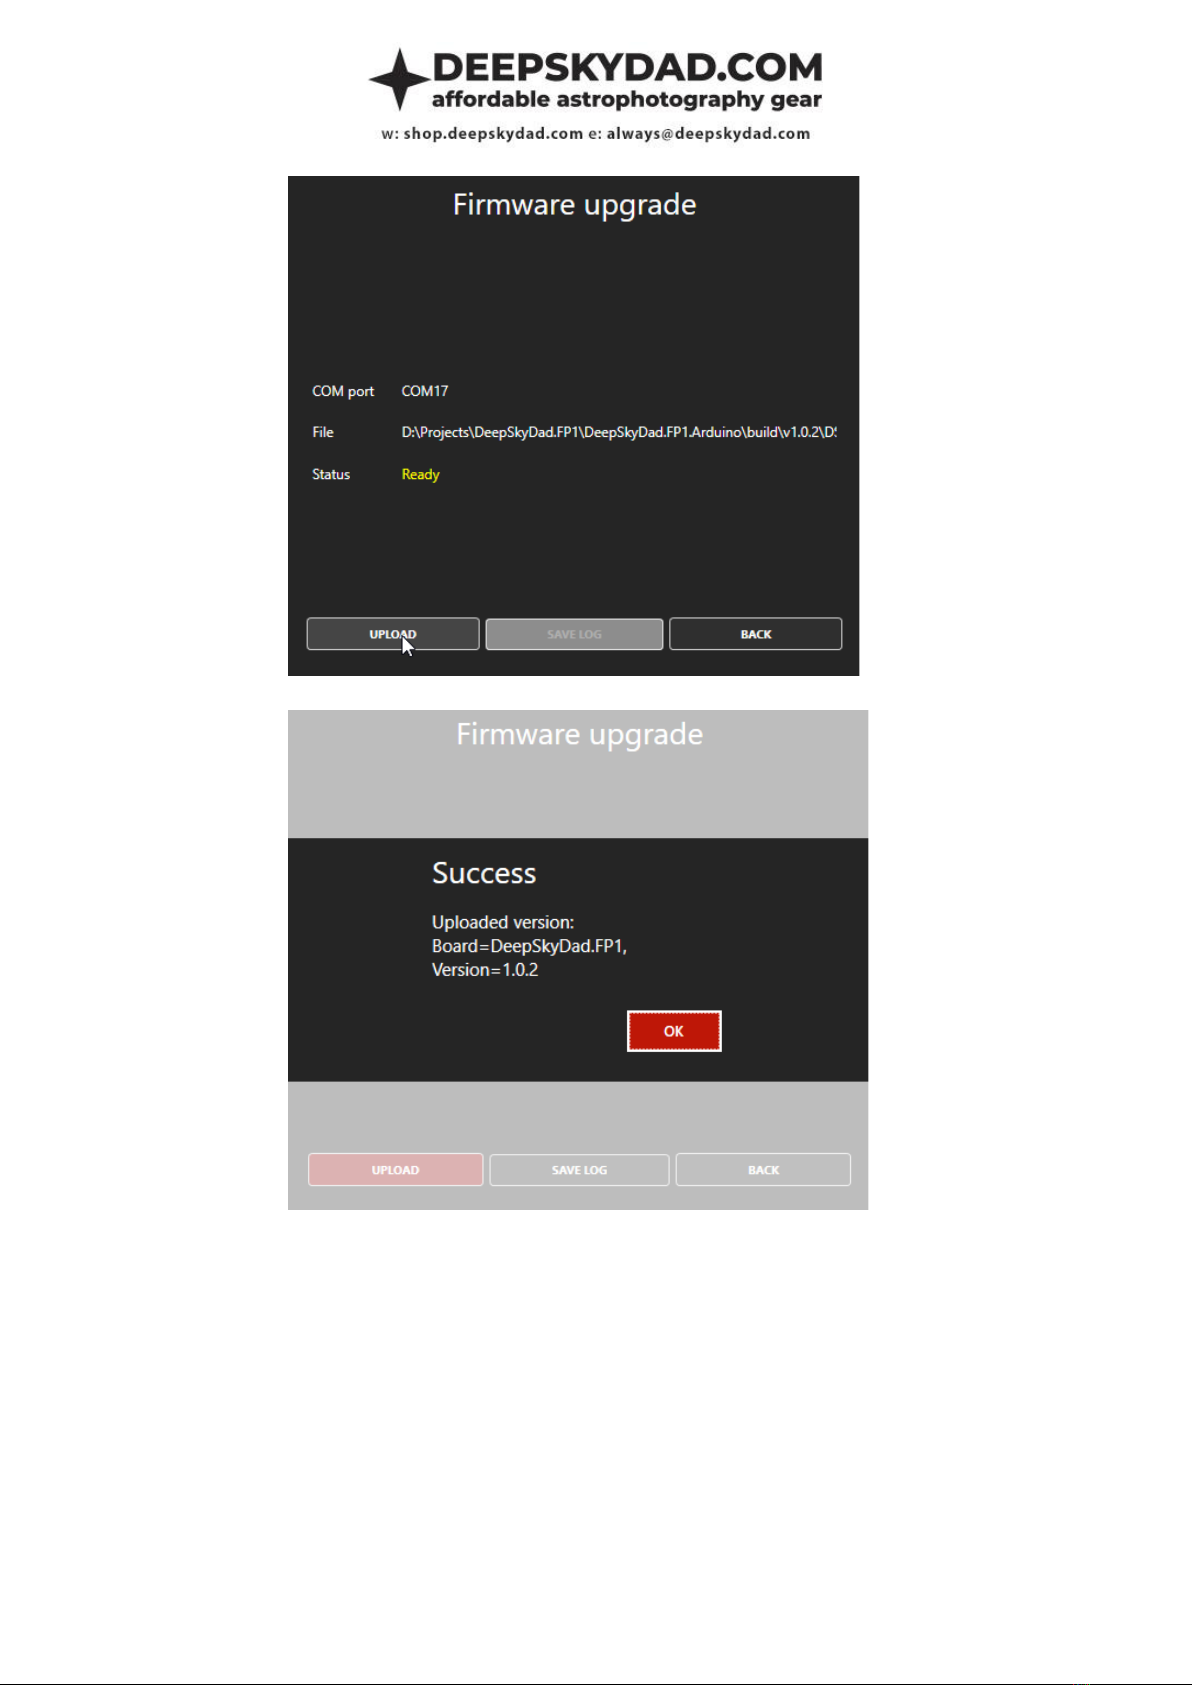
5
d. After upload is finished, you will get a confirmation popup
5. If the upload should fail, you will get the error message popup. For example, should you still
be connected to the unit in some other program and tried to upload the firmware, you will
get »Access is denied«. If you get timeout error, try replugging power and retry the upgrade
process.
Remote control
Remote operation is supported via Micro USB cable or hand controller. Below is a description of
current control methods (more will be available in the future)

6
ASCOM (Windows)
In Windows, we recommend you to use ASCOM Field Rotator driver for control. This way, you can
automate our flap in any of the popular astronomy softwares (N.I.N.A, APT, SGPro, Voyager,...). We
will use N.I.N.A. for a short demonstration below.
Basic usage
1. Download, unzip and install latest version of ASCOM driver from our website
2. Open N.I.N.A, navigate to Equipment -> Flat Panel
3. Select ASCOM Driver for DeepSkyDad.FR1
4. Open ASCOM settings and select correct COM port
5. Click OK and connect to the flap

7
6. And you are ready to automate your framing!
System controls
1. Open ASCOM settings, click Advanced
2. On the right side you have 2 sections. Heater and System. We are currently interested in
System, which contains 4 buttons:
a. Reboot FR1 –resets the unit
b. Firmware version –currently installed firmware vesion (in case you have ASCOM
connectivity issues, click this button)
INDI (Linux)
In Linux, you can control our flap panel with Deep Sky Dad FR1 INDI driver.
Basic usage
Select correct ttyUSB device (e.g. ttyUSB0) and click connect. Below is print screen of main tab after
rotator is connected:

8
FR1 Control Panel (Windows)
If you wish to control our panel without 3rd party software, you can do so in Deep Sky Dad FR1
Control panel:
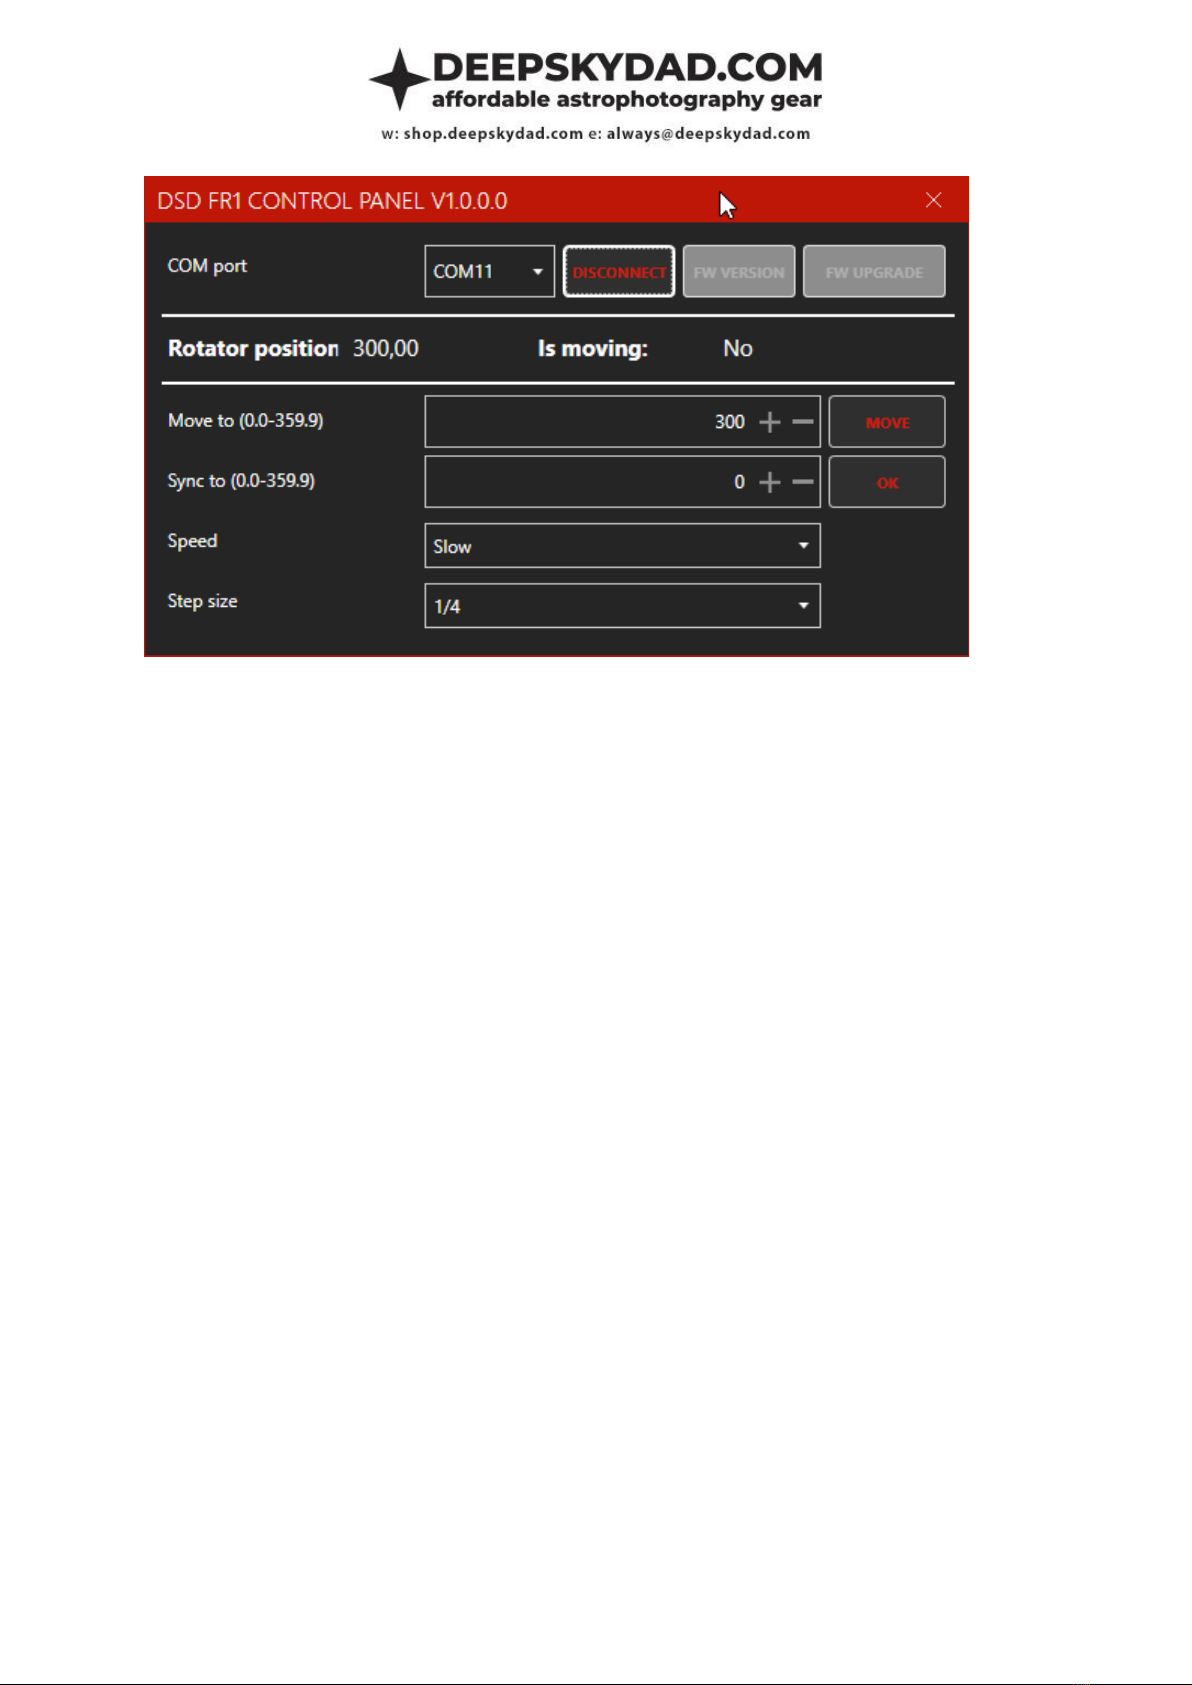
9
Control the angle, sync to desired position and select speed & step size (this affects maximum
payload –heavier cameras might require slower speeds).
Manual control
Manual operation is possible via optional hand controller.
•+ button rotates it clockwise (unless reversed)
•- button rotates it counter clockwise (unless reversed)
All our products have 2 years warranty. We will replace any malfunctioning units in this period free
of charge. Warranty does not apply to any malfunction caused by improper usage (wrong power
supply, ) or physical damage to the unit.
The customer covers return shipping costs when sending back the unit for repair or replacement. If
the unit was purchased via dealer, the dealer is responsible for customer service.
Table of contents


