Delec Unito DIO User manual

Manual DIO

2
unito DIO
Imprint
Manual
unito DIO
Version 1.0
Print version 1
Edition 1
October 2015, Eisenberg/Pfalz
Published as a digital PDF document
Publisher
DELEC Audio- und Videotechnik GmbH
Am Gielbrunnen 41
D- 67304 Eisenberg/Pfalz
Tel.: +49 6351 1317-0
Fax: +49 6351 1317-50
Registered oce: Eisenberg/Pfalz
Companies register Kaiserslautern, HRB 11854
Managing Directors: Donald Dilocker, Norbert Schömel
This document is subject to changes without prior notication.
All rights reserved

3
unito DIO
Inhalt / Content
Inhalt / Content
1. Einführung / Introduction ................................................................................................................................. 5
2. Produktbeschreibung / Product Description .............................................................................................. 7
2.1 Analog Audio / Analogue Audio ..................................................................................................................... 8
2.2 Digital Audio / Digital Audio............................................................................................................................ 9
2.3 Ethernet und Spannungsversorgung / Ethernet and Power................................................................10
3. Inbetriebnahme / Setting up .........................................................................................................................12
3.1 Lieferumfang / What‘s in the box..................................................................................................................12
3.2 Montage / Installing .........................................................................................................................................12
3.3 Verkabelung / Wiring.......................................................................................................................................13
4. Gerätekonguration / Device Setup ............................................................................................................15
5. Technische Daten / Technical data ..............................................................................................................37

4
unito DIO
Einführung / Introduction
1. Einführung / Introduction

5
unito DIO
Einführung / Introduction
Vielen Dank, dass Sie sich für das Audiogerät DIO der Firma
DELEC entschieden haben. DIO steht für „Dante™ Input Output”.
Wir haben das DIO als universelles Tool mit einer eindrucksvollen
Bandbreite an Konvertern und Funktionen entwickelt. Es verfügt
über einen 2-Port-Ethernet-Switch (1x 1 Gb Kupfer und 1x SFP-Ca-
ge - so dass verschiedene Glasfaser oder Kupfer-Verbindungen
realisiert werden können), Dante™ Audio, AES/EBU Eingang und
Ausgang, Mikrofoneingang, Line-Eingang, Line-Ausgang, Kopfhö-
rerausgang mit externem Lautstärkeregler und 2 x GPIO. Das DIO
kann mittels PoE (Power over Ethernet), oder über ein externes
Netzgerät mit Spannung versorgt werden. Hierbei ist die Redun-
danz zwischen den beiden Spannungsquellen gewährleistet.
Bitte lesen Sie dieses Handbuch sorgfältig durch bevor Sie das
Gerät in Betrieb nehmen. Nur so kann die Sicherheit gewährleis-
tet und eventuelle Fehler bei der Handhabung oder Bedienung
vermieden werden. Sollten Sie dennoch Fragen oder Probleme
haben, welche in diesem Dokument nicht geklärt werden konn-
ten, wenden Sie sich bitte direkt an Ihren DELEC-Vertriebspartner
oder die DELEC Audio- und Videotechnik GmbH.
Thank you for choosing DELEC’s DIO Audio device, DIO stands for
Dante™ Input Output. We created the DIO as the army knife for audio,
with an impressive range of tools and converters. It boasts a 2 port
Ethernet switch (1x 1Gb Copper and 1x SFP cage - allowing for various
bre or copper connections), Dante™ audio, AES Input and Output,
Mic Input, Line Input, Line Output, Headphone Output with external
volume control and 2 x GPIO. The DIO is powered by PoE (Power over
Ethernet) or runs via an external PSU. Redundancy is provided bet-
ween both power sources!
Please read this manual before attempting to operate your new
device to ensure reliable operation for years to come. For questions
that are not answered in this document, feel free to contact your local
DELEC distributor or DELEC Audio- und Videotechnik GmbH directly.
1. Einführung / Introduction

6
unito DIO
Produktbeschreibung / Product Description
2. Produktbeschreibung / Product Description
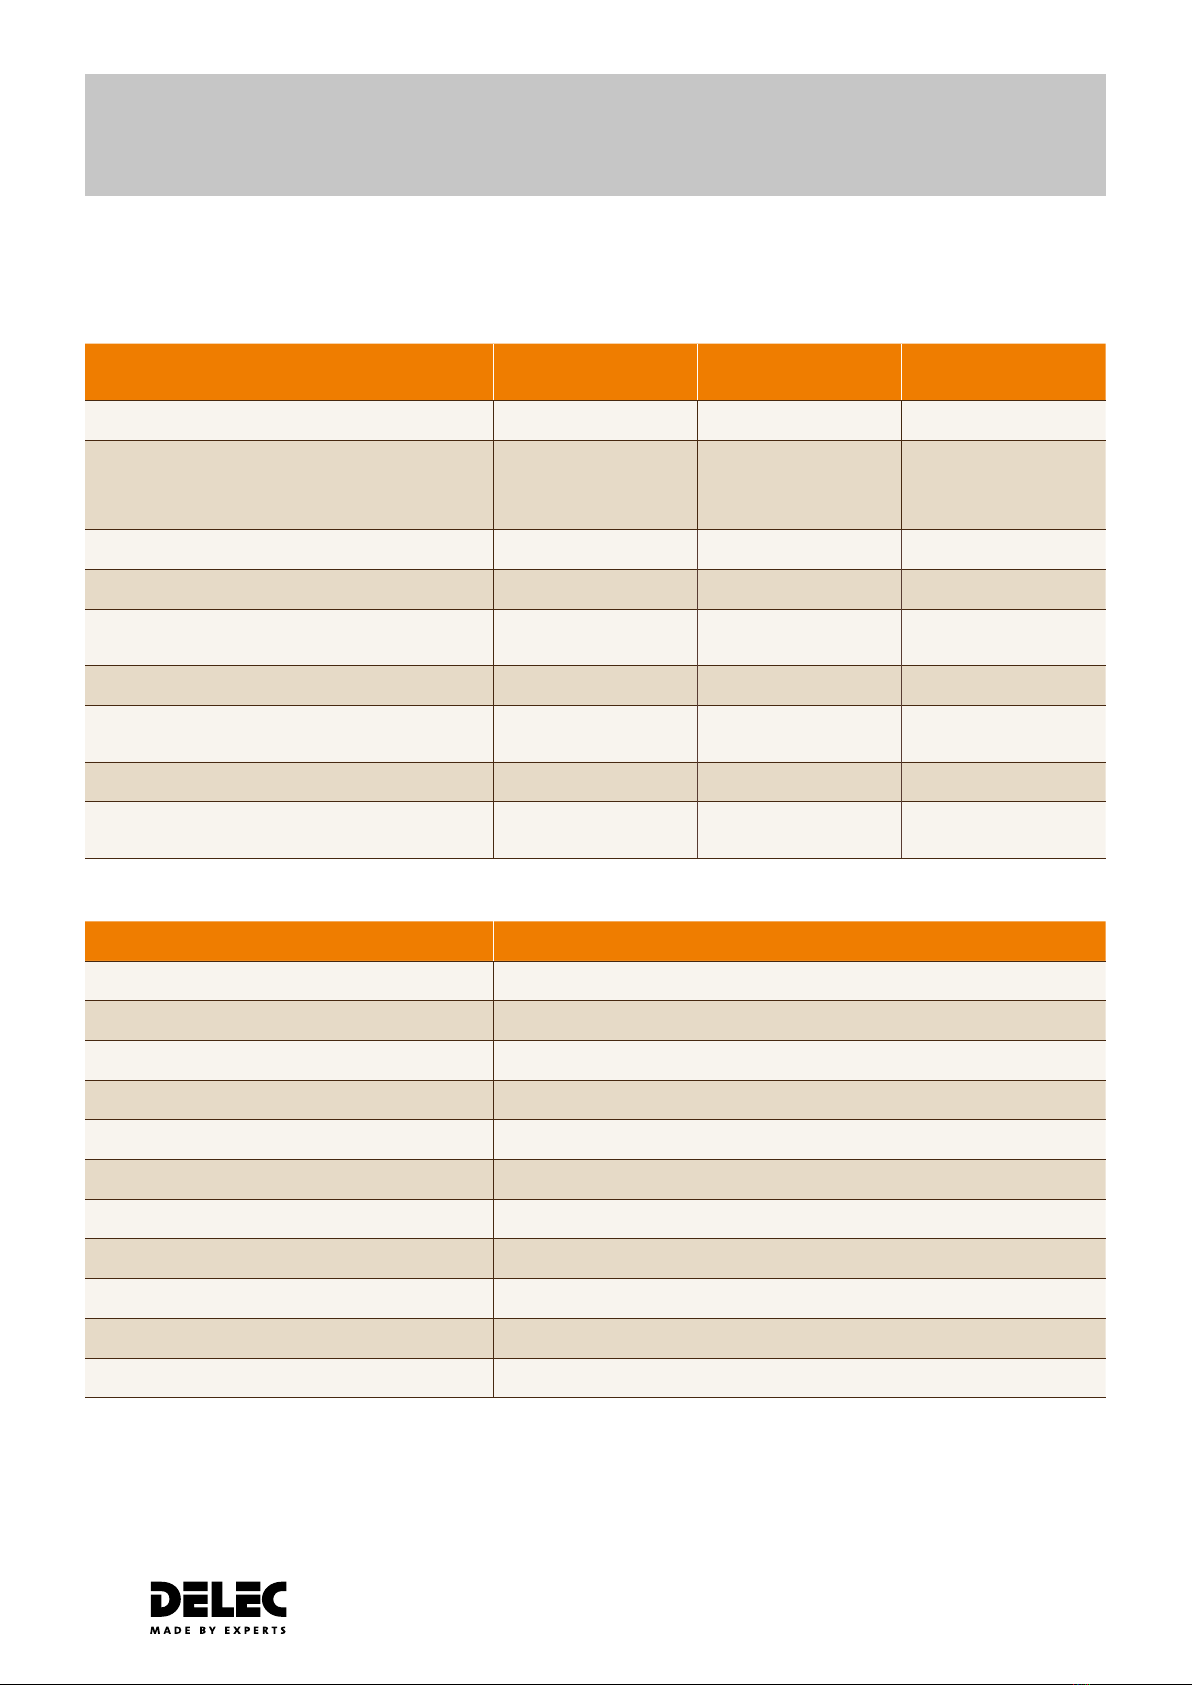
2.1 Analog Audio / Analogue Audio
2.2 Pinbelegungen / Pin assigments

7
unito DIO
DIO Geräteanschlüsse / Interfaces
DIO Abmessungen / Dimensions
2. Produktbeschreibung / Product Description
Produktbeschreibung / Product Description
AES IN/OUTPOWER
+ -
LAN 2 LAN 1
48VPOE
25 24 23 22 21 20 19 18 17 16 15 14
13 12 11 10 9 8 7 6 5 4 3 2 1
AUDIO AND CONTROL
MIC INPUT
MIC IN +
MIC IN -
24V+
GND
145 mm
145 mm
130 mm
27 mm
8
unito DIO
Analog Audio / Analogue Audio
2.1 Analog Audio / Analogue Audio
Analoge Eingänge
Balanced Inputs
Analoge Ausgänge
Balanced Outputs
Kopfhörerverstärker
Headphone Amplier
Anschlussstecker / Connection Type D25 Connector D25 Connector D25 Connector
Kanäle / Channel - 2 x Balanced,
- Max input level +24dBu
- 2 x Balanced,
- Max output level+24dBu
- 2 channel,
- 15vpp 220Ohm load
- 8vpp 50Ohm Load
- short circuit protected
Sample Rate 48kHz (24bit) 48kHz (24bit) N/A
Dynamiumfang / Dynamic Range > 95dB (A weighted) > 97dB (A weighted) > 97dB (A weighted)
THD - < -83dB 1kHz +18dBu input
- -6dBFs output
- < -86dB 1kHz -6dBFs
- 18dBu ouput
< -85dB 1kHz -6dBFs
Frequenzgang / Frequency Response 20Hz -20kHz 20Hz -20kHz 20Hz -20kHz
Channel Gain Control +6dB to -12dB in 0.5db
increments
+20dB to -57dB in 0.5db
increments
N/A
Soft Clipper N/A N/A 0.1 to 10, in 0.1 increments
Externe Lautstärkeregelung / External Volume Control N/A N/A Channel and gain range
selectable
Input (Microphone)
Anschlussstecker / Connection type Phoenix Connector
Input Gain Block +55.5 to -12dB in 0.75db Increments
Dynamikumfang / Dynamic Range > 95dB (A weighted) unity gain , -112 dBu EIN150ohm reference -50dBu input level
Frequenzgang / Frequency Response 20Hz - 20kHz
THD < -80dB 1khz 0dBu input , -3dBFs output
Attack TC 6ms to 2000ms
Release TC 24ms to 786430ms
Hold 2ms to 87491ms
Noise Gate Threshold 30 to -77db relFS
Phantom Power +48v selectable
External DC output +24v 40ma

9
unito DIO
Digital Audio / Digital Audio
2.2 Digital Audio / Digital Audio
Input Output
Anschlussstecker / Connection type RJ45 RJ45
Sample Rate 48 kHz (32bit) 48 kHz (32bit)
Modi / Modes Transparent / Non Transparent N/A
Redundanz / Redundancy 2 x Buered inputs (via Dante) N/A
Message Player (Option)
Abspielen von Wav oder MP3 Dateien, getriggert über GPIO oder
UDP Protokoll.
Wav, MP3 Message player triggered by GPIO or UDP protocol.
GPIO
Inputs 2 x optoelektronische Eingänge, max. 5mA
2 x Opto Inputs - Max 5mA Sink
Outputs 2 x Outputs, bis 200V, max. 150mA
2 x Isolated Outputs - 200V Max 150mA
10
unito DIO
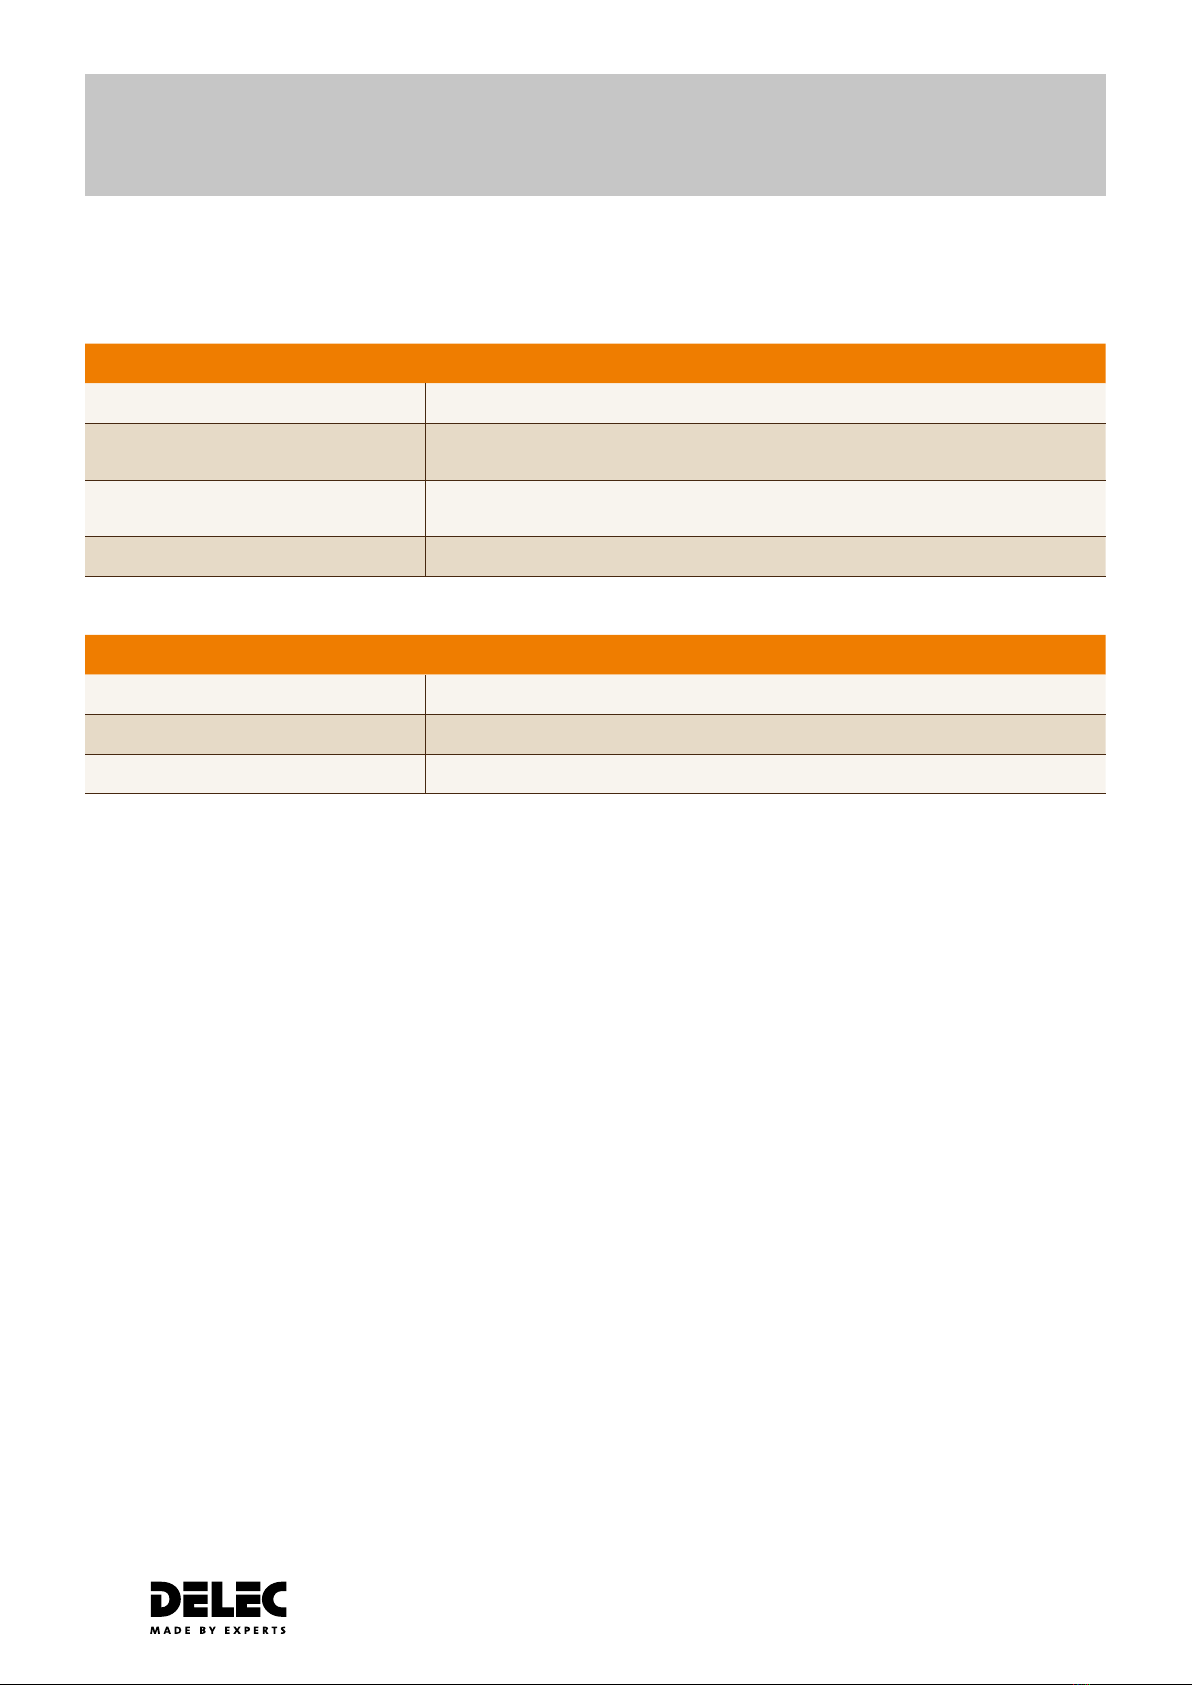
2.3 Ethernet und Spannungsversorgung / Ethernet and Power
Ethernet
Switchports 2
Port 1 1 Gbit Kupfer (POE IN)
1 Gbit Copper (POE IN)
Port 2 1 G bit Kupfer oder Fiber (SFP-Cage)
1 G bit Copper or Fibre (SFP Cage)
DANTE™ Konguration / Conguration 8 x 8
Spannungsversorgung / Power
Extern / External * 48 Volt / Volts
Power Over Ethernet * POE Switch benötigt / required
Leistung / Power 10 Watt / Watts
Ethernet und Spannungsversorgung / Ethernet and Power
*Redundanzumschaltung zwischen beiden Spannungsversorgungen ist vorhanden / Redundancy power is provided between both inputs.

11
unito DIO
Inbetriebnahme / Setting up
3. Inbetriebnahme / Setting up
3.1 Lieferumfang / What’s in the box?
3.2 Montage / Installing
3.3 Verkabelung / Wiring

12
unito DIO
3. Inbetriebnahme / Setting up
3.1 Lieferumfang / What‘s in the box
Bitte entnehmen Sie das unito DIO aus der Verpackung und ver-
gewissern Sie sich, dass das Gerät unbeschädigt und die Lieferung
vollständig ist.
Lassen Sie beim Auspacken die entsprechende Vorsicht walten,
um Verletzungen an scharfen Kanten zu vermeiden.
Der Lieferumfang umfasst folgende Positionen:
DIO
Netzkabel
Kurzanleitung
Sollten Sie bei der Überprüfung Probleme feststellen, wenden Sie
sich bitte direkt an Ihren DELEC-Vertriebspartner.
3.2 Montage / Installing
Bitte montieren Sie das DIO an einem geeigneten Ort. Das Gerät
hat zwei Befestigungslöcher an der Seite. Diese erlauben eine
Befestigung an beliebigen Plätzen und Positionen. Bitte beachten
Sie, dass der Einbauort trocken ist und dass das Gerät nicht ext-
remer Hitze ausgesetzt ist. Eine ungehinderte Luftzirkulation und
Konvektion muss zu jeder Zeit gewährleistet werden.
Entfernen Sie unter keinen Umständen, auch nicht wenn dies
die Montage erleichtert, das Gehäuse des Gerätes, da sonst die
elektrische und mechanische Sicherheit nicht mehr gewährleistet
werden kann. Durch jegliche Modikationen am Gerat verlieren
Sie Ihren regulären Garantieanspruch.
Start by removing the unito DIO from its shipping carton and check
it for possible damage. Also check whether all accessories have been
supplied.
Please be careful while unpacking as sharp edges may cause injuries.
The shipping carton contains:
DIO
Power Supply
Owner’s manual
If anything appears to be missing, please contact your local DELEC
distributor.
Install the DIO in the area you wish to place it. The casing has two
mounting holes in the side which will allow your to screw or bolt it
to wherever you wish. Please be aware that the location is a dry area
that is not subjected to extreme heat and has suitable ventilation.
Never remove the outer casing of the DIO under any circumstance.
Doing so may compromise electrical safety and mechanical protec-
tion. Be aware that any modication to the unit will void warranty.
Inbetriebnahme / Setting up

13
unito DIO
3.3 Verkabelung / Wiring
Netzversorgung
Stecken Sie den Phoenix-Stecker des mitgelieferten Netzteils in
den entsprechenden Netzanschluss am DIO. Bitte halten Sie sich
bei sämtlichen Verkabelungsarbeiten an die lokalen Sicherheits-
richtlinien und Vorschriften.
Sollten Sie einen Switch im Einsatz haben der PoE unterstützt
(Power over Ethernet), können Sie das DIO auch über eine Ether-
net Verbindung von LAN Port 1 zum PoE Switch mit Spannung
versorgen.
Anschlüsse/Schnittstellen
Nun können alle weiteren Verbindungen hergestellt werden. Fol-
gende Anschlüsse stehen zur Verfügung:
RJ45 Ethernet Anschluss (POE-fähig)
AES/EBU Eingang/Ausgang (RJ45)
SFP-cage für Glasfaser oder Kupfer SFP
4-poliger Phoenix Stecker als Microfone Eingang
25-poliger DSUB Buchse für Audio und Steuerung
Powering the device
Please use the supplied power supply to power the device by connec-
ting the phoenix connector to the power input of the DIO. Be sure
to follow all local safety regulations regarding power connections.
Alternatively, if you have a switch with POE (Power Over Ethernet)
capabilities you may connect an ethernet cable from the switch to
Lan Port 1 on the DIO to power it.
Sockets/Interfaces
Now you are ready to establish all required connections. The follo-
wing sockets are provided:
RJ45 ethernet connection (POE enabled)
AES In/Out (RJ45)
SFP cage for bre or copper SFP
4 pin phoenix connector microphone input
D25 connector (female)
Inbetriebnahme / Setting up

14
unito DIO
Gerätekonguration / Device Setup
4. Gerätekonguration / Device Setup

15
unito DIO
Die Konguration der
unito
DIO-Geräte erfolgt individuell auf
jedem Gerät via Webbrowser. Wie Sie die Konguration selbst
durchführen können, lesen Sie auf den nachfolgenden Seiten.
Conguration of the
unito
DIO is performed via a web browser
individually for each device. Please read the following page for
information on how to congure the device.
Gerätekonguration / Device Setup
4. Gerätekonguration / Device Setup
Software
Webbrowser ab Internet Explorer 8
iOS ab 6.1.3
Safari ab 6.0.3
Firefox
Um das DIO kongurieren zu können, haben Sie zwei Möglichkeiten
sich mit Ihrem Webbrowser auf das Gerät zu verbinden:
1. Schalten Sie das DIO ein und verbinden Sie es entweder mit einem
Ethernet- oder einem Glasfaserkabel mit ihrem Computer. Beachten
Sie den Default Gerätenamen auf dem Aufkleber auf dem DIO, z.B.
„DIO-B-xxxxx“. Geben Sie in der Befehlszeile Ihres Browsers die Adres-
se„http://DIO-B-xxxxx.local“ ein. Um sich auf das Gerät einzuloggen,
geben Sie das Passwort ein. Das voreingestellte Passwort lautet
„password“.
2. Laden Sie sich von der Audinate Webseite die aktuelle Version der
Dante Controller Applikation herunter:
www.audinate.com/support/softwaredownload/DanteController
Die Software erkennt automatisch alle Dante Geräte im Netzwerk
und zeigt deren Namen sowie die individuelle IP-Adresse. Diese
werden benötigt um das DIO mittels Webbrowser kongurieren zu
können.
Werden an dem Gerät Änderungen über die Dante Controller Soft-
ware vorgenommen, so bleiben diese lediglich bis zum Neustart des
Gerätes erhalten. Sollen Änderungen permanet im DIO abgelegt
werden, so müssen diese über den Web Service vorgenommen und
im Gerät abgespeichert werden.
Alternativ können Änderungen, die in der Dante Controller Software
vorgenommen wurden, anschließend über den Web Service des
DIOs gespeichert werden.
In allen anderen Fällen startet das DIO mit der zuletzt gespeicherten
Gerätekonguration.
Software
Web browser – Internet Explorer 8 or later
iOS – from 6.1.3 or later
Safari – from 6.0.3 or later
Firefox
To commission a DIO you may use two methods to login.
1. Power up the DIO and connect it to a computer via ethernet or
bre. Check the default name from the label on the DIO i.e. “DIO-
B-xxxxxx”. In a web browser, go to address “http://DIO-B-XXXXXX.
local” To login to the webpage, the default password is "password“.
2. The Audinate Dante Controller software application is required, which
can be downloaded from the Audinate website.
www.audinate.com/support/softwaredownload/DanteController
The software detects all devices in the network automatically, and shows
the name as well as individual IP addresses for each device. These are
required in order to congure the DIO via a web browser.
Changes that have been applied by using Dante Controller will only be
valid until restarting the device. In order to change the settings perma-
nently you should use the web service to apply changes and save them or
at least save them in the web server after changing in Dante Controller.
Otherwise the device will fall back to the last saved setting after reboo-
ting. This is applies to e.g. crosspoints, device names, channel names.

16
unito DIO
Dante
Controller
PRI
Primary Network Switch
PRI PRI PRI PRI PRI
Secondary Network Switch
SEC SEC SEC SEC SEC
Dante
Device
A
PRI
SEC
Dante
Device
B
PRI
SEC
Bitte beachten Sie:
DANTETM bietet die Möglichkeit, ein redundantes Audio-Netz-
werk zwischen Geräten aufzubauen. Dies muss in den
jeweiligen Geräten aktiviert werden (falls vorhanden). Bei der
Verwendung eines redundanten Audio-Natzwerks gelten
einige Besonderheiten:
§ Die kongurierende Instanz muss sich im primären
Netzwerk benden.
§ Beide Netzwerke müssen über die gleiche Link-Geschwin-
digkeit verfügen. Ist auf dem primären Netzwerk eine
Übertragungsgeschwindigkeit von einem Gigabit /sec
verfügbar, so muss diese auf dem redundanten Netzwerk
ebenfalls verfügbar sein, um ein automatisches Umschal-
ten im Fehlerfall zu ermöglichen.
§ Verfügt ein anzuschließendes Gerät nicht über die
Möglichkeit, redundante Verbindungen zu nutzen, so darf
dieses ausschließlich im primären Netzwerk verwendet
werden.
Please note:
DANTETM allows you to build a redundant audio network
between devices. This feature has to be activated on the
respective devices (if available). If you decide to use a redundant
audio network there are special requirements to consider:
§ The device which does the configuration must be the part of
the primary network.
§ Both networks must have the same link speed. If the primary
network offers a transmission speed of one gigabit per sec,
this must also be available on the redundant network in
order to facilitate automatic switchover in case of failure.
§ If a device is not to be connected with redundant links,
it should be used exclusively in the primary network.
Gerätekonguration / Device Setup

17
unito DIO
Das Kongurationsprogramm ist eine Webbrowsergestützte Kon-
gurationsoberäche. Sie werden Schritt für Schritt durch die Kon-
guration geleitet, die Ihnen folgende Möglichkeiten bietet:
Status
Statusinformationen
System
Systemkongurationen
Outputs
Konguration der Ausgänge
Dante Metering
Metering der Dante Eingänge (Reveiver) und Ausgänge (Transmitter)
Save Conguration
Sicherung der Kongurationen
Download Conguration
Download der Kongurationen
Restore Conguration
Wiederherstellung der Kongurationen
Factory Reset
Zurücksetzung des Gerätes auf die Standardeinstellungen
Reboot
Rebooten des Gerätes
Logout
Die jeweilige Kongurations-Session ist für 30 Minuten aktiv. Um
Missbrauch vorzubeugen sollte daher nach beendeter Kongura-
tion das Logout vorgenommen werden
The conguration program is a Web browser-based congu-
ration interface. You will be guided step-by-step through the
conguration which oers the following options:
Status
Status information
System
System congurations
Outputs
Conguration of OUTPUTS
Dante Metering
Metering of Dante receivers and transmitters
Save Conguration
Storing the congurations
Download Conguration
Downloading the congurations
Restore Conguration
Restoring congurations
Factory Reset
Restore the device to its default settings
Reboot
Reboot the device
Logout
A conguration session remains active for 30 minutes. To prevent
abuse, please logout after completing the conguration.
Gerätekonguration / Device Setup

18
unito DIO
Login
Verbindung mit dem unito DIO
Starten Sie Ihren Webbrowser und geben Sie in der Adress-
leiste die IP-Adresse des zu kongurierenden unito DIO ein.
Bestätigen Sie mit der Entertaste. Es erscheint die Seite mit
der Statusansicht des DIOs und der Login.
Gehen Sie nun auf den Login und geben bei der Passwort-
abfrage das Passwort ein. Im Auslieferungszustand ist das
Passwort „password“.
1
2
1
2
Connecting to the unito DIO
To congure a
unito
DIO, open your Web Browser and type the
DIO’s unique IP address into the address bar. Conrm with the
Enter key. The status page of the DIO will appear with an option
to login on the left hand side of the screen.
Click the login option. When the password prompt appears enter
the password. By default, the password is “password”.
Die jeweilige Kongurations-Session ist für 30
Minuten aktiv. Um Missbrauch vorzubeugen, sollte
daher nach beendeter Konguration ein Logout
vorgenommen werden.
A conguration session remains active for 30
minutes. To prevent abuse, please logout after
completing the conguration.
Gerätekonguration / Device Setup

19
unito DIO
Navigation
Übersicht des Kongurationsprogramms Overview on the conguration program
Gerätekonguration / Device Setup
Individuelle Kongurationen werden nur übernommen,
wenn das System nach dem Sichern neu gestartet wird.
Individual settings are only applied when the system is
restarted after saving.

20
unito DIO
SYSTEM General
1
5
2
6
3
7
8
4
Unter dem Menüpunkt SYSTEM General können Sie
folgende Kongurationen vornehmen:
Der Gerätenamen kann in diesem Feld editiert werden
Das Passwort kann geändert werden
Statusanzeige der Geräteredundanz. Um den Status zu verändern
benutzen Sie bitte nachfolgende Option.
Änderung des Status nach einem Gerätereboot.
Schalterstellung Redundant:
LAN-Anschluss 2 (mittlerer Anschluss) über VLAN isoliert zur
redundanten Netzwerk-Topologie
Schalterstellung Switched:
Die beiden LAN-Schnittstellen hängen direkt und
gleichberechtigt am internen Switch
Bestimmung des Clockmasters
Hier kann das DIO zum Clockmaster gemacht werden.
Bei mehreren Clockmastern wird derjenige mit der kleinsten
MAC-Adresse Clockmaster
Einstellung der Latenzzeit
Status der General Purpose Inputs (ON/OFF).
Hier können die General Purpose OutputsON oder OFF
geschaltet werden
1
2
3
5
6
7
8
Individuelle Kongurationen werden nur übernommen,
wenn das System nach dem Sichern neu gestartet wird.
Individual settings are only applied when the system is
restarted after saving.
Under the menu item SYSTEM General you can congure the
following settings:
The name of the device can be edited in this window
The password can be changed
This shows the status of the device’s redundancy.
Please use the option below to change the status.
Change the desired status after reboot of device.
If set to Redundant LAN port 2 is used as the link to the
redundant network, isolated by VLAN.
If set to Switched both LAN interfaces have the same functions
and are linked directly to the internal switch.
Determines clock master.
Here the DIO can be dened as the master clock. If there is no
clock master dened, or several, the device with the smallest
MAC address becomes the clock master.
This determines the latency settings.
This indicates if the external GPI signal is ON or OFF.
Allows you to turn the GPO (General Purpose Output)
ON or OFF.
Gerätekonguration / Device Setup
4
Table of contents
Other Delec Recording Equipment manuals


