Delites ES-2472 User manual

1
HƯỚNG DẪN SỬDỤNG
BÀN ỦI HƠI NƯỚC
ES-2472 220-240V~50/60Hz 1460-1740W
HƯỚNG DẪN AN TOÀN QUAN TRỌNG
Vui lòng đọc kỹhướng dẫn trước khi sửdụng
1. Sửdụng Bàn ủi đúng mục đích. Sản phẩm được thiết kếcho mục đích cá nhân,
không thích hợp cho sửdụng công nghiệp và thương mại.
2. Để tránh nguy cơ bị điện giật, không nhúng bàn ủi vào nước hoặc các chất lỏng
khác.
3. Bàn ủi nên được chuyển sang chếđộ‘OFF ’tr c khi c m i n hoặc trước
khi rút phích cắm ra khỏi ổcắm. Không giật dây điện đểrút điện khỏi ổcắm ; Nên
giữchặt ổcắm và rút phích cắm ra khỏi ổcắm.
4. Không đểdây dẫn điện tiếp xúc với bềmặt bàn ủi khi bàn ủi vẫn còn nóng. Để
bàn ủi nguội hoàn toàn trước khi cất đi.
5. Ngắt kết nối với nguồn điện khi châm nước vào bàn ủi và khi không sửdụng.
6. Không sửdụng bàn ủi khi dây dẫn điện bịrò rỉ, hoặc khi bàn ủi bịrơi vỡ, hư hỏng.
Để tránh nguy cơ điện giật, không tựý tháo rời sản phẩm hãy mang đến cửa hàng
để Nhân viên kĩ thuật kiểm tra và sửa chữa, Việc lắp lại không chính xác có thể
gây nguy cơ giật điện khi sửdụng.
7. Chống chỉđịnh với trẻem, người có vấn đềvềtâm lý, thiếu kinh nghiệm hay hiểu
biết trừkhi dưới sựquan sát hướng dẫn của người có tách nhiệm. Không đểsản
phẩm gần trẻnhỏkhi còn kết nối nguồn điện hoặc bềmặt bàn ủi vẫn còn nóng.
8. Việc tiếp xúc trực tiếp với bềmặt bàn ủi khi còn nóng, hơi nước từbàn ủi bốc lên
có thểgây bỏng cho da.
9. Nếu dây điện hoặc các bộphận bịhư hỏng, cần phải được thay thếbởi nhà sản
xuất, đại diện đủtiêu chuẩn đểđảm bảo an toàn.
2
HƯỚNG DẪN ĐẶC BIỆT
Để tránh bịquá tải, không sửdụng cùng lúc một thiết bịcó công suất cao khác
trên cùng một ổcắm.
LƯU Ý NHỮNG HƯỚNG DẪN SAU:
Cụthể:
KHÔNG Để trẻem sửdụng mà không có sựgiám sát.
TUYỆT ĐỐI KHÔNG Nhúng bàn ủi hoặc phích cắm điện vào bất kì chất lòng.
KHÔNG Để bàn ủi tiếp xúc với các chất liệu dễcháy khi còn nóng.
KHÔNG Kết nối nguồn điện khi không sửdụng. Rút phích cắm khỏi nguồn điện
khi thiết bịkhông được sửdụng.
TUYỆT ĐỐI KHÔNG Sửdụng thiết bịkhi tay ướt.
KHÔNG Để thiết bịtiếp xúc trực tiếp với các điều kiện thời tiết (N c ma,ánh
n ng tr c ti p, etc. ).
KHÔNG Rời khỏi bàn ủi mà không có sựgiám sát khi thiết bịvẫn còn kết nối với
nguồn điện.
KHÔNG Đổ đầy nước vào bình chứa nước trước khi rút phích cắm ra khỏi ổcắm.
LƯU Ý !
Không cho phụgia hoá học, chất có mùi thơm hoặc giấm, tinh bột vào ngăn
chứa nước.
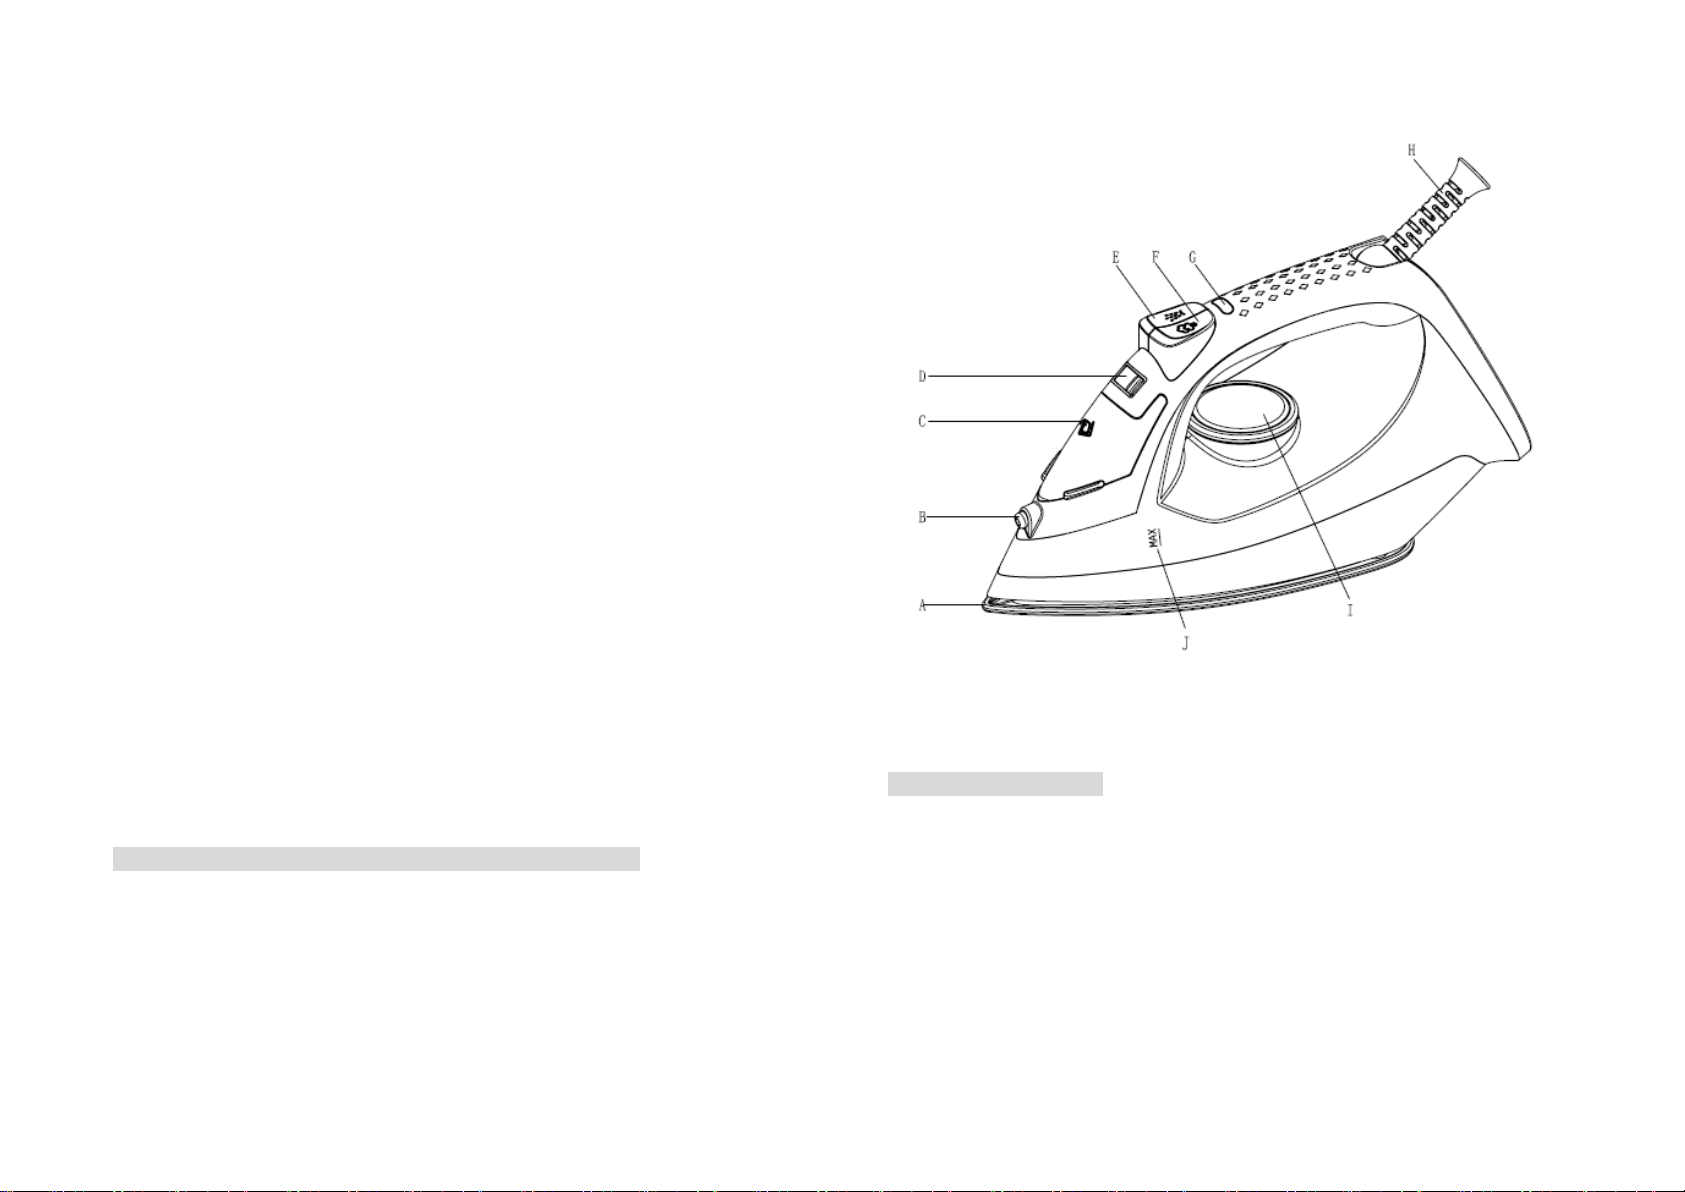
CẤU TẠO SẢN PHẨM
(A). Mặt đế
(C). Lỗđổ nước
(E). Nút phun tia
(G). Đèn báo
(I). Núm điều chỉnh nhiệt độ
HƯỚNG DẪN CHUNG
Khi sửdụng bàn ủi lần đầu tiên, sẽcó hiện tượng khói phát ra nhẹvà nghe thấy một
sốâm thanh phát ra từnhựa, điều này là bình thường và sẽdừng lại sau một thời gian.
Khuyến cáo nên sửdụng bàn ủi lần đầu tiên trên một tấm vải thô trước khi sửdụng
trực tiếp trên quần áo.
CHUẨN BỊTRƯỚC KHI ỦI
Lưu ý điều chỉnh nhiệt độ phù hợp với từng loại vải và điều kiện giặt ủi theo các ký
hiệu quốc tếtrên các nhãn hàng may mặc.
(B). Đầu phun
(D). Nút điều chỉnh hơi nước
(F). Nút phun hơi
(H). Dây nguồn
(J). Mực nước tối đa

3
NHÃN QUẦN ÁO LOẠI VẢI QUY CÁCH NHIỆT ĐỘ
Sợi tổng hợp
·
Nhiệt độ thấp
Vải lụa-len
··
Nhiệt độ trung bình
Vải Cotton
···
Nhiệt độ cao
Chất liệu vải không nên ủi
Nên bắt đầu ủi Quần áo ởm t nhi t th p.
Điều này giúp giảm thời gian chờđợi (bàn ủi mất ít thời gian để làm nóng) và giảm
nguy cơ làm cháy vải.
CHẾĐỘ ỦI HƠI NƯỚC
Đổ đầy bình chứa nước tới vạch mực nước tối đa.
- Đảm bảo phích cắm phải được ngắt kết nối với ổcắm điện.
- Gạt nút điều chỉnh hơi nước (D) về“0FF”[Hình 1].
- Mởnắp bình chứa nước (C).
- Nâng đầu bàn ủi lên để giúp nước được chứa đều trong bình chứa nước mà không bị
tràn ra noài.
- Từtừrót nước vào bình chứa lưu ý không vượt quá mức tối đa (kho n 180ml) j c
ch nh b i giátr “MAX”trên bình chứa nước [Hình 2].
- Đóng nắp bình chứa nước (C).
Lựa chọn nhiệt độthích hợp.
- Đặt bàn ủi thẳng đứng.
- Cắm phích cắm vào ổcắm.
- Vặn núm điều chỉnh nhiệt độ(I) theo ký hiệu quốc tếtrên nhãn hàng may mặc [Hình
3]. Đèn báo (G) sáng chỉ ra rằng bàn ủi đang nóng lên. Đợi đến khi đèn báo tắt hẳn
trước khi ủi.
Cảnh báo: Trong khi ủi đèn báo (G) sẽbật sáng liên tục cho đến khi nhiệt độđã chọn
được duy trì, Khi đang ủi nếu muốn hạthấp nhiệt độ của bộđiều khiển sau khi ủi ở
nhiệt độ cao phải lưu ý không ủi quần áo cho đến khi đèn báo bật sáng trởlại.
Điều chỉnh chếđộ hơi nước.
Lượng hơi nước được điều chỉnh bởi nút điều chỉnh hơi nước (D).
- Điều chỉnh núm điều chỉnh hơi nước đến vịtrí giữa, tối đa hay tối thiểu tuỳthuộc
vào lượng hơi cần thiết và nhiệt độ đã chọn [Hình 1].
Lưu ý:Bàn ủi sẽphun hơi nước liên tục chỉkhi giữbàn ủi theo chiều ngang, bàn ủi
sẽngưng phun hơi khi đặt bàn ủi ởvịtrí thẳng đứng hoặc gạt nút điều chỉnh hơi nước
về“OFF”. Chỉcó thểsửdụng hơi nước ởnhiệt độ cao, nếu nhiệt độ quá thấp nước
có thểchảy xuống mặt đếbàn ủi.
Nhấn nút phun hơi và di chuyển bàn ủi theo chiều dọc.
Nhấn nút phun hơi (F) để tạo ra một luồng hơi mạnh có thểxuyên qua các lớp vải và
các nếp nhăn khó ủi nhất. Đợi vài giây trước khi nhấn lại [Hình 4].
Bằng cách nhấn giữnút phun hơi trong vài giây có thể ủi vải theo chiều dọc (rèm cửa,
quần áo treo,...) [Hình 5].
Lưu ý:Chức năng phun hơi chỉcó thểsửdụng ởnhiệt độ cao. Dừng ủi quần áo khi
đèn báo (G) bật s
á
ng, Chỉbắt đầu ủi quần áo trởlại khi đèn báo đã tắt.
CHẾĐỘ ỦI KHÔ
Để ủi quần áo không dùng hơi nước, làm theo hướng dẫn và gạt nút điều chỉnh hơi
nước (D) về“0FF”
Chức năng phun tia
Hãy chắc chắn rằng có nước trong bình chứa nước. Nhấn và giữnút phun tia (E) từtừ
(đối với phun dày đặc) hoặc nhanh chóng (đối với phun hơi) [Hình 6].
Cảnh báo:Đối với các loại vải mỏng nên làm ẩm vải trước khi nhấn nút phun tia
(8), hoặc đặt một miếng vải ẩm giữa bàn ủi và quần áo cần ủi. Để tránh bịnhuộm

4
màu không sửdụng chếđộ phun tia trên lụa hoặc vải tổng hợp.
VỆSINH SAU KHI SỬDỤNG
Lưu ý: Trước khi vệsinh bàn ủi đảm bảo rằng phích cắm đã được rút ra khỏi
ổcắm.
Chờkhi bàn ủi nguội, dùng vải mềm đểlau sạch mặt đế bàn ủi.
Tránh làm trầy xước mặt đế bàn ủi bằng các vật dụng bằng kim loại.
Các bộphận bằng nhựa có thểlàm sạch bằng vải ẩm sau đó lau lại bằng vải khô.
BẢO QUẢN SẢN PHẨM
- Ngắt kết nối phích cắm của bàn ủi khỏi ổcắm.
- Làm trống bình chứa nước bằng cách lật ngược bàn ủi và lắc nhẹ.
- Để bàn ủi nguội hoàn toàn.
- Cuộn dây nguồn và quấn chặt vào sản phẩm
- Cất sản phẩm vào hộp đựng sản phẩm.
KHUYẾN CÁO KHI SỬDỤNG BÀN ỦI
Nếu thành phần vải là hỗn hợp (víd 40% cotton, 60% tổng hợp), điều chỉnh nhiệt độ
bàn ủi ởmức thấp nhất.
Nếu không biết thành phần của vải, hãy xác định nhiệt độ phù hợp bằng cách thửtrên
một góc của quần áo. Bắt đầu ởnhiệt độthấp và tăng dần cho đến khi đạt đến nhiệt độ
thích hợp.
Không ủi quần áo ởkhu vực có mồhôi hoặc các vết bẩn khác: sức nóng của bàn ủi có
thểlàm cho vết bẩn bám chặt vào vải và không thểtẩy rửa.
Lưu ý điều chỉnh nhiệt độkhi ủi khô ởmức vừa phải nhiệt độquá cao có thểlàm cháy
quần áo hoặc để lại vệt ốvàng trên quần áo.
Quần áo càng dễủi khi càng được làm ẩm.
Ví dụ, vải lụa phải luôn được làm ẩm.

5
INSTRUCTIONS
STEAM IRON
ES-2472 220-240V~50/60Hz 1460-1740W
IMPORTANT SAFETY INSTRUCTIONS
When using your flatiron, basic safety precautions should always be followed,
including the following:
READ ALL INSTRUCTIONS BEFORE USING
1. Use iron only for its intended use.
2. To protect against a risk of electric shock, do not immerse the iron in water or
other liquids.
3. The iron should always be turned to ‘Off ’before plugging or unplugging
from outlet. Never yank cord to disconnect from outlet; instead, grasp plug and
pull to disconnect.
4. Do not allow cord to touch hot surfaces. Let iron cool completely before putting
away. Loop cord loosely around iron when storing.
5. Always disconnect iron from electrical outlet when filling with water or emptying
and when not in use.
6. Do not operate iron with a damaged cord or if the iron has been dropped or
damaged. To avoid the risk of electric shock, do not disassemble the iron take it to
a qualified serviceman for examination and repair. Incorrect reassembly can cause
a risk of electric shock when the iron is used.
7. Close supervision is necessary for any appliance being used by or near children.
Do not leave iron unattended while connected or on an ironing board.
8. Burns can occur from touching hot metal parts, hot water, or steam. Use caution
when you turn a steam iron upside down –there may be hot water in the reservoir.
9. If the malfunction indicator goes on, the flatiron is not operating normally.
Disconnect from the power supply and have the flatiron serviced by qualified
service personnel.
Table of contents
Languages:


