DELLA 048-GM-48271 User manual
Multifunction Air Fryer
MODEL:048-GM-48271
OPERATING INSTRUCTIONS
Please read this instruction and the maintenance items throughly
and carefully before using.And keep it for reference.
1
Technical Specification
Voltage:
120V
Power:
1500W
Frequency:
60Hz
Temperature Range:
122F~446F
Time setting Range :
1~60 min
Capacity:
10L
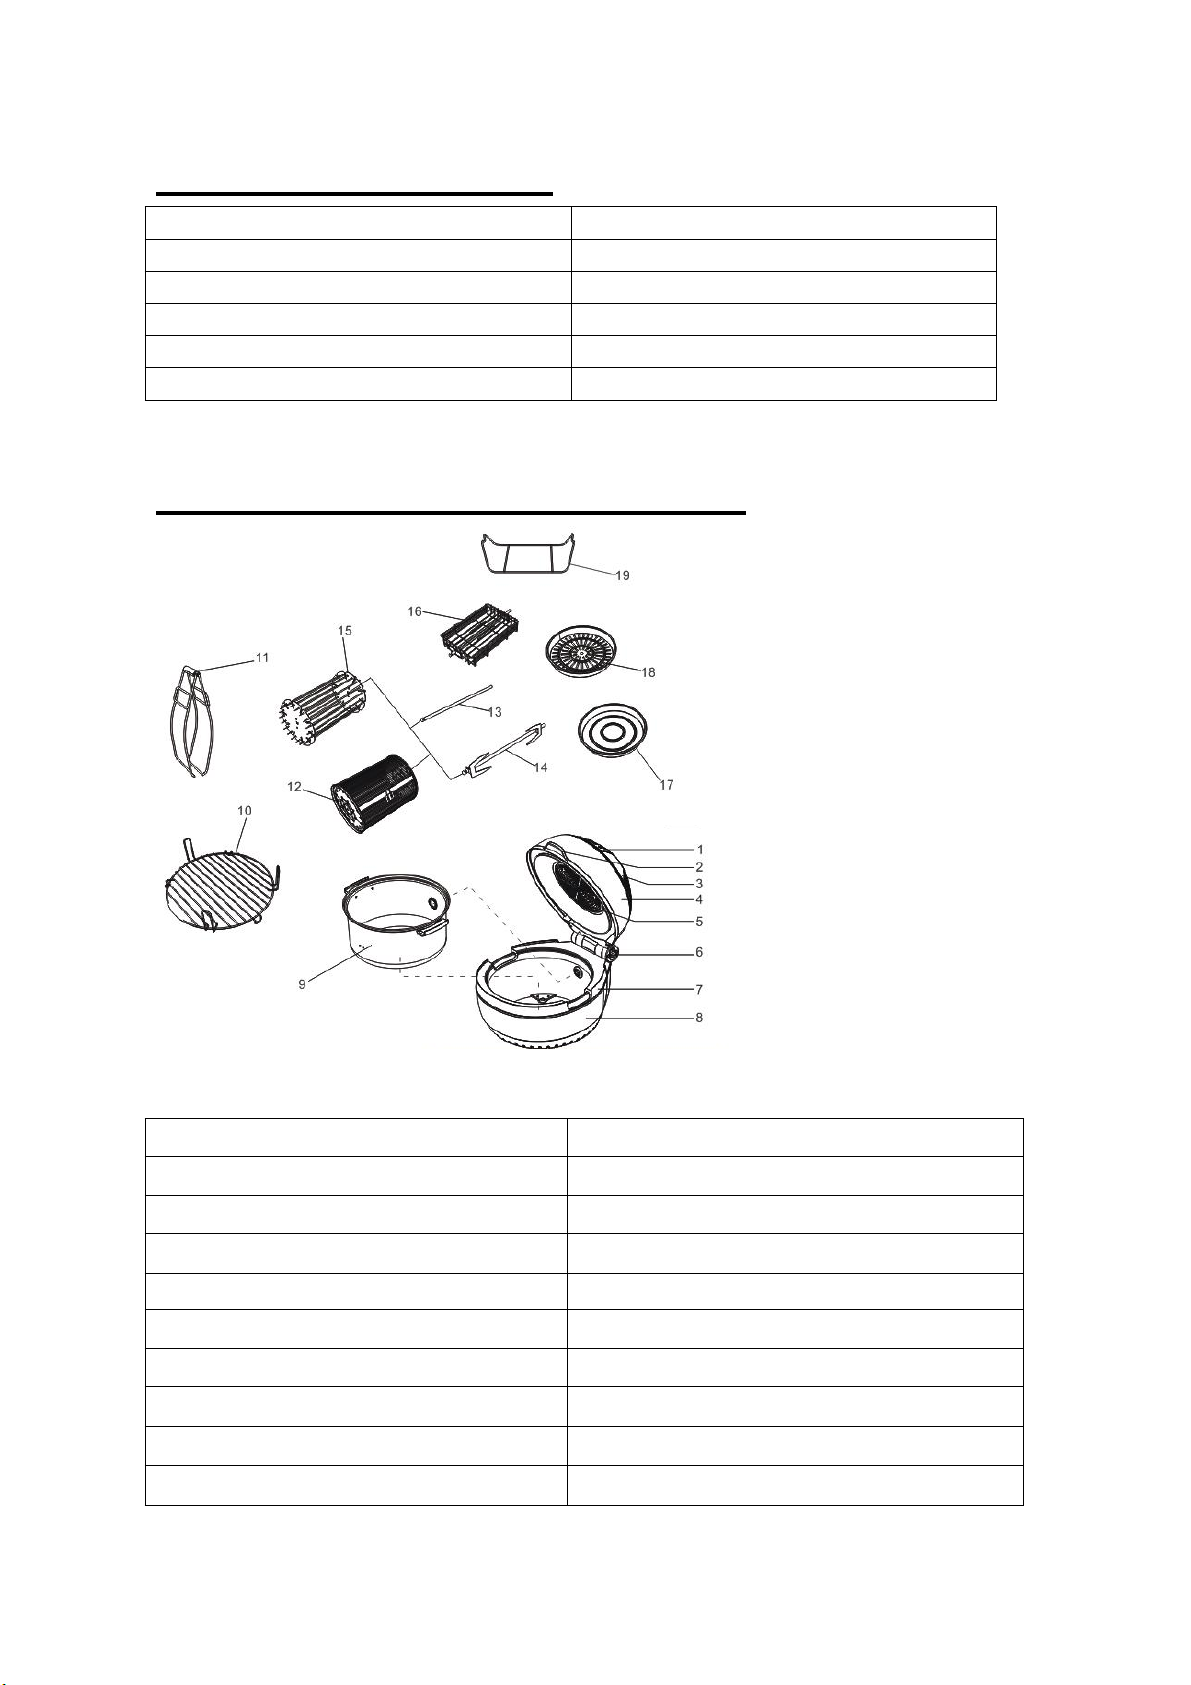
CONSTRUCTION AND FEATURES:
1. Control Panel
2. Lid Handle
3. Heat emission hole / Louver
4. Transparent Cover
5. Heating Fan
6. Fixed Switch
7. Spindle Hole
8. The Base
9. Non-Stick Bowl
10. High/Low Rack
11. Tong
12. Baking Cage
13. Spindle
14. Chicken Fork
15. Skewer Rack
16. Steak Cage
17. Frying Pan
18. Steamer
19. Cage Holder

2
Control Panel:
Item Number
Function
1. ON/ OFF
On/ Off the appliance
2. Menu
Cooking mode selection
3. Food/Roller
Start/Stop rotation function
4. Preset
Preset the cooking time and mode
5. Temperature/
Timer
Set your desired cooking temperature and time
Note: For more information see later part of instructions
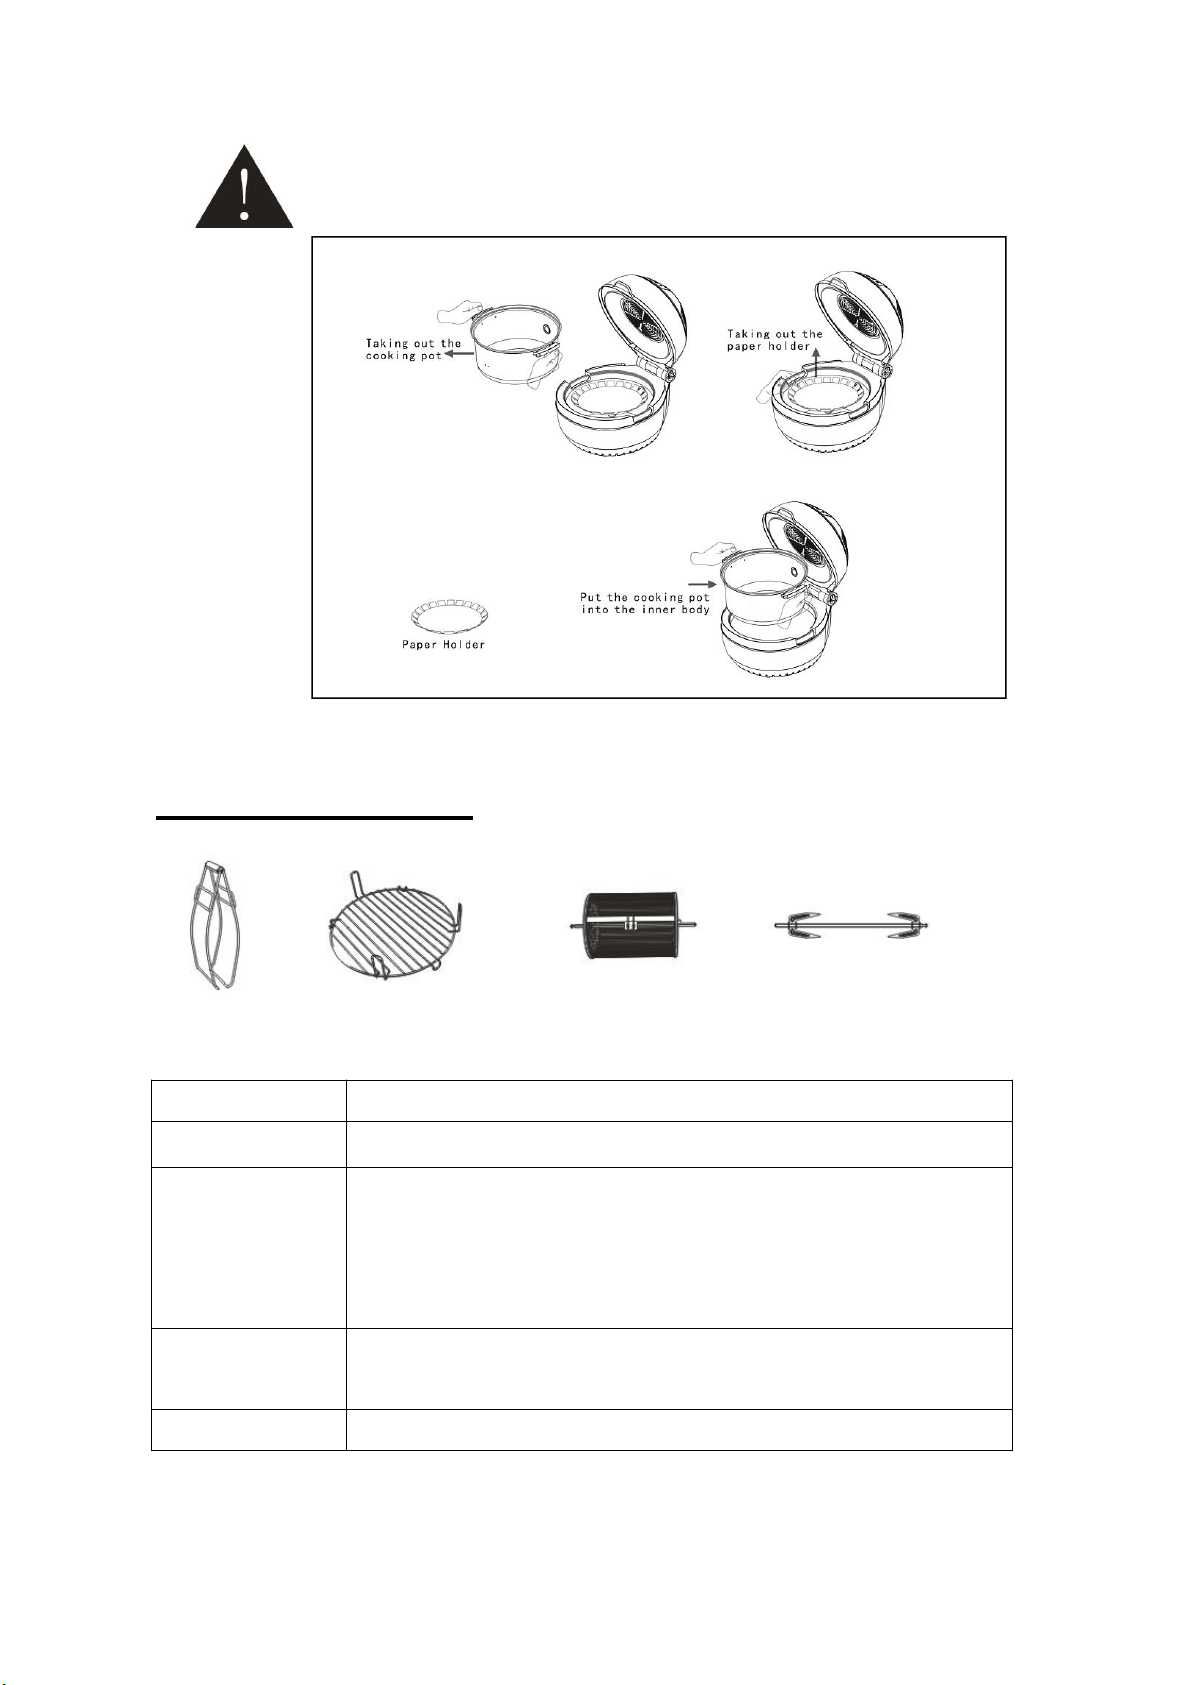
Warning:
Before opening the lid the cooking process must be stopped. Please press down the
Fixed Switch (as illustrated above) to unlock the lid. Be careful of heated steam
hurting.
Warning :Below is the correct method of opening or closing the
cooking lid of the appliance Air fryer:
3
Basic Accessories
Tong High/Low Rack Baking Cage Chicken Fork
Item
Description
Tong
For holding food, baking pan or dual rack
High/Low Rack
Low Rack: Good for cooking larger food items such as roast
poultry (full size), rice casserole, vegetables, etc.
High Rack: Suitable for cooking food with the medium size.
Such as chicken wing and pizza.
Baking cage
Suitable for food like French fries and those need rotating &
even heating
Chicken Fork
Suitable for whole chicken or lamb legs
Warning : Before using Please take out the paper holder from the
inner body
4
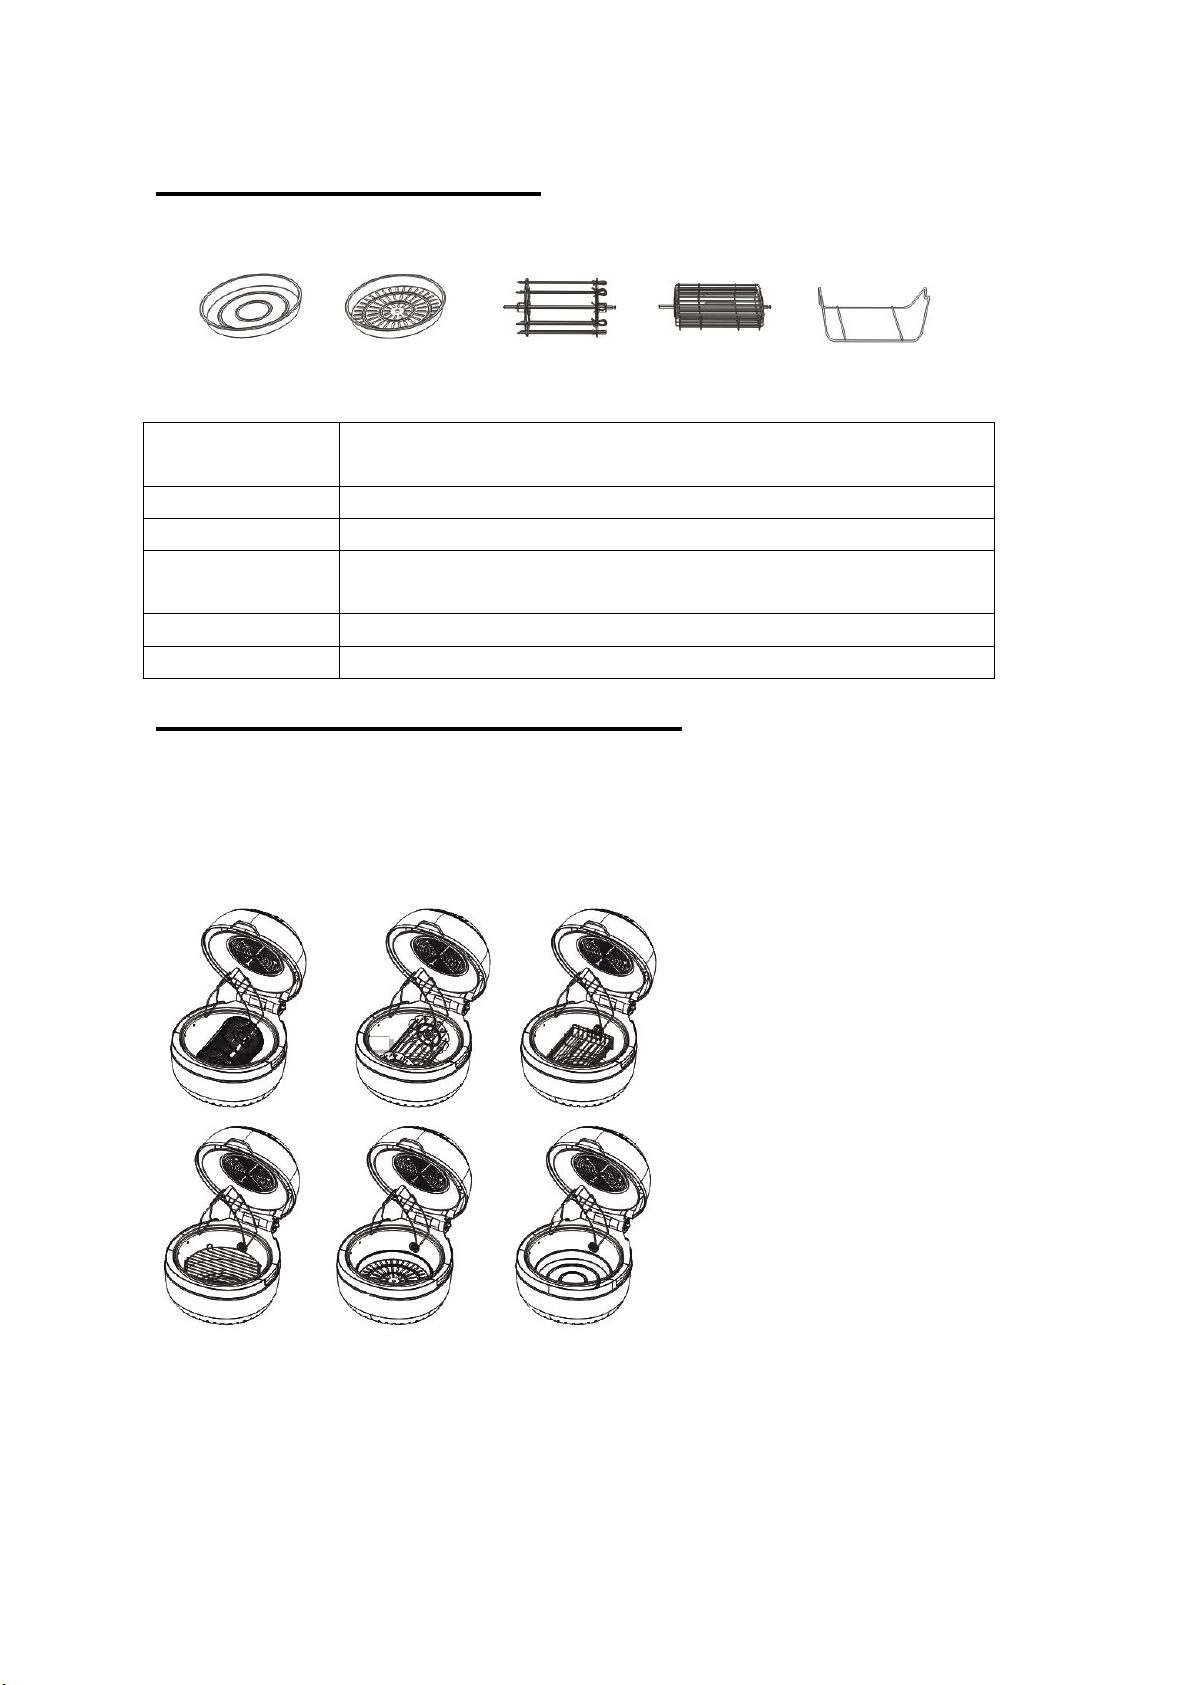
Optional Accessories
Frying Steamer Skewer Rack Steak Cage Cage Holder
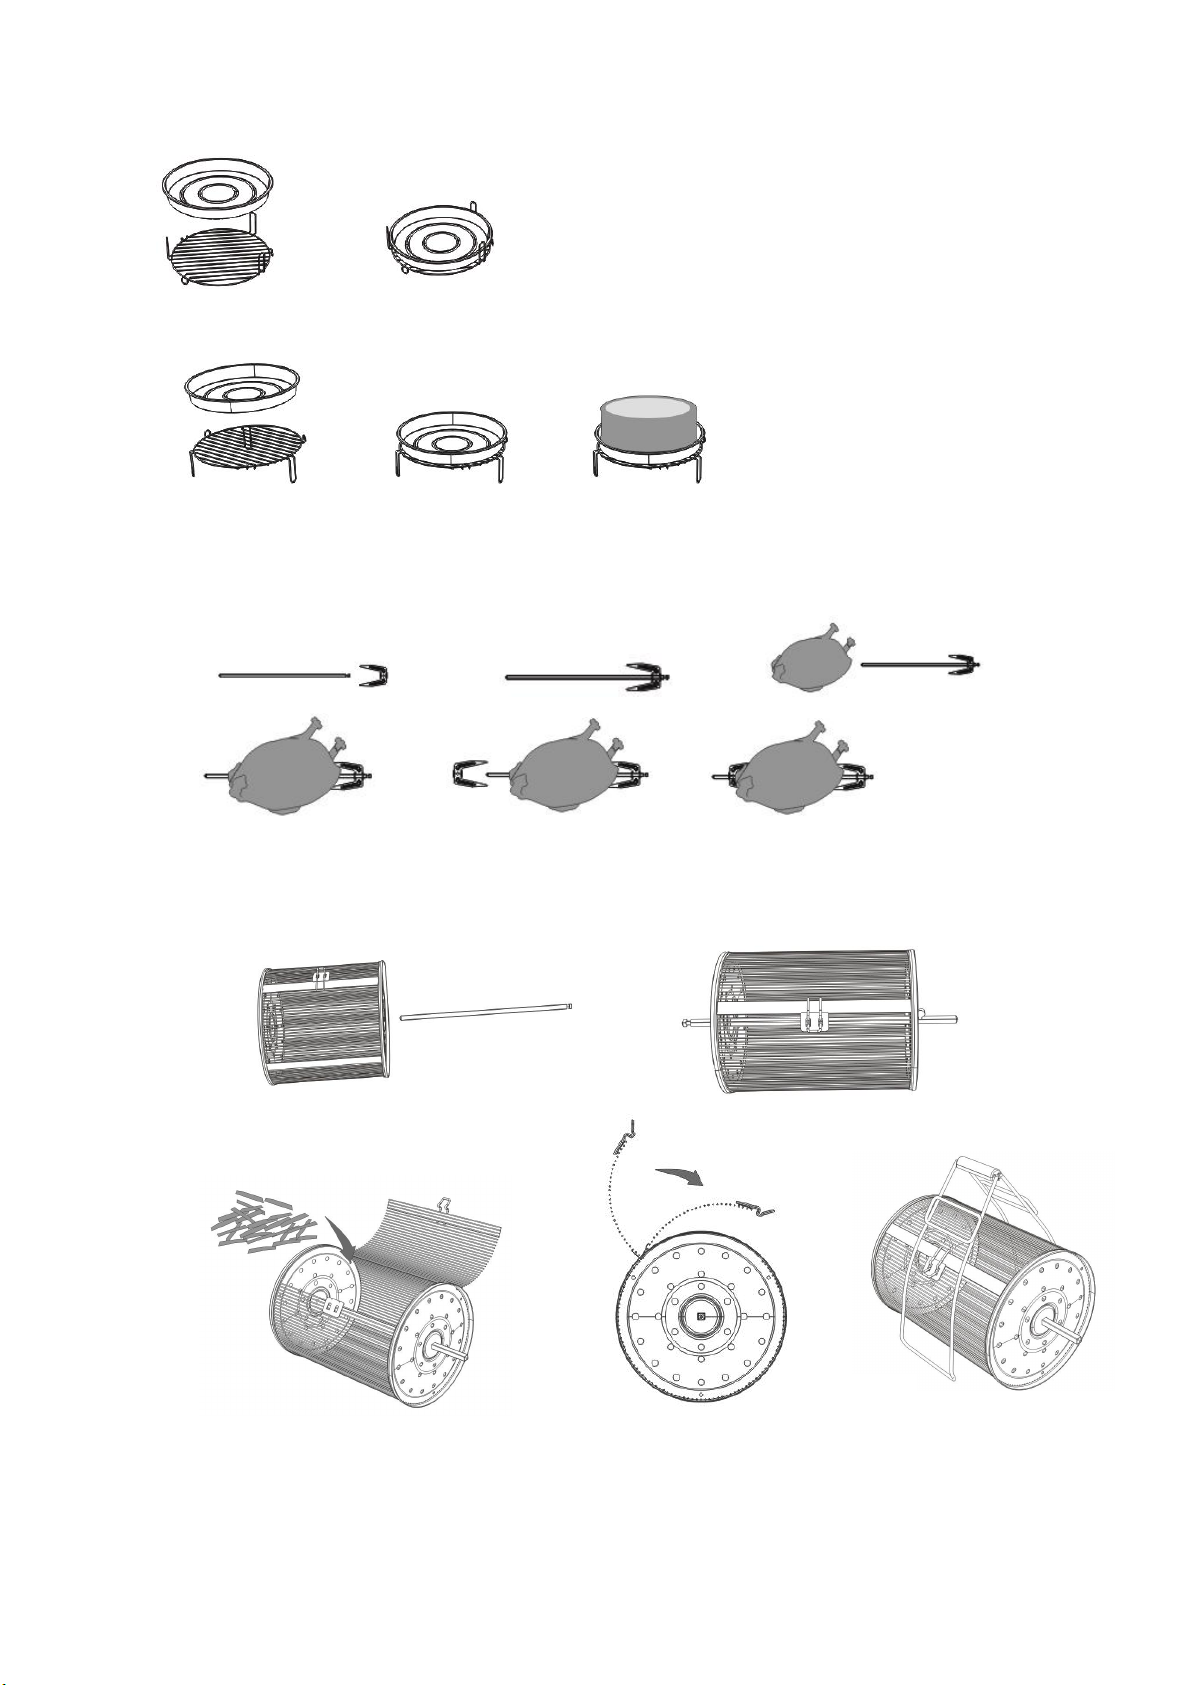
How to use the accessories :
When handling the heated accessories and food, please use tong provided and if
necessary use mitts.
Please pay attention that whether the temperature of the inner pot is too high or not,
use both hands to carry to prevent any accident
1. Dual rack and Baking pan combination:
Low rack + Baking pan
Item
Description
Steak cage
Suitable for grilled fillet steak and seafood
Skewer rack
Suitable for the brochette
Frying Pan
Be Used with the dual Rack, can bake the cake or grilled some
small food
Steamer
Reheat the food or steam the food
Cage Holder
Hold the Baking Cage/Skewer Rack/ Broiled Steak
5
High rack + Baking pan
2. Use Fork for whole chicken:
(1) (2) (3)
(4) (5) (6)
3. Tong and Baking Cage
(1) (2)
(3) (4)
(5)

6
4. Tong and steak cage
5. Tong and skewer rack
6. Tong and Cage Holder

7
IMPORTANT SAFEGUARDS
Warning:
Thank you for choosing our product.
When using electrical appliances, basic safety precautions should always be
followed, including the following. THANK YOU!
1. Read instructions carefully before use.
2. Do not touch hot surfaces. Use handles and mitts.
3. Before use, check that your local voltage corresponds with the specifications
shown on the appliance nameplate located under the appliance.
4. Do not turn on power until this appliance and parts are in place as required. Make
sure the lid in on before plugging and switching on the power..
5. To protect against electric shock do not immerse cord, plugs, or this appliance in
water or other liquid.
6. Close supervision is necessary when any appliance is used near children.
7. Unplug from outlet when not in use and before cleaning. Allow time to cool down
before putting on or taking off parts, and before cleaning the appliance.
8. Do not operate any appliance with a damaged cord or plug or after the appliance
malfunctions, or has been damaged in any manner. Return the appliance to the
nearest authorized service facility for examination, repair or adjustment.
9. Un-recommended way of using the product and accessories may cause injuries.
10. Do not use appliance for other than intended use. And this is household only and
do not use in outdoor or commercial purpose.
11. Always attach plug to appliance first, then plug cord in the wall outlet. To
disconnect, turn any control to “off”, then remove plug from wall outlet.
12. The unit should be operated on a separate electrical circuit from other operating
appliance. If the electric circuit is overloaded with other appliances, this appliance
may not work properly.
13. Extreme caution must be used when moving an appliance containing hot food.
14. Do not place on or near a hot gas or electric burner, or in a heated oven. Also keep
away from the flammable material such as curtains, draperies when it is working.
15. Leave enough open space from other subject when in use.
16. Do not let cord hand over edge of table or counter, or touch hot surface.
17. Do not leave the cord hanging.
18. Do not unplug the appliance by pulling on the cord.
19. Do not overload non-stick bowl, the maximum weight of the food is 5KG.
20. Do not cover the appliance while in use.
21. Clean the lid, windows, odor/splash guard with a sponge and soapy water. Pieces
can break off the pad and touch electrical parts involving a risk of electric shock.
22. This appliance is not designed to be used by people (including children) with a

8
physical, sensory or mental impairment, or people without knowledge or
experience, unless they are supervised or given prior instructions concerning the
use of the appliance by someone responsible for their safety. Children must be
supervised to ensure that they do not play with the appliance.
23. SAVE THESE INSTRUCTIONS.
SHORT CORD INSTRUCTIONS
Do not use with an extension cord; a short power supply cord is provided to reduce the
risks resulting from being entangled in or tripping over a long cord.
Preparation for use.
Before using Air Fryer for the first time:
Warning: when first time use, the appliance may emit slight odor which is not
harmful and will disappear after a few minutes. This is because protection oil
was applied to protect parts from possible friction in transport.
Carefully unpack the unit and remove all the packing materials. Select a flat,
heat-resistant Non-flammable surface to place the unit. Do not immerse the appliance
into water or other liquid.
Use sponge and soapy water to remove any dust on the surface that may happen
during packing and transport. Allow dry before use.
Preparing the cooking:
1. According to your cooking, place the baking tray, low rack or into the bowl
container before putting food inside. Keep the food about 15-20mm from the bowl
edge to allow maximum hot air circulation. If you use the baking cage , please put
the food inside before place into the container.
2. Close the function lid and make sure the food will not touch the top of lid.
3. Insert the power cord firmly into the wall AC main outlet.
4. Press “ON/OFF” key and then to set your desired cooking time and temperature.
5. The timer will stop working after the preset time period has passed and beep 3
times to remind you the cooking time is over and desired food to be cooked and
served. The fan inside the appliance will continue running to cool down the unit.
6. Without long time operation, the unit will turn off by itself even is connected with
the power source. Turn it on with “ON/OFF” button.
7. It is not allowed to turn the unit on without cooking any food inside.
9
Operation:
1. ON/OFF:
Put the plug into outlet, and press “on/off” the devise is ready to work , in the standby
case, without any operation, then the appliance, will off automatically after 1 min
2. Menu selection
Important: When cooking medium to large chicken using chicken fork, please
truss the thighs and wings to avoid them touching the heating top panel.
We have provided different combinations of cooking time and temperature to satisfy
your different cooking way.
Just press “ Menu” for each cooking,, the control panel will display the different icon ,
After choosing , press “ON/OFF ”key, the appliance will start. Easy Operate !
Below is our menu combination, at the same time, you can change the time and
temperature according your actual situation.
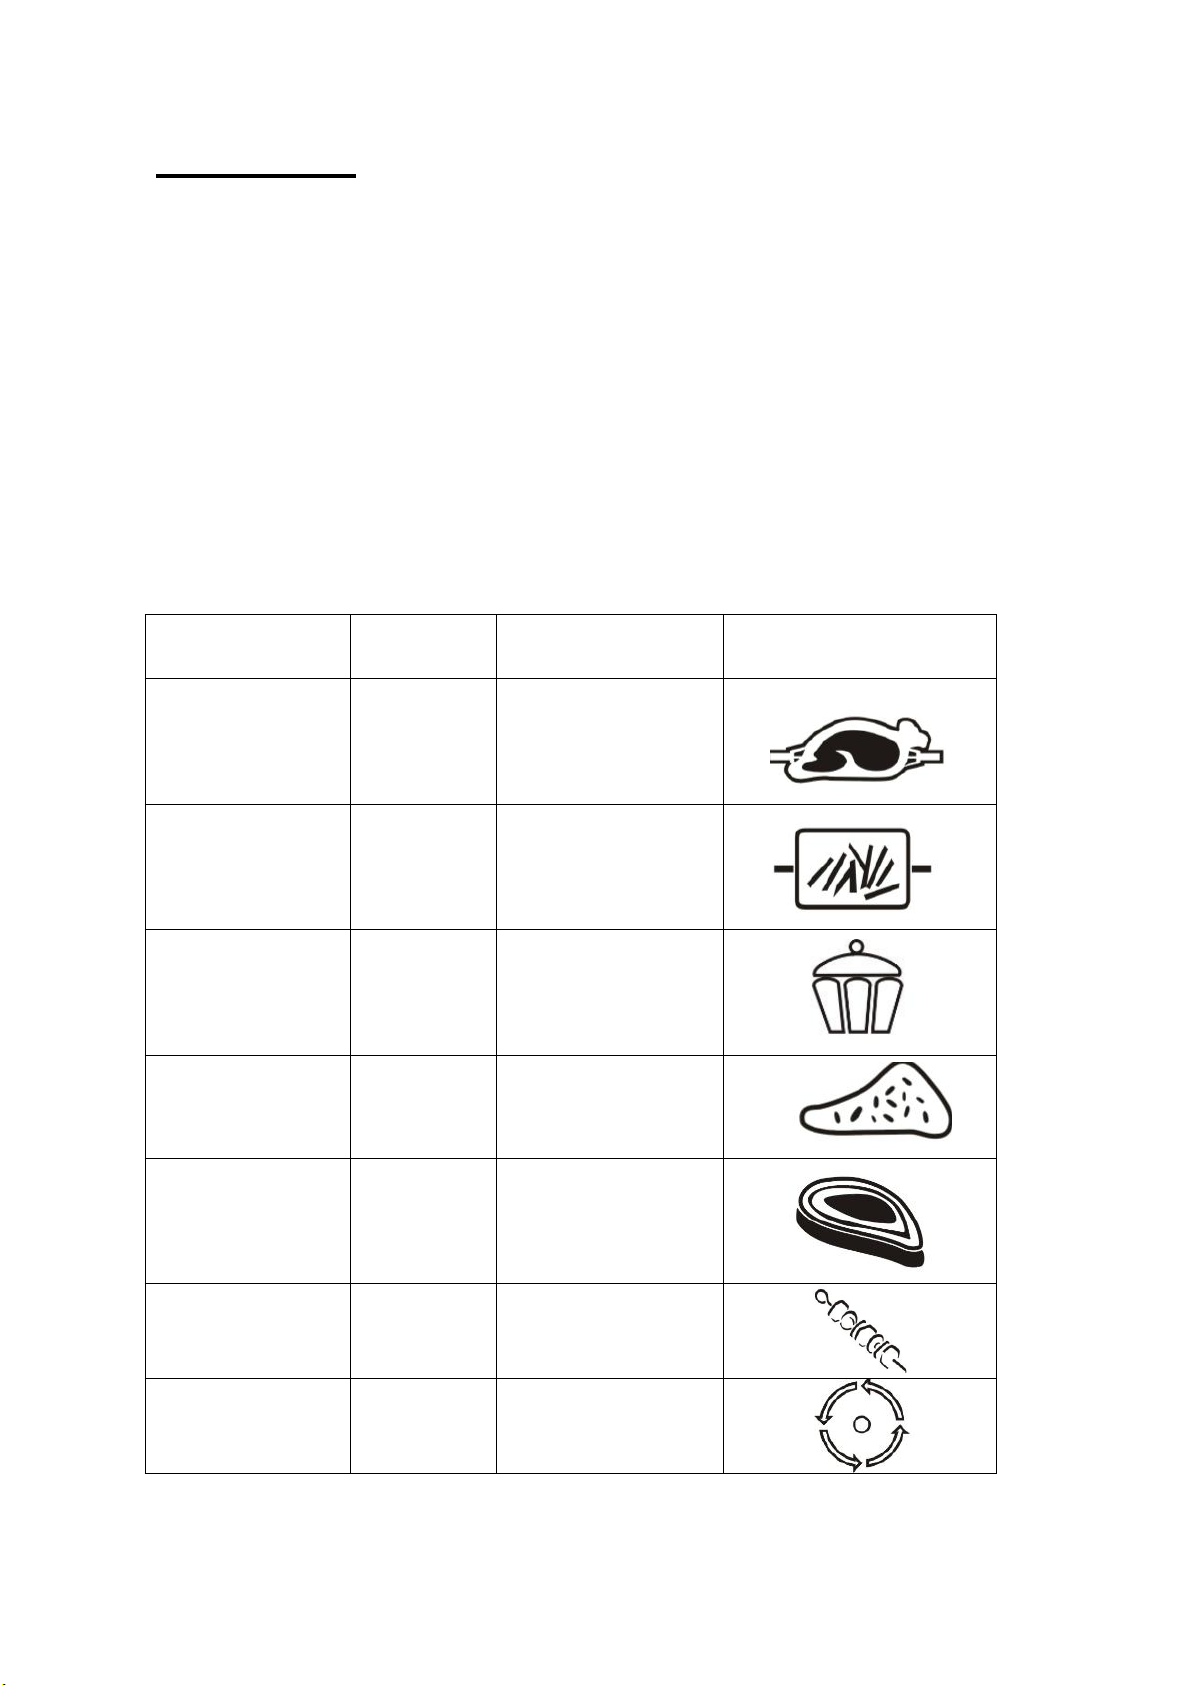
Menu
Temperat
ure
Time
Icon
Roast
392F
25 mins
French Fries
(non-precooked)
446F
25 mins
Bake
356F
20 mins
Stir-fry
392F
10 mins
Grill
374F
15 mins
BBQ
392F
12 mins
Roll
10
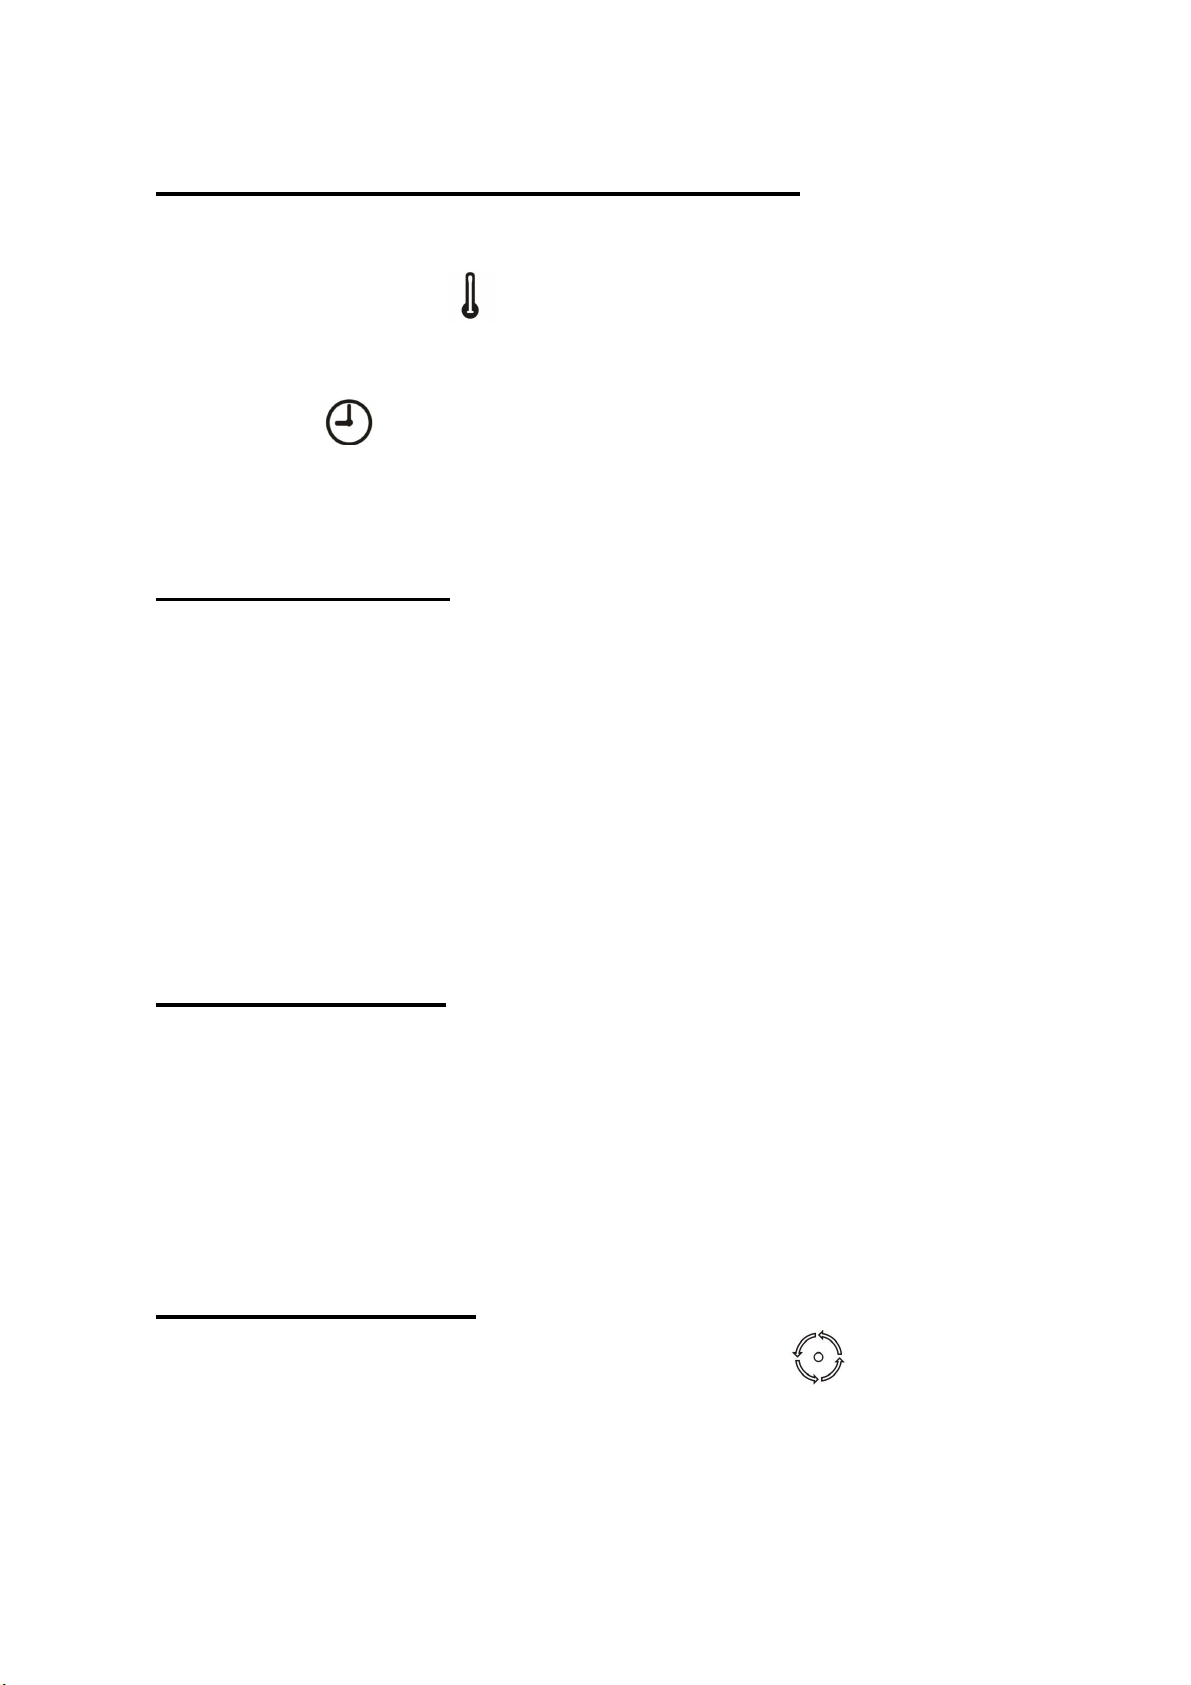
Set the cooking time and temperature
After choosing the “Menu” , you still need to set the time and temperature , you can
press "Temp/Time " key to adjust the cooking time and temperature. Press down the
"Temp/Time " key , The icon flash, now you can press “+”“-”to set the desired
temperature. every click is 18F adjustment . The continuous pressing is for 18F
changing . The max cooking temperature is 446F and min is 122F
When the icon flash , Now you can press“+”“-”set the desired cooking time .
Every click is 1 min change; if continuous press ,then it is for 10 mins changing . The
cooking time range is 1--60 mins .
Preset Function :
In the standby mode, press PRESET button, then set the appointment time through
timer key.
The default setting is 60 minutes. Every click is 1 minutes difference. The setting range is
0.5~9 hrs. And the continuous press "+" and "—" is 10 mins changing.
The default cooking time and temperature is the cooking temperature: 392F, cooking
time :25 minutes.
If you want to change the cooking temperature and time, Please press the "menu" key
to reset the time and temperature.
Then Press “ON/OFF” key to confirm the preset function , the cooking time will count
down.
Pause Function :
If you open the lid , the unit pauses cooking , all the data will save by itself , In that
condition , only the “ON/OFF”key and “Roll”key can work ,and others are locked .
Put the lid down correctly , the cooking process will resume automatically.
If you are using "Roll" function before opening the lid, the heating element will stop
working , but “Roll”function still save . Now you can add sauce on the food and
resume the heating process again.
Rotation Function:
The function make the food heated more evenly, press the key ,The “Roll”icon
will display .Press it one more time , Roll function will be canceled .
11
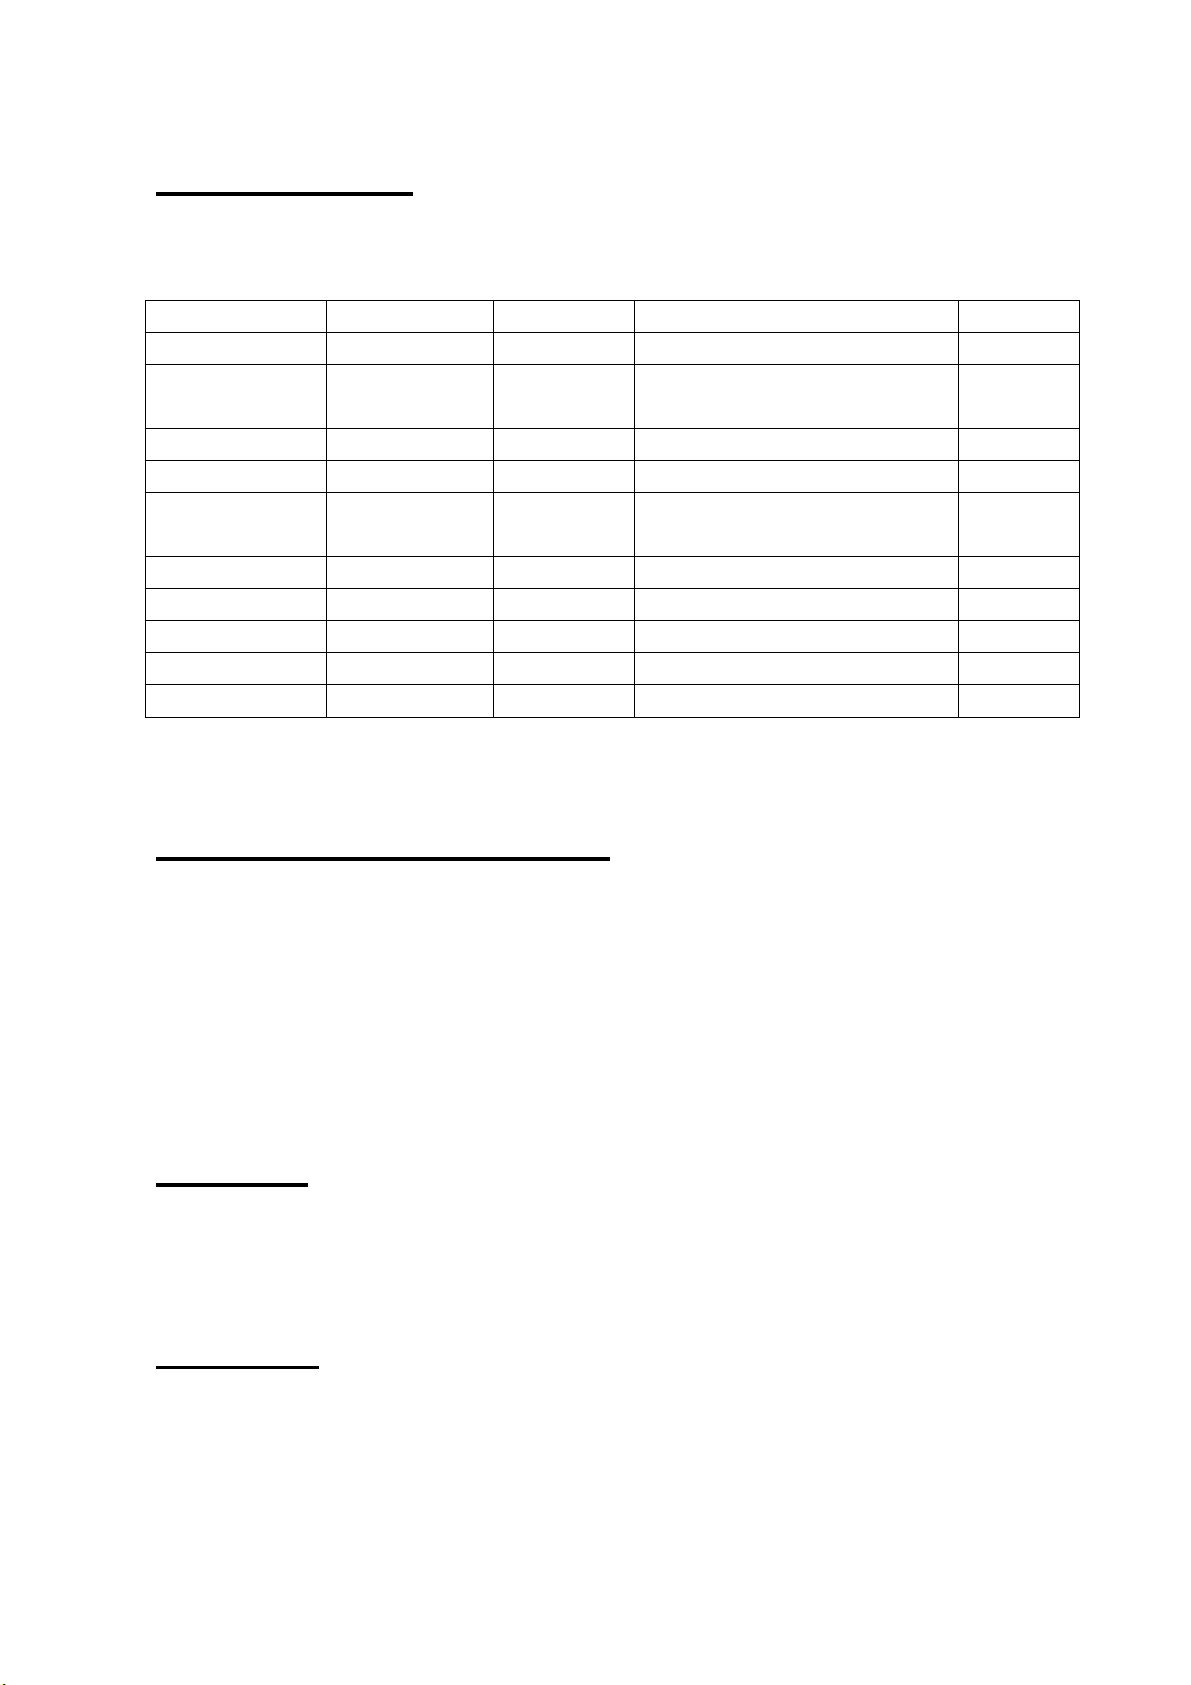
Cooking Table:
The cooking times are a guide only.
They could vary depending on quantity, tempreture and weight etc.
Food
Temperature
Time
Accessory to recommend
Note:
Roast Chicken
392F
25~30mins
Chicken fork or Low Rack
Frozen French
Fries
446F
20~25mins
Baking cage
Cashew nuts
392F
5~8mins
Baking cage
Coffee bean
446F
15~20mins
Baking cage
Chicken Wing
392F
10~15mins
Baking cage
/ High Rack + Baking Tray
Bake Cake
356F
10~15mins
Low Rack Or Baking Tray
Pizza
392F
10~15mins
High Rack/ frying pan
Steak
374F
12~16mins
High Rack/ steak cage
Bake Shrimp
392F
5~8mins
High Rack
Bake Bread
356F
15~20mins
Low Rack+ Baking Tray
*For cooking frozen food please allow more time according to weight.
*It's suggested that the maximun weight of the food can not be more than 5kg.
Cleaning and Maintenance
Completely clean and dry all parts after every use.
Unplug the unit and allow it to cool down completely before any cleaning or
maintenance.
1. Once the unit has cooled completely, clean the bowl thoroughly with warm soapy
water and damp cloth. The bowl, baking tray and food roller are dishwasher safe.
2. For self-cleaning, add half inch of water with mild liquid detergent. Close the
head/lid.
3. Set the temperature to 140F, set the timer for 15 minutes and allow residue to
soften as it heats. Unplug and cool completely before continuing to clean.
4. To clean fan cover unplug the appliance and cool completely. Wipe top of fan cover
with a soapy damp cloth or sponge to remove any grease.
Caution
1.Never immerse cord or plug into water or any other liquid.
2.If scrubbing is necessary, use a nylon or polyester mesh pad.
3.Do not use a steel wood pad or abrasive material.
4.Never use solvents or cleaning powder.
5.Do not get any liquid inside the head/lid.
STORING
Allow the unit to cool completely before storing. Store the appliance in a dry location.
Do not place any heavy items on top of appliance during storage as this may result in
possible damage of appliance.
Table of contents
Other DELLA Fryer manuals


Popular Fryer manuals by other brands


Vulcan-Hart
Vulcan-Hart GRC35 Service manual

TurboTronic
TurboTronic TT-AG700 instruction manual

Rommelsbacher
Rommelsbacher FRP 2135/E instruction manual

Emeril Lagasse
Emeril Lagasse FRENCH DOOR AIRFRYER 360 quick start guide

Casselin
Casselin CFP13 operating instructions

Hendi
Hendi MASTERCOOK DIGITAL 207345 user manual


