DeLonghi EV250 User manual

EV250
EVAPORATIVE COOLER
Instructions for use. Keep these instructions
Visit www.delonghi.com fora list of service centers
near you.
ELECTRIC CHARACTERISTICS
120V~ 60 Hz
CLIMATISEURÀÉVAPORATION
Mode d’emploi . Conservez cette notice
Visitez www.delonghi.com pour y voir une liste
descentresderéparationproches dechez vous.
CARACTÉRISTIQUES ÉLECTRIQUES
120V~ 60 Hz
ENFRIADOR EVAPORATIVO
Repase y guarde estas instrucciones.
Lea cuidadosamente este instructivo
antesdeusarsu aparato.
Visite www.delonghi.com para ver la lista
decentrosdeservicioscercanosausted.
CARACTERISTICAS ELECTRICAS:
120V~ 60 Hz

2
EN
FR
ES
page6
page11
pág.19

3
C10
C2
C3
C4
C5
C8
C
C7
C6
B
A5
A1
C
A8
A4
A6
A4
A7
A4
A10
MAX
A2
MIN
A11 A9
A3
A12
B
C9
B2
C8
B3
B4
C7
B5
C6
B6
D1
C1 C10 D2
D3
C2
D4
D5
C3
D6
C5 C4

4
Importantsafeguards
•
Use this appliance only as described in this
instruction manual.
As with any electrical appliance, the instructions
aim to cover as many situations as possible.
Caution and common sense should be used
when operating and installing this appliance.
•
Before operating the product, remove the
packaging and check that product is in good
condition.
•
This appliance has been manufactured to refresh
domestic environments and must not be used
for
otherpurposes.
•
Thisapplianceifforindooruse only!
•
It is dangerous to alter or modify the unit's
characteristicsinanyway.
•
The appliance must be installed in accordance
with
the relevant national legislation.
•
Alway placethe unit on a stable level floor.
•
Do not use in bathrooms or near water. Do not
keep the product where it may fall into a water
container.
•
Do not run power cord under carpeting, or cover
it with rugs or runners. Keep the cord away from
areas where it may betrippedover.
•
Should repairs be necessary, contact the nearest
authorized Repair Service Center. Unauthorized
servicingcanbe dangerous.
•
The appliance is not intended for use by persons
(including children) with reduced physical,
sensory or mental capabilities, or lack of
experience and knowledge, unless they have
been given supervision or instruction concerning
use of the appliance by a person responsible for
their safety.
Children should be supervised to ensure that
they do not play with the appliance.
•
If the power cord is damaged, it must be replaced
by the manufacturer or an authorized technical
servicecenterinordertoavoidall risk.
•
This appliance has a polarized plug (one blade
is wider than the other). To reduce the risk of
electric shock, this plug is intended to fit in a
polarized outlet only one way. If the plug does
not fit fully in the outlet, reverse the plug. If it
still does not fit, contact a qualified electrician.
Do not attempt to defeat this safety feature.
•
Donot useextensioncables.
•
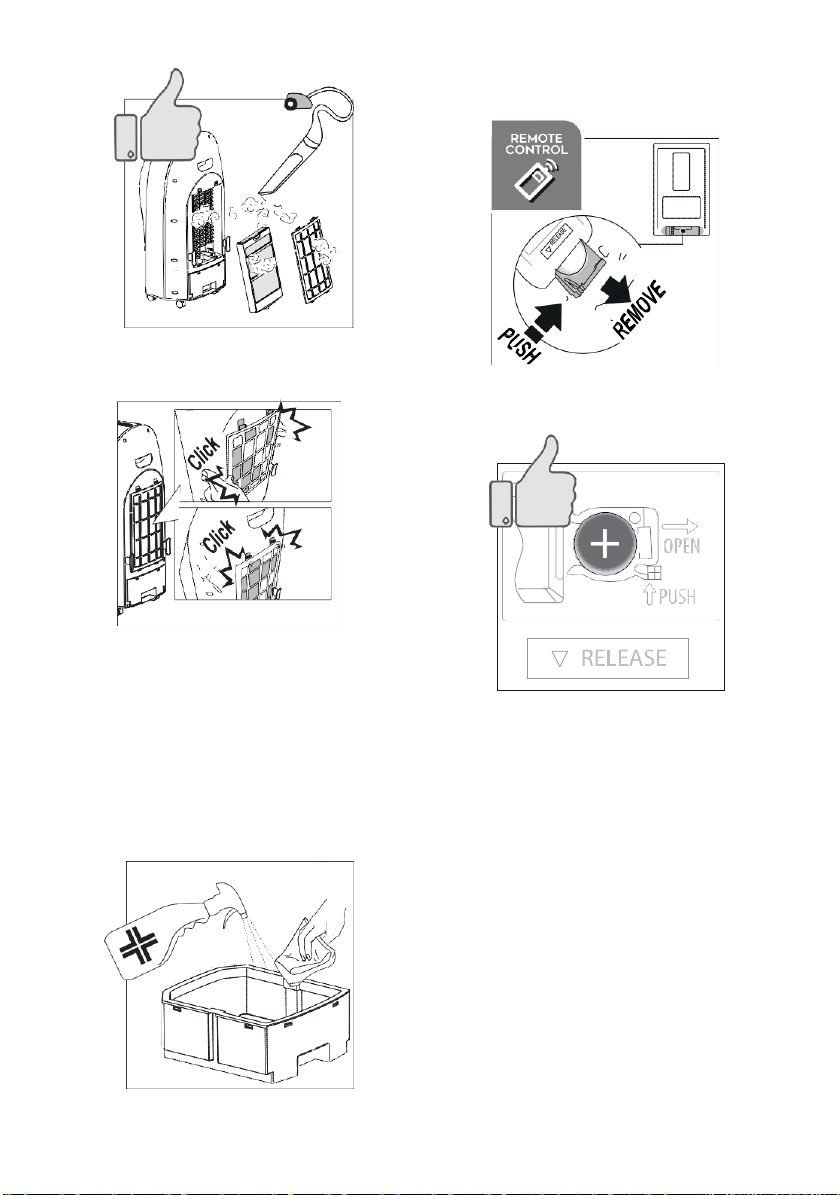
Always unplug the appliance before refilling the
watertank,cleaning,servicingorrelocatingtheunit.
•
Do not pull on or place strain on the power cord
whenmovingthe appliance.
•
The appliance should not be installed where the
atmosphere may contain combustible gases, oil
orsulphur,ornearheatsources.
•
Donotresthotorheavyobjectsontheappliance.
•
Do not insert or allow objects to enter any
ventilation or exhaust operning, as this may
damage the unit and may cause electrical shock
of fire.
•
Do not cover the appliance's air inlet or outlet, as
this may damagethe motor.
•
This equipment should be inspected frequently
and collected dirt removed from it regularly to
prevent excessive accumulation that may result
inflashover or a riskof fire.
•
Avoidusingheaters near theunit.
•
The unit should be transported with the tank
empty. Therefore, before transporting the
appliance, drain the tank.
•
Storetheunit withwater tankempty.
•
WARNING: Changes or modifications not
expressly approved by the party responsible for
compliance could void the user's authority to
operate the equipment.
•
WARNING: To reduce the risk of fire or electric
shock, do not use this appliance with any solid
statespeedcontrol device.
•
This product complies with the maximum
allowable concentration of ozone of 0.050 parts
per million by volume (ppmv) in a 24-hour
period.
Read and save these
instructions
Thisproductisforhousehold
useonly

1.
DESCRIPTION
1.1
Description of the appliance (A)
A1. Rotating vent
A2. Water level indicator
A3. Castors
A4. Power cord winder
A5. Handle
A6. Powercord
A7. Removablewater tank
A8. Filterhousing
A9. Dust filter
A10. Coolingpad
A11. Honeycomb cooling pad
A12. Ice box/pack
1.2
Descriptionofthecontrolpanel(B)
B1. ON/OFFbutton: to switchtheappliance ONandOFF
B2. Speed fan. Press to selected the desired speed:
MED,
MAX, MIN
B3. Cooler/Humidifying. Press to selectordeselect the function
B4. Press to selectthefan mode:
•
Natural : the appliance performs random ventilation
cycles at different speeds, interrupted by a few seconds of
stop
•
Sleep : the appliance runs 30 minutes at MAX speed,
then
30 minutes at MED speed: thenruns at MINspeed
B5. “Swing”mode: when pressed, the grid rotates
B6. “AUTO OFF”: press to set the delayed autooff (from1 to 24
hours):
•
When on, the symbol and the hours flash on the di-
splay for 5 seconds: when turn on steady, the auto off time
isset
•
To deactivate: press the relative button until “00”is se-
lected, then wait until the symbol and the number switch
off.
1.3
Description ofthe display (C)
C1. “Auto-off”display
C2. “Cooler/Humidifying”“ON”
C3. “Ionizer”“ON”(active in every mode)
C4. “Sleep”fan mode“ON”
C5. “Natural”fan mode“ON”
C6. “Auto-off”setting
C7. “Swing”“ON”
C8. “MIN”fan speed
C9. “MED”fan speed
C10. “MAX”fan speed
1.4
Descriptionofthe remotecontrol(D)
D1. ON/OFF:toswitchtheapplianceONandOFF
D2. “Swing”: when selected, the vent rotates
D3. “AUTOOFF”(seeB6)
D4. Fan speed (see B2)
D5. Fan mode selection (see B4)
D6. Cooler/Humidifying.Press toselector deselect the function
2.
USINGTHEAPPLIANCE
1.
Plugthe appliance in: you will hear a beep andthe applian-
ceis
ready touse;
2.
Remove the plastic tab from the battery (fig. 1);
1
3.
Toturn the applianceon, press the button ( B1 or D1).
The appliance turns on at MED fan speed and the ionizer
ison (fig. 2).
MED2
2.1
Settingfanspeed
1.
Press the button (B2 or D4);
2.
When you press the button, the fan speed changes (
MED, MAX, MIN) (fig. 3).
MAX
5
MED MIN
3

6
2.2
Cooler/Humidifying
Fill the water tank before selecting this function.
1.
Extract the water tank (fig. 4) and fill with MAX 4.5L (152
oz) of fresh tap water (do not overload the water tank: see
water level indicator A2).
6
5. Put the ice box/pack in the freezer and leave it in until it is
frozen (fig. 7);
4
2.
Put the tank back in the appliance;
3.
Press the button (B3 or D6): the corresponding light
on the display turns on (fig. 5) and the air, flowing through
the cooling pad, comes out fresh and contributes to decrea-
se the room temperature;
7
6. Put the ice box/pack vertically in the front left corner of the
tank as shown in figure 8;
5
Pleasenote:
At first use, the appliance could emit a strange odor and the
water could be discolored: this is part of normal use.
Using the ice box/pack you can increase the efficiency of the
appliance.
4.
Fill the ice box/pack with tap water (fig. 6);
8
7. Replace the water tank, turn on the appliance and select
Cooling/Humidifying: the air flow will be fresher than be-
fore (fig. 9).
Pleasenote:
Alwayscheck the Ice box/pack is correctly inserted inits housing
(see fig. 8).

7
2.4 Swing
Press the button (B5 or D2)once to activate the rotating
vent (fig. 12).
9
2.3
Selectingthe fanmode
Theappliance can be set for 3 different fan modes:
1.
NORMAL- Press the button (B2 or D4) to select the fan
speed;
2.
NATURAL - Press the MODE button (B4 or D5) once. The
appliance performs random ventilation cycles at different
speeds, interrupted by a few seconds of stop (fig. 10);
12
Press again to exit swing mode.
Thecorresponding LED turns on and off accordingly.
You can also adjust vertically the vent by lightly pushing the vent
to orientate the air flow (fig. 13): always adjust the vent when
the vent is stationary.
PAUSE
10
3.
SLEEP - Press the MODE button (B4 or D5) twice. The
ap- pliance runs 30 minutes at MAX speed, then 30
minutes at MED speed: then runs continuosly at MIN
speed (fig. 11).
13
MAX
min
x2
MED MIN
30 30
11
2.5 AutoOff
You can set the delayed shut off from 1 to 24 hours by pressing
the button (B6 or D3).
1.
Select the number relative to the operating hours desired:
the number will be shown on the display (C1);
2.
symbol flashes to highlight that you are program- ming
the auto off: when the flashing stops, the auto off is set
(fig. 14);

8
03
14
If you want to exit the “Auto off”function, repeatedly press the
button (B6 or D3) until “00”is displayed: symbol fla-
shes then disappears and“Auto Off”function is disabled.
3.
REFILLINGTHEWATERTANK
Before activating the Cooling/Humidification function, always
make sure there is water in the tank. If the water finishes during
use, the appliance makes an audible signal and the symbol
flashes on the display (fig. 15): the device will nonetheless con-
tinue to ventilate.
MAX
MIN
16
•
fully extract the tank and proceed to fill it.
Oncethe tankis filled:
•
ifnecessary, dry the tank housing;
•
check that the pump is raised;
•
carefully re-insert the water tank.
4.
CLEANINGANDMAINTENANCE
•
Always unplug the appliance before cleaning.
•
Never immerse the appliance in water.
•
Pouring water on the unit is strictly forbidden.
•
Donotuse benzine, alcohol or solvents for cleaning.
•
Do not spray insecticide liquid or similar since the plastic
could
be deformed.
•
Clean the surface of the unit with a damp cloth, never use
an abrasive scourer directly on the outside surface as it
might scratch.
4.1
Cleaning the dust filter and the cooling pad
To avoid clogging of the dustproof filter, please clean the filter
regulary. The frequency of cleaning is to be related to the wor-
king time: if used daily, it is suggested to clean filter weekly.
•
Remove the dust filter and cooling pad (fig. 17);
15
Recommendedtankfillingprocedure:
1.
Partially extract the water tank (fig. 4) and fill it with MAX
4.5l (152oz) of fresh tap water, using a jug. Always use tap
water and never overfill the tank: check the water level
indicator (A2);
2.
Put the tank back in the appliance.
Note:
If you decide to completely extract the tank:
•
extract the tank until the pump is raised (fig. 16) and wait
a few minutes for the residual water on the honeycomb
cooling pad to drip into the tank;
17
•
Remove thedust from the filter and the cooling pad using a
vacuum cleaner (fig. 18);

9
4.3 Changingthebatteryoftheremotecontrol
•
Remove the battery holder on the back of the remote con-
trol
(fig. 21);
18
•Washthoroughlythecoolingpadwithwater;thenleaveit
to completely dry and reassemble the filtersin its
housing (fig.19).
21
•
Insert one 3V CR2025 type lithium battery on the support,
checking that the polarity is correct (+ and -) (fig. 22).
19
•
To maintain the efficiency of the appliance, it is suggested
to change the cooling pad every year.
4.2
Cleaningthewatertank
Pleasenote:
Turn off unit and let sit two minutes before removing drawer to
allow excess water to drain back into tank
•
Remove the water tank (fig. 4);
•
Clean thoroughly with a cleaning sanitizer, easily available
in
stores (fig. 20).
20
22
Pleasenote:
•
If you change or dispose the remote control, the bat-
tery must be removed and disposed of according to local
recycling regulations.
•
Never throw the battery in fire as it may explode or leak
dangerous liquids.
•
This equipment has been tested and found to comply with
the limits for a Class B digital device, pursuant to part 15 of
the FCC Rules. These limits are designed to provide reaso-
nable protection against harmful interference in a residen-
tial installation.
•
This equipment generates, uses and can radiate radio fre-
quency energy and, if not installed and used in accordance
with the instructions, may cause harmful interference to
radio communications. However, there is no guarantee that
interference will not occur in a particular installation. If this
equipment does cause harmful interference to radio or te-
levision reception, which can be determined by turning the
equipment off and on, the user is encouraged to try to correct
theinterference by oneor more ofthefollowing measures:
-
Reorient or relocate the receiving antenna.

10
-
Increase the separation between the equipment and
receiver.
-
Connect the equipment into an outlet on a circuit dif-
ferent from that to which the receiver is connected.
-
Consult the dealer or an experienced radio/TV techni-
cian for help.
Changes or modifications not expressly approved by the
party responsible for compliance could void the user’s au-
thority to operate the equipment.
5.
TROUBLESHOOTING
Below is a list of some of the possible malfunctions.
•
This device complies with Part 15 of the FCC Rules. Ope-
ration is subject to the following two conditions: (1) this
device may not cause harmful interference, and (2) this
device must accept any interference received, including
interference that may cause undesired operation.
•
This Class B digital apparatus complies with Canadian
ICES-003.
If theproblemcannot be resolved as described, contact Customer Service.
PROBLEM
CAUSE
SOLUTION
Nodischarge of air
Cord is not plugged in
Make sure power cord is plugged in and the swi-
tchisON
Powerisnot ON
Turn the unit ON by pressing the button
( B1 on the control panel or D1 on the remote
control)
Theappliance switches off
The auto shutoff timer was set
Turn the appliance ON and check that the auto
shutoff symbol is off
Presence of water under the tank
When the tank is completely extracted
without waiting a couple of minutes, the
residual water on the honeycomb cooling
pad will drip into the tank housing
Dry the housing before re-inserting the tank. For
filling, follow the instructions in chap. 3.
Excessive humidity in the room
In Cooler/Humidifying function, the ap-
pliance produces moisture as a result of
evaporative cooling. This is normal
The appliance cools best in dry climates. If the
ambient humidty level is high (60% or above) re-
frain from using the cooler/humidifying function
Make sure the window/doors are open and there
is adequate cross ventilation in the room so
that the air can circulate better. Utilize the “fan”
function
Odors and coloredwater
When the appliance is new
At first use, the appliance will have an odor,
which will dissipate within a few hours of initial
use. The color in the water will also dissipate after
afewuses.
Algae or mold due to moisture. In very
damp conditions, algae may form due to
moisture
Check the Honeycomb Cooling Pad (A12), water
tank (A7) and other cooler parts. If you see mold
spots or algae issue, use a damp cloth to wipe
away the algae until all spots have disappea-
red. Make sure all parts are clean and dry before
storage. Contact Customer Service if problem
persists. If the Honeycomb Cooling Pad (A11) has
algae or mold, change it with a new one

11
PROBLEM
CAUSE
SOLUTION
Remote control does not work
Remote control battery is incorrectly in-
serted in the battery compartment
Check the battery is correctly inserted fol-
lowing the polarity guide inside the battery
compartment.
Remote control battery is exhausted
Replace with a new battery
Damaged remote control
If replacing new battery in the correct position
doesnot work, contactCustomer Service
The unit does not respond
Damaged control panel on unit
Try to activate the unit with the remote control
If the unit responds, then the control panel on
the unit may be experiencing problems: contact
Customer Service
If neither the remote control or the control panel
isworking,contactCustoner Service
If “Cooler/Humidifier” indicator
flashes and unit beeps
Because of no waterin the tank
Fill tank above MIN mark with water

12
4.
TROUBLESHOOTING
Below is a list of some of the possible malfunctions.
If theproblemcannot be resolved as described, contact Customer Service.
PROBLEM
CAUSE
SOLUTION
Nodischarge of air
Cord is not plugged in
Make sure power cord is plugged in and the swi-
tchisON
Powerisnot ON
Turn the unit ON by pressing the button
( B1 on the control panel or D1 on the remote
control)
Theappliance switches off
The auto shutoff timer was set
Turn the appliance ON and check that theautooff
symbol is shutoff
Présence d’eau sous le réservoir
Lorsqu’on extrait complètement le rés-
ervoir sans attendre quelques minutes,
l’eau résiduelle présente sur le panneau
évaporatif dégouline dans le logement
réservoir
Essuyer le logement avant de réinsérer le réserv-
oir. Pour le remplissage, toujours suivre les indi-
cations du chap. 3.
PROBLEM
CAUSE
SOLUTION
Excessive humidity in the room
In Cooler/Humidifying function, the ap-
pliance produces moisture as a result of
evaporative cooling. This is normal
The appliance cools best in dry climates. If the
ambient humidty level is high (60% or above) re-
frain from using the cooler/humidifying function
Make sure the window/doors are open and there
is adequate cross-ventilation in the room so
that the air can circulate better. Prefer the “fan”
function
Odors and coloredwater
When the appliance is new
At first use, the appliance will have an odor,
which will dissipate within a few hours of initial
use. The color in the water will also dissipate after
afewuses.
Algae or mold due to moist parts. In very
damp conditions, algae may form due to
moisture
Check the Honeycomb Cooling Pad (A12), water
tank (A7) and other cooler parts. If you see mold
spots or algae issue, use a damp cloth to wipe
away the algae until all spots have disappea-
red. Make sure all parts are clean and dry before
storage. Contact Customer Service if problem
persists. If the Honeycomb Cooling Pad (A11) has
algae or mold, change it with a new one
Remote control does not work
Remote control battery is incorrectly in-
serted in the battery compartment
Check the battery is correctly inserted fol-
lowing the polarity guide inside the battery
compartment.
Remote control battery is exhausted
Replace with a new battery
Damaged remote control
If replacing new battery in the correct position
doesnot work, contactCustomer Service

13
The unit does not respond
Damaged control panel on unit
Try to activate the unit with the remote control
If the unit responds, then the control panel on
the unit may be experiencing problems: contact
Customer Service
If neither the remote control or the control panel
isworking,contactCustoner Service
If “Cooler/Humidifier” indicator
flashes and unit beeps
Because of no waterin the tank
Fill tank above MIN mark with water

14
Advertencias
•
Use este electrodoméstico sólo como se indica
en este manual de instrucciones. Como con
cualquier electrodoméstico, las instrucciones
pretenden abarcar tantos imprevistos como
sea posible. Debe tener precaución y sentido
común al utilizar e instalar este equipo de aire
acondicionado.
•
Una vez quitado el embalaje, verifique la
integridad del aparato.
•
Este electrodoméstico se ha fabricado para
enfriar y deshumidificar el medio ambiente
domésticoynodebeusarseconotrosfines.
•
Noutilizar el aparatoen el exterior.
•
Es peligroso alterar o modificar las características
de la unidad de cualquier modo.
•
El electrodoméstico debe instalarse de
conformidad con la legislación nacional
correspondiente.
•
Ponga el aparato en una superficie estable y
plana.
•
No utilizar en baños o cerca del agua. No guarde
el producto donde pueda caer en un contenedor
deagua.
•
No deje que el cable de alimentación cuelgue
de la mesa o superficie de trabajo para evitar
enredarse o tropezarse accidentalmente con éste.
•
Para eventuales reparaciones diríjase
exclusivamente a centros de asistencia técnica
autorizados exigiendo el uso de piezas de
repuestoy deaccesoriosoriginales.
•
El aparato no puede ser utilizado por personas
(incluidos niños) con las capacidades físicas,
sensoriales o mentales reducidas o con falta de
experiencia y de conocimiento, a menos que
estén vigilados o que hayan sido instruidos
sobre el uso seguro del aparato por una persona
responsable de su seguridad. Los niños deben
ser vigilados para asegurarse de que no juegan
conelaparato.
•
En caso de daños a la clavija o al cable de
alimentación, estos deben ser exclusivamente
cambiados por la Asistencia técnica, para
prevenircualquierriesgo.
•
Este producto está equipado con una clavija de
corriente alterna polarizada (una clavija con un
polo con dimensiones mayores que las del otro).
Esta clavija se inserta sólo en un sentido en el
tomacorriente. Se trata de un dispositivo de se-
guridad. Si la clavija no entra completamente en
el tomacorriente, deberá girarla. Si tampoco así
lo consigue, solicite la intervención de un elec-
tricista para sustituir el tomacorriente obsoleto.
No intente modificar la clavija polarizada para
anularestamedidadeseguridad.
•
Evite utilizar cables de extensión debido a
potenciales riesgos a la seguridad.
•
Antes de efectuar cualquier operación de limpieza
o de
mantenimiento, desenchufe siempre la unidad
deltomacorriente.
•
No jale ni tense el cable de alimentación al mover el
electrodoméstico.
•
Elelectrodoméstico nodebeinstalarse enambientes
quepuedancontenergasescombustibles,petróleoo
azufre,nicercadefuentesdecalor.
•
No coloque objetos pesados o calientes sobre el
electrodoméstico.
•
Do not insert or allow objects to enter any ventilation
or exhaust operning, as this may damage the unit
andmaycauseelectricalshockoffire.
•
No cubra la entrada o salida de aire del aparato,
yaqueestopuededañarelmotor.
•
Este equipo debe inspeccionarse con frecuencia
y recogerse la suciedad que se extrae de él
con regularidad para evitar una acumulación
excesiva que pueda provocar una descarga
disruptivaounriesgodeincendio.
•
Eviteutilizarcalefactorescercadelaunidad.
•
La unidad debe ser transportada con el depósito
de
agua vacío. Antes de transportar la unidad,
drénela.
•
Almacenelaunidadconeltanquedeaguavacío.
•
ADVERTENCIA: Los cambios o modificaciones que
no
hayan sido aprobados expresamente por la parte
responsable del cumplimiento de especificaciones
del
electrodoméstico podrían anular la autoridad del
usuario
parautilizarelaparato.

15
•
ADVERTENCIA: No usar con cualquier aparato que
tieneuncontroldevelocidaddeestadosolido.
•
Este producto cumple con la concentración
máxima permisible de ozono de 0.050 partes
por millón por volumen (ppmv) en un período
de24horas.
Guardeestasinstrucciones
Esteproductoestádiseñadopara
uso doméstico exclusivamente
1.
DESCRIPCIÓN
1.1
Descripción delaparato (A)
A1. Rejillarotatoria
A2. Indicador del nivel deaguaen el tanque
A3. Ruedas
A4. Carretedecable
A5. Manija
A6. Cable dealimentación
A7. Depósito de aguaextraíble
A8. Soporte filtros
A9. Filtro antipolvo
A10. Soporte del panel evaporador
A11.Panelevaporador
A12. “Ice box”:Tabla de hielo
1.2
Descripción del panel de control (B)
B1. ON/OFF:paraencender yapagarel aparato
B2. Velocidad ventilación Pulse para seleccionar una de las 3
velocidades disponibles: MED, MÁX, MÍN
B3. Enfriamiento/humidificación. Pulse para activar o desacti-
var la función
B4. Seleccione la modalidad de ventilación:
•
Natural
: el aparato efectúa los ciclos de ventilación
casual a distintas velocidades, interrumpidos por varios se-
gundosdepausa.
•
Sleep
(nocturno): el aparato funciona 30 minutos a
velocidad MÁX, seguidos de 30 minutos a velocidad MED;
luegoprocede siempre a velocidad mínima.
B5. Modo“Swing”(rotación):Cuandoseselecciona,larejillagira.
B6. “AUTOOFF”(autoapagado):pulseparaconfigurarel apaga-
doretrasado (de 1 a 24horas).
•
Cuando se pulsa, en el display el símbolo y el valor
numérico parpadean unos5 segundos cuandopermanecen
encendidos el apagadoestá programado.
•
Para desactivar el ’”auto OFF”(autoapagado): pulse la tecla
hasta seleccionar “00”, a continuación espere a que se apa-
guen el símbolo y el valor numérico.
1.3
Descripcióndeldisplay(C)
C1. Visor programación“auto OFF”(autoapagado)
C2. “Enfriamiento/humidificación”activo
C3. “Ionizador”activo (siempre encendido, ya que la función
está presente en todos los modos de funcionamiento)
C4. Modo de ventilación“Sleep”(nocturno) activo
C5. Modo de ventilación“Natural”activo
C6. “Auto-off”(autoapagado) programado
C7. Modo “Swing”(rotación) seleccionado
C8. Velocidad de ventilación“MÍN”
C9. Velocidad deventilación“MED”
C10. Velocidad de ventilación“MÁX”
1.4
Descripción del mando a distancia (D)
D1. ON/OFF:paraencenderyapagarel aparato
D2. Modo “Swing”(rotación): Cuando se selecciona, la rejilla
gira.
D3. “AUTO OFF”(autoapagado) (véase B6)
D4. Velocidad de ventilación (véase B2)
D5. Seleccione la modalidadde ventilación(véaseB4)
D6. Enfriamiento/humidificación. Pulse para activar o desacti-
var la función
2.
INSTRUCCIONESDEUSO
1.
Conecte el aparato a una toma de corriente: el aparato
emite una señal acústica. La máquina está preparada para
eluso;
2.
En el primer uso, quite la lengüeta de práctica (fig. 1);
1
3.
Pulse la tecla (B1 o D1).El aparato seenciende con
velocidad de ventilación “MED”y con la “ionización”
activa (fig.
2);

16
3. Pulse la tecla (B3 o D6): el símbolo correspondiente
se enciende en el display (fig. 5). El aire atraviesa el dispo-
sitivo de enfriamiento y sale refrescada, contribuyendo de
esta forma a disminuir la temperatura del ambiente;
MED2
2.1
Seleccione la velocidad de ventilación
1.
Pulsela tecla (B2oD4);
2.
Cada vez que se pulsa la tecla, la velocidad de ventilación
cambia ( MED, MÁX, MÍN) (fig. 3).
5
MAX
Nota:
La primera vez que se utiliza esta función, el agua puede teñirse
de color: esto forma parte del funcionamiento normal del
aparato.
Para aumentar la eficiencia del aparato use la ’”Ice box”.
4. Llene la ’”Ice box”con agua del grifo (fig. 6);
MED MIN
3
2.2
Enfriamiento/humidificación
Prepare el aparato llenando el depósito de agua.
1.
Saque el depósito de agua (fig. 4) y llénelo con agua fresca
del grifo (MAX 4.5L/152 oz); utilizando una jarra, preste
atención para no superar el nivel MÁX visible en el indica-
dor de nivel (A2). El nivel MÁX asegura 6 horas de uso del
aparato;
4
2.
Vuelva a meter el depósito deagua;
6
5.
Meta en el congelador la ”Ice box”(fig. 7) y déjela dentro
hastaquesecongele;
7
6.
Saque el depósito de agua y meta la ’”Ice box”poniéndola
en el ángulo posterior izquierdo (fig. 8);

17
3. SLEEP- Pulse una vez la tecla MODE (B4 o D5). El aparato
funciona automáticamente 30 minutos a velocidad MÁX,
luego 30 minutos a velocidad MED: continúa a velocidad
MÍN (fig. 11).
x2
8
7.
Vuelva a meter el depósito de agua, encienda el aparato
y
seleccione la función “Enfriamiento/Humidificación”: el
aire
emitido por el aparato será más fresco (fig.9).
Nota:
Asegúrese de que la ”Ice box”está bien colocada en su corre-
spondiente sitio (fig. 8).
MAX
min
2.4 Swing
MED MIN
30 30 11
Pulselatecla (B5o D2) paraactivar la rotación de la rejilla
(fig. 12): en el display se enciende el correspondiente símbolo;
9
2.3 Seleccione el modo ventilación
El aparato se puede programar para funcionar en 3 modos di-
stintos de ventilación:
1.
NORMAL- Pulse la tecla (B2 o D4) para seleccionar la
velocidad de ventilación;
2.
NATURAL-PulseunavezlateclaMODE(B4oD5).Elaparato
efectúa los ciclos de ventilación casual a distintas velocida-
des,
interrumpidos por varios segundos de pausa (fig.10);
12
Para detener la rotación, pulse de nuevo la misma tecla.
El LED correspondiente se enciende y apaga en consecuencia.
La rejilla se puede inclinar verticalmente moviéndola de forma
manual para orientar el flujo de aire (fig.13): efectúe este ajuste
conla rejillaparada, sin forzar.
PAUSE
10

16
MAX
MIN
15
2.5
AutoOff
Procedimientoaconsejadoparallenareldepósito:
1.
Saque parcialmente el depósito de agua (fig. 4) y llénelo
con un MÁX de 4,5 l de agua fresca del grifo usando una
13
jarra. Use siempre agua del grifo, no sobrecargue nunca el
depósito: verifique el indicador de nivel de agua (A2);
2.
Vuelva a meter el depósito de agua.
Esposibleconfigurarel apagadoretrasadode1a 24horas:pulse
latecla (B6o D3).
1.
Pulse hasta seleccionar el número relativo a las horas de
funcionamiento deseadas: el número aparece en el display
(C1);
2.
El símbolo y el valor numérico parpadean para indi-
car
la programación en curso del autoapagado. Cuando el
símbolo
y el valor numérico permanecen encendidos fijos
significaque
laprogramación se ha salvado (fig. 14).
Nota:
Si decide sacar por completoel depósito:
•
Saque el depósito hasta elevar la bomba (fig. 16) y espere
unos minutos, hasta que el agua residual presente en el
panel evaporador gotee en el depósito;
•
saque por completo el depósito y llénelo.
03
16
Después de haberllenado el depósito:
14
Para salir del autoapagado, pulse la tecla (B6 o D3) hasta
configurar el valor numérico“00”: el símbolo y“00”parpa-
dean.Cuandoseapagan,elautoapagadosecancela
3.
LLENEELDEPÓSITODEAGUA
Antes de iniciar la función Enfriamiento/Humidificación, ase-
gúrese siempre de que hay agua en el depósito. Si el agua se
acaba durante el uso, el aparato emite una señal acústica y el
símbolo parpadea (fig. 15): en cualquier caso, el aparato
seguirá ventilando.
•
si es necesario, seque el compartimento del depósito;
•
verifique si la bomba está levantada;
•
vuelva a meter delicadamente del depósito de agua.
4.
LIMPIEZA Y MANTENIMIENTO
•
Desconecte siempre el aparato de la red eléctrica antes de
proceder a lalimpieza.
•
Nosumerja nuncael aparato en el agua.
•
Noeche nunca echeagua directamente en el aparato.
•
Noutilice nunca gasolina, alcohol o disolventes.
•
No pulverice nunca insecticidas ni sustancias similares: el
plástico podría deformarse.
•
Limpie la superficie del aparato con un paño suave, no uti-
lice nunca esponjas abrasivas, porque la superficie podría
24 rayarse.

25
4.1 Limpieelfiltroantipolvoyelpanel
evaporador
Limpie con regularidad el filtro antipolvo. La frecuencia con la
que efectúa la limpieza debe establecerse de acuerdo con el
tiempo de uso: si se utiliza cotidianamente se aconseja limpiar
el filtro todas las semanas.
•
Saque el filtro antipolvo y el soporte del panel evaporador
(fig.17);
4.2
Limpieeldepósitode agua
Nota:
Apague el aparato y déjela reposar durante dos minutos antes de
retirar el cajón para permitir que el exceso de agua vuelva al tanque.
•
Saqueel depósitodeagua;
•
Limpie meticulosamente con un detergente higienizante,
disponible en el mercado (fig.20).
20
17
•
verifique si la bomba está levantada;
•
Quiteel polvo de los filtroscon un aspirador (fig. 18); •vuelva a meter delicadamente del depósito de agua.
4.3
Cambiodelabateríadelmandoadistancia
•
Saque el soporte de la batería en la parte posterior del
mando a distancia (fig. 21);
18
•
Lave cuidadosamente con agua el soporte del panel evapo-
rador; a continuación déjelo secar por completo y vuelva a
poner los filtros en su sitio (fig.19).
21
•Introduzcaunabatería detipo3VCR2025 enelsoporte
prestandoatenciónaquelapolaridadseacorrecta(+y-
)yvuelvaaintroducirlo(fig.22).
19
Para mantener la eficiencia del aparato se aconseja cambiar el
panelevaporador cadaaño.
22

26
Pleasenote:
•
If you change or dispose the remote control, the bat-
tery must be removed and disposed of according to local
recycling regulations.
•
Never throw the battery in fire as it may explode or leak
dangerous liquids.
•
This equipment has been tested and found to comply with
the limits for a Class B digital device, pursuant to part 15 of
the FCC Rules. These limits are designed to provide reaso-
nable protection against harmful interference in a residen-
tial installation.
•
This equipment generates, uses and can radiate radio fre-
quency energy and, if not installed and used in accordance
with the instructions, may cause harmful interference to
radio communications. However, there is no guarantee that
interference will not occur in a particular installation. If
this equipment does cause harmful interference to radio or
television reception, which can be determined by turning
the equipment off and on, the user is encouraged to try to
correct the interference by one or more of the following
measures:
-
Reorient or relocate the receiving antenna.
-
Increase the separation between the equipment and
receiver.
-
Connect the equipment into an outlet on a circuit differ-
ent from that to which the receiver is connected.
-
Consult the dealer oran experienced radio/TV technician
for help.
Changes or modifications not expressly approved by the
party responsible for compliance could void the user’s au-
thority to operate the equipment.
•
This device complies with Part 15 of the FCC Rules. Ope-
ration is subject to the following two conditions: (1) this
device may not cause harmful interference, and (2) this
device must accept any interference received, including
interference that may cause undesired operation.
•
This Class B digital apparatus complies with Canadian
ICES-003.
5.
SIALGONO FUNCIONA
Below is a list of some of the possible malfunctions.
If theproblemcannot be resolved as described, contact Customer Service.
PROBLEMA
POSIBLE CAUSA
SOLUCIÓN
El aparato no se enciende
El cable de alimentación no está
conectado
Asegúrese de que el cable de alimentación está
conectado y de que hay corriente
El aparato noestáencendido
Encienda el aparato pulsando la tecla
(B1 en el panel de control o D1 en el mando a
distancia)
El aparato se apaga
El autoapagado se ha activado
Encienda el aparato y asegúrese de que el símb-
olode autoapagado estáapagadoen el display
Presencia de agua debajo del
depósito
Si se saca del todo el depósito sin esperar
unos minutos, el agua residual presente
en el panel evaporador gotea en el com-
partimento del depósito
Seque el compartimento antes de volver a meter
el depósito. Para llenarlo siga siempre las indica-
cionesdel cap. 4.
Humedad excesiva en la
habitación
Cuando se usa la función enfriamiento/
humidificación, el aparato produce hu-
medad por efecto del refrescamiento
evaporador.Esnormal
El aparato refresca con más eficiencia en los cli-
mas secos. Si el nivel de humedad es alto (60%
y más), es mejor evitar el uso en la función
enfriamiento/humidificación
Asegúrese de que las ventanas/puertas están
abiertas y de que haya bastante aire corriente en
la habitación; a fin de que el aire pueda circular
mejor, es posible en todo caso utilizar el aparato
en la función ventilación
Other manuals for EV250
1
Table of contents
Languages:
Other DeLonghi Freezer manuals

DeLonghi
DeLonghi DSBSDIX17 User manual

DeLonghi
DeLonghi DFCD60W17 User manual

DeLonghi
DeLonghi DFC60W17 User manual

DeLonghi
DeLonghi DSBSDX19G Service manual

DeLonghi
DeLonghi DFC60W16 Service manual

DeLonghi
DeLonghi D4D394X19N User manual

DeLonghi
DeLonghi DSBSDX16 Service manual

DeLonghi
DeLonghi F6ST82A User manual