DELPHIE Safewatch Premium User manual

Safewatch Premium
User manual
English

Innehåll
1. Content of the package ...............................................................................................................3
2. Read first: Safety information......................................................................................................4
3. Importen information .................................................................................................................4
4. Before you start using Delphie Safewatch ...................................................................................4
4.1 Step 1- Remove the clock from the package ........................................................................4
4.2 Step 2 –Insert SIM-card.......................................................................................................5
4.3 Step 3 - Charge ....................................................................................................................5
5. Start using your watch.................................................................................................................5
5.1 Start your watch..................................................................................................................5
5.2 Check that the safety alarm works.......................................................................................6
6. Settings.......................................................................................................................................6
6.1 Enter settings ......................................................................................................................6
6.2 Exit settings.........................................................................................................................7
6.3 Enter emergency number....................................................................................................7
6.4 Enter SMS number...............................................................................................................7
6.5 Change your personal settings.............................................................................................7
6.5.1 Change language..........................................................................................................8
6.5.2 Automatic fall-alarm ....................................................................................................8
6.5.3 Sound (alarm and low battery-level) ............................................................................8
6.5.4 Sensitivity ....................................................................................................................8
6.5.5 GPS-tracking ................................................................................................................9
6.5.6 Battery saver ...............................................................................................................9
6.5.7 Manual alarm ..............................................................................................................9
6.5.8 Automatic-answering...................................................................................................9
6.5.9 Adaptiv function ..........................................................................................................9
6.6 When you change settings.................................................................................................10
7. Turn off/ Restart the watch.......................................................................................................10
7.1 Aarm .................................................................................................................................10
7.1.1 Generel about alarms. ...............................................................................................10
7.1.2 Manual alarm ............................................................................................................10
7.1.3 Automatic alarm........................................................................................................10
7.1.4 Cancel an alarm .........................................................................................................11
7.2 Automatic answering.........................................................................................................11
7.3 GPS-tracking......................................................................................................................11
7.4 Adaptiv function................................................................................................................11

7.5 Watch dial. ........................................................................................................................12
8. Safety instructions ....................................................................................................................12
8.1 Area of use..............................................................................................................................12
8.2 Medicinsk utrustning...............................................................................................................12
8.3 Medical implants.....................................................................................................................13
8.4 Areas with risk of explosion.....................................................................................................13
8.5 Litium-polymer battery ...........................................................................................................13
8.6 Network services and costs. ....................................................................................................13
9. Care and maintenance ..............................................................................................................13
10. Specification..........................................................................................................................14
11.1 Content copyright .................................................................................................................14
11.2 ..............................................................................................................................................15
1. Content of the package
•Delphie Safewatch
•USB-cord
•Quick-start guide
•Screwdriver

•Extra screws
2. Read first: Safety information
Always read and obey safety information marked with this symbol.
•Use only supplied and / or approved accessories. The use of non-approved accessories can
cause performance problems and malfunctions.
•The safety clock must be used in the prescribed manner, in case of deviating handling, the
user must be aware that it can lead to damage to the product.
•Keep in mind that it is your personal sensitivity settings that affect whether or not the watch
will feel a fall.
3. Importen information
All systems using radio and network communication are subject to interference that the user has no
influence over. The user must be aware that the watch may lose network coverage due to operator
interference or poor coverage which may cause the watch to malfunction.
This is not something that Delphie can afford and you are advised in this situation to contact your
operator to get further information about the network disturbances and check coverage where you
should use the watch.
Information in this document may become obsolete without notice. The only guarantees that apply
to Delphie's products and services are those specified specifically in the warranty terms
accompanying these products and services. Nothing in this document may be construed as a
warranty. Delphie is not responsible for any technical errors, typographical errors or omitted text in
this document.
4. Before you start using Delphie Safewatch
4.1 Step 1- Remove the clock from the package
The first step is to remove the watch from the packaging and review the items and equipment
included in the delivery. Be sure to read through the user manual to familiarize yourself with the
equipment and basic functions of the watch.
•The included items are for this device only and may not be compatible with other devices.
•Appearance and specifications are subject to change without notice.
•Only use chargers and accessories that have been approved for use with the particular
model. Connecting other accessories can be dangerous.
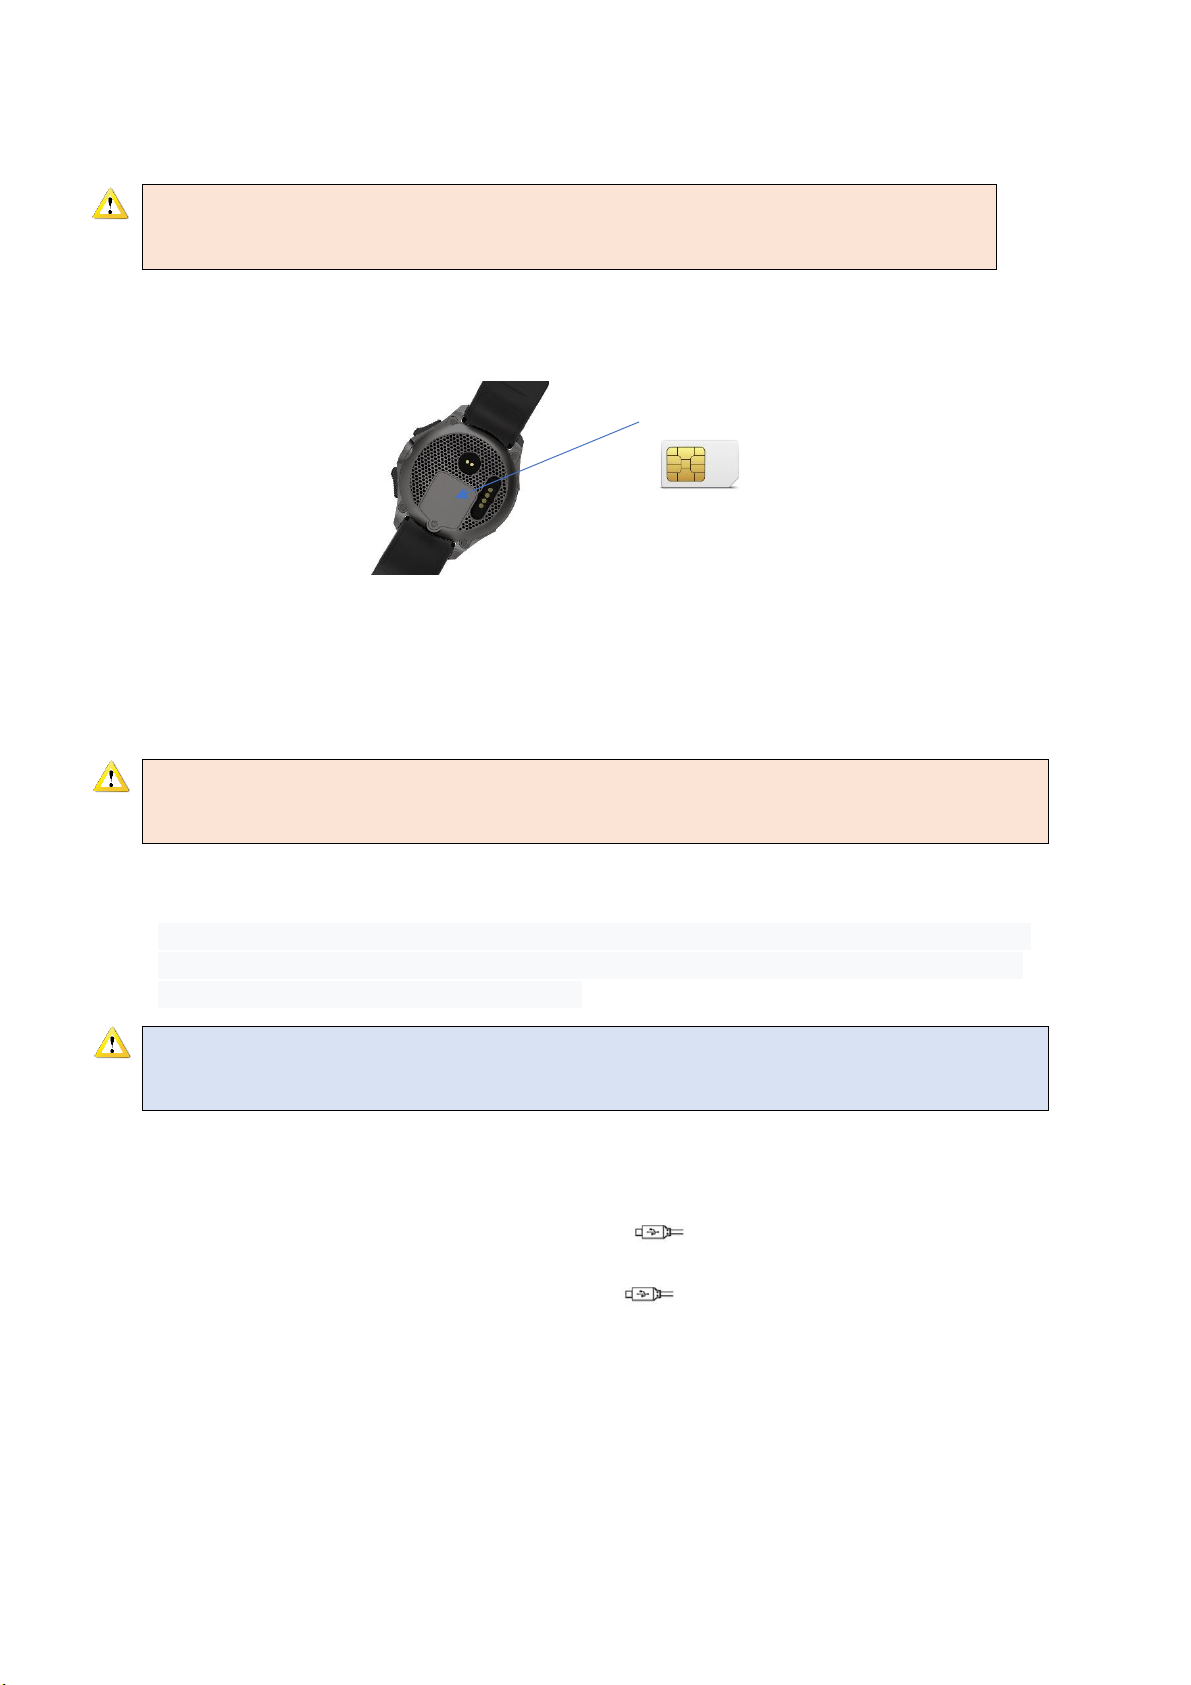
4.2 Step 2 –Insert SIM-card
First, remove the SIM card slot located on the back of the watch with accompanying screwdriver.
SIM-card holder
Insert any SIM card by sliding the metal cover to the side with your thumb and folding it up. Place
the SIM card in the holder, fold down the cover and slide it back with your thumb. Then re-insert
the SIM card cover and tighten it with the screwdriver.
Important!
This watch is only compatible with Nano SIM. Using incompatible SIM card can damage the
device.
4.3 Step 3 - Charge
It is important to load your watch properly before using it for the first time. Although the watch is
supplied with enough charge to be turned on immediately, we recommend that you charge it for
at least 2 hours before using it for the first time
Please note!
The watch contains lithium battery which may require several longer charge cycles in the
beginning to allow the battery to reach full performance.
•Insert the part of the cord with the magnetic dots against the back of the watch with the
corresponding dots.
•Insert the other end of the supplied USB cable into the wall socket that you plug into
a wall outlet.
•You can also connect the supplied USB cable to a USB port on your computer. In
general, charging goes faster directly into a wall outlet.
5. Start using your watch.
5.1 Start your watch.
Important!
The watch must always be switched off when you insert and remove the SIM card,
otherwise you risk destroying the product.

After you have prepared the watch in agreement with the above mentioned instructions, you can
start the watch when it is fully charged.
You do this by holding the top button to the right for about 2 seconds.
Press on the upper button to start your watch.
Important!
Note that by starting Delphie Safewatch forthe first time, you accept Delphie´s integrity policy.
5.2 Check that the safety alarm works.
To know that your security clock is working properly, you should test it for the first time by pressing
the bottom button for 2 seconds. You should let the clock count down and not interrupt the alarm.
The clock will dial a pre-programmed number. When you hear the voice message on your watch,
you know your watch is working properly.
When you see that the security alarm works correctly, you can start putting your own personal
settings to use the clock according to your needs in agreement with the chapter below.
Press down the lower button during 1 second to trigger alarm.
6. Settings
6.1 Enter settings
•Press with your finger on the "Delphie" logo on the watch dial for at least 1 seconds and then
remove your finger.
•Enter PIN "1, 2, 3" and then press the green icon to the right of the numbers.
•In the next step, press "Unlock" on the blue half of the dial.
Press on the ”Delphie” logo to enter the settings.

Warning!
You cannot alarm while in settings.
Please note!
The watch is equipped with a PIN code protection to prevent undue change of settings.
6.2 Exit settings
To get back to your home screen on the watch, you can at any time press any button so the side of
the clock to exit the settings.
6.3 Enter emergency number
•To enter the emergency number press the ”Delphie” logo and enter the PIN.
•Then press “Select Emergency Contact”
•Enter your emergency contact with the numbers and press the green icon to the right of
the numbers when you are done.
•Press “Save contact” on the green half of the clock (hold down at least 1 second).
•Done.
Tip!
Always enter the full international number with prefix. (for example +46)
6.4 Enter SMS number.
If you want SMS and position to be sent to a different phone number than your emergency contact,
enter it as an SMS contact. If no SMS number is entered, position and SMS will be sent to the given
emergency number.
•To enter SMS contact, press the SMS icon.
•Then press "Select SMS contact", hold your finger on the icon for at least 1 second and then
release.
•Enter your emergency contact with the numbers and press the green icon to the right of the
numbers when you are done.
•Press "Save SMS Contact" on the green half of the clock (hold down at least 1 second).
•Done.
6.5 Change your personal settings.
Press the icon to change your personal settings.

6.5.1 Change language
The clock automatically selects the language that applies to your SIM card. If you want another
language, select it here.
You can choose 5 languages:
• Danish
• Swedish
• German
• Polish
• English
6.5.2 Automatic fall-alarm
You can choose to have automatic fall alarm enabled or disabled
On / Off
6.5.3 Sound (alarm and low battery-level)
You can choose whether you want the watch to have sound on alarm or be silent and only vibrate.
On/ Off
6.5.4 Sensitivity
Here you choose how sensitive you want the watch to be when it detects fall.
•High
•Medium
•Low
Please note!
If you have chosen ”High” sensitivity, this can increase more false alarms.
Thereforem this level of sensitivity is recommended for those who have a high fall
risk or want to feel extra safe.
Please note!
When the automatic fall-alarm is turned off, the watch will NOT alarm
automatically in case of a fall accident.
Warning!
If you have chosen ”Low” as a standard in you settings you must be aware that the
watch may not detect some fall accidents.

6.5.5 GPS-tracking
You can choose to turn on or off the GPS positioning for alarms. If it is off, the specified SMS
contact will only receive SMS with the text "Manual alarm" or "Automatic alarm" but without
GPS coordinates.
On / Off
Please note!
GPS works best outside, and can get inferior positioning indoors.
6.5.6 Battery saver
With the help of "Battery-saving mode" you can extend your watch's battery life. The battery
saving mode switches off all radio communication, which means that you cannot contact the clock
until an alarm has gone off.
On / Off
Warning!
It is NOT possible to have ”Automatic-answering” and ”Battery saving mode” switched on at the
same time.
6.5.7 Manual alarm
You can choose to turn on or off the manual alarm function.
On/ Off
6.5.8 Automatic-answering
You can choose to turn on or off the automatic-answering.
On/ Off
6.5.9 Adaptiv function
You can choose to turn on or off the adaptic function to the fall-alarm.
On/ Off
When you have this function activated, this means that the clock saves the acceleration pattern
from previously interrupted automatic alarms. These are stored in a database where the watch
can compare the next possible case against and determine if it is a common occurrence for the
individual or a possible fall.
6.5.9.1 Reset your adaptive function.
If you want to delete previous stored false alarms, then you have to turn off the ”Adaptive
function” and then turn off / restart the clock. After that the database is cleared and has no
previously saved data of interrupted false alarms and you have the opportunity to start learning
your watch from scratch.
Please note!
The watch draws more battery when positioning is turned on. However, it is only during the 10
minutes that the watch is searching for position after an alarm has been triggered.
Please note!
It may take longer time for the clock to connect a call after an alarm has been trigged when
”Battery saving mode” is On.

6.6 When you change settings.
After changing your settings, it is important that you turn off your watch and then turn it back on,
in order for the settings to work. Do this according to the instructions below.
7. Turn off/ Restart the watch
You turn off your watch by pressing the top button for at least 1 second.
When you have pressed the button you will get 3 options on the screen.
”Turn off”
”Restart”
And ”Cancel”, that you can press anytime when you want to return to the watch dial.
7.1 Aarm
7.1.1 Generel about alarms.
If a manual or automatic alarm has been triggered, the clock display will light up and show a
countdown until the alarm goes off, this in order for the user to have the possibility of interrupting
an accidentally triggered alarm.
The countdown starts in 10 seconds if it is a manual alarm while the automatic starts in 20 seconds.
If the countdown reaches 0, the following will occur:
•The watch will search for mobile coverage for a maximum of 10 minutes to connect
calls to the specified emergency number.
•The watch will look for GPS position for a maximum of 10 minutes. If a position with a
precision of 101m or less has been found after this, the position will be sent.
Otherwise, the position will be described as unknown in the sent SMS to the SMS
contact.
7.1.2 Manual alarm
•To trigger a manual alarm, press one of the buttons on the side of the clock for at least 1
second and then release the button.
•The clock will start to sound through sound and vibration and count down from 10 seconds,
which you can follow on the display.
Press the lower button to trigger an alarm.
7.1.3 Automatic alarm
The clock has a built-in automatic function which detects possible fall-accidents via the built-in

sensor hub. In order for it to work, the function "Automatic alarm" must be ON in the settings.
You can also set your individual sensitivity (see section 6.5.4).
The clock starts an automatic alarm when it detects a possible case by measuring the G-force in the
user's movement.
Please note!
The watch may have a delay of uo to 1½ min from discovering a case to start an alarm.
7.1.4 Cancel an alarm
To cancel an ongoing alarm you have to press on the bottom half of the dial, with the text
”Cancel alarm” and then release your finger.
7.2 Automatic answering
If you have the function "Automatic answering" turned on, this means that the number you
specified as emergency contact can call your clock without you having to answer. The call will be
answered automatically.
This means that the emergency contact can call your clock at any time and talk to you and hear you
and your surroundings without you actively answering.
7.3 GPS-tracking
If you use the function "GPS-tracking" this means that the watch will only position you after an
alarm has passed.
After an alarm has been triggered the watch will search for its position with the help of wifi, mobile
masts and GPS. The clock will look for its position for a maximum of 10 minutes, as soon as a
position with a precision of 100m or better has been found, it will be sent in the sms, If the
precision is worse than 100m or if the clock does not find any position, this will be sent with the
text message when the 15 minutes have passed.
Please note!
Functions that determine geographical position are provided ”in existing condition”. No
guarantees are given that such information is correct. It is not possible to guarantee that location-
based information used by the watch can be delivered whitout interuption or error, and it may
also depend on network availabilty. Note that the function can be limites or completley ceased to
function in certain environments, for example in certain buildings.
7.4 Adaptiv function
This function is created for you to use to learn the clock what is commonly occurring
movement patterns in your everyday life.
Please note!
An automatic alarm cannot be triggered if there is already an ongoing alarm.

When you have this feature enabled the watch will save accelerations from previously
interrupted alarms in a database. When the clock detects a new fall it will check if the motion
pattern has categorized as "false alarm" earlier or not.
Please note!
If you click away a high number of false alarm, it may happen that the clock will not detect a
fall that is similar to the previously interrupted alarms. Thererfore, it is recommended to
clear the database from previously stored false alarms at regular intervals, see section
”6.5.9.1 Reset you adaptive function”
7.5 Watch dial.
The clock has an OLED display, on which shows the current time in analog form. The display can be lit
by making a movement where the user directs the display to the face by rotating the arm from the
display pointing to all directions except about 45 degrees with the down side (not underside) down.
The screen will turn off automatically within 20 seconds. The display can also be lit by a quick press of
the top physical button on the clock.
The dial indicates and transmits information to the user by displaying different icons in a blue circle
on the lower part of the watch face.
Icons displayed change every 5 seconds, these are:
- Current battery level.
- The company's logo.
- Day of the month.
8. Safety instructions
Warning!
The package may contain small parts. Be sure to keep all equipment out of the reach of small
children. The USB-cord should be close to the equipment and easily accessible.
8.1 Area of use
As a user, you must follow the rules and laws that apply to you and always switch off the clock in
places where it may not be used or may cause interference or risk.
The watch contains magnetic parts.
The watch can attract metal objects.
Do not store credit cards or other magnetic objects near it. There is a risk that the information stored
on them is deleted.
8.2 Medicinsk utrustning
Use of radio transmitting equipment may interfere with insufficiently protected medical equipment.
Contact a physician or the manufacturer of the equipment to determine if it has sufficient protection
against external radio signals or if you have any questions.

Always turn off your watch if there is any information on this at health care facilities of various kinds.
Hospitals and other healthcare facilities sometimes use equipment that may be sensitive to external
radio signals.
8.3 Medical implants
To prevent potential interference, medical implant manufacturers recommend a minimum distance
of 15 cm between cordless telephones (including a clock with a built-in mobile phone) and implants.
People who have a medical implant should:
•Always keep the watch at a distance of at least 15 cm from the implant.
•Do not store the watch in the chest pocket
If you suspect that interference is occurring, immediately shut down the watch. If you have any
questions about the use of your watch in combination with a medical implant, please contact your
health care provider.
8.4 Areas with risk of explosion.
Always turn off the clock when in an explosion hazard area. Follow all signs and instructions.
Explosion risk is among others. in places where you are normally asked to turn off the car engine.
Within such an area, a spark can cause an explosion or fire which in turn can lead to personal injury
or even death.
Turn off the watch at gas stations and all other locations with fuel pumps and garages. Follow
regulations regarding the use of radio equipment at places where fuel is stored and sold, chemical
plants and places where blasting is in progress.
Areas with a risk of explosion are often - but not always - clearly marked. This also applies to decks
on ships, in the transportation and storage of chemicals, for vehicles that use pressure-condensed
fuels (engine gas / LPG), and in areas where the air contains chemicals or fine particles such as flour,
dust or metal powder.
8.5 Litium-polymer battery
This product contains a permanent lithium-polymer battery that you should NOT replace yourself.
8.6 Network services and costs.
Using different services can result in costs. Some of the phone's functions must be supported by the
operator and included in the subscription
This equipment is approved for use in the following networks: WCDMA (850,2100), GSM
(850,900,1800,1900)
9. Care and maintenance
The watch is a technically advanced product and must be handled with care.
• Do not expose the watch to moisture. Rain, snow, moisture and all types of liquids contain
substances that corrode electronic circuits.
• Do not use or store the watch in dusty and dirty environments.
• Do not store the watch in hot places. High temperatures can reduce the life of electronic
equipment, damage batteries, and deform or melt certain plastics.
• Do not store the watch in cold places. When the clock is heated to normal temperature,
condensation can form on the inside and damage the electronic circuits
• Never try to open the watch in any other way than those listed here.
• Avoid dropping or shaking the watch. If handled negatively, the circuits and precision mechanics
can be damaged.
• Do not use strong chemicals to clean the watch.
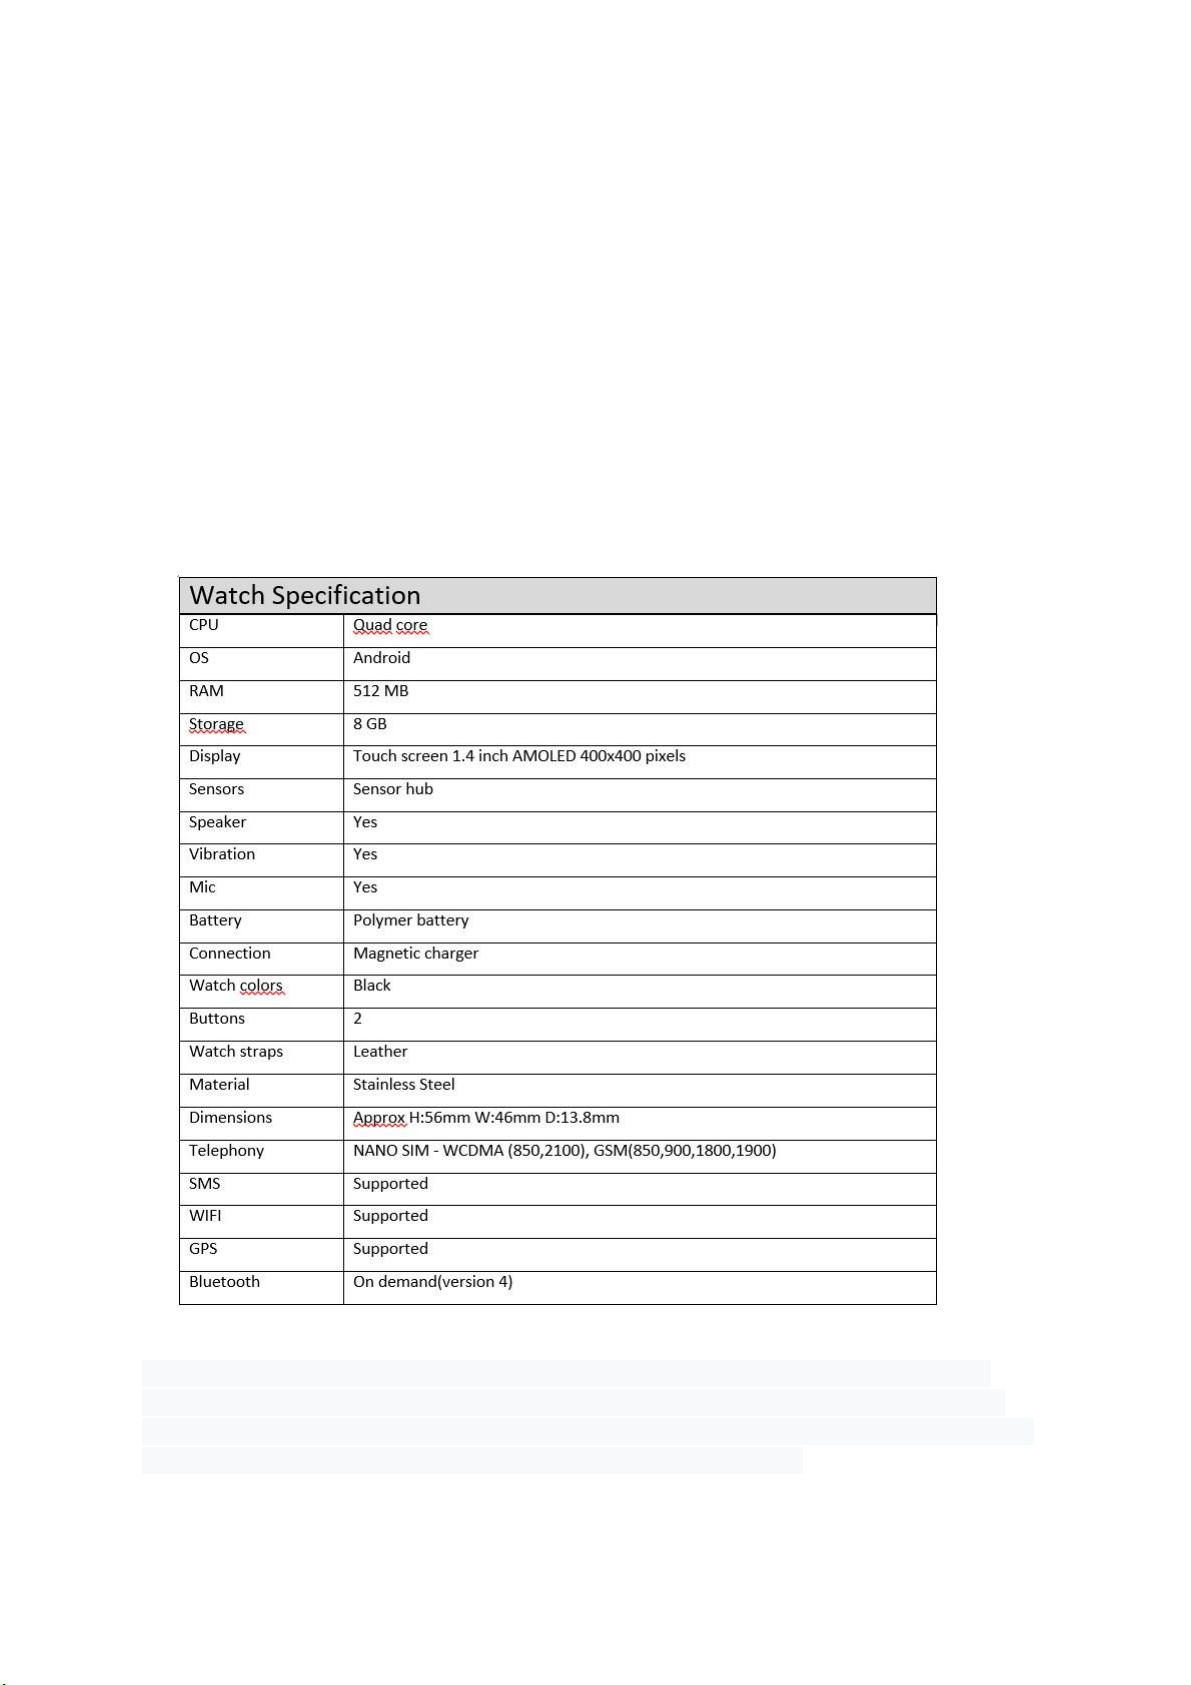
10. Specification
11.1 Content copyright
Illegal copying of copyrighted material is in violation of the copyright laws of Sweden and other
countries. This watch is intended solely for the copying of non-copyrighted material, material for
which you own the copyright or material for which you have the right or the right to copy. If you are
unsure of your right to copy any material, you should contact legal advice.

11.2 Correct disposal of the product.
(Electrical and electronic waste)
(Applies in countries with special collection systems)
This symbol on the product itself, its accessories or user manual means that the product and its
electronic accessories (eg charger, USB cable) must not be disposed of with ordinary household
waste. In order to avoid harming the environment and human health, these parts must be separately
disposed of and recycled to promote sustainable recycling of materials.
In case of questions about how and where these products should be recycled, private individuals
should contact the place of purchase or their municipality.
Companies should contact their supplier and read the terms in the purchase documentation. This
product and its electronic accessories must not be mixed with other commercial waste.
Table of contents


