DELTA DORE TYCAM 1000 User manual
2Fixation murale TYCAM 1000
5Ajoutez une caméra
111
RJ45 RJ45
22
3
2
WPS
TYDOMTYDOM TYDOM
TYCAM 1000 / 2000
www.deltadore.fr
4Application TYDOM
ON OK
1 2
Selon votre appareil, connectez-vous à Google
play ou App Store et vérifiez que vous possédez la
dernière version de l’application.
- Activez la connexion Wi-Fi de votre smartphone
ou de votre tablette. (votre smartphone ou votre
tablette doit être sur le même réseau Wi-Fi
que votre caméra)
ÊOuvrez l’application et appuyez sur l’icone
Caméra .
Ë Sélectionnez «Créer un compte»
- Remplissez les champs :
Nom, prénom, adresse email de l’utilisateur,
mot de passe, confirmez mot de passe, puis validez
.
Lorsque votre compte est créé, un mail de
confirmation est envoyé à l’adresse email renseignée.
(Si le message n’apparaît pas dans votre boîte
de réception, vérifiez les dossiers messages
indésirables et spam.)
- Appuyez sur
- L’écran de connexion apparaît affichant votre
identifiant et votre mot de passe.
1Présentation
2
1
3
5
6
4
6
4
3
2
1
TYCAM 1000 TYCAM 2000
7
8
7
3Fixation TYCAM 2000
La qualité de la connexion de votre produit peut être
altérée par différentes modifications de l’architecture IP
sur lequel il fonctionne. Ces modifications peuvent être, de
façon non limitative, un changement de matériel, une mise
à jour de logiciel ou un paramétrage, intervenants sur les
équipements de votre opérateur ou tout autre équipement
multimédia tel que tablette, smartphone, etc...» Android™
et Google play sont des marques déposées de Google Inc.
IOS™ est une marque déposée de Cisco Systems Inc.
Wi-Fi est une marque déposée par Wireless Ethernet
Compatibility Alliance. WPS (Wi-Fi Protected
Setup) est une norme créée par la Wi-Fi Alliance.
En raison de l’évolution des normes et du matériel, les
caractéristiques indiquées par le texte et les images de ce
document ne nous engagent qu’après confirmation par nos
services. Vous devez respecter la vie privée des voisins,
des visiteurs et des passants. Il est interdit de filmer la voie
publique. Vous devez également informer les personnes
travaillant à votre domicile (infirmière, baby sitter ...)
qu’elles sont susceptibles d’être filmées momentanément
pendant leur activité professionnelle. Dans ce cas, une
déclaration devra être faite auprès de la CNIL.
Avertissement
Veuillez prendre connaissance des informations
concernant la protection de la vie privée et les
dispositions réglementaires associées sur :
www.deltadore.com > Page produit TYCAM
Retrouvez plus d’informations sur la
chaine vidéo DELTA DORE :
Créer un compte
Branchement par câble réseau
(RJ45)
ÊRaccordez l’alimentation de la
caméra.
ËConnectez le câble réseau
RJ45.
Ì Dans l’application TYDOM :
- Validez
- Lorsque la caméra est trouvée
sur le réseau, appuyez sur .
Association Wi-Fi automatique
(WPS - Wi-Fi Protected Setup)
Associez la caméra à la
Box ADSL en Wi-Fi, sans
renseigner la clé de sécurité.
(Consultez la documentation
de votre Box ADSL).
ÊRaccordez l’alimentation de la
caméra.
ËAppuyez 4 secondes sur le
bouton WPS de la caméra :
- jusqu’à ce que le voyant
clignote vert (TYCAM 1000).
- Appuyez 4 secondes
sur le bouton WPS de la
caméra, relâchez, les voyants
infrarouges (vision nocturne)
clignotent (TYCAM 2000).
Ì Appuyez sur le bouton WPS
de votre BOX ADSL. (délai
maximum : 2 minutes).
ÍDans l’application TYDOM :
- Validez
- Lorsque la caméra est trouvée
sur le réseau, appuyez sur .
Association Wi-Fi manuelle
(sans WPS)
ÊRaccordez l’alimentation
de la caméra.
ËConnectez le câble réseau
RJ45.
Ì Dans l’application TYDOM :
- Validez
- Lorsque la caméra est trouvée
sur le réseau, appuyez sur
- Choisissez votre réseau
- Saisissez la clé Wi-Fi
manuellement.
- Validez
Ívous pouvez débrancher le
câble réseau de la caméra.
- Ouvrez l’application TYDOM
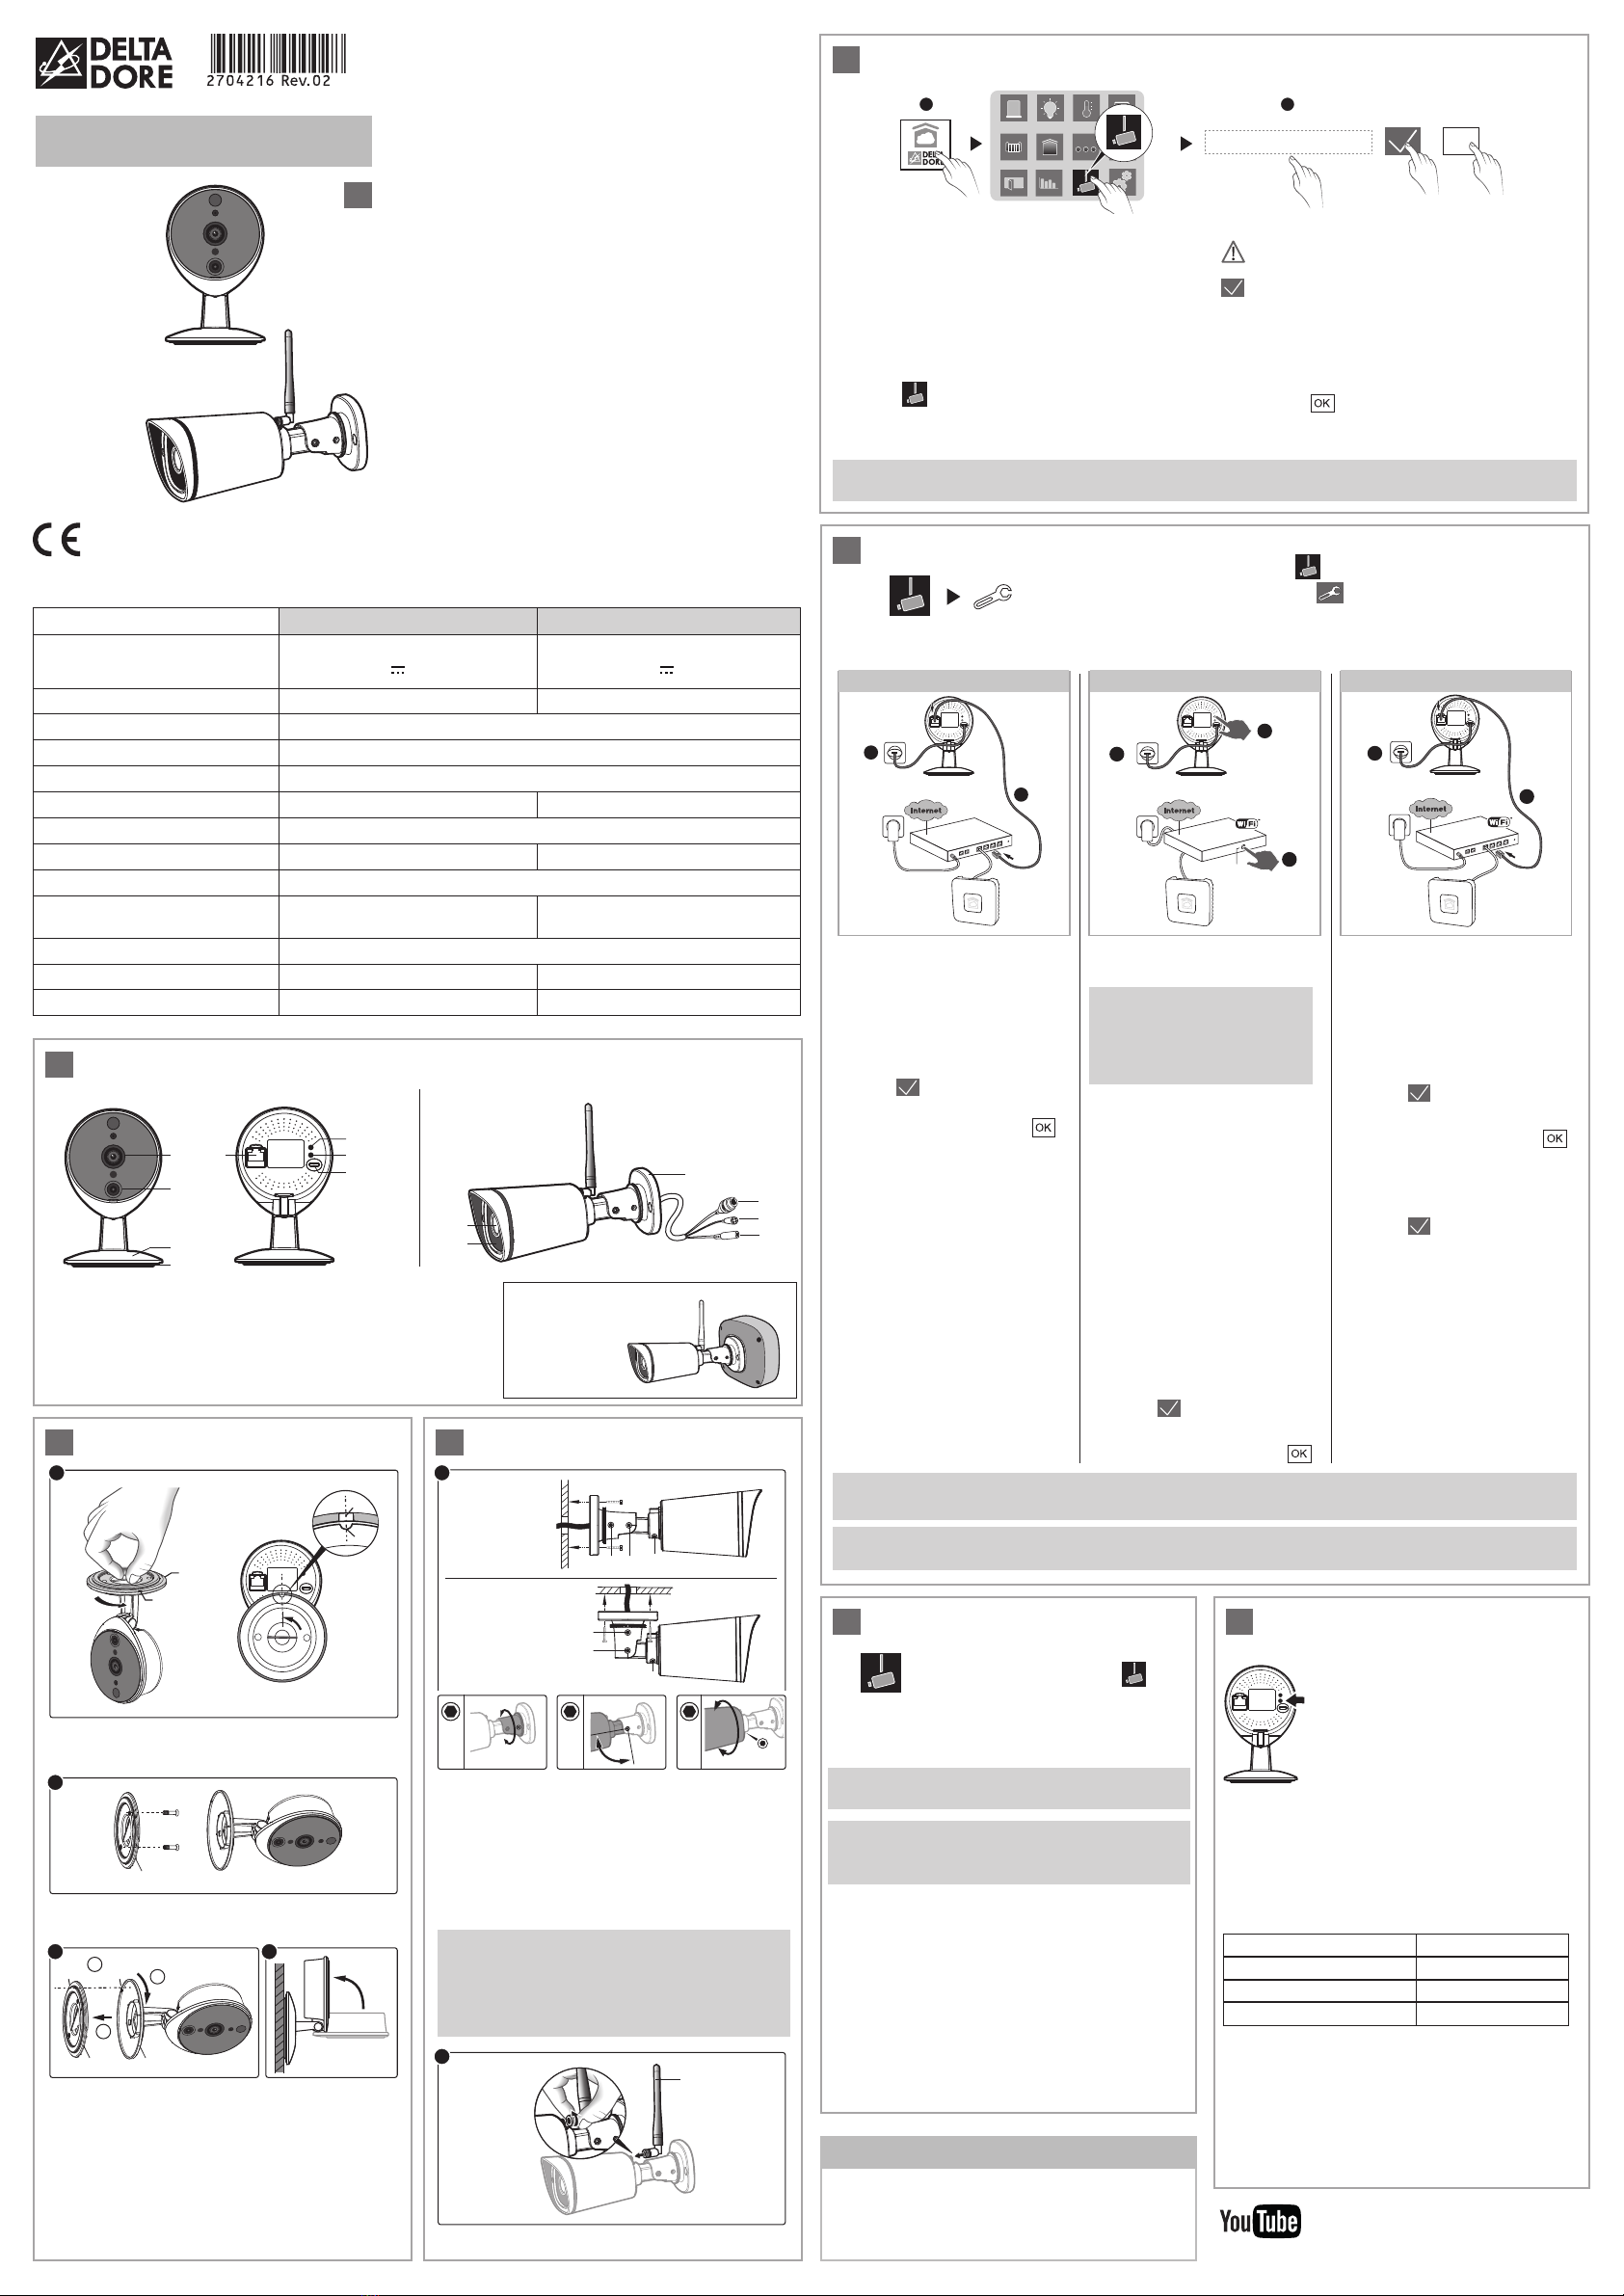
- Appuyez sur l’icone caméra .
- Appuyez sur l’icone paramètre
- Appuyez sur «Ajouter une caméra TYCAM»
- Choisissez parmi 3 options d’installation :
FR
Option 1
Caméra
BOX ADSL BOX ADSL BOX ADSL
Caméra Caméra
Option 2 Option 3
- Nommer la caméra
- Quittez le mode réglage, l’installation est terminée.
Nota : Vous disposez d’une heure pour associer la caméra à l’application, passé ce délai, débranchez puis
rebranchez l’alimentation de la caméra.
Pour garantir la sécurité de l’accès à votre caméra, choisissez un mot de passe personnel qui ne sera
connu que de vous seul.
A
A
B
BB
2
4
9
9 8
11
11
12 15
15
F
13
13
14
BA
2
3
1
3
1 1
2
360° 360°
12
14 90°
15
Ì 1- Alignez les repères A et B
2- Insérez le socle (8) de la caméra sur le
support (9).
3- Tournez le socle (8) de manière à ce que
les repères A et B ne soit plus alignés.
Í
Orientez la caméra.
ÊAlignez les repères A et B puis séparez les
deux parties Socle / Support.
ËFixez le support (9) à l’aide de vis et chevilles.
Ê - Fixez solidement le socle de la caméra à
l’emplacement choisi en utilisant des vis et
chevilles adaptées à la nature du support.
-
Desserrez les vis 11, 12, 13, 14, 15 pour orienter
la caméra à l’aide d’une clé Allen de 2,5 mm.
- Immobilisez la caméra en resserrant les vis
11,
12, 13, 14, 15
.
Fixation
murale
Fixation au
plafond
ËVissez l’antenne (F) à l’arrière de la caméra.
TYCAM 1000
Caméra
connectée
intérieure
TYCAM 2000
Caméra connectée
extérieure
L’installation de votre caméra nécessite la
présence d’un TYDOM installé et connecté à
votre BOX ADSL.
Les connexions des câbles doivent être protégées
des intempéries à l’intérieur du bâtiment ou dans
une boîte étanche (non fournie).
Le bloc alimentation secteur doit être raccordé à
l’intérieur du bâtiment.
https://www.youtube.com/user/DeltaDoreFrance
TYCAM 1000 TYCAM 2000
Alimentation
INPUT : 100-240V~ 50-60 Hz 0,3A
OUTPUT : 5V 1A
INPUT : 100-240V~ 50-60 Hz 0,5A
OUTPUT : 12V 1A
Consommation 2,5 W 2,5 W
Réseau RJ45 Ethernet 10/100Mbps
Réseau Wi-Fi Wi-Fi IEEE 802.11 b/g/n
Capteur optique / Focale 1,3” HD CMOS / f 2.8mm
Angle de prise de vue 110° 106°
Intensité lumineuse mini. 0 Lux (avec LED Infrarouge)
Vision de nuit Automatique - Portée : 8m Automatique - Portée : 20m
Résolution ÔFull HD (1920x1080)
selon la qualité de la connexion
Température d’utilisation et humidité -10°C / +55°C
10% ~ 80% sans condensation
-10°C / +60°C
10% ~ 80% sans condensation
Température de stockage et humidité -20°C / +60°C - 0% ~ 90% sans condensation
Indice de protection - IP 66
Dimensions 76x76x121 97x67x64
Avertissement TYCAM 2000 :
Cet appareil est un appareil de classe A.
Dans un environnement résidentiel, cet appareil peut
provoquer des brouillages radioélectriques. Dans ce
cas, il peut être demandé à l’utilisateur de prendre des
mesures appropriées.
6Supprimez une caméra 7Diagnostic
Etat des voyants TYCAM 1000
Débit ADSL
- Ouvrez l’application TYDOM
- Appuyez sur l’icone camera .
- Sélectionnez la caméra à supprimer
- Appuyez sur «Supprimez la caméra»
- Validez
Effacez l’association Wi-Fi
TYCAM 1000
Appuyez 15 secondes sur le bouton WPS de la
caméra jusqu’à ce que le voyant clignote rouge.
TYCAM 2000
Appuyez 15 secondes sur le bouton WPS / RESET
jusqu’à ce que les voyants infrarouges (vision
nocturne) s’allument puis s’éteignent.
- Rouge : Non connecté au serveur
- Vert : Connecté au serveur en
Ethernet.
- Vert clignotant (rapide) :
Association WPS en cours
- Vert clignotant (lent) :
Connecté en Wi-Fi.
La suppression d’une caméra nécessite d’être
connecté au compte de création initial.
Pour garantir votre sécurité, en cas de perte de
vos identifiants, seul le service technique peut
supprimer une caméra associée à un compte.
Le débit ADSL peut varier suivant la qualité de la
ligne et de son utilisation. La résolution de la caméra
doit être adaptée en fonction du débit disponible.
En cas de difficulté de connexion à distance, modifiez
la résolution de votre caméra dans l’application.
Réglage de la résolution
Débit utilisé
Haute 600
Moyenne 300
Basse 150
La box ADSL nécessite 100 kbit/s pour son propre
fonctionnement.
Exemple :
Vous disposez d’un débit de 650 kbit/s, réglez la
résolution de votre caméra en qualité moyenne.
Si vous disposez d’un débit de 1Mbit/s et possédez 4
caméras, vous pourrez visualiser simultanément vos 4
caméras en basse résolution.
1. Objectif
2. LED infrarouge (vision nocturne)
3. Connecteur Réseau RJ45
4. Bouton WPS / RESET
5. Voyant Status
6. Alimentation
7. Socle
8. Support
Boîtier de raccordement
étanche (option)
Réf. 6417005

2TYCAM 1000 wall mount
5Add a camera
111
RJ45 RJ45
22
3
2
WPS
TYDOMTYDOM TYDOM
TYCAM 1000 / 2000
www.deltadore.com
4TYDOM application
ON OK
1 2
According to your device, login to Google play
or App Store and check that you have the latest
version of the application.
- Activate the Wi-Fi connection of your smartphone
or your tablet. (your smartphone or tablet must be
on the same Wi-Fi network as your camera)
ÊOpen the application and press
the Camera icon .
Ë Select “Create an account”
- Fill in the fields:
Last name, first name, user’s email address,
password, confirm password, then confirm .
When your account is created, a confirmation email
is sent to the email address entered
(If the message does not appear in your mailbox,
check the junk e-mail and spam folders).
- Press
- The login screen appears displaying your identifier
and your password.
1Presentation
2
1
3
5
6
4
6
4
3
2
1
TYCAM 1000 TYCAM 2000
7
8
7
3TYCAM 2000 mounting
The connection quality of your product may be affected
due to changes on the IP architecture on which it
operates. These changes may involve (the list is not
exhaustive) a change in hardware, software update
or configuration operations, work on your operator’s
equipment or any other multimedia devices such as
tablets, smartphones, etc.’ Android™ and Google play
are Google Inc trademarks. IOS™ is a Cisco Systems
Inc trademark.
Wi-Fi is a Wireless Ethernet Compatibility Alliance
trademark. WPS (Wi-Fi Protected Setup) is a standard
created by the Wi-Fi Alliance.
Because of changes in standards and equipment, the
characteristics given in the text and the illustrations in
this document are not binding unless confirmed.
You must respect the privacy of neighbours, visitors and
passers-by. It is prohibited to film the public highway.
You also have to inform any persons working in your
home (nurse, baby-sitter, etc.) that they are likely to be
filmed temporarily while working. In this case, you will
have to issue a declaration to the CNIL (French data
protection authority)
.
More information is available on the
DELTA DORE video channel:
Create an account
Connection by network cable
(RJ45)
ÊConnect the camera power
supply.
ËConnect the RJ45 network
cable.
Ì In the TYDOM application:
- Confirm
- When the camera is found on
the network, press .
Automatic Wi-Fi association
(WPS - Wi-Fi Protected Setup)
Associate the camera with
the ADSL Box in Wi-Fi
mode, without entering the
security key. (Consult the
documentation of your ADSL
Box).
ÊConnect the camera power
supply.
ËPress the WPS button of the
camera for 4 seconds:
- until the LED flashes green
(TYCAM 1000).
- Press the WPS button of the
camera for 4 seconds, release,
the infrared LEDs (night vision)
flash (TYCAM 2000).
ÌPress the WPS button of your
ADSL BOX. (maximum period:
2 minutes).
ÍIn the TYDOM application:
- Confirm
- When the camera is found on
the network, press .
Manual Wi-Fi association
(without WPS)
ÊConnect the camera power
supply.
ËConnect the RJ45 network
cable.
ÌIn the TYDOM application:
- Confirm
- When the camera is found on
the network, press .
- Choose your network
- Enter the Wi-Fi key manually.
- Confirm
ÍYou can unplug the network
cable of your camera.
- Open the TYDOM application
- Press the Camera icon .
- Press the setting icon
- Press ‘Add a TYCAM camera’
- Select from among 3 installation options:
EN
Option 1
Camera
ADSL Box ADSL Box ADSL Box
Camera Camera
Option 2 Option 3
- Name the camera
- Exit the setting mode, the installation is complete.
Note: You have one hour to associate the camera with the application, after this time, unplug then reconnect
the power supply of the camera.
To ensure secure access for your camera, choose a personal password that will be known only to you.
A
A
B
BB
2
4
9
9 8
11
11
12 15
15
F
13
13
14
BA
2
3
1
3
1 1
2
360° 360°
12
14 90°
15
TYCAM 1000
Indoor
connected
camera
TYCAM 2000
Outdoor
connected
camera
The installation of your camera requires the
presence of a TYDOM installed and connected
to your ADSL BOX.
The cable connections must be protected from
bad weather within the building or in a sealed unit
(not supplied).
The power supply unit must be connected within
the building.
https://www.youtube.com/user/DeltaDoreFrance
TYCAM 1000 TYCAM 2000
Power supply
INPUT : 100-240V~ 50-60 Hz 0,3A
OUTPUT : 5V 1A
INPUT : 100-240V~ 50-60 Hz 0,5A
OUTPUT : 12V 1A
Consumption 2,5 W 2,5 W
RJ45 Network Ethernet 10/100Mbps
Wi-Fi network Wi-Fi IEEE 802.11 b/g/n
Optical sensor/Focal distance 1,3” HD CMOS / f 2.8mm
Viewing angle 110° 106°
Minimum light intensity 0 Lux (with infrared LED)
Night vision Automatic - Range: 8m Automatic - Range: 20m
Resolution ÔFull HD (1920x1080)
depending on connection quality
Operating temperature and humidity -10°C / +55°C
10% ~ 80% without condensation
-10°C / +60°C
10% ~ 80% without condensation
Storage temperature and humidity -20°C / +60°C - 0% ~ 90% without condensation
Degree of protection - IP 66
Dimensions 76x76x121 97x67x64
WARNING TYCAM 2000 :
This is a Class A product.In a domestic environment,
this product may cause radio interference, in which
case the user may be required to take adequate
measures.
7Diagnostic
TYCAM 1000 LED status
ADSL bitrate
- Red: Not connected to the server
- Green: Connected to the Ethernet
server.
- Flashing green (rapid): WPS
association in progress
- Flashing green (slow): Connected in
Wi-Fi mode.
The ADSL bitrate can vary according to the quality
of the line and its use. The resolution of the camera
must be adapted according to the available bitrate.
In the event of a remote connection problem, change
the camera resolution in the application.
Define the resolution
Bitrate used
High 600
Average 300
Low 150
The ADSL box requires 100 kbit/s for its own
operation.
Example:
You have a 650 kbit/s bitrate, set the resolution of
your camera to average quality. If you have a 1 Mbit/s
bitrate and have 4 cameras, you can simultaneously
view your 4 cameras in low resolution.
1. Lens
2. Infrared LED (night vision)
3. RJ45 Network Connector
4. WPS/RESET button
5. Status LED
6. Power supply
7. Base
8. Mount
Sealed connection terminal (option)
Ref. 6417005
Warning
Please read the information on the protection of
privacy and the associated regulatory measures on :
www.deltadore.com > TYCAM product page.
6Remove a camera
- Open the TYDOM application
- Press the Camera icon .
- Select the camera to remove
- Press ‘Remove camera’
- Confirm
Delete the Wi-Fi association
TYCAM 1000
Press the WPS button of the camera for 15
seconds until the red LED flashes.
TYCAM 2000
Press the WPS/RESET button of the camera for
15 seconds until the infrared LEDs (night vision)
switch on then off.
Removing a camera requires being connected to
the initial creation account.
To ensure your security, if you lose your identifiers,
only the technical service can remove a camera
associated with an account.
Ì 1- Align the marks A and B.
2- Insert the base (8) of the camera onto the
mount (9).
3- Turn the base (8) so that the marks A and B
are no longer aligned.
Í
Point the camera.
ÊAlign the marks A and B then separate the two
Base/Mount parts.
ËSecure the mount (9) with screws and plugs.
Ê - Secure the camera base unit firmly in the
chosen position by using screws and plugs
suitable for the nature of the support.
- Loosen screws
11, 12, 13, 14, 15
to point the
camera using a 2.5 mm Allen key.
- Immobilize the camera by tightening the screws
11, 12, 13, 14, 15
.
Wall
mounting
Ceiling
mounting
ËScrew the antenna (F) to the back of the camera.
This manual suits for next models
1
Table of contents
Languages:
Other DELTA DORE Digital Camera manuals


