Delton Easycar E9 User manual

Please read this manual carefully prior to using your new
system. Please keep this manual accessible for future use.
High Quality Starter and Alarm Systems
We sincerely appreciate you purchasing our vehicle
starter and alarm systems. Our starter and alarm systems
are produced with strict quality control and international
standards,and includesa seriesof test including;extreme
temperature, shocks, vibration and dropping. As a result,
we are certain that you will be completely satisfied with
our products.

[Remote Outside Name]
OLED
Displays
Button I
Button II
Button III
Button IV
Charger Connector
Window
▶Start Button
( only)
[Accessories]
▶Computer USB Connector
▶Cigar Jack Connetor
▶LF Module
▶Remote Case
▶Antenna Module

※Please take these safety precautions.
1. Please read our Limited Warranty and Disclaimer
information located at the back of this manual prior to
using.
2. It is not recommended installing this systen into a
convertible vehicle with a manual transmission.
3. We are not responsible for any injury or other liability
resulting from the wrongful use of this system
4. When using remote start, place the gear in the Parked
or Neutral position, and set the Emergency brake or
Foot brake
5. In manual transmission vehicles; Do Not remote start
in any position other than Neutral. We are not
responsible for any damages or consequence
resulting from this.
6. The transmitting (TX) and receiving (RX) varies
depends on the radio signal environment. Range and
response time will vary.
7. In the unlikely event of a defective product, do not
open, repair or modify the system. Ask the seller for
repair or replacement.
8. We shall not be responsible for any theft or damage to
your vehicle, since this is a subsidiary and convenient
system only.
9. Please note that some functions described in this
manual are optional functions and may not be
available on this model.
Safety Information

Greeting
Remote Outside Name
Safety Information
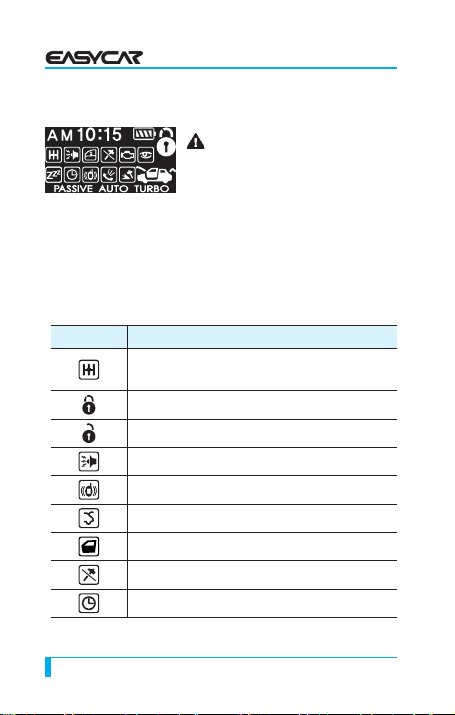
OLED Displays ………………………………………………… 6
Remote Button Functions …………………………………… 8
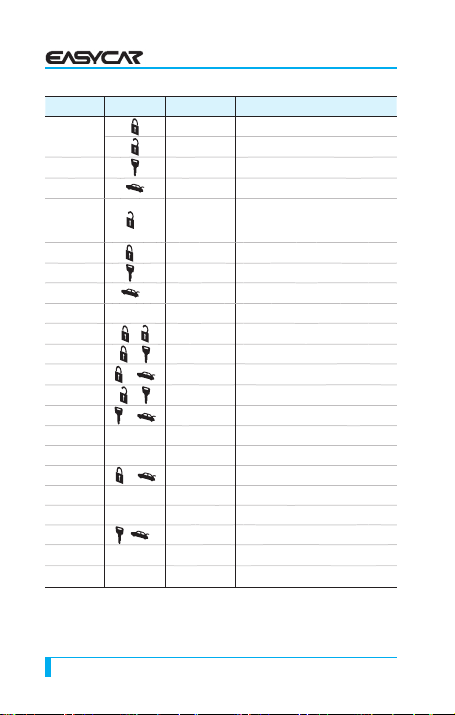
1. Lock/Unlock (Arm/Disarm) ……………………………… 9
1-1 Door Lock (Arm) …………………………………………… 9
1-2 Door Unlock (Disarm) ……………………………………… 9
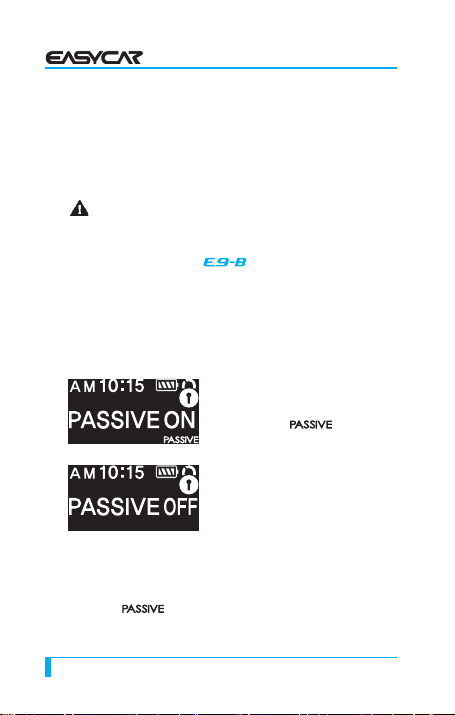
2. Passive …………………………………………………… 10
2-1 Auto Arming ………………………………………………… 10
2-2 Manual Arming …………………………………………… 10
3. Remote Start ……………………………………………… 11
3-3 Emergency Brake (Option Setting) ……………………… 11
3-4 Preventing Remote Start for your safety ………………… 12
3-5 Diagnosing Problems with auto start……………………… 12
4. Start Button (E9-B only)………………………………………… 13
4-1 Ignition ON ………………………………………………… 13
4-2 Ignition OFF ………………………………………………… 13
4-3 OFF↔ACC↔ON↔OFF ………………………………… 14
5. Trunk Open ……………………………………………… 15
6. Query Function …………………………………………… 15
7. Panic mode ……………………………………………… 16
8. Mute ……………………………………………………… 16
9. Valet ……………………………………………………… 16
10. Driving Door Lock(Ignition Lock) ……………………… 17
11. Shock senser by-pass ………………………………… 18
12. Smart Door ……………………………………………… 18
13. Reserve Time Change ………………………………… 19
14. Turbo …………………………………………………… 20
15. Power (On/Off) ………………………………………… 21
16. Vibration (On/Off) ……………………………………… 21
CONTENTS

17. Real Time Remote Paging Functions ………………… 21
17-1 Owner Call Mode ………………………………………… 22
17-2 Shock Sensing Report Mode …………………………… 22
17-3 Theft report mode ……………………………………… 22
18. Auxiliary Output(Optional Installation) ………………… 23
18-1 Aux1 ……………………………………………………… 23
18-2 Aux2 ……………………………………………………… 23
19 Current Time Change ……………………………………… 24
20. Adjusting the sensitivity of shock sensor ……………… 24
21. Reservation Mode(Manual Transmission Vehicle) …… 25
21-1 What is "Reservation mode"? …………………………… 25
21-2 Automatic Reservation Mode(Default Setting) ………… 26
21-3 Manual Reservation Mode(Option setting) …………… 26
22. Easy Door Lock(Optional) ……………………………… 26
22-2 How to input the 4 digit password ……………………… 27
22-3 Door Lock/Unlock ………………………………………… 27
22-4 LED Display ……………………………………………… 28
23. Option Mode 2 ………………………………………… 29
24. Car battery voltage check ……………………………… 29
25. Parking timer check …………………………………… 30
26. Charging time alert ……………………………………… 30
27. To check charging statue from the remote …………… 30
28. Reset …………………………………………………… 31

6
/ USER'S GUIDE
[OLED displays]
CAUTION
Use of this system is for car start
and alarm purpose only.
Since this system is a precise
instrument that is fragile and
susceptible to damage from external
shock, do not drop the unit, and keep it
away from children. Do not keep the
remote near excessive humidity or
water, as it is not water proof.
LCD Icon LCD Function
Reservation mode
(Manual transmission only)
Door Lock (Arm)
Door Unlock (Disarm)
Panic Mode
Vibration
Trunk open
Door open
Shock off
Reservation Start

USER'S GUIDE /
7
LCD Icon LCD Function
Remote Start
Valet
Passive
Turbo
Clock
Owner call mode is set
/Someone Calling Can owner
Driving door lock(Ignition Lock)
Battery Meter
Shock
Smart Door

8
/ USER'S GUIDE
2Way 1Way Press(sec) Function
I0.5 Door Lock(Arm)
0.5 Door Unlock(Disarm)
II 0.5 AUX1
III 0.5 AUX2
IV -0.5 Query Function
(include : Temp. Battery volt.
parking time check)
I- -2Panic Mode
II- -2Remote Start ON/OFF
III- - 2Trunk Open
IV- 2Vibration ON/OFF
I+II +0.5 Mute ON/OFF
I+III + 0.5 Valet ON/OFF
I+IV +0.5 Driving Door Lock ON/OFF
II+III + 0.5 Passive ON/OFF
III+IV +0.5 Shock Sensor ON/OFF
(I+II)- 2Current Time Change
(I+III)- 2Reserve Time Change
(I+IV)- (+
)
2Option Mode 1
(II+III)- 2Smart Door ON/OFF
(II+IV)- 2Reservation Start ON/OFF
(III+IV)- ( +
) -
2Turbo ON/OFF
IV-- 5Power ON/OFF
I-- 5Option Mode 2

9
* 0.5 sec. : Press the button for 0.5 second.
* 2 seconds(-) : Press the button for 2 seconds till it operates
at your vehicle
* + : Press 2 buttons simultaneously.
1. Lock/Unlock (Arm/Disarm)
1-1 Door Lock(Arm)
You can lock and arm your
vehicle by pressing button I for
0.5 second. The siren chirps
and the parking lights flash
once each. Also, the sidemirror
is being folded.(Optional installation)
Note
The remote chirps 7 times, and blinks icon on the remote
to warn that the battery of your vehicle discharges, if you lock
the doors while the tail lights are turned on during arming.
1-2 Door Unlock (Disarm)
You can open and disarm your
vehicle by pressing button I for
0.5 second.
The siren chirps and the parking
light flash twice each.
Also, the sidemirror is being unfolded(Optional
installation).
The numbers of remote chirps and parking light flashes
indicate the status of your vehicle while parking (Alarm

10
/ USER'S GUIDE
models only).
- Two chirps and two parking light flashes indicates there
were no problems while parking.
- Four chirps and four parking light flashes on the remote
indicates there has been an alarm during the arming
stage.
Note
When you open the door after the vehicle is disarmed, white
LED on start button is turned on. It is turned off 25 seconds
ofter the door is closed.
(Only)
2. Passive
2-1 Auto Arming
①You can activate this function
by pressing button (II+III)
simultaneously for 0.5 second.
Then, Icon appears on
the LCD and this system
rearms automatically.
②The doors are locked and
rearmed 30 seconds after the
engines is turned off(When
the doors are closed).
③During Valet mode, auto arming mode is not activated.
2-2 Manual Arming
The Icon disappears on LCD and doors are locked
and unlocked by remote only, if you press button (II+III)

11
simultaneously for 0.5 second.
The doors automatically lock and arm, if you don't open
the doors more than 1 minute after you disarm by remote.
3. Remote Start
3-1
Press and hold button II, for 2
seconds, the remote chirps and
the parking lights flash once each.
If it fails, the system automatically
repeats remote start a maximum
of 3 times.
When the vehicle starts,
appears on the transmitter and
the remaining engine running
time is displayed on the remote.
The default setting of the engine running time is 15 minutes.
You can change it to 25 minutes by using optional settings.
3-2
Open the door, insert the key, and turn it to ON position
(press the button until blue LED is On( only)) for
normal driving mode.
3-3 Emergency Brake(Option setting)
Manual transmission vehicles need Reservation mode to
remote start, In this case. the emergency brake must be ON.

12
/ USER'S GUIDE
3-4 Preventing Remote Start for your safety
The following cases prevent your vehicle from remote
starting for your safety.
①If trunk is open
② If hood is open (Exept for E9-B)
③If emergency brake is off (for manual transmission
vehicles only)
④If panic mode is activated
⑤If valet mode is activated (Refer to ‘Valet’)
3-5 Diagnose problems with remote start
If there is a problem in remote start, you will hear 3 chirps
and the cause for the error will be indicated by the number of
chirps and the parking lights flash within 3 seconds, when
you try the remote start (Refer to the table).
Vehicle Remote
Number of
chirps or Park
light Flash Cause of error Reason
of fail
1Engine on Start
2Key On Start
3Door open Door
4Trunk open Trunk
5Foot brake on Foot brake
6Hood open (Exept for E9-B) Hood
7Reservation Off
(Manual transmission) Reservation
8Emergency brake Off
(Manual transmission) Brake

13
4. Start Button
(Only)
Push button Ignition ON/OFF
4-1 Ignition ON
While pressing the foot brake on,
press start button for 1 secound.
Also, the parking brake (Auto
transmission) or the emergency
brake (manual transmission)
should be on at this stage. You will
see the engine get started and on
the button, it has the blue colored
light on (Stop).
Once you release the parking brake (Auto transmission) or
emergency brake (manual transmission) to drive, the blue
colored light is off.
4-2 Ignition OFF
①While pressing the foot brake on,
press start button for 1 secound.
Also, the parking brake (Auto
transmission) or the emergency
brake (manual transmission)
should be on at this stage. you
will see the engine is off and the
blue Colored Light is off.
②In case you are not able to stop the engine due to the
problem from the parking brake (Auto transmision) or
the emergency brake (manual transmission), on foot
brake, press start button for 4 seconds while pressing

14
/ USER'S GUIDE
the foot brake on. Then the engine will stop.
Note
When the parking brake (Auto transmission) or the
emergency brake (Manual transmission) is broken, check
whethen the LED light is off (Stop). And then press the start
button for about 4 seconds (while foot brake on) to start, until
you confirm the engine is running.
If you want to stop the engine while you are outside of your
vehicle,
1) check the LED light is oFF ((stop), 2) open the door and
press the button II for 2 seconds.
4-3 OFF →ACC →ON →OFF
①ACC : While not pressing the foot brake, press the start
button on time, the button gets the green colored light
on ACC, which enables you use the air-conditioning
and car audio etc.
②ON : If you press one more while not pressing the foot
brake, the button gets the red colored light on ON.
③ OFF : If you press one more while not pressing the foot
brake, the button gets the light OFF.
※To stop the engine by force : If you are not able to stop
the engine by pressing button, please open and close
the car door 7times during 15 seconds. Then the
engine will stop.
ACC(GREEN) → ON(RED) → OFF

15
5. Trunk Open
Press and hold button III for 2
seconds to open the trunk.
Parking lights will flash twice and
the siren will chirp twice.
6. Query Function
Query function allows you to check the statues of your
vehicle including car battery voltage, car temperature and
parking timer (it indicates how many minutes and hours
have passed after the system is armed). By pressing button
IV for 0.5 second, it shows the parking timer and then
either car temperature or car battery voltage (the other one
appears as the same button job is repeated).
Response
Status Remote Siren from
the vehicle
Engine Running, Armed Be, bip Be×4 Chirp×3
Enging is Not Running, Armed Bip Be×4 Chirp
Enging is running, Disarmed Be, bip×2 Be×4 Chirp×4
Engine is not running, Disarmed Bip×2 Be×4 Chirp×2
The icon and chirping sounds indicates the statues. If you
are within transmitting distance to receive the signal for
shock, theft and easy call function, you will receive the
response shown on the table.

16
/ USER'S GUIDE
7. Panic Mode
Press and hold button I for 2 seconds to activate this mode.
Your vehicle will lock the doors if unlocked, the siren will
activate, and the parking lights will flash for 90 seconds.
This function is used for warning under emergency
situations, when you feel you are in danger.
Press and hold button I for 2 seconds to deactivate.
8. Mute
Press button (I+II) simultaneously
for 0.5 second to enter this mode,
and then on LCD is
disappeared and the siren does not
operate.
The siren, however, operates in
other modes ((example) Panic,
Shock, Theft) even in Valet
mode.
In this mode, Siren does not operate during arming and
disarming only.
If you press button (I+II) simultaneously for 0.5 second
again, will appear again with siren operate.
9. Valet
Press button (I+III)
simultaneously for 0.5 second to
enter this mode.
The 2 features operating in valet

17
mode are Door lock / unlock by pressing button I and
Query function by pressing button IV. (All the other
functions do not operate temporarily.)
Valet mode is useful when loaning your vehicle or having it
serviced (example, car wash, parking lot and auto repair
shop).
Press button (I+III) simultaneously for 0.5 second again to
exit.
Note
If you want to use this mode manually, insert the key into the
ignition and rotate it(press the start button in model)
4 times between ON & OFF for 4 times within 10 seconds.
10. Driving Door Lock (Ignition Lock)
Press button (I+IV)
simultaneously for 0.5 second to
enter this mode.
Then, this mode operates with
display of Icon on LCD.
This programmable option
enables your vehicle to
automatically lock the doors in
30 seconds after the vehicle has
been started with a key while all the doors are closed.
On the contrary, the vehicle will automatically unlock the
doors upon pulling the key out from the ignition.
Please press button (I+IV) simultaneously for 0.5 second
again to exit.

18
/ USER'S GUIDE
11. Shock sensor by-pass
11-1
Press button (III+IV)
simultaneously for 0.5 second to
deactivate the shock sensor.
You can find the Icon on
LCD disappeared to confirm this
mode.
This function can be used, when
you do not want it.
example) when you sleep in the
vehicle, when baby sleeps in the
vehicle, when you let your pet stay in the vehicle.
11-2
Press button (III+IV) simultaneously for 0.5 second again
to activate shock sensor.
The Icon on LCD disappears to confirm this.
If your vehicle is shocked while your vehicle is armed and
the engine is turned off, your vehicle chirps and sends signal
to your remote with the blinking icon on LCD.
12. Smart Door
Press button II+III for 2 seconds,
then icon appers on the
LCD. To cancell it, press II+III for
2 seconds once again. The doors
are unlocked when the car owner

19
with the remote approaches the
vehicle and locks the vehicle after
10 seconds when the car owner
with the remote is far enough
away from the vehicle.
* This function is unavailable when the door is open or the
vehicle is running.
13. Reserve Time
13-1 Reserve time Change
Press button (I+III) for 2 seconds
and then timer flashes.
Press button I for 0.5 second to
increase “hour” and press it
continually to increase “hour”
continually.
Press button II for 0.5 second to increase “minute” and
press it continually to increase “minute” continually.
13-2 Reserve time ON/OFF
If you press button (II+IV) for 2
seconds after setting the timer, the
display of timer does not flash to
inform you that setting is complete
and it displays the current time
again.
In case that you do not press any
button for 10 seconds, it
automatically displays the current time.

20
/ USER'S GUIDE
14. Turbo
14-1
( Model)
Press (III+IV) for 2 seconds, then
the TURBO icon blinks. In this
mode, engine continues to run for a
selected time of 30 seconds or 2
minutes after you take the key off
from key box (you can change the
setting in Option menu).
This is very useful for turbo
charged vehicles to cool down
the mechanical components after driving.
14-2
( Model)
Press (III+IV) for 2 seconds, then the icon Turbo blinks. In
this mode, engine continues to run for a selected time of
30 seconds or 2 minutes (you can change the setting in
Option menu). ※
※Please follow the step on the remote as above.
① While the engine is running, activate the parking brake
(auto transmission) or the emergency brake (manual
transmission)
② While pressing the foot brake on, press start button for
1 second and then release. The remote chirps and the
parking lights flash once each.
③The engine keeps running and the start button’s LED
rotates from greed->red->off.
④ Open the door and close
⑤The engine additionally runs for 30 seconds (or 2
minutes, changed in option)
Table of contents
Other Delton Car Alarm manuals