Denver Mattress Hibernation Series Installation and operating instructions

Rejuven8-3
Wireless Adjustable Base
Assembly and Operation
Manual
PART#532K0225 REV: 2020-11-18

Specifications
Weight Capacity
1320 lb
Height
14.5 inches
Incline Degree
Backrest: 0°~65°
Legrest: 0°~35°
Wall Hugger
✓
Power Input
AC 100–240 50/60 HZ
Power Transformer
Output
DC 29V 1.8A
Radio Frequency
2.4MHZ
Massage Vibrator
✓
USB Charger
✓
Bluetooth Control
✓
Floor Light
✓
Flash Light on
Remote
✓
Preset Position:
rejuven8 and
BREATHE
✓
Memory Position
✓

1
Table of Contents
Safety Precaution and Usage Guide ....................................................................... 2
To decrease the risk of electronic shock ......................................................................2
Adjustable base performance.........................................................................................2
Restrictions of your adjustable base .............................................................................3
Electronic system information .......................................................................................4
Parts List ..................................................................................................................... 5
Electronics Overview................................................................................................ 6
Assembly Guide ......................................................................................................... 7
Operating Your Adjustable Base ..........................................................................11
Wireless pairing operation ..........................................................................................14
Power outage or failure of remote control................................................................15
Troubleshooting......................................................................................................16
20 YEAR LIMITED WARRANTY

2
Safety Precaution and Usage Guide
Your new adjustable base has been strictly tested and inspected prior to dispatch. It is highly
recommended to read these instructions thoroughly before you try your new adjustable base, in
order to keep your high-quality adjustable base performing well in its lifetime but also to reduce the
risk of fire, electric shock, burns or any injury to users.
To decrease the risk of electronic shock, burns, or injury to users, children or
pets, please follow these instructions.
1. After unpacking your adjustable, be aware of your small children and pets. Its packing material may put
your small children or pets in smothering dangers.
2. Unplug the power cord from the power outlet before installing parts or cleaning your adjustable base.
3. Keep the power cord away from water and heated areas. If your adjustable base is wet or has a frayed
power cord, please do not operate it.
4. Before you disconnect the power cable, please return your adjustable base to the flat position and stop all
operations.
5. Unplug your electronic gadgets from the USB port (option) of your adjustable base if they are fully charged.
6. Do not operate your adjustable base if small children or pets are under your adjustable base. Supervision
is required for operating your adjustable base if small children or pets are around your adjustable base.
Small children are not allowed to operate your adjustable base without parents or adult supervision.
7. Use your adjustable base in compliance with the restrictions.
To keep your high-quality adjustable base performing well in its lifetime, please
follow these instructions.
1. Your adjustable base is only designed for In-Home Use. This adjustable base is not designed for outdoor or
commercial purpose.
2. Do not unscrew or open the control box, lift motors, massage vibrators (option), SMPS, wired handset or
remote control (option), and other electronic components on your adjustable base, except for opening the
battery compartment on your remote control or SMPS. The warranty will be void if there is any component
damaged by users. Only authorized service personnel are allowed to repair or replace parts.
3. Do not mix different types of batteries or old batteries with a fresh one for your handset or SMPS.
4. Remove the batteries from your remote control (option) and SMPS if your adjustable base will not be used
for a long time period to prevent damage caused by battery leakage.
Attention: SAVE THESE PRECAUTIONS AND
USAGE GUIDES

3
5. Do not sit on the head or leg section while in the raised position. It can damage your adjustable base and
lead to shorter life expectancy.
6. Do not lift or move the base during operation. It might cause damage to your system.
7. Do not lift or move your adjustable base by grabbing its mattress platform or its wood lower frame
(option) furnished with fabric. If it is necessary to lift or move your adjustable base, please do it by
grabbing the cross bars of its metal frame.
8. Your adjustable base must be on flat ground to avoid damage to your product.
9. Use a compatible mattress for your adjustable base. A memory foam mattress or latex mattress is
recommended. Some spring mattresses or pocket spring mattresses, for example, may not suit your
adjustable base. Consult your mattress specialist to verify your mattress is compatible.
10. Use your adjustable base in compliance with the restrictions.
Electronic system information
Radio Frequency Compliance:
Radio Frequency: 2.4 MHZ.
FCC ID: PCU-JLDK.42
Your Device complies with part 15 of the FCC Rules. Operation is subject to the following two conditions:
1. This device may not cause harmful interference.
2. This device must accept any interference received, including interference that may cause undesired
operation.
Attention:
In compliance with FCC RF exposure requirements, there must be no change to the antenna or the device without
permission. Users may be deprived of his/her right to the device if the device exceeds the RF exposure
requirements caused by any change the antenna.
Power Ratings:
Input: AC100-240V 50/60Hz 1.5A
Output: DC29V 1.8A
Protection Class: Class II
Restrictions of your adjustable base
1. Do not operate lift motors above the 10% duty cycle. For example, after continuous 2-minute operation 18-
minute rest is required.
2. Do not continuously or intensively operate the massage vibrators (option) above maximum 2 hours within 6
hours.
3. Weight Restrictions: the maximum weight limits on your adjustable base for Twin, Twin XL, Full and Queen
are at a maximum of 600kg/1320lbs (evenly allocated across the mattress platform). This capacity includes
the mattress and occupants. The warranty of your adjustable base will be void if excessive weight of
600kg/1320lbs is loaded on your adjustable base.
4
IMPORTANT NOTE:
Check and confirm the following items are included in the carton,
BEFORE disposing of any packing materials.
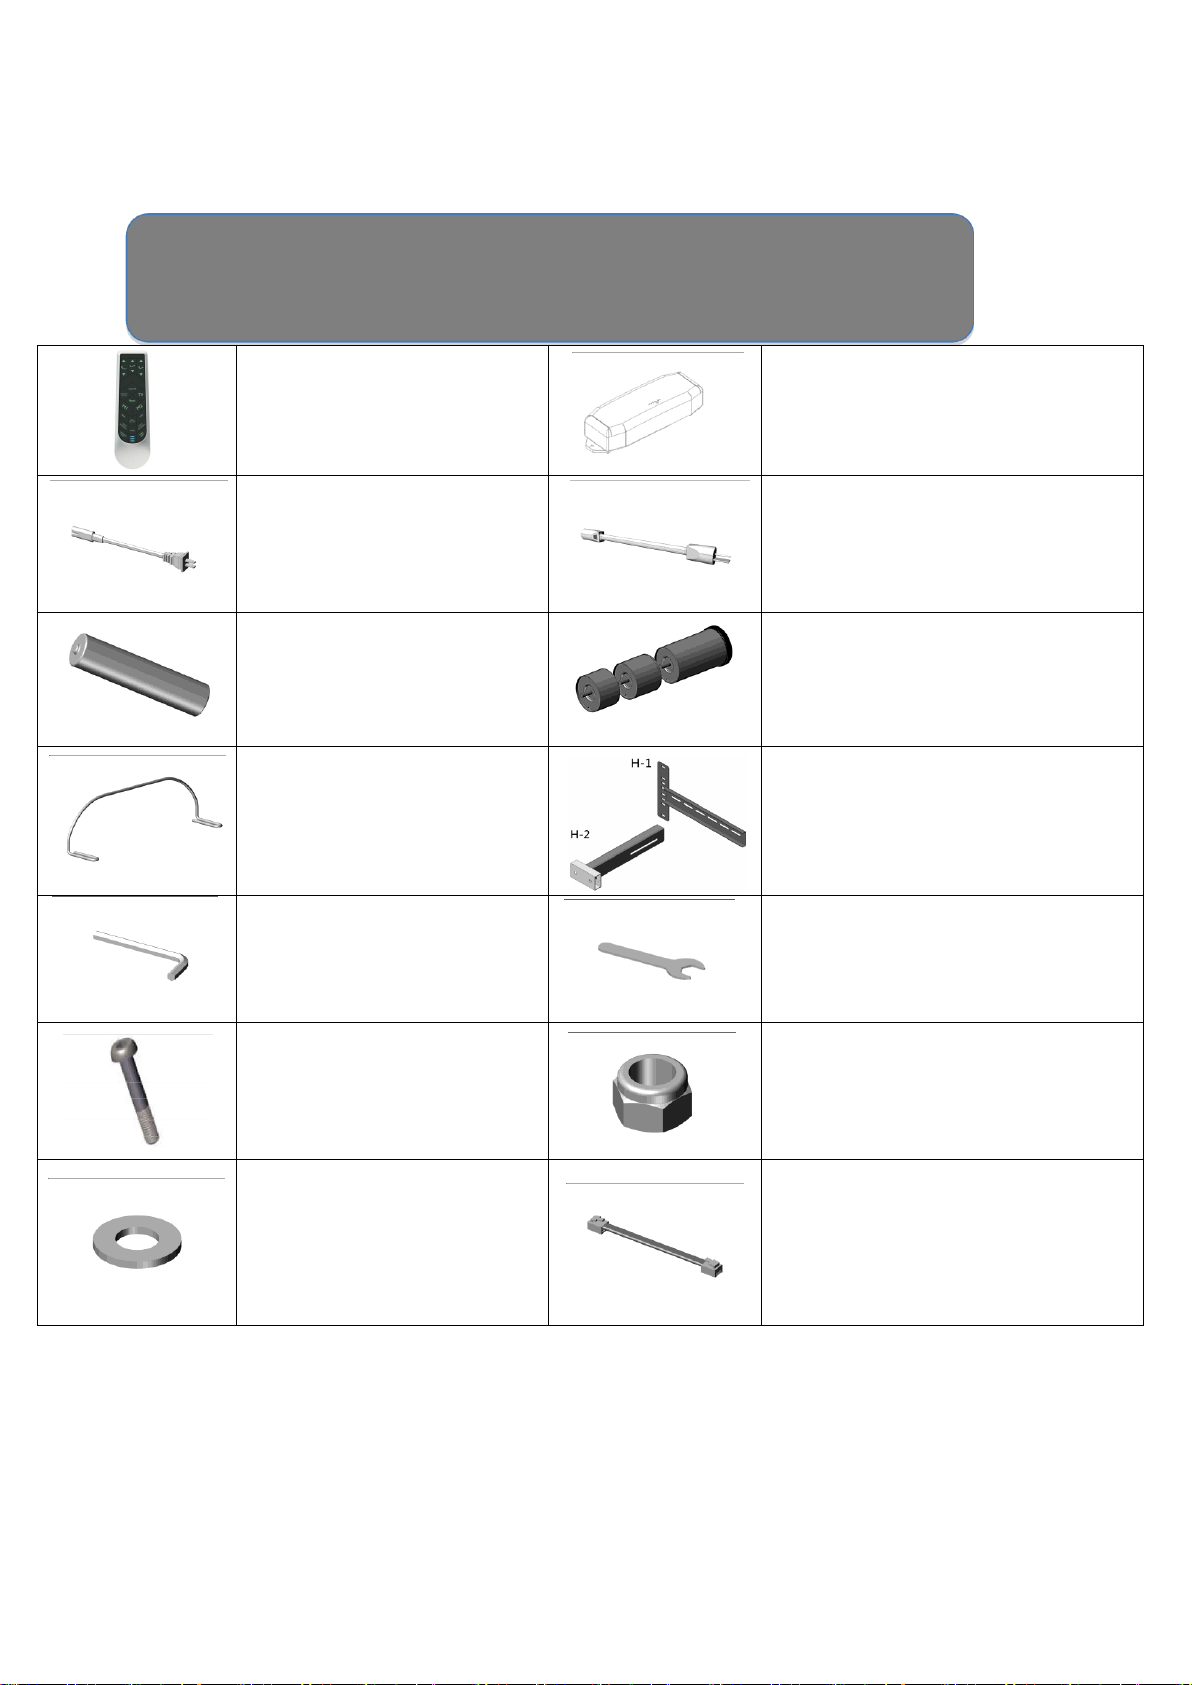
Parts List
A.
Remote Control * 1
B.
SMPS * 1
(Switched-Mode Power Supply)
C.
AC Main Cable * 1
D.
DC Extension Cable * 1
E.
AAA Battery * 3
F.
3 Sectional Leg * 6 sets
G.
Mattress Retainer * 1
H.
Headboard Brackets * 2 sets
I.
Hex Key * 1
J.
Wrench * 1
M.
Bolts for Headboard * 8
N.
Nuts for Headboard * 8
O.
Washers * 16
P.
Synch Cable * 1 (TXL ONLY)
5
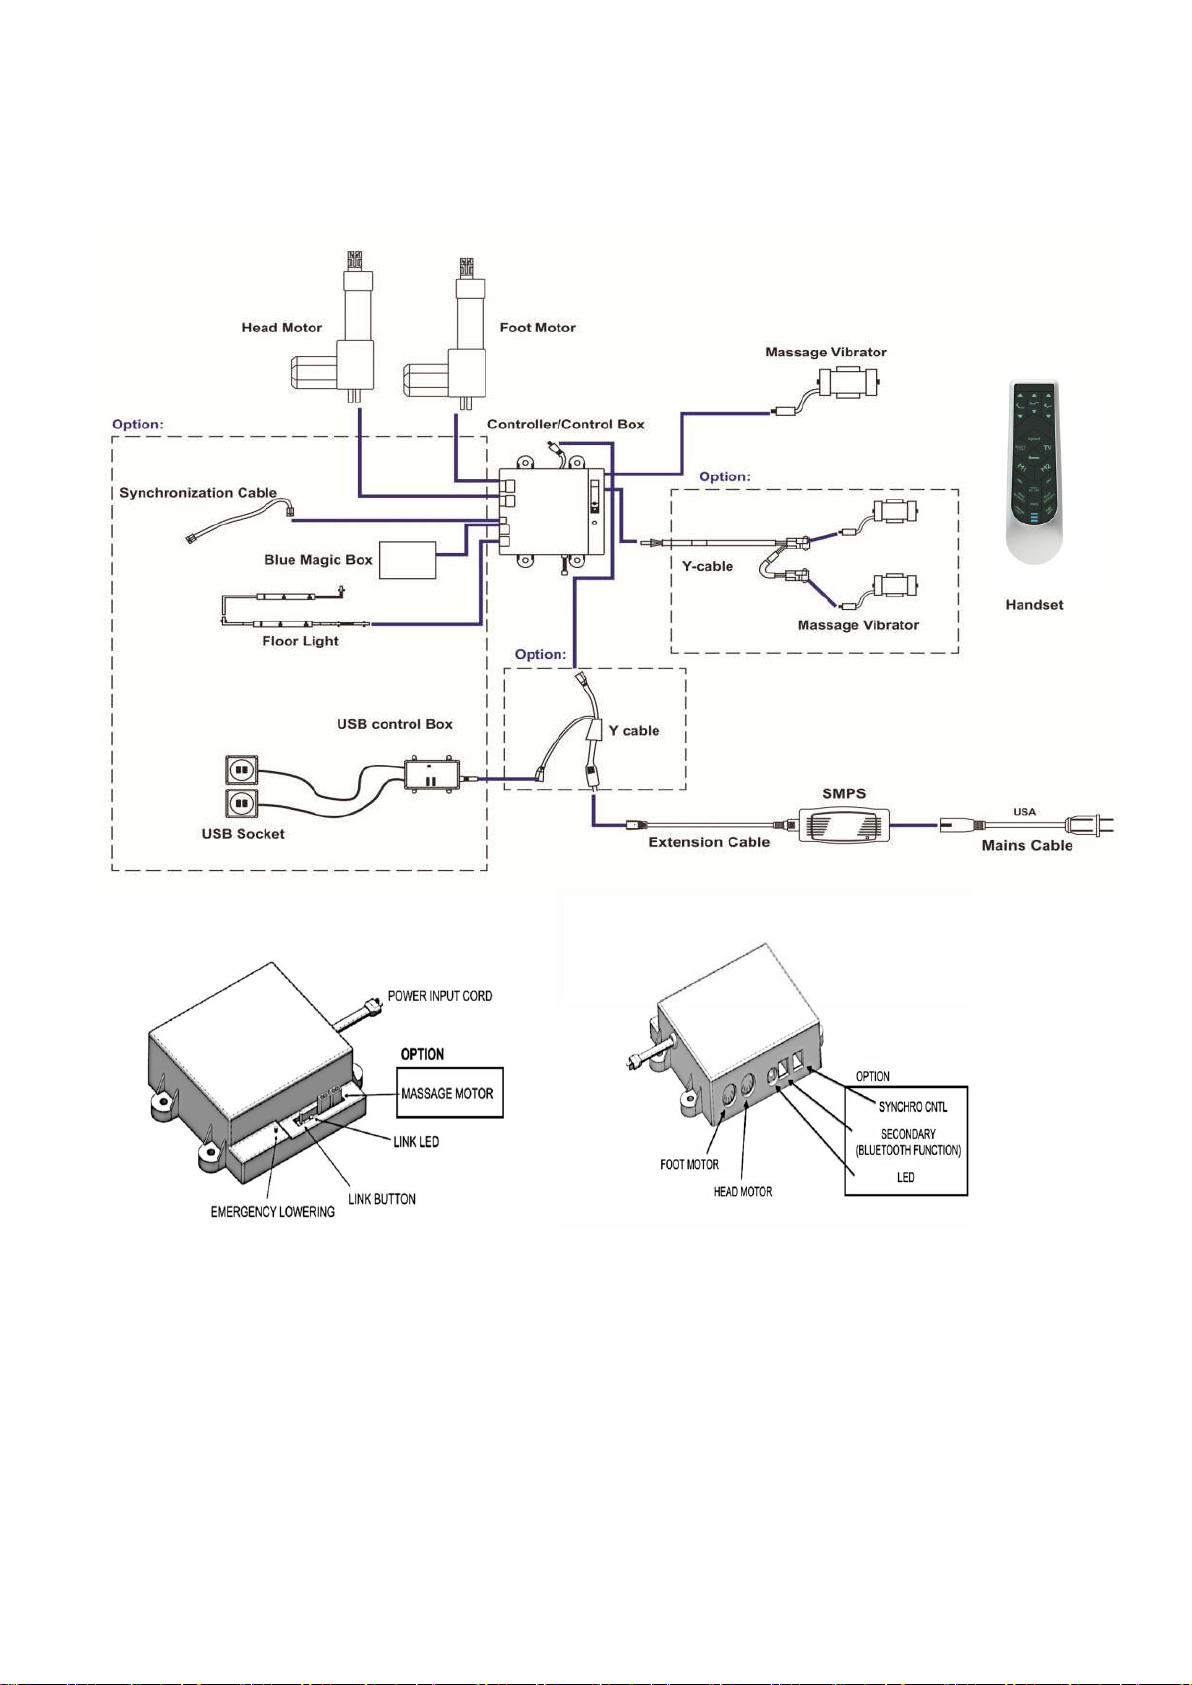
Electronics Overview

6
Assembly Guide
STEP 1
Leave the carton in the flat position. After opening this carton, carefully take your Adjustable
Base to the desired location and leave it topside down.
STEP 2
Take out Six 3 sectional legs (F) from the accessories box. You have adjustable height choices
and can use anyone of or all 3 of the leg height choices of 5”, 2-1/2”, 2”.
Once the height is determined, add the plastic cap on the bottom leg tubes, then securely tighten
the Six Legs (F) onto your Adjustable Base. Leave no gap between leg and base.
STEP 3
Insert three AAA Batteries (E) into the compartment of the Remote Control (A).
IMPORTANT NOTE:
Two people are required to set up your
adjustable base.
7
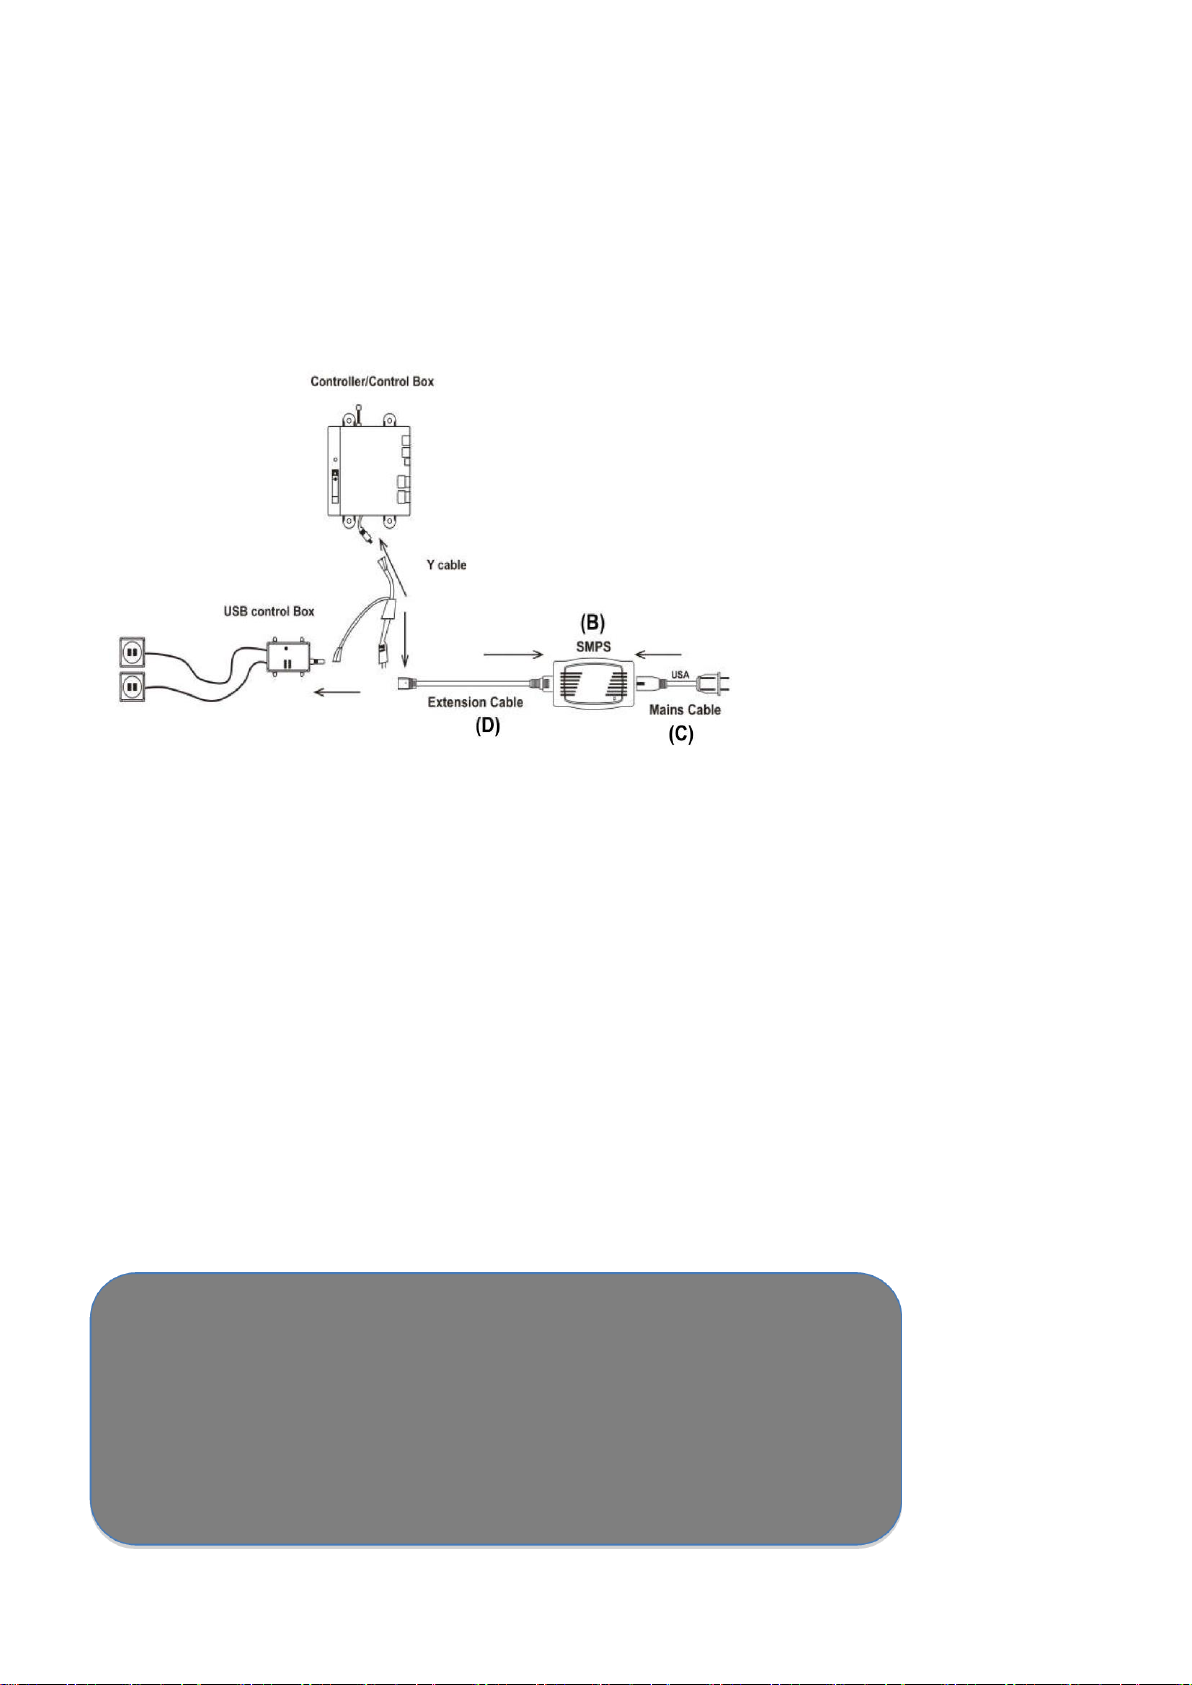
STEP 4
Insert the AC Main Cable (C) into the SMPS (B).
Insert the male end of the DC Extension Cable (D) to the SMPS (B).
Connect the female end of the DC Extension Cable (D) to the male end of the Y-Cable connected
to the Control Box and the USB Control Box.
STEP 5: SYNCHRONIZATION (OPTION)
Synchronization may be required for setting up two TXL Bases.
Insert one end of the Synch Cable (P) into the Control Box of your
Adjustable Base. After completing the first five steps on the Second Base,
insert the other end of the Synch Cable (P) into the Control Box of
the second TXL Adjustable Base.
STEP 6
Carefully flip over your topside-down Adjustable Base. Lift up the Base to desired location.
IMPORTANT NOTE:
Be Careful when flipping your Base:
The installed legs could get damaged or bent by excessive
pressure, if you lean your Adjustable Base on the legs.
1. Do not recline the Base against the installed legs to flip it
over.
2. Do not drag the Base across the floor.

8
STEP 7
Plug the AC Main Cable (C) in an electrical outlet with 100-240V, 50/60 Hz. A surge protector
(not included) is recommended for longer life of your Adjustable Base.
STEP 8
Take out Retainer (G) from your adjustable base. Insert Retainer (G) into the holes on the
Retainer Bar Fixation.
STEP 9 (Installing Headboard)
Raise the Backrest by using Remote Control (A) and remove the Head Rail.
Take out the Wrench (J), two Bolts (M), two Washers (O) and two Nuts (N) from the accessories
box.
Refer to the following picture. Place the Headboard Bracket (H-2) on the tube of the right hand
side of your Adjustable Base. Insert the Bolt (M) with its Washer (O) through the pre-drilled
holes on the Bracket (H-2) and the tube.
Fasten the two Bolts (M) with the two Washers (O) and the two Nuts (N) with the two Washers
(O) by using the Wrench (J).
Redo this step on the left hand side of your Adjustable Base.

9
STEP 10 (Installing Headboard)
The Bracket (H-1) allows adjustment to meet the dimension of user’s Headboard (not included).
After choosing desired pre-drilled holes on the H-1 Bracket, pass the Bolts (M) with the
Washers (O) through the holes on H-1 and H-2 Brackets. Fasten these Bolts (M), Washers (O)
and Nuts (N) by using the Wrench (J).
STEP 11
Now place your mattress on your Adjustable Base.
All the installation procedures have been completed.

10
Bluetooth and App
The Bluetooth App to control your adjustable base is available for iPhone and Android
smart phone. The Bluetooth App can be found on App Store and Google Play.
Step 1
Search “ComfortEnhancements”
on App Store or Google Play.
Download and install this free
app to your smart phone.
Step 2
Open “ComfortEnhancements” on
your mobile phone and select the
second icon, “Hi Lo Vertical Lift”.
Step 3
Touch the “Gear” icon on the
top right corner.
Step 4
Touch “Select device”. Your smart
phone will automatically scan your
Bluetooth device on your
adjustable base.
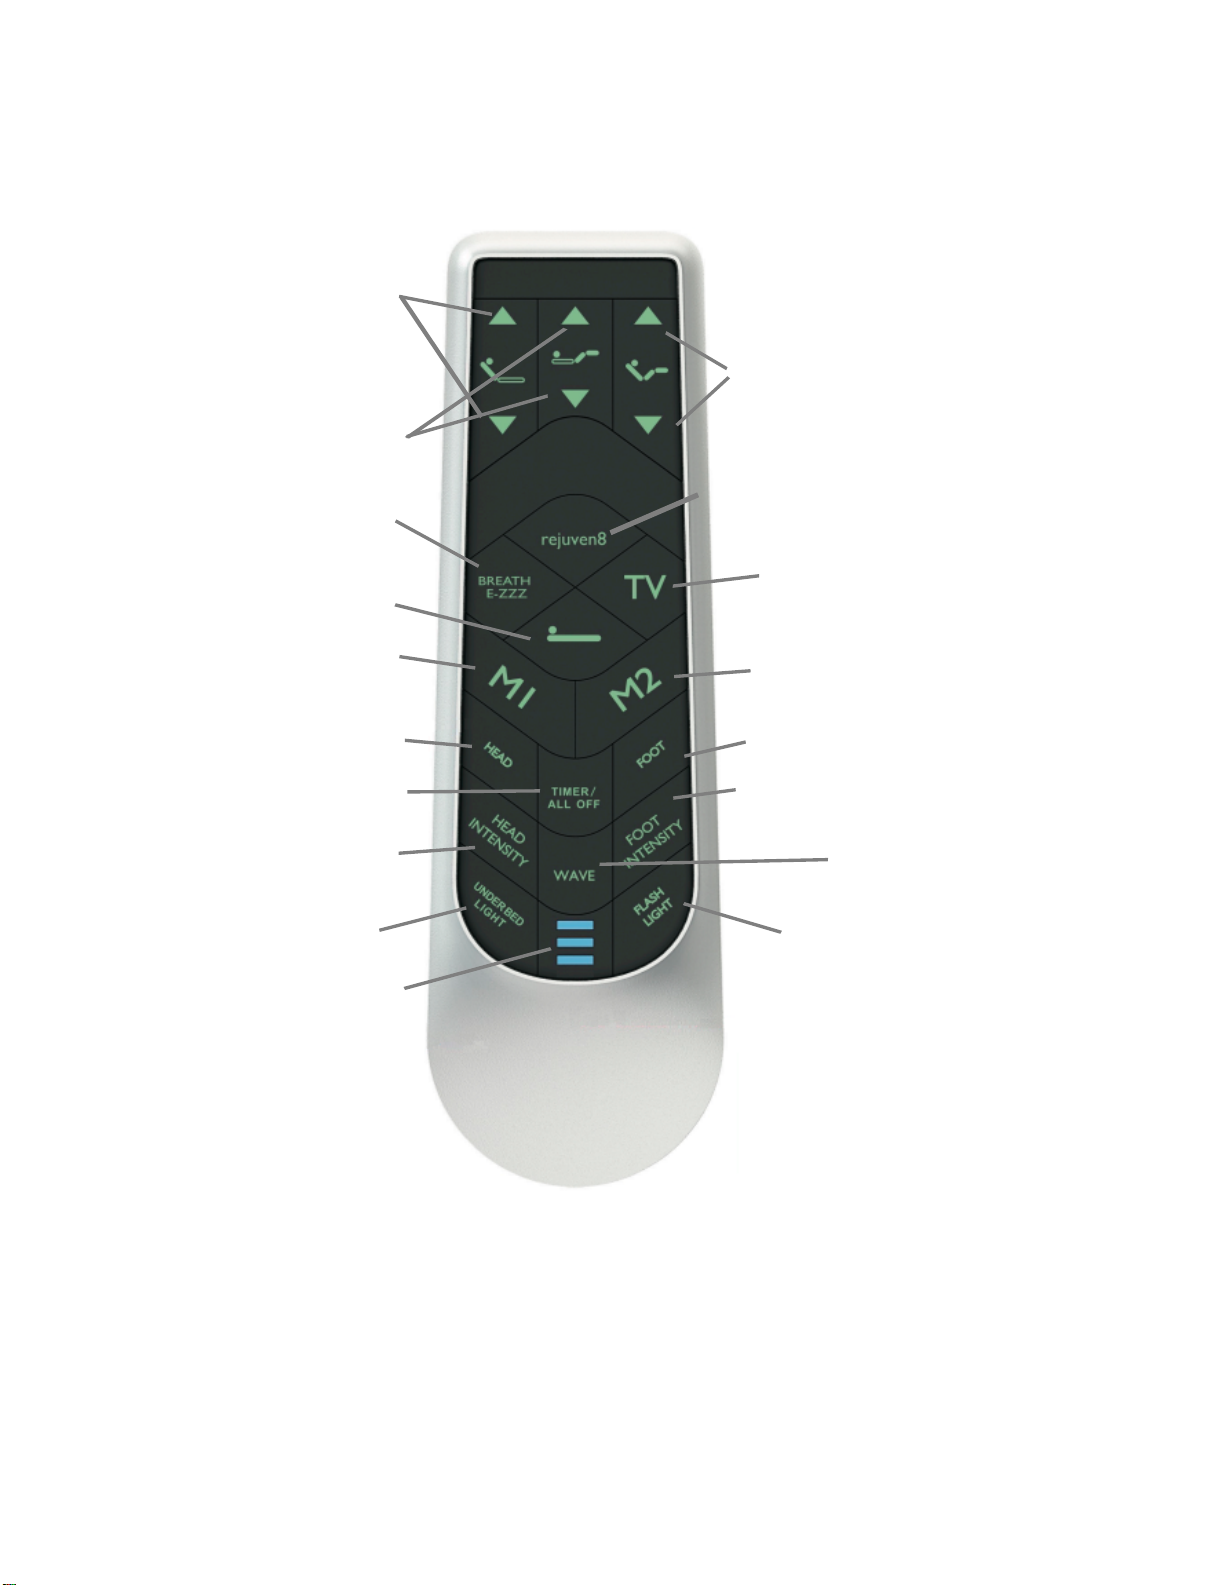
Operating Your Adjustable Base
ADJUST BACKREST
UP AND DOWN
ADJUST LEGREST
UP AND DOWN
ADJUST LUMBAR SUPPORT
UP AND DOWN
PRESET POSITION OF ZERO GRAVITY
PRESET POSITION
OF TV POSITION
PRESET POSITION
OF QUIET SLEEP
ADJUST TO FLAT POSITION
MEMORY 1 FOR
PREFERRED POSITION MEMORY 2 FOR
PREFERRED POSITION
FLASH LIGHT
FLOOR LED LIGHT
HEAD VIBRATION INVENSITY
FOOT VIBRATION INVENSITY
ACTIVATE WAVE
VIBRATION TIMER
/ MEMORY SETUP
TIMER INDICATOR LED
11
4
FOOT VIBRATION ON/OFF
HEAD VIBRATION ON/OFF

12
A.
B.
C.
D.
E.
F.
G.
Click the button to automatically adjust user’s bed to
zero gravity position.
Stops by clicking any button.
Click the button to automatically
adjust user’s bed to FLAT position. Stops by
clicking any button.
Click the button to automatically adjust user’s bed to have
QUIET SLEEP
position Stops by clicking any button.
Press and hold the button to
RAISE
or LOWER
BACK REST. Stops
when
released.
Press and hold the button to
RAISE or LOWER
LEG REST. Stops
when
released.
Press and hold the button to
RAISE and
LOWER
BACK and
LEG REST
together.
Stops
when released.
Click the button to automatically adjust user’s bed to have WATCHING TV
position. Stops by clicking any button.
H.
Click the button to automatically adjust user’s bed to the Memory 1 position
preset by user. Stops by clicking any button.
I.
Click the button to automatically adjust user’s bed to the Memory 2 position
preset by user. Stops by clicking any button.
J.
* Click the button to turn On/ Off the HEAD VIBRATOR.

K
L.
M.
N.
O.
Click the button to turn on or turn off the FLASHLIGHT on the remote
control. The
FLASHLIGHT will stay on as long as the button is pressed.
After
releasing the button, the FLASHLIGHT will stay on for several seconds
then turn off
simultaneously when the backlight turns off.
Click to adjust the four levels INTENSITY of HEAD VIBRATOR. The head massage
motor will start from strongest vibration.
STRONGMEDIUMWEAKNONESTRONGMEDIUM….
* Click the button to stop and save the intensity status when you exit for the
next activation.
* Click the button to turn On/ Off the FOOT VIBRATOR.
* Click the button to turn On/ Off the WAVE MODE VIBRATOR.
The wave mode will start from strongest vibration, click again to adjust
the
four levels
INTENSITY of FOOT VIBRATOR.
STRONGMEDIUMWEAKNONESTRONGMEDIUM….
* Click the
button to stop and save the intensity status when you exit for the
next activation.
Click to adjust the four levels INTENSITY of FOOT VIBRATOR. The foot massage
motor will start from strongest vibration.
STRONGMEDIUMWEAKNONESTRONGMEDIUM….
* Click the button to stop and save the intensity status when you exit for the
next activation.
Click the button to turn on the FLOOR LED LIGHT or push to turn it off. FLOOR
LED LIGHT will stay on for five minutes if the button is not clicked again.
P .
13
Q.
Function 1 : Click the button to set up the time periods of vibration.
Blue LED on the handset will turn on for responding your selection.
Highest is 10 minutes, Middle is 20 minutes and Lowest is 30 minutes
If start the vibration without setting TIMER, default time will be 10 minutes
and the Highest LED will turn on.
When the vibration is active, click TIMER again can stop the vibration.
Function 2 : Default Restoration Setting
Press and hold button and the backlight of handset will start flashing.
Release until the backlight stop. The default restoration process is success.
Function 3 : Memory Setting (M1 or M2) as below.
14
Wireless pairing operation
Step1:
Open the battery compartment on the Remote Control. Remove the yellow sticker, which covers DIP
Switch. Push the DIP Switch on the Remote Control to a certainposition(different from the position on
the other Remote Control paired with it near both Control Boxes.) and put three AAA batteries into the
Remote Control.
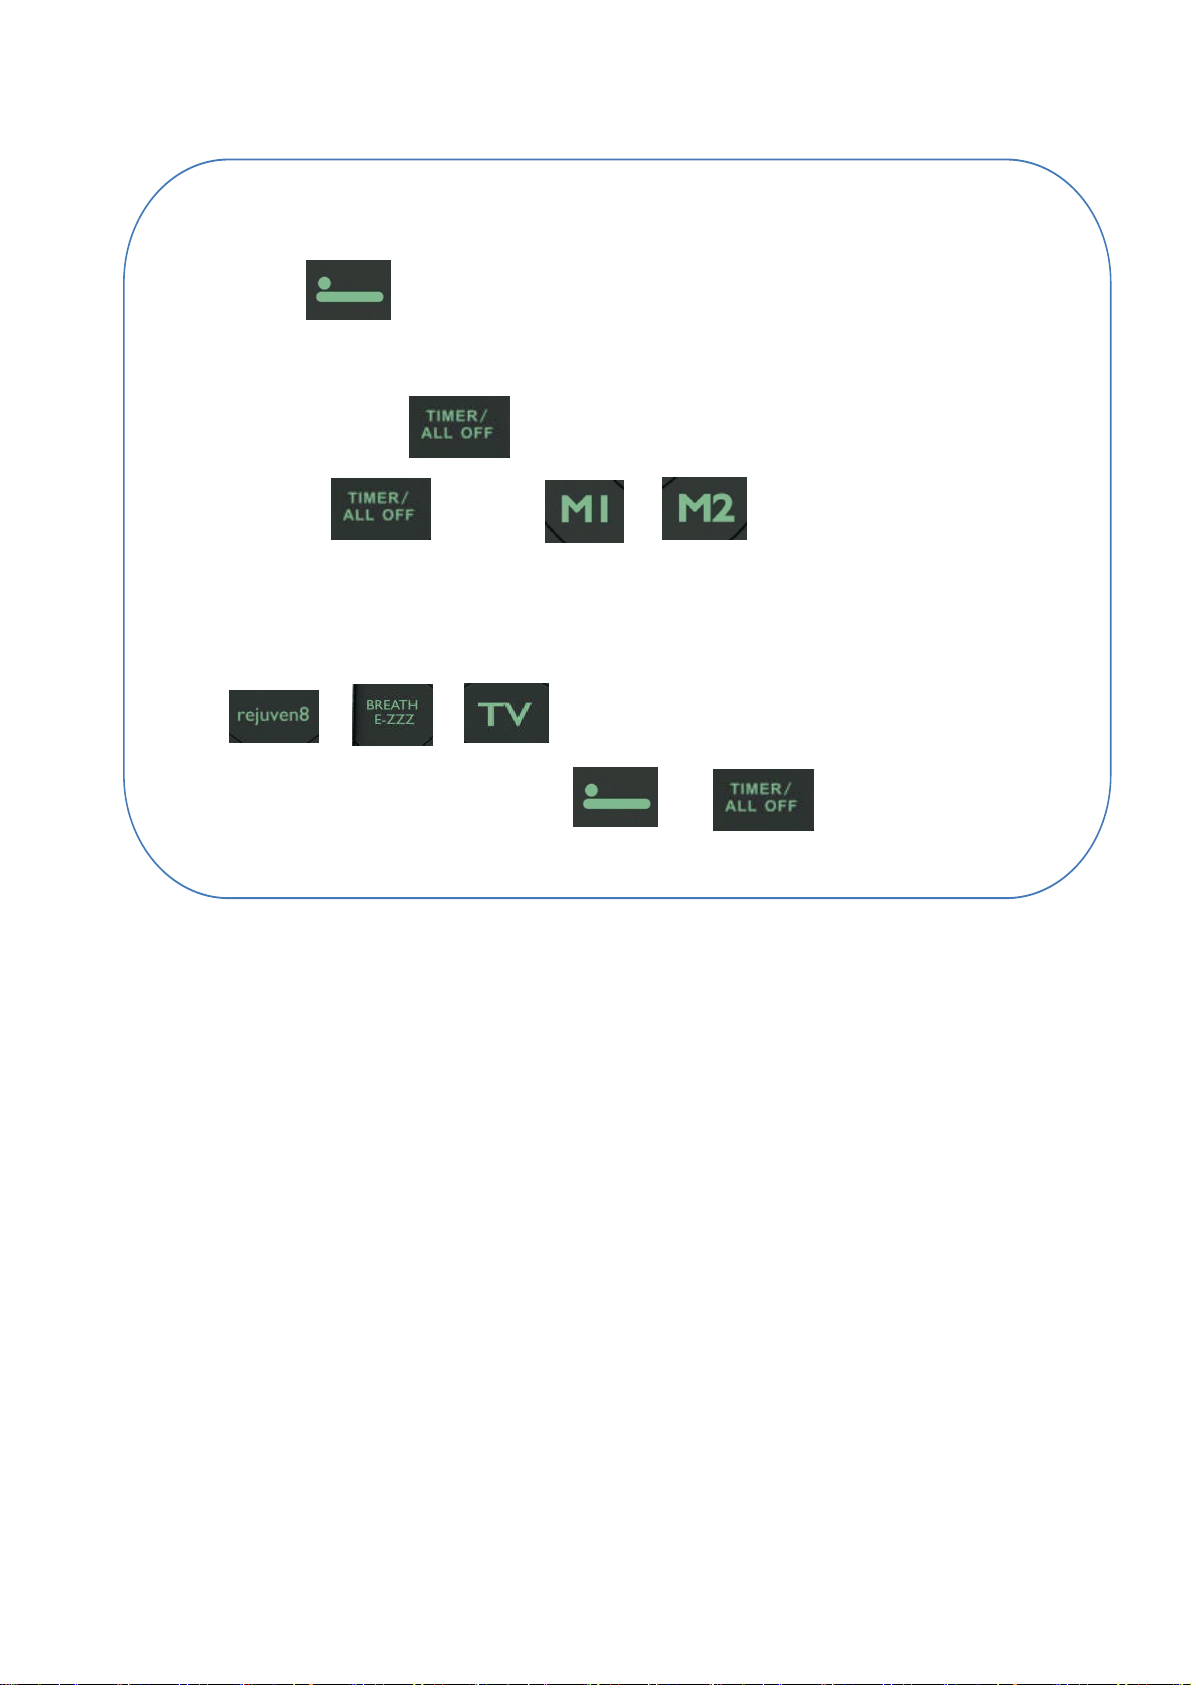
Preset Memory Position
Step
1: Click
to flatten the bed.
Step 2: Adjust the Head and Foot position to a desired position.
Step 3: Press and hold
until backlight of handset blink twice.
Step 4: Release
and click
or
. The control box will response
with Beep sound and floor light will blink twice which indicate the memory
learning has completed successfully.
Step 6: To default all, press and hold and simultaneously until
system response with Beep sound.
Step 5: To reset preprogrammed position, following Step1 to Step 3, then press
or or before LED stop flashing.
Step3:
Press and hold the LINK BUTTON on the Control Box until the LINK LED on the ControlBox turnsoff. Then
release the Link Button and the LINK LED turns flashing. That
indicates the Control Box is pending to be paired.
Step2:
Connect the Control Box to the SMPS. Plug its AC Main Cable to the Power Outlet.

15
Step4:
Press and hold simultaneously the button and the button on the Remote Control
until backlight turns flashing. Release the two buttons and the backlight LED continue flashing and search
the pending Control Box where the LINK LED is flashing.
Once both the backlight on the remote control and the LINK LED on the control box stop flashing, the
pairing operation is completed.
Please repeat the all above steps if the pairing operation failed.
Important Notes:
It is strongly recommended, if multiple Bases are being used in the same house or area,
each Base should be configured differently. Each Control Box must be paired with the
different Remote Control where the DIP-Switch position is different. Do not pair both
Controller with the same Remote Control or movement could occur on additional Base
unexpectedly.
In the case of failure of the Remote Control, press and hold the Emergency Button on the Control Box to
flatten your Adjustable Base. When releasing the Emergency Button, all movement will stop immediately.
In the case of the power outage, insert two 9V Batteries (not included) to the Battery Compartment on
the backside of SMPS. It can be used as the backup power. It is only for flatting the Base without load. Do
not to use the Massage Vibrators when using the backup power.
Power outage or Failure of remote control

16
Troubleshooting
TROUBLE
SOLUTION
There is no feature of the base that can be
activated.
Remote control illuminates
Reset the electronic components by
unplugging your base for 30 seconds. Re-
plug it into the power outlet.
Ensure the surge protection or the power
outlet is working. Test it by plugging in
another working electronic appliance.
The unworked power outlet may be led by
the tripped electrical circuit breaker.
Check the box of electrical service breaker.
Re-pair the remote control (see Wireless
pairing operation).
Remote control does not illuminate
Replace batteries in the remote control.
Install 3 AAA batteries correctly.
The base cannot return to the flat position.
Ensure the base is not obstructed. Remove
the obstruction.
Ensure there is a sufficient space between
the wall or headboard and the edge of the
mattress. The insufficient space may
obstruct the movement of the base.
Excessive noise of massage function.
Place carpet pieces or soft material
beneath each leg of the base.
If headboard is equipped ensure the
hardware of the headboard brackets are
tightened firmly.
Ensure the base stands clear of walls,
nightstands or other objects.
Minor interference with lifts functions.
Replace batteries in remote control if
necessary.
Ensure you’re operating within 10% duty
cycle (see Restrictions of your adjustable
base).
Press the adjust buttons squarely and
accurately.
Control box may be subject to the common
radio frequency from other devices.
Reprogram the remote control and the
control box on a different radio frequency
if necessary (see Wireless pairing
operation).
USB ports do not charge electronic
gadgets.
Try another well-working USB cable.
Unplug all USB cables for 10 minutes to
reset and try it again.


20 YEAR LIMITED WARRANTY
Your New Adjustable Base has a 20 Year Limited Warranty, subject to the terms and
conditions set forth herein.
The Purchaser must show original proof of purchase for Warranty to be valid.
The decision for repair or replacement of defective parts under this limited warranty is the
option and sole discretion of the manufacturer.
Year 1: Full Coverage of Parts and Labor
This adjustable base is warranted by the manufacturer against defects and workmanship
for a period of one year from the date of purchase.
During this time, the manufacturer will repair or replace, at no cost to the original
purchaser, any warranted parts found to be defective by the manufacturer. To request
service during this time period, you may call 1-855-801-2839 to arrange for assistance.
Please have your original invoice in hand when calling with questions or request for service.
Years 2 –3: Full Coverage of Parts Only
During years 2 through 3 from the original purchase date, the manufacturer will offer
replacement parts for any defective adjustable base parts determined by the manufacturer
to be defective.
The manufacturer’s liability is limited to the replacement of the defective electrical and
mechanical parts only.
The purchaser shall bear all transportation costs for parts and installation labor related to
the delivery and replacement of the defective parts.
Years 4 –20: Full Coverage of Mechanical Parts Replacement
During years 4 through 20, the manufacturer will offer mechanical replacement parts for
any mechanical base part to be found defective at 1/16 of the current replacement parts
multiplied by the number of years from the original purchase date.
The manufacturer’s liability is limited to the replacement of the defective mechanical parts
only. This does not apply to the fabrics, electrical components, lift motors, massage motors
or wood components.
The purchaser shall bear all transportation costs for parts and installation labor related to
the delivery and replacement of the defective part.
Additional Terms and Conditions:
This warranty is void and does not apply:
To any damaged caused by user
If damaged occurred during transit or mishandled
Subjected to physical or electrical abuse or misuse
Exceeded the Load Capacity recommended by the manufacturer in your Owner’s
Manual
Repair or replacement of adjustable base parts will be the sole remedy of the purchaser.
There shall be no liability on the part of the manufacturer, its respective parents,
subsidiaries, divisions or affiliates for any special, indirect, incidental or consequential
damages or other damages, claim or loss not expressly covered by terms of this Limited
Warranty. For further assistance or service beyond year 1, please contact the dealer you
purchased your Adjustable Base from.
This manual suits for next models
1
Table of contents
Popular Indoor Furnishing manuals by other brands


Balt
Balt 89847 Assembly instructions

Wren
Wren FRONTALS INFINITY Attachment guide

Great Little Trading
Great Little Trading Northcote L2505 Assembly instructions

Vogue
Vogue CR988 Assembly instructions

Southern Enterprises
Southern Enterprises OC877400TX Assembly instructions

DESKHAUS
DESKHAUS APEX PROMAX/6 Product assembly instructions


