Denver LDD-2260 User manual

21.6” TFT LED TV
Operating Instructions
LDD-2260

LED
5.6
5.5
Table of contents
Copyright notice
Design and specications are subject to change without notice.
1. Safety........................................................................... 3
1.1 General safety instructions ..............................................3
2. Preparations for use................................................... 3
2.1 Package contents ............................................................3
3. Installation................................................................... 4
3.1 Connecting random equipment ........................................4
3.2 Connecting to the mains ..................................................5
4. Functions..................................................................... 5
4.1 TV/DVD Combi ........................................................5
4.2 Remote control...............................................................6
5. Operation................................................................... 7
5.1 Quick start ...................................................................... 7
5.2 TV setup menu operation............................................... 9
5.3 TV functions ...................................................................10
5.4 DVD functions ................................................................11
DVD setup menu operation............................................13
PC monitor settings........................................................15
6.Technical data
...........................................................
16

LED TV/DVD Combi
3
General safety instructions1.1
! WARNING
Do not put force on the appliance. The appliance can fall and can
cause serious injury.
! CAUTION
Do not spill any liquid on the appliance.
! WARNING
Do not insert any objects in the ventilation holes.
! CAUTION
Do not block the ventilation holes.
i This appliance is double insulated; therefore no earth wire is
required. Always check that the mains voltage corresponds to the
voltage on the rating plate. Never attempt to replace the adaptor
plug with a regular mains plug.
L This appliance employs a laser system. To prevent direct exposure
to the laser beam, do not open the appliance.
Visible laser radiation when open and interlock defeated.
Preparations for use2.
Package contents
The following items are included in the received package:
1
1 Foot
1 Set of screws
1 AC/DC adaptor + cable
1 Remote control
2 Batteries (AAA)
1 Operator manual
2.1

4
Connecting random equipment3.1
The appliance includes various options for
permanent connection of random equipment.
Suitable cables can be purchased at your
reseller.
Audio connections (input)
These connections allow you to receive audio
signal from a connected VCR or amplier.
● L/R AUDIO: Connect a suitable cable to the
L/R channels of the AUDIO connection.
Video connections
These connections allow you to receive video
signal from a connected VCR or DVD player.
The appliance has the following video outputs
(in order of preference):
● HDMI: Connect a suitable cable into the HDMI
connection.
● COMPONENT: Connect a suitable cable to the Y/Pb/Pr channels of the
COMPONENT connection.
● SCART: Insert a suitable cable into the SCART connection.
● COMPOSITE: Insert a suitable cable into the VIDEO connection.
PC connections
The appliance has the following inputs to connect to your personal computer.
● Audio connection: Connect a suitable cable into the PC-A IN connection.
● Video connection: Connect a suitable cable into the VGA video
connection.
Cable connection
● Insert a suitable cable into the TUNER connection.
PC Audio

5
9
ALD2215FH
Connecting to the mains3.2
● Connect the adaptor plug on the adaptor
cable to the DC-12V connection.
● Connect the mains plug to a wall socket.
Functions4.
4.1 LED TV/DVD Combi

P.P button
6
Remote control4.2
General functions
15 Digit buttons (0-10+)
16 Q.VIEW button
17 MUTE button
18 VOL - button
19 ASPECT button
20 PROG - button
21 I/II button
22 VOL + button
23 MENU button
24 PROG + button
25 SOURCE button
26 SWAP button
27 SLEEP button
28 DISPLAY button
29
30 POWER button
i The PROG +/- and VOL +/-buttons are
buttons for navigation in the television
and teletext menus.
Teletext functions
31 Coloured buttons
32 SIZE button
33 REVEAL button
34 INDEX button
35 TEXT button
36 SUB PAGE button
37 STOP button
38 MIX button
30
25
29
28
27
26
24
23
22
21
20
15
19
17
18
16
38
37
36
35
33
34
32
31

7
DVD functions
39 OPEN/CLOSE button
40 NEXT button
41 PREV button
42 REPEAT button
43 SLOW button
44 ANGLE button
45 DVD menu button
46 Arrow buttons
47 ENTER button
48 DVD setup button
49 GO TO button
50 DISPLAY button
51 AUDIO button
52 SUBTITLE button
53 PROGRAM button
54 ZOOM button
55 TITLE button
56 Play/Pause button
57 STOP button
58 FWD button
59 REW button
i
The arrow buttons are buttons for navigation in the DVD menu.
Operation5.
Quick start5.1
General functions
● To switch on the appliance, press the POWER button (30). To switch back
to the standby mode, press the STANDBY button (7) again.
55
59
58
56
57
54
53
52
51
49
50
46
48
47
42
45
41
40
39
44
43

to select the AUTO SEARCH setting.
Press the VOL +/- button (22/18) to select the CHANNEL menu.
Press the VOL +/- button (22) to enter the mode.
Press the PROG +/- button (24/20) to select the mode.
To select the sound mode, press the
To select the screen size,
press the P.P button
To select the desired picture mode .
To set the sleep timer (OFF/15/30/45/60/75/90/105/120 min), press the
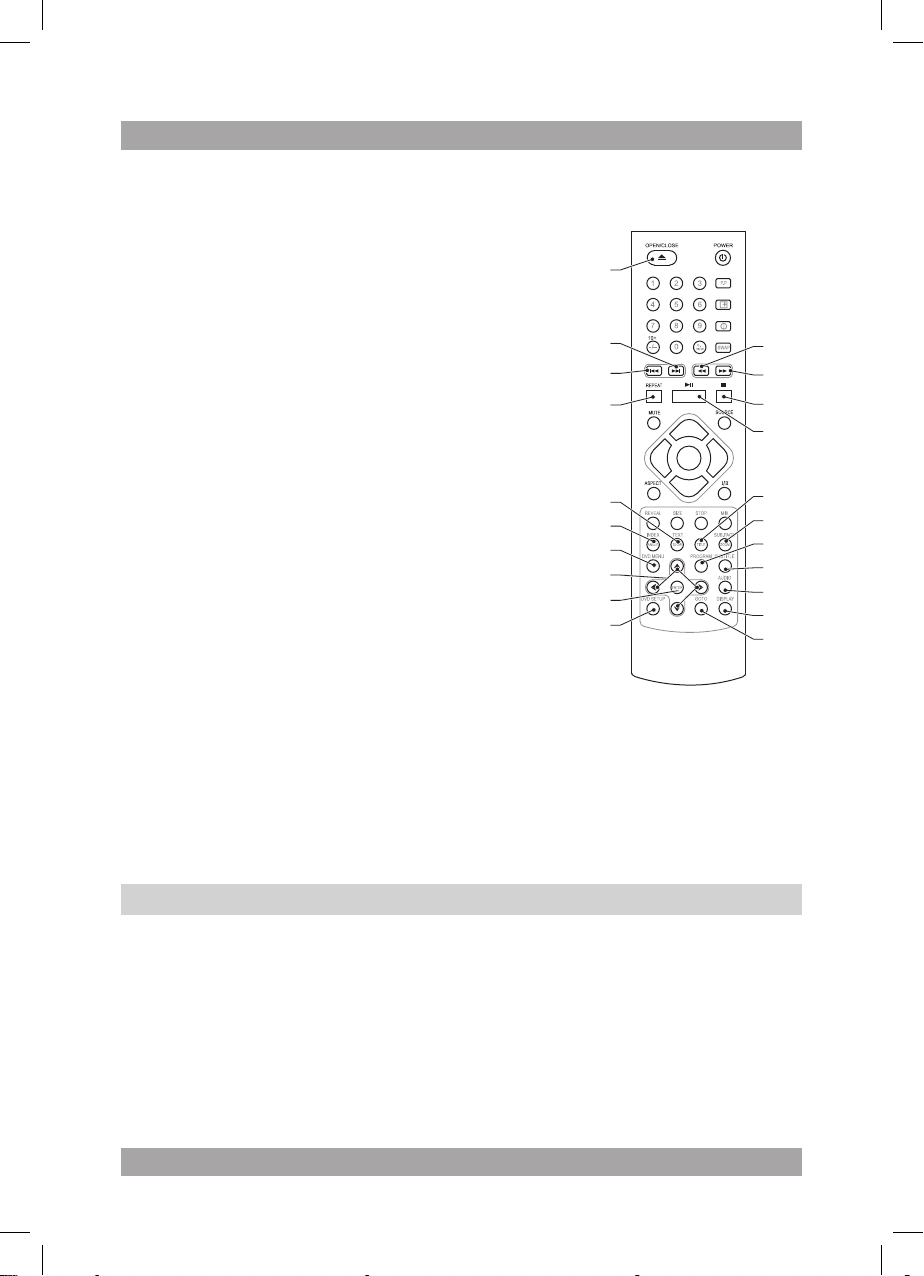
SLEEP button (27).
To select the source mode (TV/AV/SCART/YPBPR/PC/HDMI/DVD):
(24/20)
(24/20)
8
●
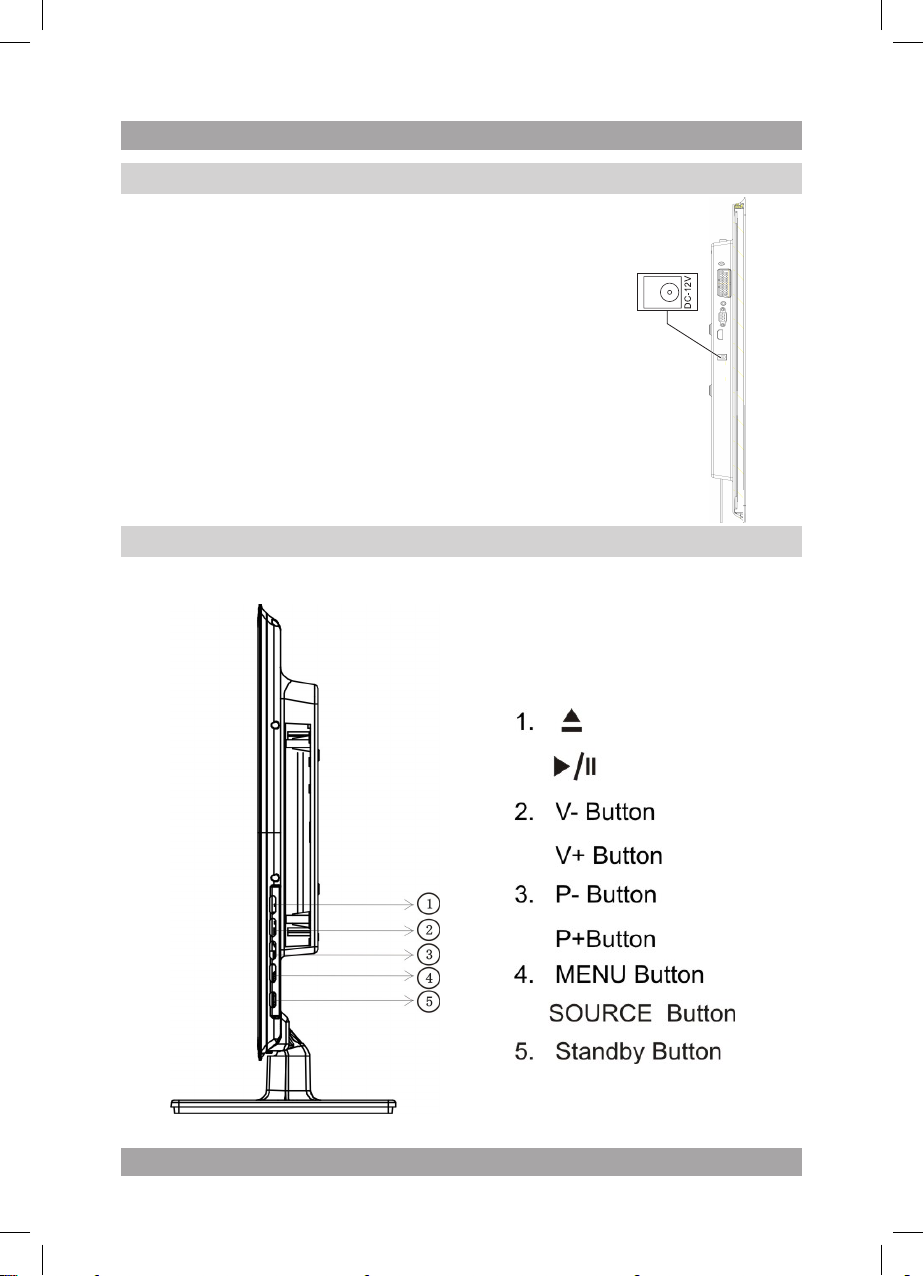
Press the SOURCE button (25). •
•
•
● To adjust the volume, press the VOL + button (22) or the VOL - button (18).
● To mute or restore sound, press the MUTE button (17).
●
● To select the desired picture mode
(29).
● To display the setting on the screen, press the DISPLAY button (28).
● press the ASPECT button (19).
● I/II button (21).
● To connect a headphone, insert the cable plug in the headphone jack (14).
TV functions
● Switch on the appliance. Select the TV mode.
● To quickly install the channel list:
Press the MENU button (23).•
•
Press the PROG +/- button to select the COUNTRY setting.•
Press the VOL +/- button to enter the setting.•
Press VOL +/- to select the country from which the program is received.•
Press the PROG +/- button•
Press the VOL +/- button to enter the setting.•
Press VOL +/- to start the search program that sets the available •
channels automatically.
Press the MENU button (23) to store the settings and exit.•
● To select a channel, press in the number with the digit buttons (15).
Alternatively, use the PROG +/- buttons (24/20) to zap through the channel
list.
● To recall to the last viewed program, press the Q. VIEW button (16).
● For extended instructions, read the paragraph "TV functions" further on in
this manual.
DVD/CD functions
● Switch on the appliance.
● Select the DVD mode.
● Insert a disc in the slot (3) with the label backwards.
● To start playback, press the PLAY/PAUSE button (56) once.
● For extended instructions, read the paragraph "DVD/CD functions" further
on in this manual.

NOISE REDVCTION:to set it off/low/high.
SOUND MODE: to set the sound mode (PERSONA/STANDARD/MOVIE
AVL: to switch the volume control ON or OFF.
/MUSIC)
PICTURE MODE: to set the picture mode (PERSONAL/STANDARD/MOVIE
/VIVID).
COLOR: to adjust the screen colour.
TINT: to adjust the screen tint. This option is available for NTSC playback
9
TV setup menu operation5.2
To change the initial settings
The following actions have to be carried out with the remote control:
● Press the MENU button (23).
● Press the VOL +/- button (22/18) to select a menu.
● Press the PROG +/- button (24/20) to enter the selected menu.
● Press the VOL +/- button to select a setting.
● Press the VOL +/- button to adjust the setting.
● Press the MENU button to store the settings and exit.
Picture menu
● CONTRAST: to adjust the screen contrast.
● BRIGHTNESS: to adjust the screen brightness.
●
only.
●
● SHARPNESS: to adjust the screen sharpness.
● COLOUR TEMP: to set the screen colour temperature
●
Sound menu
●
● BASS: to adjust the bass.
● TREBLE: to adjust the treble.
● BALANCE: to adjust the balance.
●
LANGUAGE:to select country language
LANGUAGE,OSD TIMER,TRANSPARENCE,OVERSCAN,and RESET
In the SETTING menu you may change the initials set up of preference that
SETTING MENU
your TV back to its factory default status.
OSD TIMER :to select the OSD close timer you want
TRANSPARENCE:you kan change the balance
OVERSCAN:you can select ON or OFF
RESET:you can reset the options in the SETTING menu.
●
●
●
●
●
●

preference that include SLEEP TIMER,ASPECT,TT LANGUAGE,
In the FUNCTION menu you may change the function set up of
FUNCTION
AFT: to select the option on or off.
MANUAL SEARCH: to selece frequency.
PROGRAM EDIT: to edit the list number of a channel.
FINE: press VOL +/- to ne-tune the signal frequency.
10
-
●
TV functions5.3
Using the SWAP function
This function is used to adjust the channel list order.
● Press the SWAP button (26). A content menu will display on the TV screen.
BLUE SCREEN,SYSTEM LOCK and FTI.
SLEEP TIMER:to select timer
ASPECT: to select the mode you want.
TT LANGUAGE: to select language
BLUE SCREEN: to select ON or OFF.
SYSTEM LOCK: enter your 4 digital code(factory default code is "0000")
unless reviously change to enter the submenu.
FTI : to enter FIRST TIME INSTALLATION
●
●
●
●
●
●
●
SOUND SYS: to select the sound system (B/G, D/K, I, L/L').
COLOR SYS: to select the colour system (AUTO/PAL/SECAM).
-
-
SKIP: select OFF to activate the settings for the current channel. Select -
ON to bypass the settings for the current channel.
PROGRAM: to edit the channel number.
MANUAL PROGRAM: to start a manual search for programs. -
-
The CHANNEL menu only works in TV mode.
CHANNEL menu
i
AUTO SEARCH: press VOL +/- to start the search program that sets the
● COUNTRY: to select the country from which the program is received.
● available channels automatically.

11
● Press the volume buttons to select a desired channel, and use the arrow
button down to highlight the next entry.
● To conrm the selection and start the program swap, move the highlight to
"SAVE" and press the volume button.
Teletext functions
● Press the TEXT button (35) to open the Teletext mode.
● To select a page, press in the number using the digit buttons.
● To select the index page, press the INDEX button (34).
● To show hidden information, press the REVEAL button (33) (optional for
some Teletext pages).
● To switch on subtitles, press the MIX button (38). Press the button once
again to exit this function.
● To select the size of Teletext page:
Press the SIZE button (32) once to enlarge the upper half of the page.•
Press the button once again to enlarge the lower half of the page.•
Press the button once again to cancel the function.•
● To hold a Teletext page, press the STOP button (37).
● To show a sub page, press the SUB.PAGE button (36).
● Press a coloured button to select a quick link to a teletext page (31).
DVD functions5.4
After the disc has been loaded, a content menu will display on the TV screen.
● Press the arrow buttons (46) to select a menu item.
● Press the ENTER button (47) to enter the selected menu item.
During playback, the following functions are available:
● To select a chapter (DVD) or track (CD), press the digit buttons (15).
● To select the next or previous chapter (DVD) or track (CD), press the
PREV button (41) or the NEXT button (40).
● To forward or rewind the DVD, press the FWD button (58) or the REW
button (59). The available speeds are: 2x, 4x, 8x, 16x, 32x.
● To pause playback, press the PLAY/PAUSE button (56) once; to resume
playback, press the button again.
● To stop playback temporarily, press the STOP button (57) once. Press the
button again to stop playback permanently, or press the PLAY/PAUSE
button (56) to resume playback.
● To playback in slow-motion, either forward or backward, press the SLOW
button (43) repeatedly. The available speeds are: 1/2, 1/4, 1/8, 1/16.

12
● To repeat a chapter (DVD) or one or all tracks (CD):
Press the REPEAT button (42) once to repeat the current chapter or •
track.
Press the button once again to repeat the current title.•
Press the button once again to repeat all chapters or tracks.•
Press the button once again to cancel the function.•
● To view a specic title of a DVD, press the TITLE button (55).
Use the arrow buttons to select the title.
● To select the audio language of a DVD, press the AUDIO button (51)
repeatedly until the desired language is set.
● To switch on the subtitles of a DVD, press the SUBTITLE button (52).
Press the button again to switch off the subtitles.
● To select extra information of a DVD or CD (remaining time/passed
playtime/track number/chapter number), press the DISPLAY button (50).
● To select the camera angle, press the ANGLE button (44).
● To return to the main menu, press the DVD MENU button (45).
i
● A DVD that does not match the region code cannot be read by this appliance.
● The screen saver becomes active if no disc has been loaded for 3 minutes,
or if the appliance has been in STOP mode for 3 minutes.
Using the GO TO function
The GO TO function can be used to select a specic starting point on a DVD
or CD.
● Press the GO TO button (49).
● Press the arrow buttons (46) to select an entry.
The possible entries for DVD are:
Disc time -
Chapter -
Title -
Chapter time -
Title time -
The possible entries for CD are:
Track time -
Specic track -
● Press the digit buttons to set a selection.

13
Using the PROGRAM function
● Press the PROGRAM button (53) to enter the PROGRAM function.
● Press the digit buttons to select a desired track, and use the arrow button
down to highlight the next entry.
● To conrm the selection and start the program, move the highlight to
"START" and press the ENTER button.
● To stop the progam, press the PROGRAM button (53) and press ENTER.
Using the ZOOM function
This function can be used for zooming in and out on photos and DVDs.
The available zoom ratios are: 2x, 3x, 4x, 1/2, 1/3, 1/4.
● Press the ZOOM button (54).
● Press the ZOOM button again to set the correct size.
● Press the arrow buttons to move through the picture.
DVD setup menu operation5.5
i
This menu only works in DVD mode.
To change the initial settings
The following actions have to be carried out with the remote control:
● Press the DVD SETUP button to select the setup menu.
● Press the arrow buttons to select an item and change the settings.
● Press the DVD SETUP button to store the settings and exit.
General setup page
● In the TV DISPLAY section, press the arrow buttons to choose pan and
scan display (Normal/Ps), letterbox display (Normal/Lb) or widescreen
display (Wide).
● In the ANGLE MARK section, press the arrow buttons to switch this
function ON or OFF.
● In the OSD LANG section, press the arrow buttons to choose the
language.
● In the CLOSED CAPTIONS section, press the arrow buttons to switch this
function ON or OFF.

TV TYPE:Selects the colour system.
● In the SCREEN SAVER section, press the arrow buttons to switch the
screen saver ON or OFF.
Audio setup page
DOWNMIX
● Select LT/RT to mix 5.1-channel audio into left channel and right channel.
● Select STEREO to mix 5.1 channel audio into signal stereo.
i This function is only available for 5.1-channel discs with Dolby
AC-3 encoding.
Dolby setup page
DUAL MONO
● Stereo: both channels as is. STEREO is the default setting.
● L-Mono: left channel only.
● R-Mono: right channel only.
● Mix-Mono: the average of both the left and right channel.
DYNAMIC
● Select the value for the dynamic range compression.
Preference setup page
i
The PREFERENCE menu works only with an empty DVD player.
LANGUAGES
● In the AUDIO section, choose the audio language.
● In the SUBTITLE section, choose the subtitle language.
● In the DISC MENU section, choose the language for the disc menu.
PARENTAL
● Set a rating for movies played by the appliance. Movies rated higher than
the level set for the parental lock can not be viewed.
● The password to reset the rating is 1369.
i This function is only available with discs that have parental rating
encoded.
14

: to adjust the screen automatically.
DEFAULT
● Restore all default settings of the appliance, except the settings for the
menu items PARENTAL and PASSWORD.
Password setup page
PASSWORD MODE
● Switch this function ON or OFF.
PASSWORD
● Enter the current password in the rst box.
● Enter the new password in the second box. Enter the new password again
in the third box to conrm.
i The default password (1369) is always active, even if the password
has been reset.
PC monitor settings5.6
i
This menu only works in PC mode.
● HPOS/VPOS: to select the horizontal or vertical position of the screen.
● CLOCK: to adjust any bar or stripe in the background.
● PHASE: to adjust the pixel phase in case there is picture interference.
●
AUTO ADJUST
15

LED screen
6.
170°/160°
548.6 MM (21.6")
Technical data
Parameter Value
Voltage 100 ~ 240 VAC / 50 ~ 60 Hz
Power consumption 50 W
Standby power consumption 1 W
Max power output 2 x 3 W (RMS)
Headphones output impedance 32 Ω
Dimensions (W x H x D)
without foot 530 x 400 x 75 mm
with foot 530 x 435 x 196 mm
Weight 5.5 kg
Parameter Value
Diagonal size
Ratio 16:9
Resolution pixels
Brightness 350 cd/m2
Contrast ratio 1000:1
Response time 5 ms
Viewing angle horizontally / vertically
Television system PAL/SECAM
Set-up
Parameter Value
Wall mountable VESA standard (100 x 100 mm)
Remote control
Parameter Value
Power consumption 2 x 1,5 V
Battery size AAA
1920X1080
16


基本操作
www.denver-electronics.com
ALL RIGHTS RESERVED,COPYRIGHT DENVER ELECTRONICS A/S
Table of contents
Other Denver LED TV manuals

Denver
Denver LED-4073 User manual

Denver
Denver LDD-2468 User manual

Denver
Denver LDD-2249 User manual

Denver
Denver LED-3264DVBTS User manual

Denver
Denver LED-2453MC User manual

Denver
Denver LED-2253DVBT User manual

Denver
Denver LED-5568T2CS User manual

Denver
Denver LED-2256DVBTS User manual

Denver
Denver LED-5571 User manual

Denver
Denver LDD-1953MC User manual

Denver
Denver LDD-2466T2CS User manual

Denver
Denver LED-3266T2CS User manual

Denver
Denver LDD-1953 User manual

Denver
Denver LED-5569T2CS User manual

Denver
Denver LED-2449 User manual

Denver
Denver LED-2456DVBTS User manual

Denver
Denver LED-6570 User manual

Denver
Denver LED-2259TC User manual

Denver
Denver LDD-2253 User manual

Denver
Denver LED-5573K User manual