Derale 16817 User manual

16817-16820-16827-InstructionSheet
INSTALLATION INSTRUCTIONS
HIGH OUTPUT RAD FAN ASSEMBLY
PART # 16817, 16820 & 16827
Revised-12/15/2011
KIT CONTENTS
QTY. DESCRIPTION
1 Fan Shroud Assembly
4 Angle Brackets
1 Rubber Fan Shroud Seal
QTY. DESCRIPTION
16 1/4-20 x 3/4” Hex Bolts
16 1/4-20 Lock Nuts
40 1/4” Flat Washers
Derale Performance, Los Angeles, CA 800.421.6288 www.derale.com
Diagram #1
Engine
Puller Fan
Air Flow
Radiator
Please read these instructions completely before beginning installation
IMPORTANT
This fan assembly is designed for PULLER APPLICATIONS
ONLY Engine side of radiator. (See Diagram #1)
TOOLS NEEDED
7/16” Open End Wrench
7/16” Socket and Ratchet
Wire Stripper
Wire Crimping Tool
Diagram #3
Cross Flow Radiator
Down Flow Radiator
Angle Brackets
MOUNTING OPTIONS
Angle
Brackets
Diagram #2
Option 1
Flush Mount
Angle
Bracket
Option 2
Recessed Mount
Rubber Seal
Rubber Seal
Angle
Bracket
(Page 1)
Adjustment Range
3 3/4”
Adjustment
Range
Derale Performance, Los Angeles, CA 800.421.6288 www.derale.com
WIRING OPTIONS
Switched - Utilizing an automotive rated thermostat or manual switch
There are a few options on how to activate (turn on) your new Electric Fan Assembly.
1. Manual Switch - Install a switch in the passenger compartment and turn on Electric Fan as desired.
2. Electric Fan Thermostat Switch
A. Adjustable Thermostat - Allows an adjustment range for you to determine optimal turn on temperature.
B. Pre Determined Temperature - Thermostat has a pre determined temp. from the factory that determines turn on temp.
Important: When purchasing a thermostat always consider the maximum amp draw. Some thermostats are not designed to
properly handle 25 amps.
Note: When installing the Electric Fan with a Thermostat always follow manufacturer's instructions for specific details. In some
cases you will not need the supplied relay harness.
(Page 2)
INSTALLATION
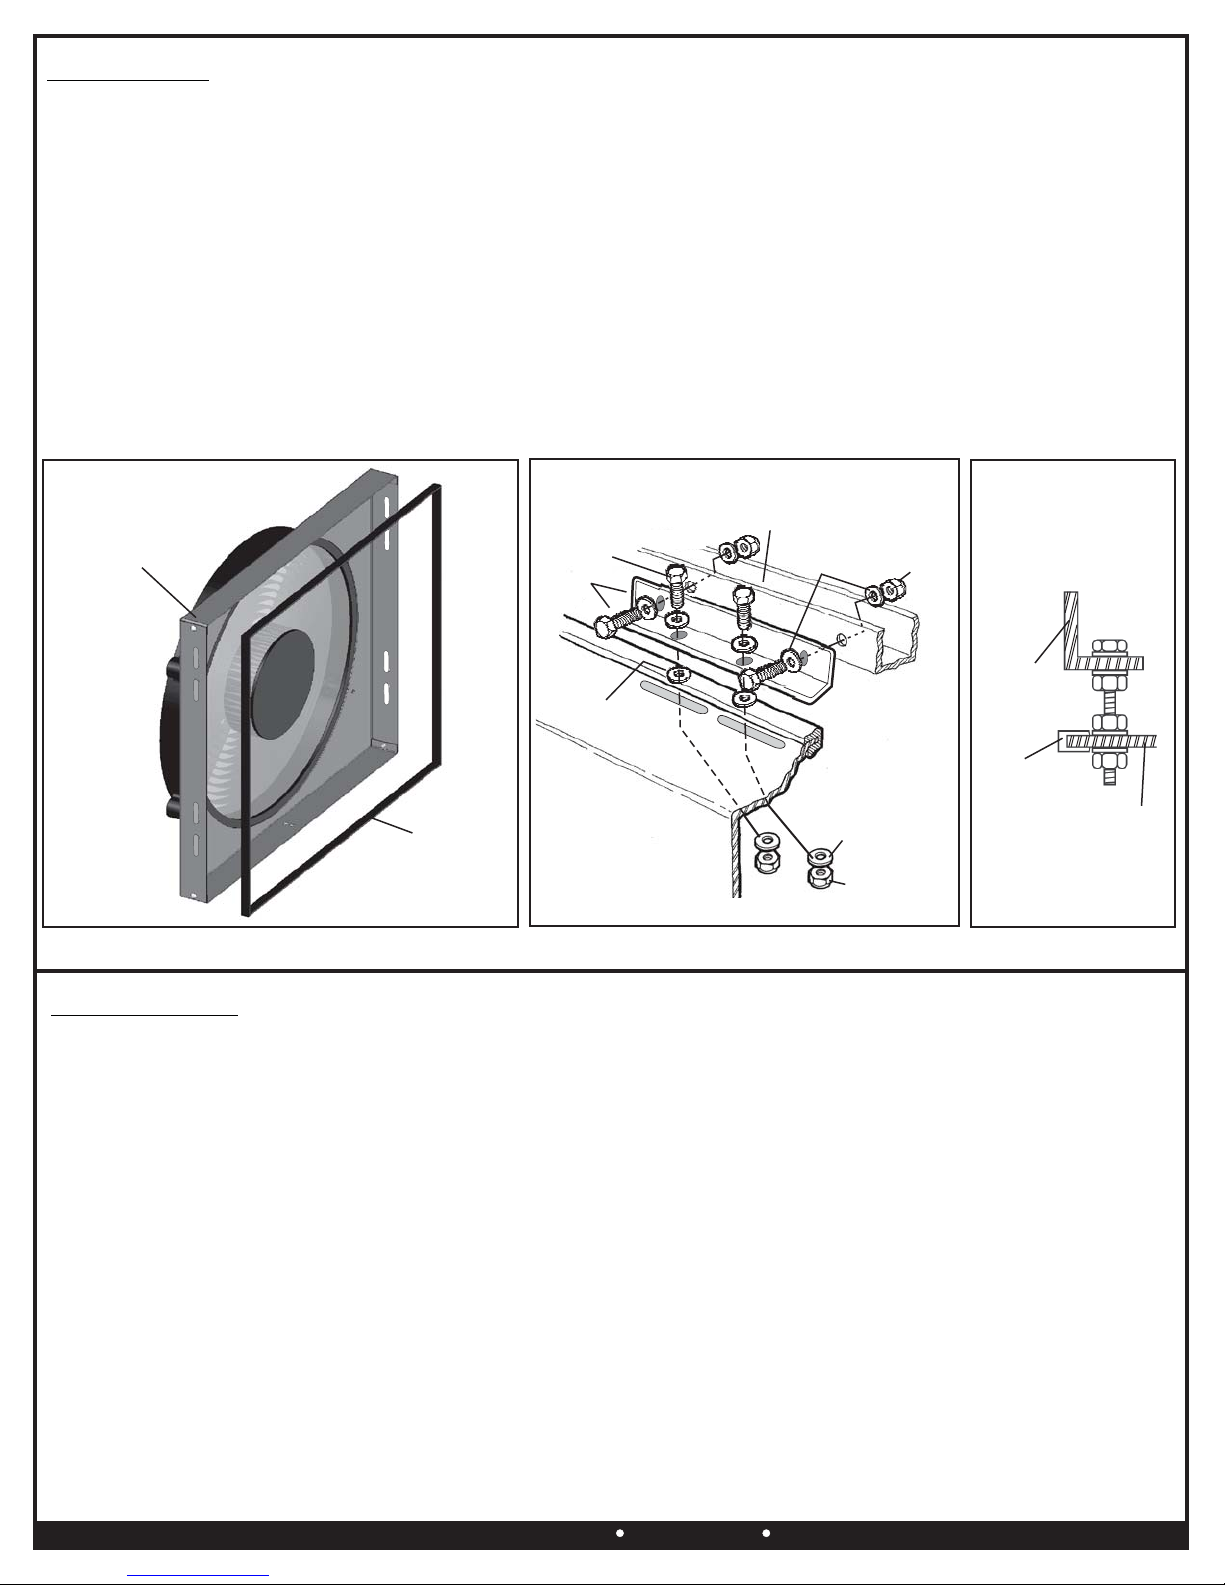
1. Using a table or workbench, lay the Electric Fan Assembly on a flat surface, Electric Fan facing down.
2. Take the supplied Rubber Fan Shroud Seal and install it onto the bottom edge of the Fan Shroud Assembly.
(See Diagram #4)
3. Cut off any excess Rubber.
4. Identify the four Angel Brackets, 1/4-20 x 3/4” Hex Bolts, 1/4” Flat Washers & 1/4-20 Lock Nuts.
5. Attach the Angle Brackets to the Shroud using two bolts per bracket. (See Diagram #5)
In some applications where the radiator flange is not right up against the fan shroud, longer bolts can be used toNote:
space the Angle Brackets. (See Diagram #6) Hardware not included!
6. Position the Electric Fan Assembly against the radiator in the desired location.
7. Using the remaining 1/4-20 x 3/4” Hex Bolts, 1/4” Flat Washers & 1/4-20 Lock Nuts, attach the Electric Fan Shroud
Assembly to the radiator. (See Diagram #5)
In some cases the radiator flange may have to be drilled for proper alignment.Note:
Diagram #4
Fan Shroud
Assembly
Rubber Fan
Shroud Seal
OPTIONAL
MOUNTING
Fan Shroud
Rubber Fan
Shroud Seal
Angle
Bracket
Provided
Diagram #6
1/4” Bolt
Radiator
Flange
1/4” flat
Washers
1/4” Nyloc Nut
Diagram #5
1/4” Flat Washer
Fan Shroud
Slotted
Holes
1/4-20 x 3/4”
Hex Bolts
1/4” Flat Washer

Derale Performance, Los Angeles, CA 800.421.6288 www.derale.com
Warning: Installation of accessories should only be undertaken by those with mechanical knowledge and are familiar with working on
vehicles. Always use eye protection (goggles, safety glasses or shield). Park the vehicle in a well lit area, on level ground and apply the
parking brake. Only work on a cold vehicle that has been sitting overnight, failure to do so will result in severe burns and injury. Before starting
the vehicle, make sure no tools or any other items are left under hood that could interfere with or be drawn into moving parts of the engine.
Failure to follow instructions can lead to severe damage and personal injury.
Diagram #7
87
87A
30
86 85
Orange
Fan (+)
Green/
Yellow
Switch (+)
Red
Battery (+)
Black
Ground (-)
Relay
NOTE: To confirm color of positive fan leads see Red/Silver
manufacturers label on the electric fan.
Relay
Red
Orange
Yellow
Black
Green
To Positive (+) side of battery
To (+) 12V Switched Power
To ground (-)
To A/C clutch (+)
Blue Wire (+) Black Wire (-)
To chassis ground (-)
Fan
(Page 3)
Wiring Diagram Using Relays (Not Supplied)
WIRING INSTALLATION USING RELAY(S) (NOT SUPPLIED)
RED Wire - Attach to the Positive side of Battery (+)
BLACK Wire - Attach to a good Chassis ground (-)
ORANGE Wire - Attach to the BLUE Positive Electric Fan Lead (Fan +)
YELLOW Wire - Attach to (+) 12V Switched Power (Thermostat or Manual Switch)
GREEN Wire* - (OPTIONAL) Attach to the Positive feed from the A/C Clutch
*This wire will allow you to turn on the Electric Fan every time the vehicles air conditioning is turned on.
If you do not wish to use this option, please disregard the Green wire.
ELECTRIC FAN
BLUE Wire - (+) Positive Fan lead Attach to the ORANGE wire coming from the relay harness
BLACK Wire - ( )(-) Negative Fan Lead Attach to a good Chassis ground See Diagram #7
This manual suits for next models
2
Table of contents
Other Derale Fan manuals


Popular Fan manuals by other brands


Westinghouse
Westinghouse Apollo Trio Plus Installation

Home Decorators Collection
Home Decorators Collection EASTWIND 43260 Use and care guide

Visual Comfort & Co.
Visual Comfort & Co. 5ASPR56 Series installation instructions

Klarstein
Klarstein Spin Doctor manual

Monte Carlo Fan Company
Monte Carlo Fan Company 8TNR56XXD Series Owner's guide and installation manual

Soleus Air
Soleus Air FT1-20-10 owner's manual