Derandi SKA-PRS-301-SMT User manual
Electric Pressure Cooker
SKA-PRS-301-SMT
120V 60Hz 1000W

IMPORTANT SAFEGUARDS
The product you have purchased is a state of the art appliance. It adheres to all of the latest
safety and technology standards; however, as with any electric appliance, there are some
potential risks. Only operate this cooker following the instructions provided and only for its
intended household use.
PLEASE READ ALL THE INSTRUCTIONS BELOW BEFORE USING THE APPLIANCE.
1. DO NOT use this cooker in a combustible or wet environment.
2. The height of food and water in the electric pressure cooker cannot exceed the maximum
capacity specified.
3. DO NOT damage the seal, if it is damaged, it must be replaced with a plastic seal. You also
don't need to use tension seal to enhance the sealing effect.
4. DO NOT rotate the rims of the cover with your hands or other tools. If the rim falls, stop using
the pressure cooker and send it to the maintenance department for repair.
5. The anti-clogging cover should be cleaned frequently to keep it clean. The pressure limiting
valve and float valve should remain unblocked.
6. DO NOT force open the electric pressure cooker if the float valve does not fall.
7. DO NOT place any heavy objects on the pressure limiting exhaust valve or replace it.
8. DO NOT use rags to block the lid and fixed points in the pot.
9. DO NOT use the inner pot for cooking in other heated places, or replace it with other
containers. The bottom of the pot and its contact surface with the heating plate should be kept
clean.

10. There is a non-stick layer in the pot, so please use a wood or plastic spoon to avoid
scratches.
11. Keep children away from the electric pressure cooker.
12. DO NOT put your hands or face close to the working pressure limiting exhaust valve. DO
NOT touch the lid during the cooking process to avoid burns.
13. If you find continuous exhaust during the cooking process, it means an abnormality has
occurred. Please cut off the power immediately and stop using the induction cooker, and then
contact customer service for repair.
14. If the electric pressure cooker fails during work, please move it from the bottom and do not
use the handle on the lid.
15. If you need to move the cooker, please hold the electric pressure cooker from the bottom,
don't use the handles on the lid.
16. DO NOT disassemble the product or replace it with other parts.
17. If the power cord is found to be damaged, it must be replaced with a power cord of the same
model. Please go to a professional repair shop or contact the customer service center for repair.
18. DO NOT touch hot surfaces. Use handles or knobs.
19. To protect against electrical shock DO NOT immerse cord, plugs, plugs, or the appliance
body in water or other liquid.
20. Intended for countertop use only.
21. Unplug the power plug from the socket when not in use and before cleaning. Please cool
down before installing or removing parts.
22. DO NOT operate the device after the power cord or plug is damaged, or the device fails.
Please contact customer service for inspection, repair or adjustment.

23. Using accessories not recommended by the manufacturer may cause injury.
24. DO NOT use outdoors .
25. DO NOT let cord hang over the edge of the table or counter, or touch hot surfaces.
26. DO NOT place electric pressure cooker on or near the hot gas, electric burner, or in a
heated oven.
27. Extreme caution must be used when moving an appliance containing hot oil or other hot
liquids.
28. Always attach plug to appliance first, and then plug cord into the wall outlet. To disconnect,
turn any control to “off ”, then remove plug from wall outlet.
29. DO NOT use appliance for other than intended use.
30. Close supervision is necessary when any appliance is used by or near children.
31. WARNING: Spilled food can cause serious burns. Keep appliance and cord away from
children. NEVER drape cord over the edge of counter. NEVER use outlet below counter, and try
not to use it with extension cords.
32. A short power-supply cord is used to reduce the risk resulting from it being grabbed by
children, becoming entangled in, or tripping over a longer cord. Longer detachable power-supply
cords or extension cords are available and may be used if care is exercised in their use.
33. Warning: Changes or modifications to this unit not expressly approved by the party
responsible for compliance could void the user’s authority to operate the equipment.
34.NOTE: This equipment has been tested and found to comply with the limits for a Class B digital
device, pursuant to Part 15 of the FCC Rules. These limits are designed to provide reasonable
protection against harmful interference in a residential installation. This equipment generates, uses
and can radiate radio frequency energy and, if not installed and used in accordance with the
instructions, may cause harmful interference to radio communications.

However, there is no guarantee that interference will not occur in a particular installation. If
this equipment does cause harmful interference to radio or television reception, which can
be determined by turning the equipment off and on, the user is encouraged to try to correct
the interference by one or more of the following measures:
Reorient or relocate the receiving antenna.
Increase the separation between the equipment and receiver.
Connect the equipment into an outlet on a circuit different from that to which the
receiver is connected.
Consult the dealer or an experienced radio/TV technician for help.
35 This equipment complies with FCC RF radiation exposure limits set forth for an uncontrolled
environment. The antenna(s) used for this transmitter must be installed and operated to provide a
separation distance of at least 20 cm from all persons and must not be collocated or operating in
conjunction with any other antenna or transmitter. Installers must ensure that 20cm separation
distance will be maintained between the device and users.
SAVE THESE INSTRUCTIONS
Thank you for choosing our product!
Congratulations on the purchase of your Smart Pressure Cooker. It has been designed to help you quickly
prepare and cook delicious meals.
To make sure you get the most out of this multi-functional cooker, we recommend you read all the
instructions, including the safety warnings, before using the product. For your own safety, please only use
the product as described in this manual.
Keep the manual in a safe place so you can easily refer to it and pass it on to any future owners of the
product.
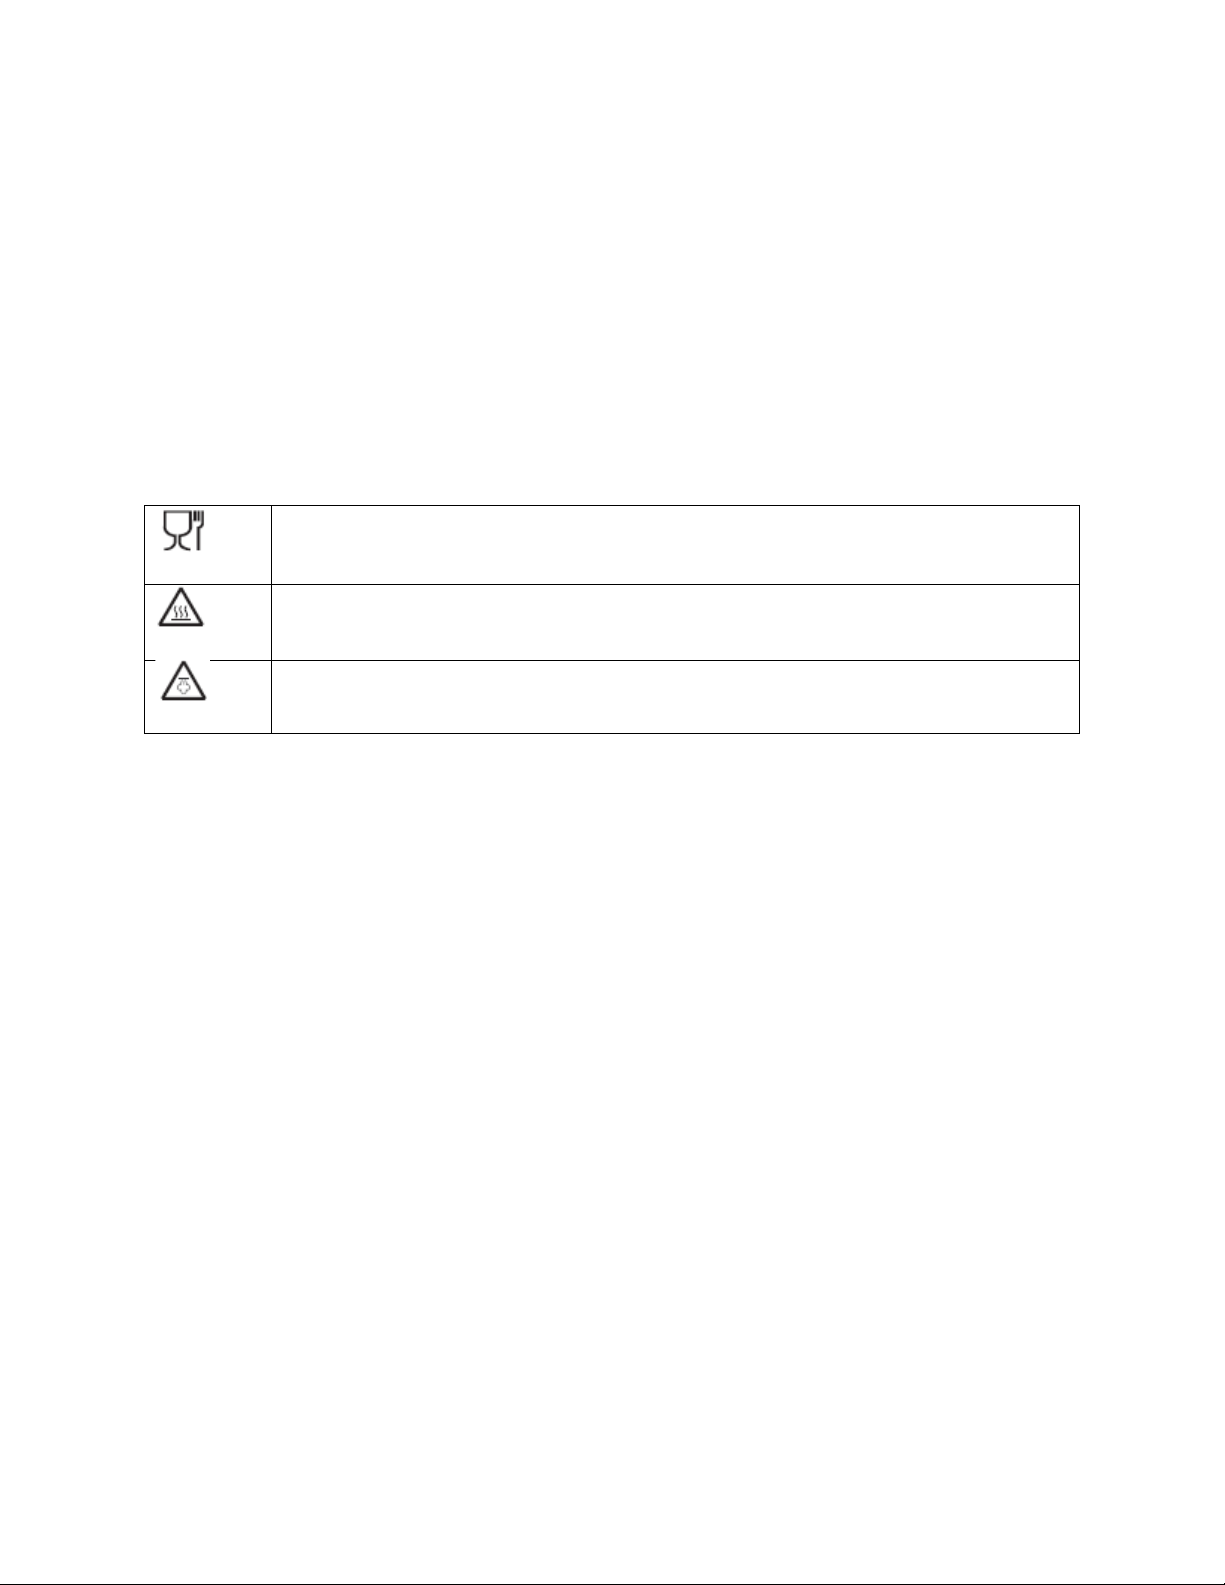
Appliance symbols
The appliance is made from food-safe materials that will not affect the taste or smell of
food.
Warning! The appliance may become extremely hot during operation. Do not touch hot
surfaces
Warning! The appliance may release hot steam during operation.
Intended purpose
Your appliance is used to cook food using pressure and non-pressure methods as well as sauté, steam and
make yogurt.
These user instructions describe the cooker’s functions. For information on the preparation of special
dishes, refer to the recipe.
The appliance is designed for private, domestic use only. The appliance must only be used indoors and
must not be used for commercial purposes.
Pressure Cooker Safety Features
The pressure cooker has several built-in safety features. If the pot's temperature or pressure exceeds
the safety parameters, then the automatic protection system will stop the cooking process. Cooking will
only resume when the pressure and temperature have returned to normal levels.
1. Excess pressure protection: when there is excess pressure, this feature will stop the pressurizing
and maintain a safe level.
2. Automatic pressure control: ensures a safe range of pressure levels.
3. Pressure regulator protection: regulates the pressure based on the function that has been
selected.
4. Safety indicator and lid lock mechanism: if the lid is not shut and sealed correctly, pressure will
not build. This feature prevents the opening of the lid while the cooker is pressurized.
5. Anti-block shield: prevents food debris from blocking the steam release vent. It must be
installed before use.
6. Steam release vent: Controls the release of steam and disperses it upwards away from the
handle. Houses the steam release valve that regulates the cooker’s internal pressure and the
steam release pipe that enables steam to come out of the inner pot and be released through the
steam release valve and vent.
7. Lid close detection: a magnetic sensor monitors whether the lid is in the locked position.
8. Automatic temperature control: regulates the temperature based on the function that has been
selected.

9. Extreme temperature and power protection: if the cooker’s internal temperature exceeds
safety limits, the power will automatically turn off.
10. High temperature warning: if the temperature is too high, the power will automatically be
turned off and an error code will display.
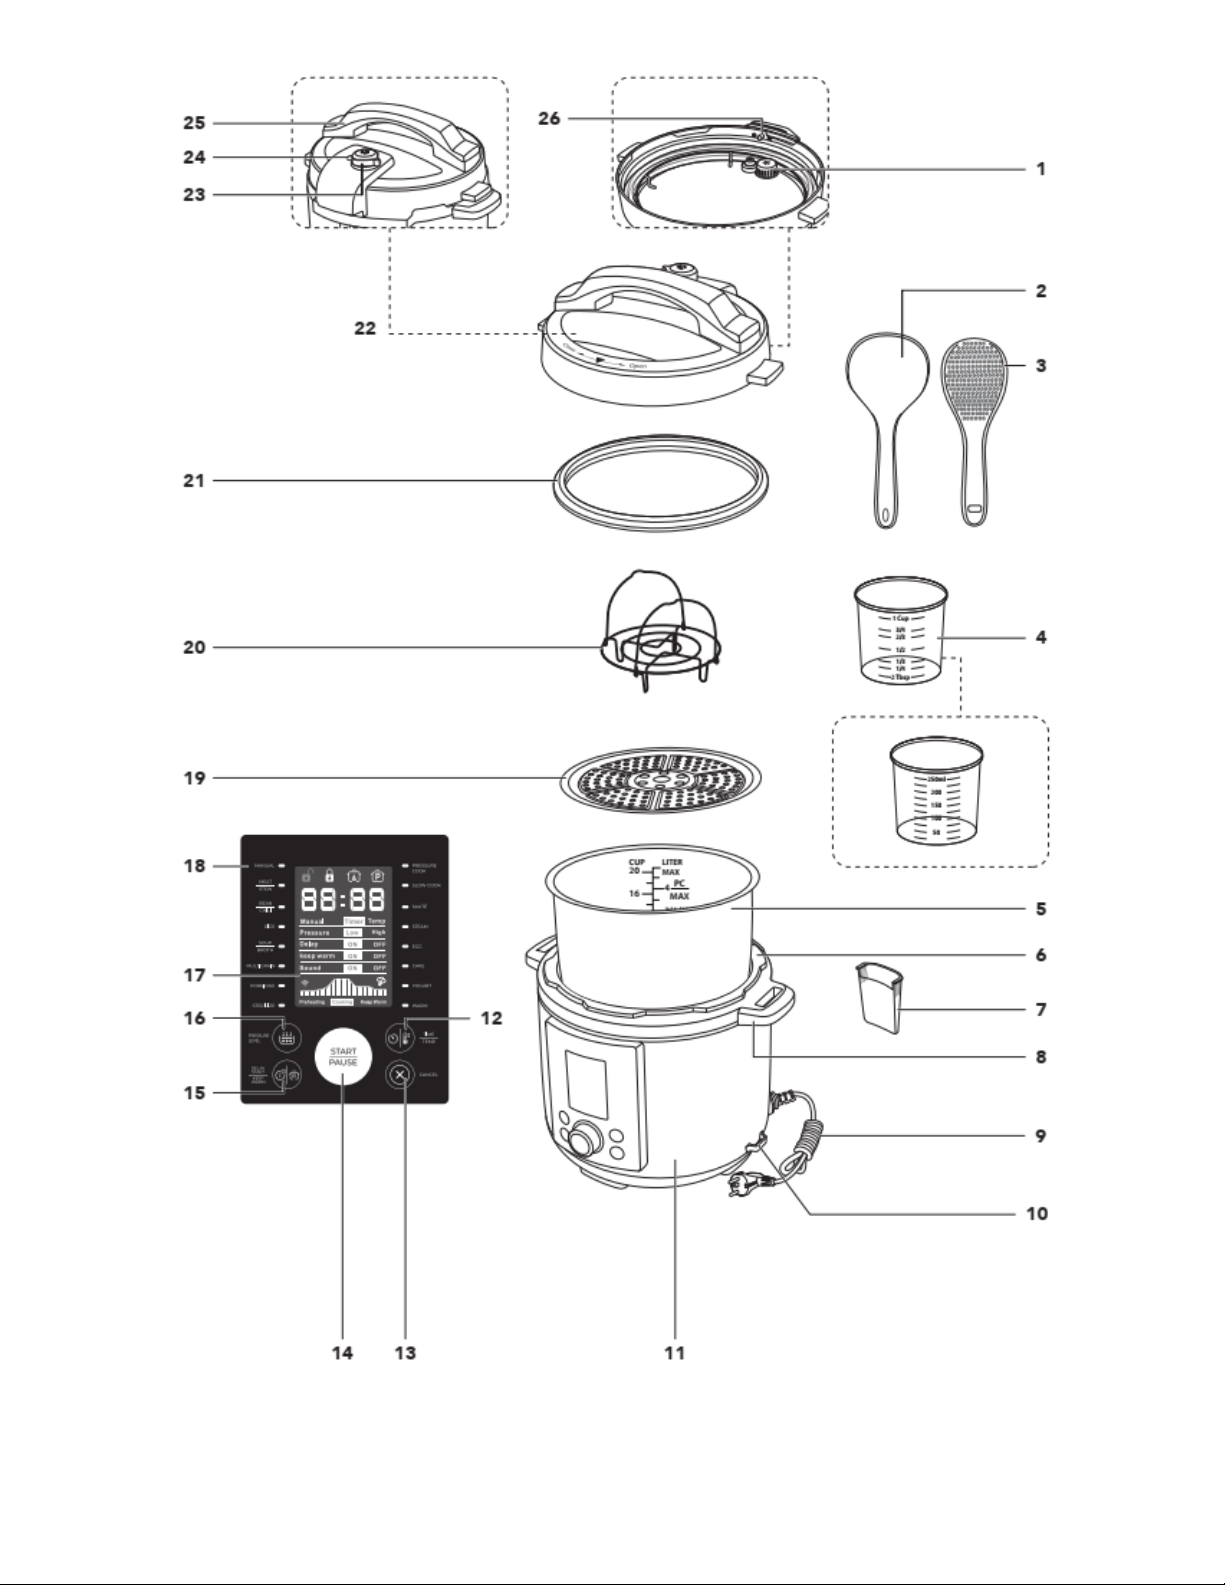

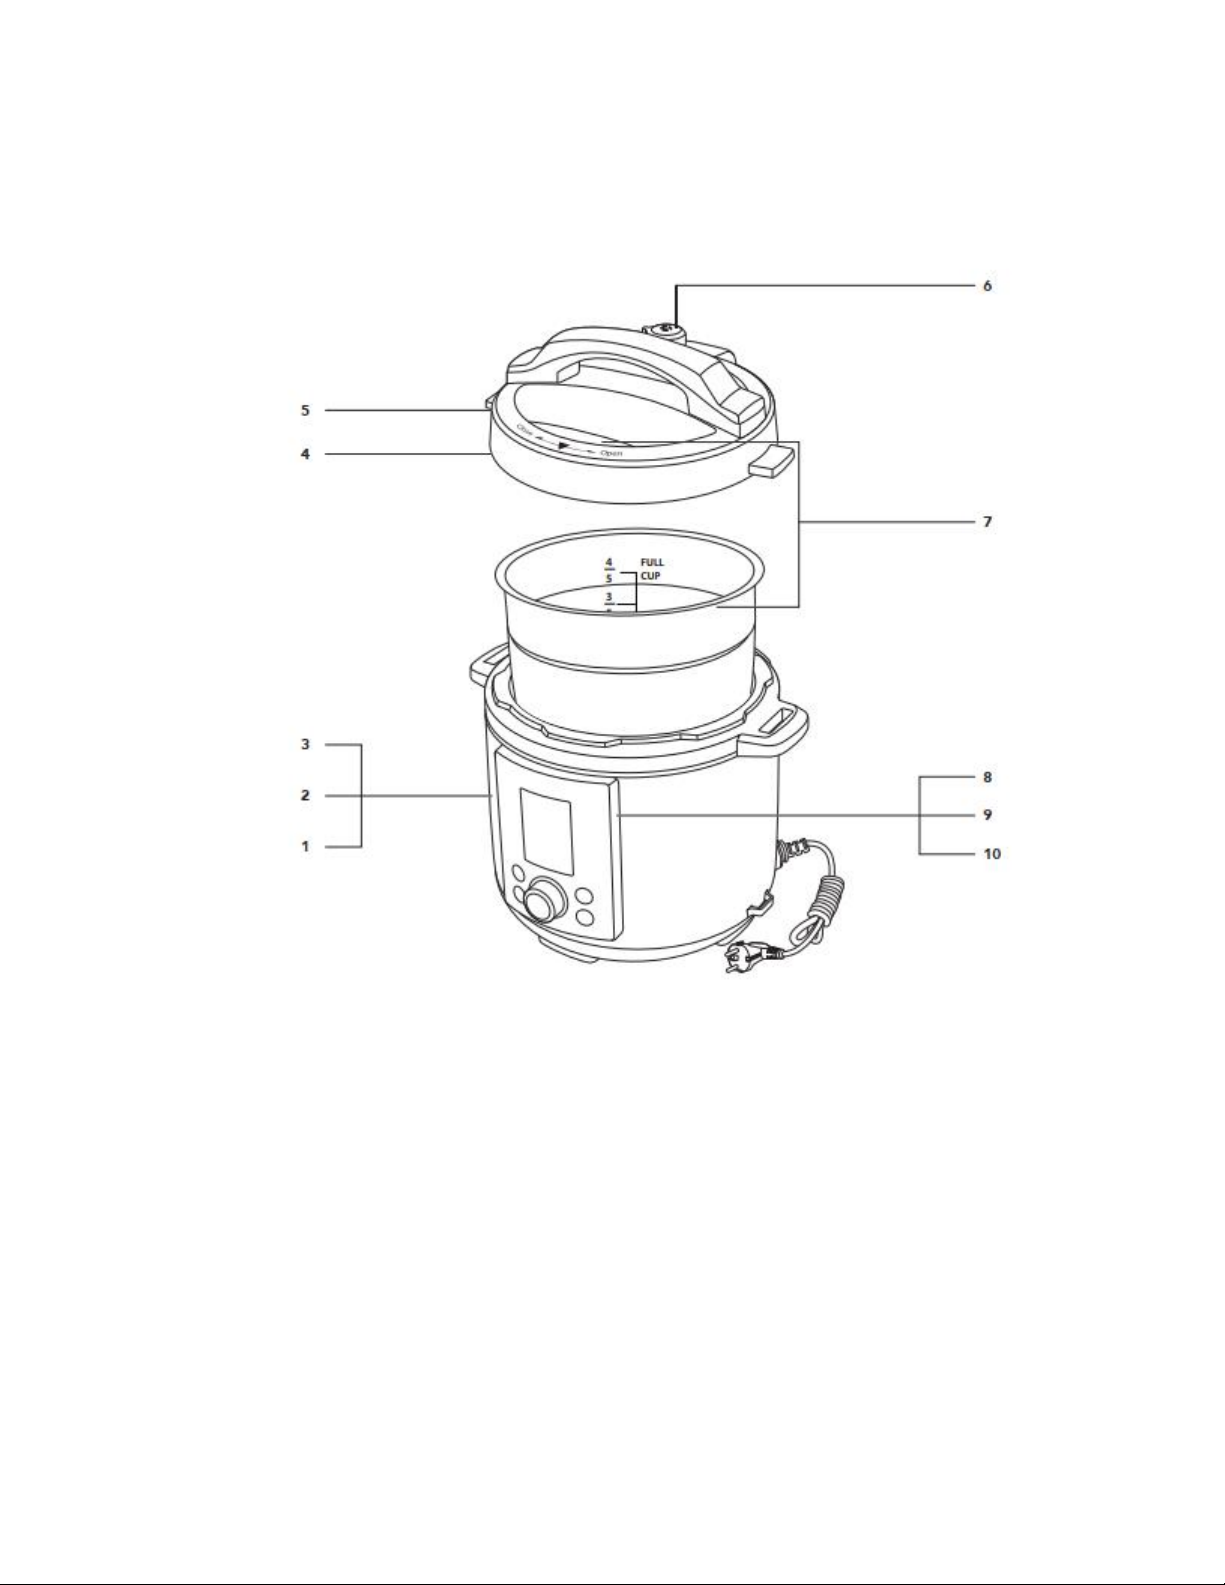
2. Overview
1.
Anti-block shield
2.
Soup ladle
3.
Rice spoon
4.
Measuring cup
5.
Inner pot
6.
Outer pot with heating plate
7.
Condensation collector
8.
Cool-touch handle with hole for
storing the lid
9.
Power cord with plug
10.
Spoon holder
11.
Base
12.
TIME / TEMP button
13.
CANCEL button
14.
START / PAUSE button and SETTING
dial
15.
DELAY START / KEEP WARM button
16.
PRESSURE LEVEL button
17.
LCD screen
18.
Indicator light
19.
Steaming rack
20.
Rack
21.
Sealing ring (silicon gasket)
22.
Lid
23.
Steam release vent
24.
Float valve (with silicone cap on the
underside)
25.
Cool-touch lid handle
26.
Self-locking pin
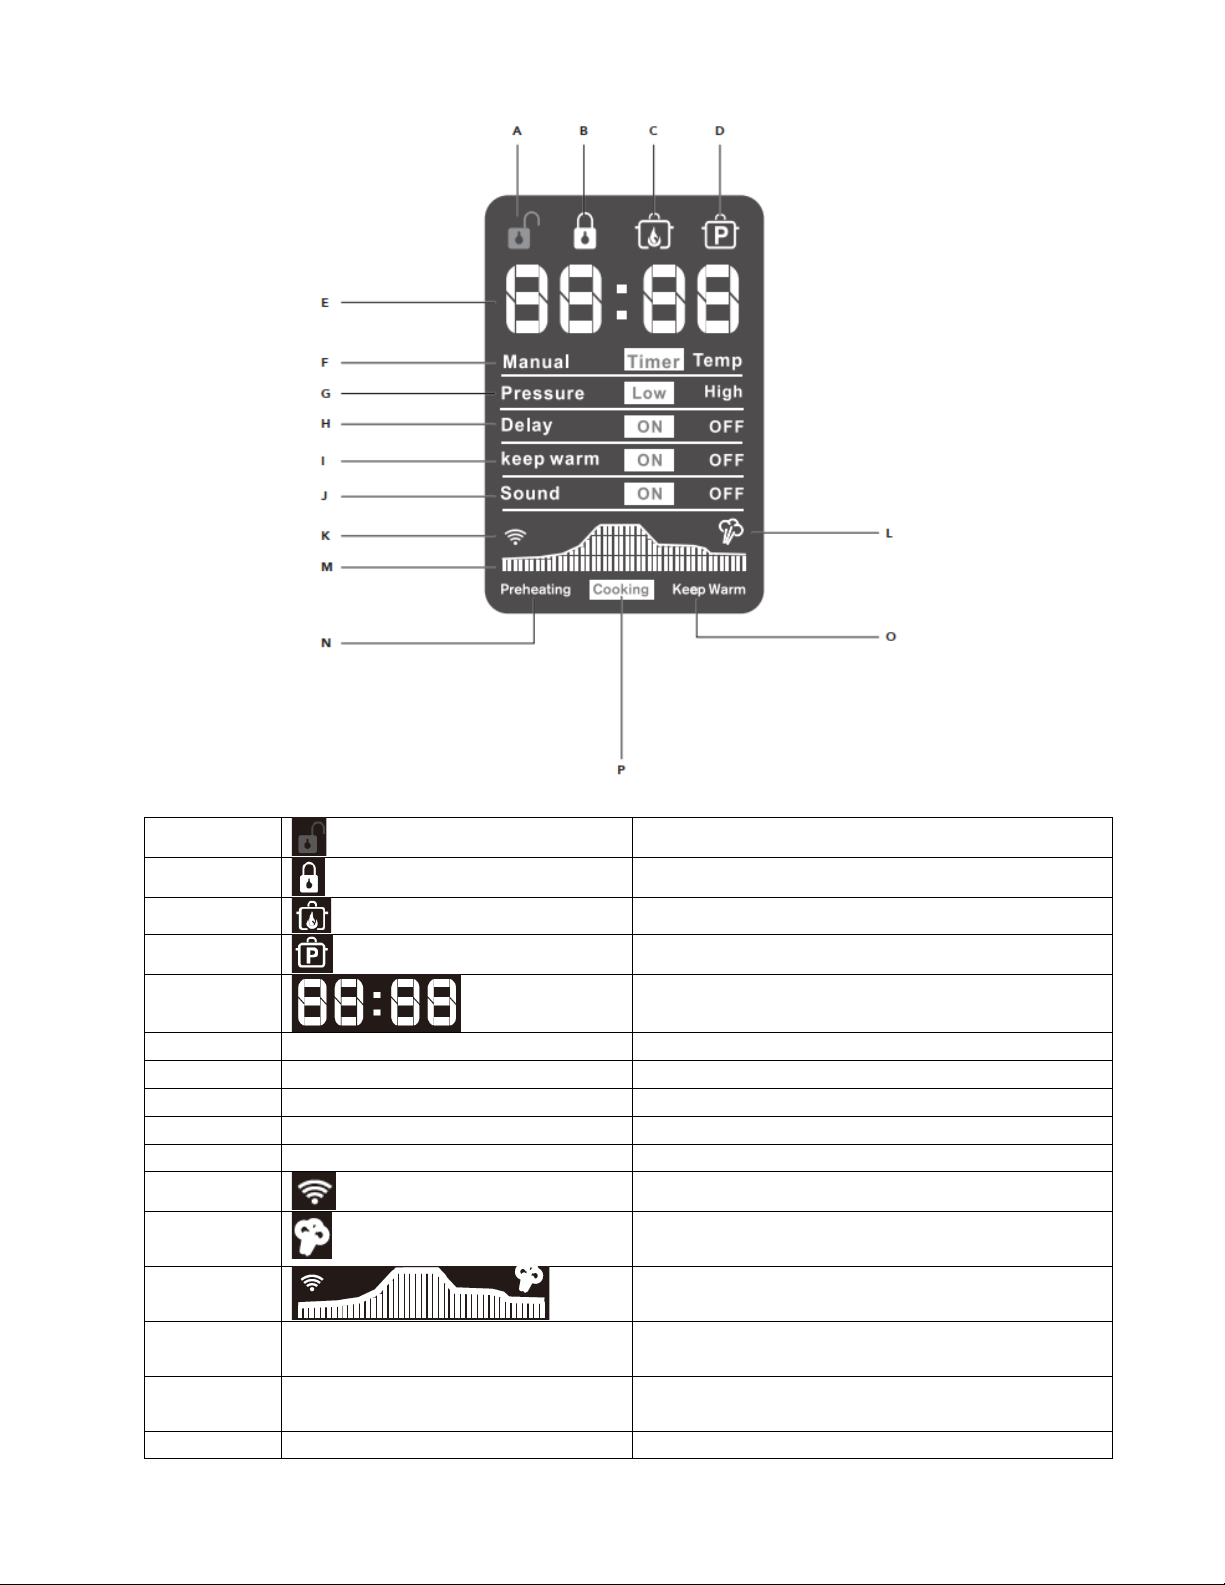
3. Screen display
A
Lid unlocked
B
Lid locked
C
Heating in progress
D
Pressure cooker is in use
E
Time or temp displays in celsius or fahrenheit
F
Manual
Change the timer or temperature manually
G
Pressure
Pressure cooker is set to a low or high level
H
Delay
Delay start function is on or off
I
Keep Warm
Keep warm function is on or off
J
Sound
Sound function is on or off
K
L
The pressure cooker is depressurising and steam is
being released
M
Progress indicator
N
Preheating
The pressure cooker is heating to the desired
temperature
O
Cooking
The set temperature has been reached and
cooking is in progress
P
Keep Warm
The keep warm function is in progress
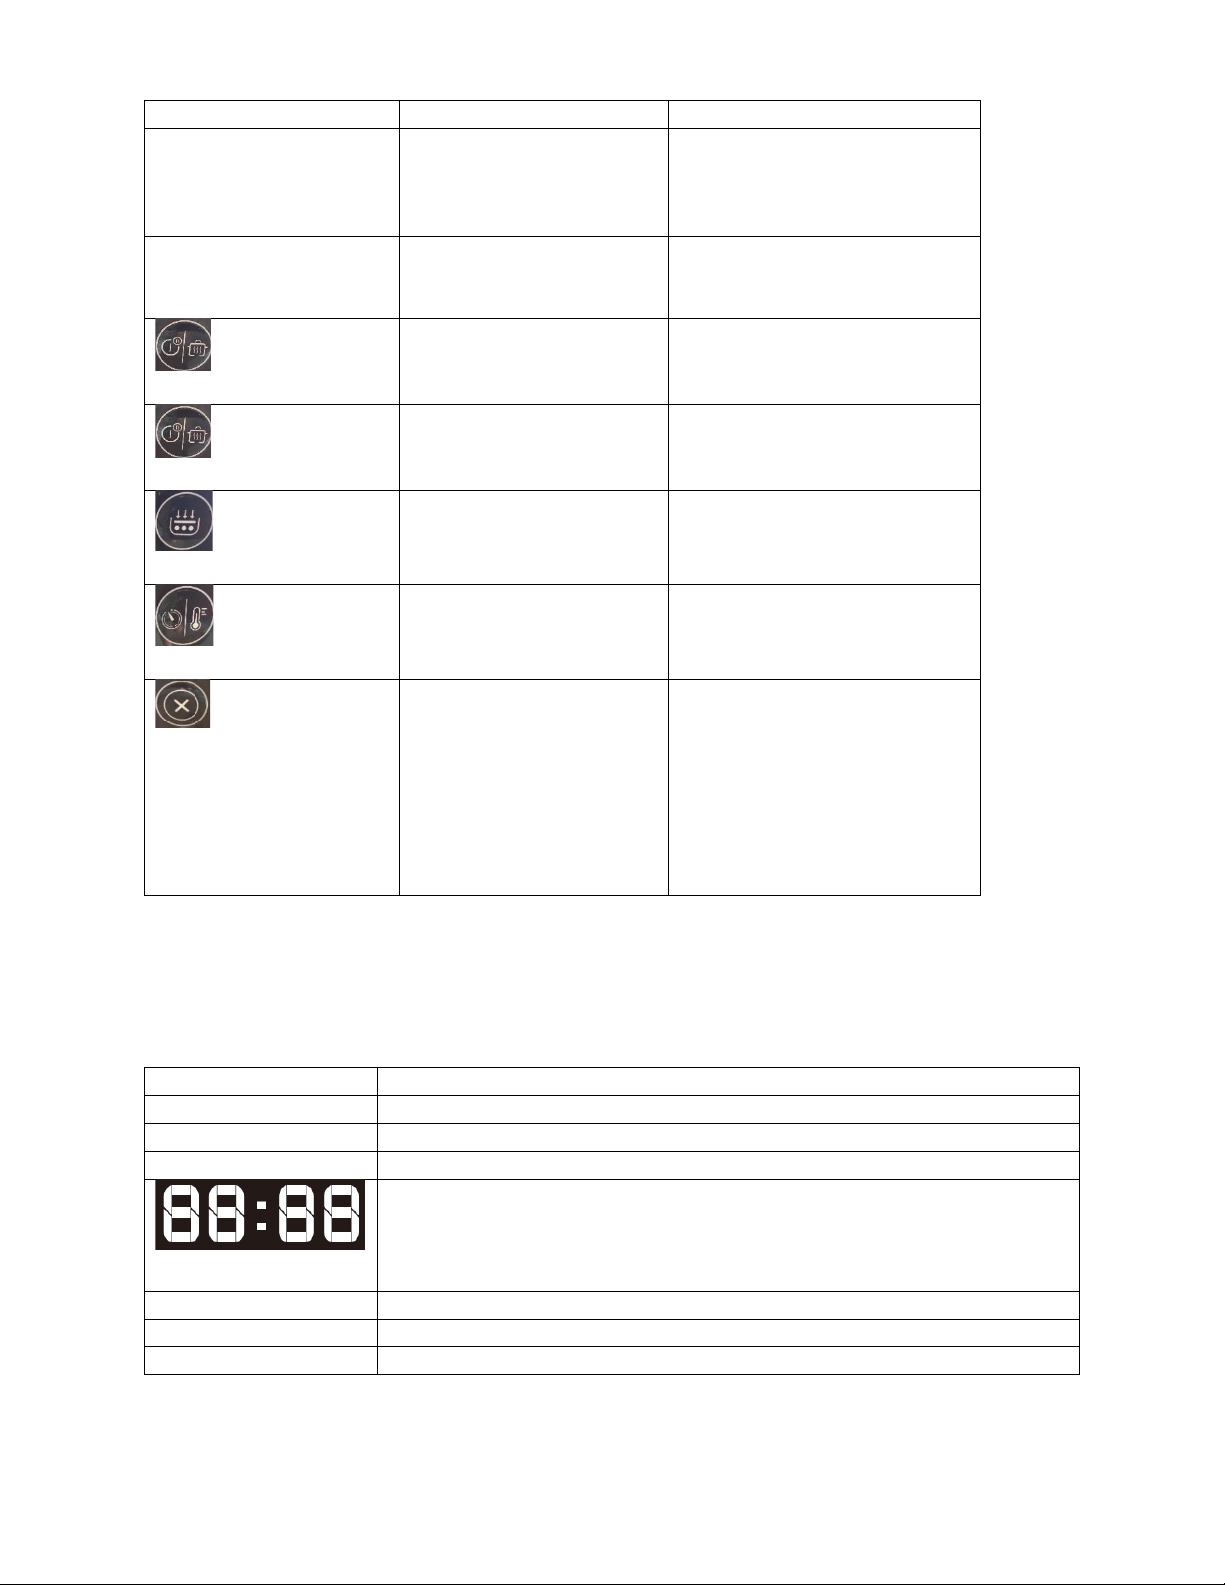
4. Functions in an overview
Button / Component
Function
Notes
SETTING dial 23
-Select 1 of the 16
available modes
-Adjust the time or
temperature
The indicator light appears next
to the selected option
START / PAUSE button 23
Press to start or pause the
cooking process
Always make sure the lid is
properly shut before starting an
operation
DELAY START
button 23
Delay the cooking start
time
Can be set up to 24 hours
KEEP WARM
button 23
Keep food warm after
cooking
Can be set for up to 10 hours
PRESSURE LEVEL
button
Set the pressure level to
low or high
TIME / TEMP
button
Set the timer or the
temperature
Refer to the charts on the
setting parameters
CANCEL button 23
-End a selected cooking
process
-Cancel a setting so that
you can enter a new
setting
-Turn the key press beep
sound on or off
5. Screen Messages
Message
Meaning
Off
The cooker is plugged in and in standby mode. No programs are running.
Lid
The lid is not properly secured into place.
On
The cooker is preheating.
•In delay start mode, it counts down the time until the program starts.
•When a program is running, it displays the remaining cooking time.
•In keep warm mode, it displays the amount of time the food has been
kept warm.
SOFF
Button press sound is off.
SON
Button press sound is on.
hot
The sauté cooking temperature has been reached.

6. Items supplied
1 pressure cooker base
1 inner pot
1 pressure cooker lid with float valve
1 steam release vent
1 anti-block shield
1 sealing ring
1 steamer, comprising
-steaming basket
-steaming lid 30
-rack
1 rice spoon 31
1 soup ladle 32
1 measuring cup
1 power cord and plug
1 copy of the user instructions
7. Before first use
Read all the warning labels on the packaging and all safety instructions. Prior to the first use, follow all
the steps in this section to unpack, clean, assemble and run a test with water. The test will remove any
residues or odors from the manufacturing process and will help to familiarize you with the pressure
cooker.
NOTE: When in operation for the first time, some odor may be generated by the appliance. This is
harmless. Please ensure adequate ventilation.
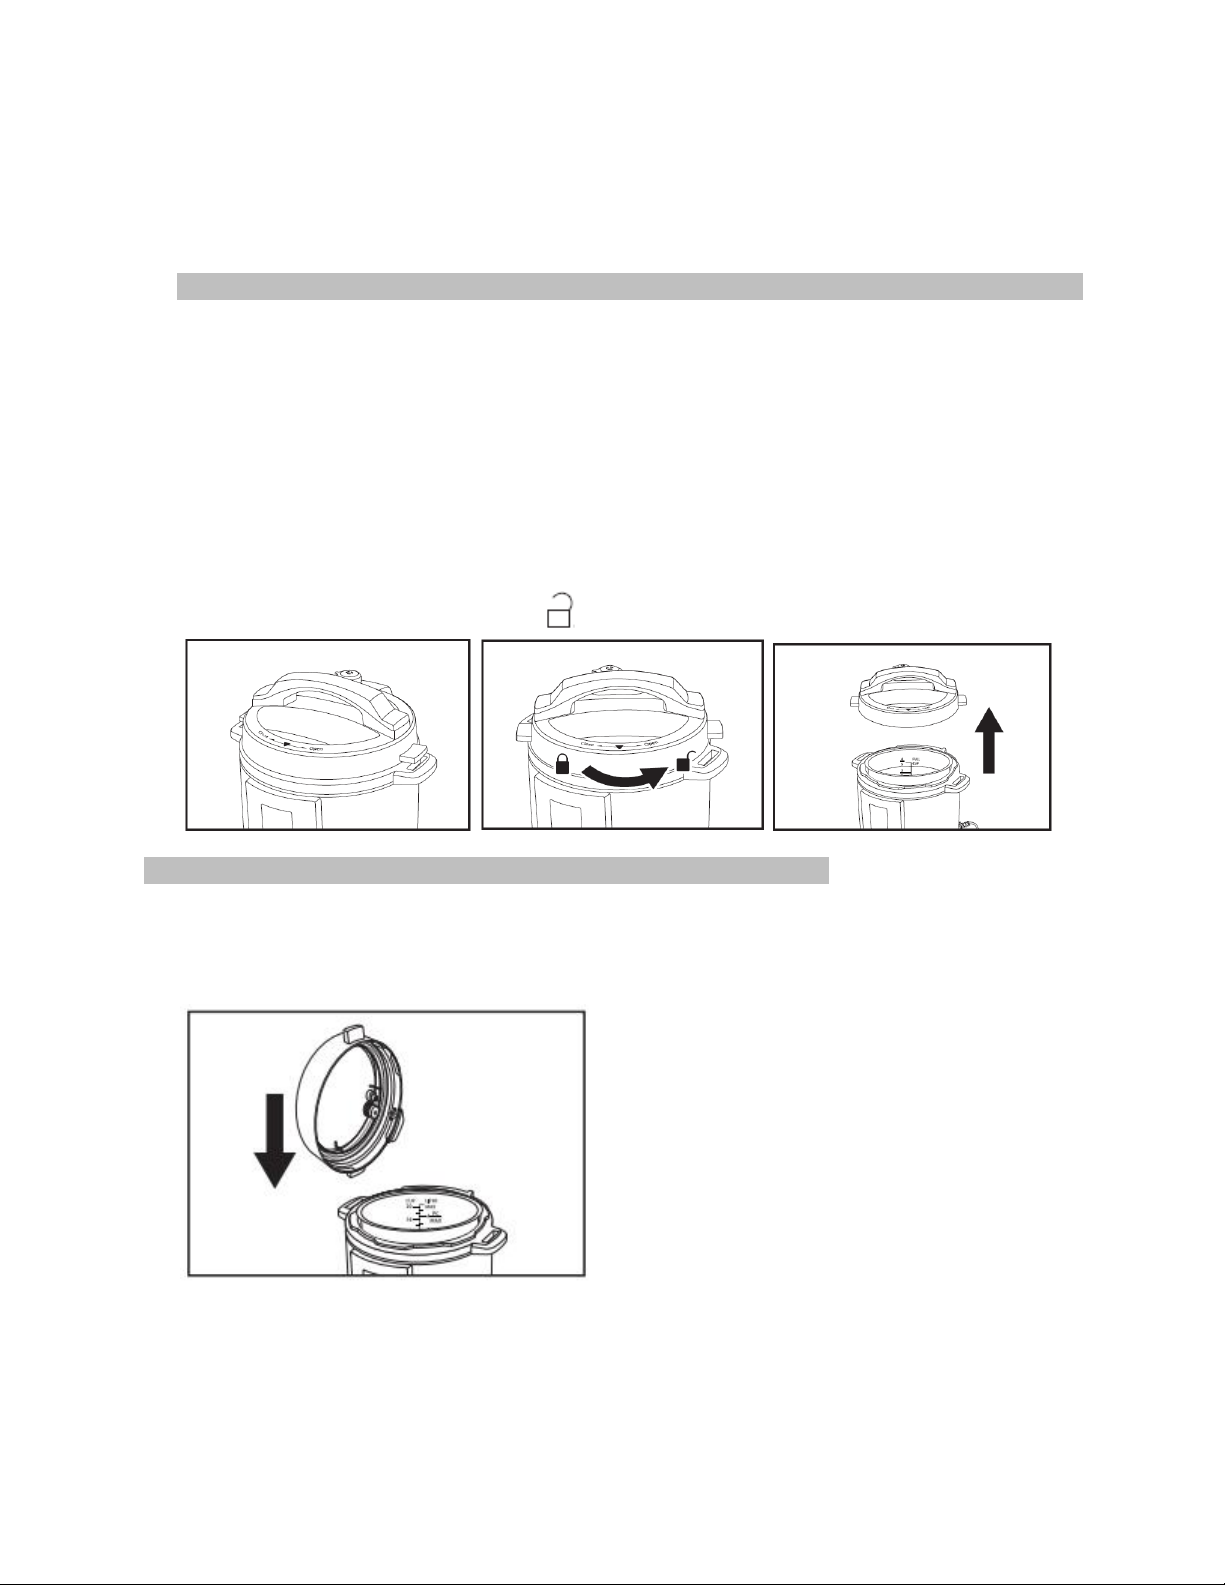
7.1 Unpacking
1. Unpack and remove all packing materials including any materials found between the inner pot and
the heating plate.
2. To open the pressure cooker lid , turn the lid anticlockwise towards the unlock symbol and take
it off. Then lift out the inner pot .
(Follow the instructions in reverse to lock the lid into place.)
3. Make sure that all parts are present and undamaged.
4. Clean the appliance prior to its first use! (See “Cleaning” on page .)
7.2 Assembly/disassembly
Steam release vent
•On the top of the steam release vent is a nodule that protrudes. Align this nodule halfway between
the Sealing and Venting markings on the top of the lid (on the opposite side from the float valve )
and then push down. It should fit loosely.

•Pull the steam release vent upwards to remove it.
WARNING!
•Risk of scalding. When removing the steam release vent , always make sure the appliance is cool and
that there is no hot or pressurized food in the cooker.
Anti-block shield
•Turn the lid over and push the anti-block shield onto the underside of the steam release vent .
•Pull it off when you want to remove and clean it.
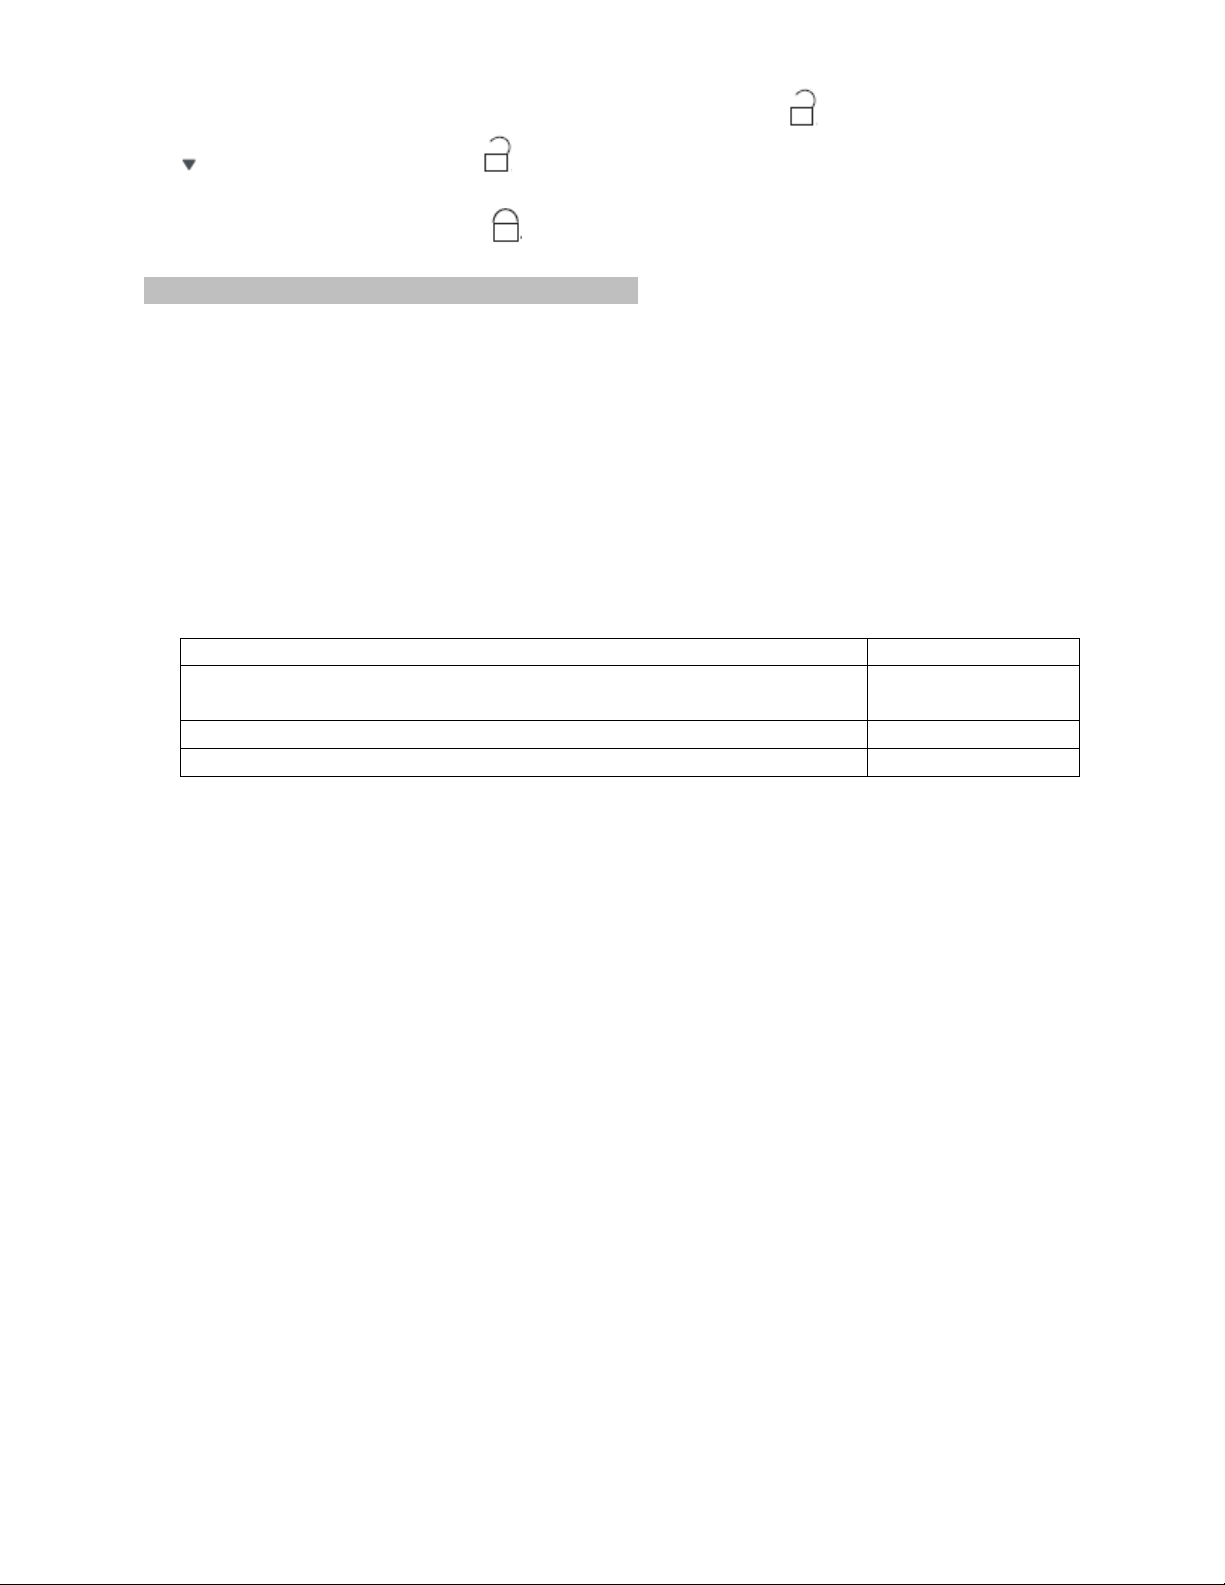
Sealing ring
The sealing ring on the underside of the lid, creates the airtight seal and stops steam escaping when
cooking.
•Install the sealing ring by slotting it behind the metal wire frame that is on the underside of the lid.
Press down bit by bit until it fits snugly all the way around the lid.

•To remove the sealing ring , simply pull it out.
NOTE:
•Always check the sealing ring is correctly installed before each use. Remove and clean the sealing
ring after each use.
•Sealing rings stretch over time and should be replaced every 12-18 months or sooner if they
become loose or deformed.
Condensation collector
•Attach the condensation collector at the rear of the housing by sliding it into the matching slot.
•Slide slide it off to remove and empty the condensation.
Location
Place the assembled pressure cooker on a level, dry, non-slip, heatproof and waterproof surface where
it cannot easily fall or slip off.
7.3 Initial test run
Perform an initial test run using water by following these instructions:

1. Fill the inner pot with 3 cups of water.
2. Close and lock the lid: put the lid on the
cooker making sure you line up the unlock
symbol on the base with the arrow on the
lid .
3. Turn the steam release valve to the Sealing
position.
4. Select the steam function: turn the SETTING
dial until the indicator light next to STEAM
illuminates.
5. Press the TIME / TEMP button and then turn
the SETTING dial counterclockwise until 2
minutes displays. Press the START button.
6. When finished, while wearing oven mitts turn
the steam release valve to the Venting
position to release the pressure. Alternatively,
you could use wooden utensil to move the
valve.
WARNING! Do not place your hands or face near
the steam release vent .
8. Operating the appliance
For safety reasons, the settings described in this chapter, can only be selected when the appliance has
been assembled completely.
8.1Turning the appliance on and off
•Plug the power cord 8into the back of the pressure cooker and insert the plug into a suitable wall
socket. A beep will sound and Off displays on the screen. The appliance is in standby mode.
NOTE: The wall socket must continue to be easily accessible after the appliance is plugged in.
•After approximately 20-30 seconds of inactivity and displaying Off, the screen will turn off, yet the
appliance continues to be in standby mode.
•To activate the appliance and start using it, turn the SETTING dial to select a cooking option. The
screen will turn on and a beep will sound.
•To fully turn off the appliance, unplug it from the wall socket.
8.2 Opening and closing the lid
When the cooker is in standby mode, a jingle will play when the lid is opened or closed.
Opening the lid
•Holding the handle, turn the lid counterclockwise in the direction of the arrow pointing to OPEN.
When the lid is open, the unlock symbol will display on the screen.
NOTE: The cooker will not operate if the lid is incorrectly placed on the base.
Lid standing position
•When you remove the lid, it can be easily and conveniently stowed by slotting it onto one of the
base handles .
Closing the lid
1. Put the lid on the cooker, make sure you line up the unlock symbol on the base with the arrow
on the lid . The unlock symbol will display on the screen.
2. Holding the handle, turn the lid clockwise in the direction of the arrow pointing to CLOSE. When the
lid is firmly closed the lock symbol will display on the screen.
NOTE: Always check the lid for damage before cooking.
8.3 Selecting a mode
•Turn the SETTINGS dial clockwise or counterclockwise to select 1 of the 16 available modes. The
indicator light illuminates next to the selected mode and the display shows the default settings for
that program. See page to see each setting’s parameters.
8.4 Setting the time
You can adjust the time in all modes except for the RICE mode.
1. Press the TIME button 21 to set the cooking time.
2. Turn the SETTING dial 20 clockwise to increase the time.
3. Turn the SETTING dial 20 counterclockwise to decrease the time.
-You can adjust the timer in increments as follows:
Mode
Increments
Manual, Meat/Stew, Bean/Chill, Soup/Broth,
Multigrain, Porridge, Pressure Cook, Sauté, Steam, Egg, Cake and Yogurt
1 minute
Warm
10-minute intervals
Slow Cook
20-minute intervals
-The time set is shown on the screen 26.
-The timer counts down after the mode has started.
-When the countdown is finished, the appliance stops and 10 beeps sound to confirm that the
cooking is complete.
TIPS
•Cooking time and pressurizing time will vary depending on the temperature you are using as well as
the ingredients. If food is cold or frozen, it will take longer to cook.
•Do not use the delay start function for foods such as oatmeal, porridge, or other thick liquids
because they may clog the steam release valve or vent . These types of foods should be monitored
while they are cooking.
8.5 Setting the temperature
You can only change the temperature setting for the following programs:
•Manual
•Pressure Cook
•Slow Cook
•Sauté
•Yogurt
•Warm
1. Press the TEMP button 18 to set the cooking temperature.
2. Turn the SETTING dial 20 clockwise to increase the time.
3. Turn the SETTING dial 20 counterclockwise to decrease the time.
-You can adjust the temperature in increments of 1°F/°C from 104°F to 338°F or 40°C to 170°C.
-The set temperature is shown on the screen 26.

8.6 Changing the temperature scale –°C or °F
•When you are in a mode that allows the temperature to be changed, such as manual mode, and the
temperature is displayed, press and hold the TEMP button for 5 seconds to switch between C
(Celsius) and F (Fahrenheit).
8.7 Progress indicator
•During cooking the progress indicator advises which stage of the process the cooker is currently in.
Stage
Meaning
Screen
Preheating
The cooker is heating up to the set
temperature or pressure required for
cooking.
Cooking
The cooker has reached the
temperature or pressure required for
cooking. The cooking time counts
down.
Keep Warm
After cooking, the keep warm
function will activate and the screen
will start to countdown the keep
warm time.
8.8 Setting the pressure level
When you are in a mode that uses the pressure cooker, displays on the screen and you can change
the pressure-cooking level.
•Press the PRESSURE LEVEL button repeatedly to toggle between HIGH and LOW pressure.
8.9 Setting the delay start function
The delay start function allows you to delay the start of the pressure cooking for up to 24 hours.
•Press the DELAY START button . On will appear next to Delay Start on the display.
•Turn the SETTING dial to increase the delay start time in increments of 10 minutes.
•
•Turn the SETTING dial to 00:00 to turn this function off.
NOTE: The delay start function is disabled for the non-pressure-cooking programs such as manual,
sauté, slow cook and yogurt.

WARNING!
•Do not allow perishables such as meat, poultry, fish or dairy products to sit at room temperature for
more than 2 hours or more than 1 hour in high room temperatures.
•Do not use the delay start function for foods such as oatmeal, porridge, or other thick liquids
because they may clog the steam valves. These types of food should be monitored while they are
cooking.
8.10 Setting the keep warm function
The keep warm function allows you to keep food warm for up to 99 hours and 50 minutes and the
default set time is 10 hours.
•Press the KEEP WARM button to toggle between until you see On appear next to Keep Warm on
the display. Press the KEEP WARM button again to turn it off.
•When it is activated the timer will count up to show the amount of time the food has been kept
warm.
•You can also use this function independently to warm up food by pressing the WARM button and
adjusting the settings to your desired time and temperature.
8.11 Starting and pausing the appliance
•When you have selected your settings, press the START / PAUSE button 20 to turn on the appliance.
The cooker will beep 3 times to confirm that it is turned on and the screen will display all the
settings for the program.
•Press the START / PAUSE button to stop the appliance cooking at any time.
8.12 Cancel
•Press the CANCEL button at any time to exit a setting or cancel a cooking program that is in
progress.
8.13 Sound settings
•To turn off the sound (except for safety or error alert messages), press and hold the CANCEL button
for 5 seconds until SOFF appears on the screen.
•To turn the sound on again, press and hold the CANCEL button for 5 seconds until SON appears on
the screen.
Table of contents


