Destination Audio VC100S User manual

VC100S
STEREO VOLUME CONTROL
Installation Instructions
PLEASE NOTE: Installation should be performed by qualied service personnel, and must meet all local building codes.
STEP 1: DETERMINE & SET IMPEDANCE MULTIPLICATION SETTINGS
1.) Count the total number of pairs of 4 Ohm and 8 Ohm speakers you are connecting. Count pairs of 6 Ohm speakers as
4 Ohm speakers.
2.) Determineiftheampliercansupporta4Ohmor8Ohmspeakerload.Youcantypicallyndthisinformationintheamplier
owner’s manual.
3.) Determine the correct impedance match jumper position from the charts shown below. See Figure 2ifyourampliercanhandle
a 4 Ohm speaker load. See Figure 3ifyourampliercanhandlean8Ohmspeakerload.
4.) Set the impedance match jumpers on all of the volume controls in the system to the same position (2X, 4X, 8X or 16X).
See Figure 1 below.
Figure 1
jumper set to 2X
Destination Audio does not recommend installing more than 8 volume controls in parallel. Destination Audio also does not recommend
installing more than two (2) 8 Ohm speakers per channel on each volume control without additional impedance protection.
PLEASE NOTE: High impedance match setting’s affect on volume
Settingtheimpedancematchjumpershigherthan2Xwillyieldlesspowerperpairofspeakers.Forexample:Anamplierratedat100
Watts per channel RMS into 8 Ohms is to be used for 8 pairs of speakers. In order to accommodate 8 pairs of 8 Ohm speakers, an 8X
impedancematchsettingmustbeused.Therefore,thiswilllimitthe100Wattsofpowerto12.5Wattsforeachspeakerpair,orone-
eighthoftheamplier’spower.
Figure 3
Number of pairs of 8 Ohm speakers
Number of pairs of
4 Ohm speakers
Figure 2
Number of pairs of 8 Ohm speakers
Number of pairs of
4 Ohm speakers
AMPLIFIER IS STABLE TO 4 OHMS AMPLIFIER IS STABLE TO 8 OHMS
WARNING!
Make sure to set the impedance
match jumpers on all of the volume
controls in the system to the same
position, otherwise serious amplier
damage may occur.
NOTICE!
Makesuretosetboth
impedancematchjumpersonthe
volumecontroltothesameposition.
For assistance, please call 800-543-2205 or visit http://www.destinationaudio.com.
Audio Power Handling:
Frequency Response:
Switch:
Wiring Requirements:
Mounting:
Impedance Multiplication:
Unit Dimensions:
Faceplate Dimensions:
Warranty:
40Wattscontinuous(RMS)/100Wattsmaximum
25Hz—20kHz
12 position slide (including ‘Off’)
14-16gaugewire.Input & Output (separate):
Twoseparatetwo-conductorspeakerwires,or1
four-conductorspeakerwire.
Fitsmoststandardsingle-gangjunctionboxes
2X, 4X, 8X & 16X
13/
4”W x 23/
4”Hx23/
8”D
23/
4”W x 41/
2”H
25Years
Technical Specications
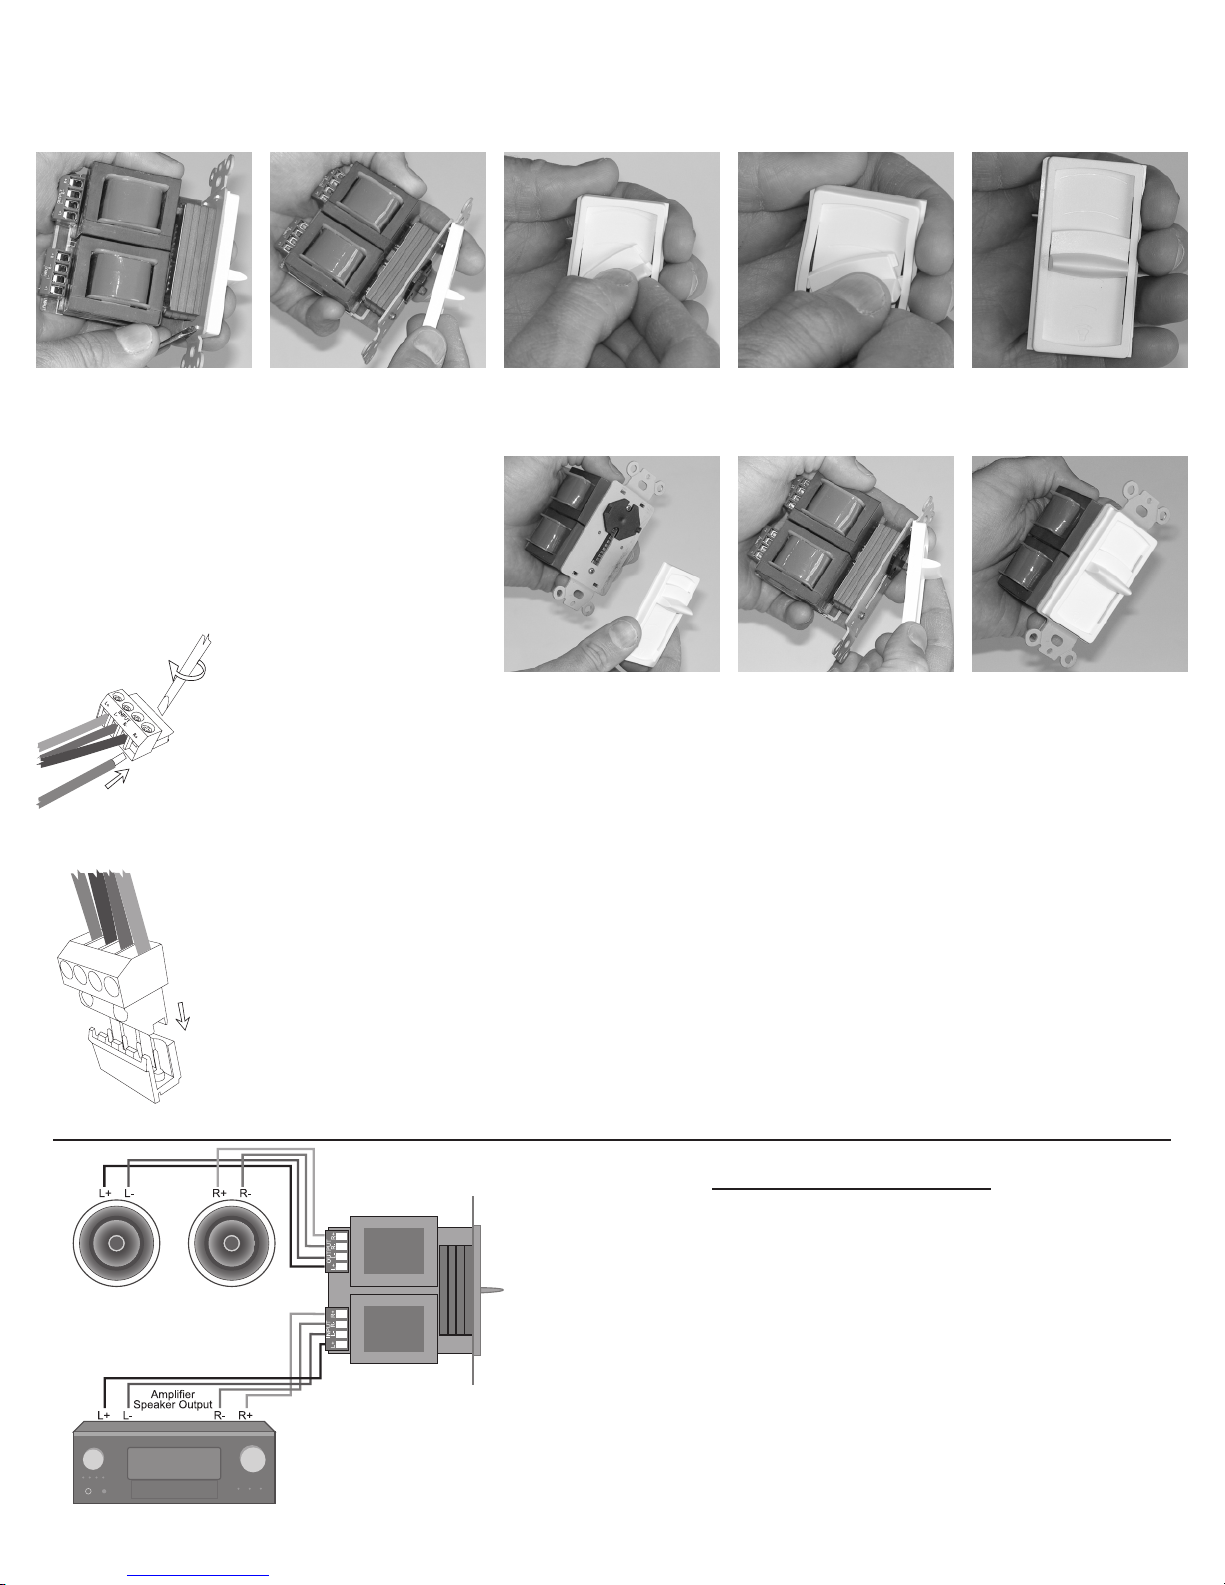
STEP 2 (optional): CHANGETRIMCOLORSCHEME
This Destination Audio Volume Control comes with four different color scheme trim kits: White,Almond, Bone, Black and Brown. The
Volume Control comes with the White trim scheme, but you can change the color scheme by following these steps:
STEP 3: INSTALLATION
1.) Strip 1/
4” to 3/
8” of the insulation from the end of each wire and tightly twist the end of each wire until no frayed
ends remain.
2.) InserteachwirefromtheamplierintotheproperL+,L-,R+orR-input terminal and use a small screwdriver to
tighten each screw; see Figure 4. Make sure to observe proper polarity for each connection.
3.) InserteachwirefromthespeakersintotheproperL+,L-,R+orR-output terminal and use a small screwdriver to
tighten each screw; see Figure 4. Make sure to observe proper polarity for each connection.
4.) Insert both input and output terminals into the proper locations on the volume control; see Figure 5.
5.) Insert the volume control into the junction box and use the two longer screws to mount the volume control into
the junction box.
6.) Placetheoutertrimringontothevolumecontrolfaceandusethetwoshorterscrewstoafxtheoutertrimring
to the volume control.
Figure 4
Figure 5
Wiring Diagram
Copyright ©2007,DestinationAudio.AllRightsReserved.
ItisDestinationAudiopolicytocontinuouslyincorporateimprovementsintoourproducts;allspecicationsaresubjecttochangewithoutnotice.
1.) Use a small screwdriver or
other similar tool to gently push
the plastic tabs through the
metal back plate.
5.)Oncethenewslideknobisin
the new faceplate, check to make
sure it slides easily in the slot.
2.) Gently pry the faceplate off of
the metal back plate. 3.) Remove the slide knob by
twisting to the left or right. 4.) Put the new slide knob into the
new faceplate by twisting to
the left or right. Some bending
is normal and is to be expected.
8.)Gently(butrmly)pressthe
new plastic faceplate onto the
metal back plate. Then, check
for smooth and easy operation.
6.) Set the volume control’s level
to maximum and move the
slide knob to the top of the
faceplate.
7.)Alignthefaceplatetabsinthe
top two holes in the metal back
plate. Then, make sure the
other two plastic tabs align with
the other two holes in the metal
back plate.
Table of contents
Other Destination Audio Speakers manuals

Destination Audio
Destination Audio BC600-70 User manual

Destination Audio
Destination Audio Builder Series User manual

Destination Audio
Destination Audio AO520 User manual

Destination Audio
Destination Audio ALW583 User manual

Destination Audio
Destination Audio CS500 User manual

Destination Audio
Destination Audio F300 SERIES User manual


