TAD TAD-ST3 User manual


2
En
Thank you for buying this TAD product. The TAD-ST3 is a
speaker stand exclusively designed for use with the TAD-ME1
speaker system.
Please read through these operating instructions for proper
assembly and use. After you have finished reading the
instructions, put them away in a safe place for future reference.
Installing the speaker stands
Place the stand on a stable, level surface; placing the stand on
an unstable surface can be dangerous.
TAD assumes no liability whatsoever for damages
resulting from assembly, improper mounting, insufficient
reinforcement, misuse of the product, acts of nature, etc.
On the rear strut of this product, 3 angles have been installed
to bundle the speaker cables. For bundling up the speaker
cables, use a commercially available cable bundling product
and bind the cables as shown in the illustration.
Assembling
the s
peaker stands
Assemble the speaker stands as illustrated below. Please note
that a Phillips screwdriver will be necessary for assembly. The
following illustration shows the fully assembled speaker stand:
Align the screw holes on the stand base and speaker
support plate with the screw holes in the stem, then insert
the screws and tighten.
* The illustration here depicts the speaker stand when equipped
with cone-shaped spikes (type b).
Make sure you assemble the stand on a flat surface that is
relatively soft (such as a carpet).
Before you start
Before setting up your speaker system, we recommend reading
the operating instructions for your system thoroughly.
Only use the screws supplied when fixing the speaker to
the speaker stand.
Do not place the stand on an unstable and/or sloping
surface. The stand and speaker may fall and cause injury.
Do not attempt to use this stand to support any object
other than the TAD-ME1 speaker system for which it was
designed. The stand may collapse and be damaged and/or
the speaker may fall and cause injury.
When moving the speaker and stand, first remove the
speaker from the stand, and then move the stand, holding
it by the stem.
Cable tie
Speaker support
plate
Stand stem
Stand base
Screw holes
for securing
speaker
(2 positions)
Speaker support plate
Screws
(Flat head, M6 x L=25)
(3-939030-034036)
Stand stem
Stand base
Screws
(Bind head with washer)
(3-939030-034034) Auxiliary support feet
with hex nuts
(3-939009-030273)
Cone-shaped spikes (b)
(3-939009-030271)
*Dowel side is for
Stand base

3
En
Select Desired Spikes
Depending on the desired mounting height and condition of the
surface on which this speaker unit is to be installed, the spike
feet used with this unit can be selected from those provided
with the unit. Consult the accompanying chart when selecting
the spike feet you wish to use.
ApplicationInstallation locationSpikes
28 mm
(1.1 in.)
Cone-shaped
spikes (a)
Locations with thick
carpet, floors where
no marks will be
caused or scars do
not matter.
Press spikes into carpet.
Carpet
Sub-floor
19 mm
(0.7 in.)
In order to prevent marks
on the floor, use the spike
bases provided.
Apply the non-slip cork
pads to the th ree location s
indicated in the illustration.
Flat surface
Cone-shaped
spikes (b)
Flat surface
Use no spikes
Non-slip cork pads
Stand base
Using the spikes
The speaker stands include spikes that you can use to isolate
the speaker from the floor. Spikes are recommended when
placing the stand on a thick carpet (for added stability), or for
better sound when placing the stand on a hard reverberant
surface (such as a concrete or wood floor). Use the supplied
spike bases to avoid scratching the floor or other surface where
the stand is placed.
When attaching the three spike feet to the unit, always use
the same kind of feet.
1 Screw the spikes into the three locations indicated on
the bottom of the stand base.
2 Adjust the length of the auxiliary support feet as
required to correct any uneven floor contact, then tighten
using the hex nuts.
Stand base
Attaching speakers TAD-ME1 to the stands
To avoid accident or injury, please use screws to secure the
speakers to the speaker stands.
1 Secure the speaker to the speaker support plate using
the screws (Bind head with washer) as shown below.
Nuts for securing the speaker to the speaker support plate
are embedded in the bottom surface of the speaker.
When using cone-shaped spikes (b)
Place the spike bases in the location where the spikes are to
rest, then place the speaker stand on top of the spike bases.
Note that these spikes are sharp metal and can cause
damage to flooring. Make sure to lay down a cloth or
suitable base before setting up.
The spike bases should be placed as shown below (with
the depression on the top side).
Make sure to use the spike bases provided to avoid
damaging the surface where you place the stand.
Do not attempt to fasten this speaker stand to any object
other than the TAD-ME1 speaker system for which it was
designed, since uneven balance may cause the object to fall,
resulting in personal injury.
TAD-ME1
Fastening nuts
Screw holes
for securing
speaker
(2 positions)
Screws
(Bind head with
washer)
(3-939030-034035)
Speaker support
plate

4
En
Specifications
Component parts........Speaker support plates, stand stems, stand bases
External dimensions.................376 mm (W) x 652 mm (H) x 460.2 mm (D)
14 13/16 in. (W) x 25 11/16 in. (H) x 18 1/8 in. (D)
Weight .....................................................................................16 kg (35.3 lbs)
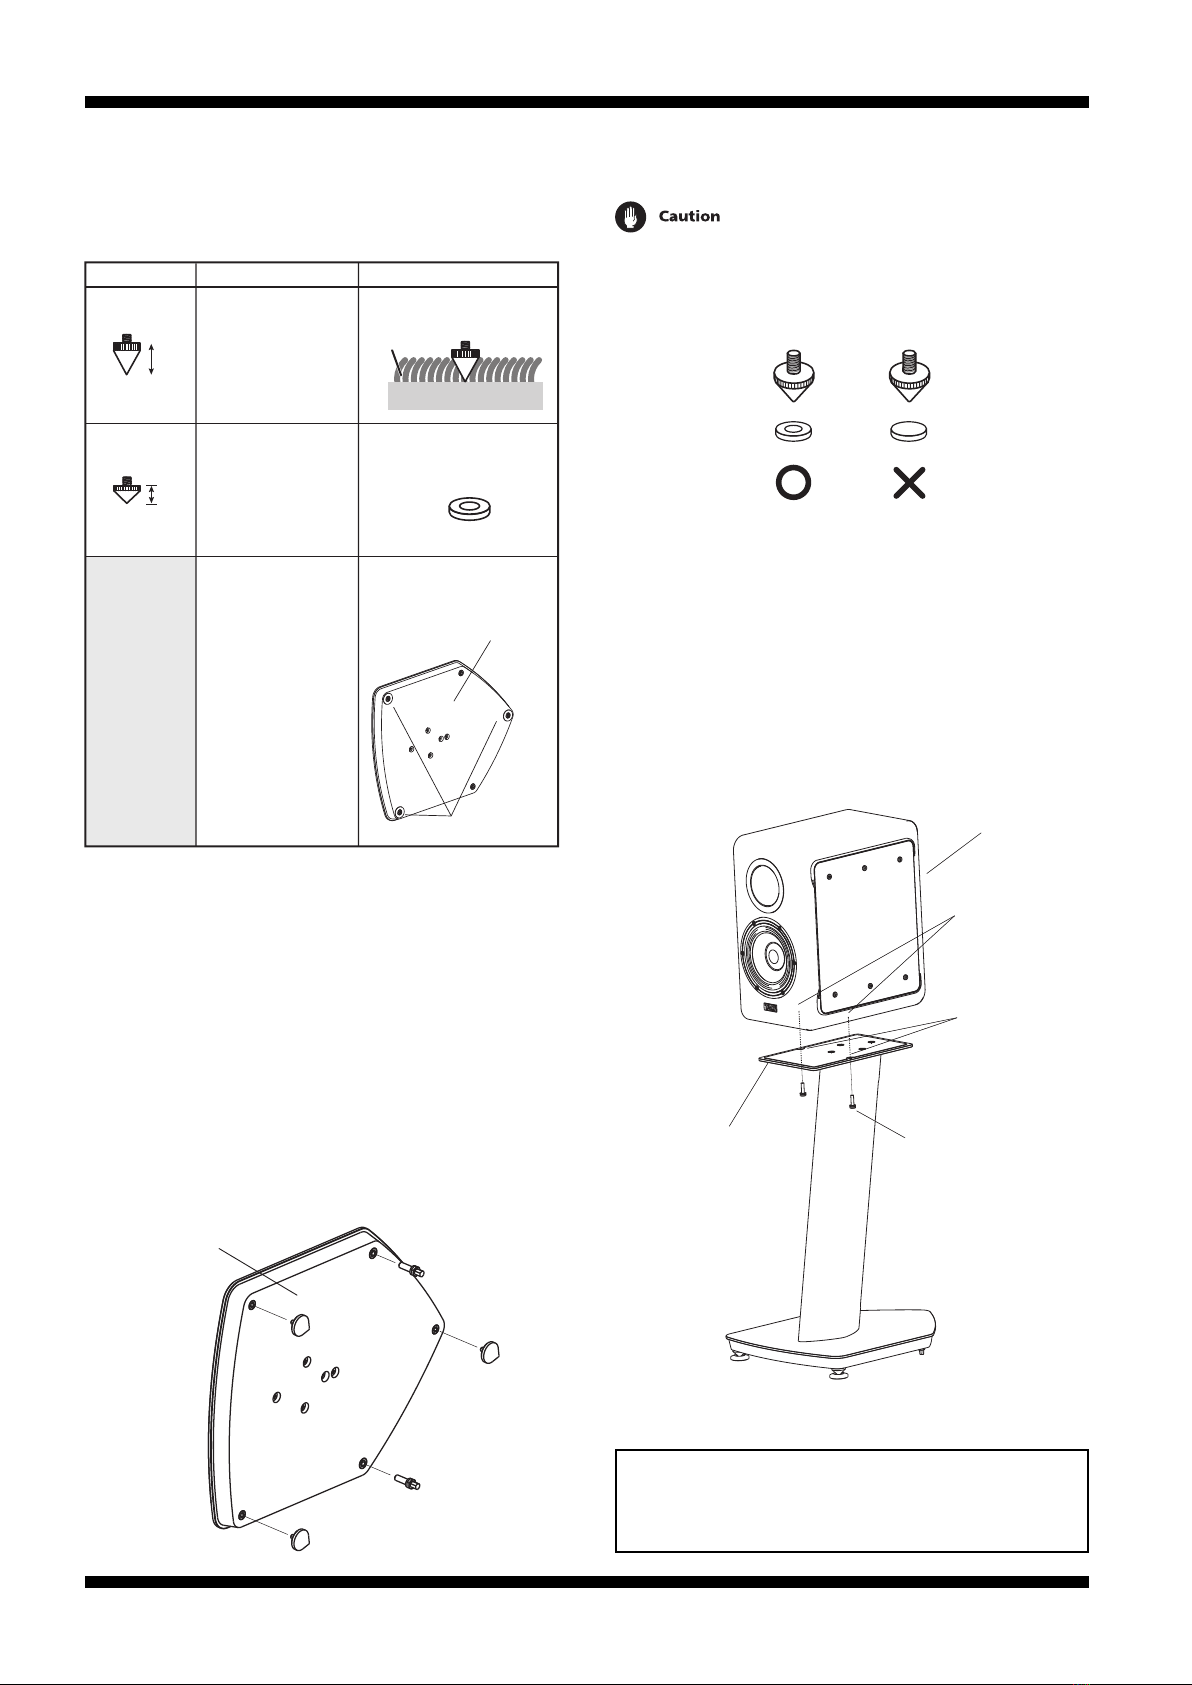
Accessories...............................Spikes (cone type a) [3-939009-030272] x 6
Spikes (cone type b) [3-939009-030271] x 6
Auxiliary support feet, with hex nuts [3-939009-030273] x 4
Spike bases [3-939051-030274] x 6
(Cushioning* applied bottom surface of spike bases)
[3-430210-030440] x 6
* Cushioning material has been applied to the bottom surface
of the spike bases at the time of manufacture.
Non-slip cork pads [3-939023-030265] x 6
Screws (flat head screw) [3-939030-034036] x 8
Screws (binf head type with washers M6 x L40) [3-939030-034034] x 8
Screws (binf head type with washers M6 x L25) [3-939030-034035] x 4
Owner’s manual [3-530008-034048] x 1
Cabinet and stand maintenance
Use a polishing cloth or dry cloth to wipe off dust and dirt.
If the cabinet or stand is very dirty, use a soft cloth dipped
in some neutral cleanser diluted 5 or 6 times with water.
Finally, wipe again using a dry cloth. Do not use furniture
wax or cleaners.
Never use thinners, benzine, insecticide sprays and other
chemicals on or near the cabinet or stand, since these will
corrode the surfaces.
Part Name Part Number
Exterior carton 3-430301-034041
Accessory box 3-430302-030288
Carton sheet
(for speaker support plates) 3-430302-034039
Carton sheet
(for stand stems) 3-430302-034040
Carton sheet
(for stand bases) 3-430103-034042
Carton sheet (for separator) 3-430104-034044
Carton sheet
(for reinforcement) 3-430105-034052
Urethane protective sheet
(for accessory box) 3-330001-030296
Nonwoven fabric sheet
(for stand stems, large) 2-929003-018365
Nonwoven fabric sheet
(for stand stems, small) 2-929003-015472
Nonwoven fabric sheet
(for speaker support plates) 2-929003-015446
Nonwoven fabric sheet
(for stand bases) 3-430205-034101
Mirrored protective film
(for accessory box) 2-929004-015471
Plastic bag
(for screws, cork pad) 3-430203-002275
Plastic bag
(for speaker support plates) 3-430204-030283
Plastic bag (for stand bases) 3-430204-034100
Plastic bag
(for stand stems) 3-430204-034038
Plastic bag
(for Owner’s manual) 3-430204-001839
PAD (for stand stems) 3-430101-034046
PAD (for accessory box) 3-430101-034045

株式会社テクニカルオーディオデバイセズラボラトリーズ
〒160-0023東京都新宿区西新宿4-15-3
http://tad-labs.com
TECHNICAL AUDIO DEVICES LABORATORIES, INC.
4-15-3 Nishi-Shinjuku Shinjuku-ku, Tokyo 160-0023, Japan
http://tad-labs.com
ТЭКНИКАЛ АУДИО ДИВАЙСИЗ ЛАБОРАТОРИЗ, ИНК.
ЯПОНИЯ, 160-0023, Токио, Синдзюку-ку, Ниси-Синдзюку 4-15-3
Импортер: ООО "ПИОНЕР РУС"
125040, Россия, г. Москва, ул. Правды, д.26 Тел.: +7(495) 956-89-01
PIONEER EUROPE NV
Haven 1087, Keetberglaan 1, B-9120 Melsele, Belgium TEL: 03/570.05.11
<3-530008-034048> Printed in China / Imprimé en Chine / Отпечатано вКитае
Сделано в Китае
© 2016 TECHNICAL AUDIO DEVICES LABORATORIES, INC.
All rights reserved.
© 2016 TECHNICAL AUDIO DEVICES LABORATORIES, INC.
Tous droits de reproduction et de traduction réservés.
©2016株式会社テクニカルオーディオデバイセズラボラトリーズ
禁無断転載
Примечание:
В соответствии со статьей 5 Закона Российской Федерации “О защите прав потребителя” и Указанием
Правительства Российской Федерации № 720 от 16 июня 1997 года корпорация Pioneer Europe NV
устанавливает условие на следующую продолжительность срока службы официально поставляемых на
Российский рынок товаров.
Аудио и видеооборудование: 7 лет
Переносное аудиооборудование: 6 лет
Другое оборудование (наушники, микрофон и т.д.): 5 лет
Автомобильная электроника: 6 лет
D3-7-10-6_A1_Ru
Table of contents
Other TAD Speakers manuals