Destination Science Millennium Starship Manual
Millennium Starship Directions
Begin by pouring all the bagged pieces into a large Ziplock baggie. Before anything gets thrown away,
make sure those small plastic bags that the pieces come in are empty. Review the names of the
pieces and how the pieces connect before you start building!
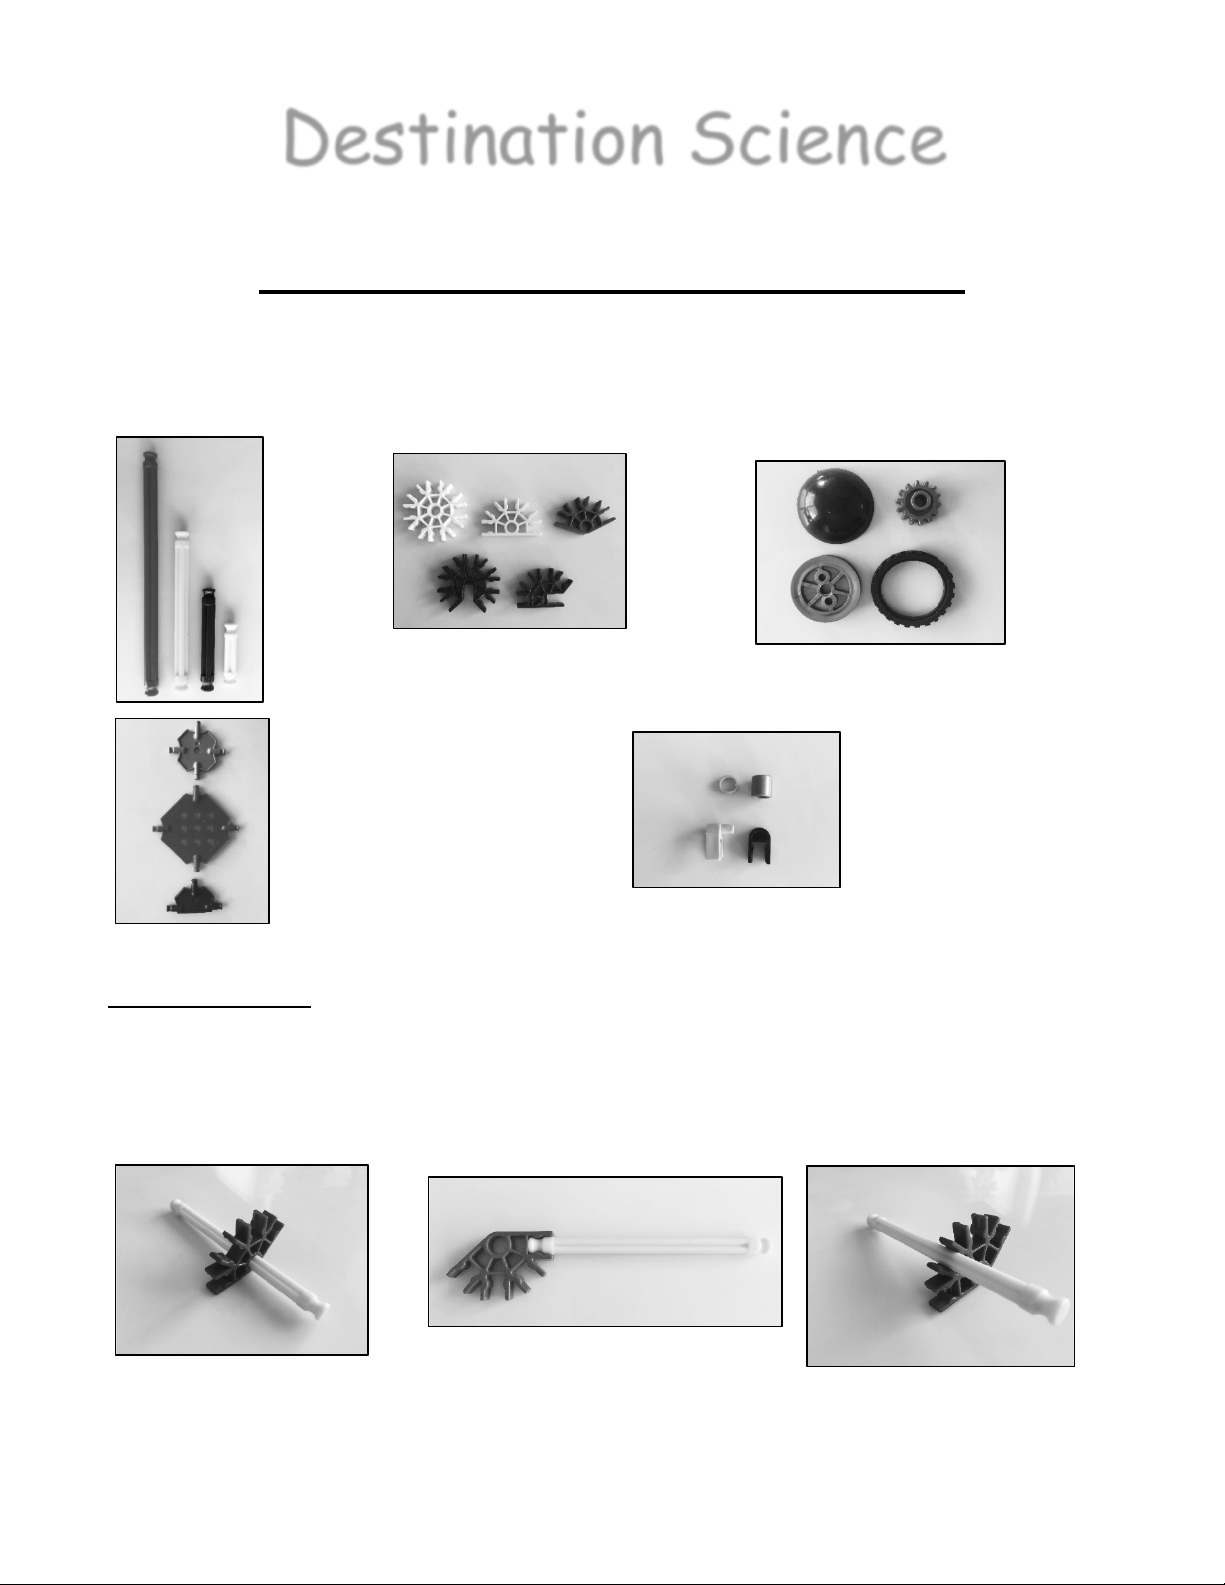
Rods
Snowflakes
Tire,
Wheel,
Gear,
Black
Dome
Gray 4 Tip Connector, Red
Waffle Connector, Blue 3 Tip
Connector
Blue Spacer, Gray
Thick Spacer, Black
Clip, Tan Nose Clip
Connecting Pieces
Rods and Snowflakes can attach to each other in three different ways, and we have special names
for them at Destination Science! The three ways they can connect are…
The Slide…
The Clip…
and The Bite.
Destination Science
1

Steps completed through the week:
Monday
Steps 1 and 2
Build the wheels
and motor
Tuesday:
Steps 3, 4, 5
Build the chassis
Wednesday
Steps 6 and 7
Expand the
chassis
Thursday:
Steps 8 and 9
Attach chassis to
wheels
Add tools
view from the top
Destination Science
2
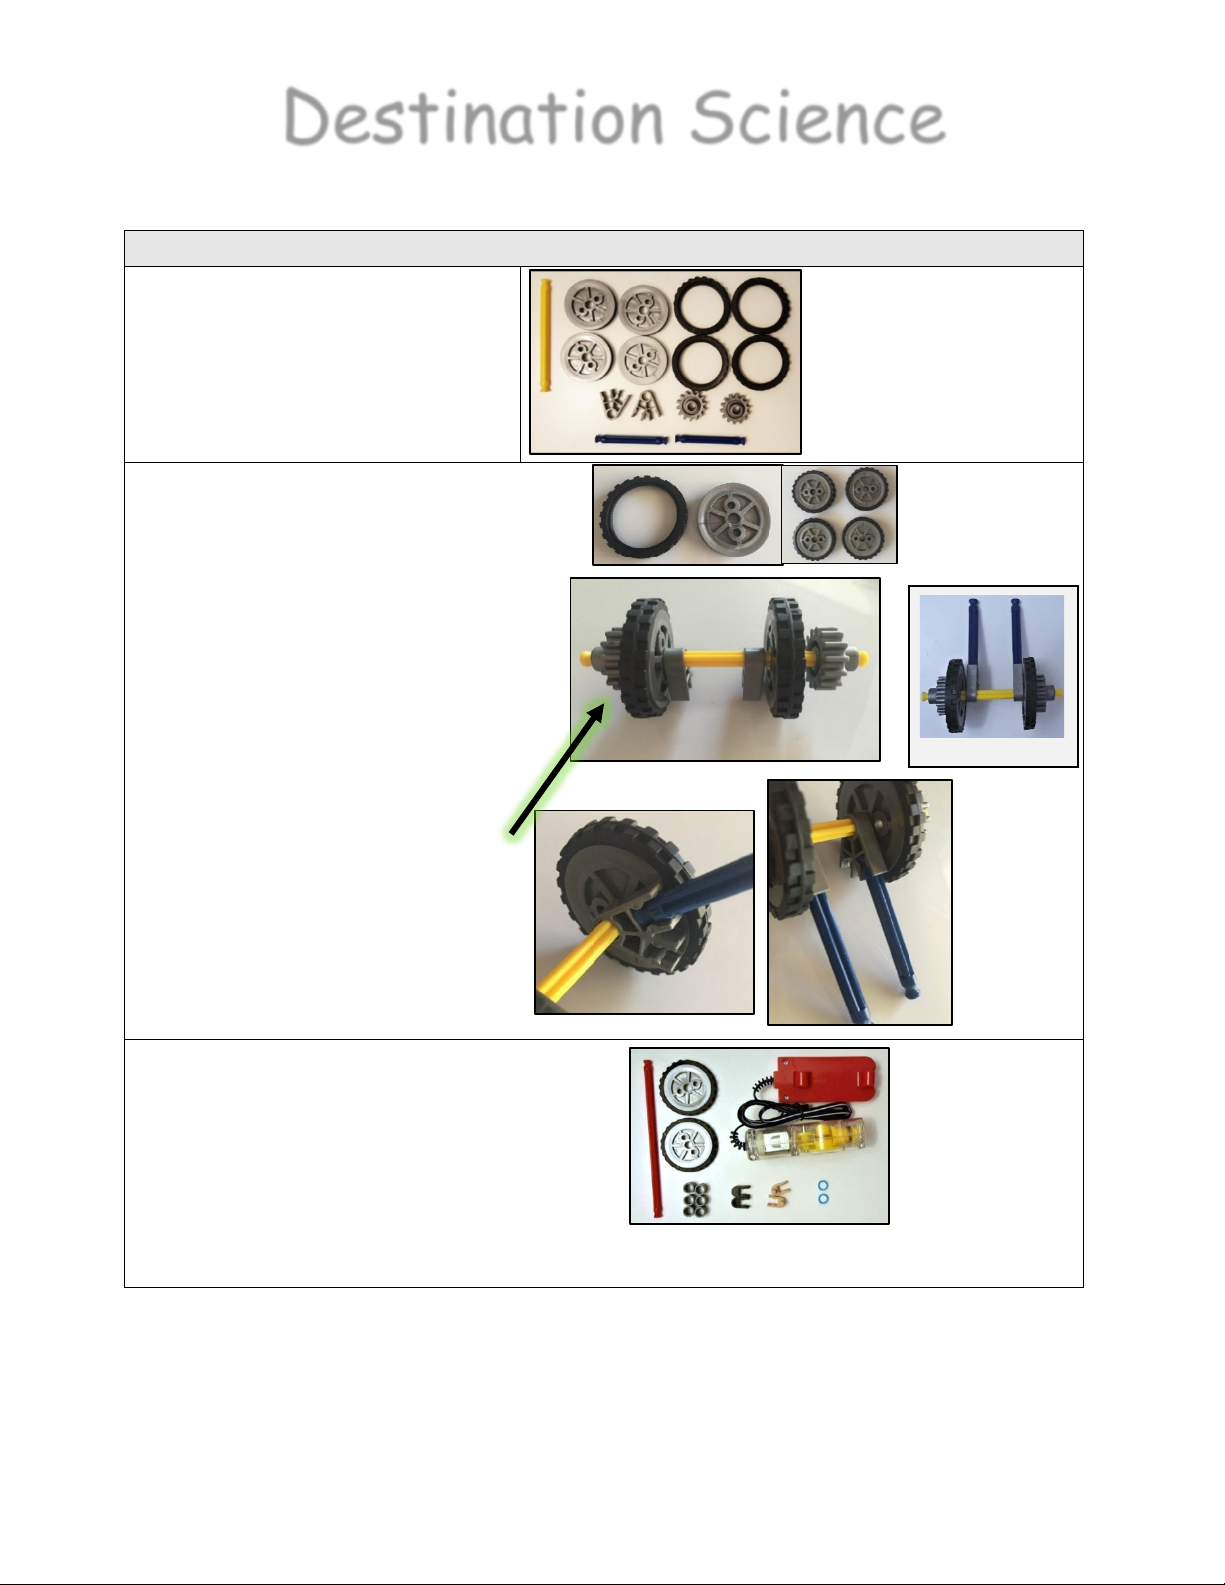
Step 1 Parts
-4 wheels
-4 tires
-1 Yellow Rod
-2 Blue Rods
-2 Gears
-2 Gray Snowflakes
Step 1 Build
Slip tires onto wheels. Create four pairs. Put
two aside for later.
Slide one gear onto the yellow rod, so
the gear’s nose sticks out toward the
end of the rod. Slide it to the end, with
just the tip of the yellow rod showing.
Slide on in order:
1. 1 Gear
2. 2 Gray Snowflakes through the
center hole
3. 1 Wheel
4. 1 Gear with the nose facing the
rod’s other end.
Then, clip on 1 blue rod into a gray
snowflake. This is the “top” and do the
same on the “top” of the other grey
snowflake, so they are level.
Step 2 Parts
-2 wheels from step 1
-6 gray spacers
-2 blue spacers
-2 black clips
-2 tan clips
-1 red rod
-1 motor
Finished Step 1
Destination Science
3

Step 2 Build
Clip 1 black clip on one end of the red rod.
Then slide 1 Wheel onto the open end of
the red rod. Then bite 1 tan nose clip onto
the red rod and slide it into one of the
holes in the wheel on the other side. Then
slide on 1 blue spacer and 3 gray spacers.
Place the motor so that the 4 “legs” with
holes in them are pointing toward the
ceiling, and the “tail” or wires are pointing
away from you.
Slide the open end of the red rod into the
hole on the right side in the middle of the
gear box. Don’t twist or the motor will
break!
Slide 1 blue spacer and 3 gray spacers
onto the open part of the Red Rod like the
other side. Bite on 1 tan clip and then 1
Wheel.
Slide the nose of the tan clip into the
Wheel. Clip 1 Black Clip onto the other end
of Red Rod. The two sides should be the
same.
Finished Step 2
Just like the
other side
*Push spacers and
clips close together
so it will all fits*
Destination Science
4
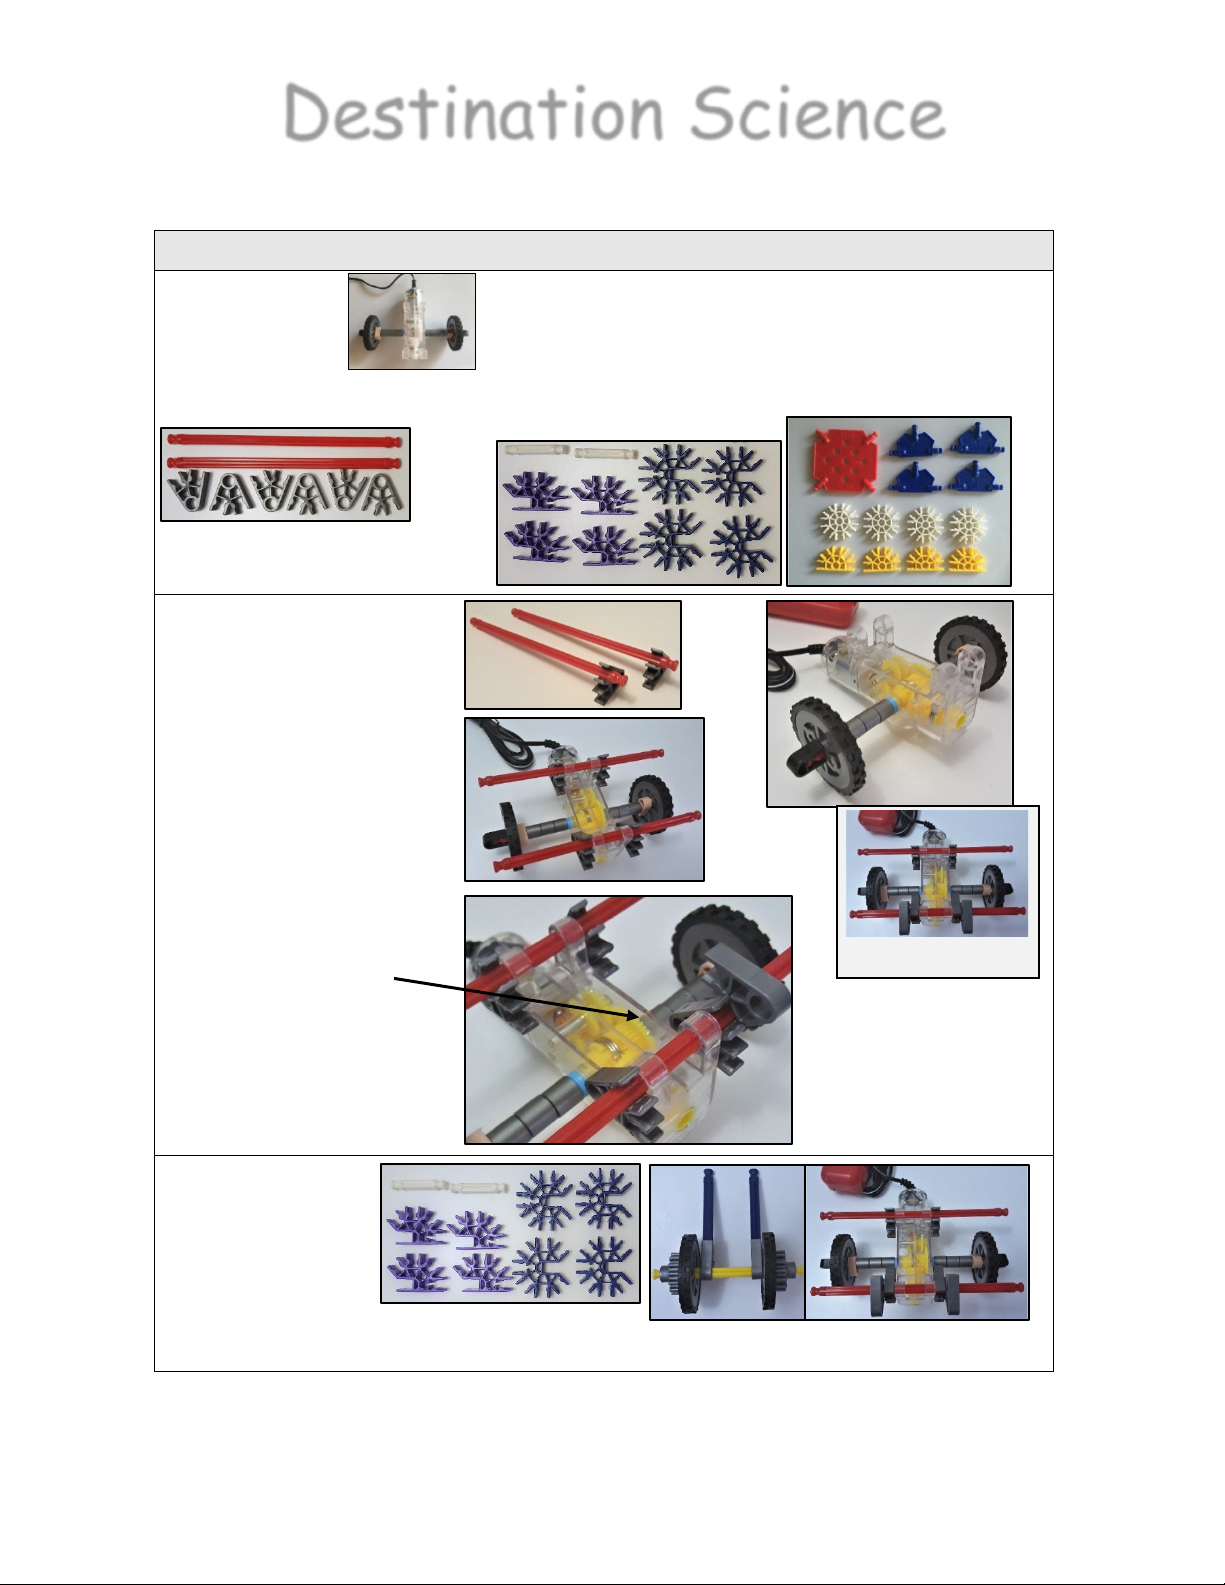
Step 3:
-2 red rods
-6 gray
snowflakes
+ motor from step 2
Step 4:
-2 white rods
-4 blue snowflakes
-4 purple snowflakes
+ wheels from step 1
Step 5:
-1 red waffle connector
-4 blue 3-tip connectors
-4 white snowflakes
-4 yellow snowflakes
Step 3 Build
Bite the top opening of 1
Gray Snowflake onto 1 Red
Rod. Make another.
Place the motor with the
cord facing away and legs up.
Slide the red rods’ open
ends into the “leg” holes.
Secure the rods by biting
the top of a gray snowflake
onto the other side and slide
the snowflake next to the
motor.
On the red rod furthest
from the cord, bite on a
bottom opening of a gray
snowflake and another on
the other side. These should
face the motor.
Steps 4 Parts:
2 white rods
4 blue snowflakes
4 purple snowflakes
+Step 1 wheels
+Step 3 motor
Finished Step 3
Destination Science
5

Step 4 build
Face the open part of the blue snowflake towards the open area of
the purple snowflake. Make sure the purple snowflake’s flat bottom is
facing down. Slide them into each other until you hear a snap. Make
three more of these.
Connect two of these snowflakes to each other by clipping in 1 white
rod in the center part of the blue snowflakes. Make another.
Clip the Blue/Purple
Snowflake pairs onto each
on the two Red Rods in
the center of the Blue
Snowflake.
Attach the wheels from
Step 1 by clipping the
Blue Rods into the open
part of the Gray
Snowflakes that hang
down (on the inside).
Step 5 Parts
-1 Red Waffle
Connector
-4 Blue 3-Tip
Connectors
-4 White
Snowflakes
-4 Yellow Snowflakes
Step 5 Build
Clip in 4 White Snowflakes
to each tip of the Red
Waffle Connector.
Step 5 Build, continued
Clip 1 Blue 3-Tip connector to the
center opening of 2 White Snowflakes.
Repeat 3 times.
Clip the center opening of the yellow
snowflakes to the last open corners of
the blue 3-Tip connector to create a
diamond shape. You’re done!
x 4
x 2
Finished Step 4
Finished Step 5
Destination Science
6

Step 6 parts:
-8 white rods
-4 gray 4–tip connectors
-8 white snowflakes
-4 blue 3-tip connectors
Step 7 parts:
-1 blue snowflake
-2 blue 3-tip connectors
-2 yellow snowflakes
-3 white rods
Step 6 Build
Clip a gray 4-tip connector to the top left white snowflake.
Add two more snowflakes to the left and right tips of the
connector. Repeat this for each corner.
1. Clip in 1 blue 3-tip connector between the top 2 white
snowflakes. Repeat 3 times around the circle.
2. Clip 1 white rod between
2 white snowflakes next to
the top left Gray Connector
(1st).
3. Place 7 rods in the spots next to the
grey connectors like the first one,
except in the top right (4th). The last
rod stays out.
4. Bite the last white rod into the 4th opening as
shown. It should be vertical while the other 7
rods are horizontal.
x8 x4 x8 x4
x2
x2
x3
x1
1st 4th
4th
1st
Finished Step 6
1st
Destination Science
7

Step 7 Parts
-1 Blue Snowflake
-2 Blue 3-Tip Connectors
-2 Yellow Snowflakes
-3 White Rods
Step 7 Build
Clip a white rod into the center opening of
a yellow snowflake to make a fan. Make 2.
Then, attach two blue connectors to the
left and right openings of a blue snowflake
like shown.
Place the ship frame so that the white rod
that you bit in on the white snowflake in
step 6 is in front of you on the right.
On the back 2 white snowflakes, bite in the
white rods of the two fans you just made
in the middle opening of each snowflake.
Tip: biting the rods first then attaching
the snowflake fans might help young
campers.
Front
Back
Attach the blue piece to
the white snowflakes
near the bitten white rod
at the front. Clip the
blue snowflake into the
blue connector in the
frame.
Bite in 1 Right Rod on the
top -left White
Snowflake (next to the
first spot from step 6),
in the middle opening.
x2
x2
x3
x1
Finished Step 7
Destination Science
8

Step 8 parts:
Base (steps 3-4) and Frame (Steps 5-7)
Step 9 parts:
3 White Snowflakes
1 Blue 3 Point Triangle Connector
3 White Rods
2 Blue Rods
1 Black Dome
2 green snowflakes
1 red rod
Step 8 Build
Attach the frame to the base with the
two white rods that are bit into the
white snowflakes. These should be
pushed down all the way
Clip the left white rod into the top of
the front left purple snowflake. Clip
the right rod into the top of the front
right purple snowflake.
the base will be offset from the frame
Step 9 Build
Clip 1 White Snowflake to the top of the
Triangle Connector, and 1 White Snowflake on
to the side. Clip in 1 Blue Rod to the right
snowflake.
Clip the Triangle Connector and Blue Rod to
the furthest right snowflake.
Put another white rod into the black dome’s opening
underneath. Rods won’t stay in the opening.
Clip 1 Red Rod into the second spot over in one
Green Snowflake. Repeat on the other side. Clip in a
White Rod to the end spot.
Left
Right
Destination Science
9

Bite that white rod
onto any white
snowflake the
campers like.
Turn all 4 inner blue 3-tip connectors up so that it
creates a box shape.
Campers are free
to customize their
starships and get
ready for the big
race to DS2020!
Finished ship!
Destination Science
10


