DetectorPro Headhunter Pirate Setup guide

TM
innovative treasure hunting concepts
Owner
Instruction
Manual
Headhunter
Pirate

INTRODUCTION
2
Thank you for buying our HEADHUNTER PIRATE metal
detector. You have purchased one of the most compact
metal detectors in the world. Not only does this metal
detector contain today's most innovative electronics, it is
one of the first detectors to have all the circuitry built into
the headphones. By eliminating a control housing, weight
of the detector is significantly reduced and so is your arm
fatigue. When you travel, the HEADHUNTER PIRATE also
takes up very little room. All of this is possible because of
our innovative micro circuitry and packaging design. The
HEADHUNTER PIRATE was engineered to perform best in
all environments: fresh water, salt water, and on land. We
feel it is a true universal application metal detector.
The HEADHUNTER PIRATE opens up a whole new
world of excitement. Thousands of valuables are
continuously lost each year and you can now start finding
them. Learn the operation of your new metal detector
well, do site research, obey the law, and respect the rights
of others. If you do all of the above, you will have an
enjoyable, successful hobby that will give you pleasure and
relaxation for years to come.
Happy hunting and good luck,
DetectorPro
Headhunter
Pirate
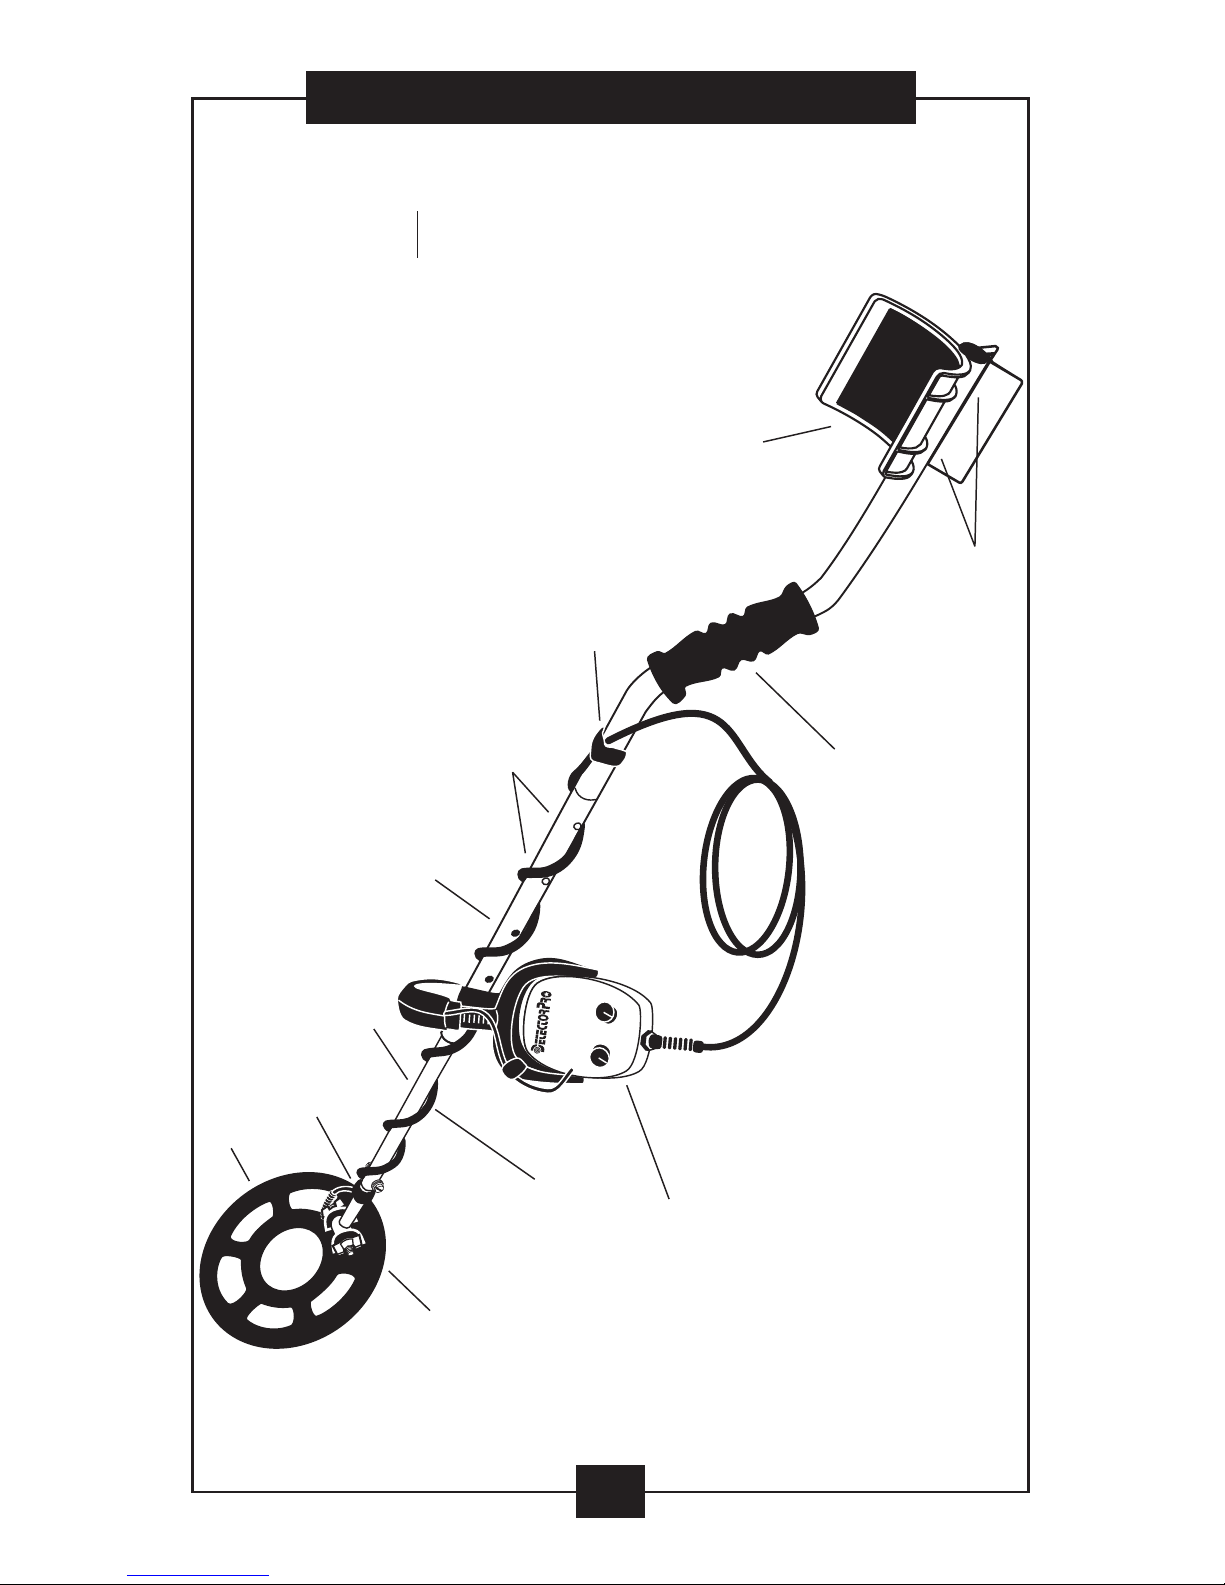
ASSEMBLY
3
Searchcoil
Nylon Thumbnut &
Stud Assemblies for Arm Cup (2)
Nylon Wingnuts &
Stud Assembly (1)
Searchcoil Cable
Headphones
w/ Circuitry
& Controls
(batteries
included)
Middle Shaft
Spring Buttons (shaft assembly
& adjustment)
®
Velcro Cable Anchor
Isolator &
®
Velcro Cable Anchor
Lower Shaft
Arm Cup
Upper Shaft
w/ Foam Handgrip
NOTE: All parts are utilized in the
hunting configuration. The
Headhunter Pirate is water resistant.
CAUTION: The Headhunter Pirate
model can be accidentally dropped
and submerged in water, but not
used for Scuba diving or snorkeling.
OFF
VOL
1
2
3
456
7
8
9
1
0
TM
innovative treasure hunting concepts
Headhunter
Pirate
DISC
0
1
2
3
456
7
8
9
10

TERMINOLOGY
4
If you are new to metal detecting, we have provided
definitions below to help you better understand
terminology used in this manual. The following was
reprinted with permission from: DETECTORIST, A How-To
Guide to Better Metal Detecting, by Robert H. Sickler.
AIR TEST - A test to determine the maximum sensitivity a
metal detector is capable of under ideal conditions. Various
sized metal samples are held beyond the searchcoil
bottom at varying distances to determine the limits of
audio or visual response. Air tests are not accurate
indicators of ground penetration ability. (see BENCH TEST)
ALKALINE - A grade of battery composition which sustains
higher current drain and possesses a greater shelf life than
basic carbon-zinc types.
BENCH TEST - Another form of air test used to define
which discriminate settings accept or reject various target
samples. Detector is placed upon a stationary, nonmetallic
rest and samples are manually passed across the bottom of
the searchcoil.
CARBON-ZINC - The standard or basic grade of drycell
battery.
DISCRIMINATION - Circuitry and the mode of operation in
which audio or visual responses from undesired metal
objects are intentionally eliminated.
GROUND BALANCE - A condition or mode of operation in
which the detector is adjusted to optimally reduce the
interference that ground mineralization has on metal
targets.
MOTION DISCRIMINATOR - A detector requiring constant
searchcoil motion to reduce the effect ground mineral
interference has on its discriminate function.
PINPOINTING - The act of aligning the center of target
response width to the designated searchcoil center for
accurate location and careful recovery.
SENSITIVITY - The measure of a metal detector's capacity
to sense changes in conductivity throughout the pattern
of detection set forth by the searchcoil configuration. (see
AIR TEST)
TARGET - Any buried or hidden object which a metal
detector responds to.
VOLUME CONTROL - A metal detector control which
regulates the loudness of target response.
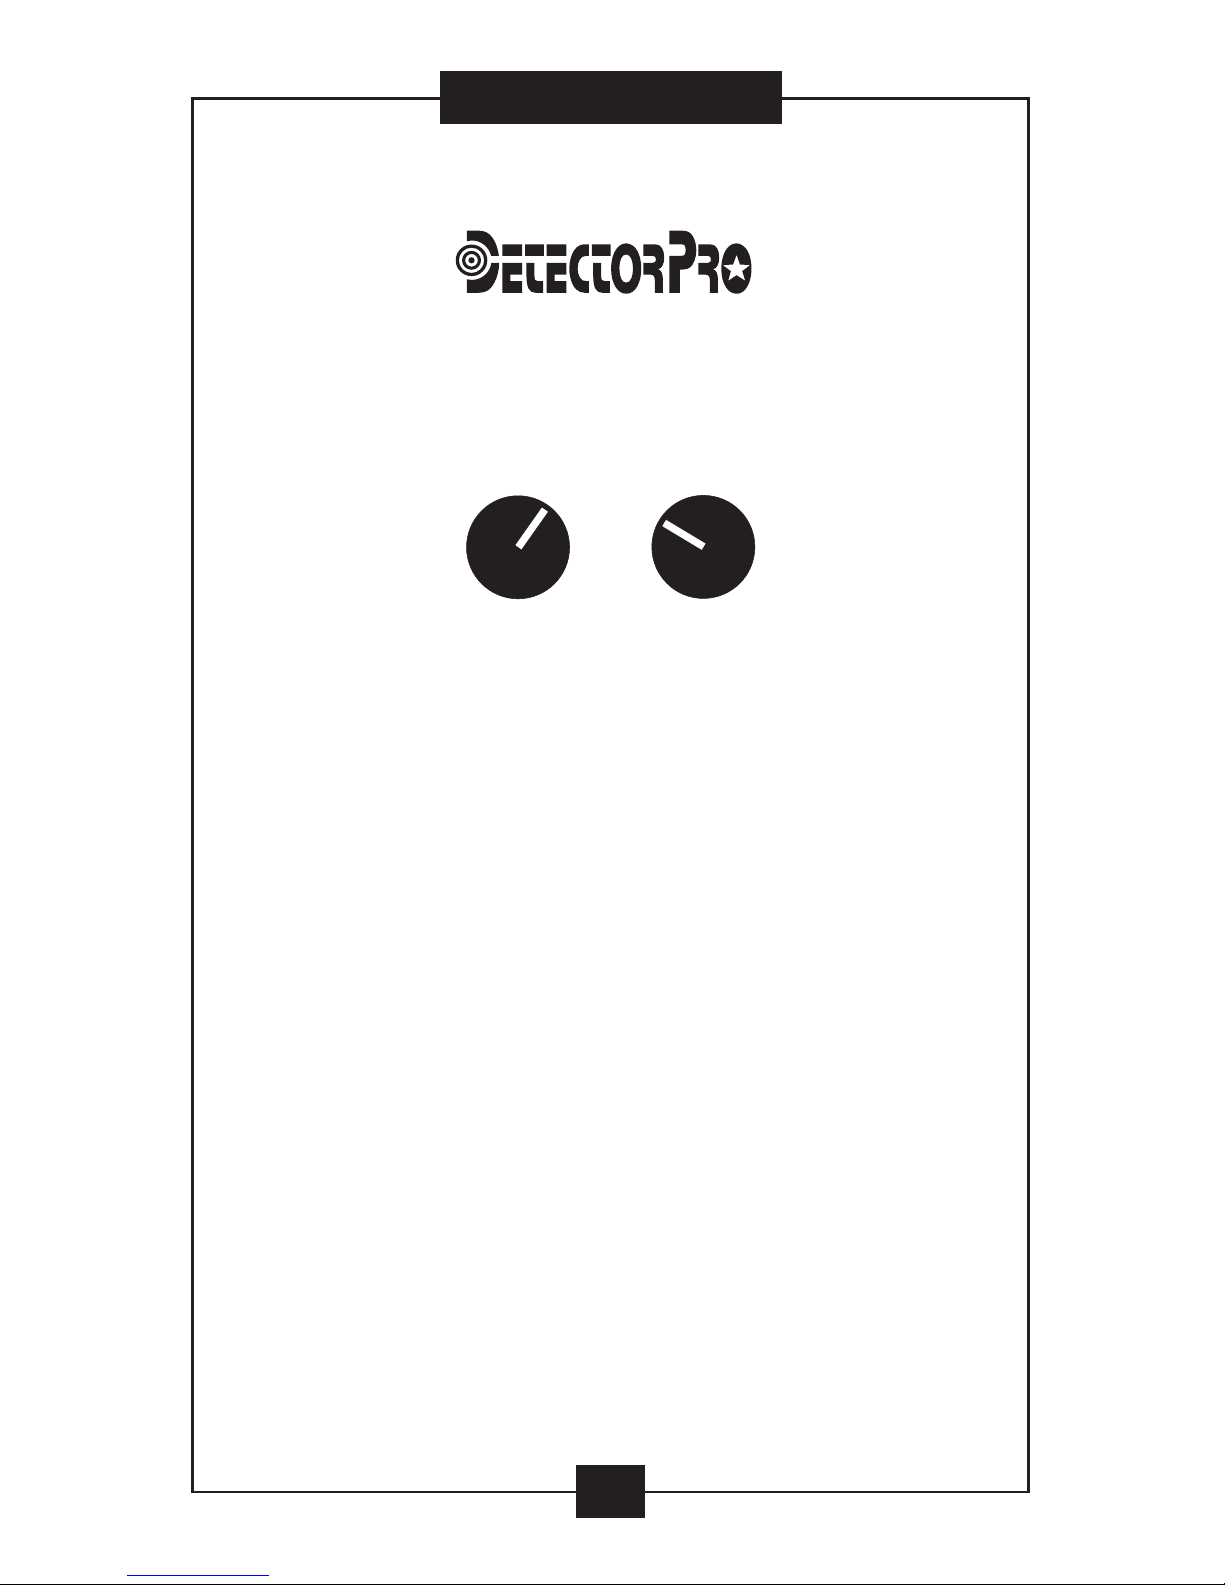
CONTROLS
5
0
DISC
1
2
3
456
7
8
9
10
OFF
VOL
1
2
3
456
7
8
9
10
HEADHUNTER PIRATE model has two controls for the
micro-encapsulated circuitry located in one sealed earcup
of the headphones. Batteries are found in the other
earcup and are user accessible.
The Discrimination (DISC) control has “stay-put”
segmented position adjustments. The Volume (VOL)
control adjustment is continuous and not segmented.
Segmented controls allow the operator to make
adjustments without removing the headphones to view
the position numbers. Once discrimination points are
learned, the operator simply moves the control to the zero
stop position and counts the segment clicks to make the
desired adjustment. This only requires learning where the
two controls are located and the starting points of each
control. The control earcup should be worn on the side of
the head opposite the arm used to sweep the searchcoil
rod — thus giving a free hand to comfortably make
adjustments. Obviously the Volume control is set to the
user’s preference and does not require a secure position.
The “stay-put” segmentation of the Discrimination control
is the most user critical. Having this control accidentally
lose adjustment could possibly make you lose some
valuable targets if set too high.
TM
innovative treasure hunting concepts
Headhunter
Pirate

DISCRIMINATION POINTS
6
Bench test your detector in an area free of metal and electrical
interference. For each item, return the DISC control to “0” and
rotate the knob while passing each item below the searchcoil.
Stop the knob when the item no longer signals or the sound
character becomes broken. This number will be a discrimination
reference point. It will not be possible for you to test all items on
the list, but this will give you an idea what different levels of
discrimination will do to your target. The items below are in
order of conductivity. Please note the good items mixed with the
trash items.
COMMON NAIL
FOIL
THIN RINGS (14K)
"TAB" OF PULLTAB
THIN RINGS (10K)
MEDIUM RINGS (14K)
NICKEL COIN (5 CENTS)
PULLTAB (WHOLE)
$2.5 GOLD COIN
"RING" FROM PULLTAB
THICK WEDDING BAND (14K)
THIN RING (STERLING SILVER)
3-CENT COIN (SILVER)
SQUARE TAB
$5 GOLD COIN
SMALL CLASS RING (10K)
INDIAN HEAD CENT
SCREWCAP (ALUMINUM)
HALF-DIME (SILVER)
ZINC CENT (COPPER PLATED)
LARGE CLASS RING 10K
2-CENT COIN
½ REALE COIN (SILVER)
BARBER DIME
"WHEAT" CENT
HALF-CENT (COPPER)
$20 GOLD COIN
CLAD DIME
1 REALE COIN (SILVER)
MERCURY/ROOSEVELT DIME (SILVER)
LARGE CENT (COPPER)
CLAD QUARTER
QUARTER (SILVER)
HALF-DOLLAR (SILVER)
DOLLAR COIN (SILVER)

OPERATION
7
Operating Instructions:
The HEADHUNTER PIRATE metal detector is one of the
simplest metal detectors to use. It employs fully
automated, ground balanced motion-discrimination
circuitry. The searchcoil must be in slight motion to
maintain audible target signal. The following is the basic
startup procedure for the PIRATE.
1. Turn the HEADHUNTER PIRATE power ON. Set Volume
to a level where you can hear target signals
comfortably. This can be accomplished by passing a coin
back and forth under the searchcoil.
2. Your HEADHUNTER PIRATE is equipped with a quality
"stay put" segmented potentiometer for the
Discrimination control. The Volume control is a
continuous turn control.
3. The next adjustment will be setting the Discrimination
level. After learning where unwanted items will be
discriminated out, you can adjust this before starting
your hunt. If you want to change Discrimination levels
once operating without having to view the control, just
simply count knob clicks from the "0" position. Again,
bench testing will teach you what click count setting
certain objects are eliminated from audio.
4. Swing your coil back and forth slowly over the ground
or surf beach. Keep the coil as close to the bottom as
possible. Solid sounding audio signals should always be
investigated. Pinpointing a target is accomplished by
raising the searchcoil off the target and slowing the
sweep until the audio signal is centered under the coil in
opposing sweep directions.
5. Retrieving targets submerged in water is more difficult
than on land. If you are wading in the surf, make sure
you use some kind of sand scoop. Always carry a small
"goody" bag to deposit and transport your finds. Please
remove and dispose of all trash you find. No one likes
digging it up more than once!

8
Battery Replacement:
Your HEADHUNTER PIRATE metal detector operates
with two, 9-volt standard batteries (batteries supplied).
Hourly use can be extended by using 9V Alkaline batteries.
To add or replace batteries on the PIRATE, place a
coin into the slot on the earcup and turn until the cup
"pops" open exposing the battery compartment. Note the
placement of the worn batteries before removal. Remove
the old batteries and insert two fresh 9-Volt batteries into
the connectors.
This earcup is O-ring sealed. Be sure to carefully clean
the O-ring, the groove it resides in and the mating halves
of the earcup. Lubricate O-ring sparingly with silicone
grease only. DO NOT USE PETROLEUM JELLY.
After batteries have been installed, carefully align the
earcup halves and press until a solid “snap” is heard. Make
sure battery connector wires are well inside of the seal
area and do not get pinched on reassembly.
Maintenance:
1. Always thoroughly rinse your HEADHUNTER
PIRATE in fresh water after using it in salt water.
2. Store your detector in a cool place.
3. Never store it in a manner that it will be subject to
vibration or shock.
BATTERIES & MAINTENANCE

WARRANTY
9
Record Your HEADHUNTER PIRATE:
Date of Purchase:
Dealer Name/Address:
Serial Number:
DetectorPro warrants to the original consumer purchaser
that your DetectorPro metal detector will be free from
defects in materials and workmanship under normal use
for two years (24 months) from the original date of
purchase. If your DetectorPro detector fails due to
defects in material or workmanship, DetectorPro will
repair or replace at its option all necessary parts without
charges for parts or labor.
This warranty gives you specific legal rights, and you
may have other legal rights that vary from state to state.
The warranty is non-transferable. Your warranty
registration card must be sent in 10 days from date of
purchase to validate your warranty.
The warranty excludes batteries, cable breakage due to
improper flexing, wear on searchcoil housing, and wear of
cable protection. Also excluded are metal detectors that
have been abused, altered, or repaired by an unauthorized
party. Opening electronics side of headphones and
tampering will void warranty.
TM
innovative treasure hunting concepts
1447, Route 44
Pleasant Valley, NY 12569
Phone: 845-635-3488
Fax: 845-635-1838
Email: [email protected]
Web Page: www.detectorpro.com
Tech Support: [email protected]

10
SPECIFICATIONS
1
Operating Search Frequency: 2.4 KHz
2
Searchcoil: 8“ Concentric, Co-Planar, RF Shielded
Audio Frequency: 400Hz
Headphone Transducer: Piezo Electric
Search Mode: Silent search, Slow Motion Discrimination
Operating Environments: Salt water, Fresh water, Land
Water Resistant: Dropping in water and hunting in rain
are acceptable.
Length: Adjustable from: 43 to 53“
Weight w/Batteries: 3.5 Pounds
Batteries: (2) 9-Volt Carbon Zinc, Alkaline, or Rechargeable
3
Battery Life: up to 50 hours
Warranty: 2 years
NOTES:
1. Quartz Crystal Controlled
2. Insulated against static interference
3. When alkaline batteries are used in the detector
4. Specifications subject to change without notice
Headhunter
Pirate
Table of contents
Other DetectorPro Metal Detector manuals


Popular Metal Detector manuals by other brands


Steinberg Systems
Steinberg Systems SBS-MD-12 user manual

GOLDEN MASK
GOLDEN MASK 5 user guide

Grizzly
Grizzly YM 203 manual

Fisher Research Labs
Fisher Research Labs 1280-X Aquanaut operating manual

Treasure Cove
Treasure Cove Vibra-Probe 560 quick guide

Accurate Locators
Accurate Locators XL16 IMAGER user guide