Famous Trails MD9300 User manual

Toll Free: (877) 97SCOPE
www.famoustrails.com
MD9300 Metal Detector
OWNER’S MANUAL
CONTENTS
Assembling the Detector----------------------------------------------------------
Installing Batteries------------------------------------------------------------------
Controls And Functions-----------------------------------------------------------
Operating Instructions-------------------------------------------------------------
Search Methods--------------------------------------------------------------------
Treasure Hunter’s Code of Ethics----------------------------------------------
Care And Maintenance------------------------------------------------------------
1
Famous Trails
Anaheim, California
Phone (714) 701-9671 Fax (714) 701-9672

Assembling the Detector
Toggle
Cable
1. There are rubber washers between lower rod and loop ears.
2. Insert lower rod into one end of middle rod so that the spring clip
buttons line up and locks into one of the adjustment holes. Then,
insert the other end of the middle rod into the curved “s” rod so that the
spring clip button lines up and locks into the hole of the middle rod.
3. Unravel loop cable and wind the cable around the rod assembly.
Plug loop connector into control box and secure the screw finger.
4. Install batteries as described in the next section.
Installing Batteries
1. The battery holder holds 8 “AA” sized batteries. Alkaline are
2

recommended. For normal searching conditions you can expect
about 70-80 hours of hunting time from one set of eight Alkaline.
2. Once the batteries become weak, the beep over metal targets will
be reduced in volume. Shortly after, the instrument will no longer
respond to metals.
3. Open the battery holder by loosening the two screws on the front of
the control box and pulling down the battery latch.
4. Slide the battery holder lid by applying gentle upward pressure on
the tab of the door so that it unlocks. Slide the door away from the
battery box.
5. Remove any old cells from the holder. Install new “AA” cells noting
carefully the correct (+) and (-) positions.
6. Replace the door so that it snaps securely.
7. Insert the battery holder into the control box, with the battery holder
door tab and metal contact points facing toward the inside of the
box.
8. Assemble the battery latch correctly by securing the two screws.
3

Controls and Function
1. Sensitivity Control
The sensitivity knob is used to turn the instrument power ON and
OFF and to adjust the response of the instrument.
As the knob is turned further clockwise, detection depth as well as
sensitivity to small metal items increases. Unfortunately, external
electrical interference (broadcast antennas, power lines, etc)
and ground interference also increases.
For good results in most conditions the “P”(Preset) position works
well.
2. Discrimination Control
The Discrimination (DISC) control selects the amount of rejection
against trash metals.
As the DISC knob is turned clockwise, more and more trash
rejection is achieved. At the fully clockwise position nearly all trash
metals are rejected as well as some valuables.
The DISC knob is active only when the detecting mode toggle
(located on the handle/rod) is in the center position (DISC Mode).
4

5
For the rejection of more common trash metals and the detection of
most valuables, this should occur somewhere between the RINGS
range.
For the rejection of all trash metals, even though some valuables
will also be lost, higher rejection levels are useful.
3. FREQ TUNE Control
The FREQ TUNE Control eliminates cross talk or interference often
resulted by two or more detectors operating close together.
4. NORMAL/MAGNETIC toggle
The NORMAL/MAGNETIC (sand) toggle allows the operator to switch
between two settings, NORMAL is best suited for normal conditions,
and MAGNETIC is best suited for extreme conditions such as black
sand, saltwater beaches or other highly mineralized ground. If
searching extreme conditions, use the Magnetic position in
combination with the detecting mode toggle (in the center DISC Mode
toggle position), and the DISC control setting within the TRASH Range
(Yellow Range). This will improve performance in extreme conditions.
5. Detecting Mode toggle
The Detecting Mode toggle (located on the handle/rod) selects
between the two available operating Detection modes (DISC mode
and ALL Metal mode). The center position is used during most
searching where the rejection of trash metal is desired, based on the
DISC control setting. Temporarily squeezing and holding the toggle or
putting it in the locked forward position will provide superior pinpointing
when detection of all types of metal is desired. Temporarily squeezing
and holding the toggle offers all the advantages of the locked forward
position only once released, the toggle automatically returns to the
center DISC Mode.

6
Operating Instruction
1. Once unit is fully assembled and the batteries installed: Turn ON/OFF
SENSITIVITY control clockwise to the “P”. Set the
DISCRIMINATION control to approx 1/3 position. Set Detecting
DISC Mode toggle to the center DISC position (located on
handle/rod).Set Magnetic Sand toggles to the NORMAL position. Set
FREQ TUNE control to the High position.
2. The ideal position for the SENSITIVITY knob, in most conditions, is the
“P”(preset). If interference becomes apparent, reduce the sensitivity
control (counterclockwise) until operation is smooth and stable. When not
in use, turn off the power.
3. Discrimination (DISC) Knob adjusts the level of rejection against
trash metals. It is active only in the Detecting DISC Mode.
a. The 5¢ position is recommended for most searching. The detector
will reject most iron and light foil and respond to most valuables
including jewelry.
b. The 1¢ position is optional. The detector will reject more trash
metals including aluminum pulltabs.$0.05 coins and some jewelry
will also be rejected.
c. The most useful range on the control is between the 5¢ and 1¢
positions.
d. When a trash metal is being rejected, it will produce a shorter
beep or flutter-sounding beep. When a good metal is accepted it will
produce consistent, smooth,
solid and longer sounding beeps.
e. Once the DISC control position has been selected, sweep loop
close to the ground, from side to side about one foot per-second.
Overlap each pass by at least 50%.
f. Once a smooth consistent beep has been located, pinpoint where to
dig by squeezing and holding the Detecting Mode toggle (located on

7
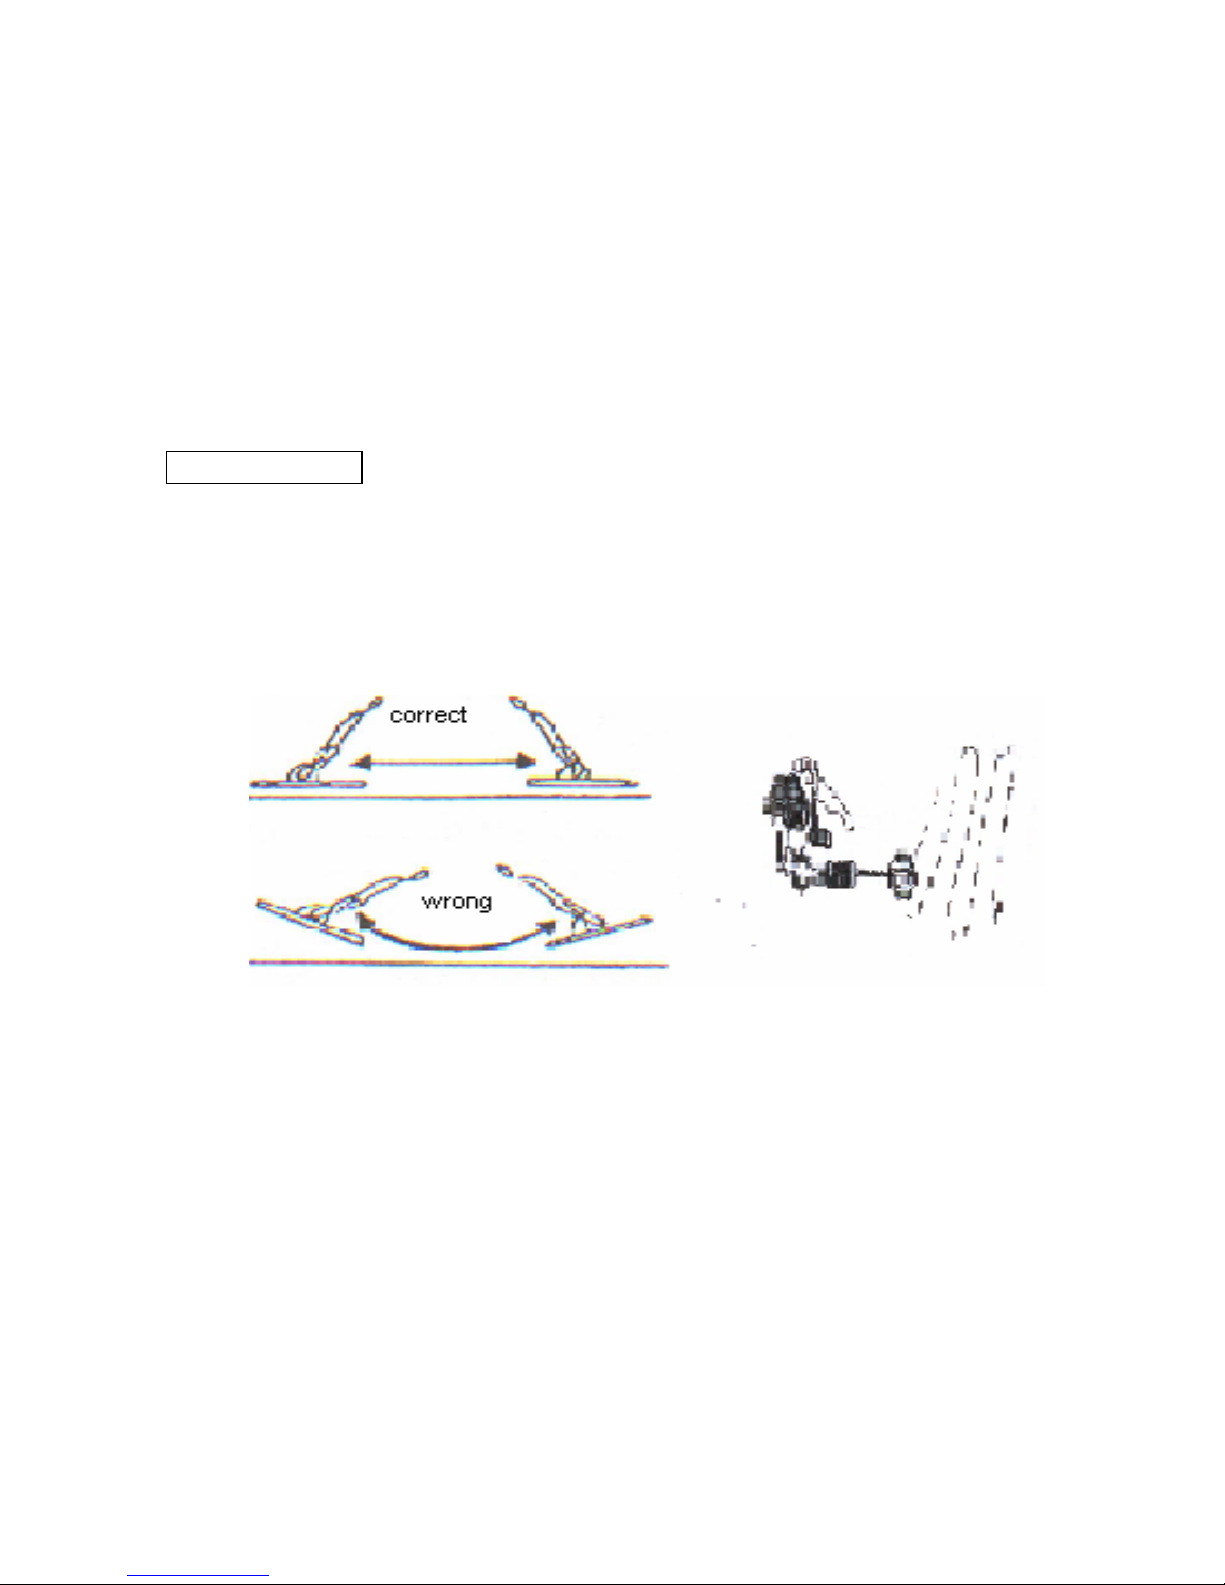
the handle). Slowly “X” loop over target, centering in on the loudest
sound. Release the toggle and it will automatically return to the center
position of the toggle.
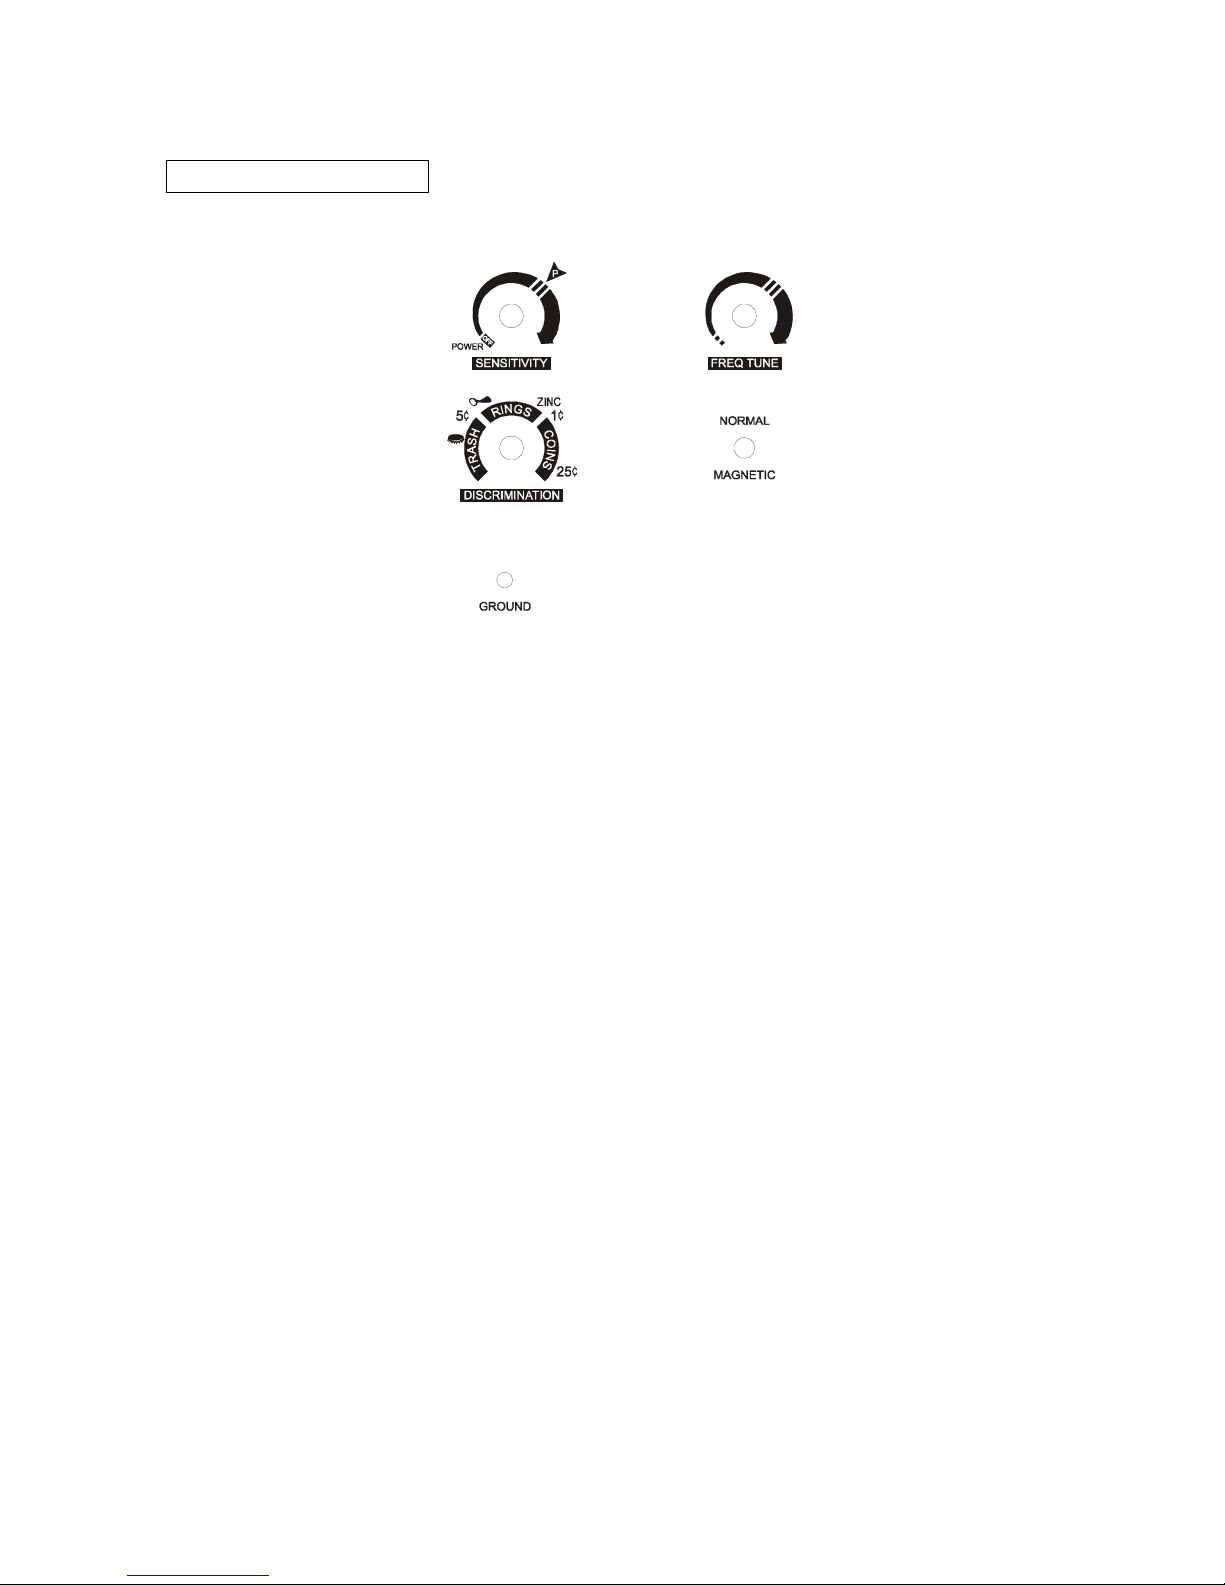
4. If searching near other metal detectors, often cross talk or
interference will result. Simply turn the FREQ TUNE control slightly,
until the static is eliminated.
5. For searching in extreme conditions such as a wet saltwater beach
with black sand or/any other highly mineralized soil, the
NORMAL/MAGNETIC sand toggle can be used to improve
performance. Place the toggle in the MAGNETIC position, place the
Detecting Mode toggle in the center, and use a low DISC Knob
setting within the TRASH Range(Yellow Range). If you increase the
DISC Knob setting above the RINGS Range (Red Range), it will
defeat performance in extreme conditions.
6. Most 1/4 inch headphones from 8-120 ohms will work with this
Model. The model doesn’t have volume control, so if you have
sensitive hearing, be sure to select headphones with volume
control.
7. Ground Rejection:The ground rejection of this model is factory preset
at a level slightly positive of a ferrite mineral sample. This setting will
provide good performance in most ground conditions. If you notice a
lot of false targeting or if ground penetration is less than several inches,
the ground rejection may need to be adjusted for your area.
To set the ground rejection:
zPlace the Detecting Mode toggle in the center position (DISC).
Lower and lift the loop from the ground. A beep indicates ground
rejection is not yet set perfectly.
zOn the top of the instrument, there is an access hole (marked
“GROUND”) with a trimmer inside which is used to reset the ground
rejection. Use a very small head screwdriver to adjust this trimmer.

Find the edge where in one direction the detector beeps as the loop
is lowered and lifted from the ground and in the other direction the
detector doesn’t beep. The correct setting is the point or edge where
the detector just stops beeping as the loop is lowered and lift from
the ground.
zRecover the access hole with a plug cover to prevent moisture and
dirt from entering the control box.
Search Methods
1. Loop Sweep
zBecause the loop must be moving in order to accurately respond, the
sweep of the loop is critical to performance. Sweep the loop close to
the ground. Keep it close throughout the sweep.
zProductive areas should be searched from at least two different
directions, at 90 degree angles from each-other.
2. Pinpointing
Once a consistent good sound is located, squeeze and hold the
detecting mode toggle (located on the handle) or press it forward to
lock and “X” the area slowly to pinpoint the exact center. The detector
will beep as the physical center of the loop passes the center of the
target. Listen for the loudest beep as you sweep the loop over the area,
then stop and sweep in the other direction listening for the loudest
8

beep. Where the two loudest beeps intersect is the center of the target.
Return the toggle to the center position (DISC) before continuing to
search.
Treasure Hunter’s Code of Ethics
All treasure hunters might be judged by the example you set. Here are a
few basic rules you should follow while using your detector.
zAlways get permission before searching any site.
zRespect the rights and property of others.
zObserve all national, state, and local laws while treasure hunting.
zNever destroy historical or archaeological treasures. If you are not
sure about an object you have found, contact a museum or historical
society in your area.
zLeave the land and vegetation as it was. Fill in any holes you dig.
zUse your detector only in safe areas.
zDispose of any junk you find, only in approved areas. Do not leave it
for the next treasure hunter to find.
Care and Maintenance
The following suggestions will help you care for your metal detector so you
can enjoy it for years.
9

10
Keep the metal detector dry. If it gets wet, wipe it dry immediately.
Liquids might contain minerals that can corrode the electronic
circuits.
Use and store the metal detector only in normal temperature
environments. Temperature extremes can shorten the life of electronic
devices, damage batteries, and distort or melt plastic parts.
Keep the metal detector away from dust and dirt, which can cause
premature wear of parts.
Handle the metal detector gently and carefully. Dropping it can
damage circuit boards and cases and can cause the metal detector to
work improperly.
Occasionally wipe the metal detector with a damp cloth to keep it
looking new. Do not use harsh chemicals, cleaning solvents, or strong
detergents to clean the metal detector.
Warranty: This product is warranted against defects in materials and
workmanship for 5 years from date of purchase. The item must be
shipped at buyer’s expense to our offices where we will, at our
discretion, repair or replace it free of charge. Please include your
original purchase receipt. This warranty is not valid for defects
caused by accidents, misuse, improper care, alteration or abuse, nor
is it valid if any service or repair is performed by non-authorized
personnel.
Table of contents
Other Famous Trails Metal Detector manuals