DEVA Broadcast Radio Explorer III DAB User manual
MAINTENANCE AND OPERATION
INSTRUCTION MANUAL
Publish Date: 10-Apr-2023
Radio Explorer III
DAB
Advanced Mobile DAB/DAB+ Radio Analyzer
50 Channel GPS Receiver

Contents
Introduction........................................................................................................................................ 5
Typographic conventions .................................................................................................................. 6
General Information.......................................................................................................................... 7
Product Features ................................................................................................................................ 8
Technical Specications .................................................................................................................. 9
Block Diagram .............................................................................................................................. 10
Safety Precautions............................................................................................................................ 11
Panel Indicators, Switches and Connectors................................................................................... 12
OLED Display............................................................................................................................... 12
Context-sensitive soft buttons........................................................................................................ 12
Navigational buttons ..................................................................................................................... 12
Front Panel.................................................................................................................................... 13
Rear Panel..................................................................................................................................... 14
Rear Panel GPO Terminal ............................................................................................................ 15
Before you start ................................................................................................................................ 16
Unpacking and Inspection............................................................................................................. 16
Radio Frequency Interference (RFI) ............................................................................................. 16
Safety Precautions......................................................................................................................... 17
Device connection ......................................................................................................................... 17
Getting Started ................................................................................................................................ 18
Connection .................................................................................................................................... 18
Network Settings............................................................................................................................ 19
Network Discovery ........................................................................................................................ 19
Basic Setup........................................................................................................................................ 20
OLED Display............................................................................................................................... 20
How to change device parameters ................................................................................................ 20
Set-up menu title ...................................................................................................................... 20
Navigation area ....................................................................................................................... 20
Home Screen.................................................................................................................................. 24
Bandscan Page.............................................................................................................................. 25
Span control state ..................................................................................................................... 27
Marker control state ................................................................................................................. 29
Parameter control state ............................................................................................................ 30
Bandscan page parameters ..................................................................................................... 30
Levels Page ................................................................................................................................... 31
Status Page.................................................................................................................................... 33
Status > Device ........................................................................................................................ 33
Status > IP Address .................................................................................................................. 33
Status > GPS ............................................................................................................................ 34
Settings Page................................................................................................................................. 35
Settings Menu screen structure ................................................................................................ 36
How to start a Logger campaign using the front panel menu?..................................................... 39
Restore factory defaults................................................................................................................... 40
WEB Interface.................................................................................................................................. 41
Manual IP Address Identication.................................................................................................. 41

Network discovery ........................................................................................................................ 43
Access............................................................................................................................................ 43
Device control interface ................................................................................................................ 44
Main .............................................................................................................................................. 46
DAB / DAB+ ................................................................................................................................. 47
Loudness........................................................................................................................................ 48
Band Scan...................................................................................................................................... 49
Status ............................................................................................................................................. 50
Log................................................................................................................................................. 51
General Settings ............................................................................................................................ 52
Tuner Settings................................................................................................................................ 53
Logger ........................................................................................................................................... 54
Important recommendations when acquisition time is set........................................................ 55
How to start a Logger campaign?............................................................................................ 56
Communication Settings................................................................................................................ 57
Outputs Settings ............................................................................................................................ 59
Other Settings................................................................................................................................ 60
APPENDIX B ................................................................................................................................... 61
How should I congure the connection between my DEVA Device and an FTP Client? 61
WARRANTY TERMS AND CONDITIONS................................................................................. 63
Product Registration Card.............................................................................................................. 64

THIS PAGE
IS INTENTIONALLY
LEFT BLANK

65 Aleksandar Stamboliyski Str., 8000 Bourgas, Bulgaria
Tel: +359 56 820027, Fax: +359 56 836700
E-mail: o[email protected] ,Web: www.devabroadcast.com
- 5 -
Introduction
DEVA Broadcast Ltd. is an international communications and high-technology manufacturing
organization, its corporate headquarters and facility located in Burgas, Bulgaria. The company
serves the broadcast and corporate markets worldwide – from consumers and small businesses to
the largest global organizations. It is dedicated to the research, design, development and provision
of advanced products, systems and services. DEVA Broadcast launched its own brand back in
1997 and has nowadays evolved to become known as a market leader and internationally reputed
manufacturer of user-friendly, cost-eective and innovative broadcast products.
Creativity and innovation are deeply woven into DEVA Broadcast corporate culture. Through
successful engineering, marketing and management our team of dedicated professionals creates
future-oriented solutions to improve customers’ performance. You may rely that all issues
communicated to our crew would be addressed accordingly. We pride ourselves on our pre and
post-sales support and purchase services, which along with the outstanding quality of our radio
gear have won us due respect and the market authority position.
DEVA Broadcast best-of-breed solutions have become the best sellers for our partners. The
strategic partnerships which have been formed with industry leaders during all these years that
we have been operating on the broadcasting market, have proved us a reliable business partner
and a valuable asset, as our dealers worldwide would conrm. In constant pursuit of precision and
long-term satisfaction, DEVA Broadcast enhances the reputation of our partners and clients alike.
Furthermore, we have already a proven merit as a credible partner provider.
Our portfolio oers complete line of high quality and competitive products for FM and Digital
Radio, Radio Networks, Telecommunication Operators and regulation authorities. For almost
two decades of intensive software and hardware development, we have achieved a unique price-
performance and endurance of our product lines. Our company’s multitude of equipment and
services is in line with the latest technologies and key trends. The most recognizable characteristics
attributed to DEVA Broadcast products are their clear-cut, streamlined design, easiness of use and
cost-eectiveness: simplicity of forms but multiplicity of functions.
For us there is no stage when we deem that we have reached the most satisfactory level in
our work. Our engineers are in constant pursuit of new ideas and technologies to be captured in
DEVA Broadcast solutions. Simultaneously, a strict control is being exercised at each step of any
new development. Experience and hard work are our fundament but the continuous improving
process is what we never leave aside. DEVA Broadcast participates on a regular basis in all
landmark broadcasting events, not only to promote its products, but to exchange valuable know-
how and experience. We are also engaged in international large-scale projects involving radio and
audio solutions which makes us even more competitive on the global market.
All DEVA Broadcast products are developed and produced in accordance with the latest ISO
9001 quality control standards.

65 Aleksandar Stamboliyski Str., 8000 Bourgas, Bulgaria
Tel: +359 56 820027, Fax: +359 56 836700
E-mail: o[email protected] ,Web: www.devabroadcast.com
- 6 -
Typographic conventions
The following table describes important conventions used in the manual.
Convention and Style Description Examples
Menu > Sub Menu >
Menu Command
A menu item(s) and menu
command that you need to click
in sequence
Click Settings > General
[Button] Interface Interactive buttons Press [OK] to save the changes
NOTE Important notes and
recommendations
NOTE: The notication will appear
only once
“Reference Name” on
Page XXX
References and links refer to “New Connection”
(see “Monitoring” on page 56)
Example Used when example text is cited Example for E-mail Notication:
Date: 04 Nov 2013, 07:31:11

65 Aleksandar Stamboliyski Str., 8000 Bourgas, Bulgaria
Tel: +359 56 820027, Fax: +359 56 836700
E-mail: o[email protected] ,Web: www.devabroadcast.com
- 7 -
General Information
Radio Explorer III DAB adds another dimension to DEVA Broadcast’s already spectacular range
of DAB/DAB+ products. This is an advanced coverage survey mobile tool in full compliance with
the ETSI EN 300 401 DAB standard. Among its most important advantages are the two powerful
DAB tuners, which account for the unprecedented accuracy and reliability to this product.
Radio Explorer III DAB allows you to monitor up to 10 services within the DAB ensemble
with predened acquisition time in a round-robin scheduler and stores the measured parameters in
a log le for further analysis through the DEVA Device Manager software.
It oers support for Program Associated Data (PAD), as well as all standard bitrates and VBR,
and automatically displays live metadata. As a tool of immense precision, it also measures the
following DAB signals: RSSI, SNR, CNR, FIC Quality, FIB Errors, FFT Oset and the Left &
Right Audio level values.
The BandScan function of the Radio Explorer III DAB presents an overview of all DAB/DAB+
signals available, plus their RF signal strength. BandScans are possible within any section of
Band III, whereas the generated spectrum diagram shows the RF Level vs. the channels. Another
great asset to this tool is the Loudness meter, which can be shown as dened by ITU BS.1770-4
and EBU R128 recommendations, as the product supports both.
As a matter of course, our aim with Radio Explorer III DAB has once again been to make
sophisticated, high quality equipment easy to use. This product has a high-resolution graphical
OLED display with front panel navigational buttons and soft buttons for quick access to the
device’s various functions. Another option to control the unit is via the built-in Web server - a
standard web browser can be used to monitor its status or to make some adjustments. iOS and
Android devices are also supported. The Main Screen of the WEB Interface shows all mandatory
parameters represented as LED bar graph readings.
The DEVA Device Manager Software, supplied free of charge, also allows for quick and easy
connection to the device.
Another elegant solution in our DAB/DAB+ line, the Radio Explorer III DAB brings precision,
eectiveness and the customary DEVA quality.

65 Aleksandar Stamboliyski Str., 8000 Bourgas, Bulgaria
Tel: +359 56 820027, Fax: +359 56 836700
E-mail: o[email protected] ,Web: www.devabroadcast.com
- 8 -
Product Features
• DAB/DAB+ compliant receiver
• Support for Program Associated Data (PAD)
• Predened DAB channels scan or manual tune
• Detailed DAB component information
• High-end digital tuner
• Dual tuner frontend for faster service switching
• Protected access to the device settings
• SNTP for automatic synchronization of the built-in clock
• LAN port for full TCP/IP remote control and monitoring
• Adjustable MIN/MAX alarms for RF, Left & Right Audio Levels
• Alarm dispatch via E-mail, SNMP ver.2C and GPO
• Firmware updates will ensure improved operation
• Antenna port supporting up to 110 dBµV direct RF Antenna Input
• Built-in 50-channels GPS Receiver
• Front panel OLED Graphical Display
• Easy to use WEB Interface
• Apple and Android devices support
• Very Intuitive Application Interface
• SNMP for adjustments and control
• Maintenance via DEVA Device Manager Software
• Measurement results visualization in Google Earth
• Accurate front-panel metering for local use
• Headphone output with front panel level control
• 3 General purpose outputs
• Built-in FTP Server for easy download of the Log les
• Robust, custom made Metal Case for high RF immunity

65 Aleksandar Stamboliyski Str., 8000 Bourgas, Bulgaria
Tel: +359 56 820027, Fax: +359 56 836700
E-mail: o[email protected] ,Web: www.devabroadcast.com
- 9 -
TECHNICAL SPECIFICATIONS
DAB/DAB+ RADIO INPUT
RF frequency range 168 - 240 MHz
DAB/DAB+ Band III Channels 5A - 13F
Sensitivity 18 dBµV
Input connector BNC 50Ω
In compliance with ETSI EN 300 401
Ensemble acquisition Time 940 ms
L&R Audio 1%, +5.0 to -50.0 dB, 0.1 dB resolution
DAB/DAB+ RADIO METERING
Quality indicators RSSI, SNR, CNR, FIC Quality, FIB Errors, FFT Oset
PAD DLS, MOT
Metadata Displayed Ensemble Label, Component List & ID, Service List & ID,
Dynamic Label, PTY, Sample Rate, Bit Rate, Gain, Mode,
Service Mode, Protection Info, Current CU & Address, Country,
Language, Time & Date
OUTPUTS
Audio (L, R) +6 dBu, 600Ω, balanced XLR Connector
GPO Terminals on rear panel, optoisolated
Headphone 6,3mm (1/4”) Phone Jack
COMMUNICATION INTERFACES
USB B-type Connector
Ethernet 10/100 Base-T RJ45 Connector
GPS RECEIVER
Number of channels 50
Antenna Pre-amplied, 5m of cable, magnetic
Connector SMA, rear panel
MEASUREMENT STORAGE
Storage 16GB Build-in Memory Card
Data format Text, CSV
POWER REQUIREMENT
Voltage 12 DC (11-15V) / 2A max at 12V
Connector XLR (on rear panel)
SIZE AND WEIGHT
Dimensions (W;H;D) 210 x 76 x 215 mm
Shipping Weight 470 x 180 x 310 mm / 4.031 kg
HS Code 8527212000
65 Aleksandar Stamboliyski Str., 8000 Bourgas, Bulgaria
Tel: +359 56 820027, Fax: +359 56 836700
E-mail: o[email protected] ,Web: www.devabroadcast.com
- 10 -
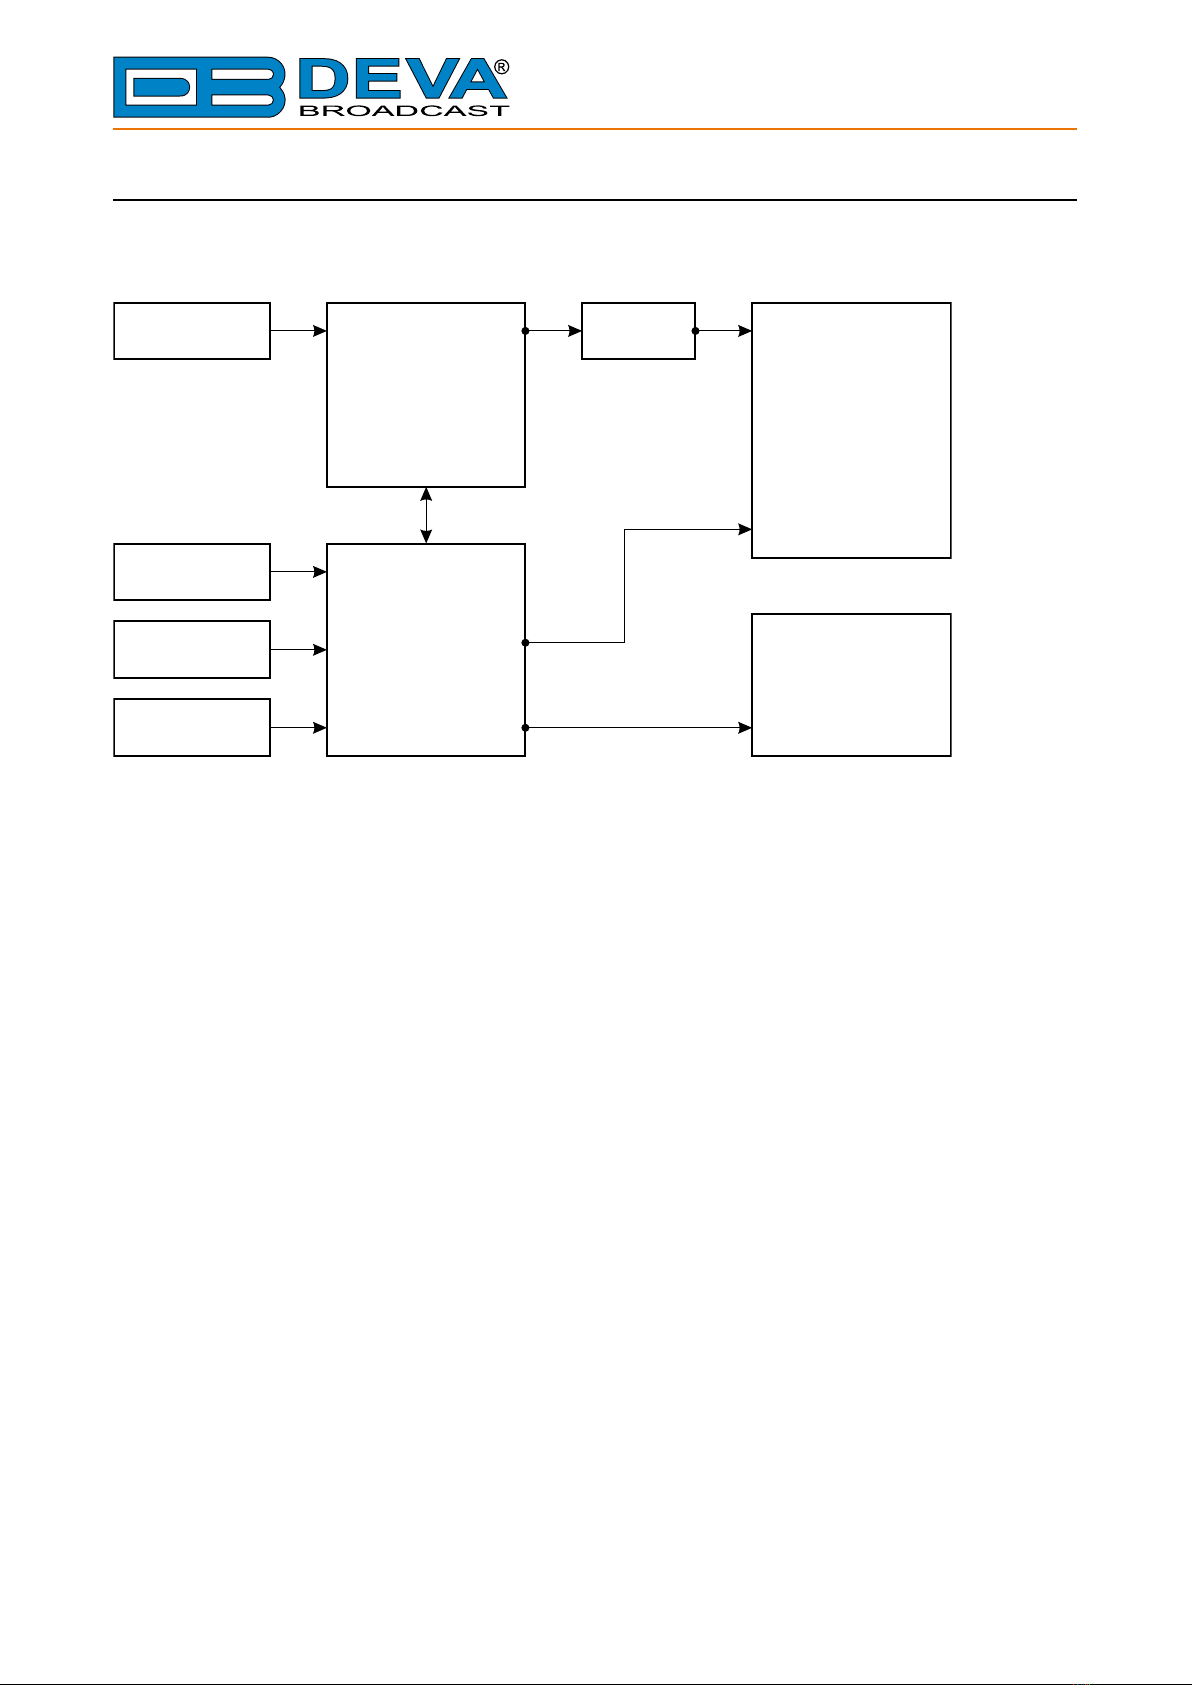
BLOCK DIAGRAM
A simplied block diagram of Radio Explorer III DAB is shown below
DSP
DAB DAB+/
Tuner
Metering
Audio Streaming
Control and
Communication
CPU
Ethernet
USB
User
controls
L/R Rear Panel
Analog Audio
GPO
Front panel
LED
OLED
GPS
Because of the all-digital, minimalist-discrete-component nature of device circuitry, we have
not provided schematic diagrams of the Radio Explorer III DAB in this Manual. Please, note that:
NO USER-SERVICEABLE COMPONENTS INSIDE.
REFER ALL SERVICING TO
QUALIFIED TECHNICAL PERSONNEL.

65 Aleksandar Stamboliyski Str., 8000 Bourgas, Bulgaria
Tel: +359 56 820027, Fax: +359 56 836700
E-mail: o[email protected] ,Web: www.devabroadcast.com
- 11 -
Safety Precautions
IMPORTANT: Carefully read this paragraph as it contains important instructions concerning
operator safety and directions regarding the installation, operation and maintenance of the
equipment. Failure to observe the safety instructions and information given in this manual
constitutes an infringement of the safety rules and design specications provided for this piece
of equipment. DEVA Broadcast Ltd. declines all responsibility if any one of the safety rules given
herein is not observed. DEVA Broadcast Ltd. declines all responsibility if the end-user resells the
product. The equipment is to be used by people capable of operating it in a trouble-free manner
and it is assumed that they are aware of the following safety rules.
◊ Keep this manual with the utmost care and close at hand so that it can be consulted whenever
needed
◊ After unpacking the equipment, check its condition.
◊ Avoid banging the equipment.
◊ The packing material (plastic bags, polystyrene, nails, etc.) must never be left within reach of
children, as these items are potential sources of danger.
◊ Do not use the equipment in places where the temperature is not within the recommended
range, as specied by the manufacturer.
◊ Before connecting the equipment, make sure the nameplate specications correspond to the
mains electricity supply (the nameplate is located on the equipment enclosure).
◊ Do not remove the sticker from the equipment as it contains important specications and the
relevant serial number.
◊ To join the equipment to the mains supply, use the power cord purchased with the equipment.
◊ The equipment must be used only for the purposes it was designed for.
◊ Abuse or misuse of the equipment is extremely dangerous for people, pets and property. The
manufacturer declines all responsibility for damage and injury resulting from improper use and
mishandling.
◊ Certain basic safety rules must be observed when using electrical equipment, in particular:
- Never touch the equipment with wet and/or damp hands or other parts of the body.
- Keep the equipment away from drops of water or sprinkling systems.
- Never use the equipment near high heat sources or explosive material.
- Do not introduce any extraneous matter into the equipment.
- Do not allow children or untrained people to use the equipment.
◊ Before cleaning or servicing the equipment outside, disconnect its power supply and wait at
least 2 seconds before working on it, as recommended by current safety regulations.
◊ In the event of faults and/or improper operation, turn o the equipment, shut o the electrical
power and call your dealer.
◊ Do not attempt to make repairs and/or adjustments when covers/guards or circuit boards are to
be removed.
◊ Call your dealer for any repairs and be certain original spare parts are used. Failure to observe
this rule may adversely aect the safety level of your equipment.
◊ The equipment is to be connected to the mains supply and provided with adequate and ecient
earth conductors.
◊ When installing, leave a clearance of at least 1 cm around the equipment to allow air to pass
freely.
- 12 -
65 Aleksandar Stamboliyski Str., 8000 Bourgas, Bulgaria
Tel: +359 56 820027, Fax: +359 56 836700
E-mail: o[email protected] ,Web: www.devabroadcast.com
Panel Indicators, Switches and Connectors
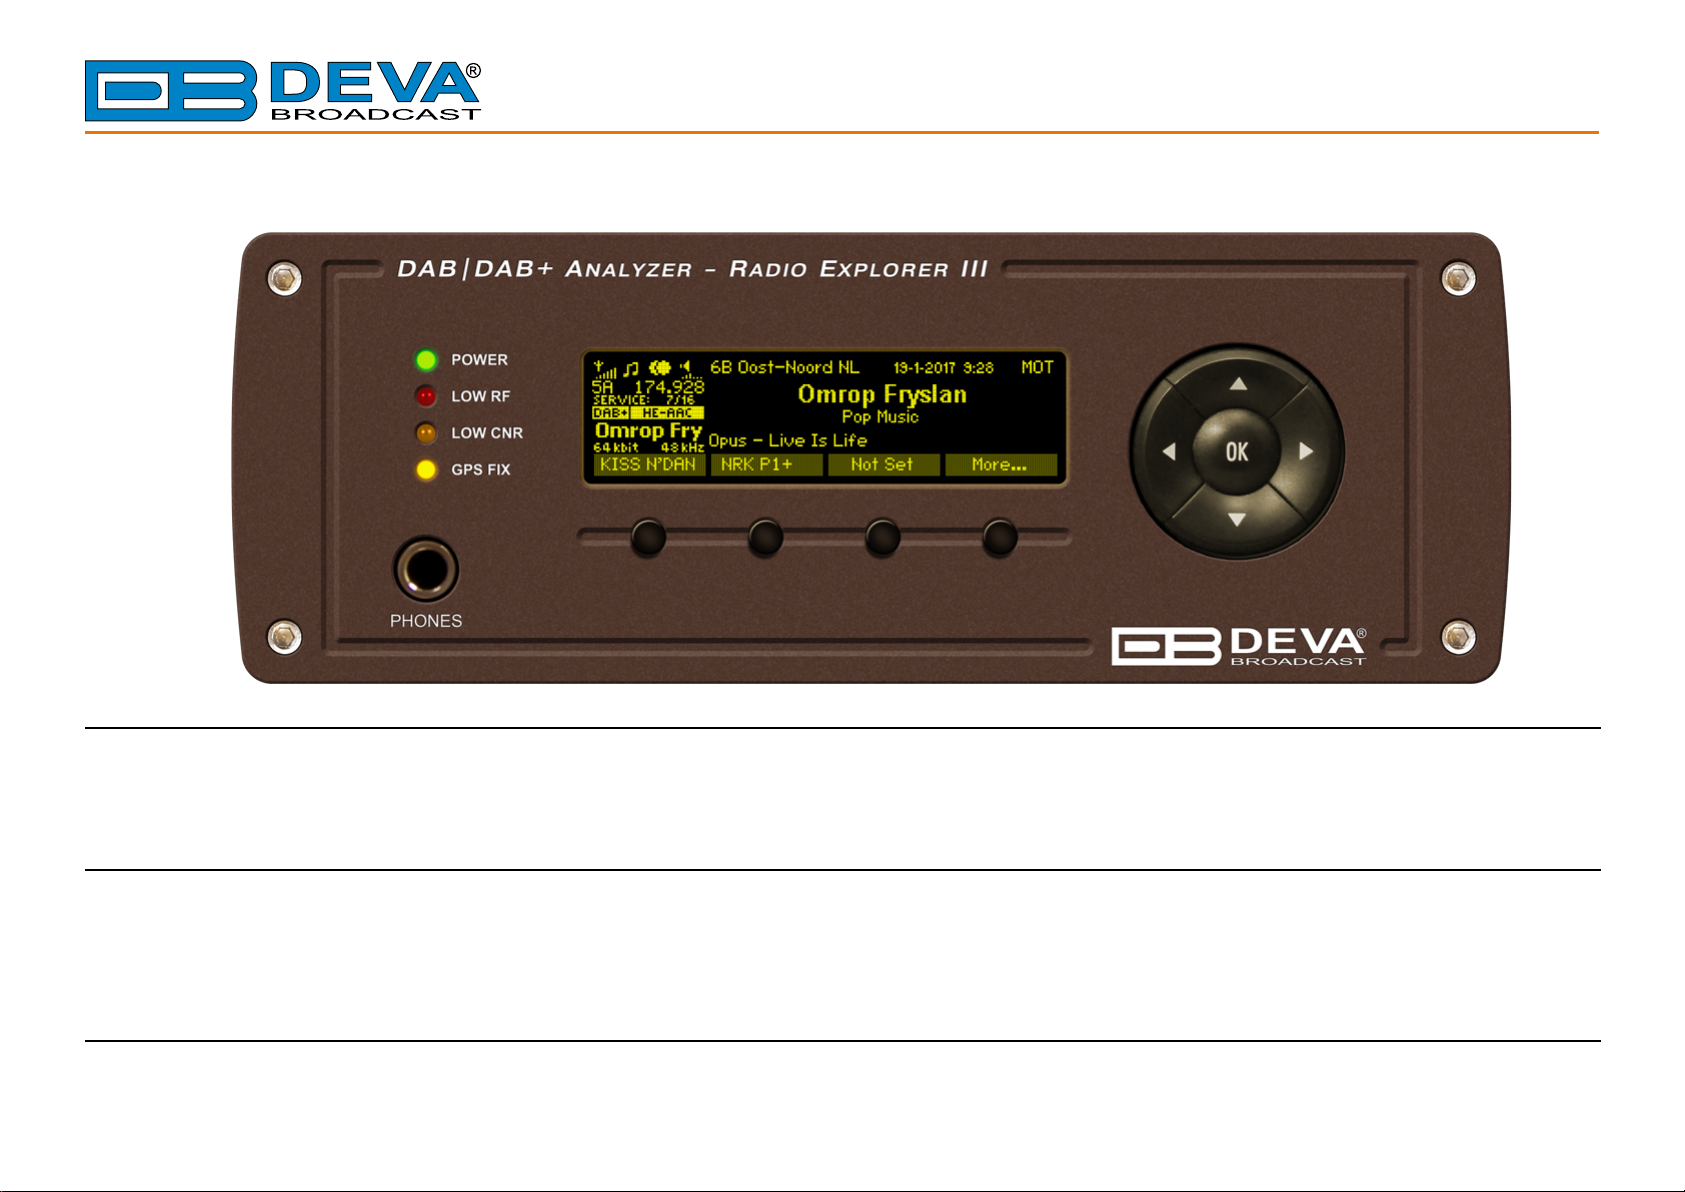
OLED DISPLAY
Radio Explorer III DAB has easy to read, high-resolution OLED graphical display that visualizes all measurements of the received signal and
Radio Explorer III DAB’s settings.
CONTEXT-SENSITIVE SOFT BUTTONS
Used for navigation through the menus, quick access to the parameters, modes, functions and to alter their values. The soft buttons indicators are placed
on the bottom side of the OLED display. Depending on the currently selected menu context the indicators change their function. The soft buttons will be
referred as (left-to-right) [SB1], [SB2], [SB3] and [SB4].
NAVIGATIONAL BUTTONS
[UP], [DOWN], [LEFT], [RIGHT] and [OK] buttons, are used to navigate through the menus selecting various functions and parameters of
Radio Explorer III DAB.
- 13 -
65 Aleksandar Stamboliyski Str., 8000 Bourgas, Bulgaria
Tel: +359 56 820027, Fax: +359 56 836700
E-mail: o[email protected] ,Web: www.devabroadcast.com
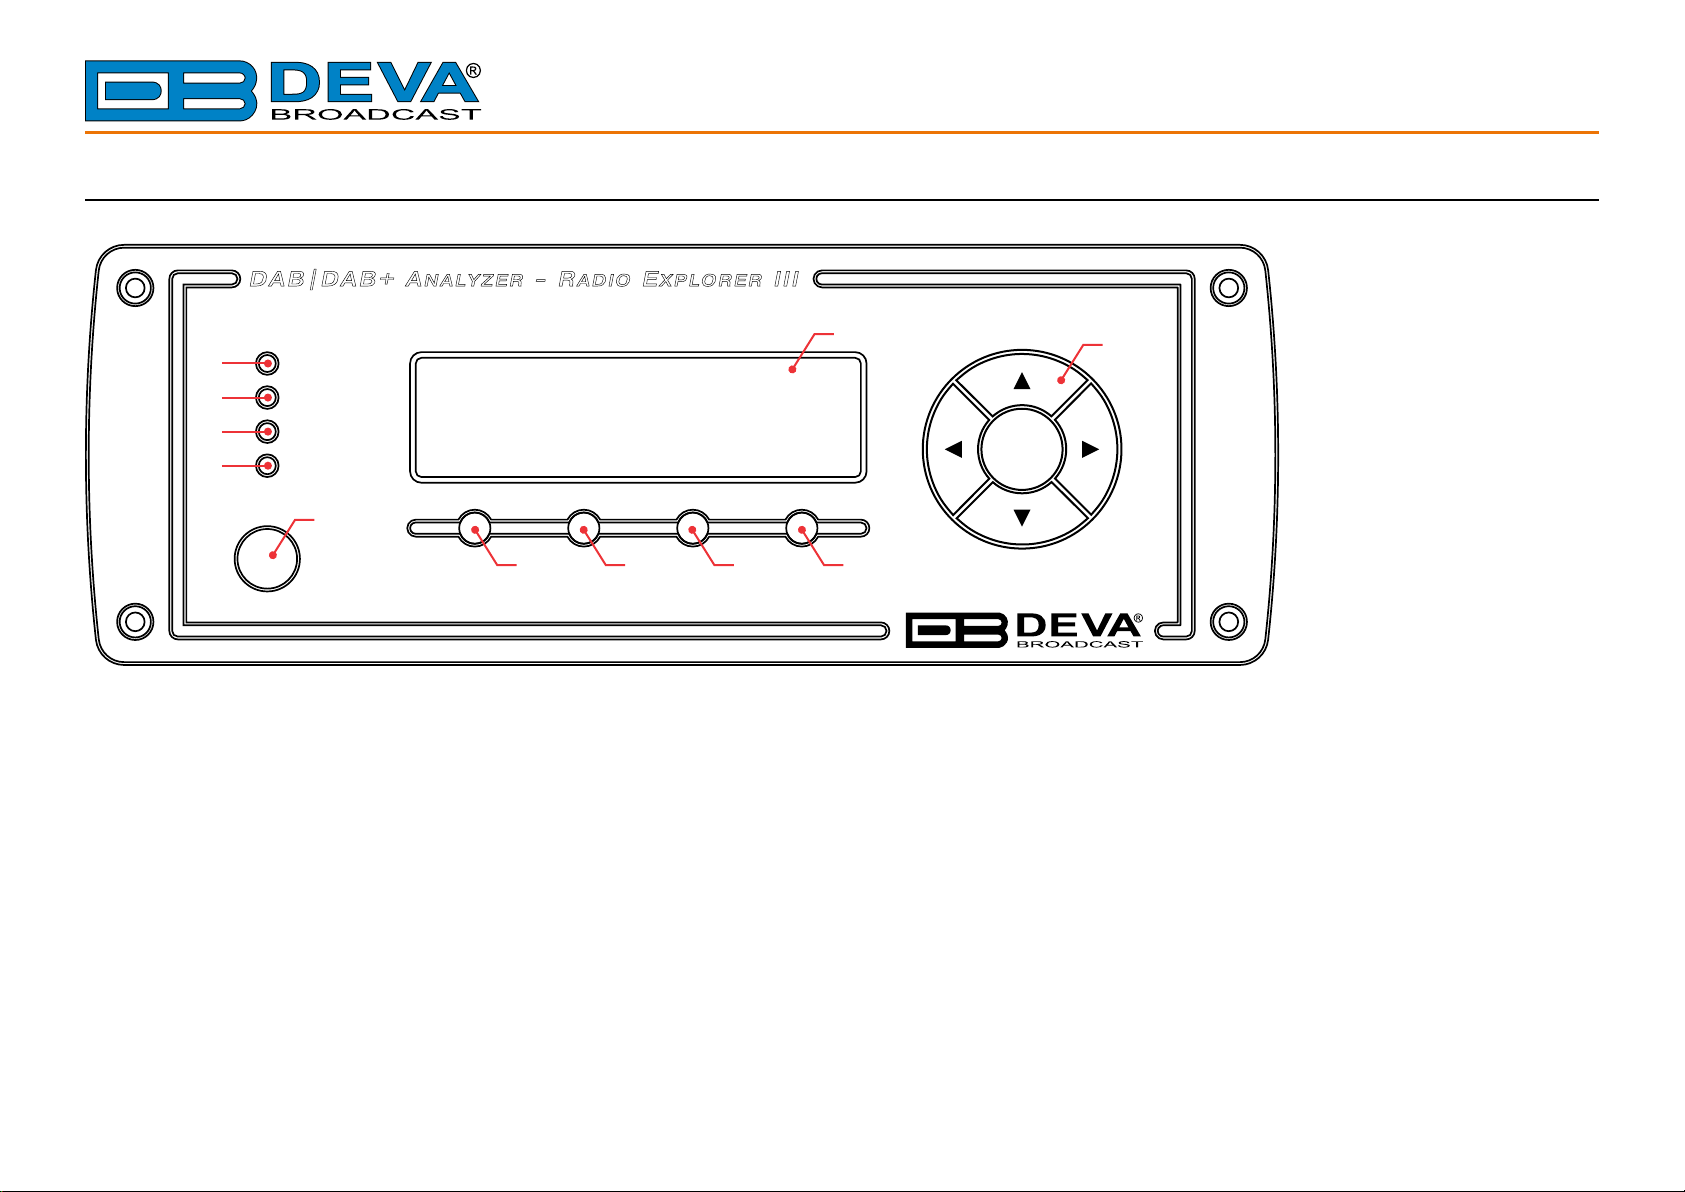
FRONT PANEL
DAB|DAB+ A-RE
NALYZER ADIO XPLORER
III
OK
PHONES
POWER
LOW RF
LOW CNR
GPS FIX
12
8
4
5
6
7
3 3 3 3
1. High resolution OLED Graphical Display.
2. Navigational Buttons – UP and DOWN, LEFT and RIGHT and OK buttons are used to navigate through the OLED menus selecting various functions
and parameters.
3. Soft Buttons – will be referred to as (left-to-right) SB1, SB2, SB3 and SB4.
4. Power indicator
5. LOW RF – This LED shows that the incoming RF signal of the tuned frequency is below the specied threshold.
6. LOW CNR – This LED shows that the CNR of the tuned frequency is below the specied threshold.
7. GPS FIX – The LED indicator will be lit when the GPS receiver acquires a GPS x. In case of poor GPS reception or insucient satellites the LED
will remain unlit.
8. PHONES – The 1/4’’ (6.3mm) phone jack provides the audio signal of tuned station for listening.
- 14 -
65 Aleksandar Stamboliyski Str., 8000 Bourgas, Bulgaria
Tel: +359 56 820027, Fax: +359 56 836700
E-mail: o[email protected] ,Web: www.devabroadcast.com
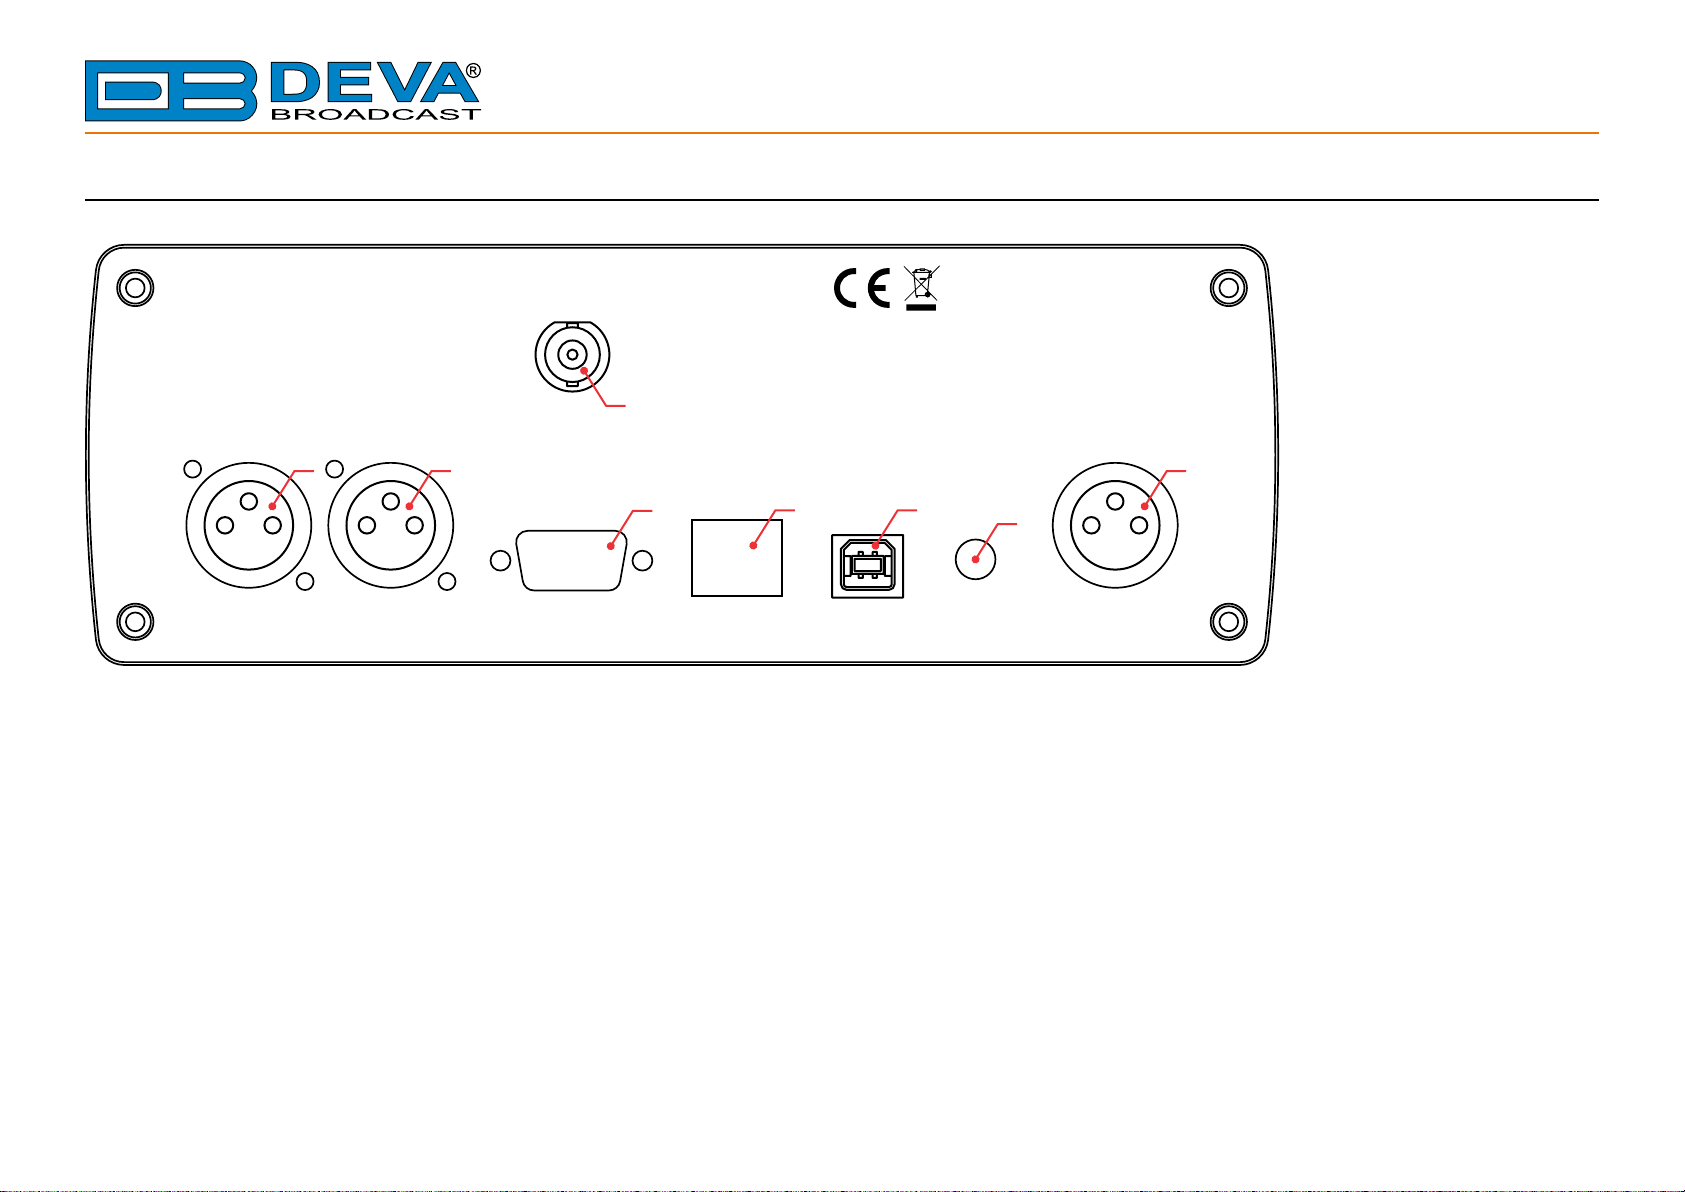
REAR PANEL
LAN USB GPS
ANT POWER
12V / 2A
LEFT RIGHT
GPO
www.devabroadcast.com
MADE IN BULGARIA
22
7
ANTENNA
MAX 110 dB Vµ
3
1
4
5
6
1. POWER CONNECTOR - DC 12V;
2. PROGRAM OUTPUT – XLR connectors for Left and Right analog audio outputs;
3. ANTENNA INPUT – 50 Ω BNC connector for Antenna input;
4. GPS ANTENNA – Consumer-standard SMA connector for GPS Antenna input;
5. USB – USB 2.0 Communication Port
6. LAN – 10/100 Mbit Ethernet port
7. GPO – Optoisolated, Female D-Sub 9 pins;
65 Aleksandar Stamboliyski Str., 8000 Bourgas, Bulgaria
Tel: +359 56 820027, Fax: +359 56 836700
E-mail: o[email protected] ,Web: www.devabroadcast.com
- 15 -
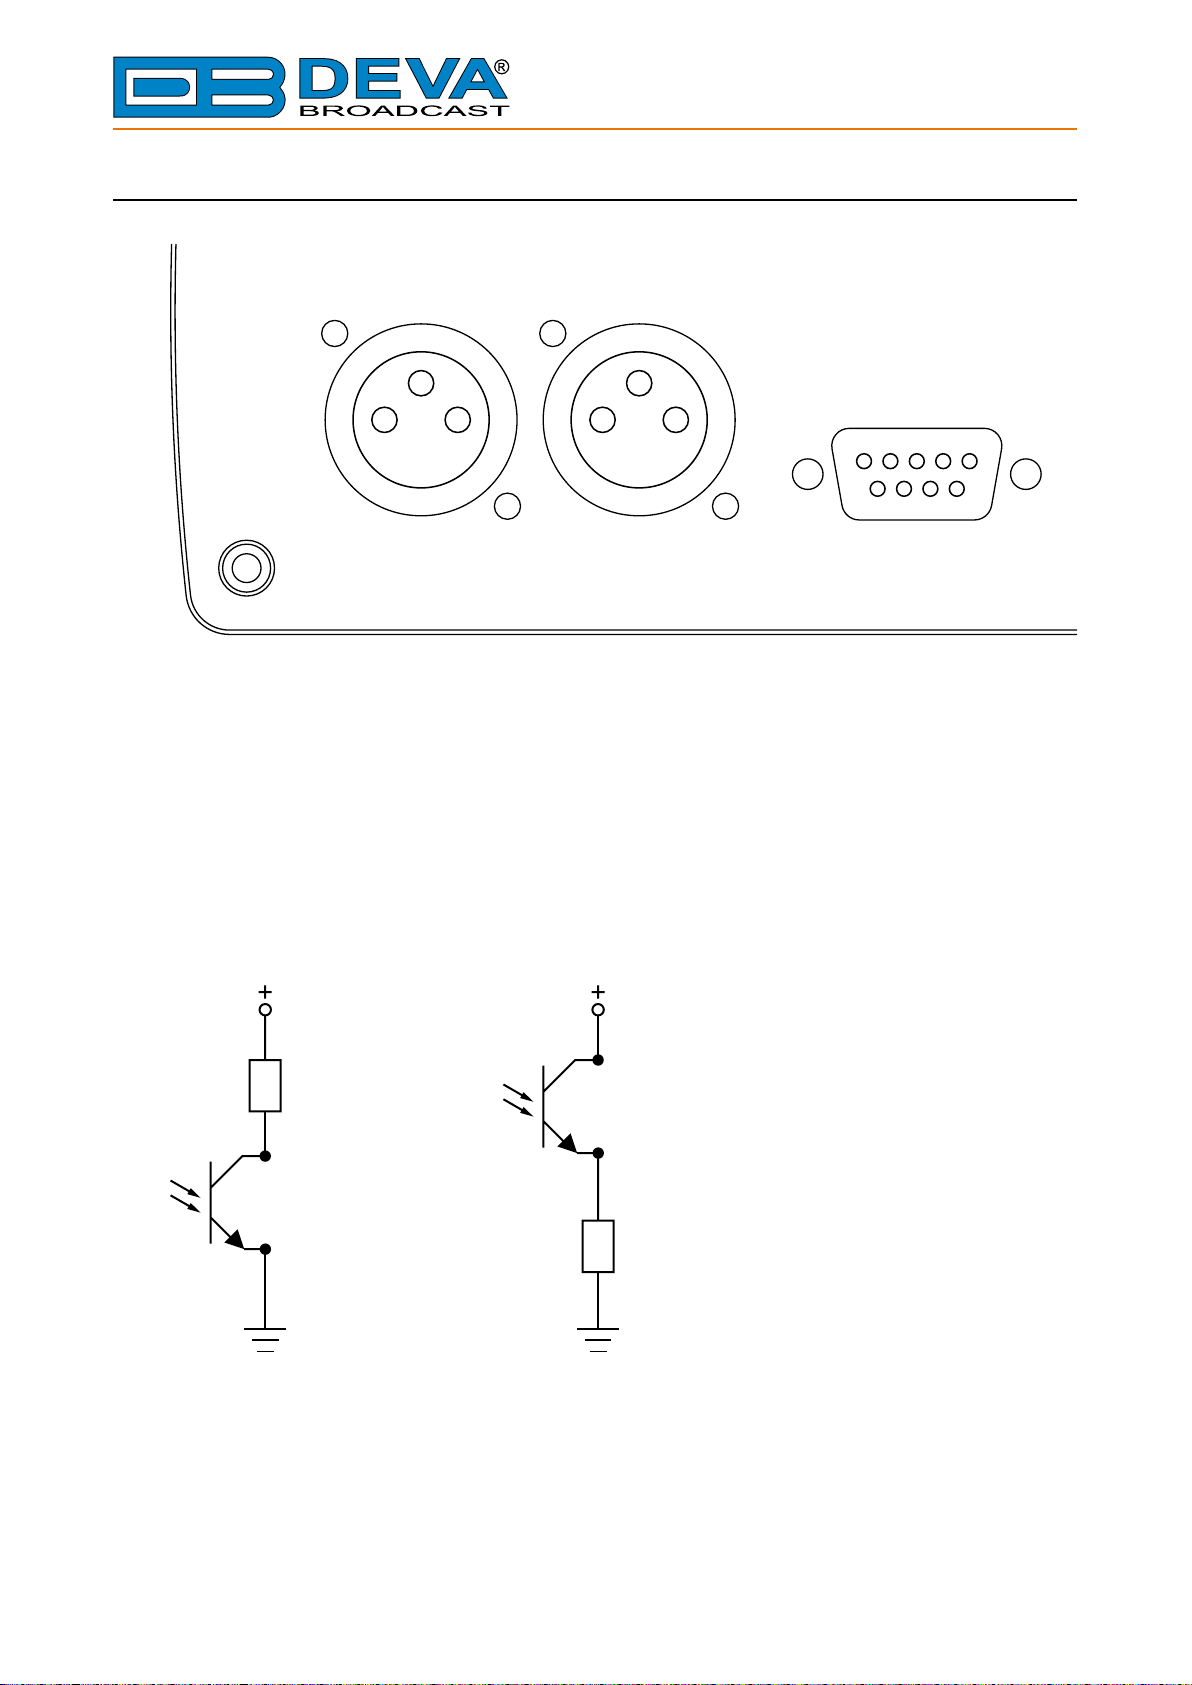
REAR PANEL GPO TERMINAL
12345
6789
LEFT RIGHT
GPO
1 - + 12V DC
2 - GPO1 Collector
3 - GPO2 Collector
4 - GPO3 Collector
5 - GND
6 - GPO1 Emitter
7 - GPO2 Emitter
8 - GPO3 Emitter
9 - GND
LOAD
2
6
GPO1
LOAD
2
6
GPO1

65 Aleksandar Stamboliyski Str., 8000 Bourgas, Bulgaria
Tel: +359 56 820027, Fax: +359 56 836700
E-mail: o[email protected] ,Web: www.devabroadcast.com
- 16 -
Before you start
UNPACKING AND INSPECTION
Upon receipt, the equipment should be inspected for possible shipping damages. If such are
found or suspected, notify the carrier at once and contact DEVA Broadcast Ltd. The original
shipping carton box and packing materials should be kept for possible reuse, in case of return for
Warranty repair, for example. Shipping damages as a result of improper packing for return may
invalidate the Warranty!
IT IS VERY IMPORTANT that the “Product Registration Card” included in the Manual be
completed accurately and returned. This will assure coverage of the terms of the Warranty and it will
provide a means of trace in case of lost or stolen equipment. In addition, the user will automatically
receive SERVICE OR MODIFICATION INSTRUCTIONS from DEVA Broadcast Ltd.
RADIO FREQUENCY INTERFERENCE (RFI)
Although we have made provision for Radio Explorer III DAB installation in the immediate
proximity of broadcast transmitters, please do practice some care using the unit near abnormally
high RF elds.

65 Aleksandar Stamboliyski Str., 8000 Bourgas, Bulgaria
Tel: +359 56 820027, Fax: +359 56 836700
E-mail: o[email protected] ,Web: www.devabroadcast.com
- 17 -
SAFETY PRECAUTIONS
Always observe the safety precautions!
The following safety precautions provide important information intended to prevent personal
injury to the operator and others, and property damage.
• Theservicingofelectronicequipmentshouldbeperformedonlybyqualiedpersonnel
only;
• Before removing the covers, Radio Explorer III DAB must be switched o and the power
cable unplugged;
• Never touch the wires or the electrical circuits;
• Use insulated tools only;
• Never touch the metal semiconductor. It might carry high voltages;
• For removing and installing electronic components, follow the recommendations for handling
MOS components.
ATTENTION: Radio Explorer III DAB has an internal Lithium battery. Do not try to re-charge
this battery! Please contact us for detailed instructions in case the battery need to be changed.
DEVICE CONNECTION
1. Connect the supplied FM and GPS Antennas to the BNC and SMA connector, placed on the
rear panel of the device;
2. Select a suitable location for installation of the GPS antenna that would allow routing of the
antenna cable to the Radio Explorer III DAB and also would provide a clear view of the sky
for a good satellite reception;
3. By using the supplied Car Cigarette Lighter adapter, connect Radio Explorer III DAB to the
Car Cigarette Lighter;
4. Congure the desired operating mode.
NOTE: Make sure that you have routed the cable in such a manner which would prevent
pinching and/or cutting the cable by doors, windows or trunk lids, when opened or closed.

65 Aleksandar Stamboliyski Str., 8000 Bourgas, Bulgaria
Tel: +359 56 820027, Fax: +359 56 836700
E-mail: o[email protected] ,Web: www.devabroadcast.com
- 18 -
Getting Started
In order for the normal operation of the Radio Explorer III DAB to be guaranteed, you will
need fulll the following conditions:
1. Standard Ethernet 10/100M connection;
2. Correctly assigned Network conguration and device settings.
To make sure that all the conditions are fullled please, follow the instructions below.
CONNECTION
1. Install the unit on its operation place;
2. Using the provided power cable, connect the unit to the power supply network;
3. Connect the antenna cable to the RF antenna input connector located on the rear panel of
the device;
4. Connect the Radio Explorer III DAB to the TCP/IP network using direct network cable;

65 Aleksandar Stamboliyski Str., 8000 Bourgas, Bulgaria
Tel: +359 56 820027, Fax: +359 56 836700
E-mail: o[email protected] ,Web: www.devabroadcast.com
- 19 -
NETWORK SETTINGS
After connecting the network cable the Led ‘LAN’ located on the rear panel must be ON or
ashing. The next and most important step for conguration is the adjustment procedure of the
Network Communication. The settings shown below are Default Network Settings:
DHCP Enabled
IP Assigned by DHCP
Mask Assigned by DHCP
Gateway Assigned by DHCP
DNS Assigned by DHCP
HTTP Port 80
The Radio Explorer III DAB is controlled trough a build in WEB Server and a standard Web
browser can be used to monitor its status or to make some adjustments. To operate the device you
need to know its IP Address. In case you are not aware of it, you can use the Network discovery
feature at Local networks.
1. Connect the device to the local network or to the Internet by LAN cable;
2. Open a new WEB Browser and enter the device IP address in the address eld then press
[Enter]. A new WEB browser with Radio Explorer III DAB’s Main window will appear;
3. To access the device’s settings press [Settings], the default values are username: admin and
password: pass.
NETWORK DISCOVERY
If you have already enabled this function on your computer just open a new Explorer bar and
click on Network. The device must be displayed. If not follow the instructions below.
1. Open Advanced sharing settings by clicking the Start button, and then on “Control Panel”.
In the search box, type “network”, click “Network and Sharing Center”, and then, in the left
panel click “Change advanced sharing settings”.
2. Select your current network prole.
3. Click Turn on network discovery, and then click Save changes. If you’re prompted for an
administrator password or conrmation, type the password or provide conrmation.
4. To access the device open a new Explorer bar and click on Network. If you have successfully
enabled the network discovery option, the device will be displayed. Double click on
Radio Explorer III DAB will open a new WEB browser with the Main window.
5. To access the device’s settings press [Settings], the default values are username: admin and
password: pass.
NOTE: If the port is dierent than the default one (80), it is necessary to specify it, for example:
http://192.168.1.2:9000
ATTENTION: Depending on Internet Protocol Settings, the assigned IP address may not be
visible outside your local network, thus the device may be accessed only within that network.
Consult with your network administrator for the appropriate IP settings.

65 Aleksandar Stamboliyski Str., 8000 Bourgas, Bulgaria
Tel: +359 56 820027, Fax: +359 56 836700
E-mail: o[email protected] ,Web: www.devabroadcast.com
- 20 -
Basic Setup
OLED DISPLAY
Radio Explorer III DAB has an easy to read, high-resolution OLED graphical display that
visualizes all measurements of the received signal and settings. Upon switching it on, the Company
Logo and model of the device will be displayed. After a few seconds the start-up screen will
disappear, replaced by the main screen. This is the starting point of the navigation process.
Radio Explorer III DAB’s OLED display has three function areas: header, soft buttons and
main screen working area.
HOW TO CHANGE DEVICE PARAMETERS
Set-up menu title
Shows the path to the currently selected menu. Note that the parameter should be included in
the settings menu title. For example: Setup> Communication> HTTP> Port is dierent from
Setup> Communication> FTP> Data Port.
Navigation area
Selection of branches / parameters is made in this area. The selected item is highlighted. All
parameters are listed on the left side of the navigational area. All parameter values are displayed
on the right side against the parameter name. As the branches have no values associated, tree dots
are shown instead. This indicates that a transition to a sub-menu is available.
Front panel buttons usage:
[OK] – Depending on the selected menu element can perform dierent actions:
• Menu branch – transition to selected sub-menu will be made;
• Menu parameter – when a name of a parameter is highlighted pressing [OK] will highlight
the value and switch to edit mode;
• Menu complex parameter (such as Alarm) – the parameter editor screen will be shown.
[UP] / [DOWN] – If edit mode is active, the value of the selected parameter will be changed.
Otherwise, are used for navigation through the menu;
[LEFT] / [RIGHT] – Change the selection when the parameter value is in edit mode;
[SB4] – Return one level up or cancel edit mode.
This manual suits for next models
1
Table of contents
Other DEVA Broadcast Measuring Instrument manuals


