DEVANT SBS-200 User manual


GB-1
Some Dos And Don't On The Safe Use Of Equipment
This equipment has been designed and manufactured to meet international safety standards but, like
any electrical equipment, care must be taken if you are to obtain the best results and safety is to be
assured.
***********************************
DO read the operating instructions before you attempt to use the equipment.
DO ensure that all electrical connections (including the mains plug, extension leads and intercon-
nections between the pieces of equipment) are properly made and in accordance with the manufac-
turer’s instructions. Switch off and withdraw the mains plug before making or changing connections.
DO consult your dealer if you are ever in doubt about the installation, operation or safety of your
equipment.
DO route the mains lead so that it is not likely to be walked on, crushed, chafed, or subjected to
excessive wear and tear or heat.
***********************************
DON’T remove any xed cover as this may expose dangerous voltages.
DON’T obstruct the ventilation openings of the equipment with items such as newspaper, tablecloths,
curtains, etc. Overheating will cause damage and shorten the life of the equipment.
DON’T allow electrical equipment to be exposed to dripping or splashing, or objects lled with liquids,
such as vases, to be placed on the equipment.
DON’T place hot object or naked ame sources such as lighted candles or night-lights on, or close to
equipment. High temperatures can melt plastic and lead to res.
DON’T use makeshift stands and NEVER x legs with wood screws-to ensure complete safety al-
ways t the manufacturer’s approved stand or legs with the xings provided according to the instruc-
tions.
DON’T use equipment such as personal stereos or radios so that you are distracted from the require-
ments of trafc safety. It is illegal to watch television whilst driving.
DON’T listen to headphones at high volume, as such use can permanently damage your hearing.
DON’T leave equipment switched on when it is unattended unless it is specically stated that it is
designed for unattended operation or has a stand-by mode. Switch off using the switch on the equip-
ment and make sure that your family know how to do this. Special arrangements may need to be
made for inrm or handicapped people.
DON’T continue to operate the equipment if you are in any doubt about it working normally, or if it is
damaged in any way-switch off, withdraw the mains plug and consult your dealer.
ABOVE ALL,
- NEVER let anyone especially children push anything into holes, slots or any other opening in the
case - this could result in a fatal electrical shock;
- NEVER guess or take chances with electrical equipment of any kind
- it is better to be safe than sorry!
***********************************
NE8006HW(SBS-200)_GB_41014751_20140604.indd 1 2014-6-4 16:15:00

GB-2
To achieve the utmost in enjoyment and performance, please read this manual carefully before
attempting to operate the unit in order to became familiar with its features, and assure you years of
faithful, trouble free performance and listening pleasure.
Important Notes
* Keep instructions: the safety and operating instructions should be retained for future reference.
* Avoid installing the unit in locations described below:
Places exposed to direct sunlight or close to heat radiating appliances such as electric heaters.
On top of other stereo equipment that radiate too much heat. Places lacking ventilation or dusty
places. Places subject to constant vibration. Humid or moist places, the use of apparatus in
moderate climates.
* Make sure not to obstruct the ventilation openings.
* Before turning on the power for the rst time, make sure the power cord is properly installed.
* Mains plug is used as the disconnect device and it shall remain readily operable.
* The product shall not be exposed to dirpping or splashing and that no objects lled with liquids,
such as vases, shall be placed on the product.
* To completely disconnect the power input, the mains plug of apparatus shall be disconnected
from the main. Unplug the unit from the wall outlet before storms to prevent damage due to
lightning and any power uctuation.
* When the standby LED and display are not illuminated; this inducates that the power switch is set
to off or the set is disconnected from the mains.
* Minimum distances 10cm around the apparatus for sufcient ventilations.
* Attention should be drawn to the environmental aspects of battery disposal.
* The mains plug should not be obstructed or should be easily accessed during intended use.
* The ventilation should not be impeded by covering the ventilation openings with items such as
newspaper, table-clothes, curtains etc.
* No naked ame sources such as lighted candles should be placed on the apparatus.
* Battery shall not be exposed to excessive heat such as sunshine, re or the like.
For safety reasons, do not remove any covers or attempt to gain access to the inside of the product.
Refer any servicing to qualied personnel.
Do not attempt to remove any screws, or open the casing of the unit; there are no user serviceable
parts inside, refer all servicing to qualied service personel.
CAUTION: TO REDUCE THE RISK OF ELECTRIC SHOCK DO NOT REMOVE COVER (OR
BACK), NO USER SERVICEABLE PARTS INSIDE, REFER SERVICING TO
QUALIFIED SERVICE PERSONNEL.
DANGEROUS VOLTAGE
There is high voltage, that may be of sufcient magnitude to constitute a risk
of electric shock to persons is present within this product enclosure.
ATTENTION
The owner manual contains important operating and maintenance instruc-
tions, for your safety, it is necessary to refer to the manual.
CAUTION
RISK OF ELECTRIC SHOCK
DO NOT OPEN
NE8006HW(SBS-200)_GB_41014751_20140604.indd 2 2014-6-4 16:15:00

GB-3
WARNING: TO PREVENT FIRE OR SHOCK HAZARD, DO NOT EXPOSE THIS APPLIANCE TO
DRIPPING OR SPLASHING.
Note:
- This unit will become warm when used for a long period of time. This is normal and does not
indicate a problem with the unit.
- If unusual conditions occur in the display or buttons, switch the unit off then turn on the unit
again.
- Under the inuence of electrostatic phenomenon, the product may malfunction and require user
to power reset.
- For soundbar, the marking plate is located on the bottom enclosure of the unit.
- For subwoofer, the marking plate is located on the rear of apparatus.
NE8006HW(SBS-200)_GB_41014751_20140604.indd 3 2014-6-4 16:15:01
GB-4
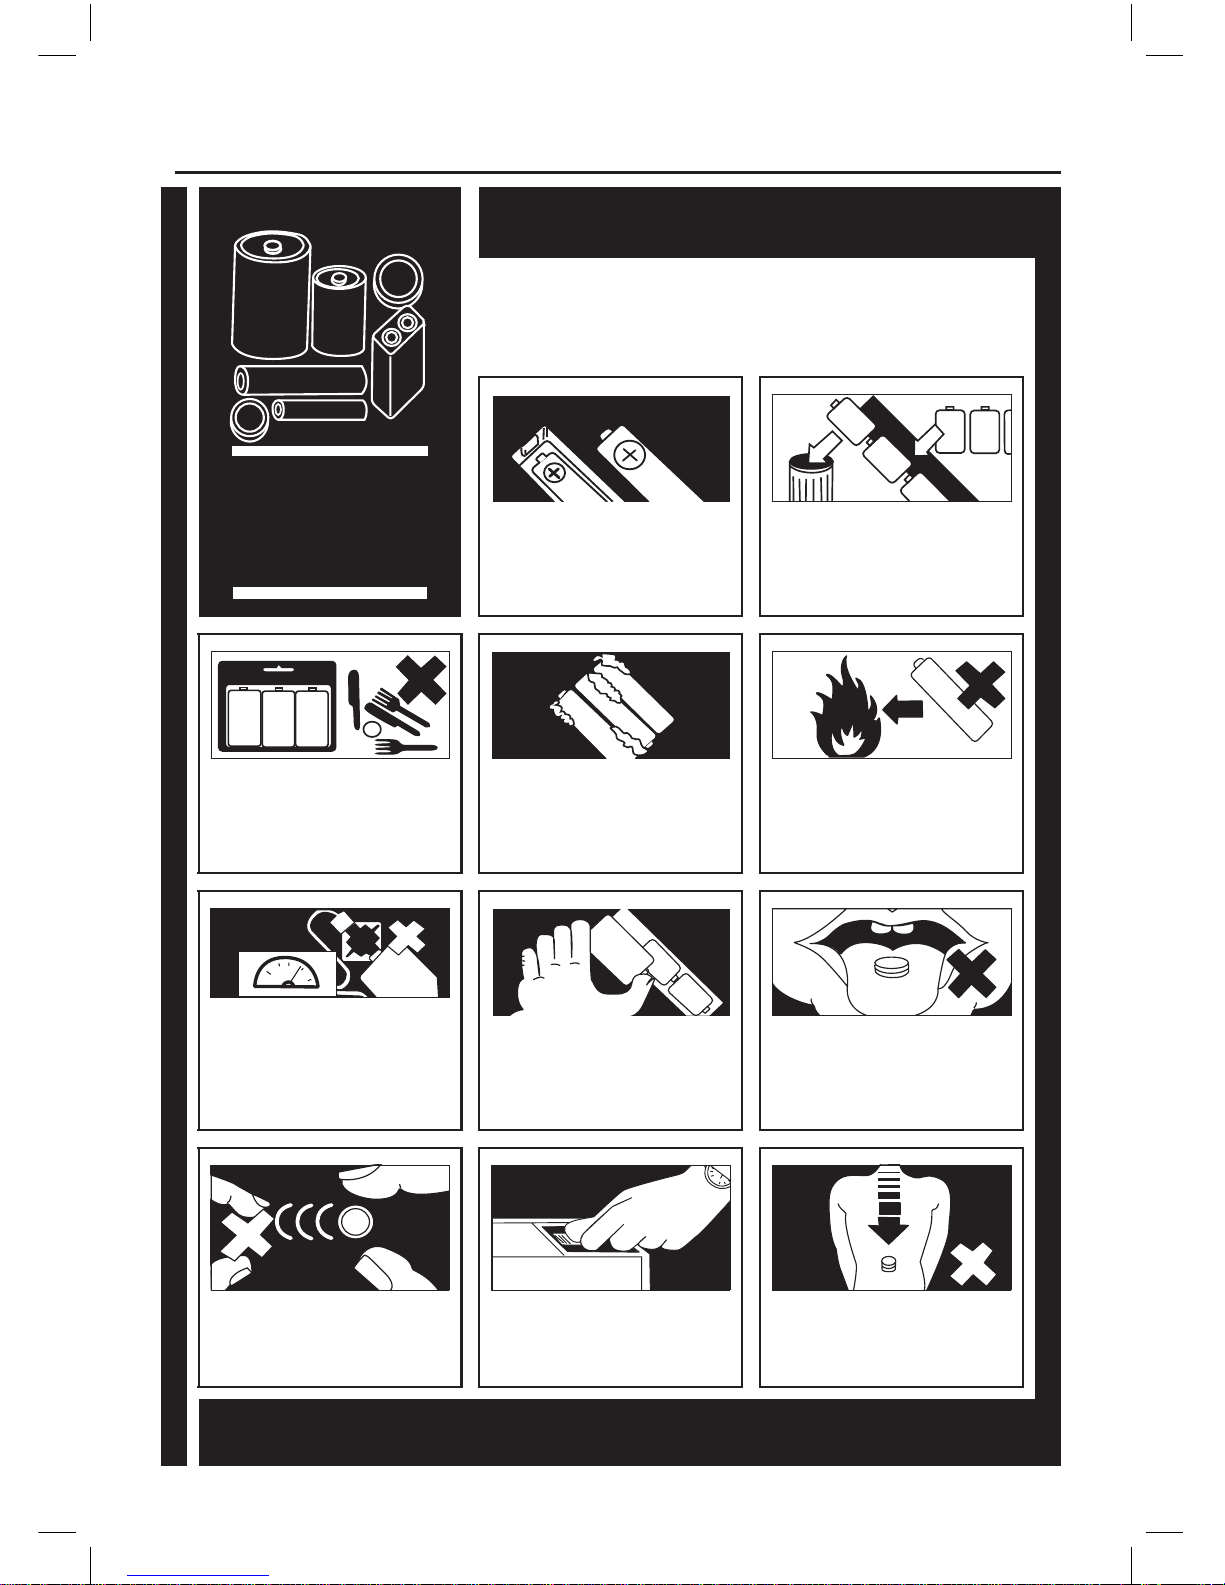
PLEASE PHOTOCOPY AND DISPLAY
BATTERY
SAFETY
GUIDELINES
Used correctly, domestic batteries are a safe and dependable source of
portable power. Problems can occur if they are misused or abused —
resulting in leakage or, in extreme cases, fire or explosion.
Here are some simple guidelines to safe battery use designed to eliminate
any such problems.
Take care to fit your batteries correctly,
observing the plus and minus marks on the
battery and appliance. Incorrect fitting can
cause leakage or, in extreme cases, fire or
even an explosion.
Replace the whole setof batteries at one
time, taking care not to mix old and new
batteries or batteries of different types, since
this can result in leakage or, in extreme
cases, fire or even an explosion.
Store unused batteries in their packaging
and away from metal objects which may
cause a short-circuit resulting in leakage or,
in extreme cases, fire or even an explosion.
Remove dead batteries from
the unit
and
all batteries from
the unit
you
know you
are not going to use for a long time.
Otherwise the batteries may leak and cause
damage.
Never dispose of batteries in fire as this can
cause them to explode. Please recycle
dead batteries; do not put with the
normal household waste.
Never attempt to recharge ordinary
batteries, either in a charger or by applying
heat to them. They may leak, cause fire or
even explode. Thereare special
rechargeable batteries which are clearly
marked as such.
Supervise children if they are replacing
batteries themselves in order to ensure
these guidelines are followed.
Remember that small button cell batteries
such as used in some hearingaids, toys,
games and other appliances, are easily
swallowed by young children and this can be
dangerous.
Keep loose button cells away from young
children.
Make sure battery compartments are
secure.
Seek medical advice if you believe a cell has
been swallowed.
Battery Safety Guidelines
NE8006HW(SBS-200)_GB_41014751_20140604.indd 4 2014-6-4 16:15:01

GB-5
Table of Contents
Some Dos And Don't On The Safe Use Of Equipment ......................................................................1
Important Notes..................................................................................................................................2
Battery Safety Guidelines...................................................................................................................4
Package Contents ..............................................................................................................................6
Product Overview ...............................................................................................................................7
The Unit ........................................................................................................................................................ 7
Top View ....................................................................................................................................................... 7
Front View..................................................................................................................................................... 7
Bottom View.................................................................................................................................................. 7
Subwoofer..................................................................................................................................................... 7
Remote Control Overview ..................................................................................................................8
Battery installation ........................................................................................................................................ 8
Battery replacement...................................................................................................................................... 9
Battery Precautions ...................................................................................................................................... 9
Remote Control Operation Range......................................................................................................9
Wall mounting...................................................................................................................................10
Connections......................................................................................................................................12
Connecting the HDMI jack .......................................................................................................................... 12
Connecting the COAXIAL jack.................................................................................................................... 13
Connecting the OPTICAL jack .................................................................................................................... 13
Connecting Auxiliary Equipment ................................................................................................................. 13
Connecting the portable media player ........................................................................................................ 14
Connecting the AC/DC Adapter .................................................................................................................. 14
Connecting the AC Power Cord.................................................................................................................. 14
Pairing the Wireless Sub-Woofer with the Soundbar.................................................................................. 15
ECO-Power/Standby Features.........................................................................................................16
Basic Operation................................................................................................................................16
Play from Bluetooth device...............................................................................................................18
Pairing bluetooth-enabled devices.............................................................................................................. 18
Listen to music from Bluetooth device ........................................................................................................ 18
Play from an external device ............................................................................................................18
Troubleshooting................................................................................................................................19
Specications ...................................................................................................................................20
NE8006HW(SBS-200)_GB_41014751_20140604.indd 5 2014-6-4 16:15:01

GB-6
Package Contents
Make sure all of the following contents are included.
Sub woofer x 1
Remote Control
(battery included) x 1 AC Power Cord x 2AC Adapter x 1
Instruction Manual x 1Audio L/R Cable x 1Dowels x 3
Screws x 3
Bracket x 1
The Unit
C 2032
NE8006HW(SBS-200)_GB_41014751_20140604.indd 6 2014-6-4 16:15:02

GB-7
Product Overview
The Unit
Front View
Top View
Bottom View
Subwoofer
① ② ③
⑤
④ ⑥
⑧ ⑨ ⑩ ⑬ ⑭⑪ ⑫⑦
1. Standby Button
2. Source Button
3. Volume Up/Down Button (VOL+/-)
4. Left Speaker
5. Display Lens
Remote Sensor
6. Right Speaker
7. AUDIO IN Terminals (L&R)
8. HDMI1 Jack
9. HDMI2 Jack
10.HDMI Out Jack
11.AUX IN Terminal
12.Coaxial Terminal
13.Optical Terminal
14.DC In Jack
15.Reset Button
16.AC Power Socket (AC ~)
NE8006HW(SBS-200)_GB_41014751_20140604.indd 7 2014-6-4 16:15:03
⑯
AC
⑮

GB-8
Remote Control Overview
1. Standby Button
2. AUX/Audio In Button
3. Volume Up Button (VOL+)
4. Preset Equalizer Button (EQ)
5. Coaxial Button
6. HDMI1/HDMI2 Button
7. Bluetooth Button
8. Mute Button
9. BASS Button (BASS)
10. Volume Down Button (VOL-)
11. Optical Button
Battery installation
1. Remove the compartment cover.
2. Remove the insulating mylar strip from
the battery. It is inside of the remote
control. Put the lithium-ion battery
(CR2032, 3V) in with the “+” side up.
3. Close the cover.
①
②⑦
⑨
⑧
⑪
⑩
⑤
⑥
④
③
CR2032
CR2032
CR2032
CR2032
NE8006HW(SBS-200)_GB_41014751_20140604.indd 8 2014-6-4 16:15:04
GB-9
Battery replacement
If the distance required between the remote control unit and main unit decreases, the battery may be
exhausted. In this case, replace the battery with a new one.
• For information about the collection of batteries, please contact your local municipality, your
waste disposal service or the place where you purchased them.
• Danger of explosion if battery is incorrectly replaced. Replace only with the same or equivalent
type.
Battery Precautions
• Be sure to insert the battery with the positive "+" and negative "-" polarities correctly positioned.
• If the battery leaks, wipe away the leakage inside the battery compartment and replace the
battery with a new one.
• If the remote control unit is not to be used for a long time (more than a month), remove the
battery from the remote control unit to prevent it from being exhausted.
• Do not use any batteries other than those specied.
• Do not heat or disassemble batteries. Never throw them in re or water.
• Do not carry or store batteries with other metallic objects. The batteries could short circuit, leak
or explode.
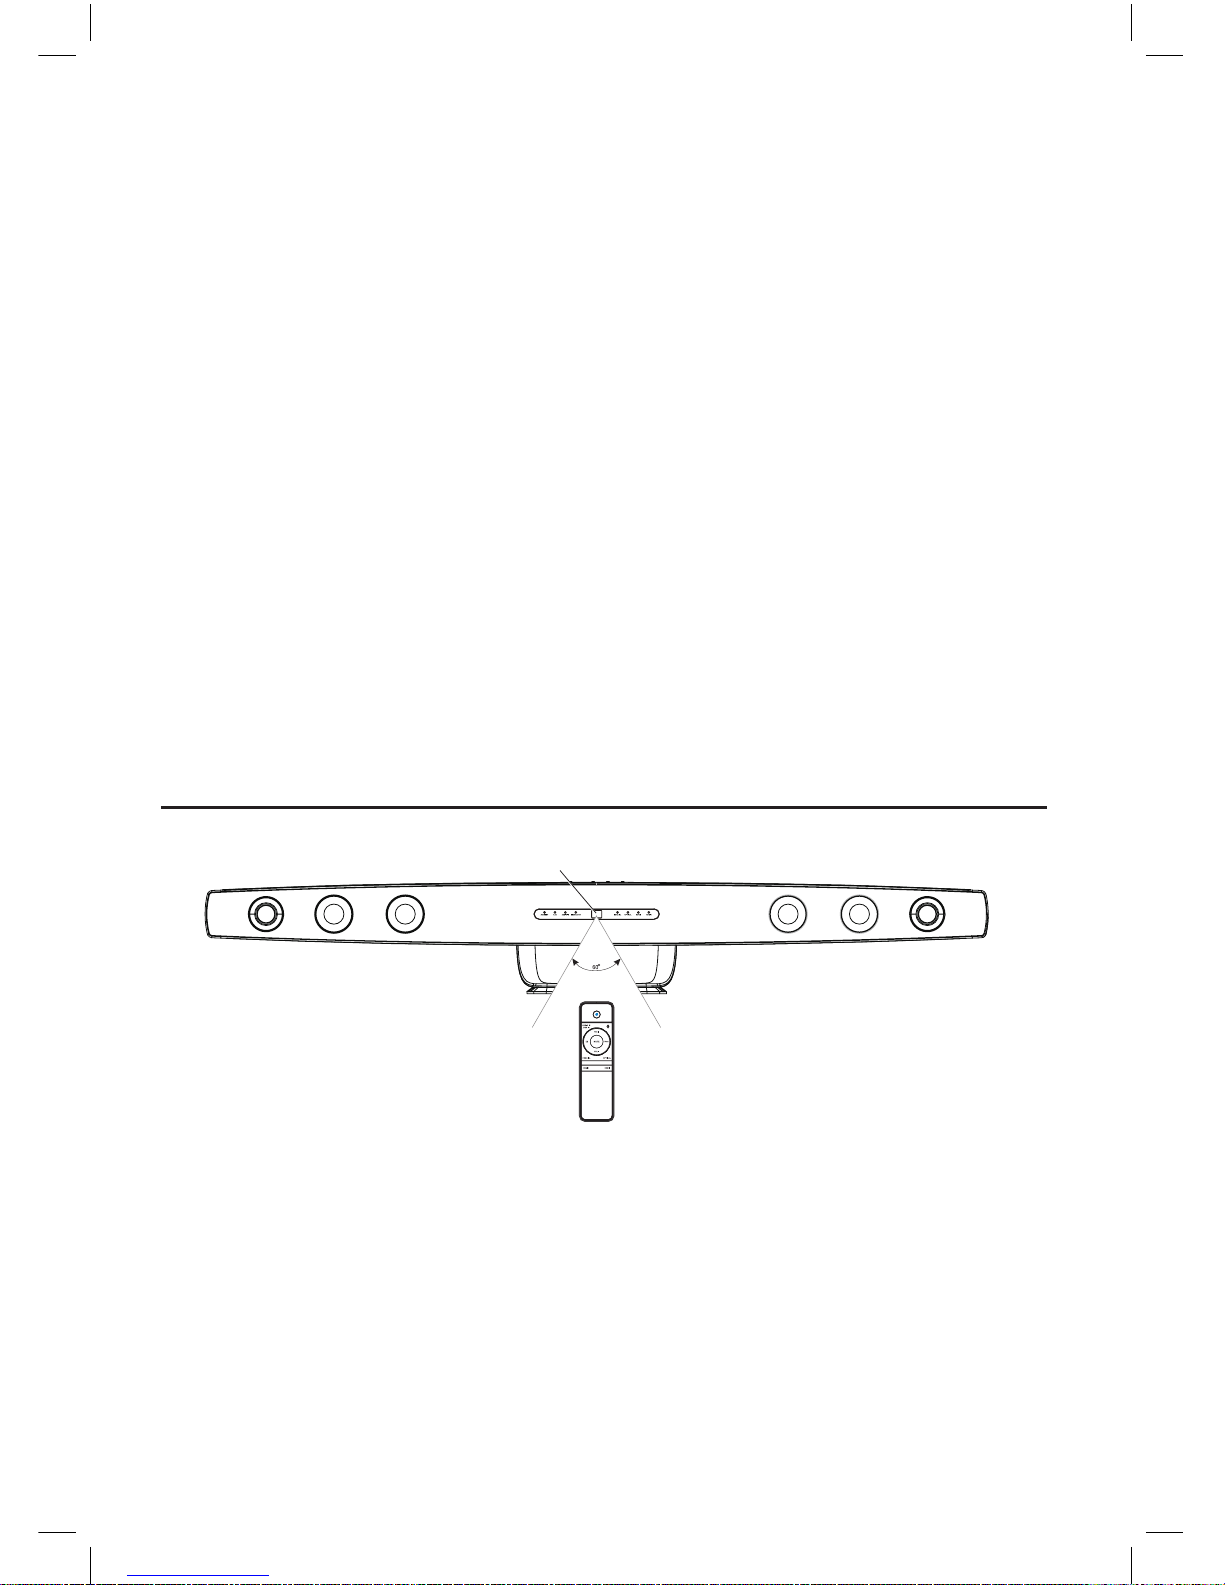
Remote Control Operation Range
The supplied remote control unit allows the unit to be operated from a distance.
When using the remote control unit, point it towards the remote sensor within 60° horizontally and
20° vertically of the front of the unit.
Note:
•Even if the remote control is used within its effective operation range (8m), the unit might not
respond to the remote if there are any obstacles between them.
•The remote control might function incorrectly if it is operated near other products that generate
infrared rays or if other remote control devices that use infrared rays are operated near the unit.
Likewise, the other products might also function incorrectly.
Remote sensor
NE8006HW(SBS-200)_GB_41014751_20140604.indd 9 2014-6-4 16:15:04

GB-10
Wall mounting
IMPORTANT
1. Please follow the installation instructions carefully as failure to do so may result in injury or
damage to the set.
2. If you do not feel condent in carrying out the installation yourself, please ask a specialist
installer to carry out the installation for you.
3. The wall xings provided are for solid (brick, concrete etc) walls only. For all other wall types
please obtain the correct xings for the wall type from your hardware retailer. If you are unsure
which xings to use, please seek professional advice.
4. To avoid potential injury it is advisable to have assistance from another person to carry out this
installation.
5. We assumes absolutely no responsibility for injuries or damage that may occur due to improper
installation and handling.
Note for mounting
To secure the mounting on wall, a concrete wall is required.
1. Collect the parts for wall mounting.
2. Draw a sheet as a template. Make the position of the unit on the wall (as illustrated below), and
then drill two 6mm diameter holes. Secure the 2 dowels B and 2 screws B (both supplied) in the holes
respectively. Leave a gap of 5 mm between the head of the screw and the wall.
3. Unscrew the 2 screws A in the middle of the soundbar with base stand.
Bracket x 1 Screws B x 3 Dowels B x 3
110mm
Base stand
Unit
NE8006HW(SBS-200)_GB_41014751_20140604.indd 10 2014-6-4 16:15:04

GB-11
3.
Secure the unit in the bracket by screwing in the 2 screws A.
After nished.
4. Hang the unit on the 2 already tted screws.
5. Connect all cables.
Screws A x 2
Wall
Screws A x 2
Bracket
NE8006HW(SBS-200)_GB_41014751_20140604.indd 11 2014-6-4 16:15:05

GB-12
Connecting the HDMI jack
Connect the HDMI cable to the HDMI IN jack on this product and the display device (or an TV, AV
receiver/amplier). This may take a few minutes, player and display device setting up and playback
automatically.
Connect the HDMI cable to the HDMI OUT jack on this product and the display device (or an TV, AV
receiver/amplier) to output sounds. This may take a few minutes, player and display device setting
up and playback automatically. (see the device user manual).
OUT
IN
Unit
OUT
IN
Unit
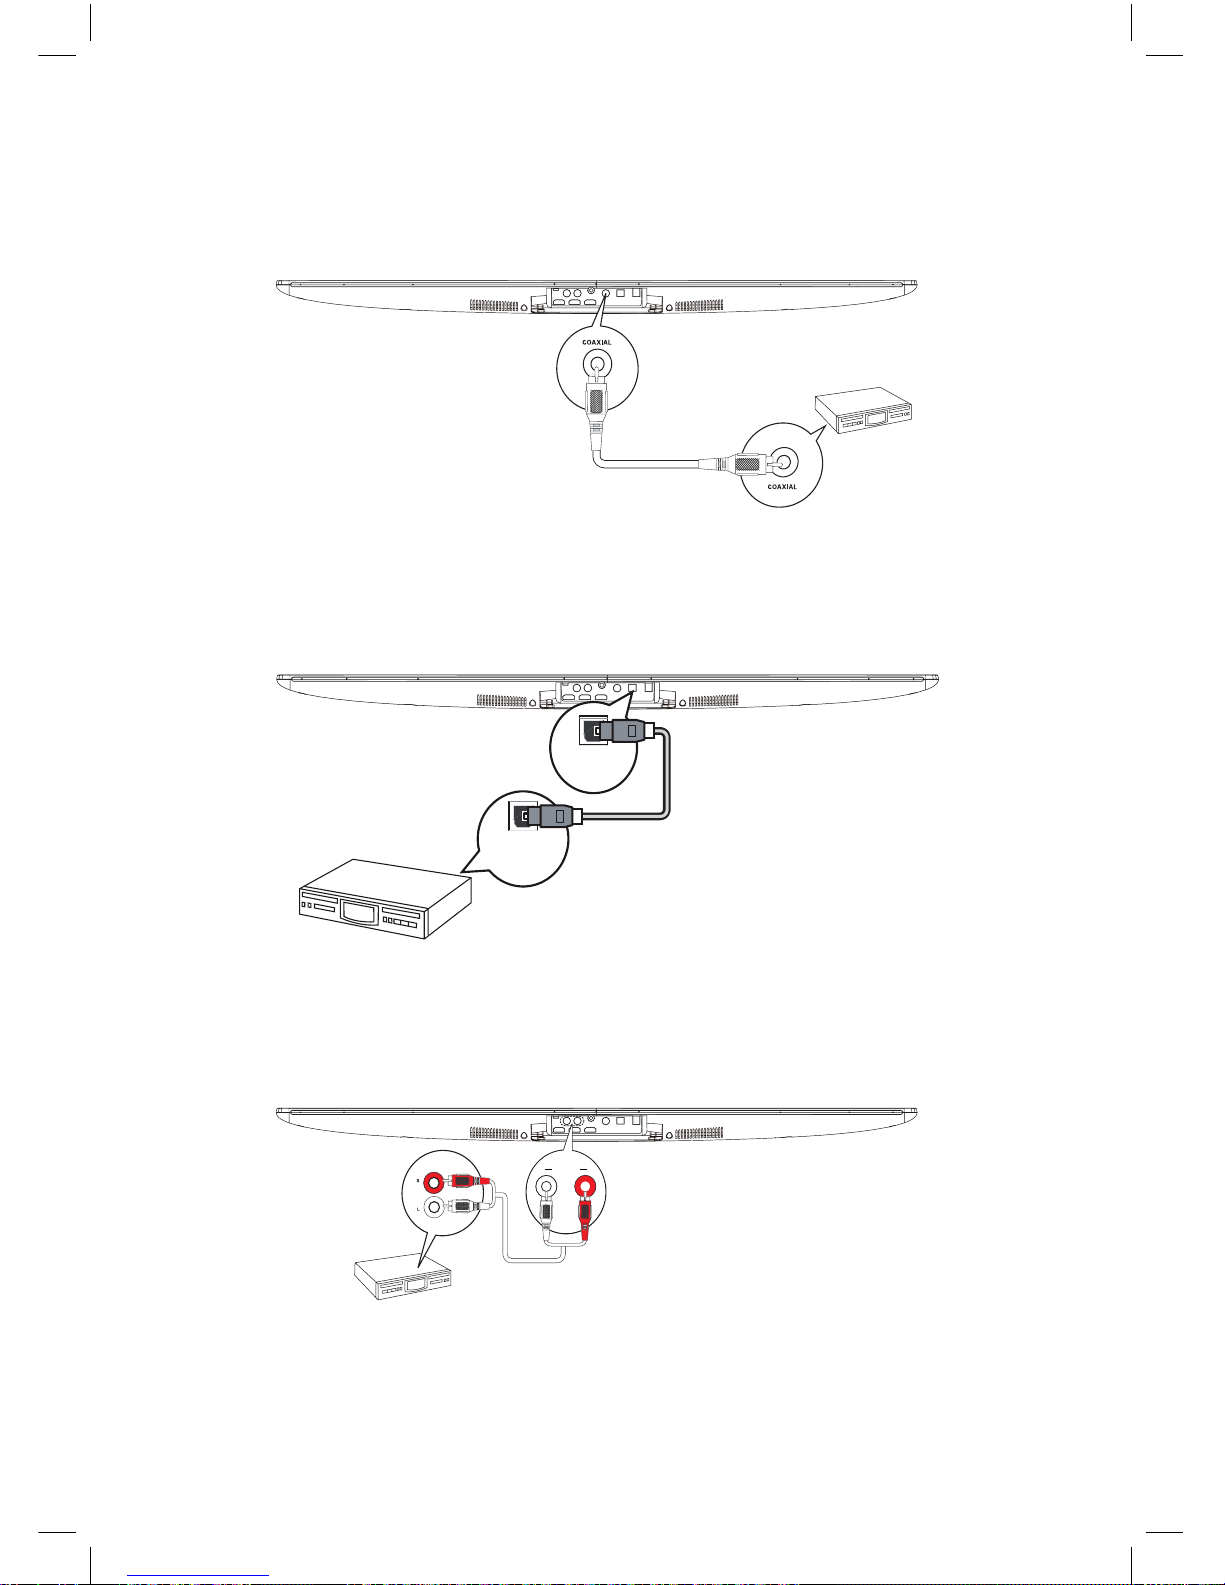
Connections
Caution: Make all connections before plugging the unit into the AC Power outlet.
NE8006HW(SBS-200)_GB_41014751_20140604.indd 12 2014-6-4 16:15:05
GB-13
Connecting the COAXIAL jack
Connect a coaxial cable (not supplied) to the COAXIAL in jack on the unit and the COAXIAL output
jack on the other device.
Connecting the OPTICAL jack
Connect an optical cable (not supplied) to the OPTICAL in jack on the unit and the OPTICAL output
jack on the other device.
Connecting Auxiliary Equipment
Connect the AUDIO Input terminals on the rear of the unit to the line output terminals on the
auxiliary equipment with an audio cable as illustrated. The Unit
Auxiliary equipment
Audio Cable
AUDIO IN RL
DIGITAL IN
OPTICAL
DIGITAL OUT
OPTICAL
The Unit
The Unit
Note: In receiving OPTICAL signals, the
setting menu of TV or other connected
devices, please changed Digital Audio
Output into PCM.
NE8006HW(SBS-200)_GB_41014751_20140604.indd 13 2014-6-4 16:15:06

GB-14
Connecting the portable media player
Connect a 3.5mm stereo audio cable (not supplied) to the AUX IN jack on this unit and the phone
jack on the portable media player (such as MP3 player).
Connecting the AC/DC Adapter
Connect the power cord to the AC/DC adapter, then connect one end(DC Plug) to the DC socket on
the main unit, after that connect the other end to the wall socket.
Connecting the AC Power Cord
Connect the AC power cord to the AC Power Socket
(AC~) on the sub-woofer and the wall outlet and your
system is ready to use.
Caution:
Be sure to unplug the power plug from the outlet
when going out or when the system is not in use for
an extended period of time.
The mains plug is used as the disconnect device,
and must remain readily operable.
Note:
1. When your connection is completed, the wireless connection will automatically set up.
2. Move the sub-woofer near the unit as closely as possible.
AC Power Cord
SUBWOOFER
The Unit
Portable media player
AUX IN
AC/DC Adapter
Power Cord
DC Plug
The Unit
NE8006HW(SBS-200)_GB_41014751_20140604.indd 14 2014-6-4 16:15:06

GB-15
Pairing the Wireless Sub-Woofer with the Soundbar
The Sub-Woofer and Soundbar should automatically pair when both units are plugged into the
mains socket and turned on. There is no cable needed to connect the two.
Manual Pairing
If both units fail to pair, please follow the steps below:
1. Press STANDBY ot switch the Soundbar to standby mode.
2. Press and hold MUTE on the remote control until the red LED indicator on the Soundbar blinks.
3. Press and hold the RESET button on the back of the Sub-Woofer untilt the LED indicator on the
Sub-Woofer blinks, alternating between red and blue.
* The LED indicator on the Sub-Woofer will rapidly blink when pairing and will become solid
blue when successful. The LED indicator on the Soundbar will become solid red.
* If the pairing fails, the LED indicator on the Sub-Woofer will keep blinking in red.
* If the Sub-Woofer does not turn on with the Soundbar, unplug both units from the mains, then
plug them in again and turn on the Soundbar.
NE8006HW(SBS-200)_GB_41014751_20140604.indd 15 2014-6-4 16:15:06

GB-16
1. Press the STANDBY button to turn the unit
on.
* The unit turns on with the source that was
last selected.
2. Play the source, and adjust the volume using
the VOL +/- buttons.
Each time the VOL +/- buttons is pressed, the
blue indicator on display panel begins to blink
until to the minimum/maximum value limited.
Basic Operation
ECO-Power/Standby Features
This unit features a ECO-Power/Standby mode. Press the STANDBY button on the remote control
or on the unit to enter standby mode. To save energy consumption.
Equalizer
You can adjust the sound according to the genre
of the music your taste.
During play, press EQ button repeatedly to
select:
Optimizer-->Flat --> Pop --> Jazz --> Rock -->
Classic
Mute
You can mute the sound temporarily.
If you change the volume or source when the
sound is muted, muting is cancelled.
NE8006HW(SBS-200)_GB_41014751_20140604.indd 16 2014-6-4 16:15:07
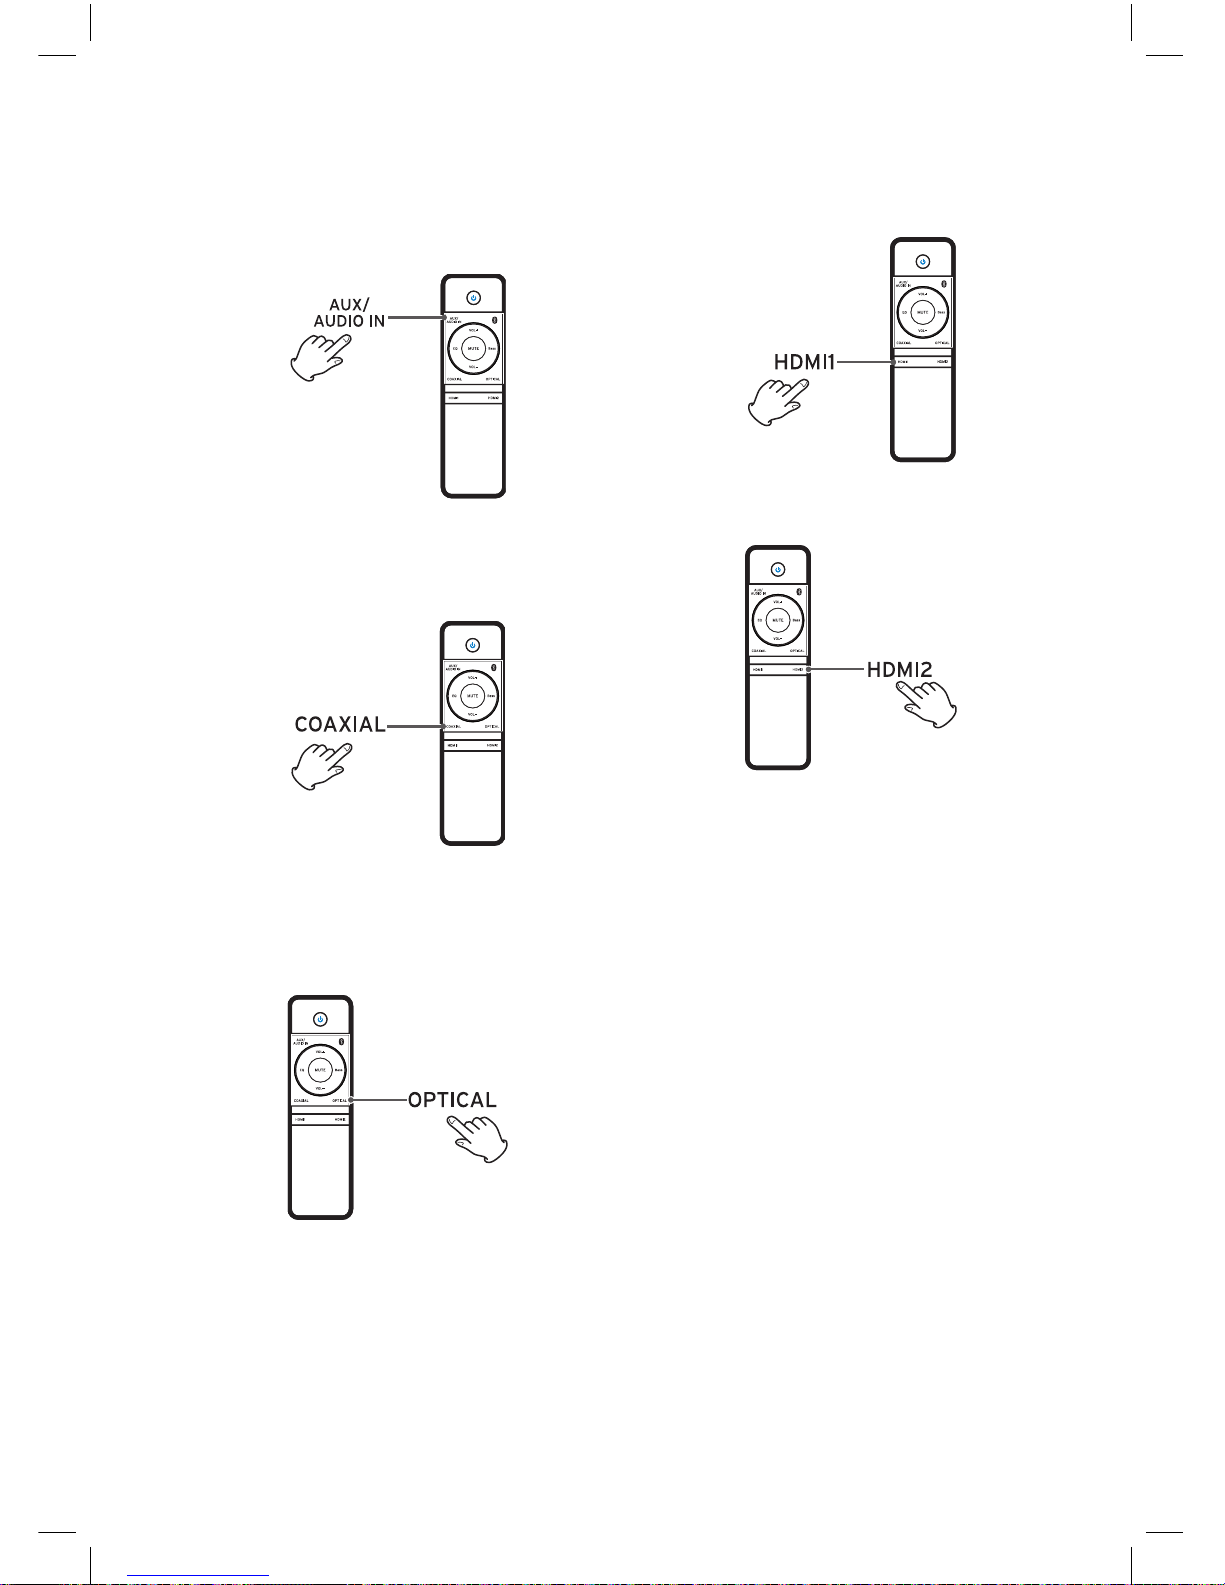
GB-17
HDMI1/HDMI2
Press to select HDMI1 or HDMI2 source input.
OR
AUDIO In/AUX
Press to select AUDIO IN or AUX source input.
COAXIAL
Press to select coaxial source input.
OPTICAL
Press to select optical source input.
Note: In receiving OPTICAL signals, the setting
menu of TV or other connected devices, please
changed Digital Audio Output into PCM.
NE8006HW(SBS-200)_GB_41014751_20140604.indd 17 2014-6-4 16:15:08

GB-18
Play from Bluetooth device
With this unit, you can listen to audio les from a player if bluetooth connection is available.
Pairing bluetooth-enabled devices
To connect your Bluetooth device to the unit, you need to pair the device to the unit. Pairing needs
only to be done once.
Note:
* The operational range between this unit and a Bluetooth device is approximately 10 meters.
* Before you connect a Bluetooth device to this unit, familiarize yourself with the Bluetooth
capabilities of the device.
* Compatibility with all Bluetooth devices is not guaranteed.
* Any obstacle between this unit and a Bluetooth device can reduce the operational range.
* Keep this unit away from any other
electronic device that may cause interference.
1. Press the Bluetooth button on the remote control.
2. Turn on the Bluetooth function on your device.
3. Search for other Bluetooth device with your device.
4. Select “SBS-200” in the pairing list.
5. Press and hold the Bluetooth button more than 2
seconds to clear pairing mode.
Note:
* The device will also be disconnected when the device is moved beyond the operation range.
* If you want to reconnect the device to the unit, place it within the operational range.
* The device will be connected the Bluetooth device pairing already, and also enter pairing mode,
other Bluetooth device can be searching for connecting or pairing.
* When the unit disconnected from the Bluetooth device, it will enter pairing mode automatically,
other Bluetooth devices can be searching for connection or pairing.
Listen to music from Bluetooth device
If the connected Bluetooth device supports Advanced Audio Distribution Prole (A2DP), you can
listen to the music stored on the device through the unit.
1. Pair the device with the unit.
2. Start playing music via device.
Play from an external device
You can listen to an audio device through this unit.
1. Make sure that the external audio device is connected to this unit.
2. Press AUDIO IN/AUX button to select the audio input through the AUDIO IN or AUX (L and R)
sockets.
3. Start to play the device (see the device user manual).
NE8006HW(SBS-200)_GB_41014751_20140604.indd 18 2014-6-4 16:15:08

GB-19
Troubleshooting
If you are having a problem with your system, check this list for a possible solution before calling for
service.
If you cannot solve the problem from the hints given here, or the system has been physically dam-
aged, contact your dealer.
No power
• Ensure that the AC power plug of the unit is connected properly.
• Ensure that there is power at the AC outlet.
No sound or subwoofer poor sound
• Adjust the volume.
• Check that the subwoofer was connected correctly.
Remote control does not work
• Reduce the distance between the remote control and the unit.
• Replace the battery.
• Aim the remote control directly at the sensor on the front of the unit.
About Bluetooth device
Music playback is unavailable on the system even after successful Bluetooth connection.
・The device cannot be used with the system to play music.
The audio quality is poor after connection with a Bluetooth-enabled device.
・The Bluetooth reception is poor. Move the device closer to the system or remove any obstacle
between the device and the system.
Cannot connect with the system.
・The device does not support the proles required for the system.
・The Bluetooth function of the device is not enabled. Refer to the user manual of the device for
how to enable the function.
・The system is not in the pairing mode.
・The system is already connected with another Bluetooth-enabled device. Disconnect that device
or all other connected devices and then try again.
NE8006HW(SBS-200)_GB_41014751_20140604.indd 19 2014-6-4 16:15:08
Table of contents
Other DEVANT Speakers System manuals


