Deyi COOKLEE SM-1522NM User manual
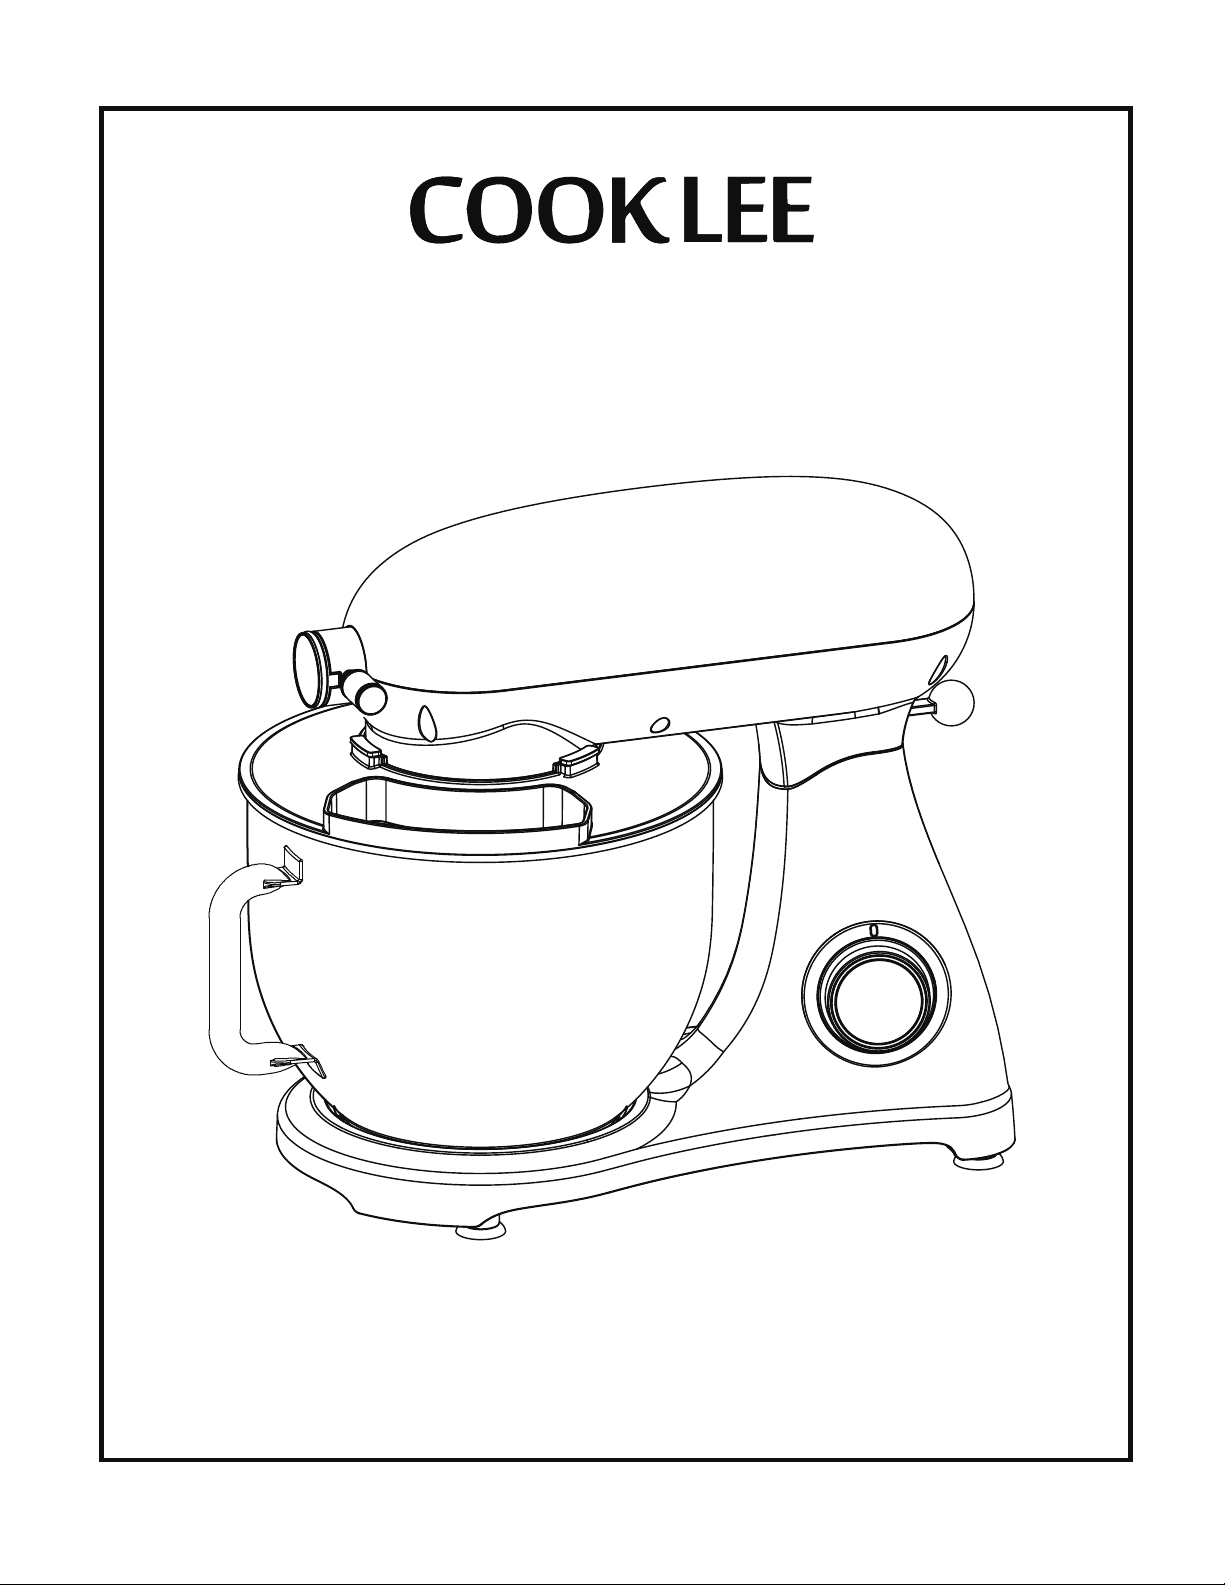
Stand Mixer
Instruction Manual
SM-1522NM
Shenzhen Deyi Electrical Technology Co., Ltd.


Content
Technical Data ..................................................................................................... 1
General Safety Instructions.................................................................................1
Overview of the components..............................................................................2
Using the mixing bowl.........................................................................................3
How to use dough hook, beater and whisk.......................................................4
How to clean.........................................................................................................5
Disposal................................................................................................................5
Inhalt
TechnischeDaten ................................................................................................. 6
Allgemeine Sicherheitshinweise .......................................................................6
Übersicht der Komponenten..............................................................................7
Mit der Mischschale............................................................................................8
Wie man Teighaken, Schlägel und Schnurrbart verwendet...........................9
Reinigung............................................................................................................9
Abfallmanagement..............................................................................................9

Contenu
Paramètres techniques............................................................................................. 10
Conseils de sécurité pour l’utilisation générale
.............................................10
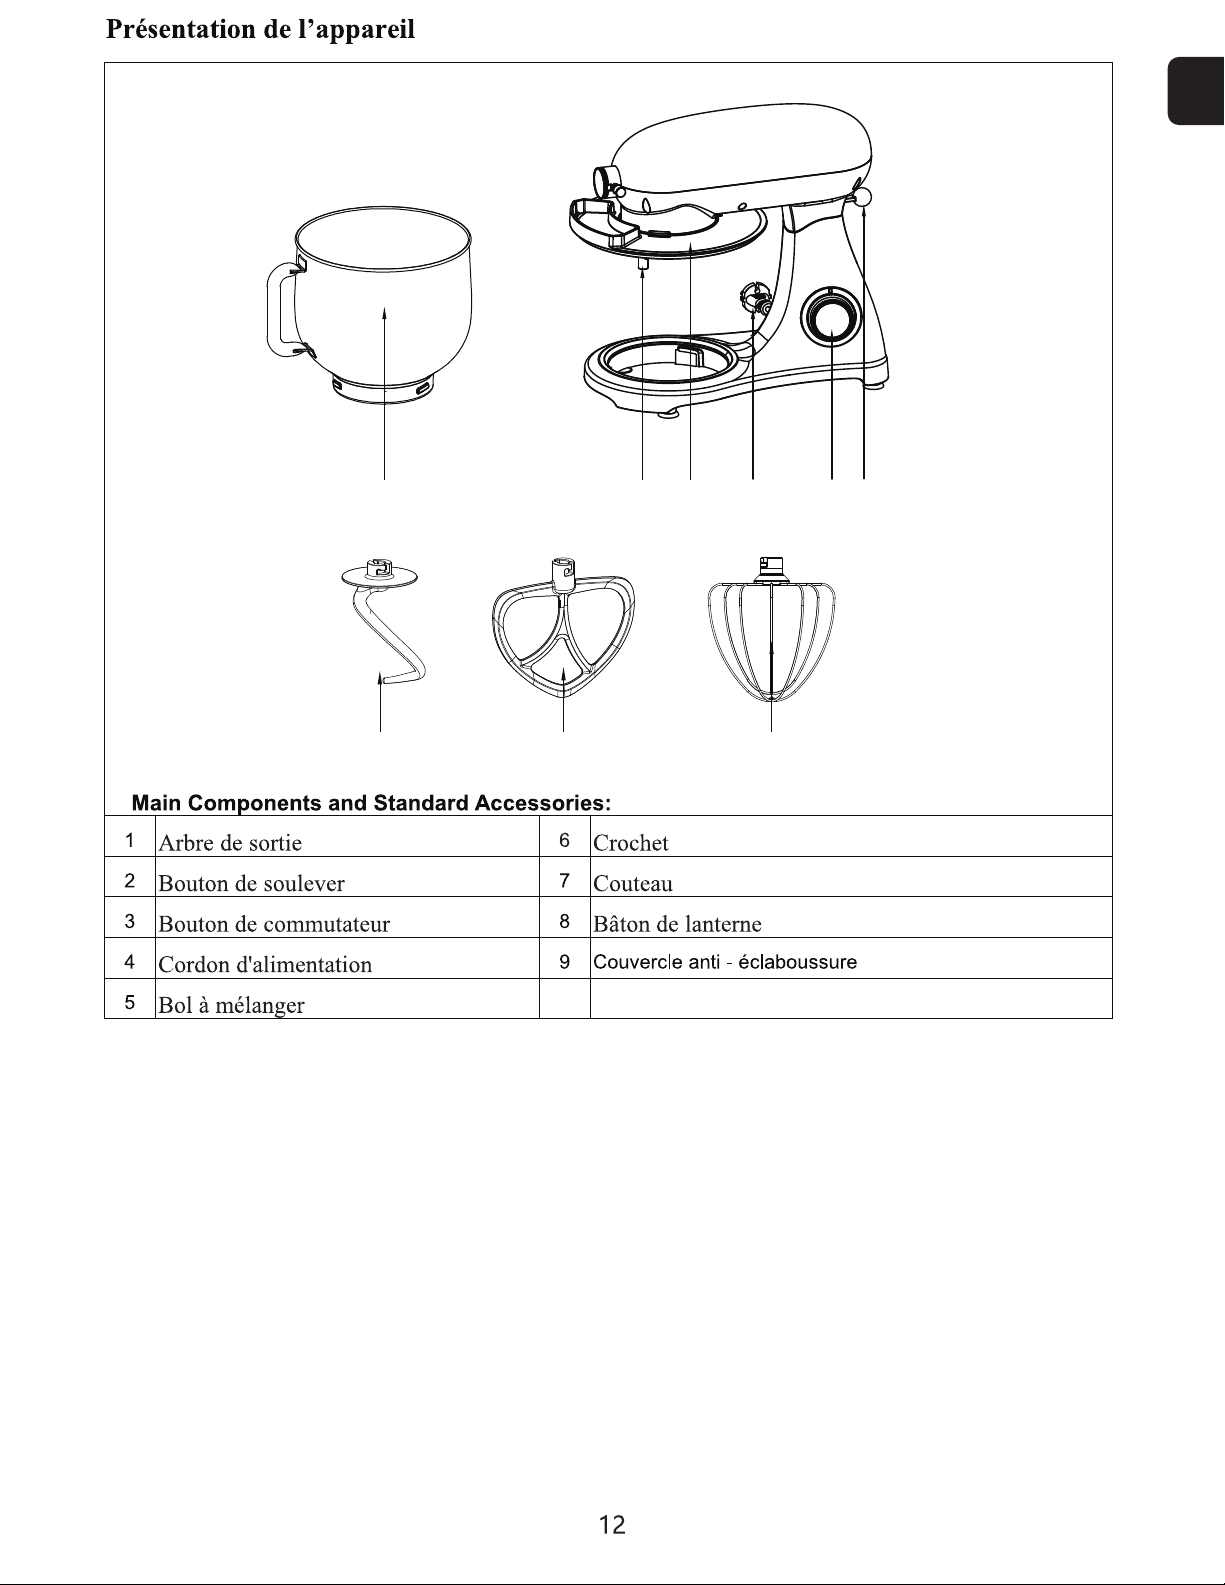
Présentation de l’appareil...................................................................................12
Utilisation d'appareils........................................................................................13
Comment utiliser des crochet, des pulvérisateur et des mélangeurs
............14
Nettoyage.............................................................................................................15
Traitement des déchets.......................................................................................15
Contenuto
Dati tecnici...... .......................................................................................................16
Istruzioni generali di sicurezza..........................................................................16
Panoramica dei componenti..............................................................................17
Usando la ciotola di miscelazione.....................................................................18
Come usare gancio, Battitore e frusta...............................................................19
Pulizia...................................................................................................................20
Disposizione.........................................................................................................20

Contenido
DatosTécnicos .....................................................................................................21
Instrucciones Generales de Seguridad...........................................................21
Descripción de los Componentes...................................................................22
Usar el Cuenco de Mezcla................................................................................23
Cómo usar ganchos, Batidor y Batidor de huevo..........................................24
Limpieza..............................................................................................................25
Disposición.........................................................................................................25

EN
N
Do not interfere with any safety switches.
Do not insert anything into the rotating hooks while the machine is working.
Place the machine on a smooth, flat and stable working surface.
Do not insert the mains plug of the machine into the power socket without having installed all the necessary
accessories.
CAUTION: Ensure that the blender is switched off before removing it from the stand.
Regarding operating time and speed setting, refer to page 4.
Warning: Potential injury from misuse.
This is the safety alert symbol. This symbol alerts you to potential hazards that can kill or hurt you
and others. All safety messages will follow the safety alert symbol and either the word "DANGER" or
"WARNING," These words mean
You can be killed or seriously injured if you don't immediately follow instructions.
All safety messages will tell you what the potential hazard is, tell you how to reduce the chance of
injury, and tell you what can happen if the instructions are not followed.
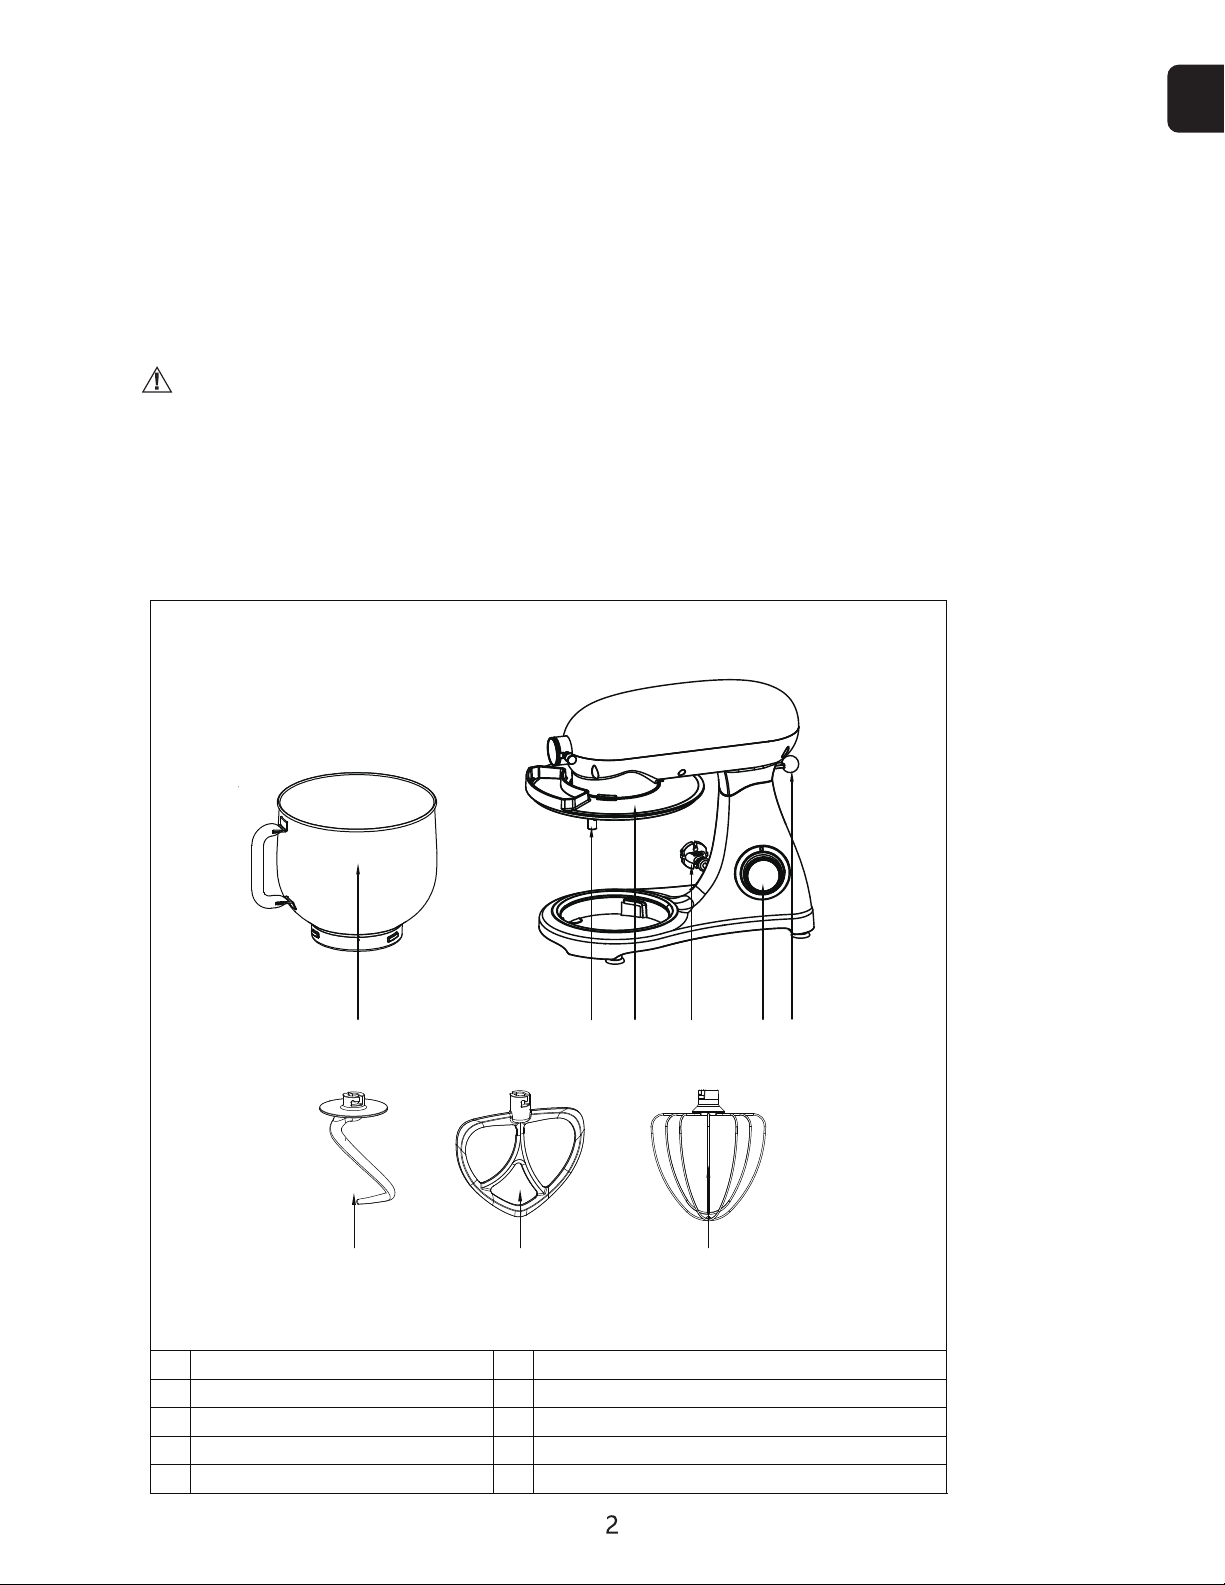
Overview of the Components
Main Components and Standard Accessories:
1
Output shaft
6
Dough Hook
2
handle metal ball
7
Beater
3
Speed knob
8
Whisk
4
Power Cord
9
Splash Guard
5
Mixing bowl
EN
6 7 8
12
3
45 9

ball.
Using the Mixing Bowl
1. In order to lift the arm, Lift up handle metal ball (2) . The arm will now move upwards.(FIG1)
2. Place the pot cover into its body. (FIG2)
3. Place the mixing bowl into its holding device(Step①) and turn the bowl clockwise until it locks into place(Step
②). (FIG3)
4. Mount the required utensil(Dough hook or Beater or Whisk)by inserting the top into the output shaft,
and turn anti-clockwise until it locks into place. (FIG4&FIG5)
5. Now fill in your ingredients.
Do not overfill the machine - the maximum quantity of ingredients is 2 kg.
6. Lower the arm using the Lift up handle metal ball (2). (FIG6)
7. Insert the mains plug into a properly installed AC220-240V 50-60Hz safety power socket.
8. Switch the machine using the speed knob to a speed between 1 and 10 (corresponding to the mixture).
9. For pulse operation (kneading at short intervals), turn the switch to the “PULSE” position. The switch has to be
held in this position according to the desired interval length. When the switch is released it returns automatically
to the “0” position.
10. After kneading/stirring turn the speed knob (3) back to the “0” position as soon as the mixture has formed a
Then remove the mains plug.
11. Lift up handle metal ball (2) downwards and the arm will be raised.
12. The mixture can now be released with the help of a spatula and removed from the mixing bowl.
13. The mixing bowl can now be removed.
14. Clean the parts as described under “Cleaning” .
EN
FIG1 FIG2 FIG3
FIG4 FIG5 FIG6
Step 1
Step 2

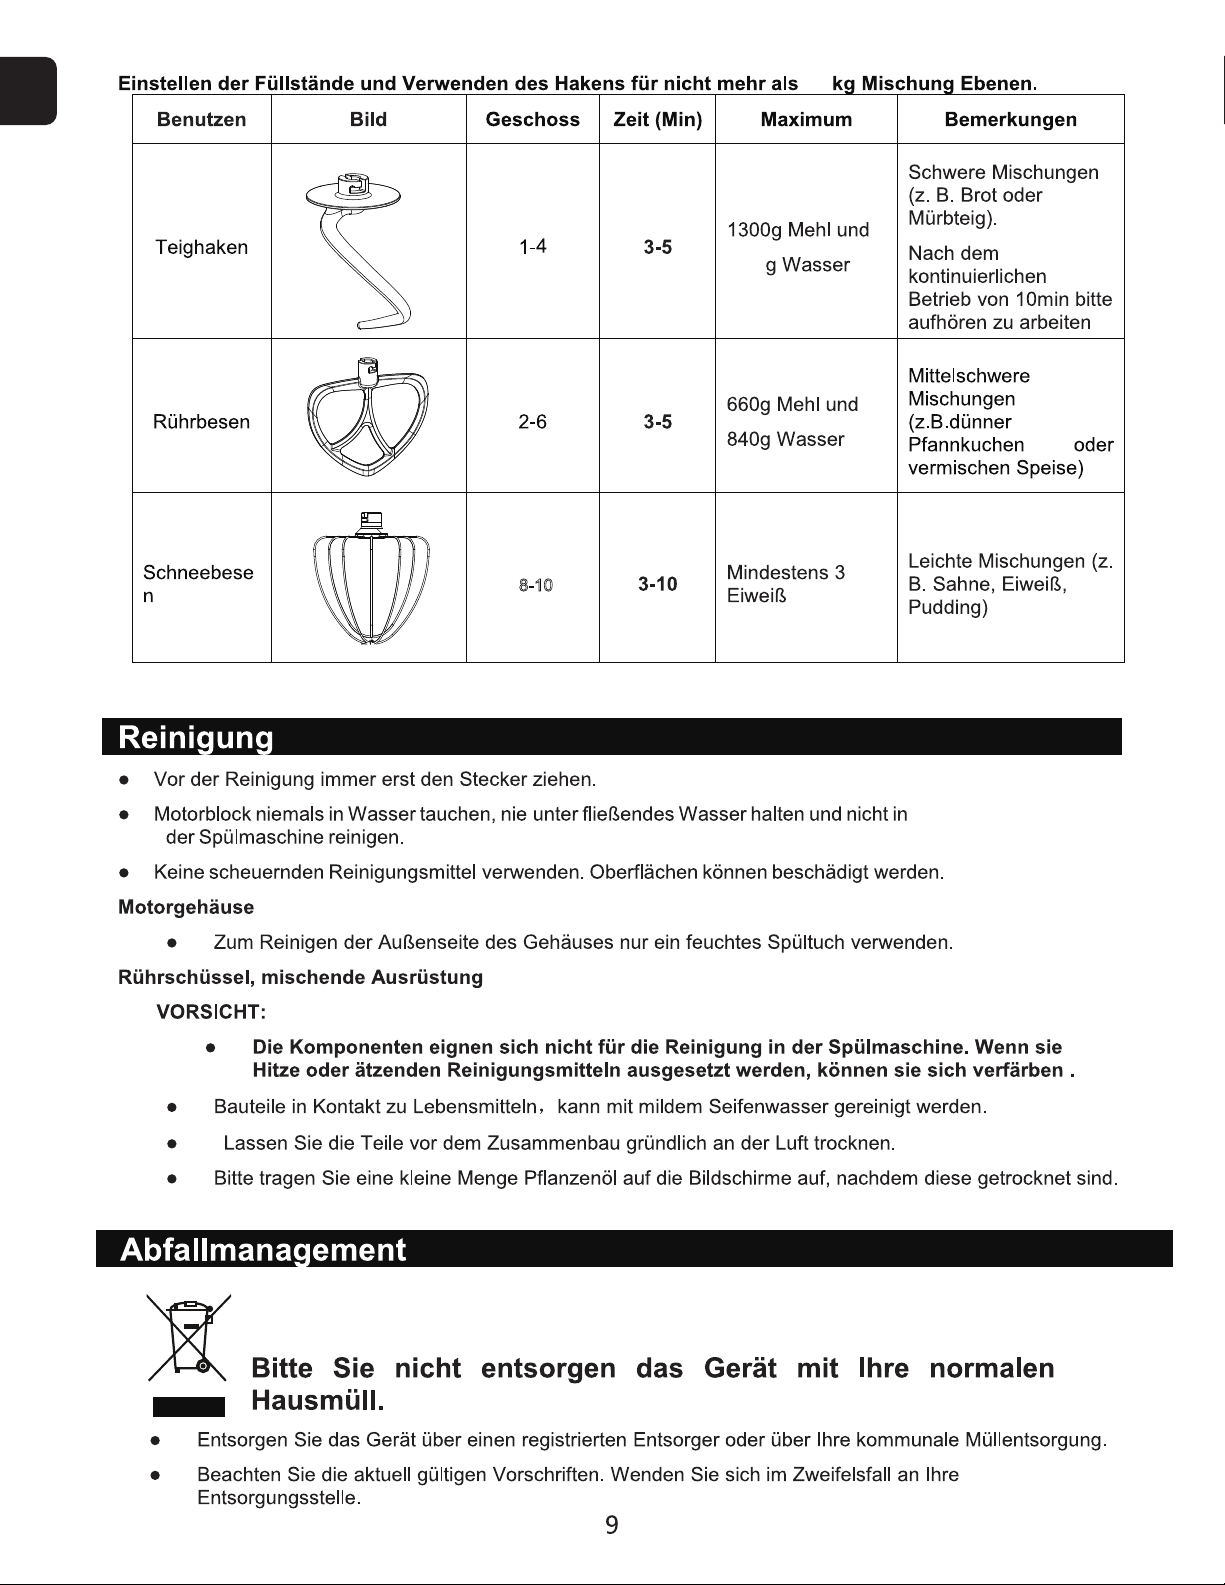
Adjusting the Levels and Using the Dough Hook for not more than 2 kg of Mixture
Use Picture Levels Time(Min) Maximum operating steps
Dough hook 1-4 3-5 1300g flour and
700g water
1 speed run for 30s,
the 2 speed run for
30s, and then the 4
speed run for 2 min to
4 min to form a cluster.
After continuous
operation of 10min
please stop working.
Beater 2-6 3-10 660g flour and
840g water
2 speed run for 20s, the
6 speed run for more
than 2 min 40s
Whisk 8-10 3-10 3 egg whites
(Minimum)
Open 8 or 10 speed to
run 3min above.
How to use dough hook, beater and whisk EN

Cleaning
Before cleaning remove the mains lead from the socket.
Never immerse the housing with motor in water!
Do not use any sharp or abrasive detergents.
Motor Housing
Only a damp rinsing cloth should be used to clean the outside of the housing.
Mixing Bowl, Mixing Equipment
CAUTION:
The components are not suitable for cleaning in a dishwasher. If exposed to heat or caustic
cleaners they might become misshapen or discolored.
Components thathave come into contact with food can be cleaned in soapy water.
Allow the parts to dry thoroughly before reassembling the device.
Please apply a small quantity of vegetable oil likely to the screens after theyhave dried.
Disposal
Do not dispose of the device in normal domestic waste.
Dispose of the device over a registered waste disposal firm or through your communal waste disposal facility.
Observe the currently valid regulations. In case of doubt, consult your waste disposal facility.
EN

DE
N

Schnurrbart
DE
6 7 8
12
3
45 9

~
DE
FIG1 FIG2 FIG3
FIG4 FIG5 FIG6
Step 1
Step 2
10
DE
2
8-10
700
FR
N
FR
Remarque: Assurez-vous de mettre le mélangeur hors tension avant de le sortir du compteur.
Lorsque vous nettoyez la machine et ses accessoires, il faut faire attention aux lames tranchantes et
des pièces ou accessoires tranchants connexes.
Utilisation d'appareils
1. Lavez toutes les pièces à l'eau, rincez-les et séchez-les avant la première utilisation.
2. Faites tourner le bouton de soulever (2) dans le sens des aiguilles d'une montre et le haut du corps se
soulèvera automatiquement (Figure 1&2).
3. Pesez les aliments et l'eau à transformer dans un bol à mélanger(5), puis l’installez sur la machine
(étape 1) et tournez-le dans le sens des aiguilles d'une montre jusqu'à ce que la boucle soit serrée
(étape 2) (Figure. 3)
4. Le poids total de la pâte ne doit pas dépasser la capacité maximale, soit 2 kg.
5. Installez les accessoires requis (6), (7), (8) (un seul peut être utilisé à la fois) sur l'arbre de sortie de la
tête de machine (1), poussez l'axe de l'accessoire jusqu'au sommet, puis tournez dans le sens contraire
FR
6 7 8
12
3
45 9
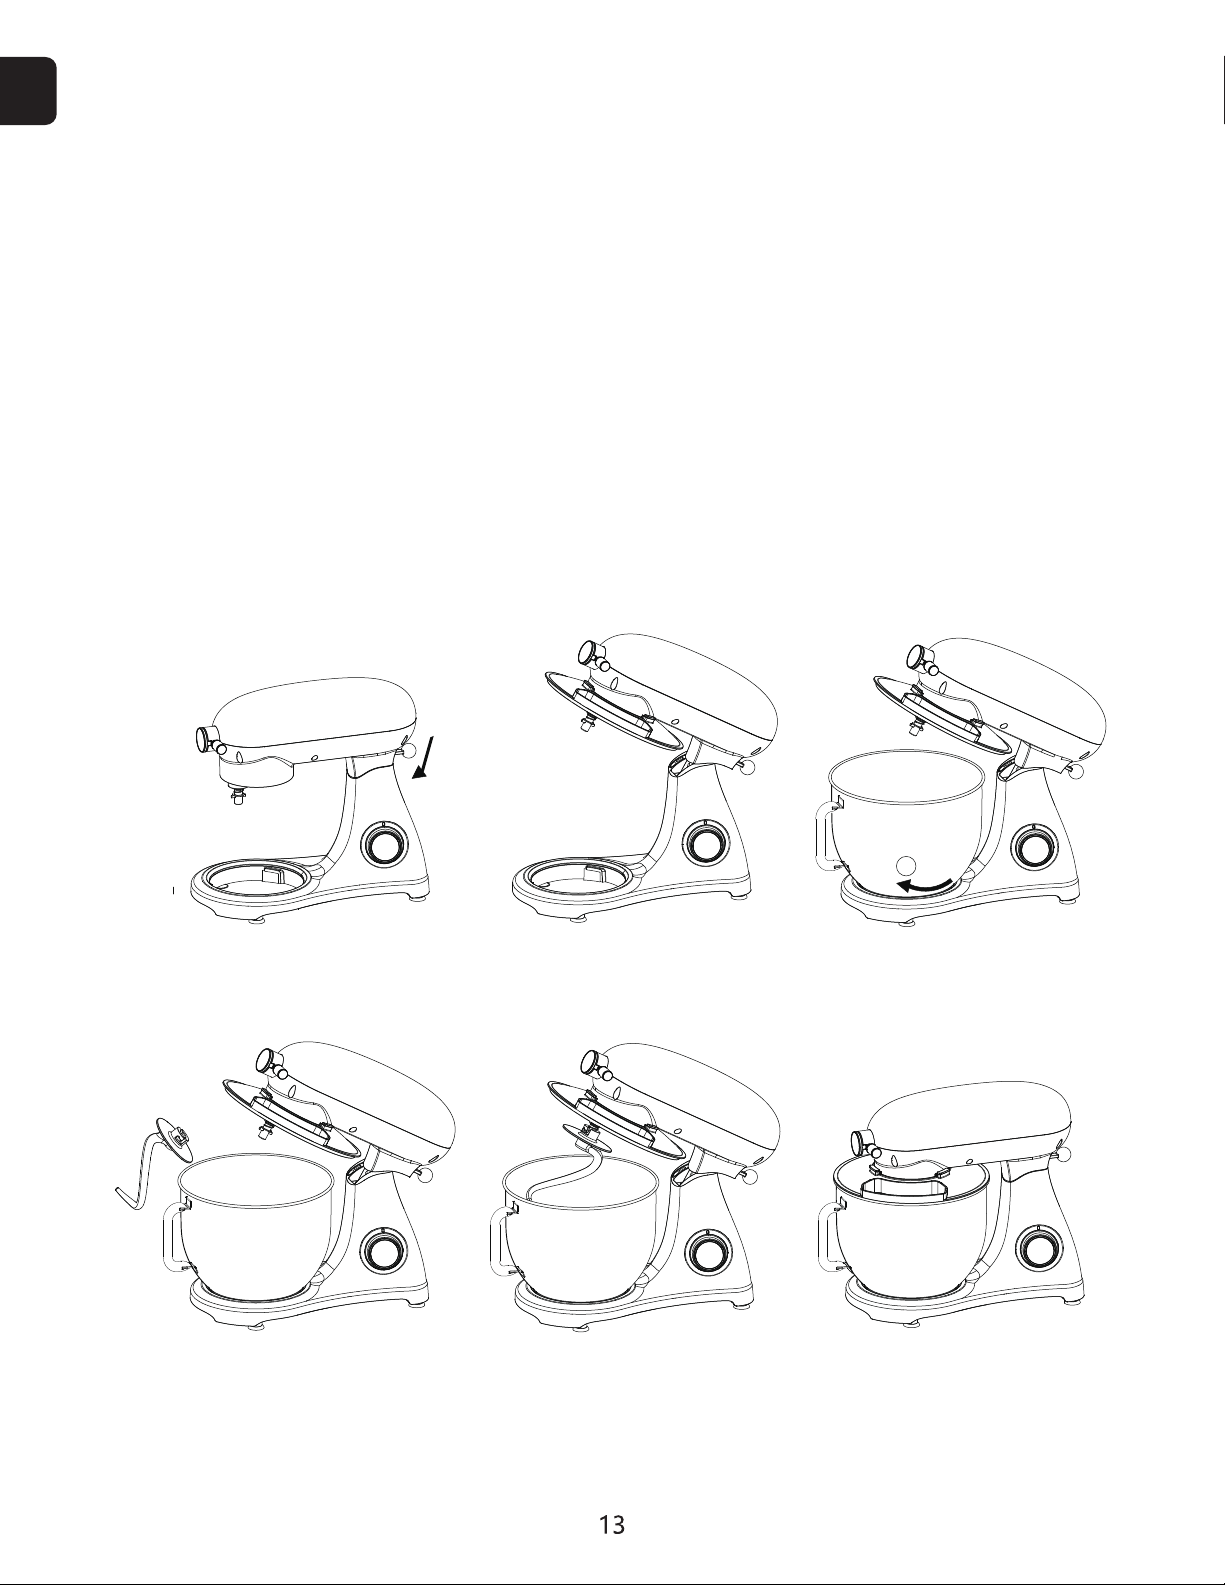
des aiguilles d’une montre d’un quart de tour jusqu’à la position verrouillée (Figure 4&5)
6. Tournez à nouveau le bouton de soulever (2) et abaissez le haut du corps en position horizontale
(Figure. 6).
7. Tournez le bouton de l'interrupteur (3) sur la position 0 pour arrêter l'appareil.
8. Placez la machine sur un comptoir plat, propre et sec, puis branchez-la et allumez l'interrupteur
d'alimentation.
9. Tournez le bouton de l'interrupteur (3) sur la plage de vitesse souhaitée pour commencer à mélanger.
10. Lorsque la pâte est conforme aux exigences, ramenez le bouton de l'interrupteur (3) sur 0 pour
arrêter.
11. Tournez le bouton de soulever (2) vers le haut dans le sens des aiguilles d'une montre, soulevez la
partie supérieure du corps, tournez le bol à mélanger dans le sens inverse des aiguilles d'une montre,
retirez le bol à mélanger et retirez la pâte.
FR
FIG1 FIG2 FIG3
FIG4 FIG5 FIG6
Step 1
Step 2

FR
2
8-10
700
3-5
3-10
3-10
FR Nettoyage
Débranchez le cordon d'alimentation de la prise avant le nettoyage.
Ne plongez pas le corps de la machine dans l'eau
N'utilisez pas de détergents irritants et abrasifs pour nettoyer.
Carrosserie: Veuillez nettoyer la carrosserie uniquement avec un chiffon humide.
Note des accessoires:
Certaines pièces ne conviennent pas au nettoyage au lave-vaisselle, car il est possible d’provoquer
une déformation ou une décoloration si elles sont exposées à des sources de chaleur et à des
détergents corrosifs.
Les pièces associées aux aliments peuvent être nettoyées à l'eau savonneuse.
Certaines pièces peuvent être complètement séchées avant de reconstituer l'appareil.
Après séchage, vous pouvez essuyer l'huile végétale.
Traitement des déchets
Il ne faut pas traiter cet appareil en tant que le déchet ménager normal.
La machine doit être éliminée par une entreprise d'élimination des déchets agréée ou une installation
d'élimination des déchets communautaire en conformant à la réglementation en vigueur. En cas dedoute,
veuillez consulter le système d'élimination des déchets.
Table of contents


