DiamaPro Systems HGX-5 User manual

HGX-5
5” Hand Grinder
INSTRUCTION MANUAL
READ BEFORE OPERATING
www.DiamaProSystems.com
470-977-2323

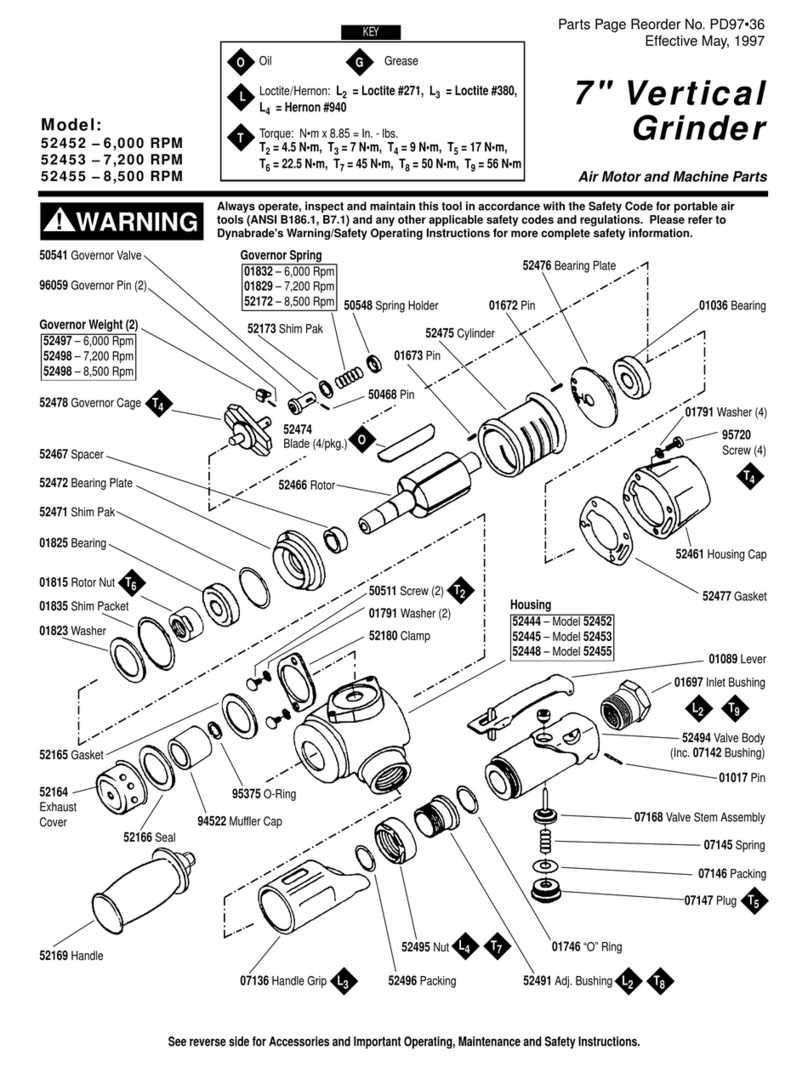
ASSEMBLY VIEW PARTS LIST
Part1
1
2
3
4
5
6
7
8
9
10
11
12
13
14
15
16
17
18
19
20
21
22
23
24
25
26
27
28
29
30
31
32
33
34
35
36
37
38
39
40
41
42
43
44
45
46
47
48
49
50
51
52
Description
Top Pressing Plate
Grinding Wheel
Nether Pressing Plate
Wheel Guard
Cross Groove Hexagon Head Screw M6x18
Dust Cap
Cross Slotted Head Set Screw M4x14
Front Cover
Bearing 6201-2RST
Front Cover Bearing Pressing Plate
Cross Slotted Head Set Screw M4x10
Output Shaft
Woodru Key 2.5x3.7xΦ10
Big Bevel Gear
Circlip for Shaft
Bearing 606-2Z
Head
Cross Groove Disc Head Self Tapping Thread ST4.2x22
Self-Lock Pin with Cap
Self-Lock Spring
Steel Cable Bae Ring
Hexagon Nut M6
Bevel Pinion
Bearing PT629-2RST
Head Bearing gland
Cross Recessed Countersunk Head Screw M4x12
Seal Ring
Rotor Assembly
Dustband
Bearing PT608-2RST
Bearing Sleeve
Break Wind Ring
Cross Groove Disc Head Self Tapping Thread ST3.9x70
Stator Assembly
Casing
Carbon Brush
Coil Spring
Cross Groove Disc Head Self Tapping Thread ST2.9x10
Carbon Brush Holder
Capacitor 0.22uf
Cross Groove Disc Head Self Tapping Thread ST4.2x14
Cable Pressing Plate
Back Cover
Switch Push Rod
Push Rod Spring
Switch Block
Switch
Speed Controller
Cable Sleeve
Plug
Side Handle
Wrench
Part1No.
HGX500100
HGX500101
HGX500102
HGX500103
HGX500104
HGX500105
HGX500106
HGX500107
HGX500108
HGX500109
HGX500110
HGX500111
HGX500112
HGX500113
HGX500114
HGX500115
HGX500116
HGX500117
HGX500118
HGX500119
HGX500120
HGX500121
HGX500122
HGX500123
HGX500124
HGX500125
HGX500126
HGX500127
HGX500128
HGX500129
HGX500130
HGX500131
HGX500132
HGX500133
HGX500134
HGX500135
HGX500136
HGX500137
HGX500138
HGX500139
HGX500140
HGX500141
HGX500142
HGX500143
HGX500144
HGX500145
HGX500146
HGX500147
HGX500148
HGX500149
HGX500150
HGX500151

12. Remove adjusting keys or
wrenches before turning the tool
on. A wrench or a key that is left at-
tached to a rotating part of the tool
may result in personal injury.
13. Do not overreach. Keep proper
footing and balance at all times.
Proper footing and balance enables
better control of the tool in unex-
pected situations.
14. Use safety equipment. Always
wear eye protection. Dust mask,
non-skid safety shoes, hard hat,
and hearing protection must be
used for appropriate conditions.
Ordinary eye or sun glasses are
NOT eye protection.
TOOL USE AND CARE
15. Use clamps or other practical
ways to secure and support the
workplace to a stable platform.
Holding the workpiece by hand or
against your body is unstable and
may lead to loss of control.
16. Do not force tool. Use the cor-
rect tool for your application. The
correct tool will do the job better
and safer at the rate for which it is
designed.
17. Do not use tool if switch does
not turn it on or o. Any tool that
cannot be controlled with the switch
is dangerous and must be repaired.
18. Disconnect the plug from the
power source before making any
adjustments, changing acces-
sories, or storing the tool. Such
preventative safety measures
reduce the risk of starting the tool
accidentally.
19. Store idle tools out of the reach
of children and other untrained
persons. Tools are dangerous in
the hands of untrained users.
20. Maintain tools with care. Keep
cutting tools sharp and clean.
Properly maintained tools with
sharp cutting edges are less likely
to bind and are easier to control.
21. Check for misalignment or bind-
ing of moving parts, breakage of
parts, and any other condition
that may aect the tool’s opera-
tion. If damaged, have the tool ser-
viced before using. Many accidents
are caused by poorly maintained
tools.
22. Use only proper 5” DiamaPro
Systems tools with this model.
Accessories that may be suitable
for one tool, may become hazard-
ous when used on another tool.
23. Tool service must be performed
only by qualied repair person-
nel. Service or maintenance per-
formed by unqualied personnel
could result in a risk of injury.
24. When servicing a tool, use only
identical replacement parts.
Follow instructions in the Mainte-
nance section of the manual. Use
of unauthorized parts or failure to
follow maintenance instructions
may create a risk of electric shock
or injury.
25. Always use with a DiamaPro
Systems dust shroud.
26. Failure to follow proper use guide-
lines will result in void of
warranty.
GENERAL SAFETY TOOLS
(For All Tools)
WARNING: Read and understand all instructions. Failure to follow
all instructions listed below may result in electric shock, re and/or
serious personal injury.
Warning: The body of the machine may get warm after extended
use. If this occurs, turn o the machine and let it cool down to
avoid risk of damaging the unit, or personal injury.
SAVE THESE INSTRUCTIONS
WORK AREA
1. Keep your work area clean and
well lit. Cluttered benches and dark
areas invite accidents.
2. Do not operate power tools in
explosive atmospheres, such as
in the presence of ammable liq-
uids, gases or dust. Power tools
create sparks which may ignite the
dust or fumes.
3. Keep bystanders, children, and
visitors away while operating a
power tool. Distractions can cause
loss of control.
ELECTRICAL SAFETY
4. Power tool plugs must match
the outlet. Never modify the
plugs in any way. Do not use any
adapter plugs with grounded
power tools. Unmodied plugs
and matching outlets will reduce
risk of electric shock. Do not
change the plug in any way. Dou-
ble insulation eliminates the need
for the three wire grounded power
cord and grounded power supply
system.
5. Avoid body contact with ground-
ed surfaces such as pipes, radi-
ators, ranges and refrigerators.
There is an increased risk of elec-
tric shock if your body is grounded.
6. Do not expose power tools to rain
or wet conditions. Water entering
a power tool will increase the risk of
electric shock.
7. Do not abuse the cord. Never use
the cord to carry the tool or pull
the plug from an outlet. Keep
cord away from heat, oil, sharp
edges or moving parts. Replace
damaged cords immediately.
Damaged cords increase the risk of
electric shock.
8. When operating a power tool
outside, use an outdoor exten-
sion cord marked “W-A” or “W.”
These cords are rated for outdoor
use and reduce the risk of electric
shock.
PERSONAL SAFETY
9. Stay alert, watch what you are
doing and use common sense
when operating a power tool. Do
not use tool while tired or under
the inuence of drugs, alcohol, or
medication. A moment of inattention
while operating power tools may
result in serious personal injury.
10. Dress properly. Do not wear
loose clothing or jewelry. Con-
tain long hair. Keep your hair,
clothing, and gloves away from
moving parts. Loose clothes, jew-
elry, or long hair can be caught in
moving parts.
11. Avoid accidental starting. Be
sure switch is o before plug-
ging in. Carrying tools with your
nger on the switch or plugging in
tools that have the switch on invites
accidents.

SPECIFIC SAFETY RULES
1. Always use a DiamaPro Systems
dust shroud. Shrouds protect opera-
tor from broken wheel fragments.
2. Accessories must be rated for at
least the speed recommended on
the tool warning label. Wheels and
other accessories running over rated
speed can y apart and cause injury.
3. Do not let the tool come in con-
tact with live wire. Contact with a
“live” wire will make exposed metal
parts of the tool “live” and shock the
operator.
4. Always use safety glasses or gog-
gles. Ordinary eye or sun glasses
are NOT safety glasses.
5. Check the wheel carefully for
cracks or damages before opera-
tion. Replace cracked or damaged
wheel immediately. Run the tool (with
guard) at no load for about a minute,
holding tool away from others. If
wheel is awed, it will likely separate
during this test.
6. Only use with DiamaPro Systems
5” cup wheels and abrasives.
7. Be careful not to damage the
spindle, the ange (especially the
installing surface) or the outer
ange. Damage to these parts could
result in wheel breakage.
8. NEVER use tool with wood cutting
blades or other saw blades. Such
blades when used on a grinder fre-
quently kick and cause loss of control
leading to personal injury.
9. Hold the tool rmly.
10. Keep hands away from rotating
parts.
11. Make sure cord is clear of wheel.
Do not wrap cord around your arm
or wrist. If control of tool is lost, cord
may become wrapped around you
and cause personal injury.
12. Make sure the wheel is not con-
tacting the workpiece before the
switch is turned on.
13. Before using the tool on an
actual workpiece, let it run for
a while. Watch for vibration or
wobbling that could indicate poor
installation or a poorly balanced
wheel.
14. Use the specied surface of the
wheel to perform the grinding.
15. Watch out for ying sparks. Hold
the tool so that sparks y away from
you and other persons or amma-
ble materials.
16. Do not leave the tool running.
Operate the tool only when hand-
held.
17. Do not touch the workpiece im-
mediately after operation; it may
be extremely hot and could burn
your skin.
18. ALWAYS wear proper apparel
including long sleeve shirts.
Leather gloves and shop aprons
to protect skin from contact with
hot grindings.
19. Use of this tool to grind or
sand some products. Paints and
wood could expose user to dust
containing hazardous substanc-
es. Use appropriate respiratory
protection.
20. Must use with DiamaPro Hepa
Filtered Dust Collector
DO NOT let comfort or familiarity with product (gained from repeated use)
replace strict adherence to grinder safety rules. If you use this tool unsafely or
incorrectly, you can suer serious personal injury.
SAVE THESE INSTRUCTIONS
WARNING: MISUSE or failure to follow the safety rules stated in this
instruction manual may cause serious personal injury.
nMaintenance & Daily Care.
CAUTION:
Always be sure that the tool is
switched o and unplugged before
attempting to perform inspection and
maintenance.
1. The tool and its air vents have to
be kept clean. Regularly clean the
tool’s air vents, or whenever the
vents start to become obstructed.
2. Make sure all screws are properly
tightened.
3. Regularly check if the cord insula-
tion is broken.
n Eective and safe grinding &
sanding operation.
• Always hold the tool rmly with
one hand on housing and the
other on the side handle. Turn the
tool on and then apply the wheel
or disc to the workpiece.
• Operating the tool while removing
the wheel guard is forbidden.
1. Do not place too much pressure on
the tool. Excessive strength could
damage the tool engine and abra-
sive wheel due to overload.
nReplacing carbon brushes.
1. Remove and check the carbon
brushes regularly. Replace when
the tool sparks or wears down with
5-7mm left.
2. Both carbon brushes should be re-
placed at the same time. Use only
DiamaPro Systems brushes.
3. Please send this tool to DiamaPro
Systems’ authorized service center
to replace or be repaired by an
experienced technician.
CAUTION:
Be sure to reinstall the knob after
inserting new carbon brush.
After replacing brushes, plug in the
tool and break in brushes by running
tool with no load for ~10min. If the
tool is not working well, ask your local
DiamaPro Systems service center for
repair.
To maintain product SAFETY &
RELIABILITY, repairs and other
maintenance or adjustment should
be performed by DiamaPro Systems
Authorized or Factory service cen-
ters, always using DiamaPro Systems
replacement parts.

FUNCTIONAL DESCRIPTION
nOperation Instructions:
Wheel Guard
Aim the convex end of the wheel
guard to the slot mouth of the
front cover, and then rotate the
guard body to 180°, finally tighten
the fastening screw (Fig1 & Fig2).
Side grip (Fig 5)
CAUTION:
Always be sure that the side grip
is installed securely before oper-
ation.
Screw the side grip securely on
the position of the tool as shown
in Fig5.
Hold the side grip rmly by hand to
better control the tool.
Fig5
Installing or removing
grinding wheel
CAUTION:
• When using an abrasive cut-
o wheel, be sure to use only
the supplied wheel guard,
inner ange, and outer ange
designed for use with cut-o
wheels.
1. Mount the inner ange onto the
spindle. Fit the wheel/disc on
the inner ange and screw the
outer ange onto the spindle
(Fig 3).
2. To tighten the outer ange,
press the shaft lock rmly
so that the spindle cannot
revolve, then use the lock nut
wrench and securely tighten
clockwise (Fig 4).
3. To remove the wheel, follow
the installation procedure in
reverse.
NOTICE:
The groove of INNER
FLANGE must align the
atness of spindle when you
install the wheel and tighten
enough.
Fig1
Fig2
Fig3
Table of contents
Other DiamaPro Systems Grinder manuals
